One method of making a hardie hole that has gone the rounds is to drill or flame cut a hole then build up with weld around a piece of square tubing.
This is a rather rough method that leaves serious hollows and weak places in the heel of an anvil. There are better ways.
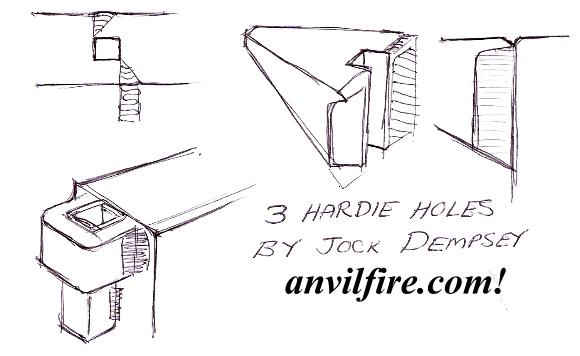 TOP LEFT:
 This method requires fine flame cutting, sawing or machining a matched pair of steps that create a hole when welded together.
The result is a very clean true hole. The 100% full penetration welds produce a strong solid joint.
It the method of creating the weld preps in the method to the right is used there would be only two narrow weld beads on the face of the anvil.
These small welds can be made last using a high strength or hard facing rod to match the surrounding material.
The fill welds should be something like E7018.
RIGHT: This is a method of creating a horn with hardie hole and 100% weld penetration.
It requires machining the hardie hole slot in the horn and then cutting one sided V weld preparations.
These are 30° cuts that leave a narrow flat (about 1/16") at the edges of the hardie hole slot.
Welding starts under the face of the anvil in the side V's and progresses an alternate sides until the V's are filled flush to the line of the horn.
Then the two face welds are done using a rod that matches the hardness and color of the steel anvil block.
BOTTOM LEFT: Standard 1.25" square 12ga. structural tubing has a .109 wall thickness.
This results in a 1.032" inside hole which is a nice sliding fit for 1" (25mm) square hardie shanks.
Fit a heavy collar to it of at least 3/8" x 1" (10mm x 25mm).
Weld the sides and top all around and dress the top flush.
Radius the inside edges of the hardie hole at least 1/16" (1.6mm).

For this type hardie hole you can make special offset hardies and fullers that put the working part over the mass of the block the "hole" is welded to.
These also work better on London farrier pattern type anvils to put the hardy over the more solid part of the anvil.
Original Offset Hardie Design by Josh Greenwood
References and Links


städ, incus, aambeeld, batente