Making a Norman Helm
Part 7: Rough Trimming and Bouging
Forward to Part 8: Grinding,
Making a Nasal
Back to Part 6: Raising, Concluded
Back to Table of Contents
| The last rough raising being done, it's time to bouge the helmet to smooth it out for surface grinding. First, though, I have to trim the edge to make it fairly level and even. A ragged edge makes it very hard to judge the symmetry of a helmet by eye. I use the "rubber band" method: it is admittedly not period, but it is quick! |
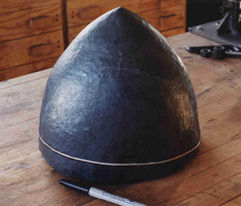 |
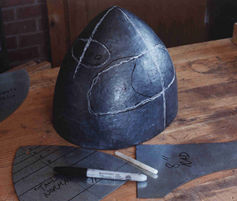
| I measure down from the peak, at all four points of the compass, making an ink mark where the rim should be, taking the lengths off the profile templates. Then I put a rubber band around the helmet, touching all four marks, and "level" the band by eye. I get a pretty good rim line. I trace along the rubber band with a marker. I decided to add 0.5" to my design height, making the bowl 7.5" high; I had the excess metal to use, and it looked nice. | |
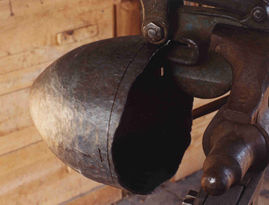 |
Now that the rim line is established, I punch a series of holes, about 15 of them, around the rim, just outside of the line. This picture shows just how ragged the edge gets in the last couple of raising courses. |
| Holes all punched. I do this as a quick way to put in guide markers for cutting the rim... |
 |
 |
...on the big shear. The shear cuts best on the inside of the helmet, and the rim line is marked on the outside, so the holes serve as cutting marks. I just "connect the dots" with the shear. This leaves a notched excess of about 1/8" around the edge, which is easy to grind off to the line. |
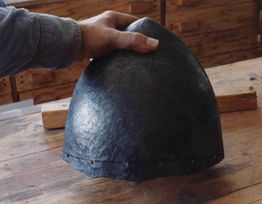
| The edge is trimmed and ground. It is not precisely level, but will do for now. Helmet weight is now 5 lb 3 oz; the trim knocked off 9 oz of material. I get out my profile templates again, and wander around the helmet bowl with them, marking areas where they don't touch the surface, or touch too closely. I mark these areas as needing adjustment "in" or "out". I mark first with ink, then finish with chalk, because I'm going to do some of the adjustment hot. |
 |
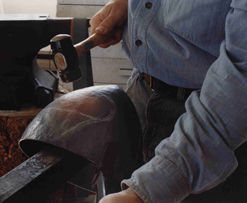 |
Bouging commences. I tap the marked areas in, using the section stake shown several photos above; or out, using a long hammer and a sinking block, as needed. I just heat the metal barely red, so it will move only a small fraction of an inch with each blow, and will not thin out, or scale. |
| I'm trying a new hammer, here: a small (1.5 lb) farrier's turning hammer. It has a wide, smooth face, with a thin springy handle, and was very comfortable to use. | |
| Bouging takes a while -- a couple of hours, for this helmet. I just tap bulges in and out, using very gentle heats, and light hammer blows. I keep the templates right by the workbench, and continually check the helmet, inside and out, with them. |
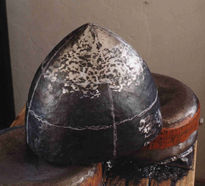 |
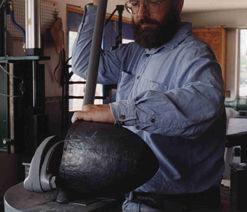
| When the coarse bulges are all taken care of, I start "fine" bouging. I mark off sections of the helmet with chalk, and lightly grind a "fairly good" area with a worn 36-grit belt. This instantly shows all my high and low spots in that area. Tiny, very shallow low spots will grind out, so I ignore them. But large, deep ones -- big dents and divots -- must be planished out, or I will grind the metal too thin getting rid of them. | |
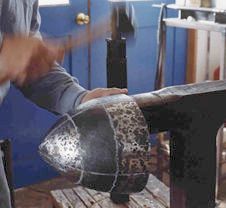 |
So it goes, lightly grinding and hammering each section, concentrating on the more severe dents. At the rim, things go a bit faster. The metal is so thick there due to compression during raising (several spots were .145" thick!) that only a reasonable "leveling out" is needed; the subsequent grinding will wipe off the high spots without causing thinning problems. Up higher, on the skull sides, I have to be much more careful. |
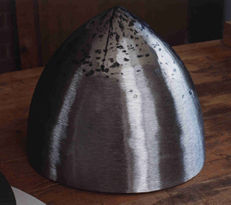
| As I go, I grind, still using a worn coarse belt. A worn belt cuts slowly, so I don't thin the skull by accident. It does generate heat though, so I dip the helmet in water frequently. I don't try to get rid of every tiny pit with the worn belt; you can see a few flaws in the ground areas. I'm nearly done with the bouging, working from the rim up to the peak. |
 |