
|
I stopped by Eric's shop while I was in Tucson, Arizona this summer.
Eric had been a Marklander back east, and dropped me a note after seeing some of my posts in Anvilfire.
We caught up on old times, and his reenactment of Coronado's expedition a few years back, in which he and some other reenactors retraced the Spanish explorer's rout through Arizona, wearing the proper clothes and armor.
Eric and some others went on foot and some on horseback.
Eric has not been idle since then, either. I was so impressed with his shop layout, and his work, that the next time I was in Tucson I photographed his setup. People are always asking: "How can I make armor?" Well, this is how Eric does it. | ||
 |
1) Eric's work stand with his two primary stakes. The laminated stand is glued and bolted together. The T stakes were fabricated at a local welding shop. The mushrooms, fullers and camelback stakes fit into the hardy holes in the larger T stakes. The sharp-eyed may note the piles of firescale around the big T-stake. | |
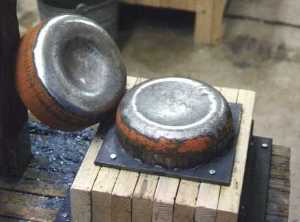 |
2) The bottoms of old gas cylinders have varying indentations used for dishing. (NOTE: Extreme caution is required when cutting any compressed gas cylinder. Do not attempt this if you don't know what you're doing!) Eric says: "I use the cylinder bottoms for hot dishing, 95% of the time. Wood is used for cold dishing. The metal forms are very effective, and cylinders are made of tough stuff, but dishing cold stuff in them is terribly noisy. If you cold-dish in metal forms without hearing protection you will go deaf, believe me. They make bells out of old cylinders!" | |

Eric's shop, looking west. Work and storage benches, belt grinder, buffer, vises and other gear. Well lit and well ventilated. |
||
| 4) Against the north wall, a drill press and a storage rack for hammers and other tools. |  |
|
 |
5) Eric's favorite raising hammers, most of them hand made from recycled steel. Eric states: "From left to right: #1 is Old Reliable, the first hammer I ever made, back in 1982. I just banged a rough punch through a pre-drilled piece of 1.25" hex wrecking bar. I've worn out 3 handles in it, and still use it extensively. #2 is a 3-lb raiser, made from 4142 alloy bar, oil-hardened. Face is a bit soft; I may re-heat-treat it some day. #3 is a 2-lb raiser, made from truck axle. #4 is a 6-lb monster, also from truck axle. It's usually a two-hander for me, both for raising and dishing; I need assistance to use it." | |
 |
6) The gas forge is used for blades and small parts. It can be opened at the back, by rearranging the bricks, to fit longer pieces. A coal forge is kept in the carport, but is used rarely due to the proximity of neighbors. Note the spray bottle of soap to check for leaks and make sure gas joints are tight. In operation, the door behind the forge is opened, and the forge moved back, so that the exhaust out the back of the forge goes outside. | |
 |
7) An arc-welding rig helps fabricate smaller stakes and jigs. He keeps a small oxy-acetylene rig at the other end of the shop, away from "fire and flame". | |
| 8) The anvil is about 240 pounds. Note the mushroom stake in the post vise for planishing the peak of a helm. |  |
|
 |
9) Eric holds a blank in his right hand, and a rough finished bascinet for a friend's son in his left. (He later abandoned it and made a 15th century German sallet for the lucky lad.) On the stakes and vise beside him are two intermediate steps. | |

|
Left, Eric's
gas forge for armor work.
The Mk. 3 head is on and the Mk. 4, still being lined, is at the bottom.
|
| 12) A B-3 Beverly shear simplifies cutting the initial patterns.
Eric usually works in 12 and 14-gauge steel, so the shears keep the cuts clean and neat.
He plans to try 10 gauge later this year.
Eric used a B-2 Beverly for 15 years and cut miles of plate with it, but felt he needed heavier capacity.
Another bick stake and a substantial laminated workbench occupy the east end of the shop.
Note the leather pad Eric is wearing over his right thigh and knee.
This is the area most likely to contact the rim of the helm blank in the early stage of raising.
|
 |
|
Copyright © 2000 Bruce Blackistone Copyright © 2000 Jock Dempsey, All Rights Reserved |

anvilfire.com home |
Related article Atli and Tadgh Make a Helm |
