The burner port form was turned on a lathe to be 1.050" diameter (the same size as a 3/4" pipe).
In use the cylindrical part is wrapped with a piece of paper to create a slip fit clearance for the burner.
An alternate method of construction is to use a short length of pipe and have the nozzle end of the form fit into the end of the pipe.

The laminated wood block is being sawed with the table angled at 5° to make the interior form.
When laminating blocks like this the wood grain should all go the same direction.
Otherwise when the wood shrinks or expands it creates steps in the form.
An alternative method to using a large band saw is cut each piece separately and glue up the assembly.
This however requires a lot of finishing to get accurate dimensions and a clean taper.
The interior forms are made in multiple pieces so that they can be used and removed in stages.
The burner port form is screwed to the base form to hold it tightly in place.
After placing the base refractory cement and it sets the screw is removed then the base form.
The burner form is extracted from the interior (a carefully planned move).
Originally the plywood disk on the base form was one piece.
But when we cut open the propane bottle we found there is a 1/2" flare sticking into the tank at the body weld joint.
To get the form past this we had to remove (it was glued on) and cut it into 3 pieces.
One piece was glued back on and the others attached with screws so they could be installed and removed after passing the weld flange.
The 20lb Propane tank was cut up as shown above.
The bottom (or back side) had to be cut out in order to place the base refractory cement.
After the cement had cured the bottom was welded back on for a cleaner appearance.
Left, tabs have been welded to the cover to help hold the refractory and the inside of the cover has been coated with ITC-213 to reduce rust and help the refractory bind to the metal.
Middle, a piece of 1" Kaowool Cerablanket has been fitted to the cover to provide some insulation.
Right, a plastic cup has been used to form the vent hole and the castable refractory placed.

Left, the base castable placed. Middle, the castable being placed around the burner port.
right, the base section after removing the forms.
I used wax as a parting agent and this did not work well.
Much of the surface of the bottom tore off with the form.
Note the ledge to support the cylindrical shell when cast.
Left, The base form with the cement stuck to it.
This is not good technique and could have ruined the project.
A thin coating of grease such as petroleum jelly would have worked better than the wax I used.
Right, The body shell cement in place.
The form is wrapped with paper to reduce sticking but the form still required a great deal of force to remove.
An 8 pound HD slide hammer with a 3/8" lag bolt was screwed into the form to remove it.
Several blows were required to break it free.
The cylindrical part of the furnace has 1" of Kaowool placed against the metal shell to reduce radiant heat.
This makes the forge/furnace more comfortable to work near and makes it more efficient.
But it makes the castable hard to place.
CONCLUSIONS:
For one-off production of cast forge liners I would use disposable paper and carboard forms that could be burned out.
Forms of this sort can be made using a variety of paper materials glued together.
Methods such as used in making paper sculptures with overlaping torn and glued strips of paper or putty like paper-mache' will work.
Wheat paste or corn starch glue is recomended as it burns out cleanly.
Reinforced cores of cardboard can be used for heavy sections but nothing as heavy as thick walled hard board tubes often recommended.
Forms for nozzles can be temporary (paper) or permanent (wood, plastic, metal).
Refractory nozzels can be formed in place or seperately as inserts from a higher temperature rated material.
Permanent forms can be covered with a thin layer of paper that will burn out later.
For durability this can be covered with a very high temperature refractory such as ITC-100HT and then the moldable refractory placed after.
Two Scrap Bottle Furnaces - Freon Bottle Melter In Operation
The Freon Bottle Melting Furnace above was much easier to build.
I've built three of these and given away two.
It has a Kaowool Cerablanket liner with a half of a standard firebrick in the bottom for a floor.
The entire interior and cover fill is coated with ITC-100HT.
The brick has Kaowool under it to insulate and hold it in place.
The burner screws into a pipe coupling with a stainless flare on the opposite side (interior).
This is held in place by an angle bracket screwed to the bottle.
Being able to remove the long burner is a convienience when moving or storing.
The lid takes advantage of the handles originally fitted to the bottle.
This little furnace works very well, melting up to 5 pounds of bronze in about 5 minutes or less once warmed up.
After building several of these I realized that the basic design is for heavy refractory where handling the cover is a significant task much less moving the entire furnace.
My future melting furnaces will have a lift off body (including the lid) taking advantage of the light weight refractory.
This will reduce pouring steps (time) as the small crucible can be lifted directly from the furnace with pouring tongs and not need to be transfered from lifting tongs to pouring.
When pouring rapidly cooling metal every bit of time that can be saved is important.
Future Projects:
We have now moved on to building light weight forges using folded refractory fiber panels supported by expanded metal in a light angle iron frame.
These forges take advantage of the light weight and high efficiency of modern refractories and methods of construction.
While they require a little more time to build the results are much more professional looking than scrap bottle and pipe forges.
| 


The goal of this project was to test build a multi-function forge and crucible furnace using the plentiful availability of 20lb propane bottles. The secondary goal was to produce a set of DIY plans detailing how to build the device. Overall this was a project was a failure. The furnace worked but did not meet expectations and the construction was deemed too complicated for a DIY project. But there was a lot of good ideas so after many years I decided to present it here.
Functionally as a crucible furnace it works perfectly. As a forge it needed a molded refractory floor insert (another mold) so that long work could be heated through the door vent hole. Conversion between the two could be done instantly and not even require cooling the furnace.
As a DIY project the molds are probably too complicated for the average builder, requiring a band saw and lathe OR a LOT of picky labor. Making the molds is something that one might do to make many furnaces in production or for a group build but not for a one off.
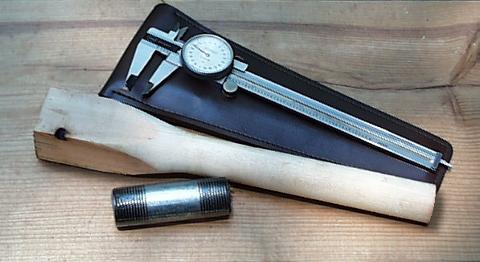
The burner port form was turned on a lathe to be 1.050" diameter (the same size as a 3/4" pipe). In use the cylindrical part is wrapped with a piece of paper to create a slip fit clearance for the burner.
An alternate method of construction is to use a short length of pipe and have the nozzle end of the form fit into the end of the pipe.
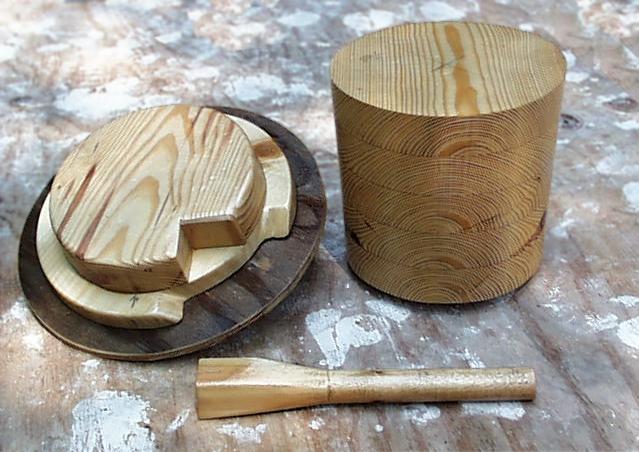
The laminated wood block is being sawed with the table angled at 5° to make the interior form. When laminating blocks like this the wood grain should all go the same direction. Otherwise when the wood shrinks or expands it creates steps in the form. An alternative method to using a large band saw is cut each piece separately and glue up the assembly. This however requires a lot of finishing to get accurate dimensions and a clean taper.
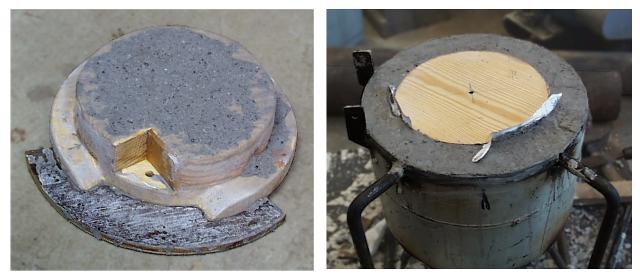
The interior forms are made in multiple pieces so that they can be used and removed in stages. The burner port form is screwed to the base form to hold it tightly in place. After placing the base refractory cement and it sets the screw is removed then the base form. The burner form is extracted from the interior (a carefully planned move).
Originally the plywood disk on the base form was one piece. But when we cut open the propane bottle we found there is a 1/2" flare sticking into the tank at the body weld joint. To get the form past this we had to remove (it was glued on) and cut it into 3 pieces. One piece was glued back on and the others attached with screws so they could be installed and removed after passing the weld flange.
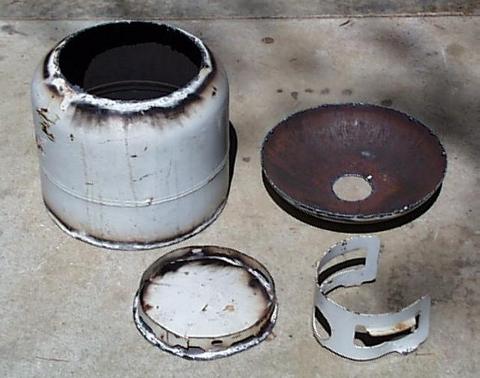
The 20lb Propane tank was cut up as shown above. The bottom (or back side) had to be cut out in order to place the base refractory cement. After the cement had cured the bottom was welded back on for a cleaner appearance.
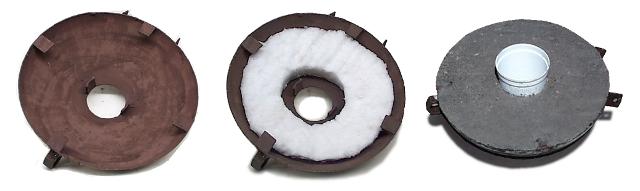
Left, tabs have been welded to the cover to help hold the refractory and the inside of the cover has been coated with ITC-213 to reduce rust and help the refractory bind to the metal. Middle, a piece of 1" Kaowool Cerablanket has been fitted to the cover to provide some insulation. Right, a plastic cup has been used to form the vent hole and the castable refractory placed.
Left, the base castable placed. Middle, the castable being placed around the burner port. right, the base section after removing the forms. I used wax as a parting agent and this did not work well. Much of the surface of the bottom tore off with the form. Note the ledge to support the cylindrical shell when cast.
Left, The base form with the cement stuck to it. This is not good technique and could have ruined the project. A thin coating of grease such as petroleum jelly would have worked better than the wax I used.
Right, The body shell cement in place. The form is wrapped with paper to reduce sticking but the form still required a great deal of force to remove. An 8 pound HD slide hammer with a 3/8" lag bolt was screwed into the form to remove it. Several blows were required to break it free.
The cylindrical part of the furnace has 1" of Kaowool placed against the metal shell to reduce radiant heat. This makes the forge/furnace more comfortable to work near and makes it more efficient. But it makes the castable hard to place.
CONCLUSIONS:
For one-off production of cast forge liners I would use disposable paper and carboard forms that could be burned out. Forms of this sort can be made using a variety of paper materials glued together. Methods such as used in making paper sculptures with overlaping torn and glued strips of paper or putty like paper-mache' will work. Wheat paste or corn starch glue is recomended as it burns out cleanly. Reinforced cores of cardboard can be used for heavy sections but nothing as heavy as thick walled hard board tubes often recommended.
Forms for nozzles can be temporary (paper) or permanent (wood, plastic, metal). Refractory nozzels can be formed in place or seperately as inserts from a higher temperature rated material. Permanent forms can be covered with a thin layer of paper that will burn out later. For durability this can be covered with a very high temperature refractory such as ITC-100HT and then the moldable refractory placed after.
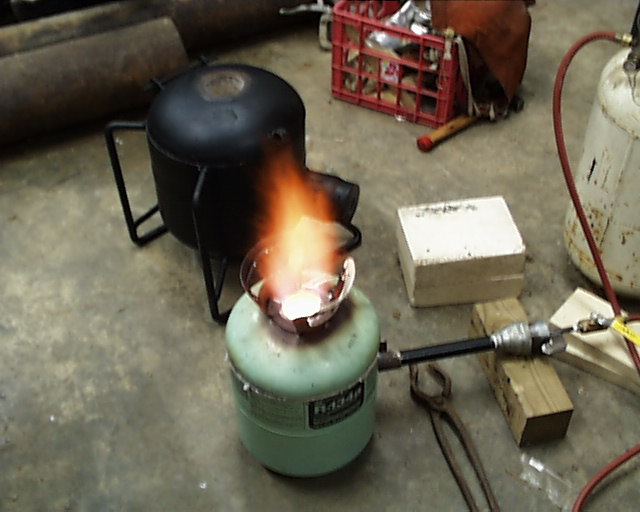
Two Scrap Bottle Furnaces - Freon Bottle Melter In Operation
The Freon Bottle Melting Furnace above was much easier to build. I've built three of these and given away two. It has a Kaowool Cerablanket liner with a half of a standard firebrick in the bottom for a floor. The entire interior and cover fill is coated with ITC-100HT. The brick has Kaowool under it to insulate and hold it in place. The burner screws into a pipe coupling with a stainless flare on the opposite side (interior). This is held in place by an angle bracket screwed to the bottle. Being able to remove the long burner is a convienience when moving or storing. The lid takes advantage of the handles originally fitted to the bottle.
This little furnace works very well, melting up to 5 pounds of bronze in about 5 minutes or less once warmed up. After building several of these I realized that the basic design is for heavy refractory where handling the cover is a significant task much less moving the entire furnace. My future melting furnaces will have a lift off body (including the lid) taking advantage of the light weight refractory. This will reduce pouring steps (time) as the small crucible can be lifted directly from the furnace with pouring tongs and not need to be transfered from lifting tongs to pouring. When pouring rapidly cooling metal every bit of time that can be saved is important.
Future Projects:
We have now moved on to building light weight forges using folded refractory fiber panels supported by expanded metal in a light angle iron frame. These forges take advantage of the light weight and high efficiency of modern refractories and methods of construction. While they require a little more time to build the results are much more professional looking than scrap bottle and pipe forges.
References and Links