| WELCOME to the anvilfire Guru's Den - V. 3.0 |
|
THIS is a forum for questions and answers about blacksmithing and general metalworking. Ask the Guru any reasonable question and he or one of his helpers will answer your question, find someone that can, OR research the question for you. This is an archive of posts from April 8 - 15, 2005 on the Guru's Den |
|
|
|
Being a sophmore computer engineering major at Virginia Tech, I have yet to learn much in the ways of electricity (mostly digital design and logic circuit things are what I know). Anyhow this brings me to a problem. I have a nice little Dayton 100CFM 1/25th HP blower motor going full bore I think its quite more than I need. In order to give this thing adjustability I purchased a "Single Pole(1 location)" rotary speed control for a fan. My problem is when I turn on the unit it has basicly three speeds. Off, very slow, full speed. The fan stays at a slow crawl for 3/4ths of the knob and when I turn it past a certain point it just goes full on. Can anyone sugest another method of how to do this or what I might be doing wrong? |
| Michael A. Gora - Thursday, 04/07/05 22:33:48 EDT |
|
Michael, Instead of trying to vary the speed of the motor, just choke off the air intake for the fan. A simple pivoting cover for the intake hole will work well. When you choke the intake, it puts no additional load on the motor, which choking the output does. |
| vicopper - Thursday, 04/07/05 22:56:34 EDT |
|
Wow didn't think of that! Thanks bunches! |
| Michael A. Gora - Thursday, 04/07/05 22:58:15 EDT |
|
On a side note dose anyone know an electronic alternative? Just curious. |
| Michael A. Gora - Thursday, 04/07/05 23:31:42 EDT |
|
Michael A Gora -- The speed controll should work, the operating principle is to vary the "on time" using a SCR. The knob is a pot which varies the delay in turning on the gate voltage that activates the SCR, so that only a part of each half cycle of the sine wave is actually conducted to the motor. This is prety much how light dimmers & speed controllers work, more advanced ones use feedback from the motor to maintain constant speed under varying load. Aparantly Your motor doesnt want to be controlled this way, restricting the intakeas Vic sugests is sure fire, and actually lowers the load on the motor as You restrict it more. |
| Dave Boyer - Friday, 04/08/05 00:28:25 EDT |
|
Thomas - you're correct regarding materials - he using a modern steel - to be totally correct he should be using charcoal reduced wrought iron. In fact, he even uses torches, etc. on occasion for heating, and to the best of my knowledge is not using a period correct forge when he is forging. I should probably have been a little more precise regarding terms when I said "period correct pieces" - it was a generalization. He's well aware that he's using modern materials and some modern methods to replicate medieval armour, I'm well aware of it also. In many ways, the materials being used are probably much better than that used in the original pieces. Ken - regarding japanese throwing weapons my guess would be something relatively shock resistant - either a mid-carbon alloy steel such as 4140, or a carburized bearing alloy steel like 4820 - of course, he'd either need to carburize or send them out to have it done. |
| - Gavainh - Friday, 04/08/05 00:44:35 EDT |
|
ThomasP; I wondered about Mr. Weygers' smoke catcher when I first saw it (about 27 years ago). How's chances that volatile vapors could build up in there, and go "WHUMP" or worse ? |
| 3dogs - Friday, 04/08/05 02:02:10 EDT |
|
Hello, I want to make my own arc welding rods. What can be used for coating, and how ? Borax maybe ? Regards, and thank you, Mark |
| Mark Matthews - Friday, 04/08/05 02:56:00 EDT |
|
Great site, hopefully I can learn something here ! Regards, Mark |
| - Mark Matthews - Friday, 04/08/05 02:58:10 EDT |
|
Mark: Early arc rods were dipped in a lime slurry and didn't run well. Some of the subsequent improvements were pretty toxic. Needless to say, you just set yourself up for some serious research. |
| Pete F - Friday, 04/08/05 03:31:52 EDT |
|
Many electric motors (and almost all the large ones) work by using the ac current to flip the magnetic field generated by the outer coils, pulling the armature along. This means their speed is determined mostly by the frequency of the current. 60 cycles per second is 3600 per minute, and that's why so many motors are close to 3600 or 1800 RPM (there's some slip, hence 3450 and 1725 RPM motors). A SCR control that essentilly reduces the voltage mostly just makes the motor inefficient. There are more expensive controllers that actually vary the frequency and work effectively on these motors. On another subject, I once read a book about an American who went to help Stalin rebuild the Soviet steel industry after WWI and the revolution. It mentions a bucket of ground glass the welders used to coat their rods. |
| Mike B - Friday, 04/08/05 06:54:04 EDT |
|
Is there any reference book where we can find mesures for all kind of tables height(dinning, conference, coffee,credence etc,or for chair, stool etc. Thanks... Andr� |
| Andr� Boudreault - Friday, 04/08/05 07:44:14 EDT |
|
Mark, Welding consumables is an area where enormous amounts of money and research have been spent to produce something that is cheap and works well. Reinventing the wheel is fun but please go to the local welding supply shop if you are doing any type of serious work. |
| - HWooldridge - Friday, 04/08/05 09:08:14 EDT |
|
Andre, I just recently picked up a new book on anthropometrics. "Human Dimension and Interior Space: A Source Book of Design Reference Standards" by Julius Panero ISBN: 0823072711 Price is about $25 at Amazon. This is the best book I've seen covering the anthropometrics of interior design. There are two other classics in the field, but this one is way cheaper and currently in print. Excellent drawings, diagrams and explanations. |
| vicopper - Friday, 04/08/05 09:13:49 EDT |
|
Reverb Noise: ptree, It is definitely there IF the forge or furnace is adjusted right. The problem is that it can be destructive so it should be avoided. I've seen it in many small forges but it may not exist in large multi burner forge. |
| - guru - Friday, 04/08/05 10:48:14 EDT |
|
CONE: Stefan (duerst), What you are making is a cone with a very low taper. The method you gave is exactly right. In full cones you cut the shape from plate, the outside radius the curve you are talking about. In a truncated cone (top cut off) you have both edges of the "bent bar". Mike-B's suggestion to forge a taper to create the curve produces the exact same results as bending on edge. IF you want to make paper templates and know all the exact angles and dimensions see our Mathematics FAQ page on cones. It is all there. You can do it via layout or purely mathematicaly. Eventually I will write a calculator for that page but meanwhile you can excersize your brain. |
| - guru - Friday, 04/08/05 11:11:03 EDT |
|
anthropometrics: I expect the book VIc noted is the best. However, another book that has similar dimensions for another purpose is Architectural Graphic Standards. Most of what it has is standard furniture templates but I remember a human figure with a range of dimensions. It also has things like driveway widths and curves. . . among thousands of other things. It is pricey new or used. |
| - guru - Friday, 04/08/05 11:21:29 EDT |
|
Well I have know old weldors that have used coathanger rods in emergency situations. If you want to make your own a good way to do it would be to get PhD's in Metallurgy and Chemistry and a research grant to cover your testing needs. Gavainh modern steel are superior to medieval ones in almost *ALL* ways; but when you are replicating medieval items then using modern materials sets you another step away from the medievalness of the item. Authenticity is a sliding scale not a binary one. I have a personal problem with people claiming that their items are "authentic" Medieval when they use a metal that wasn't around till after you could go buy Levi's at the drygoods store! No problem with you taking a shortcut in describing the stuff, just getting really nit-picky about the terminology. Thomas |
| Thomas P - Friday, 04/08/05 11:28:36 EDT |
|
Motor Speeds: Michael, I use the exact same motor on my gas forges. It can be controlled with a ceiling fan control or a HD light dimmer control. The ceiling fan control is recommended. The problem with most of these type controls, even the fancy solid state ones is that the adjustment is indirectly via a rheostat. These variable resisters (on oposite the end of the rotatable knob) tend to not be as linear as they should be. They develope dead spots from dusty wear deposits or burnt out places. The cheaper they are the worse the problem. But they also need to be sized according to the load. On my forge I have a great low range and a great high range, both adjustable, but right in the middle the speed likes to jump and is hard to control OR won't stay put. This is a linearity vs. load problem. It is what you get with cheap controls. However, they have worked great for me except for needing that little tweek. Note that you cannot START one of these motor fans at a preset low speed point. You must start at near full speed and back off. On my big forge I have automatic controls that I bulit. When the forge starts a timing relay bypasses the speed control for a couple seconds so that it can come up to speed. It also delays turning on the fuel so that you don't get ignition back in the burner or a lot of raw gas. Just as the fuel solenoid opens the blower drops to its preadjusted speed. The delay is just long enough that the blower doesn't reach full speed so there is virtualy no transition from bypass to preset. . . No . . . I don't know anything about industrial controls ;) |
| - guru - Friday, 04/08/05 11:48:22 EDT |
|
Coated Rods: Mark, as noted above you are reinventing the wheel and it is a very complicated wheel. . . FACT: All (non-alloy) welding rods from E6013 to E10011 are the SAME low carbon mild steel rod. All the differences in strength and weldability, weld position, AC or DC. . . comes from the coating. Specialty rods such as for stainless are stainless but the coating still comes into play. Specialty rods for hardfacing are also also different. But all common rods, no matter how seeminly exotic are the same steel. AND all commercial rods have the weld metal chemistry modified by the coating. The strength differences are created by powder iron and carbonacious substances that add carbon steel to the puddle. Iron powder is also used to adjust the liquidity of the puddle and the way the coating burns off. This effects whether the rod is AC or DC and its possitions. Borax is most commonly used for flux. Other fluxing agents like flouride carbonate (flourite) are used in alloy rods or rods for welding alloys. See our Borax FAQ. Cellulose is used for the smoke that protects the metal from atmospheric oxygen AND helps provide an arc path stabilizing the arc. MSDS: If you want to know what is in welding rod coatings get a copy of the MSDS (Material Safety Data Sheet). These are publicly avialable documents that are required to be available. Often you can get them on the net. There will be a LONG list of both the innocoulus and the hazardous. However, there will be no detailed proportions or common names for the ingrediants. The MSDS is a disclousure but manufactures are not required to give up trade secrets. Some obsure the facts more than others. Chemical Formulary: There is a set of books called "The Chemical Formulary" that gives common formulations and processes for EVERYTHING from perfume and makeup to epoxy paint and welding flux. It is a year by year encylopedic annual with much of the data extracted from patents. Some is also provided by researchers. Being an annual it is difficult to find specific things without going through many volumes. It has ocassional articles about improvements in welding fluxes. I have a set that ends in the 1980's. I do not know if it is still published but it is pretty nifty. One year I will spend some time studying it. Just randonly opening to ANY page is intersting reading in a geeky sort of way. *I* like it. . . And you wonder how I got THIS way. . . |
| - guru - Friday, 04/08/05 12:22:52 EDT |
|
Mn: AH, I forgot Manganese. . Welding rod is a high manganese mild steel. The manganese increases the strength of steel that is liquified as in casting or welding. The manganese has also been connected with possible health problems of professional weldors. However it is necessary to produce strong welds. |
| - guru - Friday, 04/08/05 12:30:56 EDT |
|
Propane Mixing - Forge problems: Many commercial burners use screens, plates with holes or spiral (twisted ribbon in tube) to improve propane mixing. Propane is a thick vicous gas that likes to cling together. You can see how the gas acts in its shadow under certain lighting conditons. Imagine pouring any thick liquid into a thinner one. Problems, Failures: There are numerous good forge and burner plans on the Ron Reil page, on our plans page and gas forge FAQ that all work. However, it is easy to build something that will NOT work. I experimented with a bunch of vertical burner designs for a table gas forge (like a coal forge) that did not work. I spent hundreds of dollars on pipe and fittings all for naught. I have made modifications to venturi burners (trying to go around a corner) that did not work. I KNOW it can be done but there are some little tricks that I am missing or cannot do the way I want. As soon as you go off the normal path you need to expect to possibly fail and have to start over again. Sometimes the more experiance you have the less you fail, but not always. Most recently I have had very good luck with forge burners. The last design and the hardware to build it was given to a friend untested and worked PERFECTLY the first time. . but that was luck as well as experiance. And probably more of the former than the later. |
| - guru - Friday, 04/08/05 12:53:42 EDT |
|
Hi , I wanted to know if anyone has use the mutipurpose metalcraft tool # 36131-1VGA from Harbor Freight. or one of there metal benders? Thanks Jim |
| - Jim R. Glines - Friday, 04/08/05 13:07:21 EDT |
|
Jim, I don't have either of those, but I have bought [and returned] their sheet metal rolling/forming tool. It was barely effective in 26 ga, although rated for 18. For ALL of harbor freigt's tools, I suggest cautious skepticism of their load ratings. Some of their tools work OK, others not at all. Sometimes true of two fo the SAME tool. Its all a quality control problem. In the past, wiser heads than mine have suggested that for hobby quality tools, they may be a safe bet [adjust your expectations down, though]. For professional quality work, you MUST pay for professional quality tools. |
| MikeM OH - Friday, 04/08/05 13:53:36 EDT |
|
I have heard that narrow tang swords have a tendency to break their handles with heavy blows. The explanation I heard was that the shock is too much for the wood fibers to take and thus they seperate (ie, crack). Is this true? And if so, would a latex caulk injection instead of epoxy while assembling the handle fix things? |
| Matthew Marting - Friday, 04/08/05 13:59:17 EDT |
|
I hope I didn't step on anyones's post. I HAD to edit out the hundred or so duplicates. . |
| - guru - Friday, 04/08/05 14:26:07 EDT |
|
Narrow Tang: Matthew, The problem is not so much the width of the tang but the corners where it meets the blade. This creates a load concetration and places for cracks to start (probagate) from. In technical terms it is a "stress riser". For strength you want the the largest possible radius in this corner. Look at the shape of a file for the proper shape of a knife tang. Even if you must radius the fit in the guard do so to make a large radius. Yes, sharp corners are easier to fit a guard to but they are WRONG. The best tang is as wide as will fit inside the grip without weakening it too much then tapering to square to pass through the pommel. At the front you still want those large radii. Drawings in books often show sharp corners and many inexperianced or uneducated bladesmiths have made blades with sharp corners at the tang. This is bad design and if there is going to be a failure it will be there. It is the kind of thing people "get away" with for a short time. Probability eventualy catches up with them. A very slight and smooth radius will prevent crack probagation and is often good enough for a short blade with little stress upon it. But the longer the blade the more critical the radii. If you look at many old long swords you will also notice the grip is larger at the guard to cover the wide tang. Smooth surfaces reduce crack probagation so it is benificial on highly stressed parts to finely finish them. Consider every file scratch a possible starting point for a crack. This does not mean you need to polish every surface but they should be smooth. Quality work pays. |
| - guru - Friday, 04/08/05 14:59:09 EDT |
|
Jock I think he was talking about breaking the grip not the tang. Matt if you look at historical swords you find that almost all of them use a hidden tang construction---so I guess it wasn't too big a problem or the folks who bet their lives on the sword would have asked for a change! Now harmonics do play a part in how much force the blade impact transmits to the grip. You want the grip to be at a node so it has the least ammount of vibration---both cause it doesn't transmit shock to the hand and because it's less hard on the pieces that make up the hilt. I think getting a properly designed and made sword is much more important than trying to solve a problem that shouldn't be there anyway. Note that many grips crack just from being thin and the normal expansion/contraction from changes in humidity. Traditionally the grip was expected to be changed out over the years as part of maintenance of a blade. Only nowdays do we expect to use something and never have to maintain it. Thomas |
| Thomas P - Friday, 04/08/05 15:24:22 EDT |
|
Everything the Guru said is completely correct. From reading your question though I think you're asking about the wood breaking, not the tang breaking off. That *can* happen, but it depends on a number of factors. The wood itself makes a difference, some are more prone to cracking then others. While you don't want softwood handles, the really hard hardwoods aren't good either, something mid hard would be best. Another factor is where the "nodes" are. When you hit things with a sword it vibrates. There will be 2 spots that don't vibrate nearly as much, one near the point and one in/near the handle. If these are positioned properly then that will reduce the vibration that can damage the wood handle. Also, how tight the fit is matters. If the pommel is tightly peened or screwed on, or the handle wood carved in a tightly fit mortise then the wood can't move indapendantly of the tang. If it's loose, then the handle will want to move the opposite way as the tang which puts extra stress on it and makes it more likely to break. Latex caulk would probably work fine, assuming it doesn't have any bad effects on the steel that I'm unaware of (like if it's slightly acidic). It won't make it immune to the other problems though, it will just work fine for sealing the handle to keep out moisture, which is all the epoxy is really there for too. |
| AwP - Friday, 04/08/05 15:28:57 EDT |
|
Thomas snuck in there and posted while I was typing. Good note on the expansion/contraction from humidity, that's another factor and one I forgot to mention. |
| AwP - Friday, 04/08/05 15:30:38 EDT |
|
Grips: Boy I missed that one. . Lots of reasons for tanged handles to crack. However, I suspect being forced on too tight would be the biggest problem. Modern makers bed the grips on with hard epoxy or polyester resin. The next best reason for the wood cracking is the flexibility of the tang at the hilt causing flexing as well as column loading on the wood. The heavily radiused and tapered tang I describe above also adderees that problem by maing the tang stiff where the highest load is applied. I see a lot of wire wrapped grips today. I do not know how common it was but it looks like a good way to avoid the cracking or prevent it. |
| - guru - Friday, 04/08/05 15:54:37 EDT |
|
Hmmm, looks like my posting got eaten: Zoning: I�m glad I live in rural Southern Maryland. In St. Mary�s County the zoning seems to be set up to ENCOURAGE forges. I think the only regulation is that it has to be 50� from the property line. (Actually, the old stripping house may be closer than 50�, but since that neighbors on that property line have my hinges on their barn; and have bought a number of dragon-headed bowl lamps as Christmas gifs, and their dogs run our land upon occasion, I don�t think it will be a problem.) Sword Tangs: I�ve seen a lot of broken tangs in my day, and a thin tank needs a very well fitting handle to provide support. I generally under-drill, then carefully file and burn-in the tang into the handle for a good fit; plus you need the cross-guard, handle and pommel to make a neat, snug fit. It requires a lot of patience (which I sometimes lack). The thiiner the tang, the more critical the fit; and I�ve repaired several swords by having friends or daughter weld a decent tang onto the blade. As well as the problem of a badly fitted handle, a lot of the cheaper swords have a sharp angle between the tang and the blade. This leads to stress risers developing; and consequent embarrassment in the shield wall. A lovely day on the banks of the Potomac; they�ve diddled with my computer, so now I have to remember my log-in name and password. I guess I�m Atli the Black for a while! Visit your National Parks: www.nps.gov Go viking: www.longshipco.org |
| Bruce Blackistone (Atli) - Friday, 04/08/05 15:55:16 EDT |
|
Gas forge reverberation I guess it's kinda late for me to jump in on this topic, but I have definitely noticed this in my forge and the seven glass furnaces at my old school. I always thought of it as a purring... very, very soporific during lectures. As far as I can tell, all the furnaces made that resonant noise, but interestingly, my forge (smallest) was the loudest. Most of them had Ransome venturi burners with Giberson heads or cast iron heads hooked up, but the crucible furnaces had blown recuperative burners (shop built) and seemed to be a bit quieter. My forge is loud enough that it will make it difficult to hear the radio fifteen feet away. |
| T. Gold - Friday, 04/08/05 16:21:51 EDT |
|
Ordinances, Covenants, Rules & Regs. I heard a story about a Vermont blacksmith, Bob Bourdon, and I hope it is true. At least a generation ago, he was being harassed about his coal smoke forge, so he made an appointment with the governor of Vermont. The governer gave him a special dispensation so that he could continue working. |
| Frank Turley - Friday, 04/08/05 16:23:21 EDT |
|
I am looking for a different way to make quality feathers. I have seen very nice feathers on the fireplace at Disney world. Currently we cut a feather blank from 18 ga. then weld the "rib" down the middle, then use an air chisel to put the feather appearance to the sides of the "rib", then we weld on the quill. Any other ideas would be helpful.....Steve |
| Steve Stokes - Friday, 04/08/05 16:24:51 EDT |
|
Frank, I had a student that got shut down by the city cause he didn't have an EPA permit to burn coal (translate that as "A neighbor complained"). Being a stubborn cuss he called up the EPA to get one---they asked how much coal he burned in a year, he said a cuple of hundred---"tons" they asked. "no pounds" he said. When they got up off the floor laughing they told him they weren't interested until he was up into the hundred ton range; he got them to send him a letter stating so---and then the city said he had to get a burning permit, 10 days notice and $25 *each* *time*. So he moved... AS---did I remember that right? Thomas |
| Thomas P - Friday, 04/08/05 16:58:28 EDT |
|
Feathers: Steve, It sounds like you are going about it the slow low skilled way. Out West many smiths forge feathers and a few specialize in them. Dave Manzer up in Alberta Canada does beautiful feathers all forged on a Little Giant. Uri Hofi also does a similar element on a Big BLU using his crown dies. Although the techniques are different the results are similar and have a wonderful forged look. Dave Manzer makes his by flattening angle iron over a die with a shallow V to prevent flattening the corner. This produces a nice raised center. He then hot shears the ends using a Beverly Shear. Next he forges the middle down to make the end of the quill resulting in two feathers from one piece. The last work is hand work texturing with the narrow pien of a hammer then adding a little aerodynamic curve over a round swage die. The results are very nice and he is using less time tools and techniques than you describe. We sell the video demonstrating making this feather. See our book review page or store. Uri Hofi starts with a flat bar, forges a short point on one end and necks the other on combination dies. Then using crown dies he fullers two areas on either side of the center creating a center ridge. The edges may be left thick or thinned according to the size bar you started with. This is all done in one heat. At this point he is finished with his element. The quill would be finished next by rounding the fullerd shank and cutting off. Texturing could be added if desired. However, the deep smooth fullering without texture has a very nice symbolic feather feel that is modern and more suggestive of a feather than Dave's textured feather above. See our 2004 ABANA conference coverage in our NEWS for photos of this element and more. |
| - guru - Friday, 04/08/05 17:37:50 EDT |
|
Bruce, A little off topic, but, were you an "Everquest" junkie? |
| Mike Mason - Friday, 04/08/05 17:41:04 EDT |
|
Harbor Freight Benders- with harbor freight, you really do get exactly what you pay for, which is usually not much. The little harbor freight benders and scroll jigs are very light duty, and will only bend small stuff. If you are okay working with 1/8" thick material, and only want to make a little something once in a while, then they are probably ok. If you have to do any serious bending, or plan on working with all kinds of metal for the rest of your life, you ought to be looking at real benders, which, of course, cost real money. I can go on about benders and scroll jigs at length, and have, plenty of times. So if you are really interested, and willing to spend the $800 and up a real bender costs, email me and I would be happy to run down pros and cons and manufacturers with you. Otherwise, buy the harbor freight bender, and just realize it has limitations. Real tools cost Real money. No way around it. |
| - ries - Friday, 04/08/05 17:50:46 EDT |
|
Matthew Marting, sword tangs: some thing else to keep in mind is that the pakies have been cranking out some good look pretties for a few years and they tend to have a weilded rod for a tang. Most of them are 'cranked' down to make the grip and pommel fit tightly. Some times they over tighten and some times they under tightn. This too can cause a handle to split. As for bonding the tang to the handle I've never had problems with construction glue( sub floor adheasive). For a dampning effect I use roofers cawk( stays plyable but gripps pretty good). Over all I tend not to use wood, deer and elk antler, some times iI use " stablized bone" for a different look. All polish well, demand a higher price, and tend to last longer. |
| - Timex - Friday, 04/08/05 18:48:38 EDT |
|
opps, forgot this one, Lock tight( mechanics red grade ) is a old tried and true also. |
| - Timex - Friday, 04/08/05 18:50:55 EDT |
|
Guru, Perhaps the forges I was around did not have reverb as they were all multi burner, burner fan designs. These were all in the ton and up an hour, with most in the many ton per hour. We still use a gas forge at the new shop on occasion. It is a water cooled furnace front design, for something in the 20 bars of 5.5" size. Uses gas like Texas won't run out! It has a 2" pipe feed to bring the 20 psi natural gas to the fan mixer. No reverb, and I promise, its running at the sweet spot. I think it was running when Pawpaw was there, ask him about it. |
| ptree - Friday, 04/08/05 20:34:01 EDT |
|
Mark Matthews -- If You really want to weld with electrodes You made Yourself, use bare rods on DC electrode negative. This is the way it was taught at the Hobart school 50 years ago. The reason was that if You could weld with bare electrodes, You could weld well with coated ones. This is the "hardship builds character" school of thought. You need to give it a try to really apreciate the development that goes into a product as simple as a welding rod. I am prety sure it would cost more to make bad rods Yourself than to buy good ones for about a buck a pound.[50# box price] |
| Dave Boyer - Friday, 04/08/05 22:55:02 EDT |
|
Mike: I avoid addictive behavior. If I'm going to be seduced, I'd prefer my wif to Everquest. ;-) Tangs (not Tanks, PTP): I repaired one sword where the tang was a 8" piece of ~3/16" threaded rod spot welded to a stubby tang! The whole sword came apart the first time he SWUNG it! he didn't even hit anything with it. Fortunately, there was no one down range. After the eldest daughter MIGed-on a piece of tulwar blade as a new tang, I kept the old piece of rod as an example of how horrible these cheapies can be. Consider it an act of charity for one of my childrens' friends; he thought more of that sword than it was worth. |
| Bruce Blackistone (Atli) - Friday, 04/08/05 23:58:22 EDT |
|
weilded tangs: Mr. Bruce, have you or any one that you know repaired a tang by drilling a hole in the center of a rod( on top ) and an adjoining hole in the side( connecting the two in an "L" shape ) then spot welding the tang after threding it through the hole. An 'aquatance' claimes that he has repaired a few balistic grade swords this way. I have thought about it and as of yet havent the nerve to try it. |
| - Timex - Saturday, 04/09/05 01:31:00 EDT |
|
Hello, I need a recipe - How to make my own arc welding rods ? Can you please help ? Regards, Markus |
| markus - Saturday, 04/09/05 01:47:43 EDT |
|
I have a boat that has broken the hull I am tring to find out if i can stand in the water to weld on it. salt water , thanks |
| - LEE - Saturday, 04/09/05 08:02:42 EDT |
|
I have a boat that has broken the hull I am tring to find out if i can stand in the water to weld on it. salt water , thanks |
| - LEE - Saturday, 04/09/05 08:04:39 EDT |
|
Mark, Your question was responded to several times ABOVE. Scroll UP. Please be consistant in using an alias. We stop responding to folks playing name games. |
| - guru - Saturday, 04/09/05 09:28:34 EDT |
|
Wet Welding: Lee, If you are talking about electric welding of any kind you have a very good chance of killing yourself. This is what dry docks and boat cranes were made for. Welding voltages that are normally harmless can be lethal when you are grounded over a large part of your body. Dry land weldors ocassionaly have lethal accidents when they have wet feet or are lying on damp ground OR sweat enough to produce a better than normal ground connection to earth. Underwater welding is done by highly trained professionals using special equipment. However, the fact that everything is "ground" helps allievate the problem. It is still hazzardous but it is done on oil rigs and emergency applications. A weldor standing in water is the WORST possible condition. |
| - guru - Saturday, 04/09/05 09:37:29 EDT |
|
Wet Welding: I got popped pretty good one time while working outside doing some pipe welding on a crew. It was hot and had been spotty rain all day so we were all soaked but wearing full gear with leathers and boots. I took my gloves off and had the stinger hanging on my belt. I leaned up against the pipe with my left hand and accidentally touched the rod with my right. Current passed right thru my arms and made me curl up so broke the circuit. I was using AC and probably around 130 amps - I was told AC is worse than DC to get shocked. Anyway, I had to go sit down for a while because it made me nauseous. I knew a guy who died by grounding on a metal flag pole and metal ladder. He got popped and it stopped his heart. He came down the ladder and keeled over dead - 35 years old. The other workers did not know CPR so he died but the coroner said he probably could have been resuscitated. The danger is not so much from getting fried but from stopping your heart. A weldor standing in salt water would be death waiting to happen. |
| - HWooldridge - Saturday, 04/09/05 11:34:31 EDT |
|
If any of you own a small business you might know the answer to this question about liability. Do you have to have liability insurance or can you have some type of legal document releasing you from liability that I could put in my info brochure that comes with every product. Thanks for any information. |
| - trapper - Saturday, 04/09/05 12:19:06 EDT |
|
There is no magic bullet to release you from liability. By all means, put a disclaimer in your brochure. Make people sign waivers, too, if you think it might help. But if you make truly dangerous things, and you own anything of value, then liability insurance is probably a good idea. I carry a million dollar liability policy, which is wrapped into my shop fire and business insurance. I used to have a freestanding million dollar liability policy, and it ran me around $1200 a year. However, if someone really hurts themselves, or dies, as a result of something you made, whether it is your fault or not, they could sue. And then an insurance policy might help, and it might not. Spending lots of money on lawyers is the only real answer in a case like that, followed sometimes by bankruptcy. Only you can decide what risks you want to take in life, and how much money you want to spend to protect yourself from possible legal attacks. Some people are so scared by the whole thing they refuse to start their own business, others go bare (no insurance) for many years with no problems, and others go broke. Life is a gamble- how much do you wanna bet? This is why there are almost no small airplane manufacturers, or gun manufacturers, left in America. But the amount of blacksmiths driven out of business by safety lawsuits is probably pretty small. |
| ries - Saturday, 04/09/05 12:46:37 EDT |
|
I`ve welded on construction sites for years and when your gloves get wet you`ll get zapped striking your arc or putting the rod in the stinger. I`ve been jolted 100`s of times and have seen it happen to others 100`s of times but have never seen or heard of anyone being killed by it. |
| - Robert IW - Saturday, 04/09/05 12:48:23 EDT |
|
On product and general liability. There was a discussion of this on the abana forum where one person noted he had his installation (stair rails and railings) done by a third party. In this case accidents are more likely to happen due to installation rather than faulty design or construction. He felt this added a layer of protection and helped to reduce the cost of his liability insurance. |
| - Ken Scharabok - Saturday, 04/09/05 13:18:29 EDT |
|
Robert, I have also been popped a lot but the only time it made me sick was when it went through my chest across both arms. The guy that died probably had a heart defect that was waiting for the right trigger but that little bit of juice was enough. |
| - HWooldridge - Saturday, 04/09/05 13:52:40 EDT |
|
Hi! I am more of a casual welder than a blacksmith.. I have made a few items such as a log spliter, three point hitch carrying platform and son on. I use a radial saw to cut steel after trying a cheap chinese bandsaw.. :( The radial is great, altough limited in power, because I can make compound angle cuts. I also have a portable woodmill bandsaw. Here is my question : I read somewhere that you can cut steel on a bandsaw at high speed. Apparently, the friction makes the steel "melts" as you feed it. This is quite contrary to the usual method of slow cutting with coolant. Since I have 16 HP on the mill running a 1 1/4 blade at 2000 lbs blade tension, this might make on hell of a cutting machine for steel! Any clues on this subject? Thanks! Francis P.S. Searching band saw and high speed got me a ton of useless links... |
| Francis Brabant - Saturday, 04/09/05 14:31:05 EDT |
|
HWooldridge, I agree with you 100% |
| - Robert IW - Saturday, 04/09/05 15:00:05 EDT |
|
From the ABANA site: Bill Gichner Tool Sale! On May 7 & 8, 2005 there will be a sale of the late Bill Gichner's collection of tools, books and related items. The sale will be held at the Antique Shop, located halfway between Ocean City, Maryland and Rehoboth Beach, Delaware, two miles inland from Bethany Beach. The physical address is #10 Central Avenue, Ocean City, Delaware. This will not be an auction but a sale with prices marked on everything, some negotiable! For additional information cotact: Bob Swenson (302)539-5344 |
| Ken Scharabok - Saturday, 04/09/05 15:29:23 EDT |
|
Electric shock, I am an electrician 28 years now, I have been bit more than once, and know well 'Once can be enough". One thing they taught us was if shocked and feeling sick is to drink alot of water, try to over hydrate yourself some. (I am not a Doctor, Its just what they taught us) They said shock creates some sort of electrolysis reaction to your blood and its by-products is what makes you feel sick. So drink up best you can, then go for a piss, You will feel better. M.v.h. Sven |
| - Sven - Saturday, 04/09/05 15:44:34 EDT |
|
Robert IW and HWoolridge: It actually takes very little juice to disrupt the heart. Roughly 6 milliamps for a few seconds across the heart can send a full grown human into fibrillation (heart convulses and loses the ability to pump). Exposure to an electrical shock might not kill you. Exposure to the same shock you survived once might. It's a craps shoot every time it happens, but not a game you ever want to lose, even once. The heart is an amazing non-stop pumping machine, but even a well (poorly?) timed blow to the chest can knock it out of sync. Out of sync, means no blood pumping. No blood pumping never ends well. (ever heard of a baseball player dropping dead after taking a pitch to the chest? It happens) Rather than thinking that the one fellow had a heart defect, I'd wager anyone shocked in that fashion would be lucky if it didn't kill them. Be careful guys. We want you around for years to come. Eric |
| eander4 - Saturday, 04/09/05 15:51:37 EDT |
|
Francis- the short answer to your question is no, you cant do it with your sawmill bandsaw. The process you are referring to is called "friction sawing" and it requires the bandsaw to run at very high speed- Do-All used to make machines that would do this, as far as I know they never made a horizontal, or cut off bandsaw- only vertical bandsaws. These puppies would run at about 15,000 feet per minute, which, with a 24" saw, is about 2500 RPM- (most metal cutting bandsaws run at between 100 and 200 rpm), and you need a special, very large tooth blade. They throw a lot of sparks out when doing this, and of course the material being cut is redhot while it is happening. My guess is your resaw bandsaw would shake itself to pieces at that speed, catch everything around it, which is no doubt covered with oily sawdust, on fire, and you would need one heck of a sturdy vise to do this anyway. A Saw that will do this, like a Do-All 3613, has a 10hp motor, runs 15,000fpm, and weighs in at about 3600lbs. And they still only use these big boys for some metals that are just to tough to cut any other way- they are too expensive to me used for mild steel- they use them for highly abrasive or oddball alloys that you cant cut efficiently with a carbide blade. There are quite good horizontal bandsaws on the market, its just that they cost a bit more than $159 at Harbor Freight. And there are saws called Cold Saws, which cut miters very well too. Compound miters are a bit tougher, although certainly do-able on a hefty bandsaw, such as an Ellis, Do-All, Hyd-Mech or a big Wilton or Kalamazoo. |
| ries - Saturday, 04/09/05 16:27:13 EDT |
|
WELDING IN WATER: There is an old joke.. A welder may be dumb-- but he is not dumb enough to weld standing in water.GRIN. Sandpile |
| - sandpile - Saturday, 04/09/05 17:34:54 EDT |
|
Now I do hope no one here is from OSHA, but I cut some large tool steel-type stock by getting it as hot as what my propane forge will and then cutting it with the chop saw. LOTS of sparks, but it does the job quickly and fairly cleanly. |
| Ken Scharabok - Saturday, 04/09/05 17:58:47 EDT |
|
I am Attempting to forge a double headed axe blade, and handle. I would prefer a metal handle, the problem is weight. The size prefered would be big, about a three foot handle, with a foot and a half wide head-blade to blade. I would love some insight on what metals might work. I understand this is a ruff sketch and is a first attempt. A guru's insight is much appreciated!! thanks |
| ROB - Saturday, 04/09/05 19:02:24 EDT |
|
Fantasy Broad Axe: Rob, We deal in the real world here and what you are describing is a fantasy weapon (Gimly's Axe?). Just guessing at the mass I suspect you are talking about a 100 to 150 pound item (maybe more) in solid steel and about 35 to 50 pounds in aluminum, 20 to 35 pounds in magnesium (assuming normal axe and handle shapes). Using wood for the handle as is traditional will save a lot. If you want to make a fantasy prop you need to consider hollow parts or wood covered in thin sheet metal. If you make a true scale wooden model (as all these things start out in Hollywood) you can weigh the result and calculate the weight in aluminium, brass or copper by simple proportioning. Or with a good detailed drawing you can calculate the weight. A good engineer or mathematician could roughly figure the weight in about 1 minute and pinpoint it in about 5. Or a couple seconds if the piece is a solid model in a CGI system. Even though I can do this quite quickly there are advantages to the model as it gives you the opportunity to see what you are attempting. Once you know the theoretical weight you can bolt free weights on to the model to see how a 35 pound axe feels. . . At the National Knife Museum in Chattanooga, TN they have the original models of the "Rambo" knife that were submitted to the director by the bladesmith for approval. They are carved from soft pine 2x4's. A few minutes with a bandsaw and a knife and you have a physical model. They were pretty "far out" compared to the final oversize blade. they were also larger. I suspect that after making the models the bladesmith investigated the weight and backed off or convinced the director that his original vision was too clumsy. In Hollywood they make these things out of the lightest and least expensive material (wood = pine or balsa, foam) and if they need durability for action shots they might cover it with fiberglass and epoxy then finish with paint to look like anything they want. It may have lightweight foil or sheet metal imbedded but normally if they need the glint of steel they focus on a dummy or stand-in object, if they need the sound of clashing steel the sound editor adds it. |
| - guru - Saturday, 04/09/05 20:16:47 EDT |
|
Electrocution: Robert IW and HWoolridge, eander is absolutely right. Just because you have been lucky and gotten away with accidental shocks does not mean the very real hazzard is not there. Fatal accidents from welding currents are all too common. AC current tends to make you jump or let go of the wire. DC current tends to make you grip harder. You do not need to be "smoked" at high voltage like in an electric chair. As eander (an EMT if I remember) pointed out a small current across the chest can stop the heart without frying you. It is not unusual for people to survive massive electric shocks with burns. But it is also not unusual for people to be electrocuted without a mark. The relatively low volatage electrocutions from welders tend to be this type and can be MISDIAGNOSED as a heart attack. I've been shocked with 24 VAC, 120 VAC, 240 VAC (more than once), 40 - 50 AC/DC (weldors) and lightening (twice). I was lucky or it was simple finger to finger jolts. I could have just as easily been killed by any one of those voltages under slightly different conditions. Life is a real gamble. I try not to gamble with my life, but it is sometimes out of my control. So how lucky Do YOU feel today? Ready to gamble? |
| - guru - Saturday, 04/09/05 20:34:44 EDT |
|
How much current would be fatal to a mole? Can I put my AC225 welder to work inducing heart attacks in these little monsters? For the last two summers my life has been an endless replay of "Caddy Shack". Nothing gets rid of them so I was thinking of putting some 3/8" rods into the ground about 24" apart and hook up the welder. I would stand on the porch, of course, to gleefully throw the switch and hopefully send these burrowing rats into the next life. Maybe just wishful thinking.......... |
| quenchcrack - Saturday, 04/09/05 20:56:14 EDT |
|
Q.C.: I tried it with my HOBART 8500. Nothing... Maybe if you had one of the old LINCOLN PIPE LINE welder. You could probably do some good. Sandpile |
| - sandpile - Saturday, 04/09/05 21:18:09 EDT |
|
Rob if you are not going to use it for anything but a wall hanger then any metal will work, I'd suggest you go with a tough pipe forged to shape to avoid some weight. If you are planning for it to be used using a metal handle will help destroy the users arm due to transference of the shock of impact---think of how few metal handles are used for hammers, sledges, pickaxes and axes---I've used some that were retrofitted with metal handles and dropped them and got one that was not doing it's best to hurt me. I'd design it to use a standard hickory handle as the handle is a "consumable" on an axe. Thomas |
| Thomas P - Saturday, 04/09/05 22:24:24 EDT |
|
Tangs and Timex Wait for No Man: Never heard of that method, but it seems dubious at best. Most of the sword tangs I've had repaired were shouldered into the blade itself, and then carefully welded by someone who knew what they were doing. Seems to me that if they were decent reenactment or "combat" grade blades, the tangs should have held up in the first place. Whatever works; but some methods work better and longer than others, and this doesn't sound like one. Finally back to forging; another 35 inches ( 89 cm) of sled runner swaged down from half-round to half oval by hammer and hand. Lovely day on the banks of the lower potomac. Visit your National Parks: www.nps.gov Go viking: www.longshipco.org |
| Bruce Blackistone (Atli) - Saturday, 04/09/05 22:52:36 EDT |
|
Jock, I read somewhere that the knife museum was moving from Chattanooga to Sevierville, TN and would reopen sometime in mid-2005. I had the good fortune of knowing Jimmy Lile of Rambo knife-making fame before he passed on (family friend). I'd bet money the director asked for something extreme, and he gave it to him, knowing full well that the impractically of it would stick out like a sore thumb, leaving Jimmy to sell the director on the knife Jimmy wanted to make in the first place. Q.C. You could try soaking your yard with salt water to improve the conductivity. That'd take care of that Summer mowing hassle too! (grin) Eric |
| eander4 - Saturday, 04/09/05 22:59:28 EDT |
|
QC and the mole:-) In theory if you treat the grub problem, you will solve the mole problem, bet you didn't even know you had a grub problem did yah:-) There are several brands of spring loaded moletunnel portcullis's available to end their burrowing days. Then there is the satisfying and amusing game of rent a lawn roller, and flatten ever tunnel on the property, and then doing your best Bill Mury wander around in cameo with full face paint and a M16, or failing that a nice sharp pitchfork, looking for the slightest movement:-) Have fun, treat the grubs, and the moles will eventually go away... |
| Fionnbharr - Saturday, 04/09/05 23:59:38 EDT |
|
I feel my life is more at risk driving my 140 miles (on average) round trip to and from work each day than getting killed by a shock from a welding lead. I understand what you all are saying, do you really think I enjoy getting zapped? (grin) If the job was easy and safe they would have women and childern out there doing it. I do try to be safe. |
| - Robert IW - Sunday, 04/10/05 01:07:10 EDT |
|
Moles, and the vitrification thereof. There are using essentially that same method to clean up the Hanford nuclear waste up here in the Northwest. They stick a couple of graphite rods in the ground, and can run up to 4 megawatts(yes megawatts) through them. This turns the soil molten, and cools into a sort black glass. I think this sort of method would also take care of your mole problem. The neighbor swears by olive oil soaked paper towels stuffed into the tunnel. |
| - Tom T - Sunday, 04/10/05 01:48:04 EDT |
|
I kinda thought so.. thanks Bruce Electrical shock: rt hand to rt foot, ok rt foot to lft foot, ok lft hand to rt hand, bad lft hand to lft foot, bad Its not called the right hand rule fer nothing. |
| - Timex - Sunday, 04/10/05 02:26:32 EDT |
|
Moles: Get a cheep lawn wind mill, afix a small block of wood to one of the blades in such a way to make it 'thump' the wind mills support. Place the support 6 to 8" into the ground and wait. |
| - Timex - Sunday, 04/10/05 02:31:19 EDT |
|
Moles..... Det cord and peanut butter works really well... At least I have heard it rumoured. |
| Ralph - Sunday, 04/10/05 03:29:16 EDT |
|
Moles: May or may not work. Punch a hole in the tunnel leaving it intact. Standing upwind, pour in a good slug of bleach, followed by a good slug of ammonia. Fill in hole, again trying not to crush tunnel. |
| Ken Scharabok - Sunday, 04/10/05 09:48:49 EDT |
|
Moles. . Yes folks this is the NEW lawn and Garden forum we answer all questions related to your yard, landscaping but expecialy gates and fences ;) Fionnbharr has it right. You treat the soil for grubs (according to the real experts). I have one hillside that is infested with 17 year locust grubs and THAT is where the moles stay. They are nowhere else in the yard and from the huge number of tunnels that have suddenly appeared I have more than one. We also used to have a cat that was pretty good at getting moles. Had a lot less then. |
| - guru - Sunday, 04/10/05 11:09:27 EDT |
|
Hi all, Have postedsome pics of an anvil I have been using for about 6 months now in the Yahoo user gallery. they are in the folder "lazarus's". Weight is approx 170#, appears to be cast steel as there is no evidence of a face plate weld. it rings like a bell and has decent rebound, the ball bearing test shows 75-80%. I could not find any identifying marks on it . The Anvil had been used heavily in it's previous life and has a fairly deep depression on the offside of the face near the hardy hole. The face is almost in the same plain as the step and horn and is seperated from them by a gap of about 1/2" which seems a bit odd to me as I've not seen this before. If you all would be willing to take a look and offer your opinions on it's origin or manufacture it would be much appreciated. Thanks, Adam |
| lazarus - Sunday, 04/10/05 12:19:04 EDT |
|
Been treating the yard for grubs but it has had no effect on the moles; bought the spring loaded bayonet but can't seem to find the main tunnel; put bubble gum, poisoned grain, fox urine (don't ask), and ammonia in the hole but the moles remain. Gonna forge a straight tined pitch fork and go "probing" for them. See, Jock, we got back to forging! |
| quenchcrack - Sunday, 04/10/05 13:43:52 EDT |
|
moles: run a hose from an exhaust pipe to a burrow entrance and run the engine for 30 mins |
| adam - Sunday, 04/10/05 14:17:08 EDT |
|
Adam, have you bought a tank of gasoline lately? Anyway, the main tunnel has lots of side tunnels with portholes up to the surface. You'd have to plug all the holes first. |
| quenchcrack - Sunday, 04/10/05 14:57:22 EDT |
|
In Costa Rica they have giant moles that managed to get imported from Venesuala. They are about the size of an America ground hog and very destructive to trees as they eat the roots. To trap them snares are set in the runs with the bait being skinned yuca root. They are good at getting the bait and avoiding the snares much like mice and mice traps. |
| - guru - Sunday, 04/10/05 16:11:14 EDT |
|
Adam. sent me a copy of your anvil photo. The wear point oposite the pritchel hole is often caused by the heal of shoes when punching the nail holes. This is also where you will find the second pritchel hole on farriers anvils. On the other hand, any repeticious work can make a wear spot on an anvil. Scale is very hard and abrasive and rubbing scaled steel on the anvil causes wear. |
| - guru - Sunday, 04/10/05 16:17:58 EDT |
|
Moles: I used to have a "mole hound". No, you DO NOT want one. He would find a mole burrow and start digging.. . I don't know if he started close to the mole or if the moles could out dig the dog but he never caught one. But he SURE made a mess! When I was 4 years old we had a crabby neighbor who didn't like the local kids crossing his yard. So one day to get them out of the neighborhood he made up some wild skink chase story about how to catch a mole and sent them off. It had something to do with using a big galvanized wash tub. I remember the kids marching off to the woods with the wash tub using it like a bass drum as they sang, "We are off to catch a mo-el. . .". A few hours later they came marching back singing "We caught a mo-el, we caught . . .". Well the neighbor was flabbergasted and now the hero to these kids that he just wanted to go away! Wish I knew what they did but I was not privy to the details, and I was ONLY 4. |
| - guru - Sunday, 04/10/05 16:28:08 EDT |
|
Moles - With judicious placement, a 1/4 stick of dymnamite will get rid of them...just make sure the neighbors are at work.:-) |
| - HWooldridge - Sunday, 04/10/05 17:12:22 EDT |
|
An Analogy of an Electrocution The Following is a description of the effects of different values of electric current on the body: .002 - .003 amp______________________________ Sensation (a slight tingling) .009 � 010 amp ______________________________Moderate sensation .010 - .020 amp ______________________________Very Painful .020 - .030 amp ______________________________Unable to let go of the circuit .030 - .040 amp ______________________________Muscular Paralysis .040 - .060 amp ______________________________Breathing Difficulty .060 - .100 amp ______________________________Extreme Difficulty in Breathing .100 - .200 amp ______________________________Death: This range of current generally causes fibrillation of the heart. When the heart is in this condition it ceases to pump blood to the rest of the body.Current above 200 milliamps (.200)will often Cause the heart muscle to squeeze and Normal operation will continue when the current Is removed. This is the principle operation of a De-fibrillator. |
| BobbyN - Sunday, 04/10/05 20:07:58 EDT |
|
i want to make a bowl out of copper and i want to peen it out by hand, how should i start to make sure its comes out round and true |
| Jerry - Sunday, 04/10/05 20:09:59 EDT |
|
Hi I posted a couple of days ago concerning some very old tools I had but it looks like the Net - Nanny at the computer I was posting at wouldn't let it through, so I'm gonna re-post I have about twenty 100 year old French blacksmith's hammers and about 5 sets of tongs. The hammers have two faces; one is a specialized face. Theses special faces are different for every hammer. i.e. one hammer has an inwards sloping curve on one face while the other face is flat and has been hit many times. There is another hammer just like it except the curve is outwards -- it fits perfectly into the inward curve of the other hammer (for use with and anvil without hardy holes?) Most of the hammers special faces are in good shape, but the flat faces are very bad. The metal is all pushed down around the edges and is cracking. A farrier friend of mine once used a grinder to remove this same sort of folding and cracking off an old cold chisel. I used and angle grinder to cut this excess metal off the outside of one of the flat faces of one of the hammers. I then smoothed it out with more grinding, being careful not to take an more steel than was nescesary. When I looked closely at the place where I had removed the bad metal I noticed all these balck lines running horizontally through hammer head. Now I am wondering if it is possible to use these tools for smithing, see as I have few at the momment. I'm a real beginner so sorry if I've done something maddeningly wrong. Thanks for your time -- WL |
| Walker - Sunday, 04/10/05 20:55:33 EDT |
|
Ken, Guru, Thomas, Rich, HWoolridge, and everyone who responded with suggestions on making my forge work better. I have gone from not having enough heat to weld to having an absolute blast furnace. It turns out I wasn't allowing enough distance in the air/gas pipe to allow it to mix before it entered the forge chamber. After adjusting this and adjusting the gas/air I can now get my metal to a white heat easily. it also heats the pieces I am working on REALLY fast. Now I can get it hot and hit it hard!!! Thanks again. |
| Larry Reed - Sunday, 04/10/05 21:18:26 EDT |
|
Larry, Glad to hear that we got you going! Thanks for letting us know it worked out. Now that you're up and running, you can crank out a thing or two to sell to pay your CSI membership. This shameless plug brought to you by CSI, the support group of this great resource. |
| vicopper - Sunday, 04/10/05 21:29:15 EDT |
|
Walker, You may be seeing cracks in the hammer faces and you may or may not be able to grind enough away to get rid of them. The other possibility is that you are seeing weld lines where the heads were made up from smaller pieces. |
| - HWooldridge - Sunday, 04/10/05 21:59:49 EDT |
|
Jerry, To make a round shape come out perfectly round takes more than just a little bit of care. Here are a few things that will help to keep you on track: 1. Start with a *true* circular disc of copper. Lightly center punch and scribe the circumference with a pair of dividers, then cut it out and file to as perfect as you can. This is where it all starts. 2. Using the dividers, scribe a series of concentric circles on the disc, about 3/8" apart, from the center punch to the rim. These are the "course lines" for your hammering. Remember that the side that you scribe the lines on will be the *outside* of the bowl. If you start out hammering down the side with the marks, you won't be able to redo them when needed, as you won�t have the true center punch. 3. Start by *sinking* the bowl into a depression in a stump or into a sandbag, using a domed-face hammer, or the peen end of a ball peen hammer. For this part, just try to work in a pattern of overlapping blows starting at the center and circling around and around until you get to the rim. If the copper is work-hardened after this first course of sinking, anneal it and clean with pumice and water before starting the next course. 4. You can do several courses of sinking, but remember that you are stretching the metal when you are sinking. If you do too much, you will thin the copper too much. To avoid this problem, you need to switch to a technique called "raising", in which the metal is compressed and thickened. This is where the concentric scribed lines come into play. 5. Take the annealed and stretched bowl and place it upside down over a raising stake, mushroom stake, or even a sledge hammer head clamped in a vise. If using a sledge hammer head, be sure to grind any sharp corners down to a smooth radius. For optimum smoothing, it is best if the curvature of your stake pretty much approximates the curvature of the work. Now take a rubber mallet or rawhide mallet and beat the bowl until the little bumps are evened out pretty much. The term for this process is "bouging", from the French for bump. 6. Now, you start the actual raising. For this, you start at the first ring out from center and hold the bowl so that it is resting on the stake just about at center and the line is above the surface of the stake. Using a rounded hammer face, you strike the metal on the line, driving it down to the stake, but not compressing it between the hammer face and the stake. Continue all around the line with almost overlapping blows until you meet the place where you started. Now do the same thing with the next line out, and so on to the edge. 7. When you've reached the edge, it is time for bouging again, and then annealing. Then you do it all over again, and keep on doing it until the piece is the height you want. Note that I said "height" and not depth. As you are raising the piece, it will actually get smaller in diameter as it becomes taller. This is because you are compressing the metal into itself by this process. It is a slower version of what happens when a potter takes a clay plate and turns it up into a bowl. 8. If you use care to keep your hammer blows as consistent as possible, work to the concentric lines, and keep constantly checking your work, you should be able to raise a fairly smooth bowl. There is just one step left in the forming process. 9. The final step is called "planishing', where you put the bowl over a smooth mushroom stake and peen the surface using a flat-faced hammer. The hammer should be just heavy enough to allow you to barely compress the metal against the stake, resulting in a series of hammer marks that look like small overlapping fish scales. Again, you do this by working out from center, following your course lines. When finished, you are ready to polish it up and enjoy it. I hope this helps you. |
| vicopper - Sunday, 04/10/05 22:02:50 EDT |
|
Quenchcrack - Moles; there's a couple of solutions around my place. One is one of our house cats. Usually each summer he 'gifts' us with 3 to 5 moles that he catches. And during our dryer spells (July/August) another 3 to 5 drown in the in-ground pool while trying to get a drink of water. A clear and cool 5 deg Cel. North of the Lake (Ontario.) Don |
| Don Shears - Sunday, 04/10/05 22:20:48 EDT |
|
Walker, Sounds like what you have there are a set of handled top swedges. These are held on the work and hit with a hammer on the face which you have just ground down. You were right to grind off the mushrooming caused by their use ( probably hit by a striker with a sledge). They are usually used in conjunction with a matching bottom swedge which would have a tang on it to fit the hardy hole on an anvil. The mushrooming on the striking face is normal with continual use because this face is left soft so that it wont chip and send shards of steel flying thru the shop when struck. congratulations on your find. now alls you need is an anvil and a way to get the metal hot. hope this helps, Adam |
| lazarus - Sunday, 04/10/05 22:53:25 EDT |
|
Walkers hammers:-) Walker what you are describing sounds to me like a collection of top tools / swages / set tools. Whatever you call them, they are a tool that is struck, not a tool that does the striking. The workin end, the shapes, hollows and such is set on the metal and normally there is a corresponding bottom tool / hardie / swage that the metal is set in, the the other end is struck. The striking can cause so pretty serious cracking, especially if the body of the tool was wrought, or poor quality mild steel. The lines are very likely stress fracture due to excessive mushrooming of the striking head. If you care about the value of the tools, don't do anymore grinding on them. If you plan on using them, grind off anything that looks like it is likely to chip off, giving the striking end a rounded but still blocky appearance. Simple glossary of terms for tools. Bottom tool - a hardie, generally matched to a top tool. Top tool - any handled tool that is struck, generally matched to a bottom tool:-) Swage - a top or Bottom tool that has a negative impression of the desired shape of the finished metal. Fuller - A tool with a positive impression, often used to spread metal in one particular direction. Blacksmithing terms are pretty redundant, and consequently vague. A blacksmith could mean at least five different things when he says, "fuller"... A common terminology, however vague, still helps us understand each other:-) |
| Fionnbharr - Sunday, 04/10/05 23:11:42 EDT |
|
Ok, thanks for all the great advice I figured that the black lines were stress and that the hammers were meant to be struck, not to strike. It hadn't occured to me that the black lines might have been weld lines. Seeing how old the hammers are it makes since. It seems that I've got a good collection of top tools with a few swages and fullers thrown in for good measure. Unless of course the French make huge anvils, (might be the whole bigger is better thing) because the flat sides of the hammers are all hexagonal and about 2 - 2 1/2 inches across. One of the funny things is that if I remember correctly some of the flat sides are unmarred. In my previous post I forgot to mention that all the hammers are handled. Fionnbharr -- Thanks much for the explaination of the terms. I now know what to call most of the stuff I've got. However could you explain what you mean about the degradation of the tool value if I ground away the mushrooming steel. Also I just thought that you all might like to know that the brake drum firepot/forge plan is great and turns out an awesome little heat source(have melted some mild steel and made some arrowheads and other little stuff on my tiny >100 lbs anvil). Thanks for your continued patience and advice. Walker |
| Walker - Monday, 04/11/05 02:32:53 EDT |
|
Old Mushroomed Tools: Walker, If tools are collectable antiques you do not want to do any cleaning or grinding that removes the signs of age and past use. Even removing rust can destroy antique value. However, if tools are to be used you want to grind off the mushrooming entirely. Normaly the black lines are cracks from the mushrooming and should be "chased" by grinding until they are gone. BUT, if the tools are very old and made of wrought iron the lines may be the grain in the wrought. Many old tools were made from wrought iron with steel faces or cutting edges welded on. If this is the case these would be VERY old tools that would be better off in a collection rather than in use. Set tools or top tools are handled for an assistant to hold. A smith can use them alone but it is tricky. Besides shaped tools there are also "flatters" for dressing smooth surfaces. Although they look like hammers they are not, these are all struck tools. The variety of these tools can be almost infinite as they can be for forming shapes both positive and negative, punching holes and other tasks in every concievable size. Simple shapes like half rounds are often found in sets ranging from 1/4" (6 mm) up to several inches (50 - 75 mm) depending on the size work done in the shop. Punches can be round, square, rectangular and oval in many sizes. Smiths often made these as they were needed and over a lifetime would create a significant collection. |
| - guru - Monday, 04/11/05 03:02:04 EDT |
|
a question about anvils: Is a horn really nessary? Or is it nice to have but can be done with out. My first home made anvil is kinda stuck in the chalk marked for cut phaze. Also if anyone has any info on midevil anvils pls point me in that direction. I've done all the reading but still can't get the mental lay out right. |
| - Timex - Monday, 04/11/05 03:43:35 EDT |
|
Timex, horns are nice, but if you look at teh majority of the anvils thru out history most were hornless. You can make various stake tools to fill teh need of the horn. You can also severly round off a portion of your home made anvil to duplicate much of the horns functions. Remember the anvil is only a tool and as such you can design it to do only what you want it to. |
| Ralph - Monday, 04/11/05 05:41:26 EDT |
|
Timex: There are, of course, no photographs of medieval shops. What you have are paintings and prints. The anvils protrayed in them may or may not be authentic as the artist may have stylized them. Here also, various trades (blacksmith vs armoror) likely had different sizes and shapes of anvils. Technically medieval refers to the Middle Ages, generally considered to be about 1100 to 1450 or 1500 - pretty early in the game. |
| Ken Scharabok - Monday, 04/11/05 05:53:57 EDT |
|
Timex, I agree with Ralph. I have seen many anvils cut from heavy plate that wasted much of the material by trying to emulate a modern farrier's pattern anvil. You can loose HALF your mass that way. There is a drawing of a simple slab anvil such as Ralph described in our anvil series titled Making a good inexpensive anvil. Of the bottom three I would go with the drawing to the left using the pritichel hole on the center drawing. Drill the hole first to avoid the angular break through and hard flame cut steel garanteed to break a bit. THEN torch the notch under it. Note that the notch is cut at a 45° angle leaving the far corner supported. This article was to produce the best anvil at the least cost and effort. I recently had a young man from Canada send me photos of replica 17th - 18th century anvils he has built using plate and concrete. I do not reccomend this method but it will give you a lot of mass. He used 3/4" grader plate for the face then made sculptured ribs to support the face. Between the ribs there was rebar and the the sides were fitted with shaped 16 ga plate. After the whole was welded together it was filled with concrete. He did a very fine job and the finished anvil looked just like in Diderots. The problem with this design is under heavy blows the top plate is going to flex and damage the concrete. Once the concrete is loose it will no longer supports the face and any efficiency gained will be lost. The sound will also change from a "clunk" to a hollow "clack" when struck. Now if the top plate were 2 inches or more thick and supported as above it would hold up quite well. Eventualy the concrete is still going to shrink. But with this thick a plate you would not notice. |
| - guru - Monday, 04/11/05 06:24:44 EDT |
|
ptpiddler: Please contact me as I cannot get the direct e-mail to work. I use leaf and coil springs in some of my items and cannot find a local supply - even junk yards. You mentioned you have access to a quantity of them. Perhaps we can work a deal for purchase and shipping. |
| Ken Scharabok - Monday, 04/11/05 07:13:12 EDT |
|
Timex: Some information on early medieval blacksmithing is posted at: http://members.ttlc.net/~tyrell/Viking1.htm; including some illustrations of Viking period anvils. Our current working theory is that most of the heavy, hot work was done on stone anvils (basalt preferred), and the finishing work was done on the smaller (sometimes very small) metal anvil. I've been collecting illustrations and information on early medieval anvils for years, and if I enumerated all that I know of, I doubt that I would run out of fingers and toes. Block anvils, stake anvils, occasional blocks with a small bick; that pretty much sums it up. Simple tools for wonderful work; it�s amazing what time, talent, and a large labor pool can accomplish! ;-) Sunny and low 60s on the banks of the Potomac. Visit your National Parks: www.nps.gov Go viking: www.longshipco.org |
| Bruce Blackistone (Atli) - Monday, 04/11/05 08:25:06 EDT |
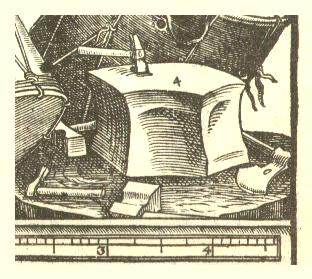 EARLY Anvils: As Atli pointed out there is darn little known about early anvils. Few were illustrated clearly and less survived. The image to the left is from Syntagma Musicum II De Organographia 1619, by Michael Praetorius. The illustration is of a anvil used in an orchestra. It is probably considerably older than the publication date (50 to 100 years). Note the scale in feet at the bottom of the drawing. EARLY Anvils: As Atli pointed out there is darn little known about early anvils. Few were illustrated clearly and less survived. The image to the left is from Syntagma Musicum II De Organographia 1619, by Michael Praetorius. The illustration is of a anvil used in an orchestra. It is probably considerably older than the publication date (50 to 100 years). Note the scale in feet at the bottom of the drawing. This image is from De Re Metallica, by Geoggius Agricola, 1556. Again, the anvil is probably older than the illustration. You can see the simularities of the two anvils. They are actualy pretty large but this is in the 16th and 17th centuries. Iron was starting to become plentiful in Europe as industrialization had been going on for about 300 years. The boat shape of six sided anvil was fairly commom. This image is from De Re Metallica, by Geoggius Agricola, 1556. Again, the anvil is probably older than the illustration. You can see the simularities of the two anvils. They are actualy pretty large but this is in the 16th and 17th centuries. Iron was starting to become plentiful in Europe as industrialization had been going on for about 300 years. The boat shape of six sided anvil was fairly commom. 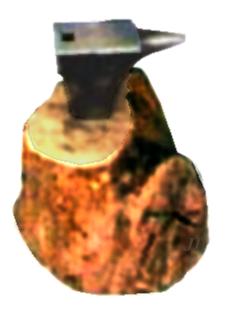 This little portable anvil has a face that is only about 2 x 4" and might weigh 15-20 lbs with the stake. This is a reproduction from an early viking find (Alti may have details). The shape is roughly similar to a Bronze Age anvil (small, stubby horn, heavy stake). A village smithy may have had one double this size and an established city (or castle) smith might have had one double that. Even so you are only talking about about 100 pounds for a very large expensive anvil of the era. This little portable anvil has a face that is only about 2 x 4" and might weigh 15-20 lbs with the stake. This is a reproduction from an early viking find (Alti may have details). The shape is roughly similar to a Bronze Age anvil (small, stubby horn, heavy stake). A village smithy may have had one double this size and an established city (or castle) smith might have had one double that. Even so you are only talking about about 100 pounds for a very large expensive anvil of the era.Since almost all anvils were one-offs or custom made to spec at this time you cannot make absolute statements about anything during this era. |
| - guru - Monday, 04/11/05 09:51:18 EDT |
|
i just ordered some stainless rod, i think it was the 316. will this spall when i put it in a kiln at temps up to 1500? should i have ordered the 304 stainless |
| lori - Monday, 04/11/05 10:16:54 EDT |
|
Lori: Perhaps you meant 312-16. I use it on a regular basis and have not seen any deterioration even after being heat at higher than 1500 degrees. You do need to watch out for flying flux as the bead cools as it really pops off. |
| Ken Scharabok - Monday, 04/11/05 10:33:50 EDT |
|
Timex. A horn is not essential - you can use with a bick for bending and scrolling operatations. However, it is important to have part of the anvil face shaped in a broad, convex curve. This is very useful for various drawing operations. If you look at old hornless anvils they all had at least part of the face shaped this way. This should be easy to form with the grinder. |
| adam - Monday, 04/11/05 10:45:23 EDT |
|
Adam, anvils also can "mushroom" to that broad curve over generations of use. The Romano-Celtic anvil in Bath looks to have started flat and worked to a lovely mushroom shaped curve over a long time of use. "Cathedral Forge and Waterwheel", Gies & Gies, has a couple of medieval anvil illuminations in it. Thomas |
| Thomas P - Monday, 04/11/05 10:58:10 EDT |
|
Lori, If we knew what your intended use is for the 316 SS rod, e could perhaps tell you something. You haven't even told us whether this is bare rod or coated electrode. Without more information, I can't tell you much except that 316 is a fairly common alloy for welding rod, both bare and coated. The alloy itself will be fine at temperatures in excess of 1500 degrees. What YOU do with it may alter that drastically. Tell us more. |
| vicopper - Monday, 04/11/05 12:03:21 EDT |
|
Old Anvil Shapes: Good hammer dies and well dressed anvils have the same shape in common, nice soft edges like a well worn anvil. Old anvils that have been used but not abused develop nice soft edges. Power hammer dies for drawing have specific radii (actualy a segment of an oval) ground on them. Ancient anvils got that way faster due to softer steels and dead soft wrought iron bodies. They also mushroomed considerably. These tend to get swayed and develope a surface reminicient to snow blending in an uneven surface. However, to the best of my knowledge they started out flat, and probably had too sharp of corners like people keep on modern anvils. . . |
| - guru - Monday, 04/11/05 12:08:11 EDT |
|
To the best of my recollection, the -15 and -16 suffix number on stainless alloy welding electrodes refers only to the flux composition, and therefore, whether it is used with AC or DC. Feel free to pounce if I'm wrong on that. |
| 3dogs - Monday, 04/11/05 12:47:26 EDT |
|
Addendum: I believe -16 is for AC, but both can run on DC. |
| 3dogs - Monday, 04/11/05 12:49:51 EDT |
|
Guru, It occurred to me that most people could not have easily dressed the corners of a fresh factory anvil to soften them because there were no right angle grinders and files would not cut it (pardon the pun). In that regard, we are fortunate to be able to dress sharp edges without much trouble. |
| - HWooldridge - Monday, 04/11/05 13:20:02 EDT |
|
moles: you really dont have to seal all the burrows. CO kills even when 02 is present. This is the preferred method for gophers in my area |
| adam - Monday, 04/11/05 13:43:25 EDT |
|
Ok well I'l see if I can figure out whether or not the black lines are stress or welds. The guy I bought the hammers off of is in France and currently I reside in Canada. And I guess I'll have to go hunting for some tools I can acutally USE. Thanks again Walker |
| - Walker - Monday, 04/11/05 14:42:06 EDT |
|
thank you for the links about anvils and the posted drawings, it helped alot. I'm not realy worried about goofing up, I've got four big blocks to work with. I just wanted to make the most cost eff( time and labor vs usability ).Plus I feel that any good Smithy puts his name on the line every time he makes some thing. Thus I should make the best of what ever I make, even anvils. Thanks again |
| - Timex - Monday, 04/11/05 14:44:58 EDT |
|
Dressing Anvils: HW, There is no way to be sure but I suspect that old anvils had reasonably dressed edges from the maker, at least when the face was ground. I've got detailed anvil drawings from the 1930's that show specific radii and even call for the sides of the anvil to be finished a certain distance from the top. The radiusing was all called out to be done with a file before the anvil was hardened. Then there is always a large hand stone. . . And although not as round as I like them I have seen MINT Peter Wrights and Mouse hole anvils that did not have a mark on them that had smoothly rounded edges. I assume they were the factory edges. I think the razor sharp edges on modern anvils are a new trend in factory dressing (or not dressing) resulting from machining the faces, labor costs, and knowing the user can grind it themselves. |
| - guru - Monday, 04/11/05 15:00:46 EDT |
|
Timex, NOW I remember, you got that good deal on those hunks of steel. . . I would try to preserve as much steel as possible. If you want a horn find a chunk of something and make a cone and weld it to the side of the block. A lot of the lesser well made English anvils were quite blocky with the feet just barely pinched out and a stubby horn added on. One thing you can do with a rectangular block to make it look nice as a tool is to cut heavy chamfers on the corners of the sides. There are two styles that work nice. Long curved chamfers that give the effect of the whole having a waist, or straight chamfers that stop some distance from the face and foot to create an old fasioned wood molding appearance. Both give the block a waist and dress it up. How good it looks is dependent on how well you do the job, not so much what the design is. |
| - guru - Monday, 04/11/05 15:10:07 EDT |
|
Ken: I have a lot of leaf spring and quite a bit of coil. If it's worth it to you to ship it from NM, you are welcome. |
| adam - Monday, 04/11/05 17:08:16 EDT |
|
Ken -where are you located- I might be out by the spring place in the next few weeks- How much do you want- do you want whole springs or short ends that will fit in a flat rate box- up to 70 lbs --anywhere in US for $7.70 |
| - ptpiddler - Monday, 04/11/05 18:27:29 EDT |
|
Adam & Ptpiddler: Leaf spring and coil spring cut to fit in a priority mail box would be great. I cut coil spring into half loop sections. I am certainly willing to pay for the service. You can contact me directly at scharabo@aol.com. Guru: On anvils, there is one on eBay now (#6170171974) listed as a wheelwright anvil. If so, first one I have seen. Problem is the curve would only fit one size rim unless it was intended as a swage rather than a full former. |
| Ken Scharabok - Monday, 04/11/05 19:28:57 EDT |
|
Ken, That's a new one on me, too. Looks like it was probably intended to be a swage, but it's hard to be sure. |
| Paw Paw - Monday, 04/11/05 19:34:57 EDT |
|
Cats and moles: Uh....I think I prefer the moles to the cats. Now, don't mis-understand, I like cats. I could just never eat a whole one. As soon as it quits raining, I may try the CO idea. Just need to rig up a hose that will not create too much back pressure on my exhaust system. |
| quenchcrack - Monday, 04/11/05 19:52:50 EDT |
|
JERRY Re the round copper bowl, you got good advice from Vicopper, but let me add additional. First: Work in the basement directly under where your wife is. Second: Keep up the Tap,Tap,Tap,Tap,Tap,Tap,Tap,Tap,Tap,Tap,und so weiter until you look up and find your wife standing behind you with bedding for you to use in the basement that night. Been there-Done that. |
| - J.Myers - Monday, 04/11/05 20:02:23 EDT |
|
Ken, I dunno about that being a wheelwright's anvil. Looks to me like the radius of the curvature is about 3+ feet, so it would fit a 6 foot diameter wheel, something I've never seen on a wagon. I wold think that a regular old tire roller would be much handier and far sturdier than that so-called anvil. It looks as though those extended wings would break right off if you tried to actually use it as an anvil. Of course, I'm not a wheelwright; the closest I've ever come was making a couple of wheels for my bush mower. They were only 1/2" x 2" flat bar and I was smacking them right soundly to get the curvature I wanted. I think I would have busted that little thing on about the second blow. |
| vicopper - Monday, 04/11/05 21:53:50 EDT |
|
Jerry, J. Myers reminds me that I left out a crucial piece of advice about raising work. Wear hearing protection! That repetitive noise will damage your hearing permanently. I know, I wear hearing aids now because of that ond other noises. Get a set of earmuffs and wear them. They're waaaay cheaper than even one hearing aid. 'Bout a thousand bucks cheaper, as a matter of fact. Guess how I know that? |
| vicopper - Monday, 04/11/05 21:57:49 EDT |
|
vicopper, have you forgotten about teh old Borax waggons? If I remember correctly the rear wheels were about 8 foot tall and were 9 inches wide. |
| Ralph - Monday, 04/11/05 22:24:27 EDT |
|
I'm looking for a list of common carbon steels that explains the differences and strengths of each kind. I know it is fairly subjective, but things like which one is good for knives, which one is good for hot punches, which one wears well, etc. Thanks. |
| Eide - Monday, 04/11/05 23:20:33 EDT |
|
There are easier ways to make a tire round. That thing looks like its cast to me, and I'd bet it's a standoff of some sort. |
| JimG - Tuesday, 04/12/05 00:04:26 EDT |
|
Eide, sounds like you need to invest in a Machinery's Handbook. It will have much onfo you are looking for. Might also look into getting a copy of The COmplete Bladesmith by Jim Hrisoulas. Jim goes into metal selection pretty well in it. |
| Ralph - Tuesday, 04/12/05 01:06:35 EDT |
|
Quenchcrack: Here is hopeing you have a pre-90's vehicle for co production. Most modern feedback fuel systems produce very little co, mostly co2. Denver had 180+ days of co violations in 1970, and no EPA violations for CO in the last 3+ years, 90% of that due to improvement in Fuel/Air mixture control. Use the garden tractor. |
| Habu - Tuesday, 04/12/05 01:08:14 EDT |
|
I was just wondering -- I've got a few pieces of typewriter guide bar that are either nickel plated or stainless steel, so while I'm waiting for the file marks I made to rust so I can tell, I wanted to know... is it safe to forge nickel-plated steel? I think nickel has a higher melting point than steel, but I dunno if it powders and gets suspended in the air when you hit it or not. Suggestions are welcome. |
| T. Gold - Tuesday, 04/12/05 01:12:40 EDT |
|
Howdy, I cannot help laughing at the Dungeons and Dragons comments in the FAQ and other questions. You guys have your target market pegged. Anyhow I have been interested in Blacksmithing every since my father and I took a propane torch and leaf spring from an old abandoned car and made a really terrible short sword from it. After watching the discovery channel and seeing an American blacksmith literally take the raw materials from a river and make his own ingots, then eventually a sword, I was hooked, especially hearing what a good handcrafted sword can sell for, functional or decorative. Anyways I cook for a living and am interested more in being able to make my own cooking knives. I was looking on Ebay for anvils and tools and realized I didn't know jack so any advice I could get on how to start out with knifemaking would be appreciated. I am particularly interested in the fabrication of Japanese style kitchen blades. Thanks in advance. |
| Chef - Tuesday, 04/12/05 01:13:58 EDT |
|
Chef, Kitchen knifes, Most japanese cooking knifes look similer to european but differ in that they like to take a high grade blade and cup it with a softer metal( kinda like a taco ) and forge weild them together. Euro or american style tends to have a single type metal with high temper in the leading edge with a softer back to the blade. Both have advantages and disadvantages. But if you want a down and dirty high end cooking knife go get a beat up old file, detemper, grind the teeth off, shape and polish, retemper. Wham bam here a kitchen knife mam. Another way( for bigger or longer Blades) is to cut a hard draw pipe, flatten, shape, grind , and polish. Some thing to rember sharpning is the verrry last step and is not( ouch ) to be done before the handle is done. Since you work as a cook how about some cookies, some MOLE cookies. |
| - Timex - Tuesday, 04/12/05 03:10:09 EDT |
|
Guru: The third anvil you show above is similar to what Postman thought might be a portable ship's anvil in Anvils in America. I suspect most wood warship and such carried a blacksmith and some type of anvil. Mutiny of the Bounty (Nordhoff & Hall) is really part of a trilogy. Men Against the Sea details Bligh's voyage in the ship's launch. Pitcairn's Island details what likely happened to the mutineers. It notes one of them was a blacksmith who set up a small forge on the island. I won't ruin story, but it wasn't exactly a case of living in a tropical paradise for them. If anyone has been on the U.S.S. Constitution in Boston, does it have a blacksmithing shop? |
| Ken Scharabok - Tuesday, 04/12/05 09:08:23 EDT |
|
Ken, I don't remember a blacksmith at the Constitution, but if you're looking for a shipyard blacksmith, check out Mystic Seaport. They have an active shop there with lots of knowledge to pass on. |
| - Marc - Tuesday, 04/12/05 09:27:39 EDT |
|
Greetings, I recently lucked out and won myself a very old Champion forge blower at an auction and now I have a bit of a problem. I have absolutely no idea what kind of oil I should use for the thing. I don't know if it will make much difference but it has a raised 400 on the fan shroud (series number?). Help is much appreciated because I wouldn't want my luck to wear in half in a month. |
| Anthony - Tuesday, 04/12/05 09:58:30 EDT |
|
Ebay wheelwright anvil? I don't think it is an anvil. It looks more like some kind of support for a big tank, boiler or something like that. A standoff as JimG noted. It is too lighly supported to be an anvil. If someone can show me a tool catalog with one in it I will eat my words but that thing is an industrial bracket, NOT an anvil. Wheelwright tire swages were made but they were long HEAVY blocks like a swage block at least 4" thick. Usualy the curve was a slot with heavy edges to strengthen the block. I have seen several of these up to three or four feet long. I have also seen old swage block with sides curved for similar purpose. I do not think they were for creating the curve but possibly taking out kinks and dressing welds. When on a swage block it is for universal use. I find these areas great for cold bending curves. |
| - guru - Tuesday, 04/12/05 10:07:20 EDT |
|
Champion 400 Blower: Anthony, anything from SAE 30, 10W40 or 80 weight gear oil. The important thing is to keep it OILED! This was one of the best blowers made but it has no oil seals. You oil it from the top daily. Note that gear oil should only be used in worn blowers in hot climates as it can make the blower hard to crank. |
| - guru - Tuesday, 04/12/05 10:13:29 EDT |
|
Knife Making: Chef, See the reference list on our Swordmaking FAQ. See our reviews of the reverences listed. Avoid buying anvils on ebay unless you really know your anvils. ebay is flooded with what we call ASO's (Anvil shapped objects). These are cheap cast iron anvils that are being made in China as fast as they can for the ebay market. They are always misrepresented as "professional" and "heat treated steel". It is all lies and by the time you have paid for the non-refundable shipping in two directions you are screwed even if you get the puirchase price back. |
| - guru - Tuesday, 04/12/05 10:20:05 EDT |
|
Marc: I was just wondering if there was a room or something aboard the U.S.S. Constitution which constituted a smithy. If so, why type of anvil it might of had. Perhaps the ship isn't furbished. If you can wade through Moby Dick, they had a blacksmith aboard for making harpoon tips and such. Wonder what a blacksmith (or cook for that matter) would have used for fuel? Whalers were out for long periods (years sometimes) with few port stops. |
| Ken Scharabok - Tuesday, 04/12/05 11:35:46 EDT |
|
Hi, I'd like to know how to be on your "links" here at anvilfire and I'll be putting a link to your site through mine of course. When I enetered the "join" section it asks me for not only my site URL but my ID# and password. Why? Is there no other way to be linked? I've built my own website, but have a lot to learn. However, I thought that giving my password for publishing to my ftp was a "no, not ever" kind of thing for everyone...Please help. Find a link to anvilfire.com at www.owleyeforge.com/hotiron.html Thanks for help, Cynthia ;email- owleyeforge@yahoo.com |
| Cynthia - Tuesday, 04/12/05 11:55:04 EDT |
|
Blower oiling: I finally settled on chain lube since it seems to stay put a bit better than other oils. I take the top of the 400 and squirt a bit all over the inside of the case and on the gears. The 400 always weeps a bit at the bearing caps but some will stick to the working parts. Ken, I always liked Melville - thought he wrote a good story - read "Billy Budd" sometime. I have read that most sailing ships carried wood for cooking purposes (whalers sometimes burnt oil). Blacksmithing was probably not a daily task but only done when needed so they either used charcoal gleaned from the cook, made their own or used wood. |
| - HWooldridge - Tuesday, 04/12/05 11:59:22 EDT |
|
Woops, I gave you the wrong address to see your link. It's this...www.owleyeforge.com/links.html This is NOT intended to be an advertisement for my site, I'm just unsure of how to be linked from anvilfire and I'm letting you know this is in good faith. Thanks again, Cynthi |
| Cynthia - Tuesday, 04/12/05 12:07:53 EDT |
|
Cynthia, Apparently you are new to doing business on the web. Many places require logins and passwords. Most allow you to choose your own password. Most people have several using a "high security" password for banking and critical access and a lower security password for non-critical logins. I try to use the same in as many places as possible but that is not always possible or wise so I have several. Our links are rather selective to resources of interest or to old friends. When we started we had no real policy and today it is mixed. I have not added sites to the link list in over a year. We have had a lot of trouble with personal sites that dissapear and end up being links to porn sites or link traps. We currently have a policy on new links that we do not accept sites with pop-up ad windows and commercial sites should have their own URL. Commercial sites selling thing to blacksmiths should consider an advertising account. JOIN 1: We also have webrings which are a sort of link list. However, you must install the webring nav-bar on your page. Many people proudly do so. We have a no pop-up policy on the web rings. When you register you make up your own ID and password for that purpose. Currently I prefer the Webrings to the link list because it is managed with a database system and is much easier to keep up. JOIN 2: There is also registering for the Slack-Tub Pub. It has nothing to with links, it is our chat. You make up an ID and password for that purpose. Note that I am several months behind in setting up registrations. . . ;( JOIN 3: Then we have CyberSmiths International. That is our non-profit support group. Dues are $52 USD/year. It also requires a login and password. We use the same as for the Pub so they work in both places. If you are not registered for the pub I setup both at the same time. If you use the on-line registration form we wait until we have the dues before setting up the account. |
| - guru - Tuesday, 04/12/05 12:31:21 EDT |
|
Mousehole Forge is thought to be the oldest of the English anvil production forges and only dates (according to Postman's book on it) to the very early 1800s - possibly going back into the late 1700s. Very large sailing ships were used prior to that and they must of had something on board to serve as an anvil. Purchased from Sweden perhaps? |
| Ken Scharabok - Tuesday, 04/12/05 12:33:03 EDT |
|
Ships Smiths: I have been told that on sailing ships where the smith was rarely needed his tools were kept packed in a barrel full of oil or wraped in oiled rags sealed in a barrel. On ships that had a permanent smithy it was often in the very tight space up in the bow of the ship (not sure why). Most tours of old sailing ships would not take you there. |
| - guru - Tuesday, 04/12/05 12:39:48 EDT |
|
I'm interested in doing a Japanese-style heat-treating technique on some of the swords I forged. I tried once with a mixture of good clay and sodium hydroxide. I wrapped wire around the clay to re-enforce it. I put it in my forge and allowed it to slowly come to tempature. My main problem is that it doesn't heat quite evenly, so i have to move it around to make it all one color of red, but when i do that, the clay cracks. How do you suggest that I do it. Should I use plaster instead of clay, or should I just put on a REALLY thick layer. Unfortunatly I haven't been able to find any refractory cement, but I thought about using a casting investment like plaster. I have only made one attempt at Japanese style heat treating, which failed, so I'm kind of new. Also how would I flux the exposed edge of the sword? Would I heat up a metal spike, and dip it in flux, and then apply it to the sword? When I tried to heat treat last time, The unprotected edge was extremely irregular when it came out of the forge, and I had to file for hours. as a result, the edge was wavy, because some areas required more filing than others. If you could give me some hints, that would save me a lot of trial-and-error time. Thanks |
| Eric - Tuesday, 04/12/05 12:59:51 EDT |
|
Thank you guru, you are a patient fellow! I'll sign up for CyberSmiths as soon as possible. Sounds great and is more than worth the fee. meanwhile if I can figure out the webring I'd be happy to to have the nav-bar on my page. My site is clean and my hand forged items are all I sell there. thanks again, Cynthia |
| Cynthia - Tuesday, 04/12/05 13:16:36 EDT |
|
i want to become a blacksmith, how should i go about on starting this journey?? |
| Joe - Tuesday, 04/12/05 13:17:07 EDT |
|
Eric, a lot of the trick is the clay and its consistancy and proper application. Heating is a trick and was done in long trough forges so that the blade can be moved easily. Refractoy cement is not recommended and plaster must be calcined to take the heat. In the process it will shrink and crack. There are books that cover the details (see our sword making FAQ resources list). I would also suggest one of the blade forums for this detailed of question. |
| - guru - Tuesday, 04/12/05 13:20:26 EDT |
|
thanks, i will do that. |
| Eric - Tuesday, 04/12/05 13:22:02 EDT |
|
Joe, see the Getting Started link at the top and bottom of this page and on our home page. We recommend many books and I cannot impress stongly enough that you STUDY (not just read) them. Without the background knowledge and lingo you cannot even ask an intellegent question in any field. Starting with the books will also help you sort the facts from much of the fiction you will find on the web. We have several recommended book lists and many of the books are reviewed on our book review page. Just going through ALL our reviews will teach you quite a bit. Then you will need to collect tools and. . well it is all covered in our Getting Started article and those it links to. |
| - guru - Tuesday, 04/12/05 13:28:46 EDT |
|
Duh.... how is it that I register in order to provide the "site ID" and "password" for the Blacksmiths' Ring? Is that done through the Slack-Tub Pub registration also or no? When looking through the Blacksmiths' Ring I couldn't find anyplace to register, but it could just be me. I definately AM new to doing business on the web, but I'm working at it ; ) Cynthia |
| Cynthia - Tuesday, 04/12/05 13:37:56 EDT |
|
Wow, Our getting started article has been viewed over 128,000 times. . . The Blacksmiths ring nav-bar has a JOIN link which takes you to the Blacksmiths Ring home page where the rules and such are. On the menu to the right there is a JOIN link. Fill in the form. You make up the site ID and password. The ID is the site code the ring uses as your database identifier. A short number, your initials or first name will work fine. "owleye" would be goog. The system will mail you code to insert on your page. Then write to me and I will put you on the ring if I find your page in good order. Everybody on the rings forgets their password so they just write to me to make changes or reminde them of their password. . . |
| - guru - Tuesday, 04/12/05 14:05:24 EDT |
|
T Gold, Test the bars witn a magnet; if non magnetic it's stainless, though some stainless is magnetic. Nickel plating won't harm you; we use nickel sheet in making damascus, but I suspect the bars are chrome plated mild steel. |
| - Ron Childers - Tuesday, 04/12/05 14:30:38 EDT |
|
Ken before a "production shop" you would go to a local smith and say " want an anvil" and then they would weld up one for you---considering that Port smithies would be doing large items like anchors, welding up an anvil might be a "small job". Mousehole was one of the first forges that specialized in anvils and did very little else. The try works on a whaler burnt the pressed leavings of the blubber. While a whaler's cruise may be for several years they would stop at various locations to stock up on things like food and water and wood. I read "The Cruise of the Cachalot" once which is a description of life on a whaler without the "literature aspects". Thomas |
| Thomas P - Tuesday, 04/12/05 15:25:36 EDT |
|
Ron, thanks. I thought it might be nickel because they're slightly yellowish. Might just be oil. I'll check it out. |
| T. Gold - Tuesday, 04/12/05 16:10:41 EDT |
|
Thomas P: Thank you. Hadn't occurred to me if a shipyard could forge up fairly large and heavy anchors they would make up something to serve as an anvil. Suspect shape was much like what Postman called a Colonial-era. |
| Ken Scharabok - Tuesday, 04/12/05 16:17:05 EDT |
|
T. Gold. If the plate has a slight golden cast it may be "aladined" (SP?) which was a replacement for the dreaded cadimium plate, and some of the cad plate has a yellow tint as well. In a typewriter, I would suspect a plate, and if it was old I would strongly suspect cad. Cad is not a plate to put in the forge as it is very toxic. If I had suspect cad plate, I would not forge, but would send to scrap or use as is. |
| ptree - Tuesday, 04/12/05 16:54:09 EDT |
|
Personal Small business Web Sites I just finished responding to two people that expect their web sites to put them into business. Sadly they will not. I am going to add the following to our website FAQ but wanted to put it here as well. Individual websites are nothing more than specs of sand on the information super highway. Just because you are there does not mean you will be found. I have two web sites that are beautiful and meet all the SEO (Search Engine Optimization) rules but have only gotten 1000 and 450 hits in two years. One is #2 on google in its expected category! To get more traffic and make sales I will have to spend money and advertise. I will need to put ads in the New York Times, Los Angles Tribune, Washington Post and on specialized well known websites to sell this product. This is not a surprise to me, it was expected from the beginning. When I DO spend the advertising money it will be less than it would have been otherwise because I can send people to the website, which is the REAL ad. The website is just one tool among many. If you are a UNIQUE resource and your web site is very good then that may be all you need. But as a blacksmith you are competing against 15,000 other blacksmiths worldwide who in turn are competing against big retailers that spend millions on advertising. If you are not in the top 3 to 10 then the web is not going to produce significant trafic. And even then the site itself and the product must be first class. A high level of professionalizm is required to make significant sales from a website. Professional photos, professional copy, professional site design, search engine optimization AND advertising. It is all part of doing business. Building a website is a craft like any other. Almost anyone can put together a website but very few can put together a profitable one. THAT is an art. Your website is just one small part of your business. It CAN be as important as any other. It CAN generate a lot of sales. But you cannot rely on it to suddenly make your business on its own. Anvilfire's advertisers spend money here because we provide them with clients that buy their products. They profit greatly from what they spend here. We are the RIGHT place for them. However, it would do them no good to advertise on a gormet cooking site. They may get traffic but not people that buy blacksmiths tools. Its the same way with your web site. |
| - guru - Tuesday, 04/12/05 17:14:59 EDT |
|
greetings from over the pond! first posting so please bear with me. I've been 'lurking' here for a while now, spending a fair while reading up on all the info, and as a result have finaly finished (bar the spray painting!) a lovely little freon tank melting forge. I fired her up and she worked! big :) im now stuck however because my lining is Kaowool then dense castable refractory. I kept hearing about ITC 100 and how good it is so I made it assuming I could get some in the U.K. to paint over the dense castable and thus drop my heat up time. Is there anyone else from the U.K. who can put me in touch with a U.K. Supplier or a similar product, I went to a 'sort of' local supplier ( Leeds about 15 miles away) for the castable and got a 'eh?' when I asked about the ITC 100. Any pointers would be VERY welcome. P.S. cracking site |
| Ian - The Tinker - Tuesday, 04/12/05 17:38:57 EDT |
|
Ian: I get my castable Mizzou from ANH Refractories (www.anh.com) here in the US and I notice they list a UK branch Harbison-Walker Refractories Limited Dock Road South Bromborough, Wirral CH 62 4SP England Contact: Alec Bowden Phone: 44 151-6415900 Fax: 44 151-6415910 I dont think they sell ITC 100 but it may be a good place to start asking - they will know who else is in the business |
| adam - Tuesday, 04/12/05 18:16:26 EDT |
|
Anvil Makers: Mousehole was the first big factory but prior to that there were small shops that made anvils. What Mousehole and Peter Wright and a few others had was the huge British export market during the the British colonial era. Without that they would not have existed. A small shop with skilled workers could easily make an anvil in the wrought iron era. No big trip hammer was needed. Just a team of strikers. The biggest tool needed was the grinder. In making large wrought iron objects you start with as big a lump as you get to welding heat. Other forges are used to heat smaller pieces to add to the big one. Once you start you do not stop. Small pieces are added to develope the shape and the whole reheated as soon as it gets below welding heat. Conserving the heat makes for short times in the forge so more can be added. The shape is constantly defined with each heat until the piece is finished. Then with the last heat the strikes finalize the shape using flaters and fullers and finaly hand hammers. The team of strikers working until the piece is finished. Then a last heat was taken on the top of the anvil and it was quenched. To handle the anvil a jib crane was ocassinaly used. The anvil forge was like a fireplace and the anvil worked at floor level. But it was supported by the faggot forges that heated bundels of rods and slabs to add to the anvil. If you look at the 17th and 18th Century anvils in Diderots many show the component slabs of merchant bar they were built up from. You will also note that no two anvils looked alike of the dozens shown and none looked like English anvils of the period. In Europe all the makers were small and regional and made different styles. |
| - guru - Tuesday, 04/12/05 18:18:40 EDT |
|
Ken Scharabok- Ship's Anvil I just posted a picture of the vise and a small anvil off the Bounty. The anvil looks quite small and was probably not the main anvil, since they had a substantial post vise. These items are located in the naval museum in Virginia around Newport News (I can't remember the name of the museum). They also have a replica of the Monitor and some recently recovered parts of that vessel. Worth seeing if you are in the area. |
| DonS - Tuesday, 04/12/05 18:23:24 EDT |
|
Ken, As fer smithy's on modern day Steel ships. Almost all modern ships have a metal shop on board with an asortment of metal working tools. The USS Independance ( aircraft carrier I was on ) had two. One for the general up keep of the ships requirements( snipes ally ) and the other for the repair of high end equipment like jet engines and such(mech's wreck). Both had the tools for heating and working heated metals. ( Hot's ). But had more tools for cold working. The US Navy even has a job rating for metal workers and two more seperate rates within that.(hull tech and boiler tech.) Guru's little room up front ( fore ) in the boat is called the Bosan's Locker and is named after the Boatsans mate(the guy incharge of the general up keep of the ship) go alittle farther forward and it becomes the Foscastle( sails chains, and on the wooden ships the bathroom[ thats why its called going a head or to the Head "Keep the wind at your back"] |
| - Timex - Tuesday, 04/12/05 18:25:43 EDT |
|
Adam, thanks for the help, ive added them to my list of 'try ringing in the morning'. Would I be right in assuming that the most important thing about the coating is its Infra Red reflecting capabilities? I could ask them about it but i've an awful feeling that I'd get another 'eh?' from the sales bod, if I hit them with science :) |
| Ian - The Tinker - Tuesday, 04/12/05 18:26:57 EDT |
|
DonS: When I was in the Navy we made a port visit to Portsmith, England. Went to the Naval Museum there. First item in is the launch used by Capt. Bligh. Don't know what it was at the time - or rather the significance of it. His voyage with part of the Bounty's crew is still consider to be a major feat of seamanship on his part. |
| Ken Scharabok - Tuesday, 04/12/05 18:55:27 EDT |
|
Hi ken, please don't take offence but its Portsmouth, been to the museum myself, they still have Bligh's launch :) |
| Ian - The Tinker - Tuesday, 04/12/05 19:10:01 EDT |
|
I and my brother are just getting into blacksmithing. We want to set up a good forge so we can start learning. We are thinking about getting a ready made forge from centaurforge.com, instead of putting more money into our brake drum forge. We like this one this one http://centaurforge.com/forge202101.html would this be able to withstand heavy use? After adding up the cost of fire bowl, blower, and hood, we figured this was a good deal. Thanks for any info! |
| Stu - Tuesday, 04/12/05 19:32:09 EDT |
|
Habu, sadly, I own a 2004 Toyota Tundra with the 4.7L V8. Very clean, very quiet. And thirsty. And, I do remember the Denver Area in the 70's. I was born there but left in 1974. The day we left town, you could not see downtown from I70. It is much improved today. |
| quenchcrack - Tuesday, 04/12/05 19:32:44 EDT |
|
Ian yes. A pint will usually do 2 or three small forges. You mebbe could order from Anvilfire Store if they ship overseas. Shipping wouldnt be too much on a pint. |
| adam - Tuesday, 04/12/05 19:34:57 EDT |
|
Anvil Info Please: I was lucky enough to get myself another anvil today and was wondering what you fine folks could tell me about it. I believe it is a carriage makers anvil as it is a London pattern with the addition of a small 2 by 3in horn on the left side below the face. Old wrought anvil with obvious forge welds at all 4 feet the horn and heel as well as the 1/2 steel plate on the face. Solid bottom, stamped 1 1 0 english wt system and the only other markings are the word Green (maker?) on the right side and a single number 6 (type?)on the front center feet. I have only seen two others like this. Average wear, minor chipping right side as usual, nice and straight top. My guess is 1840-50's English. Is it a little more valuable since it is an oddball? Never heard of Green as a maker. |
| - RC - Tuesday, 04/12/05 19:39:55 EDT |
|
I am considering blacksmithing a retirement income source, what would be the physical limiting factors in thiss feild? |
| Mark - Tuesday, 04/12/05 19:46:48 EDT |
|
RC: Green is listed on page 68 of Postman's Anvils in America. He said it was made in Greenwick. Many of these odd-ball British anvils date from about the mid 1800s. |
| Ken Scharabok - Tuesday, 04/12/05 20:26:46 EDT |
|
Mark-- A few years back I met a gent then in his 80s who'd been John Wayne's skipper on the vessel Batjak, retired to do blacksmithing full time in Dolores, Colorado. From the looks of him, he may well still be at it. Francis Whittaker, and Bill Gichner both hammered well on in years. As pitcher Satchel Paige, poster boy for Geezer Power, said, "Don't look back, something may be gaining on you!" |
| Miles Undercut - Tuesday, 04/12/05 21:04:31 EDT |
|
Truck Forge: Stu, Centaur makes this forge to fit in the back of a pickup truck for farriers. Its for making horse shoes. It could also be classed a "riveting forge". It is a little small and I recommend the stainless option for sheet metal. Coal ash and smoke EATS steel sheet metal. |
| - guru - Tuesday, 04/12/05 21:30:00 EDT |
|
Guru, Thanks for the added info. regarding web sites/sales and professionalism (aka reality check). I of course am hoping to generate some sales through my site, but I do shows mostly and word of mouth commissions so far. When attending shows many folks ask if I have a web site. So knowing a lot of other craftsmen from working the show circuit here in northern New England for over 8 years, I've heard mixed reviews about websites. Mostly though, I think it is a good investment and I'm well aware of the value of advertising. I'm just taking one step at a time and I know there isn't going to be a magic beanstalk out my window tomorrow ; ) But,I'm not going away until my time is up! Sorry if I've gotten your dander up with the dreaded "stupid questions". I'm on my way to the article you mentioned right now! Sincere thanks, Cynthia |
| Cynthia - Tuesday, 04/12/05 21:52:37 EDT |
|
Physical Limitations: Mark, Lets see. . we have some one handed smiths and I know at least one in a wheelchair. . . First it IS a physical field. There is a certian amount of weight that must be moved, usualy by hand. However, you can almost always use smarts instead of brawn. I DO NOT pickup anvils anymore. I used to move 200 pound anvils in an out of my pickup truck. . now I use a handtruck and an overhead monorail hoist. Some things I used to do myself I wait until I have help or figure out another way. Heavy forging was ALWAYS done with help. Labor used to cheap and young men would be hired to swing heavy sledges. However, labor is expensive now days and never around when you need them. . A power hammer can replace half a dozen helpers or assistants. One can also greatly increase the range of work ANY blacksmith can do. A power hammer can also reduce the possibility of some kind of repetitive motion injury. Many smiths in excelent physical condition often screw up their wrist, elbow or shoulder using too big of a hammer too long. You can do a LOT of hammer work without hurting yourself but it takes time to build up the strength and learn to use the hammer efficiently. Trying to do too much too soon often results in injury. Taking on a production job even if it is light forging can be too much too soon. A light blacksmiths hammer is about twice as heavy as a carpenter's hammer. If you can swing a two pound hammer you can forge iron. Blacksmithing equipment is heavy and is often moved. Typical small shops have: Anvils - 100 to 200 pounds Swage blocks 30 to 200 pounds Small machines 300 to 1500 pounds Forge (coal) 300 to 500 pounds Cone mandrel 200 to 400 pounds Gas Cylinders 150 to 300 pounds Solid fuel 50 to 80 pound bags. Heavy Vise 75 to 200 pounds Heavy bench 250 to 1500 pounds Small tools on racks totaling hundreds each to tons. There is also the bar stock bought by the hundreds of pounds. Small bar doesn't weigh much but a 20 foot bar of 3/4" square bar weighs 38 pounds, 1" weighs 68 pounds. You move a lot of this stuff. In a smart shop you will have some kind of overhead lifting system to move heavy objects. Getting a 300 pound anvil off the floor onto a stand can be a bear of a job. A small jib crane can be used in conjunction with the power hammer for heavy forging or even moderate weight forging. Work smart, work safe and you should be able to work at smithing for as long as you feel up to it. You can always scale down the work you do to meet your capabilities. You can forge doll house furniture on a kitchen table. . . |
| - guru - Tuesday, 04/12/05 22:10:55 EDT |
|
Hi Guru , in a book about metalwork I found the description : hot zinc galvanized and zinc blackened . Research brought up a hint of some chemical ingeedient that blackens a zinc coated surface . Do You have any idea what it might be ? Thanks Mike |
| High Mike - Wednesday, 04/13/05 04:52:38 EDT |
|
Mark: It should be pointed out also there are some first class women blacksmiths. While some do fine (small) work, Dorothy Steigler can put many a robust blacksmith to shame. Your question is somewhat two parted. Income and physical. Guru answered physical. In the income part lies the problem. It is not only what you make, but finding a market for it. I have seen numerous listings for hand-forged ironwork on eBay go without a bid. I suspect it is not the quality of the work, or even the price, as much as this is something people seem to want to pick up, examine and visualize how it would look in their home. Thus, where will you get your exposure and how will you compete against the thousand or so other smiths likely doing similar work. If you place work in a gallery, you will lose most of your profit in their commission. Unless you are specialized, you almost are forced to try to find a direct market. I know a full-time ornamental smith in Dickson, TN who, with an assistant, works out of a shop maybe 24' x 24'. He sells almost nothing directly, but works through several designers who give him commission work, often working from designer sketches or reproducting additional items from a sample, such as making additional copies of what was once a one-of-a-kind ceiling lighting fixture. However, he noted some weeks his assistant takes home more pay then he nets out of the jobs. I have noticed many of the more successful blacksmiths are really more artists in metal more than blacksmiths. Do you have 'the eye' required to make your work different and unique? Thus, it is a combination of now only what you make, but how and where you can sell it - and the latter is likely far more complicated than the first. I get the impression you are a novice at blacksmithing. If you have a serious interest (almost passionate love) for it, I would recommend spending a year or so just attending various classes and courses, starting with beginner and working up to intermediate-level. Then decide where you want to go with it. |
| Ken Scharabok - Wednesday, 04/13/05 07:39:46 EDT |
|
Well, thanks to the advice that the Guru often gives here on pricing and including a proper finish in the price I may have lost a bid on a job. This is actualy good news, because if I had lowballed the bid I would have lost reputation, or money. Definatly worth the CSI dues. |
| JimG - Wednesday, 04/13/05 11:30:33 EDT |
|
The mighty Guruissimo observes, "You can forge doll house furniture on a kitchen table. . . ." You sure enough can, and for beaucoup bucks, too. The Mrs. here makes miniatures, sold a 1/12-scale blacksmith shop replete with leg vise, anvil, apprentice's loft (with spicy pin-ups) and scrap pile for several times what my pick-up's worth. There is a broad market for such teency nifties out there. And, as ever, not much available in the high end super-duper quality range of the spectrum. Probably 'cause micro-smiting is so damned difficult! Try holding a heat on a piece an inch long and 1/16 thick. |
| Miles Undercut - Wednesday, 04/13/05 11:51:24 EDT |
|
Lowballing Bids: I have known many people to do it hoping to get the "next" job. The problem is the next job never comes or the client is shrewd enough to figure what your time was bid at and expect all your jobs to be at that rate. Lowballing almost never pays. The other folks that lowball bids often come back and ask for more money to finish the job. . . Yep, they may get paid but after hijacking the client they are unlikely to get another job from that client. The only folks that get away with this are the big government defense contractors. In this case the buyer KNOWS the bid is low but accepts it because HIS boss or bosses boss (congress) wants to buy something they cannot afford. So they take the lowbal bid, then let the contractor renegotiate the price, over and over. The finish question is a tough one. You know the customer does not want to refinish the job every couple years. . . I lost several jobs in recent years. I do not know who got the jobs. But I do know that they could not have done what I bid on for less. So they did not do the same job or worked for nothing. One customer came back to me and said she had an $800 lower bid on the gate I had designed and that I could have the job if I could meet that price. I asked if the other bidder had designed the gate. No. The customer had taken my design to someone else. . . I should have told her she owed me $800 for the design and billed her. . |
| - guru - Wednesday, 04/13/05 12:32:02 EDT |
|
Jock, I used to have that happen to me when I had the sign shop. I finally stopped letting designs out the door unless they were paid for at the going shop rate for the time it too to do the design work. That way, I at least recouped the time spent. Yes, it annoyed a few who never came back, but I figured I was better off without them as clients. A few other "tricks" that I and others used were to do only half the design, even if it meant that we drew the whole thing and only showed them the middle third or so. The next guy had to at least finish the design to use it. Another thing was to print COPYRIGHT, etc. across the whole design so the next guy had to openly steal our work. One thing I always advise is to NEVER let the original artwork out the door, period. They can buy a copy or go away empty-handed, but they never leave with the artwork unless it is priced, paid for and they acknowledge *in writing* that it is a copyrighted creative property. And when they violate the copyright, you have your lawyer send them a letter demanding payment. Surprisingly, I usually got paid one way or the other after I instituted these policies. And when I didn't get paid, I was usually better off without that particular client or job. |
| vicopper - Wednesday, 04/13/05 13:27:51 EDT |
|
VIc, That last job DID have Copyright all over it. . . ;( |
| - guru - Wednesday, 04/13/05 13:49:28 EDT |
|
In defense of government contracting, contractors bid on a very, very specific proposal. Their bid is for exactly that and they are, and should be, required to provide what was specified at the agreed to price. It is when the client (in this case the government) comes in for changes following contract award where the price is really jacked up. |
| Ken Scharabok - Wednesday, 04/13/05 15:07:34 EDT |
|
Government Contracts: Ken, I have bid on enough big (to me) government jobs to know the score. The last one was a three million dollar job. The nearest competitive big was double ours (we had the PERFECT skill set and shop size). We worked for three weeks on the bid and attended a mandatory bid conference. However, the winning bid went to the Franklin Institute (a think tank) at $40K (11% of the lowest honest bid - ours). Now, ANYONE working within the confines of realitiy and honesty would have discarded this as a naive bid. They did not meet the bid requirements which were to re-design and build a piece of machinery. They bid to do a feasability study that was not asked for. I know exactly what was going on. We stopped bidding on government jobs. Too much corruption. Too much cronyism. |
| - guru - Wednesday, 04/13/05 15:48:28 EDT |
|
Artist Blacksmith: I know a lot of folks that get into this business wanting to pound iron and sell what they make. However, many never consider that "decorative" ironwork or "home accessories" means being an ARTIST first and a blacksmith second. The difference between an S-hook made as a decorative item and a galvanized chain link is the ART. The art to see a graceful curve and a perfect scroll. The art to see a straight line and a uniform twist. The art to control the texture or lack of. Even in such as simple item there is art. We are often asked how to make a scroll or how to layout a scroll. It is not difficult to do but those with an artistic eye just MAKE them. They do not think about them they just do it. Those that cannot invision a graceful curve or recognize the difference between a well made scroll and a lumpy ill proportioned one will have a difficult time making one even when they have a drawing or layout. The point, to be an "artist blacksmith", or "decorative ironworker" requires some artistic skill. You may no need to be a great artist but you need to be able to SEE with an artistic eye. It helps a great deal to be able to draw and that is a skill that can be learned. Courses in basic drafting help as do general drawing and composition. Advanced perspective drawing and life drawing should be studied if you plan on selling architectural work. You can practice drawing on your own if you are a self educator. It is like anything else, it takes practice, practice, practice. Start with easy things, straight lines, circles, scrolls. Old fashioned script writing excersizes are good. Representational art takes time and some people need instruction on how to see volumes and convert them to lines. But it can be learned by almost anyone. And its part of the job of being an "artist blacksmith". |
| - guru - Wednesday, 04/13/05 15:53:26 EDT |
|
Thank you all for tour response and yes I am just starting out as a blacksmith, however I have spent 38 years working metal, steel, copper, brass, stainless, and whatever else the client thought the wanted. What I find most attractive is the ability to see dimensionally into a piece of iron and to create something functional or beautifull, or both. I do plan on signing up for a beginners class offerd by Pieh tool, when I can free up for three days. |
| Mark - Wednesday, 04/13/05 18:09:20 EDT |
|
I would like to dip my toe ever so slightly into the blacksmithing world. I'm an engineer by profession, and woodworker on the weekends. I have a small collection of chisels, and over the last year have become fascinated by the different properties. For example: A2 chisels keep their edge much longer than "old" chisels (Swan, Old Stanleys), but don't get a keen edge and are slow to sharpen. The "old chisels" sharpen very quickly, and get wicked sharp edges but don't hold them long in abrasive woods. Modern japanese chisels (Hitachi "White Label" steel, RC64 hardness, coal fire forged) sharpen better than the old American chisels, and keep their edges longer than the A2 versions. I was hoping you would be willing to explain, or speculate, on the reasons for these differences, and particularly what makes for a steel that will take the hair splitting edge and one that won't. Also, I want to make 2 special purpose chisels (ground shape for cleaning dovetails). My tool base will limit me to purchasing steel in desired thickness, grinding it to shape, then using the company heat treat oven. Do you think in that scenario I could get a tool that was reasonably satisfactory, or am I better off grinding an old chisel to shape? What steel would you recommend? Thanks in advance for replies. |
| jg - Wednesday, 04/13/05 20:04:17 EDT |
|
A little insight on tool steel: A2 has greater abrasion resistance than plain carbon tool steel mostly because it has 5% chrome. The more abrasion resistant , the harder it will be to sharpen. D2 & D3have 12% chrome and are much more abrasion resistant. Nothing is to be gained in using high speed steel if the tool will not get hot in service. Also it is of no use to choose a steel that You don't have the ability to heat treat properly, unless You are willing to send it out to a comercial heat treater. When sharpening, after You have used Your finest stones, a pass over a cloth buffing wheel charged with stainless compound will get rid of the burr, leaving a really sharp edge. ALWAYS buff "off the edge" to keep the wheel from snaging the tool. |
| Dave Boyer - Wednesday, 04/13/05 23:54:41 EDT |
|
PRESS BRAKE DIES I have come across some salvaged press brake dies and am reshaping them to fit into my gillotine tool (aka. smiths magician). I cut a 90 degree 'V' die in half, heated it to critical temp and let it air cool. This made it MANY times harder to cut than the same die that was not heated. I have found that most die makers are hardening their dies to around 280 Brinnel (31 Rockwell "C"), but i cannot find out what alloy the dies are. Do you all have any idea what alloy(s) press brake dies are made of ? My goal is to use them as striking and pressing tools for hot steel. -Chris |
| Crand - Thursday, 04/14/05 00:51:49 EDT |
|
Mark: Don't overlook the option of also becoming a supplier. I'll give an example. At the moment on eBay there are about 650 listing for Damascus knives. There are only six to furnish Damascus blade blanks. Would seem a possibility here for someone to settle on say six steel/alloy combinations and then offer them in various fold numbers (e.g., starting with five layers: 17, 33, 65, 129 and 258) as unfinished. Target market would be the amateur/part-time blade grinders/stock removers who don't have either the inclination or capability to make the billets/blanks themselves. Production work can help pay the bills artistic work doesn't - about like at one time hogs on dairy farm being 'mortgage lifters' - they paid the bills between milk checks. Guru referred to target marketing earlier and I'll expand with an example. Both I and Norm Wendall (in Ohio) sell blacksmithing tools. If we were to take them to a typical flea market (no matter how large), chances are almost nothing would sell. Just isn't the market there for them. We both sell on eBay. I sell far more because I cater more to the beginning/hobbiest blacksmith while he caters more to the professional and eBay largely isn't where they go looking for tools. At Quad-State he sells many times what I do because blacksmithing conferences, by and large, draw the more experienced/professional blacksmiths who appreciate and need high quality tools like he offers. Thus, one market wouldn't work for either of us, one works well for me but limited for him, and one works well for him but limited for me. Understanding your market is perhaps half the battle. |
| Ken Scharabok - Thursday, 04/14/05 07:52:38 EDT |
|
Dave, thanks for the reply. What about the difference in edge retention between the western "old" chisels, which I assume are high carbon steel, and the modern japanese chisels? Do you think this is a function of composition, heat treat, cold working? I have buffed before, and it improves over a 5000gr. waterstone. But I've found that 8000 and 12000 gr. waterstones give better edges than the buffing compound--at least on HCS. On the A2, the 12000gr doesn't help, and the 8000gr is still better (marginally) than the wheel, but not as good as the HCS. Is the chromium the cause of this? |
| jg - Thursday, 04/14/05 07:58:37 EDT |
|
Ken, Excellent analysis of market strategy! |
| Paw Paw - Thursday, 04/14/05 08:06:31 EDT |
|
Press Brake Dies: Crand, Tool steels vary greatly and are specified for many reasons, among them is "a suitable steel that is available and inexpensive". In this one simple sentence there are three variables. Cost and availability are often more important than the actual alloy. These days availability may be at the top of the list. As long as the manufacturer knows the alloy and can heat treat it to their satisfaction they may use a variety of steels. Manufacturers EACH make their own descision and may change that decision any time they want. For these and many other reasons all steels of unknown pedigree come under the classification of "Junkyard steels". In small shops A-2 is used a lot because it is easy to heat treat. I use it for punch press dies that I machine in shop and heat treat in the forge. It is an expensive steel, especialy annealed. A large manufacturer would not use it because they could use much less expensive steels and heat treat exactly as needed in a professional setup. |
| - guru - Thursday, 04/14/05 09:41:47 EDT |
|
Corruption and Cronyism: In addition to, and more common than, corruption and cronyism, let's not forget bureaucratic inertia and contrary laws and regulations. Almost all of the laws and regulations, in isolation, make perfectly good sense, but when you try to do them all at once, they trip over each other. Add to that the �little p� and �big P� political decisions which are often imposed from above and the �level playing field� that they strive to achieve is full of potholes. It�s about as bad from the inside looking out as from the outside looking in. Well, it�s the 21st century; complexity is accelerating, so I�d best get used to it. Markets: In addition to what Ken said: People who shop at flea markets expect flea-market prices. You don�t expect to spend a lot of money in a junk shop, as opposed to an �Antique Shoppe�, but people spend a lot of time looking for antiques amidst the junk and dodging junk amidst the antiques. All of those used tool lying about would tend to drag down the value of the new stuff, just like the prices take a dive between the �church arts and crafts fair� and the �church yard sale.� I�ve actually bought back some of my work sold at the former at the latter, just because I knew it was worth more in the proper venue (and �cause it hurt me to see it so cheap ;-) Remember, the Mona Lisa is just some oil and pigment brushed onto some canvas, but it�s in the Louvre! Know your markets. |
| Bruce Blackistone (Atli) - Thursday, 04/14/05 09:49:25 EDT |
|
Sharpest Edges: My personal experiance is that plain carbon steels are easiest to sharpen and take a sharper edge. Alloy steels are more difficult to sharpen and some high alloy steels do not hold an edge as well as plain carbon steels. Between the two there is a great range of products. Besides the carbon and alloy content you have the care in heat treating. Tools that are selectively tempered so that the edge is harder than the body will hold an edge much longer than a tool that is uniformly tempered and must be uniformly softer to prevent breaking. There are a lot of wonderful steels available but they are often selected for ease of manufacturability rather than the absolute best for the application. Then there is HOW they are processed including forging and heat treating. These can make a huge difference in the end quality. There is no "magic" perfect steel. The magic is in how much care is put into processing the steel. For wood working I think a lot of folks go with the wrong steels. The best wood working chisels I have were made from old British car springs. I do not have a clue what the alloy is. They were oil quenched and tempered by heating until the motor oil burned off (about 350 - 450 F). This is old time seat of the pants blacksmith heat treating with "guess and by-golly" results. Those springs were probably a 60-80 point high manganese low alloy steel but that is a big quess. Stock Removal is the term for making a blade from the solid by cutting, filing and grinding. Many knife makers use this process and even when blades are forged there is a LOT of grinding. Stock removal requires efficient grinding equipment, usualy belt or disk grinders. Most stock removal folks have numerous grinders for different purposes. Depending on the shape being ground it requires skill and practice. Often factory blades including chisels are made by stock removal. One famous turning gouge is made by milling a half round groove down the center of a round bar then turning the tang. Grinding is not the not the only stock removal method used. |
| - guru - Thursday, 04/14/05 10:19:53 EDT |
|
Historically, folks have observed that some knife edges got sharper with age. Some folks assumed that the steel was �maturing� or some other odd/romantic/superstitious explanation; but mostly, I suspect, they were slowly sharpening away areas of decarburization. This could happen even in factory produced knives if quality control, forging heats and heat treatment were somewhat hit and miss. I�ve observed it on several tools and knives of mine. Then again, maybe my sharpening is just refining the edge geometry. The old saying to forge thick and grind thin works on many levels. Cool and sunny on the banks on the Potomac. Visit your National Parks: www.nps.gov Go viking: www.longshipco.org |
| Bruce Blackistone (Atli) - Thursday, 04/14/05 11:27:04 EDT |
|
Markets: I had an apprentice that kept trading hooks he had made at the flea market (against my advice). Now in quantity and at wholesale they were worth at lease $3 ea. They were nice hooks made to my standards. In a decorator shop they would sell for $7 to $15 each (depending on locality). But in the fleamarket they were being re-sold at $1 each. This was much less than they cost to make. I recently ran into a fellow that bought a bunch of them. He said he took one look and realized they were WAY under priced and bought all the flea marketer had. The proper market for hand forged artist-blacksmith made goods is a fancy gallery or gift shop. And these as well must be in the right location, a big city in the expensive sales district. Those are the only places that get high enough prices to make it worth while. On-line markets: I have recently had long discussions with a couple folks about their web-site marketing. They had self-built amature web sites and amature photos that did not show the work well. These are the flea markets of web sites. The folks that can afford fine hand made goods shop in the finest stores and most expensive catalogs. They expect the web sites they visit to have the same quality. They SHOP at the finest websites. They expect photos to look like the ones taken by professionas, massaged by professionals and printed by professionals on the finest gravuer color printing presses in the high dollar gift catalogs. They expect the web site to have the artistic feel of a fine shop on Hollywood's Rodeo drive. Sucessful artist-craftfolk are usualy the ones that went to college and studied art and know something about marketing and creating a portfolio. They KNOW what professional photos look like. They KNOW what professional layouts and displays look like. They KNOW there is no substitute for quality of presentation. I am not saying you cannot do this without a college education but you NEED to know professional quality when you see it. Now. . . I have made all the mistakes I speak about, sometimes even when I knew better. So I know from experiance that your marketing is a BIG part of the job. I also review MANY websites and most I see are pretty bad. Consider THIS. In the commercial market the cost of the product is often on 2% or 8% of the sales price. The rest is largely packaging and advertising. When you buy goods at the Super Market the product is a microscopic part of what you pay. It is the pretty container that makes your purchasing decision more often than the product. And in return you pay more for that container or lable than the product. Even though meat is the least efficient method of producing food, grains (many that are fed to cattle) sell for more per pound than meat. Per pound a box of cereal costs more than the finest steak in the Super Market. Why? The packaging. Marketing in the Digital Millennia: Marketing is much different today than it was even 10 years ago. I can take my old out of date digital camera, photograph a piece of work on a dirty backdrop in poor lighting, step into the office, down load the image, adjust the lighting and contrast, cut out the background, toss in a drop shadow and viola' have a photo almost as good as any taken by a professional. Now, this takes some SKILL, I have eight years of practice AND I also do it for others. LOOK at the book cover photos on our book review page. Those are all my photos. They are not from the publishers. Some are better than others my newest ones better than the early ones. The point? In 1984 I paid a professional photographer $800 for ONE simple photo (it was worth it). Today I can do it myself with a digital camera and an inexpensive PC. No, my photos are NOT as good as a professional's but they are close and good enough for the Internet. To sell product your images MUST be this good or better. If I cannot see your work like I am holding it in my hand I am not going to buy it. If you cannot produce images of commercial quality then you need to spend the money and pay a professional photographer. If your work is very large, artistic or architectural then hire a professional anyway. Plan ahead. Make an appointment for the day you know the work will be finished. I know far too many craftsfolk that have let their best work out of their hands and have not photographs of it. If it is installed work get permission to photograph it in your sales contract. The same goes for your website. A good artisticly designed and well engineered web site costs $5,000 to $20,000 NOT including images. Very few individuals can build a decent DIY website. If this is your business then it is an investment like any other. It is part of that advertising and packaging cost. All of this is part of a marketing plan. Where you sell, how you advertise and present your product. No, it is not blacksmithing. But it is part of any business. |
| - guru - Thursday, 04/14/05 11:52:06 EDT |
|
Guru, Thanks for your reply. Can you expand a bit on the role of the forging process in edge retention? Are you changing grain structure, for example? |
| jg - Thursday, 04/14/05 12:51:27 EDT |
|
jg with modern steels the grain structure is usually dealt with through heat treatment which both stock removal and forged blades go through. Ric Furrer demonstrated this at quad-state a couple of years ago when he took a piece of high carbon steel and overheated it and then broke it to show the coarse grains and then took the same piece and normalized it several times and broke it to show very fine grains---no forging done at all. In early steels forging was the method of refining grain size due to lack of alloying. So if you are using steel that dates back to pre-ACW times you may want to be aware of the forging/grain size interaction. If you are using modern steels learning proper heat treatment will get you a lot further. Thomas |
| Thomas P - Thursday, 04/14/05 13:20:49 EDT |
|
Gentlemen: I want to purchase one of Hrisoulas books but I don't know which to get. I do simple Damascus and make knives out of the steel. I've been smithing for 10 years and prior to that was a professional farrier. I prefer coal over gas. Can anyone tell me which of his books would be appropriate to my level of skill. I'm not interested in sword making or fighting knives and I have very little interest in non-pattern welded materials. Thx, Larry P.S. how do you pronounce his name? |
| - lsundstrom - Thursday, 04/14/05 14:28:46 EDT |
|
lsundstrom, Might I suggest The Pattern-Welded Blade ? it is on his web site. I do not have that one, but I do have the The Master Bladesmith which is very helpful. And I for the most part do not make blades. |
| Ralph - Thursday, 04/14/05 16:30:16 EDT |
|
lsundstrom---why don't you check them out of the library and mak your own decision? If your local library doesn't have them ask about ILL (Inter Library Loan). Thomas |
| Thomas P - Thursday, 04/14/05 16:32:42 EDT |
|
I have a little forge in my backyard, Everytime i go to start the fire the Coke i'm using doesn't lite, doesn't even heat up, i tried different kindling but everytime i get the coke near it the kindling goes out. Help me pleaaaaaaaaaaase. |
| - Jon Duggan - Thursday, 04/14/05 18:02:44 EDT |
|
I have a little forge in my backyard, Everytime i go to start the fire the Coke i'm using doesn't lite, doesn't even heat up, i tried different kindling but everytime i get the coke near it the kindling goes out. Help me pleaaaaaaaaaaase. |
| - Jon Duggan - Thursday, 04/14/05 18:02:54 EDT |
|
I have a little forge in my backyard, Everytime i go to start the fire the Coke i'm using doesn't lite, doesn't even heat up, i tried different kindling but everytime i get the coke near it the kindling goes out. Help me pleaaaaaaaaaaase. |
| Jon Duggan - Thursday, 04/14/05 18:03:52 EDT |
|
Jon, coke is sometimes hard to start and it takes a constant blast of air to keep it going. Then there are diferent types. Foundry coke is in big lumps that are not suitable for a forge. What kind of forge? Commercial, home built? Depth of firepot? Bellows, hand crank or electric blower? You MUST have a good blast of air to start coke. It takes more than a little kindling, most folks use a torch. |
| - guru - Thursday, 04/14/05 18:09:16 EDT |
|
Thanks Ralph and Thomas, I am quite sure our little county library wouldn't have them but I hadn't though of the ILL. I'LL give it a try. Thx, Larry |
| - lsundstrom - Thursday, 04/14/05 18:12:10 EDT |
|
Larry, I have the "Complete Bladesmith" to review but got distracted by the awful illustrations and didn't finish it. I'll look again and see what I think. CVBG may have them in their library. . . |
| - guru - Thursday, 04/14/05 18:13:39 EDT |
|
Jon- I had the same problem with coke- I now start some Kingsford "matchlite " charcoal and add the coke - works for me |
| - ptpiddler - Thursday, 04/14/05 18:58:24 EDT |
|
GURU On using someone else's design, my Dad was a building contractor who had a retired architect part-time in his company. A Florist about three buildings down the street asked him to design an addition and quote on it. He did and furnished a set of plans and a written quotation. He heard nothing for about 3 weeks and then noticed that an addition was underway. He let it get completed and verified that they had used his plans and then sent the gentleman a bill for the plans. He got a call to the effect that the bill was not going to be paid and Dad asked him to check with his attorney before he made the statement. Three days later he got a check. So, sometimes that kind of fink gets what he deserves. Spent three hours at the forge today to finish up a project for the Bealer guild meeting Saturday and am struck by how different the heavily worked parts appear from the parts that do not get all that hammering. George Dixon preached putting a "texture" on the raw metal before forging and I have become a believer. It seems like wasted effort, but I can see the value. Also made a discovery. When I am working just one piece in a gas forge that reheating time is an opportunity to pick up, straighten up and put things back in their place. |
| - J.Myers - Thursday, 04/14/05 21:03:14 EDT |
|
Jim Hrisoulas may have a PhD, but I think he skipped Mechanical Drawing in Jr. High School. The books are good, the drawings are terrible, and they have never been updated in subsequent reprintings. I think it's pronounced hris-su-las; or at least he didn't correct me the one time I actually met him. |
| Bruce Blackistone (Atli) - Thursday, 04/14/05 21:26:16 EDT |
|
I have located a small mousehole anvile in excellent shape, looks to be never used but has been painted silver. I am not sure if the paint is covering anything. I did not get a chance to get a good look at it but looks to be about 105# or so. I want to make this guy an offer on it and I know he paid $50 for it. Is a mousehole anvil worth more than another in the same condition, or still worth about $2 per pound as long as it is in good shape? I can get some #s off it if that helps and maybe a picture. |
| Jeff - Thursday, 04/14/05 21:35:25 EDT |
|
Jeff, The picture and numbers would help. |
| Paw Paw - Thursday, 04/14/05 22:42:02 EDT |
|
Quenchcrack, re Moles Place one end of flexable hose in fresh mole hill. Wrap other end with old welding glove and shove up tailpipe of your pickup. Go to house for glass of ice tea. The ground will smoke!! I got the last rotten little bugger just Monday. |
| Steve Paullin - Friday, 04/15/05 00:33:07 EDT |
|
Illistrations and books. Sometimes folks do not use the best drawings in book so as to not help other makers. Most of the bladesmiths I have meet are rather secretive about how they do certain things. But that is just my observation |
| Ralph - Friday, 04/15/05 02:08:54 EDT |
|
Press Brake Dies Guru, so if i understand correctly, my search for die alloy may be hopless because of all the variables involved. What we do known is the hardness of the dies. Would it be benificial to leave them 'as is' for striking hot metal or to increase the hardness by air cooling them ? I have put much time into shaping the dies and hope to make them last a long time- of quality and consideration. What do you think / |
| Crand - Friday, 04/15/05 02:10:43 EDT |
|
hey it's me again, Welding tech student teaching myself blacksmithing. i'm currewntly working on making my own anvil tools and i have a question about the metal i'm using. I'm using what can best be bescribed as weld cores from test plates. Basivaly the welded up section of a one inch test plate cut out. these welds are pretty tough stuff should it be plenty hard for a hardy? |
| Lakesactor - Friday, 04/15/05 05:29:25 EDT |
|
I have at my disposal several very large plates of 1040. They are 3 3/4" x 14" x 17". I am considering using a couple of these plates to make anvils. Is 1040 a suitable material or should I consider welding 4140 on these blocks for the working areas? Guru, I would like to thank you for the time and energy you have invested in this site. I have been able to find many answers to my questions and some great inspiration here! By the way, the reason the smithy shops on the old sailing ships were located in the bow is because the wind would blow the smoke away from the ship rather than over it. |
| Ano - Friday, 04/15/05 05:53:19 EDT |
|
hello guru i wood like to show you a picture of wat i found .How do i send it? |
| michel - Friday, 04/15/05 07:04:53 EDT |
|
Smokey ships: I question the placement of the ships smithy in the bow as a means of avoiding smoke, in most points of sail the the wind flows around the sail and the boat's forward movement moves the apperant wind (the direction that the wind appears to come from in relation to the boat) forward toward the bow. This would tend to move the smoke the length of the boat. The execption would be a Broad Reach where the boat would be in a down wind point of sail. Look at old paintings of tall ships and note the directions of the flags and banners at the stern of the ship, they most often flow aft if the painter was a salt. Photo: http://www.genosplace.org/Tenacious/sailing/cd_5_18.jpg |
| Habu - Friday, 04/15/05 09:03:28 EDT |
|
Thank You: I would like to Thank Uri & Jock for taking the time to write to me. I will be purchasing the Uri hammer and DVD on hammer tech. I am looking forward to all the help theses techniques will give me with my health issues. If it was not for anvilfire web site I would have never known of Uri Hofi. The advertising does work here for the blacksmith suppliers. When I get some extra money I would like to join CSI as I can see a lot of hard work and and generous time is given to everyone who has questions and a desire to improve or gain more knowledge in blacksmithing. I would like to thank all the other CSI members who contribute to this site as well. Special Thanks to Uri Hofi and Jock Demsey for the time they took to email me with helpful information. I think we are very lucky to have such skilled smiths who give time freely to help those of us who could use there expertise. Uri understood my situation and that gives me the fuel to never give up and try new techniques and approaches to make blacksmithing still a reality for me today. Thank You all again. :) |
| burntforge - Friday, 04/15/05 10:11:04 EDT |
|
Junkyard Steel Crand, if you torch cut the dies OR have heated the dies above critical (non-magnetic) then they probably need to be re-heat treated. IF the steel was VERY hard after heating and air cooling then it is probably an air hardening steel. IF that is the case then they need to be tempered. On air hardening steel you need to heat to at least 500°F to do any good. See our FAQ on Junkyard steels and the FAQ on Heat Treating. |
| - guru - Friday, 04/15/05 10:38:25 EDT |
|
SAE 1040 Steel: Ano, Commercial anvils vary from 50 to 65 point carbon steel. The alloying ingrediants improve hardenability and other factors. Most cast steels are fairly high tech alloy steels because steel does NOT like to be cast. Although your 1040 is not the optimum steel it is a good one. You could probably flame harden it and get a fair surface. |
| - guru - Friday, 04/15/05 10:42:59 EDT |
|
DIY anvils for the most part are not going to be as good as commercial anvils. Even with the optimum steel the heat treating is very difficult and or expensive. On the other hand, and good heavy anvil with compact mass is better than no anvil or one with too distributed mas (like a RR-rail anvil). Very eary anvils were stone then bronze then soft iron. Hard steel anvil faces were a long time in coming. If you work HOT low to medium carbon steel on a soft anvil and are careful not to strike the anvil it will hold up quite well. Hammer technique on a soft dead anvil is different than a rock hard one. Without that springy rebound bouncing the hammer off the anvil does not give you a rest. It will also mark the soft anvil. So you need a different rhythm and need to practice accuracy. On the other hand a soft DIY anvil is easy to dress or repair and there is no worry about damaging an antique. If you need a special proturbance just weld on on. If you need a special notch cut it out, refill it later. The fellows in our shop used to treat my heavy (1500#) welding bench this way. My only complaint was they didn't repair their modifications when they were finished. . . |
| - guru - Friday, 04/15/05 11:00:54 EDT |
|
Lakesactor, the weld metal should be approximately equal to the base metal. If A-36 was used for the base material then something like E-6010, E-7018, ER70S-X may have been the electrode. Although tuff, this weld metal is not considered hardenable. E-6010 and E-7018 is the softer end of manufactured electrodes. Although these electrodes are steel they are used to weld wrought iron. There are hardenable electrodes on the market, but I don't think theyre used in a training school. The reason for this is hardenable electrodes would break if bent in a guided bend test machine. That is a short and to the point answer. |
| - Rutterbush - Friday, 04/15/05 11:13:54 EDT |
|
Mouseholes are nice in that they tend to concentrate the mass under the "working area" of the face---they look a little "squat" compared to the late Hay Budens and Trentons with their long horn and heel. I would not consider them worth any more than any other of the first rank anvils; but not any less. Depending on the type of smithing I was going to be doing I might select the Mousehole over say a Trenton; but vice versa as well! The paint shouldn't cover up much of anything that the "ping" test wouldn't show. The mousehole is a ringing anvil so tap it with a hammer and listen. If it doesn't ring or worse it *buzzes* then there is a problem with the face's weld to the body and it's most likely a door stop. If it rings then the weld is good and the anvil should be good---save for the chance that it went through a fire and is now tempered soft---which the rebound from tapping it should show you... Lakesactor in steel "tough" and "hard" are loosely coupled. Unless the test was for high carbon welding the test sample should not be very good material for a hardy. For a hardy my choice would be H13 or S7; but most of mine are 1080 and one is the end of a jackhammer bit, Thomas |
| Thomas P - Friday, 04/15/05 11:25:35 EDT |
|
Painted Anvils: Never, buy an old anvil that is painted all over. If the face, horn and edges are painted the paint may be hiding repairs. I have known people to buy anvils that were repaired with plastic auto body putty and one fellow that paid top dollar for a very large anvil that had large one inch holes drilled in the face then welded up with alloy rod. Many weld repairs on anvils have been done with alloy rod and are easy to detect. The nickle alloy is yellower than plain carbon steel and it does not rust. On a lightly rusted anvil the repairs stand out like a neon sign. All repairs (welds or machining) on an anvil should reduce it price compared to a similar anvil without repairs. Cracks can also be hidden by paint (that is why wooden ladders are never painted). If the face is painted then it needs to be cleaned for inspection. Lacquer thinner will usualy remove the paint with damaging the surface. Sanding it off may disguise repairs. If the seller refuses to let you inspect the bare metal face then pass or tell him bluntly that without inspection it is only worth scrap. It is common for the bodies of anvils to be painted. Many came from the factory that way and it reduces the amount of area prone to rust and looks better in the shop. NEW faces were lightly varnished or oiled so that you could see the condition and finish. Old anvils usualy hae an even coating of rust. |
| - guru - Friday, 04/15/05 11:43:34 EDT |
|
More. . the owner may not be hiding anything other than some rust. But without inspection you do not know. |
| - guru - Friday, 04/15/05 11:48:09 EDT |
|
Contact and Photos: Michel, Just click my name in this log and your mail program if it is properly configured should open with my address. Otherwise see the contact form (very bottom of the drop down menu or home page). Write to me and I will respond with my address. Please excuse the run around. Until I recently changed my e-mail address I was getting some 350 spam mails EVERY day. Now I am down to one or two. This will not last but for now it is good. Note that none of the spam is comming from my forum address. It is all from my new regular address via some virus on someone elses system. |
| - guru - Friday, 04/15/05 11:58:35 EDT |
|
Hi there, I have a 1.5 kg air hammer , just installed and after about thirty hits , I had three people come down from my studio building that I rent a old furnace room in .They said that their walls and rads where ratteling!Can I put the hammer on some sort of a spring base or somthing ? I could really ues a soluition. please help me oh great guru. ( www.acdesignsironwork.com ) |
| - Anthony Cateaux - Friday, 04/15/05 12:29:09 EDT |
|
Texture: Overall texturing is one of those things that should be uniform. Be it hammered, bark textured or an oxidized burnt texture. If you do smooth clean work it often blends with the normal hot roll finish. However, if you use cold finish steel with sharp corners the difference really stands out. On either hot or cold finish steel chamfering the edges by hand or power hammer is usualy enough to kill the "shiney new" look of new barstock. Clean smooth hammered chamfers will have just enough variation to say "this was all hand worked" and not require overall forging. I have never been in favor of forced texturing. In the 1950's it was a handful of ball pien marks. In the 1970's it was often random power hammer blows from a Little Giant. Either one was as forced and trite as the other and just plain bad workmanship. Good texturing changes all of the original surface. For a piece to have 100% hammer texture it should be made in a way that results in that texture. Big stock forged into small stock is common. The method recommended by Francis Whitaker was to make round out of square or square out of round. With a good power hammer you can start with a short piece of 1" round and mave a picket length all forge bar in one heat. This is REAL forged work and unless you REALLY work hard at removing all signs of forging the piece will look 100% forged. The degree of texturing is up to you. Many places where long bar is used and it is obviously factory bar I think it is best to do clean work that matches the bar instead of doing rough work and trying to make the bar match. Of course this is all a matter of style, taste and design. The important thing is to have the work look like all of it was within your control and by design. Texture or lack of it should be a design decision. |
| - guru - Friday, 04/15/05 12:53:26 EDT |
|
Thanks for the info, I know the guy who has the anvil, Maybe he painted it to make it look nice. I will find out. He said that it has a hell of a ring. I will try to get some more info and some photos for you Paw Paw. Thanks again to all. |
| Jeff - Friday, 04/15/05 13:05:13 EDT |
|
Stolen Gate Design: The problem in my case is that the gates are on a large private estate and are not visible from the public road. Obtaining proof that they were built using my design would be difficult. I just considered it a lesson and will not give drawings to potential customers anymore. I had a long discussion with a smith in Costa Rica on this very subject. How do you show the customer a design without giving it away? You can take the drawings, show them, and then be sure you take them with you. If the customer asks for them politely tell them these are the originals and you cannot leave them. However, his were CAD drawings and the customer knows better. Leaving with the drawings is an art. I have been at engineering meetings where someone that was not supposed to have copies walked out with multiple sets of drawings, manuals and proposals. . and nobody noticed. OR make your drawings in a large bound sketch book. You can show the customer the drawings and not be expected to give them your sketch book which contains many other drawings. If drawings are needed for the contract then simply tell the customer that formal drawings will be made for a fee or as part of the contract. This is one of those areas of sales negotiations that everyone runs into. My daughter is a landscape designer and she has the exact same problem. It is an art to learn to be polite but firm about not leaving drawings until a contract has been signed or money changed hands. |
| - guru - Friday, 04/15/05 13:12:18 EDT |
|
Hammer Noise Vibration: Anthony, are you sure you don't mean 150 kg? Being in the basement of a building, close to the foundation is a problem that will not be easily fixed. First, there are power hammers and there are power hammers. To absorb as much of the hammer blow as possible a power hammer needs a ratio of 20:1 between anvil and ram. For economic reasons the better hammers usualy only had 15:1. However, many new hammers have as little as 6:1. The lower the ratio the more shock that is transmitted to the floor. Also for economic reasons many hammer manufacturers and resellers will tell you that no special foundation is required. True, the hammer WILL operate on any good concrete floor but good engineering dictates that any power hammer be installed on a seperate foundation. Even antique 25 pound (11kg) Little Giants called for a concrete block much larger than the hammer. A seperate foundation requires cutting a hole in the existing concrete floor, digging down several feet, perhaps a meter, placing isolation material around the sides of the opening and pouring a heavy steel reinforced concrete block with anchoring points for the hammer. In some cases the foundation is criss crossed wood timbers. This absorbs much more shock than just a seperate block. However, even on a seperate foundation the vibration may be transmitted by the soil or if there is a high water table by hydraulics. In this case the only solution is a very expensive inertia block foundation. This is a very large concrete block suspended on springs and shock absorbers, the hammer mounted on the block. It requires a large concrete lined pit and access to adjust the springs. Deck plate or wood covers the gap between the isolation block and the surrounding floor. Inertia block foundations require carefull engineering. Power hammers of all sizes up into the ton range have been installed on inertia block foundations. If you have a hammer with a low anvil to ram ratio the first step would be to put it on a large steel slab to increase the system efficiency. The second step would be to put this atop a deep wood foundation which is better than concrete and less expensive than an inertia block. Stacked timber foundations need to be fairly deep so that there are six or more layers of 6 x 6 inch (150 x 150mm) timbers. These are laid flat in alternating directions. The variations in the layers of timbers create a springy compressability. The top layer of timbers are bolted together and the hammer bolted to them. The combination of a more efficient anvil and a shock absorband foundation MAY cure your problem. |
| - guru - Friday, 04/15/05 13:50:17 EDT |
|
Essay on Bad Illustrations: |
| - guru - Friday, 04/15/05 14:33:06 EDT |
|
Leaving Drawings: Several years ago I was part of a team that went to Shanghai to make a proposal on a $35Million pipe mill. Knowing that the Chinese Govt. was the main contractor, we suspected they would take our engineering drawings to "study" and use them to build the plant. We showed up with a computer, a computer projector, and all the drawings in CAD files. We projected the drawings on an old sheet hung on the wall of the hotel room where we met. For two days they furiously demanded hard copies of the drawings. We told them the drawings would be provided when the contract was signed. We did not get the contract but they did not get the drawings! |
| quenchcrack - Friday, 04/15/05 17:19:30 EDT |
|
Carbon VS Stainless for cutting tools: I have read all the posts on this topic and would not take issue with any of the opinions expressed: Carbon steel does take a finer edge, a faster edge, and will not hold that edge as long as high alloy steels. Most cutlery used by butchers is 1095, a simple carbon-manganese steel. Used butcher knives are often worn down so much they look like fillet knives. Stainless steel knives are made because most average purchasers do not want to spend any time actually taking care of a knife. All of my wood carving tools (Swiss Made) are carbon steel with a small amount of alloy to control hardenability. They get "scary sharp" on a soft Arkansas stone followed by time on a hard Arkansas stone and then stropped with jewelers rouge. If you will just strop your blades and oil them regularly you will not have to stone them very often. |
| quenchcrack - Friday, 04/15/05 17:43:23 EDT |
|
Welding mild steel to low carbon steel (.6%)Will I need special rods or will 6013 be OK? |
| Bob G - Friday, 04/15/05 17:55:05 EDT |
|
Hammer foundations. Jock, to add a small bit to what you've said, hammer manufacturers are very much concerned with helping customers deal with vibration. I don't know any who would mislead someone on this issue. For hammers with low relative weight (less than 10:1), a supplementary baseplate is the fastest way to add effective hammer mass. When a supplementary baseplate for a power hammer is massive enough it negates the need for a special hammer foundation. Effectively, the supplementary baseplate serves much the same function as a special foundation. That's the logic of the situation. In the direction of the absurd, with a 50-pound hammer on a 5000 pound auxilliary baseplate, the baseplate will (almost) totally absorb all hammering energy not absorbed by the hot metal. Renters can't usually dig up the concrete floor of their rented structure and therefore the auxilliary baseplate becomes the primary method for absorbing the periodic hammer blows that rattle windows and such. The hammer must be firmly affixed to the baseplate and a plywood sheet or some other pliable substance must be between the concrete and the auxilliary baseplate. It doesn't do much for pounding vibration, but it preserves the surface of the concrete. A thick and somewhat soft material requires substantial area for the auxilliary baseplate. Therefore I advocate plywood or high durometer cow mats or conveyor belting. I want the mass added to a hammer to be as close to the direct line between the dies and the ground as possible, instead of several feet away where it does little except reduce the inherent rocking motion of a hammer caused by hammer head reciprocation. Enlarging the anvil to achieve a high relative weight, 20:1 as you say, is the best. One of my acquaintances in Philadelphia placed his Kinyon I-beam hammer on rubber cushions that looked like industrial motor mount biscuits with success. It added several inches of height so he had to rest his treadle foot on a wood block. His next door neighbor stopped complaining. He didn't add any weight to his machine---so, there are at least several ways to deal with "ground zero vibration." John Larson at www.ironkisshammers.com |
| - John Larson - Friday, 04/15/05 18:23:45 EDT |
|
Bob G- Preheat to 300F or so, weld, and post heat to 350F or so, makes my higher carbon power hammer tools stick to mild steel handles a lot longer. |
| mike-hr - Friday, 04/15/05 20:19:58 EDT |
|
GURU Thanks for your comments on overall finish. It fits what George Dixon taught at John C. Campbell. More to the point, it fits what I did not sucessfully quite do on the piece I just finished. George likes to chamfer the edges of a bar with a hand hammer and then forge them back square with a hand hammer all hot. I have got to get out of the mental attitude of wanting to do something quickly at the expense of doing it so that it is pleasing to me. I get "free" landscaping advice as my daughter is a landscape architect. When I say "Free" I always remember what it cost to get her that degree and that is good for a chuckle. |
| - J.Myers - Friday, 04/15/05 21:01:23 EDT |
|
JG: The old chisles are probably high carbon as new "ordinary" ones most likeley are allso. It is hard to say what the Japanise chisles are made of,64 Rc is about as hard as You would want to make a chissle, cheaper hardware store tools are probably in the mid to upper 50's. Hardness helps with abrasion resistance, but after reaching practical limits of hardness,improvements come from diferent alloys [chrome]. I don't think the chrome will make it impossible to get a good edge on the A2, but keep in mind that sharpening is an abrasion process, and abrasion resistant steels will be more dificult to sharpen. I havn't made chisles from A2, but I have used many hundreds of pounds of it for metal stamping dies. look at the edge with an eye loop, comparitor, gologists microscope, or watever You can, to see if the edge is smooth, & sharp. Expect to spend 2 to 3 times as long with each grit stone, and buffer, yes you can "blame" the chrome for the abrasion resistance. There are some real metalurgists here, they could probably give an explanation on how the chrome/carbon matrix forms, my guess is chrome carbides which I think would be small enough not to cause a broblem in fine edge tools. A2 is an excelent die steel for general use tooling, more abrasion resistant than W1,O1, or O2, and much easier to machine & grind than High Carbon / High Chrome [Hc Hc] alloys like D2 & D3. I hope this long winded answer helps. |
| Dave Boyer - Friday, 04/15/05 22:13:44 EDT |
|
JG: More to the point in Your first post, it would be a lot faster to regrind an old chissel to the custom shape, or to grind one from an old file. Be sure not to heat to the point of making any color on the steel, as You need all the hardness You can get. Grain improvements from forging are improvements over grain from casting the same alloy. A tool like a chissel if hand forged will have grain much like the rolled stock it is made from. A forged billet or a closed die forging gets compacted from all directions, and is some improvement over rolled stock. |
| Dave Boyer - Friday, 04/15/05 22:54:03 EDT |
|
Guru: Good essay on bad illustrations; you nailed a lot of points that have driven me to distraction over the years. Some pictures need a thousand words. Off to Marching Through Time instead of the Spring Fling: http://www.pgparks.com/places/eleganthistoric/marietta_events.html Not enough weekends in the year, and we had to schedule the Longship Company annual meeting sometime. I'm not setting up the early medieval forge, but there's plenty of arms and armor to keep the metalheads happy. ;-) Clear, cold and frost warnings on the banks of the lower Potomac; glad I'm sleeping out tomorrow night instead of tonight. Visit your National Parks: www.nps.gov Go viking: www.longshipco.org |
| Bruce Blackistone (Atli) - Friday, 04/15/05 23:00:33 EDT |
|
I am supposed to answer an occasional question on anvilfire, but the thread about forging and grain structure reminded me of a (lost) article I read a few years back. This article talked about something called "grain flow" caused by slag inclusions and traces of phosphorus and sulphur forming a longitudinal structure when the steel was hot rolled. It is not anything near as gross as the stringy siliceous structure of wrought iron, but it exists. The article got almost spiritual about the grain flow coming together at the forged point of a knife. I don't buy all of that, but I suppose that when a tool with length is forged, the grain flow reacts to getting pushed around...say, a screwdriver, chisel, dirt pick, etc. Is anything going on there that is important or that we should investigate? |
| Frank Turley - Friday, 04/15/05 23:19:39 EDT |
|
A Cheap, dirty and effective method to reduce hammer hit load from going to the floor or foundation is to attach the hammer to a big radial tire on it's wheel with the tire laying sidewall against the concrete. The hammer base can be bolted or welded to the steel wheel. The tire will flex and act as an isolation spring. Be sure to select a tire and wheel combination that will not have the steel wheel hitting the floor. Play around with tire inflation pressure. Be sure to use a radial tire, not bias ply. Tire center must be close to the center of the dies. A piece of plywood or sheet metal over the top of the tire will keep hot stuff you drop from melting into the tire which is a safety issue as well as a BIG STINK. Yes, the hammer may buck around some, and that is far less than optimal, but you do what you have to do. Must be respectful of the neighbors. Sounds disgusting doesn't it? It is, and I hesitate to admit I did it, but it works. I was using my first air hammer on a spancrete floor over basement for a while and didn't want the spancrete to get vibrated a lot. A heavy supplementary steel baseplate over plywood or conveyor belting is far better. I used to prefer conveyor belting. Plywood under a large enough base might be working better since the wood cells permanently crush as required to conform to the irregularities of the concrete and spreads the load out a little better. I have another method on test. Won't know the durability for a year or so. As always, I am an advocate of large mass, but not an advocate of deep. Spreading the load out over a bigger area will result in less severity of load to the soil or floor in most cases. Less pounds per square foot means less vibration transfer in most cases. Not all, but most. |
| - Tony - Saturday, 04/16/05 07:04:29 EDT |
|
The guru's post on isolation bases reminds me of the old tool and die shop at the valve shop. It was on the 7th floor of the machine shop, with a drop forge shop about 50' away. Now this hammer shop had a 25,000# steam Erie drop hammer, as well as 15,000 and 10,000 down to 1000#. When that 25,000# hit, the whole machine shop bounced. If a coffee cup was about 2/3 full, and was placed on the headstock of a certain lathe, the cofee would come out of the cup about 2", hang a moment, then fall back into the cup. Seems the lathe was in the middle of the span between posts. Now we had 7 floors of heavy machines, something like 450, with many in the 60,000# range, and they all bounced to some degree. That hammer shook about 20 square blocks of louisville. The hammer anvil rested on a timber foundation, sitting on a poured foundation that went down to a roughly 20 square block of limestone. That block was floating on the old Ohio Riverbed of sand and mud. Talk about an almost infinite weight of base! Now for those who would ask, the toolmakers learned to know the sound od the big hammers tupping,(exhaust muffler was close to their shop) and the rythem of the blows, and would not be in the cut when it hit. |
| ptree - Saturday, 04/16/05 08:25:51 EDT |
|
|
|
|