So, about socket chisels. I was thinking of drilling a (possibly stepped) blind hole along the axis of my bar stock. I would then drift this out to the desired conical shape. Using a similar shaped mandrel I could work the outside to the desired shape. If the drift is made on a lathe, it seems an easy way to get a reasonably true socket....
|
|
andrew
- Sunday, 04/01/07 00:29:23 EST
|
ANdrew,
If you're going to do that, let me offer a suggestion. After you step drill the hole, use a tapered reamer (broach) to clean up the transitions between sizes before you start forging it out. This will give you a more consistent thickness of stock to be working.
You can get tapered reamers at MSC or McMaster-Carr.
|
|
vicopper
- Sunday, 04/01/07 00:41:03 EST
|
Guru,
Thank you for your reccomendation.
I want to be clear about the rust, it is really just surface rust colored dust. there is no scale, or anything with depth. I think some oil and a wirebrush, or steel wool will take care of it.
I wouldn'tgo so far as to sand it.
I now need to build a small forge.
Thanks again,
-Pete
|
|
Pete
- Sunday, 04/01/07 09:05:20 EDT
|
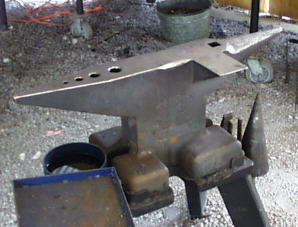
Pete: Look on the left side of the front foot. Should be a serial number there. It can be roughly correlated to year of manufacturer. According to Anvils in America in 1908 H-B switched from a soft steel top half with a tool steel plate to the entire top half being forged tool steel.
On U.S. anvil dating Richard Postman was able to locate the logs for Trentons and Arm & Hammer but not for H-B. He made an educated guess based on the number produced mentioned in their advertisements, which could themselves be dated. I once spoke to him about this and he is relatively confident the cross-reference table in AIA is accurate to within a year give or take.
On periodic oiling WD40 seems to work quite well.
|
|
Ken Scharabok (Poor Boy)
- Sunday, 04/01/07 09:26:21 EDT
|
the numbers are...
1746 99
There is also a 2 stamped into the bottom side of the horn, and a 5 stamped into the base. at the front, above the foot.
any help is appreciated. I will start on the WD40 this morning.
-Pete
|
|
Pete
- Sunday, 04/01/07 09:48:32 EDT
|
There also seems to be a 56 stamped into the back side (opposite the Hay-Budden logo) of the anvil. once again, any help is appreciated. It is not terribly important, as I intend to use this anvil, and not sell it, but I am curious.
-Pete
|
|
Pete
- Sunday, 04/01/07 11:33:19 EDT
|
Forging Brass
Hi All, can brass (yellow brass from a brass pipe nipple) be forged? And if so, does it turn any color at forging temperature? Oh, I assume that tongs are a necessity just like aluminum...
Thanks,
Mike
|
|
Mike Berube
- Sunday, 04/01/07 11:35:09 EDT
|
Pete: Your H-B was likely made in or about 1919. Should have the tool steel top half. The weight should be stamped under the logo. Other numbers are likely inspector marks or perhaps metal batch number.
The base is likely cast mild steel. According to Postman A&H, Trenton & H-B purchased the anvil bases from a supplier. However, occasionally they might be out of a certain size, or for a low sales volume one, and they would forge out a base. He notes sometimes the base looks out of proportion to the top, implicating they may not have had the proper size base on hand and used the next size up or down.
|
|
Ken Scharabok (Poor Boy)
- Sunday, 04/01/07 12:07:32 EDT
|
Ken,
Thanks for the help. I cleaned it up with 3 in 1 oil, as my WD-40 can died out on the first spray. It looks really good, but this is my first experience with an anvil. The weight stamp clearly reads 159, in fact all of the stamps are pretty clear.
I appreciate all of the help. now I have to figure out how to use it.
-Pete
|
|
Pete
- Sunday, 04/01/07 12:31:48 EDT
|
> "For all your days prepare,
> And meet them ever alike:
> When you are the anvil, bear--
> When you are the hammer, Strike."
>
> - Edwin Markham
|
|
Frank Turley
- Sunday, 04/01/07 12:37:42 EDT
|
Brass pipe. Yes it can be forged, Mind the temperature closley, It will melt just beyond a dull red, If you have some scrap to play with, you may want to experiment with before forging your good stuff.
As far as tongs,, This will depend on how much of the pipe length you are heating and pipe diameter. FWIW, I was forging candle cups of a 3/4" pipe that started out just under 3'. Every few heats I had to quench the end I was holding on to, Even with a weldersglove it was uncomfortable hot after a while.
Safety tip, Stuff a rag tight inside the end you are holding, This keeps hot gases from flowing thru the pipe to needlessly heat the end further, Also will keep steam from blowing through the pipe (onto your body) if you need to quench.
One more thing,, be real careful with the tongs too, The brass is real soft at forging temp, tongs can leave dents in your work.
|
|
- H�kan
- Sunday, 04/01/07 14:12:07 EDT
|
Thanks H�kan
Mike
|
|
Mike Berube
- Sunday, 04/01/07 14:31:52 EDT
|
Frank, thanks for that bit of philosophy. I liked it a lot.
|
|
quenchcrack
- Sunday, 04/01/07 14:54:47 EDT
|
Forging Brass: That dull red is in a dark shop. In a bright well lit shop you cannot see any color to brass. It is difficult to heat in a coal forge without melting. I would heat a steel plate and rest the brass on that OR use a gas forge turned WAY WAY down.
Years ago I did a lot of brass work. I used a torch for heat. Even while being very careful it was common to have to weld pieces back together. . . Today I would build a special low temperature gas forge with a temperature readout for the purpose.
|
|
- guru
- Sunday, 04/01/07 15:25:48 EDT
|
Is there a pickle that can be mixed from pool chimicles to clean steel and iron in a hot bath?
|
|
Lon Warinner
- Sunday, 04/01/07 16:00:56 EDT
|
For forging small pieces of brass, bronze or copper, I have used an electric hotplate. Put a piece of refractory tile on the hotplate and a couple of soft firebricks (or pieces thereof) arond the edges to make a small kiln-like enclosure. With the hotplate on low or medium, you get a pretty good temperature after about half an hour, and it stays right in the forging range. Thisis with a one-burner Calrad-type element hotplate with proportional control. You'll need to experiment with your own hotplate to find the sweet spot.
|
|
vicopper
- Sunday, 04/01/07 16:01:36 EDT
|
Lon,
Yes. Most swimming pool acid is either dilute hydrocloric acid (HCl) or sodium bisulfate, which is a half-neutralized sulfuric acid. Either one wil work to pickle steel. However, you're going to pay more for swimming pool chemicals than you will for the real stuff. Hobby or luxury items always command a premium price.
Regular Muriatic Acid is about 30% hydsrocloric acid in water. You can get it at the hardware store. It is used for cleaning driveways and masonry. Cheap stuff. Dilute it about 1:3 with water, pouring the acid into the water, (NOT the other way around) and soak the piece in it. No need to heat it. If you're in a hurry, use it a bit stronger, but don't waste energy heating it.
I will repeat here: DO NOT POUR WATER INTO ACID! Doing so creates a very exothermic reaction, resulting in steam explosions, toxic gases, and personal injury.
Wear protective cloting and face and eyeprotection when using any chemicals. Use rubber gloves suitable for handling acids. Wash up afterwards and neutralize any spills with baking soda.
Used HCL pickling solution can be neutralized with sodium hydroxide (lye),which is NaOH chemically. When you mix HCl and NaOh and titrate to neutrality, you end up with NaCl +H2O, or plain salt water. The minute amounts of dissolved iron and aloying ingredients from mild steel will not be environmentally problematic as long as you're not using tank car loads of the stuff.
|
|
vicopper
- Sunday, 04/01/07 16:14:40 EDT
|
Aaron
Hickory is no question a very good wood for handles the problam in my place in Israel is that this type of wood is not impoted and therefore not available in the country,but not having the wood and forging and selling many hammers around the world i had to finde my way my suply of wood and experiance. White maple is not good enough! too soft and breaks,Oak the same, Red maple is very very good,I Have hammers in my shop 17 years now with the original Red maple wood. the E-PPE-A wood i found 3 years ago (i''ll try to fined the right spelling)for the hammewrs i forge for GERMANY and fined myself using it for ALLthe hammers i produce.The color of the wood is dark browen a bit heavier then the water and have a very nice touch to the hand.
i saw in my life many Hickory handles broken because of missuse ,eaven the best quality wood will not tolerate a missuse of the hammer.
Aaron sorry for being late with the answer ! just came back from teaching two "free form air hammer "classes and one tools forging class in GERMANY.
HOFI
|
|
HOFI
- Sunday, 04/01/07 16:35:37 EDT
|
Brass emits some toxic nasties when you cook it. Ventilate well. Ditto derustifying steel in acid-- gives off stinky fumes-- do it outdoors. Never in a closed vessel. NEVER in a closed glass vessel.
|
|
Miles Undercut
- Sunday, 04/01/07 17:37:37 EDT
|
Frank, that is the first quote I've ever heard that I'd consider putting on my tombstone. Thanks for posting it here.
|
|
T. Gold
- Sunday, 04/01/07 18:11:27 EDT
|
Guru,
i've been building the stupid blown burner you have on this site. I finally have a blower (dumpster diving FTW) and all the fitting and the silly thing wired and all connected. I was wondering if you could give me a bit of advise on tuning the thing to the right neutral flame. I've got a choke plate on the blower to restrict down the airflow as well as the standard regulator/needle valve on my Propane supply. so far I've gone from orange flames only (not enough air) to blowing the fire off the end of the burner. I think i can recognize a neutral flame but I'm not used to looking for a neutral flame on a torch 1.5 inches across. Oh and bright sunlight and trying to tune a burner doesn't mix (figured that out on my own) makes some fun shadows tho. I'm also assuming that changing the propane pressure changes the ammount of air you need to add.
Second question, How far into the chamber should the burner sit? Assuming 2 inches of Insulation, from what I've read the tip needs to not protrue past the insulation or it will/might melt. should it sit back in the insulation a bit? flush with the inner surface?
thanks again for putting up with my questions.
|
|
Frostfly
- Sunday, 04/01/07 18:38:29 EDT
|
Thanks to all for the insight re Pegley anvils. I am expecting to pay around $400-$600 for a good second-hand one so rest assured Guru, that I am serious and am not looking to rip anyone off. I have been stalking the flea markets for a while, and whilst there are quite a few OLD blacksmithing tools for sale there, anvils are pretty rare.
Can anyone give me a tip for an easy way to tell cast from steel without actually smashing at it with a hammer?
|
|
Craig
- Sunday, 04/01/07 19:03:30 EDT
|
I am looking at new Anvil. I was told that Euroanvil are good quality as well as Nimba. The euroanvile re basically 1/2 the price of Nimba. Is the Nimba really twice as good or it's a compliment of our wonderfull union?
I would hate to spend twice as much only beacause of the made in USA by proud union.
Thanks in advance for your input
Dan
vermont
|
|
Dan Des Rosiers
- Sunday, 04/01/07 19:05:24 EDT
|
What type of metal worker could make replacement window locks for a 1986 Isuzu Trooper II. These are hard to replace as Auto junk yards are picked clean of them and I need to put them on our car we picked up a year ago. These are SLIDING windows from left to right. No rolling up down type windows. A Trooper is similar to a Jeep.
|
|
Cameron
- Sunday, 04/01/07 19:26:02 EDT
|
Dan
Nimba is made from a better grade of cast steel-8640. They have a much finer finish. The anvils are hand dressed before delivery. They have a 50-52 rockwell. The have a marvelous ring and rebound. They are hands down a better anvil.
The euro anvil is a bit soft at a 40-44 rockwell. They are a medium carbon maganese cast steel that varies in material consistancy. They have a rough finish and need to be dressed when arrive. They are a good anvil. They are the ford focus and the nimba is the lincoln.
|
|
- Hit & Miss
- Sunday, 04/01/07 21:47:52 EDT
|
Frostfly, re: blown burners, the nozzle should be completely outside the insulation. I would set it up with a 1/4" gap between the plane of the forge shell and the nozzle of the burner. Making the burner port bigger than the nozzle by a bit (3/4" - 1" diameter) can help keep the burner nozzle cool, which reduces backburning.
As far as neutral mixing goes, when I first started tuning burners the thing I found most handy was this image from Ron Reil's burner site:
http://ronreil.abana.org/richtolean.jpg
From what you've said, you have experience tuning torches, so you should be on the right track already.
Cloudy and drizzly in Kaneohe, Hawaii.
|
|
T. Gold
- Sunday, 04/01/07 22:00:37 EDT
|
what is a micro forge i see all you guys talk about them i was just wondering what is it is
thanks
|
|
- jake
- Sunday, 04/01/07 22:01:42 EDT
|
CRAIG, I gave you a tip on good cast steel anvils. Did you miss it? Alan Ball had them cast to his design for resale. www.villagesmith.com.au He is 50 kms southwest of Brisbane. He also has tools and books for sale and sponsors an annual one week "Hot Iron Muster" at his place near Logan Village.
Some, but not all, cast anvils may have raised lettering or raised symbols on them. Old wrought anvils will often have letters and/or numbers stamped into them.
|
|
Frank Turley
- Sunday, 04/01/07 22:11:59 EDT
|
Lon, Someone on this site recommended I use vinegar and salt to remove mill scale...works like a charm and not so potentially dangerous. Mix the salt into the vinegar, add salt till it will no longer mix in solution but settles out on the bottom. Soak your metal for 24hrs and the scale is gone. The metal will be slightly discolored, but wire brushing removes the residue.
|
|
Thumper
- Sunday, 04/01/07 22:32:52 EDT
|
Frostfly the blown propane forge that I'm finishing this next weekend is being made just like the one at
http://www.indiangeorgesknives.com/building_a_forge.html
I've used George's forges for a bit of work and they work great, for welding or whatever. (actually Indian George gave me the pipe body for the one I'm building and I'm going to his place next weekend to finish it up)
His step through with pictures has a very good picture of how far in the burner tube sticks into the forge body, and the answer is, not at all really. The mounting pipe (2" nipple to hold the 1.5" end of the burner is welded to the outside with essentially none sticking in.
|
|
jmercier
- Sunday, 04/01/07 22:48:21 EDT
|
Jake, See FAQ's, G, Gas Forges, bottom of the page, Micro Forge
|
|
- guru
- Sunday, 04/01/07 23:22:53 EDT
|
Frostfly, Burners operate differently in the forge where there is back pressure than in open air. You don't want a neutral flame at the burner, you want a neutral to rich atmosphere in the forge.
Fuel injected at elbow: I use a T and thread a pipe bushing on the INSIDE for an extension pipe. A lot cleaner and does not require welding or brazing on galvanized. Most pipe bushings are thick enough to tap from the inside and screw pipe in from both sides. . .
I prefer the nozzle on burners to be refractory material. Either reinforced kaowool or some refractory cement. On my first big blower forge the nozzle was firebrick chips and refractory cement. On the current version I made a heavy steel version (3/4" thick walls) and it scales up badly.
On small forges I have been using SS nozzles and they scale up as well.
|
|
- guru
- Sunday, 04/01/07 23:32:47 EDT
|
Window Locks: Cameron, almost any metalworker could make them it just depends on what you want to pay. I would go to a Locksmith first. They have catalogs of all kinds of after market locks, latches and replacement hardware. If you actually need a LOCK not just a latch they may have something in stock. But these guys, especially old shops in big cities have tons of odds and ends.
I've noticed in Costa Rica that the rental cars use nice heavy Yale locks in place of the tinny (easy to pick/bypass) OEM locks. . .
|
|
- guru
- Sunday, 04/01/07 23:39:17 EDT
|
Dan Des Rosiers,
I've used both the euroanvil and the Nimba, and the Nimba wins hands down. If you're goiing to do serious forging, the nimba is the way to go. The design is better, in my pinion, with the heel tapering to almost a pint you can have any face width you need. The face itself is nice and wide. The horn is much better than that little skinny conical thing on the Euroanvil. The ony thing the Euroanvil has that the nimba doesn't is the side shelf, and a bridge hardy takes care of that very handily.
There is no comparison between the two as to fit and finish. The Nimba is ready to use as delivered, and the Euroanvil will take a few hours of dressing to be useable. The Niimba is madein the USA, but I don't think the Jacqua shop is unionized. They're just good people who take great pride in making an excellent product. Euroanvils are made in any of several Eastern European foundries and the quality can vary considerably.
If you're just a hobbyist who only uses the anvil for an hour or so a week, then the Euroanvil might be all you'll ever need, at a lower price. If you're serious about forging, the Niimba is a serious tool.
|
|
vicopper
- Monday, 04/02/07 00:57:01 EDT
|
Using a T and threading each side with 1/4" ntp is what I did for my burner. The burner is finished and seems to work fine (though having just used venturi burners previously I, like Frostfly, am going to have to get used to adjusting the flame properly. I kept blowing my flame out while trying to adjust it.)
http://www.tharkis.com/images/burner.jpg There's a 6" black pipe 1/4" nipple inside the T as well as the one screwed into the back of the nipple. Simple design and works great.
|
|
jmercier
- Monday, 04/02/07 01:19:44 EDT
|
It looks like their is a consensus that Nimba Anvil is the way to go. I guess I will have to bite the bullet and go for Nimba when the wallet will allow it.
Thanks again for your input
Dan
|
|
Dan Des Rosiers
- Monday, 04/02/07 10:14:08 EDT
|
Forging Brass:
Guru, thanks for the info.
Miles, thanks for the warning I will be careful.
Mike
|
|
Mike Berube
- Monday, 04/02/07 10:21:59 EDT
|
Split edge while forging:
Guru, All,
While at Home Depot, I found a masonry chisel forged from 3/8"x1" bar stock with a rather blunt chisel forged into the end of the bar. It was cheap $7 and I thought I could make 3-4 (it was 12" long) hot cuts from it.
So I brought it home, put it in the forge, brought it up to a bright orange/yellow heat and proceeded to thin out the chisel section. The very first blow, centered laterally and just behind the cutting edge (the edge of the hammer face was ~1/4" from the cutting edge), caused the cutting edge to split. This did not cause me a big problem, after thinning out the section I sawed off the split part.
But I am wondering what I did wrong to make it split? Any thoughts?
Mike
|
|
Mike Berube
- Monday, 04/02/07 10:28:14 EDT
|
Dan,
I was in a similar situation to you with regard to the anvils. I decided to go with the Nimba. I do not have ANY regrets. I love the Nimba more and more every time I use it. Wonderful people to do business with as well.
You will not regret your decision.
Mike
|
|
Mike Berube
- Monday, 04/02/07 10:38:32 EDT
|
> "For all your days prepare,
> And meet them ever alike:
> When you are the anvil, bear--
> When you are the hammer, Strike."
>
> - Edwin Markham
Second verse
My day's prepared with plans and thought
When Rome burns I don't fiddle
But lately I feel much more like
That hot piece in the middle
-Sarah
|
|
Sarah Hahn
- Monday, 04/02/07 11:26:48 EDT
|
I am new to blacksmithing and I am currently building a forge. I do not have a career in metalworking but I do make a living as a journeyman lineman, so while my knowledge of this craft obviously isn't broad I am by far not a dummy. Coming from an old industrial area where coal was once mined, believe it or not it is rather hard to find locally so I decided to use charcoal basically to get my feet wet. Here is my question, the forge I'm building/designing is a mixture of ideas I've aquired through various websites, (rather than taking the easy way out and buying a firepot, blower, and forge), I am wondering if anyone could tell me of a good idea or design to use for making a clinker breaker to use in the tuyere? I believe that one is not needed in a charcoal forge, but i do plan to upgrade to coal/coke as my experience grows. All ideas are more than welcome and greatly appreciated.
|
|
Jeff
- Monday, 04/02/07 11:40:44 EDT
|
Jeff, You are right that a clinker breaker is not needed for charcoal. The best simplest most durable design is the tiangular "ball" type. This is a piece roughly shaped like a triangle with blunt rounded corners. In a square hole it would be flat on the ends, in a round hole it would be semi spherical. This rotates on a 1/2" bar allowing a point OR a flat to be UP. Tis either focuses the fire or spreads it out. The handle is bent on the axis of the triangle so you know the point is UP or DOWN. Since you want a concentrated fire most of the time the handle is bend down opposite the point. This way gravity helps hold it in place most of the time.
If I was making one of these I would use a tuyeer with a square hole or tube (2" ID) and use my first forge to make it.
Over the years I've found that grates and clinker breakers burn out, rust out and are generally a pain and maintenance headache. So I use none, just a hole through which fuel falls down. I gain peace of mind and efficiency at the cost of a little fuel.
Another route to go that a friend uses is a bent U shaped piece of stainless bar. The U shape has the ends bent up to fit the sides of the fire pot thus stays in place fairly well. The bar is about 3/8" by 1/2" (10mm x13mm) turned on edge. Occasionally it gets burned out or dislocated but it is easy to replace.
|
|
- guru
- Monday, 04/02/07 12:08:49 EDT
|
Dan Des Rosiers,
Also, check out www.ratholeforge.com for a look at another U.S.A. anvil.
Mike Berube,
Whenever you forge tool steel and you don't know which of the "jillion" alloys it is, you're just guessing at all heat treatment temperatures. I consider 'forging' a heat treatment.
|
|
Frank Turley
- Monday, 04/02/07 12:17:57 EDT
|
thank you very much Guru. The other "route to go" as your friend uses sounds very interesting, would you care to elaborate more on how it is utilized or placed, i.e. the "U" placed inside the tuyere rather than the firepot itself I am guessing. The tuyere I am making involves a 3" cast "T", three 3" nipples and 1 3" X 4" cast reducing coupling unless I come across a better design idea.
|
|
Jeff
- Monday, 04/02/07 12:31:12 EDT
|
Anvil style preferences: Many folks do not like the Nimba Italian style anvil because the face is too wide, while other like the width. Many smiths prefer a relatively narrow face on a heavy anvil so that they can get into tight places. The Italian pattern also has a proportionately short stubby horn that is difficult to use if you are used to a more slender taper.
The Hofi anvil and the early Euro anvils had a graduated series of round punching holes which are very handy. I have not seen this on other anvils. The holes are drilled so there is some extra cost involved.
Many folks prefer side shelves such as many German pattern and the Euro anvil have. Dean Curfman maker of the Big BLU had one welded onto his Peddinghaus. The thinness of the shelf gives you a feature found only in the heal of much smaller anvils plus a nice inside corner. Dean uses the open space between the face of the anvil and the shelf for straightening.
Rat-hole anvils makes a very nicely hand finished Euro/German style anvil that is made of good material and is a beautiful classic design.
The Kaynes sell the TFS line of anvils which look a little different because they put more iron into the body of the anvil than into the base. Bill Epps called these the "biggest little anvil made". They now make larger versions in this pattern. It is sort of like an Italian pattern with feet.
In the old shops they had blocky hornless forging anvils and then for curves and decorative work they had slender stake anvils with round and square horn. As shoeing became a larger part of the smith's business the horn was added to the forging anvil. Then the hardy hole was added and heel made longer and thinner to make it easier to punch. Then the pritchel hole was added along with the soft cutting shelf at the horn. The anvil became as we most commonly know it, a multi purpose tool. Each country had slightly different versions. The Germans like a sloping side so that the working corner is not a right angle. Their anvils also had upsetting blocks and side shelves. The French liked anvils with a raised face, there being two steps at each horn. The Americans liked an anvil with a sexy narrow waist that also made them ring like a bell. This pattern was a continuation of the anvil developing largely for making shoes as well as a general purpose tool. The modern farrier's anvil is the result of this design carried to the absurd.
Of course a lot of these preferences are based on what you are used to.
|
|
- guru
- Monday, 04/02/07 12:36:29 EDT
|
I, too, love my Nimba.
The "Jacque Shop" consists of Willene, Russells widow, who does the administrative work and selling, and then Jim Garret, who is a world class blacksmith who has his shop a couple of blocks away, who comes in and hand sands the anvils, mostly as a labor of love and friendship. Neither belongs to a union, as far as I know.
The casting and heat treating is jobbed out to commercial shops, which could, I suppose, be union- but there is not a lot of featherbedding going on.
The anvils cost more because they are made in America, as opposed to in a foundry that was built by a communist government with no eye towards expense. And the wages in the Czech republic are still a bit lower than here in Washington State.
My guess is the Czech foundry IS unionized- in most of eastern europe, even during communism, unions survived, and are still there.
So the Euroanvils are cheaper, and probably from a Union shop, hows that for standing things on their head?
|
|
- ries
- Monday, 04/02/07 12:43:32 EDT
|
Greenwood Grate: Jeff, Josh's grate lies in the fire pot across the tuyere opening. The short turned up ends (about 1") rest against the slope of the fire pot. This is just a loose piece and it can get dislodged if you are not used to working with it.
The grates Josh prefers do not have a clinker breaker and are in fact an actual grate. This is a series of about five 1/2" (13mm) bars spanning about a 4.5" (~115mm) square hole. This makes a large evenly heated hot spot in the fire.
DIY firepot preferences are as infinite as those that make them. You can also have have as many failures as successes making your own.
|
|
- guru
- Monday, 04/02/07 12:48:49 EDT
|
once again thank you for your input guru. I agree with you about the DIY failures and successes, that's what interests me the most. Perhaps that's just the "Lineman's Perspective" that has been bestowed in me, "always looking for a challenge and if it doesn't work, then beat it into submission" *smiles*
Thanks again
|
|
Jeff
- Monday, 04/02/07 13:01:55 EDT
|
Greetings,
I am from Russia, i am interesting in armoury of XV - XVII centries of Eastern Europe and Middle East - moustly plate-and-mail armoury system. So i have to make a planty of holes. In our regione almoust impossible to buy such a tool as Roper Witney Punch. But there is an opportunity to produce it. So tell me, please, where can i find the sketches of similar tool?
|
|
Roman
- Monday, 04/02/07 13:07:23 EDT
|
Thanks for cleaning up the mess Guru...
Mike
|
|
Mike Berube
- Monday, 04/02/07 14:16:23 EDT
|
Hofi Anvil? Okay now that is a new one to me. Wher can I find info on that one?
|
|
Dan Des Rosiers
- Monday, 04/02/07 14:24:40 EDT
|
Punches: Roman, Generally production tool drawings are not available. Punches like the little Whitney punch use a sophisticated frame design that varies greatly with the force (tonnage) and throat depth. These must be matched to the maximum hole size. Machinery's Handbook has the math for calculating punch frames such as these.
Otherwise you are looking at a relatively simple compound leverage device. However, some of the larger punches use a gear segment. As the size gets larger they also use needle roller bearings to reduce friction. In compound leverage devices friction can eat up a lot of the advantage gained by the levers.
If you do not need the portability of the little production punches then a bench mount device is easy enough to fabricate. Making the guide and the punches and dies would be the most difficult part. If I were doing it here I would build around commercial punches.
If you are going to make a clone of these as they already do in China then your best bet would be to buy one and reverse engineer it.
I suspect that if you search the industrial suppliers in your country that the tools you are looking for are made there. These tools are used a great deal in manufacturing aircraft.
|
|
- guru
- Monday, 04/02/07 14:27:53 EDT
|
Dan, Tom Clark of the Ozark School of Blacksmithing makes an anvil from the Hofi pattern. Hofi has talked about having them produced in Europe but it is only a rumor.
 Original Hofi anvil. The stand it is mounted on accentuates some of the features. The heavy perpendicular feet act like upsetting blocks and the space in between allows work pass through the stand to the floor if needed. Original Hofi anvil. The stand it is mounted on accentuates some of the features. The heavy perpendicular feet act like upsetting blocks and the space in between allows work pass through the stand to the floor if needed.
The graduated "pritchell" or punching holes are very useful. I know several people that like an anvil with a narrow face and this one certainly has one.
This is a cast steel anvil weight 265 pounds (120kg).
|
|
- guru
- Monday, 04/02/07 14:35:28 EDT
|
Split Steel: Mike, it sounds like a problem with the steel or how it was originally worked.
|
|
- guru
- Monday, 04/02/07 14:40:55 EDT
|
www.ratholeforge.com
This looks really nice as well made in the USA. Anyone here has used those in the pass?
|
|
Dan Des Rosiers
- Monday, 04/02/07 14:55:30 EDT
|
I am thinking about making a hot cutter, and some different tools for metal working. What type of steel should I make this stuff out of? I asked the local steel mill what they would use for tool steel, and they told me that there are 50,000 different kinds. What would you all recommend? Any advice would also be helpful. Are there any demonstrations on how to make a hot cutter?
Thanks alot for all of the help you guys give
ringo
|
|
ringo
- Monday, 04/02/07 15:00:24 EDT
|
TFS Anvils:
I took a trip to Kayne's (Blacksmith's Depot) last Friday to pick up some assorted supplies. While I was there I had the treat of seeing two large pallets loaded with brand new anvils, not something one gets to see very often! These were the TFS anvils in all weights from 70 lbs to 400 lbs, single horn, double horn, and double horn with side shelf. I did not get a chance to work on one, but the Kayne's use a 300-lb double horn in their own shop and say it is as good as the Peddinghaus at the next workstation over. And yes, I know they ARE trying to sell them... TFS is made in the USA as well.
My impression is that the TFS line is better than the Euroanvil/Old World anvil line for not a lot more money. The faces do still have some milling marks to clean up, but that's a very minor issue. If I were in the market I'd consider one. I have no experience with Nimbas, but I've never heard a bad thing about them. A friend of mine was interested in the Rathole, but said they were very rude and uncooperative when he tried to get information about it.
|
|
Alan-L
- Monday, 04/02/07 15:28:16 EDT
|
Split Steel:
Frank, if I hear you correctly you are saying "It happens with unknown steels, just get past it." I'm OK with that.
Guru, OK I just figured, being a newbie, that I made a mistake. But I guess you don't think I made any glaring errors. Cool.
Mike
|
|
Mike Berube
- Monday, 04/02/07 15:34:40 EDT
|
Mike the biggest problem with working some tool steels is working them too hot. The second biggest is working them too cold...
Thomas
|
|
Thomas P
- Monday, 04/02/07 16:43:18 EDT
|
Thomas P
Is there any way to tell that I am working a particular steel "too hot"?
Mike
|
|
Mike Berube
- Monday, 04/02/07 17:02:08 EDT
|
Mike Berube & Ringo,
I'm saying more than "Get over it." I'm saying get the right steel for the right job. Get a catalog or two. Do some homework. Buy the steel new. Get all forging and heat treatment specs and temperatures when you purchase. You'll have to get the tool steel from a specialty tool & die steel company. Avoid junk yard steels, especially if you're going to sell the tool you made.
If you can afford hot-work steel, it would be the best to use for a hot cutter. For the small shop, we usually can get H13, S1, and S7. Sometimes H21 is available. You will need a minimum of 1" square. 1¼" square is OK, as is 1½" square for the larger one. These steels are excellent because they have a quality called "red hardness."
|
|
Frank Turley
- Monday, 04/02/07 17:03:27 EDT
|
Mike, the way you tell when you're working a steel too hot is that it falls apart into metallic cottage cheese. Too cold and it cracks. If it's an unknown steel prepare to experiment until you find out what it likes. Be prepared for disappointment. Use known steels until you have enough experience to tell what's going on, and for anything that *has* to be done right.
|
|
Alan-L
- Monday, 04/02/07 17:22:27 EDT
|
. . . in other words that "cheap" piece of steel was not such a bargain. . .
As for steel specs I've been telling folks to get a MACHINERY'S HANDBOOK for 10 years. It is not the last reference on steel but used copies for $30 are the best reference for the money.
We still have a 10th, 11th and 15th edition from Paw-Paws collection. Only $35 including shipping in the U.S.
|
|
- guru
- Monday, 04/02/07 17:53:18 EDT
|
Cheap Tool Steel:
I guess I should redefine what I meant by cheap. All I have in my shop is mild steel. I have been feeling the need to make a hot cutter for a while, but figured making one out of mild steel would be an exercise in making one but probably wouldn't last long. I saw an opportunity to buy a small sample of steel that I supposed would be a better candidate for a hot cutter than the mild steel I have. For me it was an inexpensive experiment. I did not need to take time out of work to visit the steel yard (they work only the same hours as I do on my day job) to acquire some "tool steel" to play with.
I will weld it up tonight and try it out. If it works well, then cool. If it does not, then no big deal.
Machinery's, I scored a 14th edition on ebay for $7.50 :-)
Frank, I hear you. Question... Do I have any chance of forging 1"+ hot work tool steel on a 120lb anvil with a hand hammer (no strikers available)?
Mike
|
|
Mike Berube
- Monday, 04/02/07 18:11:56 EDT
|
I am a kenpo girl myself, but I've decided to do my next research paper on Japanese sword-making. Specifically i want to compare ancient techniques to modern day ones (materials, equiptment, technology) I found this site and was wondering if you could recomend some good books for me to get and also if you had any personal insights of your own. (I'm sure you do because you guys are experts)
Thanks,
Denise
|
|
Denise Elisio
- Monday, 04/02/07 18:46:30 EDT
|
Working Steel too cold:
It should be noted that working tool or high carbon steels too cold can result in cracking that occurs in heat treat rather than during the forging process. Most of the time, you won't be able to get high alloy steels to move much by hand if they are too cold, but you can do it with a power hammer. In general, don't work high carbon or simple alloy steels below 1600 F. Higher alloy steels like D2, A2, M2 have much higher minimum working temps, lower max temps. A lot of this has to be learned by experience since, even with a specified temperature range, you must learn what that LOOKS like in your shop, unless you have a temperature controlled furnace.
Patrick
|
|
Patrick Nowak
- Monday, 04/02/07 18:59:00 EDT
|
Sarah, a worthy addition to a pithy bit of verse! I like it!
|
|
quenchcrack
- Monday, 04/02/07 21:19:44 EDT
|
Mike,
Yes, a guy can forge 1" square on a 120 pound anvil. You might think about using a 4 pound hammer. It will take quite a few more heats than if you had a striker. I punch an eye in the tool steel to receive a haft. After the eye is punched and drifted, I forge out the blade. The striking head is slightly tapered, the corners chamfer tapered, and the edge ground chamfered. Anneal the entire tool. Harden and temper the blade only.
|
|
Frank Turley
- Monday, 04/02/07 21:52:01 EDT
|
The HOFI anvil is NOT a rumer.
Two of the anvils are now tested from all aspects of shape finish and qulity. One at my smithy in Israel and one in Germany. The steel is 6150 HRC 53-59 GRINDED FLAT AND LEAVELED UP AND DOWEN. In two corners of the anvil base and opossit on the anvil bottom there are two paralel conical 9/19 holes that steel peens will be driven into the steel base and the anvil will seat ON and therefor the base plate will be the same size of the anvile,because of the pins the anvil will not moove from the plate.
THE ANVIL on the foto on jock letter is NOT 265# IT IS only 236 # the one I casted now together with ''angele''
is 265 # or 120 kg it is more robust the width 4"
with all the fichers you see on the pix.
I DO NOT want to speack much on my ANVIL because some people will say i want to sell it whice is right! Iwant to say only one thing I DO NOT SELL AN ANVILE I SELL A SYSTEM
WHICH WILL ANABLE THE USER TO FORGE MORE FORGE EASYIER FORGE FASTER MORE FLEXIBLE AND MORE FORMES WITHOUT MOOVING FROM THE ANVIL !!!! the anvil will be demonstrated first in the coming MAY in HOLAND in the EUROPEN IFGS BIG SCULPTUER SHOW where I am invited to demonstrate my "free form air hammer " system with two anyang air hammers.
The moment the anvil will pass the tests and go to the market I WILL SUBMIT FULL INFORMATION DRAWINGS AND FOTOS OF THE ANVIL WITH THE BASE AND EXPLAINE THE SYSTEM .
''JOHANESS ANGELE'' WILL BE THE WORLD AGENT FOR ME .
We have now more the 30 anvils orders.
To weld a shelf to a regular anvil is a commone process that mr Curfman of the big blu learend at my shop when he came twice to study for a month.
HOFI
|
|
HOFI
- Monday, 04/02/07 21:56:15 EDT
|
Denise Elisio,
"The Craft of the Japanese Sword" by Leon & Hirioko Kapp and Yoshindo Yoshihara. ISBN 0-87011-798-X (in the U.S.) I don't think the techniques have changed that much over the years. Some present day bladesmiths use power hammers. Techniques vary somewhat from smith to smith, but that was true in the early days, as well. Annually, there is a Tatara furnace firing, an old time method, and the resulting tamahagane steel is distributed to the bladesmiths and toolsmiths.
|
|
Frank Turley
- Monday, 04/02/07 22:02:39 EDT
|
Thanks Frank,
Mike
|
|
Mike Berube
- Monday, 04/02/07 22:03:21 EDT
|
Mike, I have used a leaf spring (4 layer) for my high carbon tools. Make a hot cut hardie by either bending a piece or cutting and welding one to 90 degrees and cutting/filing to a sharp edge. I also made my first sword today....... although it is about 4 inches long ;)
Makes a nice letter opener. Anyways, theres a lot of things you can make otherwise with mild steel. Heck, I'm making a 2-1/2' tree with hand forged leaeves entirely out of mild steel and found bolts, rods, etc.
|
|
- Nippulini
- Monday, 04/02/07 23:32:26 EDT
|
Nipp:
Thanks. Ya got pics of the wee sword? I would like to see it.
Mike
|
|
Mike Berube
- Tuesday, 04/03/07 06:33:13 EDT
|
Dear HOFI,
Can we have more precise information on who exactly will sell your system in the USA,when it will be available and the phone # of the person who will be responsible to sell them. Is it also possible to be refered to a web site that I can see the picture of the Anvil and the system that will be available in May.
Finally, I know that you give some technical workshop; will you do the same as you introduce your new system. I would be interested to attend one inorder to use the system correctly right form the get go
Dan
|
|
Dan Des Rosiers
- Tuesday, 04/03/07 08:12:25 EDT
|
Denise Elisio:
May I suggest you ask that question at http://forums.dfoggknives.com ? The book Mr. Turley mentioned is the bible of the craft, but the professional bladesmiths who stop by Mr. Fogg's forum are the current world leaders of the Japanese-style blade, both ultra-traditional and "modern." By that I mean there are some who make their own tamahagane and go from there, and there are some who use modern alloys. Some heat-treat in a charcoal forge, some use molten salts. The one thread that binds them all together is that they produce differentially hardened blades in the Japanese style.
Blade shapes don't change much due to the weight of tradition and the attitude among collectors of such things that the proportions and geometry have to be exactly those of one of the ancient schools of swordsmithing.
Be prepared to learn a lot about metallurgy!
|
|
Alan-L
- Tuesday, 04/03/07 08:48:26 EDT
|
Wee sword..... it may be mightier than a pen.
http://a501.ac-images.myspacecdn.com/images01/50/l_04307a1c314be3a82873ee09efe563ac.jpg
http://a965.ac-images.myspacecdn.com/images01/58/l_82df482fdbc8404ca05ebf472e068f74.jpg
|
|
- Nippulini
- Tuesday, 04/03/07 09:54:37 EDT
|
DAN
As vi told on my letter every thing is still under construction , the marketing the prices and more.as i said the moment that will be finished the full detailed fotos and drawing will be given to the people of interest.
On top of it we are prepering a cd and dvd on how to use the anviland the use and the advantege of every point.
YES i give classes in the stats . I am coming to teach at the ''center for metal art '' CHESTER FLORIDA NY. Speak to ed Meck on the 16 of april for two weeks. Come again on NOVEMBER FOR TWO WEEKS asnd may be on the end of the year to errect a new forging school in the west. hopew to see u in one of the times.
HOFI
|
|
HOFI
- Tuesday, 04/03/07 11:48:14 EDT
|
Nipp:
Very very nice. I like it.
Mike
|
|
Mike Berube
- Tuesday, 04/03/07 11:53:59 EDT
|
Mr. Hofi,
No problem on taking your time, I've been without internet since this past Wednesday myself :)
Good to hear about the Hofi Anvil.
-Aaron @ the SCF
|
|
thesandycreekforge
- Tuesday, 04/03/07 13:43:53 EDT
|
Nipp:
Very lilliputian. I like.
-Aaron @ the SCF
|
|
thesandycreekforge
- Tuesday, 04/03/07 13:46:36 EDT
|
Denise Elisio have you stopped by the swordforum.com yet?
Thomas
|
|
Thomas P
- Tuesday, 04/03/07 14:03:35 EDT
|
im wanting to make a Sgian Dubh out of roller chain damascus , since it is a small knife, would i be able to use just regular bicycle chain for it? , and is it allright to use EZ weld with it, or will the iron filings in the flux ruin the look? , fold together, wire, weld, twist , , fold, weld twist, forge blade ? correct?
|
|
Cameron
- Tuesday, 04/03/07 17:36:27 EDT
|
Cameron: Are you good at forge welding? Bicycle chain is tough to stick. A hint: Fold the chain on itself until it's about 6 inches long, heat it up, flux, and squish it together as close as you can, THEN wire it up. Flux again, and then start your welding. Don't weld the wire, and while ez-weld works, plain old borax is cleaner. Ez-weld will leave dark spots after etching. Plan on folding it two or three times after the first welding sequence, and be aware that it takes a lot of gentle pounding to close up the spaces in the chain.
One bike chain will give you enough for a sgian dubh, but not much more. If you have not mastered forge welding, don't plan on an easy project.
|
|
Alan-L
- Tuesday, 04/03/07 18:15:07 EDT
|
i have been using just borax for flux, im all right at forge welding, but, i had a buddy help me, and i mainly just took my time, used lots of flux, and tried my best to forge it well,
and, it looks pretty good
im currently grinding the blade, and i see no slag inclusions, so im pretty happy with it, i cut the bike chain in half, and it still has enough for a sgian dubh,
how do i etch it? and for how long?
|
|
Cameron
- Tuesday, 04/03/07 20:11:25 EDT
|
thanks guys! I'll let you know how my paper turns out.
|
|
Denise
- Tuesday, 04/03/07 20:17:18 EDT
|
I have looked at Bill Epps directions for making tongs, and I dont understand one part. On the first set of tongs, after he has put the two 3/8 divots in it, what does he mean when he says line them up with the corner of the anvil and set it down with a good blow? How does that give you a flat spot? I have been looking at the pictures on there and what he says before and after, and i cant make heads or tails out of that part. I think that I understand the rest of it well enough to try it. Thank you all for your help.
|
|
ringo
- Tuesday, 04/03/07 21:16:11 EDT
|
Cameron, what I use for etching damascus is feric chloride (PCB etchant) you should be able to pick it up at radio shack or another store that sells electronics hobby stuff. As for how long, that's entierly up to you, if you like a deep etch, leave it in longer, if you like a light one, less time. There's no real way to say how long. Just be sure to neutralize the blade when you get the level of etch that you desire.
|
|
jmercier
- Tuesday, 04/03/07 22:12:31 EDT
|
Bill Epps tongs.
I have not tried this tong making method, but it looks like a "half face" blow where of half the hammer face is off the anvil as you hit. This causes a shoulder on the anvil side, and you'll get a little side swelling on the flattened portion. He didn't give dimensions, but I would reduce the boss area to at least 5/16" thick.
The half face blow is a good method, except that, to a degree, you're working blind. You can get the same effect and see what is going on if you set the shoulder from the top with the corner of a square faced set-hammer.
|
|
Frank Turley
- Tuesday, 04/03/07 23:12:45 EDT
|
Ringo,the frustration to Bill and Andrew Hooper of trying to explain that procedure to me over on the Pub one nite was the spark that started the demos on here.I just couldn't figure it out.Bill said "if I had a blackboard and a piece of chalk I could show you".That planted a seed in Andrew's mind and he came up with pictures on a chat line,it was cutting edge at the time.
You just want to flatten the piece between the divots and only 1/8".You put the metal between the divots onto the corner of the anvil and hit it,only the part touching the anvil flattens to any extent.It will bend a little on either side of the flat spot but the metal not on the anvil remains round.Straighten it.Flip it over and do the same on the other side on the opposite corner of the anvil and you end up with a flat spot on both sides.The divots will be altered somewhat but the jaws and reins should be still round.
The part I didn't understand was that the "setting down" occured on the anvil side not on the hammer side.
I hope I explained this right,if not...well...maybe another trip to Texas is neccessary.
|
|
dimag
- Tuesday, 04/03/07 23:43:50 EDT
|
Wanted to buy a camp bell
i manage a campground on the site of an of an old ccc camp we are looking for an american made bell to replace the broken 50 plus year old bell any ideas thank you terry
|
|
terry tallman
- Wednesday, 04/04/07 07:54:46 EDT
|
terry tallman:
I've seen them at flea markets and at least one is on eBay as listing #290101616875.
Be aware likely all of the ones you see in catalogs today, such as Lehman's, are likely Asian made.
|
|
Ken Scharabok (Poor Boy)
- Wednesday, 04/04/07 08:15:46 EDT
|
Bells:
http://www.brosamersbells.com/index.html
|
|
Hudson
- Wednesday, 04/04/07 08:41:33 EDT
|
Etching pattern welded steel---you can use almost any acid, the Indonesians used lime juice for their keris's. I use salt and hot vinegar if I want to see the pattern but not have much topography. Muriatic acid, hardware store, Battery acid, auto supply store can be used
BUT strong acids are *DANGEROUS* know how to use them safely!
Ferric Chloride is easy to use and much safer to boot.
One trick to get good definition on alloys that are close in content is to dilute the Ferric Chloride 1:3 or even 1:4. The idea is that strong solutions etch *everything* and there is not much difference in how much. Weak solutions tend to etch some alloys and leave the others alone.
Last Sunday I etched my pattern welded pizza cutter. Did a fast "no-topo" etch for the blade and a long etch for the handle. I had the handle in the dilute Ferric Chloride for over an hour, checking it every 15 minutes. When it was done it had a lot of topo that after I washed it off and scrubbed it I then "knocked down" using a very, very fine stone and WD40 as a lubricant leaving nice shiney high parts and darker low parts.
Full Strength would have eaten it up in that ammount of time! Temperature is alo important. it was between 70 and 80 degF here. I used a gatoraide bottle, (small) as the etching tank and had a piece of *unbroken* plastic insulated wire---you don't want to get copper into the ferric chloride! (except for when you do...) to lift the piece in and out.
Thomas
|
|
Thomas P
- Wednesday, 04/04/07 10:40:29 EDT
|
Hey Ken:
I'd mentioned before about offering a picture of my Kirkstall Forge anvil if Mr. Postman needed it, but he already had a pic of a similar one. Might wanna check out ebay item number 270105133785. It's a Kirkstall, but with a side shelf, and a bit heavier than mine.
-Aaron @ the SCF------is wishing he had the cash on hand to afford that anvil:(
|
|
thesandycreekforge
- Wednesday, 04/04/07 13:42:03 EDT
|
Aaron: I have printed out a copy of the listing for Mr. Postman already. They initially had it advertised as a farrier anvil. I corrected them to it being a coachmaker's anvil. First one I recall seeing for Kirkstall Forge.
I wouldn't say coachmaker's anvils, nor Kirkstall Forge anvils are rare by themselves; however, putting the two together probably puts it into the collector's category.
I would date that anvil to early- to mid-1800s.
|
|
Ken Scharabok (Poor Boy)
- Wednesday, 04/04/07 14:42:36 EDT
|
I had never noticed that the shelf on a coachmaker's anvil was on the NEAR side while German style side shelves are on the far side. . . . I wonder why?
|
|
- guru
- Wednesday, 04/04/07 15:54:37 EDT
|
Kirkstall Coachmaker's Anvil
I sent several actual photos of a Kirkstall Coachmaker's anvil my friend has to Richard about 3 years ago. If I recall it was in the 120-130 lb class.
|
|
- Hit & Miss
- Wednesday, 04/04/07 19:34:29 EDT
|
terry tallman-- the big ring off an old truck split rim will produce one helluva loud ring.
|
|
Miles Undercut
- Wednesday, 04/04/07 22:14:57 EDT
|
Anvil shelves on the" NEAR " side of the anvil are produced for "left" handed blacksmith.
|
|
HOFI
- Thursday, 04/05/07 03:55:55 EDT
|
Hi Guru. I have a Paragon anvil and it's stamped 112LBS. Got any idea how old it is? It's pretty beat up but still flat on top. I used it a few times. I really like hammering out steel and making things. I took blacksmithing in highschool and won first prize in a state show for highschool general metals course students. I had an advantage because I started working in a welding shop when I was 15 years old. (I'm 66 now)They had a 300lb. anvil there. I weighed about 100 lbs. and I could just lift it off the wooden blocks before it'd start slipping out of my hands. Lot of fun showing off to grown men! My dad weighed 150 and he'd pick it up, set it on the floor and lift it back up on the blocks! No one would try that, that I can remember. Blacksmithing is a real good hobby for taking out frustrations too! I love to hear the ringing rhythm of the anvil and hammer. I enjoy reading this site also. Thanks for any info. you might have and goodby. Sincerely, Bob Hagan.
|
|
Bob Hagan
- Thursday, 04/05/07 07:56:12 EDT
|
We have been asked to make a two sided fireplace doors and screens in "Hobbitstyle'' as in Lord of the Rings , Other than renting the movie does anyone know of a sourse of images we can look at.? We have been looking at historical Celtic designs and early Scandanavian stuff that we think were the ispiration for Tolkien Who were the blacksmith /consultants on the movie? Apparently there was an exhibition of ironwork from the movie but I can't find it on Google.
|
|
tim
- Thursday, 04/05/07 08:37:56 EDT
|
I have a Masport Terrier which is a small rotary hoe with four blades on each side of the power head. I'd like to replace the blades with something tougher than what is supplied. The current blades are 0.1" thick, 1.5" wide. The blades are about 9" long in total and curve at the tip by 90 degrees. 5" of the blade length is secured to the power head by three bolts. What are my options in terms of what sort of steel I can make new blades from? I'm concerned about being able to drill holes and bend the blade tips.
|
|
john
- Thursday, 04/05/07 08:50:45 EDT
|
The ratholeforge.com anvil has the upsetting block on the near side, with the rounded horn to the left. They designed it that way on purpose; it is handy and is not in the way. See the photo on their website.
|
|
Frank Turley
- Thursday, 04/05/07 10:28:20 EDT
|
I'll try to check my wif's complete collection of the "official" fan magazines tonight and see if they have any leads. The art direction had a heavy Art Noveau influence (easpecially with the Elves) which, in itself, was influenced by both Celtic and Nordic design. Some review there may be worth while.
Cold and hectic on the banks of the Potomac.
Visit your National Parks: www.nps.gov
Go viking: www.longshipco.org
|
|
Bruce Blackistone (Atli)
- Thursday, 04/05/07 11:27:53 EDT
|
Bob Hagan-- My Paragon has a date, 1929, stamped on the side, so maybe yours is from around that era. Try a gentle wire-brushing and maybe some more markings will emerge, especially when viewed in cross light.
|
|
Miles Undercut
- Thursday, 04/05/07 11:42:01 EDT
|
I've noticed that on many of the old post vise's, the smith intentionally cut off the wing that protudes over the handle washer. Was there a reason for this? I've actually seen a couple that weren't dressed out and you could easily see the cutting torch marks.
|
|
Thumper
- Thursday, 04/05/07 12:14:47 EDT
|
Mossport Parts: John, The most commonly available steel for this type thing is SAE 4140. It is very tough but not too hard. The problem's ARE:
1) Annealed stock is machinable, hardened and tempered is machinable with good equipment (no drilling with hand held tools).
2) Not all stock is annealed.
3) Annealed may not be hard enough for your application. if so then the steel must be fully heat treated after fabrication. This may be beyond your capacity.
You used to be able to purchase 4140HT meaning it was pre heat treated. This was often hardened and tempered to its toughest condition and was still machinable. However, it is a LOT harder to work, especially bending, than annealed stock.
Hardening and tempering such parts (as well as making your own replacements) also introduces a serious libility issue for you.
|
|
- guru
- Thursday, 04/05/07 12:42:12 EDT
|
Hobbitstyle fireplace -- Tim, I've got the director's version of TLOTR for all 3 films at home. They have hours and hours of explanation about how the film was made, how the props were designed, etc. I don't remember anything about blacksmithing, except they had a short part about the sword maker, a New Zealander, but he must of had help, considering the volume of work. Most of their props were way overdone, in that items with seconds of screen time took months to build, especially since they were correct in every detail. They do show Bilbo Baggins fireplace in the first film, as Gandalf throws the ring in the fire (a science experiment), but I doubt if you can even see many details. There were 2 or 3 guys that did all of the art work, who were pretty much in charge of the props departments. They did have sketches of everything they considered significant. Props were created by the Weta Workshop, which was formed by Richard Taylor, but there were a couple other art guys that would be worth looking for, and I'm sorry that I haven't given you anything sound yet
|
|
JohnW
- Thursday, 04/05/07 12:49:44 EDT
|
Modified Leg Vices: Thumper, I have never seen that. the only reason I could think of is the protrusion might hang up on gloves if one were wearing gloves while using the vice.
The little duck tail, besides being a nice bit of style, helps keep swarf from sliding down the jaw into the thrust washer and sticking in the oil and grease (you DO lubricate your vice don't you?), perhaps eventually working into the screw threads.
I think you have a local aberition. I have a heavy bench vise that a fool welded the handle to the screw by some idiot. It was done the night before it was auctioned off. Perhaps the idiot hurt himself on the heavy (5 pound) handle . . In any case this is not normal, but I suspect the idiot has done it to more than one vice. When I go to setup the vice the FIRST thing I have to do is cut off, drill out and replace the handle. . .
|
|
- guru
- Thursday, 04/05/07 12:51:39 EDT
|
Paragon by Söderfors: These anvils were made by Söderfors a very old Swedish company. Their anvils were sold in the U.S. from around 1900 until the 1930's, perhaps a little later. They are a cast steel anvil much like the Kohlswa.
|
|
- guru
- Thursday, 04/05/07 13:12:50 EDT
|
I am planning on forging a set of fireplace tools but do not know how the broom straws are attached to the handle.
Any help? Thanks.
|
|
- Ken Admire
- Thursday, 04/05/07 13:46:42 EDT
|
Brooms: Ken, The are tied on to the handle in the process of making or "tying" the broom. OR you can attach a broom made on a wood core to the handle. Many thread them on.
In the broom tying process a bundle of broom corn is held around the handle and wire is wrapped tightly around it. Then another layer is applied and shaped as it is tied on with wire as well. Broom corn finishing can also be woven like a basket weave to cover the raw ends of the broom corn. String and wire are also used in decorative manners. It is quite an art. It is also a specialty that you are best off hiring someone else to do.
When I was having brooms tied I made a handle with the end reduced to about 1/4" for 4" and a ball or knot on the end so that the broom would not pull off. This was worked out with my broom maker. Others make a flat and drill a hole for the end of the wire to start.
Click the link at the beginning of this post for our iForge broom making demo for more.
|
|
- guru
- Thursday, 04/05/07 14:06:38 EDT
|
LOTR Hobbitstyle Fireplace: In the first film there are two fireplaces shown in Bilbo Baggins house and another in the third film. None have doors of screens. Two are round or half round fireplaces. The last, the kitchen fireplace is tall with an arch. It has some sort of fire front or door to one side that you see part of for about 2 seconds. Not very decorative. These are all the fireplaces in Hobbit houses shown. The only thing in common is their simplicity and each has rather common looking wrought andirons.
Things of artfullness in the films are generally embued with the artistic flavor of the Elves. Leaf motifs and organic tree arch columnc and decoration. It is a sort of geometric or formalized art-nouveau. There art many artists that practice this style. The Elvish writing is part of this style and you may find it useful.
One reason for lack of art in this respect is that the LOTR owners have done an excellent job of defending their copyright in their work. The original artists had contracts that prevent them from producing future work in the style developed for the films. . .
Buy, don't rent the films in DVD and study the style.
Look for the books by George Bain (and father or son) on Celtic art and knot work. There are only two books, on by the father and one by the son. They are THE references to the art and clearly spell out the rules (there ARE rules) to the art form. I have them both but can only lay my hands on one. . .
Hey, this is what artistic blacksmithing is about, ART.
|
|
- guru
- Thursday, 04/05/07 14:26:32 EDT
|
Celtic Knots and Borders: This is a serious art form and one that frankly gives me a headache. I studied it a little when doing musical instrument research as it is used to decorate Irish harps and Medieval style lutes and such. I also worked on some modular CAD templates to use as borders on documents such as family trees. I can do the simple stuff but the complicated patterns require a mind set that I do not have.
Much of what you see in art is copied out of the Bain books. However, some folks practice this specialized art and do it quite well. If you need this type of thing look for one of them. Many have web sites on the subject.
|
|
- guru
- Thursday, 04/05/07 14:48:25 EDT
|
Modified Vise:
I just saw one on ebay (auction closed and I don't remember how to access finished auction history), modified that way which brought the question to mind. But I've found 3 here in Idaho so far. I actually welded the piece back on one of my vise's cause it just didn't look right without it. On lube, Bag Balm, works real well on the washers and screw....we'll see how quickly it starts dripping when warm weather gets here, I put some on this winter cause my grease gun was empty.
|
|
Thumper
- Thursday, 04/05/07 15:26:08 EDT
|
Any lube is better than none. I use Never Seize on vise screws and washers because it works well under high pressure. Don't forget to oil that pivot and spring bearing area.
|
|
- guru
- Thursday, 04/05/07 15:58:32 EDT
|
For vise screw lube I use a 70% moly paste from Dow Corning. Years ago I tested every anti sieze and extreme pressure lube available. The application was for ACME threads on valves. I built a test rig and destroyed many many stems and yoke nuts. The threads were 3/8 full acme, 410 SS running in a 416SS nut, with a cylinder for thrust. The thrust was 1200#. Dry was about 1 cycle. Oil gave a couple of cycles. Axle grease about 5 cycles. Nuclear grade pure nickel never sieze, gave 15 cycles or so. Dry film moly gave from 25 to 30 cycles, depending on brand. Wet film moly gave 30 to 50. 70% moly paste gave 15,000 cycles, and while the threads had cold flowed over, you could still see the tooling marks. We used this on EVERY stem, of every gate and globe valve we built from then on, that was not special cleaned for oxygen etc. We had complaints from customers that did not want ANY grease as they thought that dirt and dust and blowing sand would stick and cause early failure. I did a test in the same rig, got it running and sifted used sandblast sand on the horizontal stem. A degradation in life occurred. The stem only lasted about 8,000 cycles. A little goes a long way. The product is available in a small toothpaste type tube, and that would be a life time supply for most shops. This is also an excellent run-in lube and is used in newly assembled BIG engines(Ship type) as a rule.
The product is Dow Corning MolyKote G-N Assembly Paste.
Be aware that the paste will reduce the torque to achieve a given thrust by as much as 40%, and will allow things to fail if you don't drop the applied torque. Seen another way, you don't have to twist as hard:) When the valve shop was moved I managed to salvage a qt can from the remains of a 5 gallon bucket. Wonderful stuff.
|
|
ptree
- Thursday, 04/05/07 18:07:59 EDT
|
That Kirkstall coachmaker's anvil we were discussing sold for $2000! Folks I know with collections could retire off them at those prices. . .
|
|
- guru
- Friday, 04/06/07 00:12:51 EDT
|
Sir,
Read your article on Hossfeld bender and would be beholden if you could tell me how the make a special hot bend unit to bend 3 x 2 x 3/16 angle 2" leg out to a 6" radius bend.
Regards,
Bryce
|
|
LEO BRYCE SCHRAEDER
- Friday, 04/06/07 08:54:20 EDT
|
On the Kirkstall Forge anvil I suspect it was two bidders who simply weren't going to be outbid more than a reflection on the value of the anvil itself.
|
|
Ken Scharabok (Poor Boy)
- Friday, 04/06/07 09:30:22 EDT
|
Bryce, Even hot there is a limit to how tight a bend you can put into a given structural. The extra material must upset thicker and the edges stretch.
The type dies Hossfeld uses for high force jobs is a press type die. These are a pair that push together like in a press with. A "toggle" link goes between the middle of the die and a hole near the center of the lever arm to achieve as much force as possible (several tons).
The Hossfeld web site shows this tools under tooling options, bar and angle. They are making a bend similar to what you describe cold.
The Hossfeld dies of this type are progressive feed along dies and are too slow to use on hot material. more. . .
|
|
- guru
- Friday, 04/06/07 09:57:00 EDT
|
Angle hot Bend, 2 x 3/16 equal angle: As noted, Hossfeld does this job cold and sells the dies for it.
To do it hot with the leg OUT you will need a roller nose on the lever with a plate on the arm to hold the leg down. OR horizontal rollers pressing on the outer edge of the leg where it needs to be thinned. These rollers may need to be followed by a plate as above. The design would depend on how much straight angle you need beyond the curve, if any. Bending would be done around a curved die plate much like our simple dies shown on our bender article pages.
With the leg IN the die surface would need a groove to accept the leg and prevent it from buckling. This would be made by bolting pieces together with a spacer in between. Again a roller nose would be used on the lever. A little pressure on the roller will help stretch the vertical leg.
In either case the hot bends will be made very quickly and you hope the time saved offsets the fuel cost. On both hot bends a blacksmith would touch up the pieces on the anvil and possibly run them through the bender a second time to correct the curve. However, with well made dies a production laborer should be able to do the job.
All die making of this type is partially trial and error. If you have a good feel for how the metal is going to act and do a good job on the dies they may work the first time. If you do not have the knack for this then the Hossfeld dies can save you a lot of time and aggravation.
|
|
- guru
- Friday, 04/06/07 10:16:07 EDT
|
Ken, the second place bidder dropped out at 800. The winner kept bidding to meet the reserve which must have been set over 1500. So in fact, this was NOT an auction price. It was a dealer asking a very high price and a buyer with too much money.
While collectable anvil prices have been going up they are selling at levels that no longer make them good investments.
|
|
- guru
- Friday, 04/06/07 10:25:38 EDT
|
My question is related not so much to making a sword as to maintainance and repai of one, and in the early nineteenth century, (around 1800-1815) in perticular.
Would you be able to tell me what was needed to care for a sword, to keep it in great condition, what oils were available then (if any were used), what cleaning, sharpening tools, methods would have been used, etc.
Or where you might suggest I could search for this information. I've tried the local libraries and am having trouble tracking down this info.
Thanks for your help!
|
|
Shereen
- Friday, 04/06/07 11:04:09 EDT
|
Sherren, At that time there were several choices for oil. Vegetable oils which tend to oxidize and harden and animal fats that tend to turn rancid. The best lubricating oil of the time was whale oil and was often kept in kits for cleaning and oiling guns. Of course this is no longer an option and modern substitutes are just as good.
For sharpening stones were used just as they are today. Natural sandstone grinding wheels of various grits were available and in use in the 1600's if not earlier and the plain hand stones for millenia before that.
Polishing was as it is today done with natural minerals. Tripoli and rottenstone were known to the ancients. They were mixed with oil or wax to make a paste and used on leather pads. Today's stick buffing compounds are a compressed version but you can also still get polishing pastes. Silver and brass polish is not much different today than 300 years ago. In many areas shark skin was used as a polishing "paper". I do not know if it was used on metal. Scrapers were commonly used in the manufacture of these items and produced fine finishes without abrasives.
HOWEVER, When dealing with antiques you NEVER use abrasives to restore a finish. The original condition is part of the value of the item. As soon as you go grinding, polishing and refinishing then you have destroyed most of the collector's value in the item.
The best thing to apply to must old iron is a little WD-40. It is thin and non-corrosive. Most of it is kerosene so it evaporates and the mineral oil left behind may be too little to protect for long periods. So reapply as needed. WD-40 will help remove old oil, dirt and waxes from the metal without hurting the aged finish.
Most swords and such have wood, leather or ivory grips. These each have their own method of care. On an antique any kind of oil that would help preserve the leather may also hurt the value of the item. DO NOT get machine oil on the old leather. You need to speak to someone in a museum about this. Otherwise the same treatments that you would use on modern leathers is appropriate. For bone and irory, which dries out and shrinks clear mineral oil (unscented "baby" oil) is used. Wood should just be waxed with a natural wax mixture. Carabuna wax is the hardest natural wax.
Of course at the time hand oil and sweat was the maintaining finish on many wood, leather and ivory items. . .
REMEMBER, If its an antique, do nothing to change its condition. You want to preserve it as-is. If you want something shiny to hang on the wall then get a new wall hanger.
|
|
- guru
- Friday, 04/06/07 11:37:31 EDT
|
I got my forge up and running this morning. with the small size and blown burner I was able to get 1/2 round up to a mid orange color very quickly using very low gas pressure. Nothing like building by trial and error. I'm already planning my next forge, but I'll get a lot of use out of this one first
Thank you to everyone for your help and advice. And espcially to the Guru for his amazing site and the endless font of information you provide.
my First Project: Dempsy twist tongs :-) Happy Pounding!
|
|
Frostfly
- Friday, 04/06/07 11:56:32 EDT
|
guru,
After 2yrs searching for a good used 150#+ used anvil, I am ready to bite the bullet and get a new one. I have found a JHM 260# for $860 and a Delta TFS 250# for $1065.
Both are new, farrier style and about the same driving distance for pick up.
Any preference or better suggestion?
Thanks,
Mike
|
|
Mike Broach
- Friday, 04/06/07 12:00:27 EDT
|
Mink oil is a good leather treatment. I use it on all my shoes and leathers for waterproofing. I believe that it IS historically correct as well it was available then.
|
|
- Nippulini
- Friday, 04/06/07 12:24:12 EDT
|
Thank you so much for your info.
I don't have an antique sword to polish or mess up by doing the wrong thing, but your swift help was invalable because I'm working on a novel and your information gave me the details I needed to make the scene (set in 1815 Cornwall England) of a knight cleaning and repairing a broadsword come alive and sound authentic and correct.
Really appreciate your help! Thank you!
|
|
Shereen
- Friday, 04/06/07 12:57:09 EDT
|
Anvil Choices: Mike, without seeing them I would go for the one with the heaviest waist. Both manufacturers make farriers patterns and blacksmiths patterns. A lot of farriers anvils are very springy due to the narrow waist. Forging or blacksmiths anvils have a heavier waist and are more solid under the hammer for the same weight.
|
|
- guru
- Friday, 04/06/07 13:10:38 EDT
|
Shereen, Then in that case you need old terms for common items. . . Tallow was used a lot for various things and sharpening stones would have come from specific districts such as we have Arkansas stones here in the US (exported everywhere). And Tripoli which is mined everywhere but carries the name of that Mediterranean city.
Another low tech technique I over looked was the use of a scythe anvil and hammer. These were (still are) used to restore the edge of farmers grain cutting scythes by drawing out the edge thinner. This would not apply to sharpening the heavier edged sword but it could be used to repair dings by putting the metal back in place. These are portable tools, the anvil having a spike so that it could be driven into any handy tree stump or root. They are also called by their German name, Dengelamboß These have a split shank and two double ended scrolls that make a stop to prevent it from being driven too deep into the wood or hard earth.
|
|
- guru
- Friday, 04/06/07 13:33:30 EDT
|
I tried to forge weld today, and did not succeed at all. I am wondering if my forge did not get hot enough. I tried to see if a coathanger would stick to the metal, and it never did. This would not normally be a problem, but I had my forge turned up about as far as i could and still stand to get in front of it. I have a gas forge with two adjustable burners. I was running the LP at about 25 lbs, and had the burners going full blast. What do I need to do to help it heat up? Do I need to rig a blower somehow? Any ideas of advice would be great. I have read the i-forge on how to weld, and was trying to follow those steps. I was trying a fagot weld on 1/2" round.
Thank you all for your time and help
|
|
ringo
- Friday, 04/06/07 13:39:48 EDT
|
Ringo, The coat hanger trick is usually a good test.
As to pressure settings that is particular to any given forge design. Most forges can run at around 4 to 15 PSI unless they have a very small orifice or valve restricting the flow.
IF you are over firing the forge (way too much gas/air) then most of the ignition may be going on outside the forge rather than in. Try throttling everything back.
If your fuel/air mixture is incorrect you can run too cool as well. It is the nature of gas forges to be quite oxidizing when they are run at their optimum for max BTU's. You tell when this is by the roar of the forge. There is a point where there is a loud reverberation that is where the forge will be the hottest. Turn back DOWN from that point just enough to reduce the noise. There are two reasons. The noise is LOUD and carries, the vibration will damage the forge and even shake things of the shelves.
Gas forges also need some back pressure. They do not operate at maximum temperature if they are wide open. Try cutting down on the door opening and then readjusting the forge.
Last. . many forges need to "soak" to get good and hot. Once the heavier refractories are glowing a good yellow the whole will run hotter with less fuel. The often takes 30 to 45 minutes in a small forge. So you do there tasks until the forge is at full temperature.
In general, gas forges are much moe difficult to weld with than solid fuel forges.
|
|
- guru
- Friday, 04/06/07 14:46:07 EDT
|
That's great. Thank you!
|
|
Shereen
- Friday, 04/06/07 15:11:47 EDT
|
I went to a friends shop, and picked up a straight bar of spring steel, about 54 inches long, by 3 inches wide, and cut it with his torch, to the rough shape of a sword blade, now im going to grind it to a claymore shape,
i have a turned pommel that suits the general look of a claymore well, but, i have to forge the Guard, with the quillions and quatrefoils ends. how would i go about forging this?
http://www.kilts-n-stuff.com/Weaponry/Image_Links/claymore_sr077_lg.html is how i would like the guard to be something like,
i do not have a welder, so i have to forge it, and i do have a drill press for the four holes in each arm of the guard,
thanks,
Cam
oh yeah, my friend is going to temper it in his spring tempering oven,
he fixes and makes car leaf springs, and we cut the sword from a "Soft tempered" peice, but, he will harden and temper it once it is done,
thanks
|
|
Cameron
- Friday, 04/06/07 15:59:26 EDT
|
Fancy Guard: Cameron. I hope you had that width cut down to about 1/2. . .
That guard is probably largely fabricated (welded from pieces) and there is much grinding and filing. OR it may be centrifugal cast steel from a wax model which is more likely.
To make a one piece guard of that type would be a LOT of work. The first step is to carefully make your tang (see our sword making article). Then you will need to fit to this. I would make this in three pieces, the guard and the overlapping side pieces.
1) Slit a hole in the middle of a 1/2" square bar on edge.
2) Drift to fit using a drift the exact same shape as the tang joint or just a tad smaller to allow for filing. Make the drift from an extra piece of the spring steel. Flatten the sides at the hole as you open it with the drift. Done properly on the diagonal this should create a diamond shaped flat.
3) Round the two ends (knock the corners off)
4) Taper the two shanks leaving a shoulder creating rounds at each end. Do not over taper.
5) Flatten the ends to the thickness of the taper at the shoulder. They should start like a small cylinder and will flatten nearly round. This is like making a bean end for a latch or hinge. You may want to practice this separately.
6) Punch or drill and file the 5 decorative holes in the flattened ends.
7) Shape the ends with a file.
8) Finish sculpting the piece with files and scrapers.
9) Forge the two side pieces and file to finish fitting to the guard.
10) Braze or silver solder the two side pieces to the guard. These will then need to be finished a second time by filing and scraping.
Making this kind of thing requires a lot of persistence in metal craft. Start with a set of new files both bastard and smooth cut. You will need at least one each 10" half round, a round and a square. You will also need an 8" bastard and smooth triangular file and an 8" warding file. Expect to pay about $15 each for 10 files. The last time I replentished files I spent over $200 and I need to do it again. . .
If I was doing all this work I would make it out of stainless. I would forge samples in mild steel to get the length right and work out the processes to support the work, especially while slitting. Drifting may need a special fixture. THEN I would make one in SS. It is tougher to forge and must be worked like tool steel (hot). It will also be tougher to file. But when done you can scrape and sand it then buff to look like silver and it will stay that way.
Good luck.
|
|
- guru
- Friday, 04/06/07 17:29:33 EDT
|
could you answer a question for me which is harder brass or bronze. i realize that brass is made from copper and zinc and bronze is made from copper and tin but i can't find any information telling me which is harder than the other
|
|
fred
- Friday, 04/06/07 18:41:59 EDT
|
The sword is to be used in "live steel combat" with a group of friends of mine so the sword will be blunt, but we need good flex, thats why i chose spring steel,
what do you mean i hope you had that width cut down to about 1/2 the blade is thickest at the end right where the guard will go, and then cuts down to like, 3/4 of an inch, for the handle
is there a way to forge this all from one bar of steel, perhaps one inch bar,
split the bar into 3 peices, fold the guards out, and drill and grind the hole for the handle, then flatten, drill, and file the decorateve holes? then texture the start of the handle , so the guard all fits niec, with the wood of the handle?
|
|
Cameron
- Friday, 04/06/07 18:57:32 EDT
|
Brass and Bronze: Fred, Normally bronze is the harder alloy. HOWEVER, there are thousands of copper alloys and many have both tin and zinc in them as well as other elements such as aluminum, bismuth, antimony, iron (usually trace), silicon, beryllium.
THEN, as a non-ferrous alloy the hardness of most of these alloys is also determined by how much work hardening they have seen. Wire and sheet can be rolled that is very hard and springy.
Beryllium bronze is one of the hardest bronzes and is used for springs and non-sparking tools such as wrenches, pry bars and hammers, replacing steel The down side to this excellent alloy is the toxicity of Beryllium. Dust inhaled from machining or polishing Beryllium results in pneumonia like symptoms which can be fatal.
|
|
- guru
- Friday, 04/06/07 19:28:00 EDT
|
One Piece guard: Cameron, When you go this route then you are now sculpting the piece with some minor bending. I would jump to a piece of stock about 3/4" x 3 and drill and saw the blank as shown below. The whole can be carved cold with a drill press, hack saw, files and some chisels if you are into iron carving. But you asked about forging.

A milling machine and a lathe would be real handy on a little project like this. I would turn the round part and hand blend it. The mill would save some sawing and filing.
|
|
- guru
- Friday, 04/06/07 20:05:57 EDT
|
Ahhh a knight of 1815 using a sword is most likely in the army of that time, (napoleonic war you know) The way he would clean and sharpen his sword is to tell his servant to have his sword cleaned and sharpened. Having him do it himself would be very unlikely.
Having him repair it himself would be *EXTREEMELY UNLIKELY INDEED*!
Thomas
|
|
Thomas Powers
- Friday, 04/06/07 21:38:42 EDT
|
May I commend to your attention: "What Jane Austen Ate and Charles Dickens Knew: From Fox Hunting to Whist -- The Facts of Daily Life in Nineteenth-Century England" (ISBN: 0671793373) Daniel Pool
abebooks.com shows 3 copies for sale under US$5 apiece
Thomas
|
|
Thomas Powers
- Friday, 04/06/07 21:45:52 EDT
|
Can someone tell me the most efficient and safest method to remove zinc from galvanized pipe without running a grinder?
|
|
Jeff
- Saturday, 04/07/07 10:26:04 EDT
|
I just did some zinc removal on some pipe for my forge burner. I got a quart of Phosporic acid from Home Depot and put it in a large plastic container (30 gallon garbage can in this case) put the pieces in and added the acid and about 10 gallons of water. Took 2 days or so to get all the zinc off. I've been told almost any acid would work, even vinigar. Also i'll repeat the safty things I've read as well, and people can correct me if i've missed any. 1. Do it outside, the fumes are not pleasant. 2. Water is added to acid, not the other way around. Apparently the fumes created aren't nice. 3. Rubber gloves are a good idea, it's fun to get live acid in an open cut and will hurt unbroken skin as well.
|
|
Frostfly
- Saturday, 04/07/07 11:03:25 EDT
|
Forstfly, you add *acid* to *water*, not the other way.
Mixing the two creates heat, and the first few drops of water mixed with acid can boil and cause spattering.
Adding acid to water is safe(r) because the acid has a higer boiling point, and the relatively large volume of water normally won't get hot enough to boil. I think the risk is mostly when you're dealing with concentrated acids, but the acid to water rule is always a good idea.
|
|
Mike BR
- Saturday, 04/07/07 11:28:07 EDT
|
Lesson from Chemistry 101: AAAW! Always Add Acid to Water! This is what you say when you don't.
|
|
quenchcrack
- Saturday, 04/07/07 11:37:02 EDT
|
I knew i'd get something wrong, never did take chemistry. Sorry for the bad information, thank you for the corrections.
|
|
frostfly
- Saturday, 04/07/07 12:08:39 EDT
|
thanks frostfly i had read that since posting the question and also i read somewhere that caustic soda (lye) is also a good method due to it not having a reaction with steel. Problem is with lye is that it must be 100% and with the problem with meth labs in my area its virtually impossible to find much less obtain without becoming a suspected meth cook.
|
|
Jeff
- Saturday, 04/07/07 12:17:36 EDT
|
Ahh the times we live in, can't buy lye cause you get suspected of cooking meth, can't buy amonium phosphate to make the grass green cause you would be suspected of cooking a bomb...
I say lets do away with the cooks and then the blacksmiths can get what we need.
|
|
ptree
- Saturday, 04/07/07 12:55:37 EDT
|
Jeff: burn hard wood, put the ashes in a trough with a drain at one end, pour water over the ashes and lye comes out he other end. (boil it with lard & you have soap)
|
|
ML
- Saturday, 04/07/07 14:35:54 EDT
|
I have obtained by wont of good looks :)(and $20.00 to the owner) two speed reducers I am thinking of using one for my power hammer (rusty type) is there any reason not to use a speed reducer in this manner?
the input shaft is .75" and the output 1.25" reduction is 6-1 using a 1hp 1375rpm this would give me 229rpm a good stroke per minute that could be reduced further using a smaller pulley on the moter.
also what would the recomendations for gear oil and grese for these be?
I have put a couple of photos on my website for referance
http://home.cogeco.ca/~vulcans-forge/sr1.jpg
http://home.cogeco.ca/~vulcans-forge/sr2.jpg
thank you Mark
|
|
Mark P
- Saturday, 04/07/07 14:36:17 EDT
|
Zinc removal. when I built my brake drum forge, O loaded the zinc covered 2 inch pipe fittings into the BBQ chimney, added charcoal over it and lit the charcoal in a remote, windy corner of the yard, didn't take and hour to burn off all the zinc. Let it cool and then brushed off the white stuff, dust mask in place.
|
|
Michael
- Saturday, 04/07/07 15:08:23 EDT
|
Hi----I have 2 anvils I was planning to sell on Ebay. They were part of my Dad's collection. Good chance both came from GA. Alex Bealer was a friend, & gave him the "Blacksmith Bug"!
1. Traditional type-
Dated 1881 on front edge of foot-barely legible. 23 1/4" Long abt. 90 Lbs or a bit more. Height- just under 10". Hardy 1" & 1/2" pritchel hole.
Any Idea of maker?
2.What is it? Anvil on stand. Long slim Double Bick??? 50 lbs. 25" high & anvil 27 3/4" Long (one side is horn then flat then long again with squared tip.)- Hardy 5/8"- horn side 12".
Can't find one like it in any search except (sm. stake anvils).
Thanks for any help you can give. I can send photos.
|
|
Deb Johnson
- Saturday, 04/07/07 15:41:09 EDT
|
"Can someone tell me the most efficient and safest method to remove zinc from galvanized pipe without running a grinder?"
http://www.anvilfire.com/iForge/tutor/safety3/index.htm
The first thing you do before wanting to use galvanized pipe in in a smithy for anything is go bang your head on the anvil until the desire goes away! Less painful and cheaper in the long run.
Therefore the answer to the question is, go and buy black pipe.
|
|
JimG
- Saturday, 04/07/07 16:14:00 EDT
|
Deb Johnson: First one is likely a Fisher Norris. If so, would be cast iron with a steel plate. Tape horn and heel with a hammer. You should get a dull thud. Second one is likely some sort of tinsmith stake. Take a look at the stakes at www.centaurforge.com.
|
|
Ken Scharabok (Poor Boy)
- Saturday, 04/07/07 16:53:44 EDT
|
Hi Thomas,
Thanks for the suggestion about "What Jane Austen Ate and Charles Dickens Knew."
It's a good suggestion, I hadn't thought to look in there for this info. I've actually got a few regency reference books that I'll also check for common oils used at the time.
And I know it's uncommon for a knight to be cleaning his own sword instead of having his servant take care of that job Actually a regency gentleman carrying a sword at all (as you say, outside of the military) is very unusual.
But this scene in particular is an unuasal occassion and warranted a different solution.
And you guys were very helpful. Thank you!
I also heard another tip today, used in medieval times, that I thought I'd pass along to you since everyone here was so helpful to me.
A writer friend of mine suggested the following:
Medieval sword scabbards were often lined with sheepskin because the lanolin in the wool lubricated the metal and resisted rust. So if there's any sheep around and he can get some wool off them, it might help.
Shereen
|
|
Shereen
- Saturday, 04/07/07 18:43:21 EDT
|
Burning off Zinc.
I agree with JimG. When you burn zinc off the burnt zinc fume goes somewhere. It goes downwind, and who ever may be downwind gets to breathe that zinc. Yes it is not as concentrated, but it will stay in the air for a very long time as fume is increadably small particles.
If you use acid, what do you then do with the heavy metal bearing acid? Pour it on the ground and leave a permanent contaminant in the soil? pour it down the drain? Send it to the water that will eventually find its way to someones drinking water?
Buy some black iron pipe. If you are really hard up and near, see me and i will give you some black iron pipe.
And i won't even make you bang your head on the anvil.
|
|
ptree
- Saturday, 04/07/07 19:36:26 EDT
|
While I wait for the right anvil to come along (and the money with which to buy it) I am using a length of old train rail. Can anyone throw some ideas at me for a good project or two that the rail would be suitable for? I just finished making a mounted can holder for my beer over the BBQ out of a scrap of concrete reo bar, and can't think of anything else to make with my limited facilities.
|
|
Craig Williams
- Saturday, 04/07/07 21:48:47 EDT
|
Hey all quick question for whoever can answer. I just finished building a new forge today, a nice forced air one, from a 16" long 8" diameter pipe, and my question now is, how concerned should I be with using it indoors. (inside my 2 car garage, with both doors open that is, like I normally work)
My old whisper baby venturi forge I could practically sit stuff ontop of hte forge and not worry about the heat around it, but this new one is a LOT more powerful and hotter, and i can singe my eyebrows off just standing too close to the front of it. I'm concerned because my garage, while having a nice high roof, is all wood. Should I now be looking at building some sort of metal hood and chimney or something?
http://www.tharkis.com/images/forge.jpg
|
|
Jmercier
- Saturday, 04/07/07 22:58:29 EDT
|
Jmercier, It depends strictly on ventilation, space and distance. I suspect there it relatively low overhead clearance. I would cover the immediate overhead space with dry wall as it is an insulating fireproofing. This will help disapate the hot exhaust so it is not heating one localized area. But you will need doors and windows open and a roof peak vent would help a lot to keep temperatures down.
The fire code will call for triple wall pipe and a proper roof penetration flange as well as the device not being any closer than 30" from anything.
The singing problem can be taken care of with and air curtain.
|
|
- guru
- Sunday, 04/08/07 00:39:28 EDT
|
|
|
[
CSI - anvilfire MEMBERS Group |
Getting Started in Blacksmithing ]
|
