Prentiss Vises: Jr, I have two big Prentiss Chipping vises. The smaller with approx 6" jaws opens to 14". I think the larger is 8" or more. Both are my other shop so I cannot go measure them.
8-1/2" seems to be about the widest jaws in metalworking bench vises.
Reed, who took over Prentiss OR vise versa (maybe), made 8 and 9" jaw chipping vises. The large weighed 283 pounds
They also made swivel base machinist vises up to 9" and 327 pounds.
In the "Bull Dog" line Prentiss vises in 1/2" jaw increments but my catalog only lists up to 6" wide.
Many of these old companies were closely related and their product lines changed over time and with mergers and acquisitions. There were enough major vise manufacturers at one time that practically every hardware catalog had a different line or combination of lines.
During the hey-day of the heavy duty vise and handwork most of these vises were cast ductile iron. Only cheap light duty vise were cast iron. The era of the big vise manufacturers is gone and most now come from China and are of questionable quality and design. Simply compare the weight for the same size, look at the flimsey handles and screws and try to find the actual material. . . The DO NOT compare to the good old vises.
These are WONDERFUL old tools and will last lifetimes in heavy service if not abused. They CAN be broken with a heavy hammer or by using a pipe on the handle. Screws can be worn out if not cleaned and oiled. I have two Prentiss fixed base vises that I much prefer to the 6" Columbian swivel base I also have. There is no way to sufficiently tighten that swivel base when doing high leverage work. So even though it is a huge vise, it is much lighter use.
Howevr, no matter how heavy, in all cases for serious blacksmith work, you still cannot find better than a forged blacksmiths vise.
|
|
- guru
- Wednesday, 04/21/10 22:31:44 EDT
|
I have have one of those Chinese bench vises since I bought it at the big blue box store some ten years ago. About four years ago it got enough humidity to start popping off the quarter inch of Bondo that they had used under the paint to make a smooth finish over the rough casting surface. There aren't any major defects visible so far, but I won't be surprised to find some as more bondo flakes off. It still mostly works, but if I ever need to get another one of these it will be an antique one made in the USA and it won't be painted except by me.
|
|
mstu
- Thursday, 04/22/10 11:53:28 EDT
|
I would like to get a few feet of used railroad rail. Does anyone know of a source in the Chicago area or anywhere along the I-57 route the length of Illinois?
|
|
Jim T
- Thursday, 04/22/10 15:22:06 EDT
|
Jim, I can't help with chicago but there is a guy on ebay selling pieces of rail. Hes listed under blacksmith anvils. . .
Many large scrap yards handle rail. The problem is they do it in spurts as it becomes available and it is usually moved pretty quick. Used RR-rail is crushed into abrasive media anywhere from 1" pieces down to 1/4" pieces to use in grit blasting machines. Its a VERY sad end to what was once the life blood of our industrial transportation system.
If you are looking for something to make an anvil from you should be MUCH more opportunistic and look for any large pieces of steel. I beam is the last choice due to its thin sections and springiness FOLLOWED by RR-rail. Please look closely at how I recommend using rail in our anvil making articles. Solid pieces of heavy plate (3" and up) make much better anvils, so does large diameter shafting (4" and up).
|
|
- guru
- Thursday, 04/22/10 16:36:57 EDT
|
The world is so transfixed on making anvils from RR-rail that I often feel like removing every reference to them from anvilfire. . .
But the fact is at least one manufacture of craft anvils made them from rail. The face and sides were machined flat and square, holes drilled for bolting it down and a small horn formed on one end. These were a "craft work" anvil sold to jewelers and schools. They were not intended for forging. AND at least they were miles better than the cheap cast iron things imported today and sold to the same market. . .
|
|
- guru
- Thursday, 04/22/10 17:13:14 EDT
|
When I was a kid I wanted My uncle's anvil, but He would not part with it. He worked at the local Bethlehm Steel plant, and got somebody there to make an anvil from a chunk of medium size rail for me. They did a nice job, all factors considered.
After He died, I did get that old anvil, a soft cast iron ASO about 75#.
|
|
- Dave Boyer
- Thursday, 04/22/10 19:08:06 EDT
|
Not all old anvils were good anvils. Many catalog houses sold cast iron ASO's for about 1/2 of what premium anvils sold for. But, being what they were, very few survived long enough to be "good old anvils". So you still have a better bet buying old than anything new on ebay. . .
|
|
- guru
- Thursday, 04/22/10 20:32:55 EDT
|
Even the little cast iron craft anvils have their uses if you know their limitations. I use mine for copperwork and jewelry. ASOs are sometimes okay for very light work and straightening, or flattening mail rings. You just don't have a full capability tool, which means if you try to step them up to any sort of heavier forging, you're in trouble. It's all in the knowledge, which most manufacuters, merchants and private seller are either reluctant to impart, don't know, or just don't care about. It's sad that you seldom or never see "light duty" or similar caveats in the descriptions.
Meanwhile, certain catalogs for "replica" historic weapons and gear will just make things up to suit the inventory. (A subject for the Hammer-In, perhaps.) It's not just endemic in blacksmits tools. :-)
|
|
Bruce Blackistone (Atli)
- Friday, 04/23/10 07:12:48 EDT
|
Definitoins: I understand everyone will have a different view, but I would appreciate a general description of the following terms. 1) hobby blacksmith 2) professional blacksmith 3) Journyman 4) master blacksmith. Thank you.
|
|
Milton
- Friday, 04/23/10 07:20:37 EDT
|
Milton, These are fairly clear until the last which there has been contention about in some places. I've put the following together for a FAQ.
- Apprentice Smith
- Any student smith working for his teacher that is not a Journeyman or any student that has not reached Journeyman status. This may include legal employment of not. It may include a defined schedule of apprenticeship or not. See our Apprenticeships FAQ for details.
- Journeyman
- Someone who has completed an apprenticeship or has been taken on as a Journeyman due to skills learned elsewhere (self taught, schooled or while employed). A Journeyman is expected to be able to perform all the basic of blacksmithing tasks as well as operate all the tools and machinery commonly found in a blacksmith shop. In the modern shop this includes most welding equipment, cut off saws, drill press, bench shears. . .
- Master Smith
- In Europe (only in Germany at this time I believe), one who has completed an apprenticeship and earned Journeyman papers, then worked in sufficient shops or a prescribed time in order to apply to their guild for Master's Papers. In some cases Master's Papers are legally required to teach the craft.
In the U.S. or other places where papers are not issued, any professional smith who by their body of work is considered sufficiently skilled to teach their craft at least in their specialty. However, they should have a fairly well rounded knowledge ranging from artistic smithing to industrial methods.
While anyone could call themselves a "Master Smith", due to the lack of a ystem to define a Master many who are Master Smiths do call call themselves such and are often embarrassed when called a Master Smith. Others have occasionally gone to other countries to obtain papers in their craft. However, these papers are often "honorary" as the entire system has not been gone through.
Generally if someone calls themselves a Master Smith one should take their word for it.
- Artist Blacksmith (Kunstschmied)
- A smith who primarily does artistic blacksmithing including small decorative works, large decorative architectural work or sculpture.
- Industrial Smith
- A smith that works primarily in industry doing open die forging making forged parts according to blueprints or as a tool maker.
- Professional Smith
- Anyone who earns their living at blacksmithing either producing work or their own or for others. Usually a Journeyman level or better.
- Hobby Smith (Hobbyschmied)
- A smith who's primary occupation is not blacksmithing. A hobby smith may have a better equipped shop than some professionals and may have the skill level of a Master.
- Horseshoer (Farrier)
- Farriers are NOT by definition a blacksmith but are commonly called blacksmiths. This is partially due to the pioneer and horse drawn era when almost all smiths were also shoers. Farriers must have a deep knowledge of the anatomy of a horses' foot, hoof diseases and other things that a blacksmiths does not. On the other hand a blacksmith will probably need to know many more forging techniques than a farrier. However, most farriers that forge shoes are very skilled at moving metal and can easily pickup the skills of the artist blacksmith and others.
- NOTE:
- Many of thes classifications are not exclusive to each other. One can be a Hobby Artist Blacksmith or a Journeyman Industrial Smith. In some casses Toolmaker is a specialty smith but should not be confused with a Machinist Toolmaker. - guru
|
|
- guru
- Friday, 04/23/10 09:04:17 EDT
|
I need to add to Journeyman, Should have a high school education or better. This should include an elective no longer taught in many schools, mechanical drawing. And if the goal is to be an artist blacksmith, art classes.
A Professional Smith also needs more education especially since most are self employed entrepreneurs. Bookkeeping and some business acumen is needed. Art and Craft schools do not teach how to price one's work. Nor do they teach how to calculate shop rates or how to use press releases for advertisement. But this is another subject. . .
|
|
- guru
- Friday, 04/23/10 09:19:45 EDT
|
Just an idea....I was thinking if you had a large container of borax, place it on a hot plate, melt it and keep it in a liquid state, prepare the steel for welding, dip the pieces in the liquid borax, weld, fold, redip etc.
When the level of borax goes down, add more for remelting.
The moisture content should be gone.
|
|
Mike T.
- Friday, 04/23/10 10:07:21 EDT
|
Mike, the container would need to be a high temperature glass or ceramic. Borax would eat most common metals metal. I guess the only question is if its cost/fuel efficient.
|
|
- guru
- Friday, 04/23/10 10:19:15 EDT
|
Mike; your not the first to have that idea; I remember running across a patternwelder who did it that way about 15-20 years ago. He used his forge to melt the borax; most hotplates don't like to run as hot as you need to melt borax!
It seemed a lot more trouble to go through unless you were really cranking out billets during a short ammount of time.
Thomas
|
|
Thomas P
- Friday, 04/23/10 11:59:48 EDT
|
I could see where it might be efficient in a shop with three or more smiths doing forge welds all day. But for efficiency using dehydrated (anhydrous) borax would be much cheaper. Use the fuel once. . .
|
|
- guru
- Friday, 04/23/10 12:10:57 EDT
|
The terms Journeyman and mastersmith are vague in general blacksmithing...in bladesmithing there are specific tests and requirements for these titles:
http://www.americanbladesmith.com/ABS_JSTest.htm
http://www.americanbladesmith.com/ABS_MSTest.htm
|
|
- arthur
- Friday, 04/23/10 16:11:22 EDT
|
I was at the NWBA meet today, and I am reporting that I saw, in reality, all three sizes of the Rhino/Bubba anvils.
All three sizes actually exist in the real world, and not just as CAD drawings.
|
|
- Ries
- Friday, 04/23/10 16:49:24 EDT
|
While the ABS has a performance test it really does not speak to the depth of knowledge and maturity a "Master" of any craft should have. There are a couple teenage "Master" smiths in the ABS.
The ABS standards have some really huge holes in them as well. The 90 degree bend test should have a maximum bend radius. Some of the early applicants bent blades to an inch or so radius but many today just make half the blade length. There is a huge difference. The "layers" of steel thrown around in knife circles mean nothing. Layers per unit thickness such as layers per inch MEANS something. You could have 300 layers in a two inch billet and they become 2400 layers per inch when forged to 1/4" thick but is still only 2400 layers per inch if the blade is then ground to 1/8". . .
Standards: ABANA has a Journeyman program and a list of suggested requirements.
http://www.abana.org/resources/education/journeyman/index.shtml
Other U.S. smithing organizations have tried to set standards but have failed. I understand because I have issues with all those I have seen. ABANA's is best. But there are others that require the use of specific machines that I never had in my shop until recently and only use for special purposes, not general use.
I believe that any journeyman in metal working (smith or bladesmith) should have completed accredited welding courses for oxyacetylene (minimum) and arc welding (if expecting to practice it). It is the only way to properly get all the safety rules drilled into you and tested. While ABANA requires knowledge of modern welding it does not emphasize how it was obtained.
While some things can be learned on-the-job this is one that SHOULD not. We have posts this moment on the Hammer-In where so-called "weldors" are giving advise to a teenager when they don't have a clue what they are talking about. I'd bet they don't know HALF the safety rules they should.
The Victor welding booklet I just pulled out of a Journeyman II outfit has at least 32 critical rules and starts out with DO NOT use this equipment without proper training.. . . We learned about twice that many in a semester course.
Other than that, ABANA's Journeyman program COULD be tested or "proved" by a series of required samples and tests listed. But I want to see your welding school certificate or equivalent before you touch that cylinder rack. . .
|
|
- guru
- Friday, 04/23/10 18:41:00 EDT
|
I had been thinking of taking knife making classes at the Bill Moran blade making school in Texarkana, Ark. I called them and got some information and read up on it on their web site. In order to pass, you arrive with a knife you made in your own shop. The knife must have a welded pattern of 300 folds, sharpening the knife, once arriving is not allowed. You must be able to chop a 2 X 4 in two, then cut a rope in two with one chop, then be able to shave with it, then undergo a bend test in a vise. I changed my mind about attending the school, I think it is ridiculous.
|
|
Mike T.
- Friday, 04/23/10 20:34:10 EDT
|
I live in Pittsburg KS (that is southeast KS) does anyone know if the coal that was mined here is good for blacksmithing? It was stripped mined and I have found a place that I'm still able to find it on the ground.
|
|
Adam Grillot
- Friday, 04/23/10 20:59:14 EDT
|
Mike, That is the Masters test. I think they had to be telling you the goals of what they teach. OR thought you were applying for the Master's test. I think you had some gross misscommunication.
|
|
- guru
- Friday, 04/23/10 21:12:14 EDT
|
I was looking for the RR rail piece (see above) to make anvil tools like a fuller or base for a bending fork and such. I was already able to get a reasonable anvil...(I hope) But have yet to make my first project.
|
|
JimT
- Friday, 04/23/10 21:24:18 EDT
|
Kansas Coal, Adam, I know nothing about it. However, Coal comes in infinite variety from stuff that it only fit to pave roads with to the highest grade fuel short of refined petroleum. Coal for blacksmithing generally needs to be the best. A lot of mined coal is burned in bulk in plants that are "tuned" for its characteristics. Coal that works fine in these big plants might burn in the forge but not burn hot enough and leave large amounts of ash and clinkers.
A good way to find out about coal is to build a very cheap brake drum forge with scrounged parts, THEN buy a bag of 1st class coal from one of the blacksmithing suppliers. Try some, melt the end off a steel bar, see how it acts and how much burns up for the small amount of ash. THEN test your local coal. Break it up in about the same size pieces as the purchased coal. Try a bucket full. If you can scrounge something for an anvil, try forging with it. Then go back to the good coal. Its a relatively cheap efficient test that you learn a lot from including how coal behaves, how to build a coal fire, manage it and maybe a little forging. If the local coal is no good and you think bagged coal plus shipping is too expensive then you may want to go to a propane forge OR get a bag of real lump charcoal (not briquettes), and test it in your forge.
Note that these little forges are not the best and only have a short time when the fire is just right. But they will work well enough to get started and test some coal.
|
|
- guru
- Friday, 04/23/10 21:37:16 EDT
|
Mlke T
I think your a little confused..The test you mention is for a Mastersmith rating..No Damascus alowed for the journeyman test..and each part is designed to test a different aspect of the blade...This has nothing to do with the school!! The school is a fine place to learn and offers several courses ranging from the two week introduction course..up to advanced courses on folders,Damascus,etc...I found the school to be excellent as have everybody else I know who have attended..
|
|
- arthur
- Saturday, 04/24/10 12:25:50 EDT
|
After 40 years of welding my husband's kidneys have failed. He was sure it was just the flu. He's a Vietnam Vet and the government says there is no connection between all the welding he's done and the auto-immune disease he has. I'm wondering if it could be linked to heavy metal fumes and dust. Do you know of a website or organization that could help me? I have found some information but I need all I can get to fight the government.
Thank you,
Sammi
|
|
Sammi
- Saturday, 04/24/10 16:26:27 EDT
|
Sammi, Welders get heavy metal poisoning from a variety of sources.
1) Most welding rod has manganese in it. The higher the strength and harder the rod the greater the manganese content. Manganese has been found to be related to more and more illnesses and there is much debate at this time.
2) Common galvanizing contains zinc which is related to metal fume fever. Repeated exposures tend to have more severe reactions. One of our members died as the result of zinc fume exposure. See Metal Fume Fever.
3) Cadmium plating and zinc/cadmium was used on marine hardware and particularly military hardware of various types. Fumes from cadmium is very toxic. If it does not kill you it has serious long term affects on major organs.
4) Weldors are often called upon to repair babbitt bearings.
5) Weldors often make repairs to surfaces painted with lead paint either making dust or lead fumes in the process.
6) In the past and still too often today weldors work in tight spaces or with improper ventilation. All welding creates some metal fumes. Welding plated metals or painted surfaces creates more. This ends up being inhaled unless there is very good ventilation.
If your husband's doctors are not looking for heavy metals they will not find them.
NOTE: We get a request like this about once a year. It is always a wife looking for answers to mystery diseases suffered by their long time weldor husbands.
|
|
- guru
- Saturday, 04/24/10 17:46:55 EDT
|
Is there anywhere on the net where I can get reliable information on acetylene welding? Here there seems to be only 1 design of torch available for both cutting and welding. Would ordinary, mild steel fencing type wire be suitable? I have got some technique but want to improve.
|
|
philip in china
- Saturday, 04/24/10 19:52:28 EDT
|
Just got back from trip to check out another anvil, this time it paid off.
Came home with a HAY-BUDDEN, stamped 1 1 2 under the Brooklyn NY. There's a number 5 to the right of the square hole under the horn, but the #'s on the front feet are marred up hard where they took sharpened horseshoes and bent them over the feet to drive into a stump. It's been used and the horn's covered in shallow nicks from beating horseshoes, but a real clean & smooth face with a good hardy-hole. Old cowboy took care of it.
I'll let the wife take some photos of it and I'll post them.
Thank you Guru for setting me straight on that junky jet-ASO. You helped turn a bad trip to see cast-iron into a good trip for a nice anvil.
Danial Bang
forgenarmory360@yahoo.com
|
|
Danial Bang
- Saturday, 04/24/10 20:09:11 EDT
|
Phillip, Except for the very small torches that use the preheat flame for both welding and cutting all standard torches use a single jet tip for welding and an attachment that uses multiple jets for preheat and a center pure oxygen jet for the cutting.
God oxy-acetylene welding starts with good weld prep, then the right sized tip and then puddling technique. Filler wire is a mild steel wire and the source can vary but it needed to be clean. Commercial rod is copper flashed to keep it from rusting. You can oxy-acetylene weld from 1/16 plate to 3/4" (if you are crazy).
IF you get the torch to close into the puddle, and the jet is too soft (slow), and a spark travels up into the nozzle, this causes the POP that then blasts out the metal in your puddle and requires restarting the bead. Learning to avoid this is the critical part of torch manipulation.
Constant motion of the tip to manipulate the puddle and control the amount of heat and preheat ahead of the puddle is the art.
Then its practice, practice practice. That is the thing about going to welding school. I used up way more fuel and rod than the curriculum cost. But it is the same in your own shop. Until you have put in the daily hours and used up the materials you will not have learned what you set out to do. Fuel, rod, steel. . . takes a bunch to learn. This is something I knew but had not applied it to all tasks. When you go to the power hammer school you might go through 50 pounds of short pieces of steel and the necessary fuel to heat it doing nothing put practice pieces for a couple days. Forge a point. . bad, toss it forge another, an another and another. . . Forge a ball, then another then another. . . Welding is the same. Run flat beads, then inside fillets, then outside corners then tubing at right angles then fitted odd angles. . .weld light to heavy. . . Do it again until you get it right. I had a clue when I took welding that my $75 tuition was subsidized or not properly costed and I took advantage of the materials, not wasting time and doing extra when the time and materials allowed. . .
|
|
- guru
- Saturday, 04/24/10 20:57:13 EDT
|
"Came home with a Hay-Bud", there's got to be a song in there someware...
Good for you Danial B, welcome to the H-B brotherhood!
Too bad about the unreadable serial number, it would have been nice to know how old it is.
I have a 134lb. H-B that is 116 y.o. this year. Like yours, the horn is a little nicked up and I would guess that would put yours with a wrought iron body and tool steel top like mine.
For its age, I consider the top on mine nearly pristein with good edges to boot and, flat as can be.
All the working surfaces stay clean and bright with use although I admit that I do baby it during the winter months.
I made an enclosure from 1" "blue bord "insulation that covers the anvil and stand right down to the floor.
Then I have a 200w oil pan heater that I stick on it to keep it warm for use in my un-heated shop.
I find that keeping it warm and coverd, also keeps it from rusting so, I don't need to oil or paint it either.
You may be able to see it on the AnvilCAM page as soon as I get some stuff done for the Guru.
Happy Hammerin'
|
|
- merl
- Saturday, 04/24/10 21:24:46 EDT
|
Phillip: The old standby shade tree garage welding rod is coat hanger wire. The fence wire might be galvanized, if so it is less desirable. Bare bailing wire is fine if You can find it.
There is some irony to Your mention of the lack of torch equipment in China, perhaps they export all of it to the US. I thnk there are some differences in what Us North Americans are accustomed to in torch equipment compaired to what is used in other parts of the world, especially Asia. See picture- http://genstartech.com/fs/outfit-fs.html This shows what Americans expect in a torch set, it is a copy of Victor brand. The picture shows the cutting atachment mounted on the handle, the welding tip & mixer just below it.
As for practice, start by carrying a uniform puddle on steel plate, when You can do this reliably then add filler and carry a uniform bead, learn to work in all directions, then all positions, & various joint geometries as Jock mentioned
|
|
- Dave Boyer
- Saturday, 04/24/10 22:45:38 EDT
|
Well ain't this something....
Bought a pair of heavy-duty tongs a few weeks back that was painted red...but I've never seen a pair like these before, and they are in great shape!.....but then, I'm new & taking it slow, learning as I go.
cleaned them up & found a name stamped in them, TRUAX, GREEN & CO. So I looked them up and had the wife do some checking also.
Turns out they're old surgery insturments from way back in the day.....Leg amputation forceps. They're over 21 inches long! Wife got an e-mail on them and they're over 150 years old. And some "mu-zee-um" over in England is wanting us to let them check 'em out.
Really, they make horrible tongs, so I guess I won't pound on them then.
I'll tell 'em I'll trade them for one of their anvils......
Danial
forgenarmory360@yahoo.com
|
|
Danial Bang
- Sunday, 04/25/10 01:04:12 EDT
|
Its a Blacksmith's Tool: Individuals, antique dealers and junk dealers try to classify ANYTHING old and rusty as blacksmiths tools and if it has a pivoting joint it's a pair of tongs. I've seen everything from upholstery hog ring pliers to wire cutters labeled "tongs". And our recent discussion on the Hammer-In identified an ebay "anvil stand" as a milk separator stand. It would probably bring more money as a piece of antique farm equipment. . .
|
|
- guru
- Sunday, 04/25/10 09:39:57 EDT
|
I just got a sweet deal on a little champion that had been sitting on someone's lawn as a decoration. Needless to say, a bit of cleaning was in order! I've already disassembled and derusted everything in an electrolysis bath, and am in the stages of re-assembly, but I was wondering if you gents had any specific oil/grease recommendations for the gears... Other than the cosmetic rust on the outside it actually appears to be in *great* condition. I'd be happy to send pics of the project if you'd like.
Also, speaking of tongs- I was at an antique mall yesterday and stumbled across a pair of fairly large tongs. As near as I can tell they were for some pretty hefty flat bar or something. Well, the whole time I'm looking at them I was thinking
|
|
- MacFly
- Sunday, 04/25/10 10:33:40 EDT
|
'jeeze, these things are a poor excuse for tongs... Did the guy even know what the heck he was doing when he made these?!' Well, I then saw the description and price; 'very unique RR tool, $169' Lemme tell ya, I got more than a few looks when I started laughing!
|
|
MacFly
- Sunday, 04/25/10 10:35:39 EDT
|
Re "old blacksmiths' tools," how about corn/bunion tongs and arc welding chipping hammers?
|
|
Frank Turley
- Sunday, 04/25/10 11:32:49 EDT
|
Oh, and Mr. Turley- Thanks for all the info, that flyer you sent me got here FAST!
|
|
MacFly
- Sunday, 04/25/10 14:16:56 EDT
|
Large cludgy tongs:
We see a lot of these at flea markets, often in groups. I used to call these "farmer tongs" as they were common and obviously not made by a trained blacksmith. Later I found a fellow that had a large box full. I asked him where they came from. . . an old trade school. These were first tongs made as graded projects by students. And as is fairly common in such situations the materials were two heavy (5/8" round for reins) and the instructor probably not a professional smith. The virtually useless tongs were left behind at the school. . .
About all these "tongs" are good for is raw material OR decorator pieces. Considering the cost of steel these days its sort of a toss up.
Since the junk dealers don't know good tongs from bad and both sell the price is the same.
|
|
- guru
- Sunday, 04/25/10 15:23:01 EDT
|
Hello, I have a Trenton 150# anvil, and Peter Wright 186# anvil wanted to know if you would want pictures of them to add to the Avnil gallery? please let me know
|
|
- Jeff King
- Sunday, 04/25/10 17:57:07 EDT
|
Hello, I have a Trenton 150# anvil, and Peter Wright 186# anvil wanted to know if you would want pictures of them to add to the Avnil gallery? please let me know
|
|
- Jeff King
- Sunday, 04/25/10 17:57:47 EDT
|
I have a 1979 f350 I am looking to put back on the road. It has a dump body which works good with a pto and large cylinder to raise the bed. I am considering putting a whole new bed on it, and the dumping mechanism isn't all that useful for blacksmithing...
I'm wondering about the feasability of utilizing the components in a more useful way. I thought of using the cylinder for a hydraulic press, or perhaps keeping the pto mechanism to run a crane or some such thing. I'm open to any ideas..
|
|
- Josh S.
- Sunday, 04/25/10 19:10:54 EDT
|
If you are stripping the dump bed off then the PTO has a considerable demand. The cylinder might work for a press but is probably long travel and not as high a force as you might want for a press. The pump is seperate from the PTO and has its own value as well.
An F-350 is a little small for a dump bed isn't it? My F-600 seems to be more dump body size. . .
|
|
- guru
- Sunday, 04/25/10 19:38:07 EDT
|
Regarding antiques wrongly classified my father was an old school pharmacist. He had learnt to make his own tablets, pills etc. He once sold a whole load of old gear to an antique dealer. One item was what the dealer later sold as a bullet mould. It was actually for making suppositories.
|
|
philip in china
- Monday, 04/26/10 09:16:14 EDT
|
"in bladesmithing there are specific tests and requirements for these titles"
Arthur; those were set up *by* the ABS *for* the ABS. There was quite a lot of bad blood generated in the Bladesmithing community when the ABS was started and instituted their ranking system. A lot of master bladesmiths refused to join over it.
As such they would have as much validity as if you started up a smithing group and instituted your own system for apprentice, journeyman and master smith. What merit they have is in the reputation of the certifying group. They were not handed down from on high to the ABS.
I remember some of the discussion that went on during that time!
BTAIM the ABS school is very well thought of and everyone I know that has attended it has learned scads. And there are class for every level you are at---beginner, intermediate and experienced!
Thomas
|
|
Thomas P
- Monday, 04/26/10 17:04:59 EDT
|
Thomas..I've also found that over the years the bar is continuously raised and some old time mastersmiths wouldn't pass under todays standards....also the performance tests are not all that hard and any handforged blade should be able to pass..It's the five knives submitted for judging that are the real challenge..still it's good [I think?] to have some kind of judging standard...My knives while being admired by SWABA would not come close to earning a JS stamp.
|
|
- arthur
- Monday, 04/26/10 17:31:34 EDT
|
Does anyone have a source for pure nickel wire? I would like to use some in a pattern welded cable knife blade. It is mentioned in chapter six of The Pattern-Welded Blade book by Jim Hrisoulas.
|
|
sroomsmith
- Monday, 04/26/10 18:05:58 EDT
|
Hey, i've always wanted to make a gasoline engine completely
from scrap with my hands (have no experience blacksmithing
or machining) and was exploring a few ideas for tecniques.
I know that if i take aluminum foil and crunch it up, i can
compress it and it becomes rock hard. So, if i use a metal mallet or something to do this instead of my hands, would it become hard enough to withstand a blow from a small gas explosion if i mold it into a piston? The cylinder and piston is really the only part i'm afraid of doing wrong.
Also, i was thinking that if i take several tin cans and wrap them around each other, could that make them stronger? I really have no idea where else to ask these questions.
|
|
John Jacob
- Monday, 04/26/10 20:27:05 EDT
|
also, the main reason i'm deciding to use aluminum foil
is that it's the most easily accessible pure metal
material i can think of using. Also, easily foldable
and workable using the hands, and optionally tools, and
very light. But most of all, it has a very high melting point, which is good to have in an engine that may get very hot.
|
|
John Jacob
- Monday, 04/26/10 20:42:50 EDT
|
John Jacob - NO NO NO. Aluminum does not have a high melting point - it's around 1100 F, copper melts at much higher temps and iron higher yet. You can't compress aluminum foil into a solid using a hammer, even PM using powdered metal and multi-ton forces per square inch doesn't reach 100 % density even after sintering - it's got to be forged again at proper forging temps for the metal in question.
If you want to make a gasoline engine, casting parts is a better way to go. I believe Lindsay publications has books on building gasoline engines and also building backyard foundries for casting AL.
|
|
- Gavainh
- Monday, 04/26/10 21:55:05 EDT
|
@John Jacob. Your idea of what 'rock hard' is, and from an engineering stand point what 'rock hard' is, are two completely different things. Aluminium is not hard in any shape or form as a pure substance, and as mentioned, one of the common lower melting point metals you'll come across. Infact, aluminium is so easy to melt, that you could do it using a heating element in an insulated container. However the advantage of this, as mentioned, is that you could somewhat easily cast the 'housing' for the main engine components. Infact, small 2 stroke engines that you see on grass trimmers etc are made from cast aluminium I believe. Yes it will get hot easily as aluminium is an excellent conductor of heat, but it will be just as easy to cool it using appropriate methods. Even still, a large portion of the heat generated from combustion will be converted to mechanical energy.
However, I don't think aluminium is the only metal that they use; as was explained to me before, engines are made of cast iron or aluminium with machined metal alloy inserts for the cylinders, if I recall correctly (I don't remember what the inserts were made from).
Think about it, if it is easy for you to shape aluminium to a form, it will be just as easy, if not even more, for gas pressure to deform it. Also one of the neat things about why aluminium is so resistant to corrosion is because it is very reactive, so reactive that any exposed surfaces soon develop a very thin layer of aluminium oxide (a ceramic material) which protects the pure aluminium underneath. So regardless of how hard you beat aluminium sheets together, you cannot make them fuse together due to the layer of oxide on their surfaces.
I suggest studying how gas engines work and the relevant thermodynamic principles behind them, before even attempting to decide upon materials etc, even the simplest engines have some pretty complicated ideas behind how they work. Also consider if a spark ignition gasoline engine is the first thing you want to try, a diesel engine which burns the fuel purely from heat of compression might be easier. I don't think there might be a need for a fuel injector either if it is designed so that the compression process causes ignition just as the engine enters its power stroke.
|
|
Nabiul Haque
- Monday, 04/26/10 22:33:54 EDT
|
You know, I'm so new & dumb here at this wonderful site called ANVILFIRE.com that I'm as square as a hardy-hole.
I mean just starting from bare basics I've learned that I don't know how to swing a hammer the right way and I'm taking lessons in the I-Forge archives from a duck named Dippy......it's true.
But back in a different time & place I remember some wizz-kid Ivy-school engineers pushing a bad idea for an all aluminium sound suppressor for full-auto fire.
No matter how they "wrapped & packed" these things, they just DID-NOT-WORK. Even controlled burst-fire would turn the baffles inside into something like mangled pasta-shells.
Sometimes pushed bad-ideas can cause more than just failure, it can get someone killed.
|
|
Danial
- Tuesday, 04/27/10 00:30:09 EDT
|
John, Interesting thoughts but no, it won't work.
As others have noted there are other ways. However, you are very unlikely to do it without machinery, at least an engine lathe.
Boot Strapping and other Life Choices
IF you want to do this on the cheap and very low tech then KNOWLEDGE is your most important tool. The first step is to learn basic metalworking methods. There is a good general text book titled Metalwork Technology and Practice. New copies are, well what new books cost but used copies are available cheap. You want to study the and practice the most basic metalworking techniques, chiseling, filing, scraping and sawing. With the knowledge of some basic metallurgy and use of the simplest tools you can make more complicated tools, machines and many of your engine parts. However, it DOES require patience.
If you study the development of modern technology you will find that most modern machine tools tools were originally made with nothing but hand methods and simple castings. Forging was also used but less than you think. Most shafts were forged iron or steel which today you obtain already in the form of shafts. But you may forge parts if you wish.
Castings for machine tools are best made of cast iron but there are plans for making them using aluminium castings. If you make the aluminum a little heavier than the cast iron parts you can make very good equipment.
In a modern society you can also use commonly available steel shapes but some might consider this "cheating". But the fact is that you can start with large lumps of metal and carve parts from them rather than using castings. This is largely the modern chip making method used in many machine shops. It helps to have machines for this method (purchased or those you build).
Building (or purchasing) small simple machines to build larger more complex machines is a "bootstraping" process. Many folks enjoy this process and start as primitive as possible. It is definitively an educational if not somewhat altruistic method.
The other less altruistic and somewhat more practical method is to purchase small machines, learn to use them and then make your projects, engines, inventions, whatever.
Either way, metalworking is a very enjoyable hobby or occupation. But there is no going half way.
|
|
- guru
- Tuesday, 04/27/10 00:30:27 EDT
|
John Jacob,
I'm front & center and asking for your eyes-on-me for just a moment....please.
In no way was I wanting to come off as calling you out, or dumb,(that was me picking on myself) or flagging your thoughts as a "bad idea".
IF I did come off as such, please forgive me. I am sorry.
Who am I, among all these mighty men of wisdom & knowledge, to judge??? Not I.
I sincerely hope that you take your idea and run with it until its honed and refined till it snaps & spins like a fuel-injected rattle snake!
( waddling back to the school of archives, and removing Dippy-ducks hammer from my backside. )
|
|
Danial
- Tuesday, 04/27/10 01:38:33 EDT
|
Hi. I am a complete beginner getting set up. I live in town and have a small woodworking shop with some outdoor work space. I am debating between coal forge and gas forge. Coal seems cheaper but I am concerned about the odor. Gas forge would take up less space but I hear will cost about $10/hr to operate with propane. Neighbors don't complain about woodshop noise so I don't think metal hammering will be any more or less annoying.
My shop is multifunctional and space is an issue. What can you suggest I do?
Thanks.
Rob
|
|
Rob Gorrell
- Tuesday, 04/27/10 07:01:33 EDT
|
My personal answer was both; but it depends upon your scale of work and ambitions. I get about 21 hours off of a "barbeque" size gas cylinder on my one-burner Whisper Baby gas forge. It is perfect for smaller parts such as box hinges, small to medium knives, display pieces, iron jewelry, or even spearheads. It is good for sub-assemblies on larger projects. You do, of course, have to be careful of sequencing, so that you don't make a big bend or curve and not be able to get the item back into the small working chamber, or out the back hatch.
However, if you are doing any welding or bigger work such as large chest or barn hinges or architectural work, you need a lot bigger gas forge using a lot more fuel (and at greater expense) or an open coal forge.
Now, some of my neighbors actually like the smell of the coal; it reminds them of their childhoods back up in Pittsburgh. Also, I’m down on the farm, and there’s lots of room for the smoke to dissipate. Suburban neighbors can be a little fussier. One dodge is to experiment with a small brake drum or "BBQ" coal forge. Small investment; small loss if it doesn't work out. Also, if you have a steady and cheap source, lump (not briquette) charcoal is wonderful- clean, no sulfur to contaminate the finer cutting edges or springs or more sensitive steel projects; mostly smokeless, mostly odorless; and you can cook hotdogs over it! It's the historic fuel of the blacksmith, but you burn through it, by volume, at a fierce rate and there are a number of tricks to forging and welding with it. (I've ripped through a LOT of charcoal doing a weld.)
Just like anvils, you can do small work in a large forge, but you can't do large work in a small forge; so unless you already know the scale of your work, you would probably be best experimenting with a medium coal/charcoal forge and see what the neighbors think. Then adapt as necessary based upon the reactions of your neighbors and your developing capabilities.
One final note- I'm presently setting up a separate building for my woodshop to remove sources of random fuel from my forge. Woodchips and sawdust and long shavings from planes and drawknives make great tinder. Random hot coals or hot cutoffs at the hardy make great ignitions sources. In the forge I use sodium silicate AND metal wainscoting, and a dirt/sand floor at the hot work area to reduce the threat of fire. You may wish to make your setup and "out the door" system, so you can forge outside, and only put things in your woodshop when they cool down and are safe.
I’m sure the other folks here will add to this. Good luck!
Sunny with clouds and cool on the banks of the Potomac. The waterspout/tornado managed to miss us last night at Oakley!
Visit your National Parks: www.nps.gov
Go viking: www.longshipco.org
|
|
Bruce Blackistone (Atli)
- Tuesday, 04/27/10 08:02:56 EDT
|
Boot Strapping: Hasluck's Metal Working Has plans for a small foot treadle lathe designed to be made from a bunch of small cast iron castings. The only trouble with this is the near impossibility of getting a foundry to cast the parts from your patterns. When the book was written almost every town with any industry at all had a foundry/ironworks and skilled foundrymen who could take amateur loose patterns or even old work/broken parts and make castings from them. While like all foundries their money was in the production of a product in large quantities they also did a lot of one-offs for in-house use as well as off the street business.
Today such foundries are rarer than hen's teeth. Thus the backyard foundry. This is much simpler said than done and is very serious business.
|
|
- guru
- Tuesday, 04/27/10 09:21:29 EDT
|
John Jacob(jingle himmer schmitt???... just teasing...)
That is an interesting proposal, "to make a working I.C. engine from highly compressed aluminum foil"
It sounds like you are trying to imitate the stintering prosses but, I dought you would ever be able to achieve the heat and pressure needed to cause fussion of the material even in a very small, localised area, not to mention a complete, homogeinious part.
No matter how tightly "packed" your aluminum ends up it will still be just alot of unwelded layers.
If you want to build an engine from scrap I would suggest you go to a srap yard and ask if you can carefully dig through the aluminum scrap to see if you can find a piece of tubeing to suit your needs.
The other thing about "bootstraping" as suggested by the Guru, is that you don't want to start at a point so far beond your skill and knowlage level that you will completly loose sight of the project. How many steps back from the desired end resault SHOULD you take? Are you going to go off and learn how to identify a naturaly occuring Bauxite(sp) sorce and then learn how to mine and prosses it and refine it and make your own aluminum ect...?
A noble endevor, if that is what you're after. The persuit of knowlage can be like a great religious experience for many people. On the other hand, practicality may dictate an alternate reality for you, as it does for most of us.
If you're undaunted by all of us "nay sayers" here then I would suggest you research the stintering prosses and the Linley lost technology books and see what you can find to fan your flames...
|
|
- merl
- Tuesday, 04/27/10 10:00:50 EDT
|
correction:
"Linley" was the name of the company that manufactured the very fine little jig mill that I have.
"Lindsay" is the name of the publishing company that produces the books I refer to.
I'm pushin' my mid-late 40s and some times the clutch slips...
|
|
- merl
- Tuesday, 04/27/10 10:12:45 EDT
|
Mixing Wood Working and Metal Working: There are some issues to be aware of. One as Bruce noted is fire.
Metalworking is generally dirty. Coal and charcoal dust can stain your woodwork. Worse, is iron scale, powder and swarf. Grinding grit can embed in wood and stains oak in particular. Welding sputter balls do similarly.
If you have a fairly large open shop these problems are not too severe. Storing wood where it is not exposed to grinding swarf and sputter balls is important. Otherwise with good housekeeping the two can be compatible.
|
|
- guru
- Tuesday, 04/27/10 11:01:15 EDT
|
More Boot strapping:
As Merl notes a lot depends on just HOW primitive a point you want to start at. Digging ore with stone age tools? Even stone age tools are a level of technology one needs to learn. Smelting metals using charcoal you made from wood cut with those stone tools? Folks smelt metals in primitive furnaces today for both the experience and trying to recreate lost arts. But making sufficient metal of suitable quality to make both steel tools and cast iron to make machines from and recreate modern technology is a significant task. At that point are you going to make your own files, drill bits, saw blades? Each is a significant specialty. . . a LOT to learn.
|
|
- guru
- Tuesday, 04/27/10 12:12:02 EDT
|
Bootstrapping, Science and Technology: We stand on the shoulders of giants, who stand on the shoulders of other giants...
Don't nobody sneeze!
;-)
|
|
Bruce Blackistone (Atli)
- Tuesday, 04/27/10 12:57:13 EDT
|
Guru,
I was wondering if there is a set amount that a rivet has to protrude and what it might be. I have been looking in all my books and on the internet and can not find anything on it. Any help would be greatly appriciated.
Thanks, Glenn
|
|
Glenn Owen
- Tuesday, 04/27/10 12:57:43 EDT
|
I am trying to find out the value of a small anvil for my father, it is marked The Crispin Lap 1883. I found one photo online and not much else. Apparently it was used as a traveling anvil. Can you help us? Thanks!
|
|
Jeni
- Tuesday, 04/27/10 13:06:52 EDT
|
Glenn, There is a prior to heading length ratios for various head types. It is about 1.5 to 1.75 diameters. Is that what you are asking? Machinery's Handbook and various other references including most blacksmithing books have the details. Our iForge riveting demo has different head types and other information about riveting.
|
|
- guru
- Tuesday, 04/27/10 13:56:03 EDT
|
Crispin Lap: Jeni, Click the link, I think that will answer your questions.
|
|
- guru
- Tuesday, 04/27/10 13:59:45 EDT
|
Hi, I want to color-temper steel rings. Your chart specifies "Plain Carbon Steel", but I've got W1-type steel. Will it work? Also, when you say "polished," does that just mean sanded smooth?
Many thanks, Miranda
|
|
Miranda
- Tuesday, 04/27/10 14:06:41 EDT
|
Hi, I want to color-temper steel rings. Can I use W1-type steel? Or is that different from "Plain Carbon Steel"?
|
|
Miranda
- Tuesday, 04/27/10 14:07:27 EDT
|
Well that's par for the course I read everything but my machinery handbook. And yes that was what I was looking for. And as usual my murphys law kicks in 50/50 chance of finding it and I have a 90% chance of choosing the wrong 50%. The demo was exactly what I was trying to find thank you for your time and now I am going to play with my rabid bulldog:)
Thanks, Glenn
|
|
Glenn Owen
- Tuesday, 04/27/10 15:01:21 EDT
|
Temper Colors:
Miranda, what are the rings for?
W1 is a tool steel that contains a little Chrome and Nickel. Not enough to greatly effect the temper colors.
However, it hardens very hard and in its untempered state is very brittle. Normally the color is used to determine the temper temperature and thus the resilience of the steel.
IF you are just bending the rings and coloring them this will not harden or temper the as-delivered annealed tool steel.
Even though it is annealed to make it soft it will be darn tough to make rings from. . .
|
|
- guru
- Tuesday, 04/27/10 15:27:41 EDT
|
Rob what kind of propane forge are you considering? I run one quiet frequently and use about $1.50 an hour for fuel and that's with the end wide open and the pressure turned up for teaching a class out of it!
Gingery wrote a whole series of books on bootstrapping a small machine shop by first building an aluminum foundry set up and then casting the parts gradually using one machine to help build the next and so on. lindsaybks.com has them see the "Build a Complete Metalworking Shop from Scrap!" under the gingery books link.
Thomas
|
|
Thomas P
- Tuesday, 04/27/10 15:41:00 EDT
|
Polish - Sandpaper: Miranda, There is sandpaper and there is sandpaper. 320 grit Wet-or-Dry does a good job putting a very smooth near-polish on steel. As long as it is bright and clean the temper colors will show well. However, an actual polished surface using buffing compounds will show brighter colors and be more long lasting.
|
|
- guru
- Tuesday, 04/27/10 15:52:11 EDT
|
Rob, i run my propane forge (i still have a coal one for heavy work and big scrolls, so you will want both sooner or later). when i did the math is costs me $1.57 per hour (i get 28 hours from a 50lb propane tank. i included the cost of gas to get the propane) to run it. it handles 1 1/4in sqaure and welds easily. i don't know if that will affect your choice, but if you are a suburnbanite i recomend a small gas forge and if you get serious, go bigger. do be warned though, you HAVE to check for leaks and be really annal about doing so.
if you are more interested in knives and tools then decorative work, you can set up a livley style forge (it runs on charcoal or wood) for cheap, and they are good from what i hear. I highly recomend dowloading 'knifemaking unplugged'. it is about $10 to download and it is well worth looking at how to improvise most of the tools you will need.
|
|
- bigoot
- Tuesday, 04/27/10 18:19:52 EDT
|
When I was in something like 4th grade, I tried to motorize toy boat. It needed a keel, so I made one out of "packed" aluminum foil and super glued it to the hull. The glue did a great job holding the top layer of foil to the boat . . . .
|
|
Mike BR
- Tuesday, 04/27/10 18:49:47 EDT
|
Thanks for the advise. $1.50/hr sounds a lot more reasonable. The points about fire are well taken and I have thought about that a lot. I have an outside area that is walled off from site that I think I will set up for forge work.
I have been buying books for gingery but have not really dug into them yet.
|
|
Rob Gorrell
- Tuesday, 04/27/10 19:22:11 EDT
|
John Jacob: Check out the pictures on this site to see what other guys have done in home shops.
http://www.cabinfeverexpo.com/
These are serious hobby builders, and they use wood & metal working machine tools as well as do a lot of hand work. At these shows, there are kits available that You finish into working engines, and plans for those who want to start from scratch. Most of the items displayed are built without kits or plans.
|
|
- Dave Boyer
- Tuesday, 04/27/10 20:09:50 EDT
|
Dave, pretty cool stuff. . . I could look at it for hours.
My little 6 inch Craftsman Lathe was the low end lathe for guys that build all these little model and scaled down engines. The 8" Atlas with quick change gears was the king of the model builders lathes in its day.
Dave Baker using 6" Craftsman Lathe
Using imaginative setups and tooling all the bores, facing and many other tasks could be done on these little lathes.
Steady rest on large threaded rod.
It seems like every job is at the limit of the machine but I think that is just because you don't remember the jobs that fit. I re-machined the movable vise jaw for a 6" Wilton drill press vise on this machine. My Dad hogged out a right angle gear box on it from a block of aluminium over 4" square. Our recent hammer parts have started from 3" round and 3" x 4" rectangular stock and had 1.5" and 1.75" precision bores machined.

Connecting link made on 6" Lathe.
This lathe is on its third stand. The first was an old chest of drawers that it vibrated apart. The second was a "government" project made from scrap at one of Dad's shops. . . and the current one weighs about 3x the lathe, has an integral chip pan and shelf below.
The big thing is that it is really amazing what you can make on a little machine like this. You can square stock, turn shafts and generator armatures, make screws and handles, make bushings and washers to fit everything. . .
When it was new in 1950 this lathe sold for $99 plus a whopping $5.20 for a 1/3HP motor. That did not include a chuck or attachments. My Dad bought the 3 jaw chuck but it was 38 years later when I equipped it with a 4 jaw, a full set of tool holders and steady rest.
|
|
- guru
- Tuesday, 04/27/10 21:46:27 EDT
|
Rob Gorrell, I was just checking out a video on youtube of a professional blacksmith that is makeing rigging parts (chainplates and dead eye strops) for a large schooner. His gas forge is set up outside the side door and he grabs the hot stuff and dashes back inside to take it to task under the power hammer.
Keep the wood inside, under a tarp or maybe build an enclosure for it and put the fire outside under a vented overhang. Maybe you'll build a nice brick harth forge with just a tin roof over it to keep the rain off.
Personaly, I'm lucky enough to have the space in my shop that I can have wood storage a safe distance from any hot work. When I have to use something like the abrasive cutoff saw I set it up out in the gravle driveway and keep the hose handy when it's dry in the summer.
I live far enough out in the counrty that our little town volunteer fire department would get there just in time to put the embers out if we had a fire. I always keep this reality in mind anytime I do anything around my place.
|
|
- merl
- Tuesday, 04/27/10 21:53:42 EDT
|
i highly recomend the 3/4in z burner from zoeller forge (www.zoelerforge.com). it is what i use and is dainty, but puts out ALOT of heat. it is not a cheap toy to buy, though, but is a great burner.
|
|
- Bigfoot
- Wednesday, 04/28/10 08:23:24 EDT
|
well, if i am to experiment with this stuff, can
anyone give me some pointers on safety? I've
always thought that if you have safety down, then
you can experiment all you want, and even if you
fail, nobody gets hurt. (works with electricity and
computers) So, can i get a few pointers?
|
|
John Jacob
- Wednesday, 04/28/10 08:59:30 EDT
|
i meant danial when i was talking about that
thing where you did the front-center apology.
I didn't realize that the poster name was below
the message and not above it
|
|
John Jacob
- Wednesday, 04/28/10 09:10:59 EDT
|
Regardless of where you come from, people will still act like people, I believe your notions about japanese people are from a bad stereo type created by the media. Also I'm not sure, but I think Danial was being sarcastic.
Safety is pretty relevant to the situation at hand and goes beyond what equipment you use; I believe that you would need a good working knowledge of physics,chemistry and some about your own physiology to be truly safe. There are many common chemicals in your home that when used improperly, could hurt or kill you, same thing for many equipment/ devices etc.
For example, did you know that if you boil water in a sealed container, it will become heated above its boiling point and stay mostly as a liquid (as long as the container can take it). When this container is opened, the pressure that was forcing the water molecules together would have dissapeared and the super heated water would suddenly vapourize into steam until the remaining volume of water dropped to 100 degrees C. I could imagine that being in the path of this steam would not be good for you.
This is somewhat similar to boiling water in a microwave, which can allow water to go beyond the boiling point if it is not disturbed.
In this instance though, it depends on the size of your engine, are you going to be making a palm sized engine like commonly available for RC vehicles or something bigger? There isn't much to worry about with those small things other than the fuel source and fires starting if it leaks. Another interesting thing to look at is nitro engines, they use glow plugs which do not require electricity or timing after the engine is started. Works purely on heat of combustion and catalysis, you have to be careful with nitro fuel though, I believe the stuff can get absorbed through your skin.
Have you thought about how exactly you're going to cut threads to fit in a spark plug? This thing has to withstand high pressure, you can't just glue something in.
|
|
Nabiul Haque
- Wednesday, 04/28/10 11:21:21 EDT
|
You gotta be kidding, right? Make an IC engine from crumpled up tin foil? Never happen and a total waste of time and energy.
|
|
- sceptic
- Wednesday, 04/28/10 12:32:48 EDT
|
This could be the start of a fun and rewarding hobby! I'd like to make a plug for the "hit and miss" engine crowd as a type of IC you can build.
I've always wanted one to run a triphammer off of!
Thomas
|
|
Thomas P
- Wednesday, 04/28/10 13:37:34 EDT
|
Incidentally, I happen to be trying to fix a very old kawasaki weed eater that I got from a friend. It wouldn't start despite using an electric drill to spin it up, revved it with the spark plug taken out and it is getting a good spark. I got a surprise however when I took out the filter, it basically crumbled apart since it's so old / is probably a makeshift one from the wrong material, wouldn't be surprised if it's clogging up the carburetor.
Anyways, I don't think they sell filters like this anymore, a round disc shape, are there any suitable materials that I could use as a replacement? The stuff that was inside looked like the foam padding that you get inside equipment cases, could I cut a new filter out of that stuff? Or maybe cut some disks out of old socks, I've got plenty of those?
|
|
Nabiul Haque
- Wednesday, 04/28/10 14:08:03 EDT
|
Safety and Safety:
Well there is simple safety such as falling down and extrapolating it to falling a larger distance. We learn this as a baby at about 18 months.
Then there is safety that requires common sense (a thing a great many people do not seem to have). We do not have to experience being hit by a car to know that it would hurt a LOT and possibly kill us. We should also know that if it hurts US it hurts others. . .
Common sense applies to issues such as people that cannot swim and lie to others about it in a life or death situation such as going into water over their heads. If you have more pride than common sense you drown and that is THE END. This is NOT hypothetical. I and three other adults asked a bright intelligent teen age girl if she could swim and a few minutes minute later she was dead. SHe had too much pride to say NO.
Then there are things we are educated about. When things are labeled POISON or HAZARDOUS with the death symbol (scull and cross bones) a person that can read or who has been taught the universal symbol (one of the few standards we should keep), should know that pain or death will occur if they ingest the substance or feed it to their pets.
This requires the knowledge to READ and understand the repercussions (injury, illness, death). Almost all safety issues are expressed in writing in books on the applicable subject.
But THEN there is safety that requires more than common sense and a lot of knowledge. This is gained from study and experience. As mentioned above, many safety issues are in plain writing. But those such as why a building would fall down in a wind storm are engineering issues that require high levels of education PLUS putting in the effort to research the materials and how they are applied, study the forces applied and do the calculations to determine the end results. It does not come magically. It comes after a great deal of study and hard work.
On the other hand, someone with a great deal of experience could also build a weather resistant building based on that experience. But in most cases, you need education PLUS the experience tempered by common sense.
While it is often stated that there are no stupid questions (and we answer a LOT of them here), forming a question in such a manner that it conveys specifically what you need to know is VERY important. It also very important to listen to answers given.
My pointer to you John Jacob is to read a few books on the subjects you are interested in. To answer all your questions STUDY, not just read and make it more than a FEW books. You want a list? Start with the alphabet and A for Algebra, B for Boolean, C for Chemistry, D for Destructive testing, E for Elements of Strength of Materials by Timoshenko . . .
|
|
- guru
- Wednesday, 04/28/10 14:16:35 EDT
|
Foam filters: Nabiul, they still make these, maybe not for your specific device. Try a shop that sells several brands of small engine and find something close.
The problem with plastics and elastomers in the engine business is that there are materials that are gasoline resistant AND there are materials that are alcohol resistant but there are only a few materials that are both alcohol and gasoline resistant (there are other solvents as well that a filter must be resistant to).
GM had a HUGE problem in the late 70's with this when many companies started putting alcohol in gasoline. . . The closed cell foam plastic carburetor floats absorbed the alcohol and then would not float. . .
The second problem is that there is open cell foam and closed cell foam. IF you use closed cell foam for a filter nothing will go through it. If you run water through an open cell filter it goes right through like the filter is not there - good test.
So, off the shelf foam may be a problem. Find a larger filter and cut it down to fit. . .
|
|
- guru
- Wednesday, 04/28/10 14:28:17 EDT
|
In Depth Study: If you are REALLY serious about a subject one method of research is to start with any book that has a bibliography and find THOSE books. If any of those have bibliographies find THOSE.
While doing so look for circular references. This is one book referring to another that refers to the first for the same information. This is surprisingly common among newer publications. THEN look for the true source material.
It helps to have a research goal. To find some specific and uncommon thing.
|
|
- guru
- Wednesday, 04/28/10 14:44:00 EDT
|
Alright thanks, I will try that. Assuming that this engine still works, very doubtful though.
|
|
Nabiul Haque
- Wednesday, 04/28/10 14:47:38 EDT
|
Thomas, if you want to see a power hammer running from a line shaft that is being powerd by a "hit and miss" engine, check out my video in the comuntiy video section of the ANVILCAM II page.
The entire shop is run by the one line shaft so we sometimes have to take turns using the power as the engine is pretty much just ideling so it can be left unattended.
|
|
- merl
- Wednesday, 04/28/10 15:29:39 EDT
|
Naibul,
A friend of mine just made an old weed eater engine into an air compressor. Not sure I'd recommend it, though. . .
|
|
Mike BR
- Wednesday, 04/28/10 17:34:07 EDT
|
This one is going to be for some kind of RC vehicle. I wanted to make a tank with a transmission and everything, but the machinery needed for that is out of my reach. Probably going to make a large RC boat out of it,.... but that looks a long way off, it won't even start and I have no idea why.
|
|
Nabiul Haque
- Wednesday, 04/28/10 18:05:52 EDT
|
Simple Engines: The Wright Bro's couldn't buy an engine to suit their needs so they built their own. The engine was thin walled cast iron and had babbitt bearings. I doubt that they made their own castings. It would be interesting to research.
A short lived automobile called the Crosby had a fabricated engine made from steel plate. Detractors (and competitors) called it a "sheet metal" or "tin" engine. This stuck and may have had an effect on the demise of the line.
The funny thing about the "sheet metal" moniker implying a cheap engine is that the "cast iron" engines of a few years later and up until today would have about the same weight in steel sheet metal than cast iron. This includes rocker covers, side or top push rod covers, chain covers, oil pans and intake filter assemblies. It all adds up to a lot of the engine.
The simplest internal combustion engines are two cycle. The only moving parts are the crank, piston and connecting rod. In small engines the cylinder, head and half the crank case are one piece.
The entirety of one of these little engines can be made from small scraps of aluminum, steel and brass using a small lathe like the old Atlas/Craftsman several posts above.
I have a second 6" lathe I bought due to the oportunity. It was $400 plus a mad dash some 800 miles to Florida and back. The fellow selling it would not ship and he was not interested in parting it out. It is a complete machine with extra chucks and many of the attachments.
|
|
- guru
- Wednesday, 04/28/10 18:58:48 EDT
|
My Dad went "all out" and got he Atlas Clausing 12" with quick change gears in '59. It is still in really good shape, and it too has done some jobs that barely cleared the ways. This has "V" ways and steel change gears, but is a rather light machine, about like a 9" South Bend in terms of structural mass. It is a well made machine, just light.
|
|
- Dave Boyer
- Wednesday, 04/28/10 19:46:27 EDT
|
Engine-compressor conversion: My Dad made one out of a Maytag engine. The compression ratio was so low that it only made 35 PSI. He made another from an air cooled hit & miss. These were easy conversions, both engines used "Model T" spark plugs with 1/2" tapered pipe thread, all He really did was provide a discharge check valve, and in the case of the Maytag, drilled some intake holes in the crank case. The Hit & miss has a sniffer intake valve, as they generally do.
These were not sucessfull attempts, they worked, but not well. We ended up using belt driven refrigeration compressors untill I got a 5 HP industrial compressor.
|
|
- Dave Boyer
- Wednesday, 04/28/10 20:08:43 EDT
|
That car was the Crosley, same company that made refrigerators & radios. The engine was developed as a light weight engine for the US military, they later put it in the cars. It was brazed together from thin plat and tubing. After a few unsuccessfull years they went to a normal cast iron engine, but thier reputation was already shot.
I had a '47 Crosley, the top half of the engine had been removed [Cylinders bolted to the crank case] and a 7 HP Briggs & stratton was bolted to the top of the crank case. It belt drove the front of the crank. Somebody had cobbled this together for kids to drive around the farm, but the Briggs engine was shot. The whole car was really rough.
The entire car was cheaply built, and way behind the times for a post war car. The brakes were operated by cables, like a bicycle. The windows slid back in tracks to open.
|
|
- Dave Boyer
- Wednesday, 04/28/10 20:21:36 EDT
|
I am building a great bellows and am not sure how to make the valves, it seems that it would be good if the valves could be replace with out having to dismantle the bellows. Any ideas (pictures Would help).
Thanks
David
|
|
David Phillips
- Wednesday, 04/28/10 20:34:23 EDT
|
Dave,
My friend discovered that two-stroke engines aren't made to keep oil in the crankcase -- he wound up making an oil separator as well. Of course, the compressor was made to feed fuel into his home-built (atmospheric) boiler. Somehow he manages to make my projects look practical (grin).
Naibul -- Thinking about it, the air passages in a little carburettor are probably pretty simply; there may not be anywhere for bits of the air cleaner to lodge. Possibly bits got stuck in the reed valve. If it were mine, though, the first thing I'd look for is a gummed-up fuel passage somewhere in the carburettor. Especially if the engine sat for any length of time.
|
|
Mike BR
- Wednesday, 04/28/10 20:36:29 EDT
|
I think the problem is deeper than that, I already cleaned the carb out today, nothing. When you try to start an engine, it makes a grumbling sound which lets you know that it's at least firing. This engine doesn't do squat when it turns over. The only noticeable thing is when I hold the throttle open fully, it becomes a little easier for the drill to turn it. Maybe I'm using bad gas, I don't know, it's been sitting in the garage for a long time.
|
|
Nabiul Haque
- Wednesday, 04/28/10 21:07:26 EDT
|
Nabiul, clean clean clean. . . On the other hand, I've had chain saws and weed wackers and given up on the gasoline powered ones. The little cheap ones only lasted me one season and repair shops were pretty hopeless. So I've gone electric for these tools.
On the other hand, I had a Lawn-Boy mower that lasted 30 years that replaced another that had lasted 20+ years. . . but ever spring the carb had to be disassembled and cleaned. It was removed opened and replaced using the original gaskets 30 times. Today the engine is still basically good but it needs a new exhaust, new blade flange, new wheels, new air cover. . . If I can get all the parts I might do it one day. . .
|
|
- guru
- Wednesday, 04/28/10 21:31:50 EDT
|
Bellows designs: Dave, I should really make plans for My Great Bellows I built in 1978. See link for photos.
I made the valves on seperate boards so that they could be removed for maintenance. They never needed repair in over 25 years but they gave access to patch some holes in the leather (*I* didn't poke the holes. . ).
The bottom valve body as can be seen had four openings and was larger than the middle valve body. This allowed the middle board valves to be removed through the bottom board valve hole.
The valves were made of an unusual material I had on hand, a laminated rubber and canvas material. But traditionally heavy leather can be used OR pieces of wood. Today I would use soft thin upholstery leather attached to a thin board to hold the leather flat, and the leather as the hinge. To make a long lasting hinge a rounded piece of wood would be screwed down across the leather.
I used four 3" diameter valves on the bottom and tweo 3" valves in the middle. The size was the largest hole saw I had on hand. The reason the intake had larger valves was the same reason as an automobile or air compressor has larger intake ports, a low pressure differential requires a larger opening to prevent restricted flow.
The only change I would make in this bellows was the artsy crafty circus hinges. This part of the general design of my portable blacksmith shop. Today I would use steel hinges set flush in the wood and then covered with leather as in traditional bellows.
Note that all the wood in this bellows was 3/4" (19mm) pine shelving carefully selected for as few knots as possible. It was tongue and grooved to make it air tight ans the top and bottom had tangential reinforcing boards. The boards were MORE than heavy enough to create sufficient pressure to operate a general purpose coal forge. The only time they did not provide sufficient pressure is when the fire was clogged with clinker. The disadvantage to the thin boards is the narrow nailing surface and the need for a LOT of nails.
It was a great "Great Bellows" and one of the few things I missed about selling the shop trailer.
NEW Bellows. . . My next bellows project will probably be an oriental box bellows. About the same amount of wood, no leather. . .
|
|
- guru
- Wednesday, 04/28/10 22:03:15 EDT
|
Bellows Valve Drawing
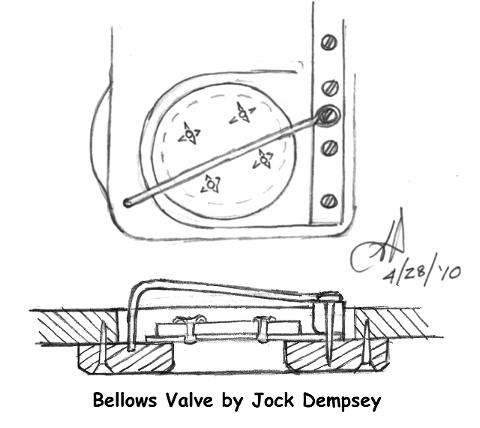
This is the valve as described above. The original I used was just the rubberized canvas laminate over the holes. This one is leather with a wood stiffener disk.
This valve has a flip over guard. However, looking at the layout it might not be needed on this recessed valve.
It is common for the center valve in a bellows to get flipped over while handling and the top board holding it in position long enough for the leather to take a set in the bent or rolled over position. This prevents the valve from closing of its own accord. When setup the bellows that worked perfectly when put into storage will no longer work correctly. I've seen this several times and once on a bellows that was re-leathered TWICE and the repairers did not notice the non-functioning middle valve (they were so-called museum experts).
With these recessed removable valves the issue is not critical but if the valves are part of the boards then flip over needs to be prevented on the normally inaccessible middle board.
Valves could also be hinged sheet metal. . and as noted many were wood with a couple staples that they hinged on. Wooden valve would make a distinctive wooden "plop" noise when they closed.
|
|
- guru
- Thursday, 04/29/10 00:23:00 EDT
|
i don't mean engine building safety! (I learned that in auto-
tech class in high school - already know how an engine works, too) I mean blacksmithing safety. Like what kind of protection you should wear, what kind of tools, etc. Thank you for your assistance, everyone :)
|
|
John Jacob
- Thursday, 04/29/10 04:21:03 EDT
|
@guru: why not make some plastic rings with four hooks on the inside, then cut some socks down into circles and fit them through the rings (should be one after the other, and the socks should be pretty thin - but not too thin) and fasten them into the hooks, probably make seven of them if it's JUST a weedwhacker, and then take the rings and melt four plastic beams across them (melting to fuse the plastic together) And make sure that the extra diameter created by the beams just alost reaches the diameter of the filter housing. Then, wrap it in posterboard or cardboard or something, and stick it into the filter housing. Totally diy filter! Okay, i was just challenging myself (it's a lot easier to just buy one)
|
|
John Jacob
- Thursday, 04/29/10 04:36:42 EDT
|
Guru, I must disagree about the original Wright brothers engine. If a guy was to make an engine, with the minimum shop equipment, he would probably end up with an engine much like that Wright 200 cubic inch 4 cylinder. Cast aluminum case, with iron sleeves, crank turned from billet, automatic inlet valves and no carb, just a fuel drip on hot surface. The ignition would now probably be different as that one had make and break, not coil and plugs. Made about 16 Hp on about 40 octane gas, and once the uncooled heads got hot dropped off to about 12 Hp. 2 power settings, on and off. And once the fuel was turned off, it would run for a few seconds more till the fuel already dripped out was consumed. But, 12 Hp, for about 238# in running order was near cutting edge then.
|
|
ptree
- Thursday, 04/29/10 06:03:06 EDT
|
Dave: So the Crosley was like the Citroen, but without the Gallic charm?
http://www.free-images.org.uk/cars/citroen-2cv6.jpg
Skeptic: I tend to agree with you. However, now the original post has me wondering about the properties of "compressed aluminum foil" in terms of heat dissipation, insulation and such. It obviously doesn't have the structural integrity, or heat resistance* to withstand internal combustion stresses; but I'm remembering my old Chevy Vega with its aluminum engine block (…a noble experiment, says I!) to which they later added steel sleeves in the cylinders when the silly things would slag. (See, the secret with the originals was to not get an air conditioner; it just couldn't handle the extra heat load.)
So, what could you make out of "CAF" that might be useful, or even superior to other materials? Pillow blocks? Heat dissipaters? Clunky, yet light and flashy, platform shoes? You never know what comes wandering along out of left field**; it may surprise us.
* Most alloys of aluminum do badly at higher temperatures, as both the American and British Navy's have found to their dismay in the later 20th century. It crumbles, then melts, before showing any incandescent colors.
** "Left field," according to my father, is where my mind spent most of its time. ;-)
Cool and clear on the banks of the Potomac.
Visit your National Parks: www.nps.gov
Go viking: www.longshipco.org
|
|
Bruce Blackistone (Atli)
- Thursday, 04/29/10 07:15:10 EDT
|
Well, I actually have some minor experience with crumbled foil as a heat conductor. On our plastic piping we had several hundred feet of heat tape running linearly on the pipes. To get the tape to conduct the heat around the pipes we loosely wrapped and then compressed the foil around the pipes then tied it into place. There was often several layers and packed marerial in joints. It both insulated and conducted the heat (air pocket insulation). In some critical places we used insulation over that but if there was a power failure and you had to thaw the pipes then you had to strip the insulation. The crumpled foil cover helped when thawing the pipes with a propane torch.
I got to observe a LOT of crumpled foil over 25 years. The primary problem is that it would uncrumple, the wind catch corners, loosen it and eventually it loosened and fell off where it was not tied on. Anywhere is got wet repeatedly it would corode rapidly. But the primary issue was relaxation and faling apart.
It is also VERY VERY weak material. While it does well in compression up to the pressure it was compressed at it has almost no tensile strength. After heating it relaxes and can be compressed more OR it falls apart. These are simple mechanical tests that anyone can do. But they are rather pointless.
|
|
- guru
- Thursday, 04/29/10 07:47:05 EDT
|
i've used CAF to demonstrate forging to my 2-1/2 year old, on a trolly track anvil w/ a wooden toy hammer.
Moves like hot steel. Playdough does NOT, it bounces the hammer.
|
|
- DAVE LEPPO
- Thursday, 04/29/10 07:55:12 EDT
|
Can we all stop calling it "tin" foil? There is absolutley ZERO tin in todays foil. It aggravates me to no end. My wife always says to me "Hey, while you're in the kitchen, get me some tin foil", to my reply of "we don't have tin foil.... did you want some ALUMINUM foil?"
Other annoying things people say that need to stop:
Calling it a "clicker"... it's a remote control and they stopped clicking decades ago.
Calling it a "blinker"... it's a turn signal... lots of things on a car blink. Heck, I'm a blinker... I think we all are.
Calling the Home Depot the "Depot" (with pronounciation like Deh-pott or Deh-pit).
Calling a creek a "crick".... there is no "I" in creek (just like team).
Okay, my rant is over. Now people, talk normal.
|
|
- Nippulini
- Thursday, 04/29/10 08:34:03 EDT
|
Dave, you're supposed to use modeling clay, not Playdoug. Two different animals. . . The water based Playdoug is quite springy, much like actual bread or biscuit doug. The only problem with oil based modeling clay is that it is VERY temperature sensitive. Like beeswax just a few degrees makes a huge difference in workability and a few more and its almost not self supporting.
I've modeled some fairly large sculptures (50 pounds) from modeling clay and also used it in mold making. Springy it is not. .
I recently read an article about the fellow that invented modeling clay and his company who made most of the worlds supply for most of the 20th century. They made a very good product that many others did a poor job copying. I think they finally succumbed to the many corporate buy outs. . .
Playdoug on the other hand can dry out over a period of days or weeks, its consistency getting stiffer and probably springier over time. I know that it is very weird when it has a slightly dried crust and soft interior. . . Strange stuff. I can still remember the smell of opening a fresh can. . . I'm sure it is a very odd perfume designed to hook kids on the original and only Playdoug.
|
|
- guru
- Thursday, 04/29/10 08:35:07 EDT
|
Nip don't you mean "narmal" the way they say it up North?
|
|
- guru
- Thursday, 04/29/10 08:39:26 EDT
|
Down South.. hated it when Bush would discuss "nookyular" situations regarding the "You-nah-tid" states.
|
|
- Nippulini
- Thursday, 04/29/10 08:53:06 EDT
|
Blacksmithing and Shop Safety:
1) Wear safety glasses when in the shop.
2) Read and understand all tool, machinery and material property warnings. ASK for MSDS (material safety data sheet) for all chemicals.
3) Wear hearing protection when needed. NOTE: I prefer a quiet, non-musical shop so that I can HEAR the machinery. Many machines that run fairly quietly will warn you of problems by sound a long time before a serious failure.
4) There are times for gloves and times NOT. Most shop work is more dangerous with gloves than without. The exceptions are simple material handling and all types of welding. In the blacksmith shop we use TONGS as hot steel will burn through gloves. In the foundry gloves are worn but MUST be kept dry. Wet gloves will conduct heat as well as make steam and cause severe burns rather thanprotecting from heat.
5) While many of us do not wear them steel toed shoes can save your feet. Dropping a common 40 pound object on your foot can crush toes, break bones and do serious life long damage. Accidentally kicking or tripping on same object can cause toe damage that will follow you throughout life.
6) Leather approns (common welding apron) are a good idea when doing hot work as well as grinding and buffing. They protect you and your clothing. They are also snag resistant.
7) Wear the proper respiratory protection as needed. Hospital masks are worthless in this regard. Note that particulate filters are NOT smoke or fume filters. Also note that good respirators fit the face and filter ALL the air. Consult a safety equipment supplier for type of mask and filter you need. Good respirators put stress on your respiratory system and industry requires medical exams prior to allowing use of respirators. If you have breathing or heart problems you should avoid work requiring a respirator.
8) The heat of a blown fire such as in a forge can melt steel and set it on fire. It can also vaporize many other toxic metals such as zinc, lead, cadnium. It easily melts and vaporizes other compounds such as fluxes and even clays. All these vapors and fumes have possible toxic effects and should be considered.
9) A smokey shop is an unhealthy shop. Use proper stacks and ventilation. Note that grinding dust from hand held grinders with fiberglass reinforced wheels make clouds of fine glass fibers that float in the air. Good ventilation helps remove this as well as smoke.
9) Every piece of steel in the shop should be considered HOT unless proven otherwise. In a forge area it pays to pick EVERYTHING up with tongs and quench it before handling bare handed. See GLOVES.
10) IF using gas cylinders or welding equipment learn all the safety rules applicable to that subject. There are hundreds of dangers in the modern welding field. If using oxy-acetylene equipment you should take an accredited welding course.
11) DO NOT operate machinery you do not understand. Study the operating manual OR general shop operations manuals for the type of machine. Familiarize yourself with every aspect of the machine and safety warnings before turning it on.
12) Chuck keys or wrenches are never left in the key hole or on the chuck, not for a second. If you take your hand away from the chuck the key should come with it, EVERY TIME. This applies to hand drills, drill presses, lathes, milling machines, die grinders. . .
13) No rough housing, running or playing in the shop. Shop tools and machinery are heavy, hard and sometimes have sharp points. Trip and hit your head on the anvil and you will no longer think of yourself as "hard headed".
14) Almost every machine has the capability to destroy itself. Your knowledge is all that prevents it.
15) Anyone else working in your shop should know the safety rules.
16) In the self employed, one man or hobby shop, YOU are the "safety officer" and responsible for your own safety.
In industry YOU are still the last line of common sense in dangerous situations. Remember that it is not unusual for an employer to care less for your safety than you do. It is a well known fact that many great feats are built with the blood of men. It is an expected cost.
17) This is just the obvious. There are many more.
SEE: 12 Rules of Paw-Paws Forge as adopted from the rules of Atli's Forge.
|
|
- guru
- Thursday, 04/29/10 10:00:05 EDT
|
@Nip, tin foil is a bit annoying, but leagues better than kitchen foil. Would definitely hate having to live across the pond.
|
|
Nabiul Haque
- Thursday, 04/29/10 10:39:45 EDT
|
SHOP FIRE SAFETY RULES:
1) All personell will be trained and tested in proper use of appropriate fire suppression methods for various types of fire.
2) After using open flames, torches or spark throwing grinders a fire watch will observe the area for no less than one hour.
3) Fire extinguishers of the appropriate type will be made available and be inspected according to insurance regulations on a regular schedule by certified personell. In between these inspections the extinguishers should be inspected weekly by shop personell for removed pins (indicating use), reduced pressure (if equipped with a gauge) nozzles clogged by insects and proper placement in the shop (on their hanger under their sign). Extinguishers failing inspection should be serviced by certified personell or company.
4) A fire bucket (2.5 gal) filled with sand will be maintained on a hook as a "regular use" extinguisher method to prevent unnecessary discharge of fire extinguishers except in emergency situations. Small fires are common in the blacksmith and welding shop and should be handled appropriately.
5) IF not on a universal (911 or 411) emergency call system the Police, Fire Department and Rescue Squad phone numbers should be posted near the shop phone.
6) Small fires very rapidly become large fires. Any uncontrollable situation should be reported as soon as possible to the fire department.
NOTE: In many open shops, mud daubers will build nests in extinguisher hoses and nozzles overnight. This may be prevented by a piece of tape pressed on the front surface of tubular nozzles. DO NOT wrap tape around the nozzle! It should be lightly applied so that it comes off easily.
NOTE: While not the perfect location, an extra extinguisher may be mounted on a portable welding cylinder rack and thus always available in the same location relative to the user.
Extinguishers kept in vehicles should also be inspected on a regular basis and replaced as necessary.
|
|
- guru
- Thursday, 04/29/10 10:47:37 EDT
|
Fire prevention readiness is often a matter of common sense more than preparedness. It also requires a cool head. I have seen adults panic over a grease fire in a kitchen that merely needed a lid put on the pan and the heat turned off. Two seconds and the fire is out, no big deal. Panic and let 10 seconds pass and you will probably lose your home.
If you open an oven and the smoke busts into flame, close the oven and turn off the heat. The fire will put itself out.
If you have a small spill kitchen fire and no extinguiser then baking soda will often put out the fire. NEVER use water. This will splash the oil/grease and spread the fire.
These same rules apply to the shop. Oil quenches should be in metal containers AND you should have a lid to fit. Kitchen utensils work great and if you need large pots with a lid they are available for commercial kitchens. If the oil flashes, then put the lid on and the excitement is over.
Small debris and small spill fires can be quickly put out with the sand from that bucket.
|
|
- guru
- Thursday, 04/29/10 11:04:22 EDT
|
Extinguisher stories. . .
Years ago my next door neighbor called and said her fireplace (stove insert) was making a funny noise. She could not describe it but HAD to leave for work. It was in a blizzard, she was a pharmacist and her ride was waiting. . .
I knew what it was, a chimney fire, grabbed all the little disposable fire extinguisers we kept in the house and trudged through the 30" of snow up hill to the neighbor's. . . I had told her to shut down the insert/fireplace. She had not. It was making the great roar of a chimney fire. I closed the doors and vents, prepared a fire extinguisher opened a vent a crack and fizzit. . fizzit. . just a dribble of while powder. I tried a second and it discharged about half way. . . The third did pretty well and the fire was slowing. The fourth was like the first. . but the one and a half that worked had done the job. I waited while the roar stopped completely, then broke up the fire in the fire box and sprinkled a little snow on it.
I left a note telling her to have the chimney cleaned before building another fire. I also left the discharged fire extinguishers.
My neighbor had no idea how close she had come to losing her house and to add insult to injury did not offer to replace the fire extinguishers I used. . .
-----------------------------------------
One of the extinguishers I used had been mounted on my portable shop trailer. I replaced it with a bigger better extinguisher. It came with a little protective piece of tape over the nozzle. But after a while in its exposed location the tape fell off. One day I noticed the nozzle was filled with a mub dauber's nest. . . I removed the nozzle and and cleaned it our. After that I checked the nozzle every time I walked by which was several times a day. There were mud clogs about once a week during the summer.
-----------------------------------------------
There is a fire extinguisher under the seat of my Ford F600. The seat is always in the full back position and it takes two people to slide it forward. I've ignored the fact that the extinguisher exits. It is probably 15 years old and MIGHT work. But it is in such a difficult place to get to that any vehicle fire is going to be out of control by the time it could be gotten out. . . . so my common sense says to forget it exists. . .
My next task for the truck is to put an under body tool chest on it. A new fire extinguisher will be hung inside.
Common sense, a little knowledge and a cool head can usually stop a little fire from becoming a big fire. .
|
|
- guru
- Thursday, 04/29/10 11:49:45 EDT
|
No. I want to *run* my *own* powerhammer from a hit or miss engine! I used to work in the oilpatch where they once were common for driving donkey engines and many of time have gone to sleep hearing the BANG-put-put-put-Bang-put-put-put...
Thomas
|
|
Thomas P
- Thursday, 04/29/10 12:40:16 EDT
|
Wagh. I just noticed that the starter switch wires that my friend had cut and taped together, had come apart. What does the starter do any ways? I can still see a spark with the plug grounded.
Going to solder this back together, and hopefully it will start then. I also need a new spark plug, I bent the electrode by tightening it too much.
|
|
Nabiul Haque
- Thursday, 04/29/10 13:36:46 EDT
|
Ok I see, there's a huge difference in the amount of power that goes to the plug. Before I could only see sparks when I cranked it really fast, now it fires every cycle.
It fired a couple of times as well, now I need to play with the screws. There's three of them on this model, the high speed is marked with red I'm pretty sure. Don't know what the others do. Going to wait a few, I think I flooded it.
|
|
Nabiul Haque
- Thursday, 04/29/10 14:19:58 EDT
|
Tightenten spark plug too much? If tightening the plug bends the electrode then it has hit the piston. You have the WRONG plug and will wreck the engine. . . May have already damaged the piston.
|
|
- guru
- Thursday, 04/29/10 14:26:52 EDT
|
Was thinking that, but there is a little pocket inside which I think the electrode is being forced against, it wasn't just bent, but twisted to the side. I also feel the resistance of the electrode bending while tightening the plug, but it's not really 'tight' when I go to undo it, meaning that it's being bent in the screwing in process.
This is what I think it looks like from what I can see.
http://img339.imageshack.us/img339/9913/plug.jpg
It is probably the wrong plug, but I know that is has ran before like this.
I unbent it and stopped forcing it in, at least if it starts like this, I can spend money on getting a new plug and filter. So far just a sputter here and there.
|
|
Nabiul Haque
- Thursday, 04/29/10 15:11:47 EDT
|
Definately the wrong sparkplug, air is leaking out from around it, maybe that's why it's not working.
|
|
Nabiul Haque
- Thursday, 04/29/10 15:51:30 EDT
|
Yep, Wrong plug. There are all kinds of lengths, tip and electrode designs. Plugs seat an seal TWO ways. One is a 45 degree tapered seat and the other is a compressible steel gasket on a flat land. If the outer electrode hits ANYTHING it is the WRONG plug.
The gap between the electrode and the center post is semi critical. A longer gap is better than shorter. A long gap forces a hotter spark and better ignition. But it also make the plug run hot. It can also cause problems in the ignition system. Also, if too large a gap the spark may not be hot enough to jump the gap at all. Too small and the spark is too cool.
Typical gaps are .025" and .030" and set using a spark plug gap tool with several round feeler gauge wires on them.
|
|
- guru
- Thursday, 04/29/10 16:11:30 EDT
|
I had a two cycle motor cycle when I was a kid. First day out of the box it would not start. I wore a flat on one of the foot peg covers trying to start it. A new spark plug fixed it right up. . .
It would run for a while then the plug would quit. i started going to service stations and getting USED spark plugs - anything that fit in the hole. . . . At one time the plugs I was using ran so hot that the ceramic insulator was melting. I learned to LOVE Champion spark plugs then because they were definitely the most reliable. This replacing plugs every couple days went on for a year. . .
I finally took the bike apart to check the coil, it was hidden in the frame and a BIG deal to get to. When I finally got there the end of the plug lead was OUT of the coil resting next to the nipple. The spark had been jumping a total of about an inch up the nipple then down to the lead. . . Created a VERY HOT spark. I put the parts back together properly and it ran like a champ for another year on ONE plug. . .
Ironically the end of the bike was a cracked magneto plate (a zinc casting that held all the parts). It appeared to have broken from vibration. There were NO parts available. It was a Sears import that they had stopped supporting. I SHOULD have remembered that lesson about Sears when I bought my welding equipment. . .
|
|
- guru
- Thursday, 04/29/10 16:24:29 EDT
|
Hallelujah! It runs, even with the bad spark plug it runs, I bent the electrode off to the opposite side from where it was being twisted, I can screw it almost to a good seal without bending the electrode now. Runs pretty well except it wont stay running unless I open the throttle. Going to try messing with the screws to find the low speed.
|
|
Nabiul Haque
- Thursday, 04/29/10 16:46:36 EDT
|
More safety rules applied in some industries . . .
##) Every person working in the shop shall have taken and passed an accredited First Aid class within 2 years.
##) Every person working in the shop shall have taken an accredited CPR class and maintained their certification (The American Red Cross sets the time between retaking the course for continued certification - 2 years)
##) An emergency first aid kit will be maintained in the shop. There should be a secondary kit (supply of bandages and disinfectant) for daily cuts, scratches, splinters and minor burns. The emergency kit should only be used for a major emergency and then immediately refilled or replaced.
NOTE that many high school health classes include First Aid and a few CPR. I had the Red Cross First Aid class in the Boy scouts, taught it in Scouts then again in the 9th and 12th grades. . . I'm sure I am WAY out of sync with current practice on some issues.
I was working on a first aid kit article a couple years ago but buying the stuff to fill one gets expensive. After visiting a site today that sells nothing but first aid kits I'll have to say that you can purchase a fairly comprehensive kit for less than 10% of buying supplies to fill your own. I still recommend a seperate stash for the minor daily issues.
|
|
- guru
- Thursday, 04/29/10 16:59:42 EDT
|
Nabiul, Do not run the engine with the wrong plug. Several things can happen. 1) hot gasses can leak by and score the threads possibly ruining them so the plug will not seal in the future. 2) the wrong plug can cause the engine to operate hot and burn a hole in the piston. 3) the plug can strike the piston. The last is not possible in your case but it is in many engines.
|
|
- guru
- Thursday, 04/29/10 17:03:42 EDT
|
Roger that, I'm done for the day. It runs continuously though, but only with the high speed needle turned in pretty far. Won't stay running at low rpm. Maybe different story with a better plug but at least the last few days have been worth something.
Time to get working on some boat designs :D.
|
|
Nabiul Haque
- Thursday, 04/29/10 17:24:26 EDT
|
Guru, as a Red Cross instructor, I can advise that the CPR is a every year certification, and First Aid is 3 years. OSHA requires Bloodborne Pathogen training for employees with exposure potential in the job to be trained yearly, even though Red Cross is once and done.
I have found a VERY good trauma kit, from Swift that runs about $100, and has the supplies a First Aid responder needs for a real accident. I agree that you need a daily bandaid and such box, and a real emergency kit.
My trauma kit has the zippers closed with a seal from a fire extinguisher that lets me see at a glance if it has been opened/pilfered.
My fire extinguisher tech provides me out of date seals to use. I use them on my amputation kit, and my spill kits.
|
|
ptree
- Thursday, 04/29/10 17:39:50 EDT
|
PTree, I'm glad you agree. I don't think I've been anywhere when I needed a first aid kit that it hadn't been pilfered for all the most common stuff for the daily scratches.
There are small home kits that are nothing short of useless and should be avoided. Those I was looking at were about $40 but an additional burn kit added another $40. In either case it is still cheaper to buy the complete kits. You can spend $40 on a box of gauze pads and a roll of tape.
My goal had been to put together a kit that would fit in a standard ammo can. They are steel and water tight. Good for carrying in the car or truck. You can cover most needs that the average person would do with that volume of contents. But as I noted, it can be pricey to do right.
Now. . if you were buying for a group it might break even. . .
|
|
- guru
- Thursday, 04/29/10 18:17:13 EDT
|
guru, if you do a group buy for a good med kit, count me in. i have one i use everyday, but it is running low. saftey is first second and third IMO. i have never been hurt bad enough in my shop to stop me for more then two days and it hopefully won't happen to me soon. i have been CPR certified this year and first aid the year before (by the BSA). i am less prepared then i should be so i ought to improve that.
|
|
- bigoot
- Thursday, 04/29/10 18:26:02 EDT
|
What started this was a question about safety rules. The problem is that no list is ever complete.
Above I started with shop safety rules. They refer to machinery and welding safety rules. Then you add general fire safety rules which I just touched on. Then first aid. Altogether you could make a nice multi-page booklet but that would be without the background, reasoning and many details. Each category is worthy of a course of study.
Where things get difficult in safety and first aid in particular is when YOU are the victim and must help yourself. Paw-Paw's head injury is an example. He was wire brushing a little hook made of less than a foot of 1/4" square steel. It snagged on the wheel and wacked him in the temple. It knocked him down and he was unconscious for a moment. He then staggered into the house to get help. But then paused to have his photo taken as a safety warning. . . He was bleeding profusely and they stopped that before taking the photo. The end result of his accident was a cracked scull and headaches that kept him out of action to a large degree for over a year.
This accident could have been worse. He was working alone and if he had been unconscious long enough he might have bled to death. So what do you do when working alone and you sever a finger or hand? Or set your beard and hair on fire and cannot see?
What happens if it is someone else and YOU are the first on the scene? Will you keep your cool and do what you have been trained for.
I've had to treat myself for shock twice. Once when my arm was broken in gym class. . .all the idiots that had JUST completed the first aid course INCLUDING the instructor were standing over me watching me turn white. . . I had to tell them I was going into shock and get something to raise my feet on, then check my arm. . . Its REALLY bad when the ONLY person to keep their cool is the victim. . .
So knowing first aid may end up helping yourself, even if you have to tell others what to do OR treat yourself. Just remember that if you are seriously hurt and there is ANY possibility of becoming unconscious, call help FIRST. Then treat yourself (unless you are squirting blood from an artery. . . there ARE priorties. . ).
I've been lucky in the shop. There have been numerous close calls. Hopefully flying thing miss you and you learn from the near misses. . .
One thing I mentioned under steel toed shoes is heavy things. Almost everything in a blacksmith shop is relatively heavy. Anvils, swage blocks, vises and even hammers. Get between these things and the force of gravity and you WILL get hurt. Things shift, fall off benches, out of vises. . . Just dead, stupid mass. No moving parts, no motors, no pressurized gas or fluids. . . just mass and gravity. A noisy saw will scare the bejabbers out of you and keep your attention. But that 40 pound block of steel sitting on the edge of the bench can sever a finger or toe as fast as the saw and without any warning or fear factor. . .
Danger often lurks in unexpected places in a shop. These are the dangers that no amount of rules can avoid.
|
|
- guru
- Thursday, 04/29/10 20:38:51 EDT
|
Hello, I need advice on forging stainless steel roses. I have made many roses from mild steel. I have done only a few jobs with stainless steel. My customers would like four large stainless roses for an archway. My concern is my mild steel tools will leave a residue of mild steel on the stainless that will rust. Can I sand blast this off?
|
|
Dan
- Thursday, 04/29/10 21:05:42 EDT
|
Nabiual: set the mixture screws 1 1/2 turns open [turn in 'till they seat, than open 1 1/2 turns] as a ball park setting. Then You do the fine tuning while it is running.
|
|
- Dave Boyer
- Thursday, 04/29/10 21:22:35 EDT
|
There's three of them, I'm pretty sure I've identified the low and high speed, not sure what the small third one is for, it doesn't really seem to have as much effect on the engine as the other two.
|
|
Nabiul Haque
- Thursday, 04/29/10 22:14:14 EDT
|
Guru, I will forward via e-mail the info on that Swift trauma kit.
|
|
ptree
- Friday, 04/30/10 05:47:17 EDT
|
Dan, try to passivate the stainless by soaking in warm citric acid overnight. Otherwise, run it through an electro-polishing process, it will do the same.
|
|
- Nippulini
- Friday, 04/30/10 06:37:20 EDT
|
If you're planning on severing a digit or opening up a large perforation in your hide, I strongly suggest you invest in a product called "QuikClot Hemostatic Agent", made by Z-Medica. The "Combat Gauze" is particularly handy. Stops arterial bleeding in seconds. Darned expensive, unless you need it; if you do, then it's really cheap. You simply cannot imagine how long an ambulance can take to arrive while you're watching blood spurting out of you with every heartbeat.
Blacksmiths tend to get some nasty burns, the kind that want to get infected. Make no mistake about it, this IS life threatening. "Silvadene" cream is, bar none, the best burn treatment made. Get your doc to write you a scrip for a tube and keep it in the fridge. You WILL thank me for this later.
Ladies' old-fashioned sanitary napkins make great, inexpensive, large wound dressings. Snicker if you must, but probably half of the perpetually under-funded rescue groups in rural America swear by them.
"Boraqua" is a sterile eyewash that comes with a nifty little plastic eye cup for washing foreign objects from the eyes. Much less traumatic than going to the ophthalmologist to have a "rust ring" ground out of your eyeball with a dental drill. (Hundreds of dollars cheaper, too.) A compact mirror and few Q-tips should be stored with it - if you wet the Q-tip with a bit of eyewash before jabbing it in your eye you'll find you flinch less. :-)
The best bandages (or sticking plasters, as our Brit friends call 'em) are the "BandAid Flexible Fabric" ones. A box of a hundred in the 1" x 3" size is only six bucks if you order online from the discount drugstore place. Add a three dollar tube of generic Triple Antibiotic Ointment and you've spent less than ten bucks for a year's worth of safely patching your pelt.
Forget those fancy first aid kits that come in snazzy sealed containers - ever try to open one of those while simultaneously trying to stop the bleeding? Takes just one more hand than you have available a that time. Sort your stuff by general categories and put them in those "disposable" Ziplok/Glad food storage containers. You can see through them to verify you have the one you want. Date all medications with a Sharpie marker and replace when out-of-date.
Need some really, really, good adhesive tape? The kind that sticks but doesn't remove your hair and hide when you take it back off? Conforms to weird anatomical irregularities? "Hypafix" is the stuff you want. Nothing better. Want something that conforms and holds without adhesive of any kind? Your local vet or horse trainer has some tape called "Coban" that is the absolute balls for holding dressings in place, even if you're as hairy as a horse. Cheaper at the vet than the pharmacy and the same stuff.
This public safety message brought to you by The Hard Knocks School of Blacksmithing, the place where education is optional, the work is dirty and you learn by painful experience.
|
|
buford heliotrope
- Friday, 04/30/10 07:06:27 EDT
|
Nice tips... here's a few more... for the less than life threatening....
Small cut? Bleeding? Not bleeding, but hurts and opens up so you see the white meat? Close the wound, drip a line of Krazy glue across it (weld yourself closed). Cyanoacrylate was invented for field suture in combat. Be sure to clean the wound first.
Small burns (that won't kill you if infected)? Tiger Balm works wonders! Not only does it cool the burn, but it prevents the resultant blisters from appearing.
The Coban is AWESOME stuff, your regular vet has a good supply of it as well. It's gauze that only sticks to itself, so wrap it a few times and you're good to go.
I also live by the motto "if you aren't bleeding, you're not working."
|
|
- Nippulini
- Friday, 04/30/10 08:23:50 EDT
|
I buy Coban 260 rolls at a time for the factory to use as finger protecter. Costs $0.96/ 1" x 5yd roll in that qty.
For burns, I swear by "Watergel" dressings. Come in a foil pack, you tear it open lift out a dripping wet dressing that cools and soothes. Save the extra juice in the packet to pout over after a couple of minutes. The all time best.
Silvadene is a must. Explain to your doc what you do and he will usually fall over himself to write the script.
I find the best big trauma dressings are called "Bloodstoppers" they have a pad, a rolled guaze on top the pad for a raised compressor, and another roll to wrap around the roll/pad to hold pressure on the trauma. I buy those for under $2.00 each.
|
|
ptree
- Friday, 04/30/10 08:57:27 EDT
|
Nip, I like your motto, but one thing is... what if you work everyday? You can really beat yourself to death in a shop before you know it if you aren't paying attention. For instance a couple mondays ago I had something on my mind all day and between busting my knuckles and dropping a broach that ran across my hand... my hands were pretty tore up :)
|
|
- TMurch
- Friday, 04/30/10 09:21:17 EDT
|
I use one of those "google news" apps on my homepage where you can customize your content, and one of the channels that I created was simply "welding". Thought it would bring me all the interesting new stuff in the wide world of welding. Turns out it's all fires and explosions. Keeps me grounded.
|
|
jamie
- Friday, 04/30/10 09:43:49 EDT
|
For nicks and cuts, alum will stop bleeding, remember the old alum sticks for stopping razor cuts ? Also, for burns, aloe vera sooths, heals and will prevent scarring. My mother always kept aloe vera plants for this reason, break off a piece, squeeze the juice on the wound, can also use with a bandage.
|
|
Mike T.
- Friday, 04/30/10 11:57:57 EDT
|
I would like to commend you on your comments in the following page http://www.anvilfire.com/FAQs/swords_faq_index.htm
I agree wholeheartedly that a sword is for COMBAT and If you wish to make a play toy or decoration you should just take up nitting and find somthing safe. If you have gotten complaints because of stupid people I apoligize for them. I admit I havnt worked Metal before and I hope I can soon. I will not take offence to any comment you and your associates say and I have a good humor for my ignorance if you have the patience. I plan on learning how to make shields and Many other items such as spoons and forkes as well. Once again I apoligize for my ignorance and that of the other ignorant people that message you. I would love to hear from you guys :D
|
|
Michael Whalen
- Friday, 04/30/10 12:28:07 EDT
|
Eyes: every metalworker should have one of those "scary strong" magnets like you can find in a trashed disk drive.
I've "plucked" a sharp piece of steel from a die grinder that rode my hair under the face shield and safety glasses and into my eye. Getting it out fast saved a lot of scratching of the eyeball!
Also *sharp* pointed tweezers and a lighted magnifier for those tiny splinters we all love so much.
Thomas
|
|
Thomas P
- Friday, 04/30/10 12:48:57 EDT
|
Don't forget that little mirror that used to be in the top of every machinists tool chest (particularly the old wooden ones). This was so you could see what you got in your eye. . .
|
|
- guru
- Friday, 04/30/10 13:26:01 EDT
|
Michael, There are three aspects to all metal working trades.
1) Self Education
2) Instructed Education
3) Obtaining tools.
Our swords article is largely about self education from the beginning as well as asking to be educated. Some folks can do with nothing but self education and others need instruction. You are the only one who can make this determination to your own satisfaction. But for both categories we provided our sword making resources. While it is not a complete list of references (there never can be) it starts at the beginning and includes most of the best references available today related to the subject.
While my projects list is incomplete I have not heard from anyone that worked through them from the beginning. Nor have I heard from any of these that said they had NO metalworking skills that started with Metalwork, Technology and Practice. But I HAVE heard from a lot of cry babies that thought the article was a cheat.
The making of a fitted together wooden sword requires the patience and skills needed every day in bladesmithing. Design, layout, cutting straight lines, using files and scrapers, doing picky careful work. IF when you are done with that project you have a sloppy ugly piece of junk then it should be done AGAIN. Bladesmithing requires a lot of careful fitting and finishing in nonmetallic and metallic materials. It is a lot easier in non-metallic and a good place to learn.
The wall hanger project requires working soft metals as well as nonmetallics. While a good steel blade is the end goal the blade is only ONE part of something that has at least three or more other parts that are often made of brass, silver, wood, bone. . . The furniture can wreck an otherwise good blade. Here we are fitting together the soft metals and nonmetallics. This project also requires LOTS of filing, sanding and finishing metal. Finishing to a polish is an art that takes practice and is very rewarding when done on soft metals that take brilliant surfaces.
Just as one learns their alphabet before learning to read, there is a progression that if followed makes the learning much easier.
You are not forced to go to my "school". You are not my indentured servant or bound apprentice. I cannot force a path of education on you. How you go about it is up to you. All I can do is make a suggestion.
If you want REAL answers, you start with the books. Metalwork Technology and Practice is a text book used by thousands of trade schools for over 60 years. It is still the beginning reference in almost every metalworking curriculum in the U.S. Note that the older editions are a little more applicable to the hand worker and the newer editions to the machine shop.
|
|
- guru
- Friday, 04/30/10 14:15:56 EDT
|
As for tweezers, I buy these nifty little tweezers with a serrated razor sharp tip, that have a built in magnifing glass. That way you can use you one hand to hold the tweezers while looking thru the glass to find the splinter in the other hand. About $6 a set
|
|
ptree
- Friday, 04/30/10 17:18:45 EDT
|
My father in law bought a used forge and the only marking is (CK Forge) We're trying to find a book for it. The only CK I can find does not make forges, just tools. Any ideas? Thanks, Noel
|
|
Noel Dickson
- Friday, 04/30/10 17:43:50 EDT
|
The Swift first aid Kit I like comes in a soft red nylon bag with hanging straps, and once the zipper is opened, the kit contents are instantly to hand. Comes with a number of trauma pads and a CPR mask.
Swift #346200
|
|
ptree
- Friday, 04/30/10 18:13:06 EDT
|
People take certain jobs for granted as far as safety goes. Actually, I don't wear safety glasses when driving nails, but I know of two people who were blinded by nails flying up. My grand dad scattered his pupil by a flying nail, another guy actually had the nail go through the eyeball. I think I will become more safety conscience though, it only takes a second to put the safety glasses on.
|
|
Mike T.
- Friday, 04/30/10 22:02:06 EDT
|
I had a doctor friend lose an eye to a racket ball. . . worse, he was an ophthalmologist. . This was in the 60's before sports started to become more safety conscious. After his accident he formaed a group that pushed for protective wear for athletes and was involved in the design and manufacture of some of the first form fitting wrap around wear for the purpose.
|
|
- guru
- Saturday, 05/01/10 00:17:00 EDT
|
Mike T, Try this safety glass test every time you start to work. Close both eyes and ask yourself, what can I see? The answer should motivate you to wear glasses every time.
With the huge selection of safety glasses styles and shapes there is a comfortable pair that will fit any face.
|
|
ptree
- Saturday, 05/01/10 06:44:33 EDT
|
|
|
[
CSI - anvilfire MEMBERS Group |
Getting Started in Blacksmithing ]
|