I need to relace a missing handle on a vise and this poses a welding question. I've found and purchased some mild steel balls (from "Pacific Steel", in various sizes, if anyones looking) and intend to weld them onto the handle ends instead of upsetting and shaping. For a secure weld I figure to grind down the end of the bar to a blunt point, but I'm not sure how to prep the balls. Will overlapping the welds to get back to the bar thickness be strong enough contact on the ball surface?
|
|
Thumper
- Thursday, 05/31/07 23:20:28 EDT
|
Thumper:
This is a vise handle, not a pry bar. Even a decent tack weld would do...if you aren't in the habit of slamming the handle against the screw head. Which you shouldn't be, as you'll quickly learn the very first time you do it with the web of your thumb in between the handle knob and the screw head. In fact, I like to put a hose washer on each end of a handle before I weld or upset the last end, so thereis a cushion against slamming. On handles that are already installed, I use a couple layers of heat-shrink tubing. Saves both the hand and the hole in the screw.
|
|
vicopper
- Friday, 06/01/07 00:56:14 EDT
|
Guru,
I'm building a trough charcoal forge with side tuyeer. Should I use many drilled holes in a pipe, or just the large end hole? I might even use a pipe on each side.
Also, any advice on box bellows VS "accordion style"? Power blowers are great, but I want to get back to basics.
- John
|
|
john f
- Friday, 06/01/07 02:17:18 EDT
|
Thumper: On the vise handle balls I would drill a hole through the balls for the rod, then plug weld them on at the ends. On one heavy-duty bench vise I have they drilled, but counter-drilled from side to upset a small diameter rod when went through both the ball and handle rod.
John F: This site uses a wash-tub, but basic concept is the same: http://64.176.180.203/washtubforge.htm With permision of Tim Lively (www.livelyknives.com).
|
|
Ken Scharabok (Poor Boy)
- Friday, 06/01/07 07:32:53 EDT
|
Hey gang, just got a job at a pioneer village as the blacksmith (Blackberry Farm -http://www.foxvalleyparkdistrict.org/facilities/bbf/bbf-intro.html)and I'm looking for info on early 1800s settlers blacksmithing and/or knife designs from then. I know there are books, but my pocketbook is a bit thin at the moment, so I can't afford any. I admire this managements dedication to wanting to do things as period as possible, so I want to bring as much authenticity as possible to my work there. Thanks in advance!
|
|
SteelGeek
- Friday, 06/01/07 08:16:39 EDT
|
Vise Handles: I have made a few of these and never been really happy with them. I've welded on nuts and reshaped them, forged the ends, use weld build up. . . The first one is easy, the second one has the screw hanging from it . . But that is not as big a problem as you might think. I've fitted replacement bails to 30 gallon copper kettles. The first end is easy, the second must be heated in the forge and manipulated with a 30" diameter pot hanging off the end. On copper kettles the end loops often face outward away from each other so it is a real trick to get the second in. The bails on this size are 3/4" round bar. . .
Actually vise handles ends take quite a bit of hard force from normal use. It is very common for them to line up dead vertical and the weight of the handle drop full force on the end. Rubber washers Do help. Steve Kayne gave me some electrical grommets for the purpose years ago and they work very well EXCEPT on the vise I do welding and blacksmithing on they caught fire so I removed them.
Save the balls.
Vise Handle Ends: Wrap a steel collar from a piece of stock about 5/16" thick and 3/4" wide around the handle (for a 3/4" handle). You may need to forge these pieces to the proper proportions. Leave about 1/4" of the end of the bar sticking out. Weld the collar all around on both edges and the joint. Then grind or forge the ball to shape. If your collar is too thin you can use some weld buildup at the center. If you slightly crown the ends of the bar before you start and forge the collar with an arced surface there will not be a lot of shaping or dressing to do afterwards. If you forge an arc on the collars be sure to keep them narrow enough to have a good 1/4" for the weld bead.
Of course you could always upset and forge the first end fairly easily. However, the method above makes nice ends and doing them the same will produce uniform results.
Be SURE to dress the edges of the hole in the screw before installing a new handle. These edges get upset and create a very sharp wire edge that is dangerous.
|
|
- guru
- Friday, 06/01/07 08:42:47 EDT
|
SteelGeek,
Remembering that buying a good book is like buying a good tool, I would recommend "Hooks Rings and other Things" by Frank Barnes. It is pricey at present; I looked it up on campusi.com which gives price comparisons. It's worth the money.
Barnes has made many line drawings of all manner of iron and steel items from your period and in most instances, he has given at least one dimension for reference.
|
|
Frank Turley
- Friday, 06/01/07 09:27:20 EDT
|
Matt,
High carbon steel and 4140 tongs are used for the large, industrial type. NO forge welds on the reins. The reins are drawn.
|
|
Frank Turley
- Friday, 06/01/07 09:51:17 EDT
|
Vice handles- weld the balls to the shaft and don't worry about it unless the handle is spring steel. I used ball bearings on a jack handle but annealed the bearings and ends; welded 'em and dressed off- looks good & works fine
|
|
- Ron Childers
- Friday, 06/01/07 10:11:14 EDT
|
I tend to stick to light tongs they have always worked fine for me? I have even used ferriers tongs for some of my projects. thanks for the info.
|
|
- dwelly forge
- Friday, 06/01/07 10:12:32 EDT
|
I am thinking about doing iforge project 101. One question, It seems like it would make sense to draw and point the three individual rods before welding them. But is there any advantage to welding them first and then pointing them. Just seems like extra work to draw and point after they are welded. Any other tips on this project would be helpful as I would like to make it for my wife for our anniversary, which is Sunday.
|
|
Sean in China
- Friday, 06/01/07 10:27:04 EDT
|
Frank,
Thanks. I understand about the reins; that's how I made the pair I'm trying to fix. When I mentioned welding, I just meant that on this particular set, where the joint between the jaws and the reins has cracked, it might be worth cutting off the jaws, grinding out the cracks, and arc welding the jaws back on.
|
|
Matt B
- Friday, 06/01/07 10:27:28 EDT
|
Guru,
Yeah, I hadn't seen the Machinery's Handbook tong dimensions table until after I forged this first pair. The next pair I do, I'll try to stick close to those dimensions.
|
|
Matt B
- Friday, 06/01/07 10:43:25 EDT
|
I have several books on colonial *American* ironwork, the Sorber Collection for one; but unfortunately many of them deal with the 1600's and 1700's. I would suggest searching on the Mountain man websites as they do the 1820's-1840's.
Research books should really be bought by the organization and not by yourself, when we all stop laughing, you might look into ILL of them if you are in the USA and have access to a public library.
If you are referring to any of the other 60 odd countries that had colonial periods around then please tell and we will dig into them as well. I work with a number of people from Chile and am learning a lot of interesting history about Chile now; unfortunately none of them are smiths...
Thomas
|
|
Thomas P
- Friday, 06/01/07 10:58:28 EDT
|
Vise Handles:
Love the rubber grommet idea, no, I've never caught the web of my hand, but I do have the habit of releasing the handle on the last turn when verticle (SLAM). Guru, I like your method but since I already made the 60mi round trip to P.S. for supplies, discovered & picked up the balls, I think I'll use them instead. For the record, I love the brainstorming on this sight, as a horseman I've found that if you ask 5 horse-people one question, you get about 12 different useable and good answers, this place makes me feel right at home!
|
|
Thumper
- Friday, 06/01/07 11:14:05 EDT
|
References: SteelGeek, As Frank noted books are TOOLS and often necessary tools. They are a significant part of your education as a blacksmith and a very inexpensive part of it compared to shop time.
The classic "Early American Wrought Iron" by Sonn is now in reprint and available from BlacksmithsDepot.
"Antique Iron" by Schiffer is another good book and then there is Plummer's Colonial Wrought Iron (both available from Artisan Ideas).
Some of my favorites are the box sets of Eric Sloane's works on Americana. Also available in reprint.
IF your employer is concerned about historical accuracy they should have all the books above plus more (for both their education AND yours). Note that many blacksmithing organizations maintain lending libraries.
$500 will buy you good historical reference library and $1000 would fill a long book shelf with most of the books on our review page plus the ones listed above. These would equate to the all the text books in a college art history major's school career at about 1/2 to 1/4 the cost of text books.
I have been collecting blacksmithing books for some 40 years and the amazing thing is that almost all are in print today. With very few exceptions you could go out and buy most of what is in my blacksmithing collection in one day.
When I started there was only ONE book available on blacksmithing methods (Bealer) and a few hard to find references from CoSIRA but almost nobody in the U.S. knew who they were or imported their books. Then the late Dona Meilach wrote Decorative and Sculptural Ironwork and Jack Andrews wrote Edge of the Anvil. Richardson's Practical Blacksmithing in reprint from Weathervane books followed. Bladesmithing books also came on the market and since the 1990's and the Internet there has been a flood of new and reprint books.
This is not true on many other fields. Locksmithing is very short on good definitive books on old locks, their works and methods of making them. I have more invested in a short stack of locksmithing books (many quite rare) than in most of my blacksmithing library. In the area of making musical instruments there are MANY books on some instruments and none or only one very rare book on many others.
Modern blacksmiths are very lucky to have the vast quantity of books that are available at reasonable prices. You should take advantage of it. Books go in and out of print and this just happens to be a time when there are more in print than at any other time.
|
|
- guru
- Friday, 06/01/07 11:17:38 EDT
|
Hi,
I am looking for a bronze casting company that would be able to make around 500/year 2" x2" stars for a five year term contract.
Main issues are price and quality. Please only serious supplpiers respond- I will send pictures by email to responders.
This is part of a large sign contract I am doing for a very famous building (more details will be suppplied)- once we develop a rapport(that's why I am using my personal email here)
Thanks All
Joy
|
|
joy
- Friday, 06/01/07 11:38:32 EDT
|
iForge 101 and Blacksmiths Twists: Sean, much of the material is needed to fill in the spaces between the bars. If you are forge welding there will be a loss from scale and the points would burn off. The end where the pieces are joined becomes material to draw out to a point.
On this particular project you may want to point or draw out with a ball the ends that will become the legs. Where the dimension says 2" for the legs I would use 4" (5" if already pointed).
The leg ends on this can be points, ball ends, fishtail scrolls. . .
There are a ton of things you can do with candlesticks once you get started.
|
|
- guru
- Friday, 06/01/07 11:43:32 EDT
|
Thanks for the info!
I should have mentioned they are trying to recreate the pioneer settlement that existed in the Aurora, IL, area in the early 1800s.
I give management credit for trying to the best they can on a shoestring budget, so I figured the least I could do is try to match that attitude : )
|
|
SteelGeek
- Friday, 06/01/07 12:47:15 EDT
|
I think my first two blacksmithing books were Dona Meilach's Decorative and Sculptural Ironwork and Weygers "The Modern Blacksmith".
I did luck onto a copy of Wrought Iron and Its Decorative Use---the 1929 issue (recently republished by Dover at a *MUCH* lower cost than the hardback original) and Iron and Brass Implements of the English Home---originally published in 1927; but I think my copy is the 1960 reprint...I have a copy of the 1913? Blacksmithing book put out by Popular Mechanics
The trick is to visit the big book remainder stores reqularly and purchase anything on the topic when it's cheap; wait 10 years and folks are drooling over your library---until the reprints come out.
Back before the internet cruising used bookstores, esp in small towns could be a great way to find books, though time consuming---it's one way my wife and I have fun on vacations...Now even small towns in AR can be on top of "going" rates for books and you are reduced to more esoteric sources.
Think about it; if you saved 1 dollar a week you could buy a pretty nice book for yourself every Christmas and over time you would have a great reference collection.
Currently the most expensive book I have ever bought was "The Knight and the Blast Furnace" Alan Williams and it's new and in print!
Thomas
|
|
Thomas P
- Friday, 06/01/07 14:22:31 EDT
|
Early 1800's: The trick with that era is change was happening very fast. The steam era had just begun to effect rural areas, The improvements in mills described in Oliver Evans' 1795 "The Young Mill-Wright & Miller's Guide." was being used to update grist mill machinery world wide. Our 1806 Grist mill was built using 1700's milling technology and was refitted with all new equipment a generation later. In 1794 Eli Whitney patented his cotton gin and in 1807 congress refused to renew the patent because so many infringing businesses were based on it. Whitney concluded that 'an invention can be so valuable as to be worthless to the inventor.' Cyrus McCormick of Virginia invented the mechanical reaper in 1831. By 1847 he began the mass manufacture of his reaper in a Chicago factory.
This was the era when inventors such as James Nasmyth were changing the world day by day. A look at Nasmyth's list of inventions and contrivances is amazing. Besides the steam hammer he invented the lathe reversing mechanism and the shaper. His theories of self actuating machinery advanced the art of machine tool building for all inventors.
What is most significant thing in this era is CHANGE. Few places stayed the same or used the same tools of machines for long because something new and more efficient was becoming available every day.
|
|
- guru
- Friday, 06/01/07 14:36:38 EDT
|
joy: Look in the yellow pages of a large city under foundry or foundries. You can likely find at least one which works with non-ferrous metals. You will have to provide the molds to them in the type they want, such as for pouring multiple stars at one time. Mold making itself can be pricy.
SteelGeed: You may be surprised what your local library can obtain for you on an inter-library loan basis. Usually just for a small handling charge.
|
|
Ken Scharabok (Poor Boy)
- Friday, 06/01/07 14:53:33 EDT
|
Books and the Internet: The Internet has been a double edged sword for book collectors. You can find and collect books from across the entire world sitting at your desk. But as Thomas noted the most isolated of book sellers now has access to global prices and what is really rare and what is not. Your chances of finding a real jewel in some out of the way place has become very low. Demand is up because of the easy access and thus prices are up. One locksmithing book I paid $60 for several years ago is now selling for nearly 10 times that. Without the Internet the price would probably have been less and stable for decades.
The other thing is the availability of reprints. When old editions are going for very high prices then it is a clue that a reprint would sell well. Thus there is a whole industry bringing back books that would never have been reprinted otherwise. And this is one of those frightening aspects of paying high prices for old books. A significant part of that price is due to its not being available. Once in reprint the value of your old edition MAY plummet. If it is a first edition it may retain some collector's value but if not then it may become worth less than a reprint.
MANY books are initially printed in the low thousands or only 1,000. If the book is not successful enough OR something happens to the author then the initial printing may be the last. What makes it difficult for the reprint industry is that modern copyrights last a very long time. In fact, I am sure that many reprints are currently a gamble based on the publisher not having clear rights to the book but not being able to find a copyright holder. But many books are printed ONCE and that is it. If you do not buy a copy today you may not be able to do so in a few years.
Then there is the making of texts available on-line. I have mixed feelings about this. In many cases this devalues a reprint to the point where it will not be made. Then there are odd things like The Countryside Agency making the CoSIRA books available on-line while they were still selling print copies to book sellers.
The Internet and computers which were supposed to create the "paperless office" as well as make book publishing obsolete has in fact done the opposite (like video tapes and movies) and brought a new and larger audience to many books. Remember in the early 1980's when the movie industry screamed that the VHS tape player was going to put them out of business and another high budget movie wold never be made? Videotape revolutionized the industry and more big budget movies are being made than ever. Lets hope the Internet does the same for books.
|
|
- guru
- Friday, 06/01/07 15:34:09 EDT
|
On Books: Guru, you are very correct in your assessment on books and the internet. I have put together quite a nice starter library by buying books on Blacksmithing on the internet. However, some of the best tutorials I have, IMHO, are gleaned from different internet sources. The CoSIRA books are a good example, I printed the whole thing out. Good reference for a beginner like myself.
Values are harder to predict in this whole internet age. For example, a few years ago I purchased "The Care and Training of the Tennessee Walking Horse" by Joe Webb, when I became interested in horses. My wife was appalled when I told her it cost $34.00 on eBay. However, a search for the same book now will find the same book at around 100-140 dollars.
Some things go up, some go down. Go figure.
|
|
keykeeper
- Friday, 06/01/07 15:49:14 EDT
|
The cost of printing is also a consideration. Richard Postman has to sell Anvils in America for $60 per copy. Yes, the publisher of The Backyard Blacksmith by Lorelei Sims suggested retail is $24.99 and wholesales for about 60% of that. Some internet sellers are offering them for $16-18 copy. Large format book with lots of color photographs. Primary difference? AIA is printed in the U.S. while TBB is printed in China (which means sales price also includes transportation costs from China to the U.S.).
Instant book publishers are readily available. If you can provide your book to them on-line or via a disk they can very quickly put out a very nice copy for not much per copy cost, even in small print runs, say 100-300 copies.
|
|
Ken Scharabok (Poor Boy)
- Friday, 06/01/07 16:43:08 EDT
|
Of course one of the joys of a library is seeing what books are *near* the one you are interested in and sometimes finding something you never heard of. This is balanced by being able to do subject matter searches on the internet book sellers though sometimes the names may seem quite odd---"The Work of Angels" is a book on early medieval Irish metalworking.
Then their are the books you hear about but can never find a copy for sale...I am greatly tempted to yield to the temptation to make a copy of a book I have been hunting for for over 5 years; but can ILL easily.
Or the one that got away---I once ran into a cite for a german book about iron age smith graves in the alps and did not write it down and have not been able to find it again!
Makes you want to go out and pound on hot iron!
Thomas bibliophile smith
|
|
Thomas P
- Friday, 06/01/07 17:11:25 EDT
|
BOOKS: A big problem for the buyer is book quality. I have several nice hard back books that were glue bound. This is OK if good glue is used. However, several have fallen apart due to using cheap rubber cement instead of high quality binders glue. This includes a large "coffee table" book on China published by Time Life which fell apart completely in 5 years and a copy of The Blacksmith and His Art by J.E Hawley published in 1976. It was falling apart in just a few years and ALL the pages are a loose collection now. The book was printed by Publisher Press in Arizona, USA. I have paper bound catalogs much older that are in fine condition.
Properly sewn hard bound books last as long as the paper they are printed on. I have numerous books published in the mid 1800's that are in nearly perfect condition. Soft bound books are often just as good of paper but their life is often dictated by the glue used.
I have a small collection of books and printed manuscripts waiting for when I have time to bind them. I use a personal method of gluing on threads that seems to work fairly well. But it is not something I should have to do to good books purchased in my lifetime. The binding is easy, the making of good covers is hard. . .
BOOKS: The one that got away. . . When I was researching musical instruments and buying a few books on the subject I came across an old illustrated book of musical instruments published in the early 1900's. It had the bookplate of a large movie studio (MGM I think) and the name of one of the great directors or producers in it. $99. It was not much money at the time for the particular book but a LOT for me at the time. I passed on it. Now the same book without the nifty bookplate sells for five times that.
BOOKS: Really Rare ones like Thomas is talking about are not listed ANYWHERE. If a book is copyrighted in the U.S. there should be one or more copies in the Library of Congress (LOC) and they have a very good computerized catalog system and if not it is at least LISTED. But many foreign books do not have U.S. copyrights and often they only exist in a couple libraries in the world. When I was researching musical instruments I found ONE University library that had more books on musical instruments than the LOC, Oxford University and the Sorbonne combined. They have dozens of books that are not found anywhere else in the world other than in private collections. It took two years of continuous research to figure this out. There may be such a treasure trove of metalworking books but I doubt it is in a library.
|
|
- guru
- Friday, 06/01/07 17:50:16 EDT
|
BOOKS: On a Shelf in Association with Similar THIS is a huge failing of electronic libraries and card catalogs. AND the US Patent Office has fallen to this level as well.
It used to be that patents were in folders of other similar patents. When looking for prior art it would almost always be within a foot of any one patent on the subject. Once you found one, you had them all.
Today you rely on how well the librarian indexed the record and what key words they used. Often the title is the only thing that is used for key words because the person putting in the data does not take time to actually OPEN the book and look at the index. This makes keyword searches impossible or nearly worthless. This applies to computer catalogs of books, movies, recordings and patents.
The problem is that in the rush to get collections into computer catalogs the cost is way underestimated or there is no budget at all. Small libraries are often cataloged by volunteers or student workers who are not instructed in OR given time to make a good key word list for each book. In the case of books like "The Work of Angels" that Thomas mentioned you may never find it via a computer index under metalwork. .
|
|
- guru
- Friday, 06/01/07 18:11:40 EDT
|
hellos! i have a few questions. the first is do you know of any blacksmiths is NH or a place i could look?. because i have been looking and came up with nothing, that or i'm blind! also, what would be a good anvil for a beginer? i haven't done a whole lot of blacksmithing, i have only flattened the heads of RR spikes using a 3 pound hammer on an old RR track plate. should i just secure that to a log? or get something better?
thanks for your time!
|
|
Jake
- Friday, 06/01/07 18:14:39 EDT
|
I am looking for more or less a summer job helping or apprenticing in a swordsmith or bladesmith shop. I live in the state of UTAH and I am just a teenager. I have run a blacksmith shop of my own in the past. Despite my age I am very smart when it comes to the construction of swords. I have a fair amount of experience in the feild, but am no expert. If you know of any leads or oportunities to get me on the right track it would be greatly appresiated. I am not looking for any major high paying job; I Just want to learn and work in a smithy.
Thanks for the Help!!
|
|
Troy
- Friday, 06/01/07 18:50:32 EDT
|
hello all. after restoring a third forge, this one a champion i've discovered parts are not readily available. does anyone know where machine (blue) prints can be found? am going to start making rotating fans. always seems to be broken or missing. any help would be apprecianted. also, any info on the broze gear in the champion 400 blowers? would be nice not to have to start making them. thank you in advance, kirt
|
|
kirt
- Friday, 06/01/07 19:04:54 EDT
|
Try Lindsay publications, kirt. they have centerfugal fan plans there, along with 5 books on blacksmithing
|
|
Jake
- Friday, 06/01/07 19:10:42 EDT
|
Kirt
Centaur Forge sells The Champion Blower & Forge co January 1,1909 catalogue reprint for 6.50. www.centaurforge.com
|
|
- Burnt Forge
- Friday, 06/01/07 19:31:06 EDT
|
Kirt, There are no such drawings that I know of. In the era when these things were made there were assembly drawings with dimensions and then each craftsman in a factory made his own sketches to make parts from. When there were drawings the originals were often used on the plant floor. Pattern makers often did their layouts on a piece of wood OR the actual pattern blank. The worm gears and bearings on these were custom made by the factory.
|
|
- guru
- Friday, 06/01/07 19:38:22 EDT
|
Smiths in NH: Jake I know there are a bunch up there but no organization that I know of.
When looking for smiths start in the yellow pages. Most professional smiths will be listed under "Ironworks" and some under "fencing". Start in the major cities and wrok down. Some ironworks are strictly "hack and tack" fabricators but some do forge work. Politely ask if they do forge work then ask if you may speak to their blacksmith.
While horseshoers or farriers are generally not the kind of smith you are looking for they will know smiths. A FEW do forge work (hot shoeing) and may be able to help you one your search.
If you have unlimited long distance (as many folks do these days) a couple days on the phone should turn up quite a few results.
|
|
- guru
- Friday, 06/01/07 20:52:10 EDT
|
Troy, I can only assume you are having a giraffe there mate.. your in your teens and youve run a blacksmiths shop?????? PMSL
im 32, and have an IQ that would scare you,I run (and own) a $1m+ business, in the forging industry, and can only just forge weld damascus, i have bought and sold a few indutrial forging comapanies. forge a sword... maybee in 5 years.... thats the truth of it.
despite being minted, and a confident person I still find it difficult to hire & fire peops (at the age of 32), your doing well son.
I would like to see some examples of your work, you can post some pictures over at forgemagic.com
when I hire labour honesty is the main trait im looking for, you can go along way with this and hard work, but dont B.S,
(if you are really trolling well done , youve got a response! :)
|
|
- John N
- Friday, 06/01/07 20:55:43 EDT
|
God in infinite wisdom gave man the Xerox machine to copy books with. Just don't crack the bindings, please, because then the idiots in the library you borrowed the book from will trash it, as the University of New Mexico did with a lovely copy of Sir William Flinders Petrie's Tools and Weapons, selling at the time on the Net for $300. (Nope, I am not the one who cracked it. The book was printed in WW I era, cheap paper, crumby binding.) But anyway, if you can't afford it, get the library to get it for you and photocopy it. Just don't tangle with Kinkos clerks or ask them to do this boring task, because they do not understand copyright and think everything is sacred. It ain't.
|
|
Miles Undercut
- Friday, 06/01/07 21:02:08 EDT
|
miles , good rant, but youve lost me there......continue over in hammer in.............. (feel free to delete this post mr d.)
|
|
- John N
- Friday, 06/01/07 21:06:54 EDT
|

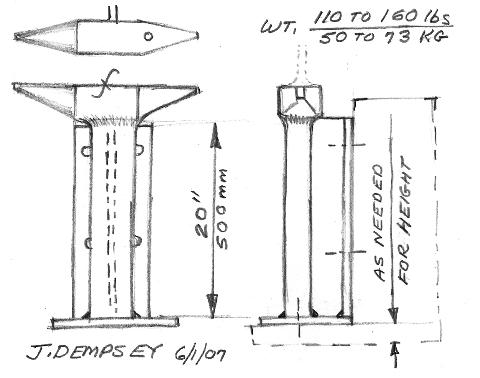
RR-Rail Anvils:
Railroad rail anvils are miserable things. The is because they put no mass under the hammer blow and the narrow web makes them very springy. The radiused surface is something only Chinese smiths appreciate.
To put MASS under the hammer blow you turn the rail on end. This puts 50% of the rail under the blow and takes the spring out of the connection between it and the web and flange which then become good mass with a high efficiency.
YES, this make the working surface small. However, this small spot just a few times larger than the face of the hammer is just as big as the "sweet spot" that most smiths find on their anvils and use for 90% of their work. As long as this area is larger than what you are hammering on then it is more than you need. So up to about 3" bar stock the end of the rail is all you need.
Above are three ways to mount a piece of rail. IF you have a choice and can get a piece cut the length you need then a 28" long (or a little over knuckle height) piece of rail will weigh about 100 pounds which is a nice anvil weight, ESPECIALLY if most of it is under the hammer blow. In this case the 90 to 120 pounds of rail will react to your blows like a 200 to 300 pound anvil. Pretty NICE eh?
The second method (middle) shows a typical short section of rail mounted on a tree stump using RR-spikes Rail and spikes. . cooool. While this short length of 10" to a foot will only weigh about 30 to 40 pounds it will react like an anvil about twice that weight. Grind the web into a fuller (radiused) shape. IF your RR-rail anvil has a pointed horn on it then carve a hole in the stump and bed it into body putty or epoxy like a stake anvil.
The last (right) setup is based on a drawing I made for an iForge demo on tools made from RR-rail way back in 2000. . . Here I show a stand made from laminated structural lumber. Much less could be used. It also shows a bolster plate for holding hary tools from iForge demo #164 on square holes.
While these are not great anvils the bladesmithing community has taken up the banner of using long stock on end to make bladesmithing anvils. They are using heavy round stock from 4" to 6" in diameter. Their target and working space is only a little larger and this is the rage in bladesmithing. Rail has that nice flange to bolt to.
If you are working in a shop with a dirt floor or outdoors you can set a post in the ground 2 or 3 feet then mount your rail on one side and a leg vise on the other. If you have access to a welder OR someone that will do a little cuitting and welding for you then the little double horned RR-rail anvil could be made. The SAME features could be put on a long piece as well and make a very good anvil. 2nd Drawing to follow.
|
|
- guru
- Friday, 06/01/07 21:22:34 EDT
|
for the newbees out there, if you just want to have a go at woopin on some hot metal, and are anviless you can use a big sledge hammer head as the anvil (ironic I know) tat as an anvil but works, in some countries this would be a luxery!...dont over analyse it all and have a go .... find something solid to rest it on and your away :)
|
|
- John N
- Friday, 06/01/07 21:35:21 EDT
|
Note John N's comment above. In many parts of Asia swords and knives are forged on sledge hammer head anvils for EXPORT to the Europe and the US. . .
IF you MUST make an anvil from RR-rail and I have seen MANY with a lot more work in them than the above, THIS is the best way to make one.
You start with a 3 foot long (36" or .91m) piece of RR-rail. The weight will vary with the type of rail but the one dimension given will give you an anvil short enough for most people and it can be raised with a wooden pad attached to the rest of the stand which helps balance the anvil.
So you start with 3 feet and cut off a cubit (or a foot depending on the starting length). This shorter piece is then flame cut and ground to make a double ended anvil top. Use the web side for the face (upside down). The reason is that much old used RR-rail has flaws (shears and cold shuts) in the working surface. Put that side down to weld to the base. Note that the top end of the flange may be cut down or rounded or decorative as you may want. It is shown as simple as possible.
Drill four mounting holes in the rail and two or more in the base plate. The base plate is not necessary but it will help distribute the force and make the whole more stable. It should be about 1/2" (13mm) thick.
Fit and weld the pieces together. Remember that RR-rail is often 75 point carbon steel and needs to be preheated prior to welding and cooled slowly after.
If you want to drill a punching hole or make a hardie hole in the rail be sure to grind away any heat affect material from cutting. Then drill on a drill press at low speed.
The results are a 100 pound (50kg) or more anvil with an effective mass of a much heavier anvil. The flat working face will be about 3" (75mm) wide long enough for most work.
|
|
- guru
- Friday, 06/01/07 22:27:02 EDT
|
John N-- Sirrah! That's not a rant, that's good solid advice based on long experience on how to come by books one cannot afford, which is one of the things we were discussing here. Pay attention and you might learn something besides being ingratiating.
|
|
Miles Undercut
- Friday, 06/01/07 22:47:33 EDT
|
NOTES:
1) While the above RR-Rail anvil has a high effective mass for direct downward blows it will not resist sideways blows and heavy work on the horn much better than an anvil one third its mass. You cannot beat the compact mass of a traditional anvil for resisting motion in many directions.
2) The anvil head may be welded on at 90 degrees to what is shown. There are advantages and disadvantages. The primary advantage is the longer weld area under the anvil top. However the sweet spot where the best mass is will still be centered over the head of the lower piece of rail. The position of where the stand/post changes. This may be good or not.
|
|
- guru
- Friday, 06/01/07 22:49:46 EDT
|
My favorite University library has a copying machine that has a 110° corner to put books over while copying and it sees to within about 3/8" (10mm) of that corner. Even then some the old stiff books do not like having the pages flattened at that angle. However, it must save a ton of wear and tear on the books that are not that stiff. With care even the stiff old books could be copied without flattening 100% and without a shadow in the type area.
|
|
- guru
- Friday, 06/01/07 23:05:16 EDT
|
thanks everyone for the quick response. not what i was hoping to read. looks like its time to start measuring and building some dies for stamping fan blades. will be using old riveted champion design and can adapt as necessary.
|
|
kirt
- Friday, 06/01/07 23:56:31 EDT
|
I am working with some Boy Scout's on their metal working merit badge and I need some ideas or patterns to complete the blacksmith option. I had some ideas, but they do not seem to do the requirements. Bob
|
|
Bob Mancuso
- Saturday, 06/02/07 00:08:15 EDT
|
I'm, well I'm young, 12 to be exact and I want to get into blacksmithing for the purpose of weapons and armor. And yes I know weapons are dangerous but I already heve five swords. I am well aware that I would have to practise on simple things but my goal is to make sword and armor. I need a simple and relitivly cheap forge that I could build in my backyard
|
|
Bradley
- Saturday, 06/02/07 00:43:43 EDT
|
Jake,
Try Newengland Blacksmiths Associaton Good group of guys They have a teaching shop in Brentwood NH.
I am a hobby smith located in Royalston, Ma. Next town south of Richmond NH ....Near Keene NH.
You may contact me by clicking on my screen name at the end of this post
Harley
|
|
Harley
- Saturday, 06/02/07 03:21:34 EDT
|
I read a few years ago about a company that was developing a compact printing/binding machine. The idea was that you'd walk into a book store, and they could download any book in a database and print one for you. I'd hate to see *all* books be printed that way, but it seems like the system might have its place. I wonder if any more's been done on it.
|
|
Mike BR
- Saturday, 06/02/07 07:55:04 EDT
|
Bradley: I use the references that competent blacksmithing is about like a college degree. Competent forged knifemaking (as defined as producing something someone else is willing to pay high dollars for) is somewhat having a master's degree in blacksmithing. Competent forged swords and armor is somewhat like having a PhD in blacksmithing.
What you are suggesting is a bit like someone entering a toddler in an Olympic marathon.
Put away the computer games and start planning to take every high level course your middle and high schools offer. In college a triple degree in fine arts, business and metalurgy may serve you well.
|
|
Ken Scharabok (Poor Boy)
- Saturday, 06/02/07 08:57:41 EDT
|
On acquiring equipment sometimes persistence does pay off. A friend bought a Hossfeld bender off a mutual friend for $200. Simply beat me to it. He pretty well just put it in an outbuilding as something he might have a use for sometime in the future. Hey, the price was right for a packrat. When the opportunity arose I have tried to buy it off of him. Earlier today he accepted $300 for it, with the stipulation it is his to use if that need does arise.
But, alas, to make room for it my riding lawnmower is going to have to live out in the barn.
|
|
Ken Scharabok (Poor Boy)
- Saturday, 06/02/07 09:18:58 EDT
|
Bradley -
You sound a lot like I did when I was your age :) Weapons and armor can be advanced, but there are smaller projects to start that will teach you the skills needed for the big stuff . Not even guys with masters degrees start on the hard stuff, after all!
My recommendation is to start small. Set a 4" fixed bladed, single edged knife as your target. Research what it will take to make your forge (its not that hard! There are plans here to help!), you might need to make your first tongs, and so on. By the time you're done making all your tools and researching (which is the most important thing! Research everything! Know what you need to do and in what order!) you'll find you've acquired a lot of knowledge about blacksmithing that will help when you start your knife. There is a lot more to it, but feel free to ask questions. More than one person here started the exact same way you did, with just a desire to make certain things!
|
|
SteelGeek
- Saturday, 06/02/07 11:00:05 EDT
|
Cheap Forge, Budget Armoury: Bradley, See our plans page for the Brake Drum Forge. and also the link to My First Forge. These are cheap to build hobbiest forges that will burn coal or charcoal. You will need to do some scrounging for parts. Auto garages often have worn out brake drums or bent auto wheels to get rid of. You will need to learn to wheel and deal.
By far the cheapest forge is the pit forge. This is just a hole in the ground about 6 to 8" deep lined with clay (red brick clay mud or pottery stoneware clay). It will need a side tunnel which is often lined with stone but a piece of 2" pipe will work fine. The side tunnel goes to your air supply. This can be a bellows, blower (hand crank or electric), "wine skin". An electric blower is best if working alone. If you have helpers and want to go REAL primitive you can use a second larger pit covered with an animal hide (heavy blanket) that you lift with a corner open to let air in, then push down with the corner closed to blow air on the fire. This method takes a little practice but way done by near stone age peoples at the beginning of the age of metals.
Charcoal means REAL wood or lump charcoal, NOT molded briquetts. These are made from sawdust, charcoal powder and glue. They do not provide the same kind of fire and heat as real charcoal. See our Coal and Charcol FAQ
Pit forges must be built in clay soils not sandy or loamy (high organic soils). Some high organic soils will burn and are not suitable for building a forge in. You can surround your forge with stones like a fire pit but DO NOT put them in the forge. Many types of stone will spall (explode) from the high heat. Scrap brick is better if you can scrounge some up.
For armour work the majority of plate work is done cold. The primary tools are wooden stumps and large round faced and various specialty hammers. Many armourers make their own hammers because they are both rare so you never find used ones OR they are expensive. Many of the hammer types are the same as used for auto body work.
Stumps can be picked up when trees are cut by the city or highway crews. Ususally they end up going to the land fill but the property owner MAY want them for firewood. SO ASK. If you tell them what you want it for you may have good luck. If you are in a location that has few large trees then you can make your own stumps by laminating pieces of framing lumber (2x6, 2x8, 2x10) into a heavy block.
The most difficult task in plate work is cutting the material. There is no easy cheap way to do it. The old fashioned shears that looked like tin snips that were used for plate were HUGE things four feet long and operated by two men. The most popular tool for cutting armour plate is a "Beverly" shear or a throatless shear. They are called a Beverly because that is the only company that made them for many years and they still make the best. They cost $600 or more. However, you can get a cheap knock off from Harbor Freight for $99. But you get what you pay for.
Tools tools tools: While many tasks can be done the hard way with a hammer, scraper, stone and other primitive tools you need almost infinite patience and desire PLUS strength and ingenuity to make anything. Tools CAN be found inexpensively but that requires transportation, the ability to follow leads, make deals AND there is almost always a cash cost. It also takes a talent or a "nose" for where tools are OR an imagination to apply them. Things some people seem to do for free or almost no money others spend thousands of dollars on.
|
|
- guru
- Saturday, 06/02/07 11:07:37 EDT
|
Boy Scout Projects: Bob, Many of our iForge projects meet the requirements EXCEPT that the rules (if you are sticking to strict rules) call for the boys to design their own "tasteful" projects. . . Which I think is a stretch. BUT, There are a few that could. I could at that age. But that is why I am here now. . .
See iForge demo #110, Spiral candle holder
See iForge demo #132, Easy Tongs
See iForge demo #135, Scounce
There are many others, you will have to decide. Most of the iForge projects are beginner's projects and many made 100% on the anvil.
When we ran Scouts through a 1 day merit badge-a-thon we forged two items. From 1/2 or 7/16 square a tent stake (point one end, bend the other). From 1/4" round or square an S-hook.
The two years I helped with this there was only ONE boy out of a dozen or more that had any hand skills or real interest in metal work. The rest had never held a hammer and were just there for an easy merit badge. Those two boys (one each year) could ALMOST finish the third project above in the time alloted (about an hour's turn at the forge).
What surprised me was the lack of boys that had ever held a hammer of ANY type doing ANYTHING. They had not built a tree house, dog house, bird house. . or driven a tent stake or used an ax . . . these were BOY SCOUTS!
|
|
- guru
- Saturday, 06/02/07 12:34:48 EDT
|
Thanks guys. this has been most helpfull
|
|
Jake
- Saturday, 06/02/07 13:59:24 EDT
|
Box bellows vs. "accordion style"
John, Sorry we got off on other tangents. Drilled holes in a pipe are a waste of time and effort. If the forge gets to a decent temperature the steel pipe will burn out. In a trough forge the air comes in from one side from a gap between two bricks. For a LARGE trough forge the air comes in from two gaps on one side.
The reason for the air coming in from one side is simplicity and tradition. Traditionally there was no easy way to pipe air to the opposite side of the forge so air came in via a wood duct on the side of the bellows. Using modern pipe you COULD come in from both sides but it is a complicated expense for very little purpose.
The main topic, box verses leather bellows. From what I have seen and experienced the Oriental box bellows is just as good as the European Great Bellows. The big difference is the expense. The box bellows takes about half the lumber and NO leather. Thus they are cheaper to make. They are also slightly more durable as there is no leather to poke a hole in. Cost to build a first class box bellows is half or less of an equivalent Great Bellows.
Mistakes people make building either is using plywood. In a regular bellows you use MANY nails to hold the leather on. These are driven into the edges of boards. Plywood will not hold nails this way and when many are used it splits the plywood apart. On box bellows the common plywood grain causes very high friction which is no good in a sliding piston device. So be sure to use REAL wood. Top grade pine shelving works well if it has few knots or if you work around them.
|
|
- guru
- Saturday, 06/02/07 14:07:25 EDT
|
Well Bradley about learning about metallurgy an properies of metals all i can say is BOOKS BOOKS BOOKS!!! your probably in jr. high right? check your library for metal working books, especialy old ones. also if you have a shop teacher, pick his brain.
one of the main things is to learn why metal does the things it does.
|
|
- Maiers
- Saturday, 06/02/07 18:48:10 EDT
|
I would Just like to add that an a Eagle scout I am appalled by these boys lack of hand tool use. Shucks you couldn't get the tools out of my hand during some project we were working on. How times change(and I'm only 19!). I guess being a scout isn't what it was for me, what a shame. One can only hope that the two boys will take on the spirit of scouting and continue to learn all those cool skills that I did at their age. Anyway just had to say that to any of the boys that visit this page.
John
|
|
John
- Saturday, 06/02/07 18:53:04 EDT
|
Hey, guru. what length of handle should i put on a 4 pound cross peen?
|
|
- Maiers
- Saturday, 06/02/07 20:23:00 EDT
|
Maiers,
I would put a 16"-17" haft on, but you might get as many answers as there are blacksmiths.
From the Hammer-in, the face can be round or squarish all edges radiused. No chamfer that leaves a chamfer mark on your work. Face should be rockered slightly like the crystal of a pocket watch.
|
|
Frank Turley
- Saturday, 06/02/07 21:06:28 EDT
|
Is there anywhere to find plans to make a Hossfield Bender clone?
|
|
Thumper
- Saturday, 06/02/07 22:13:44 EDT
|
Ken
Still no reply from Matthew-CEO of Hope Works. No Worries...it is obvious he could not handle honest product feedback when he went on a rant.He is a real W@#%*R!!
Cheers Burnt B
|
|
- Burnt Forge
- Saturday, 06/02/07 22:32:32 EDT
|
What would be the most common material used for store bought tongs?
|
|
Donnie
- Saturday, 06/02/07 22:38:29 EDT
|
Donnie
5160
Don't get them hot and quench them. They will crack if hit then.
Hot Rolled mild steel is fine to use to make tongs. Early tongs were soft as well.
|
|
- Burnt Forge
- Saturday, 06/02/07 22:44:18 EDT
|
Just got back home after completing Frank Turley's 3-week blacksmithing class. It was a terrific experience; I learned more in that 3-week span than I did in my previous 20-year interval of "messing around with it on odd weekends". Frank is an amazing resource.
Eric T
|
|
- Eric Thing
- Saturday, 06/02/07 23:35:04 EDT
|
Handle Length: If you purchase a good commercial handle that fits the eye it will be the standard length which is fairly long similar to what Frank noted. You can decide to cut it off later if you want it shorter.
A four pound hammer it really heavy unless you are very strong. If it is too heavy for normal use there are two ways to go. Very short for single handed use OR longer than standard (about 24") for two handed use as a sledge. In this case you need to purchase a sledge handle for it.
I purchase top grade handles from McMaster Carr. They have a good selection. Often when you go to local suppliers they will not have the right sizes.
You can make your own handles. You want good straight grain hickory. It is best to split out handle blanks from fresh log sections then leg them dry. I would split and rough shape green wood with a draw knife, rasp then drive a staple in the end, hang up and let dry. You can make 5 or ten an hour from green lumber. The near finished handles air dry fairly quickly and do not check.
OR you can use old handles to make new. . .
|
|
- guru
- Sunday, 06/03/07 00:35:30 EDT
|
I am looking for a buyer of three old metal lathes. They belong to the widow of a school shop teacher in NY. She is a close family friend. One is a Porter lathe. One is an Atlas. The third is a smaller South Bend which might also be convertible to use for wood as well. There are also piles of accessories. I am not a machinist but I have seen similar lathes and their relevant tools sold on e-bay for varying amounts. The most important thing is that they are sold at a fair market value to someone who can use and appreciate them. Delivery can be discussed. Thanks.
|
|
John Koch
- Sunday, 06/03/07 06:09:56 EDT
|
Dear John Koch,
I don't know how much interest you will get here, but I do know of a great website where alot of people would be interested in buy those lathes if only just to save and later restore them. the website is: wwww.practicalmachinist.com
just click on the lathe to enter the website. Hope this helps.
John
|
|
John
- Sunday, 06/03/07 11:23:47 EDT
|
Thumper:
Several years ago, I found a set of plans for a Hossfeld clone that was put out by an outfit making low-cost wheelchairs for third-world countries. Sadly, that link went away with a HDD crash five years or so ago. However, here is a set of plans that should do what you're loooking for.
http://www.kinzers.com/don/MachineTools/bender/
|
|
vicopper
- Sunday, 06/03/07 13:04:48 EDT
|
Troy; you basically are looking for a low grade blade shop; you might ask around swordsmiths at a RennFaire that do production work. In a high grade shop your "helping" will reduce the price upto several *thousand* dollars for a sword; I don't know if you can afford to pay that much to work there.
Have you read the Sword Making and Apprenticeship FAQ'a and thought long and hard about them?
For armour making I would suggest the armourarchive.org forums and note the english spelling of armour; lots easier to get into armourmaking then to leap into blademaking.
Guru; I used an european great bellows, (late renaissance for blacksmiths a bit earlier for goldsmiths), for about 20 years----it did not have a single piece of leather in it, and I believe that Biringuccio's "Pirotechnia" mentions some metalworking bellows not using leather as well. Shoot I once built a single bellows that used the wood from an old printer stand and an old awning thrown out by an awning company. Only bought hardware for that one and that from the fleamarket.
Where the *real* difference is is in transportation! My great bellows took up most of the bed of my pickuptruck when mounted on it's stand. A chinese box bellows you could even bring on a plane as checked luggage! I've used both and prefer the great bellows I built to the CBB that someone else had built---but preferred that CBB to a bellows another fellow had built and made such that it was enourmously tiring to use.
Thomas
|
|
Thomas P
- Sunday, 06/03/07 14:48:33 EDT
|
Do you know of any way for people who want to apprentice or work for a sword or blacksmith to find someone? Is there any way to contact people looking for this set up or them to contact you. I'm looking for a summer job.
|
|
Troy
- Sunday, 06/03/07 15:37:01 EDT
|
Troy: If it is a summer job I assume you want something in the local area. Look in upper right for NAVIGATE anvilfire. Scroll down to ABANA-Chapter.com. It is a link to the list of ABANA affiliates. Find those in your general area and ask there. They might have someone looking for a summer hire, but your chances are a bit slim.
I suspect you will find there are only a relative handful of blacksmith enterprises large enough for even a single employee, much less several.
If you just want the experience, check in the Yellow Pages of large cities near you under Iron Working, Decorative Iron, Ornamental Ironwork or such. These are mostly cut and stick shops, but will provide some valuable training for you anyway.
|
|
Ken Scharabok (Poor Boy)
- Sunday, 06/03/07 16:13:27 EDT
|
Fire Welding, Steel Cable & Damascus:
Greetings all, found some borax, and am attempting fire welding. very tricky. I've read some of the articles/tutorials here, but can't seem to get the hang of it. practice obviously, but maybe I'm doing something wrong.
I've tried welding 2 square stock pieces together using this process:
1) upset the faces, made scarfs (convex like)
2) heated to just under cherry, and applied borax, thin coat
3) held the pieces in the fire for the borax to melt, then added some more borax.
4) after I nice gooey coating of borax, shoved both pieces in the fire, waited till it was sparkly
5) hit them.
6) repeated
after I was done, I appeard to have a nice weld going. so I heated the whole piece, maybe not super sparkly hot, then tried to twist the piece. during the twist, near the ends of the welds, the welds broke, or maybe didn't hold. although I think some of the weld held, not sure, I stopped twisting. Is my process correct?
I've also tried using 1 piece of round stock, with a small end piece (3 or 4") bent back on itself. heated the end, applied borax, sparkly hot, hit. fail's every time. I've tried hitting it lightly, hitting it hard, hitting it hard enough to make it flat on first blow (power hammer), no dice. it seems like more often one edge just goes into the other. long story short, weld failed.
what's wrong ?
And a question concerning steel cable + damascus, I've read online, and seen on youtube the welding of steel cable to make some sort of damascus. I've tried this with a maybe 1/2" thick cable. cleaned the cable well with gas, (was very greasy), heated one end, applied borax nice and evenly, heated to sparkly, and hit. with the cable, some welds are visible, on the outside anyway. My question is, if I do this, what keeps the borax from staying inside the steel cable (foreign material) ? And how can I tell if my weld is good. Is there some sort of secret to this ? this is a long process, and have not had the chance to completely weld a small piece of cable, maybe 6"- 1', but I would have to heat very many times. does this not weaken the steal quite a bit ?
Any comments/help/advice greatly appreciated.
thanks,
-bruno
|
|
bruno
- Sunday, 06/03/07 16:42:12 EDT
|
Bruno, Welding heat varies with material. Sparkly is OK for wrought iron but is too hot for mild steel and well into burning of higher or not-so-mild structural steels. Mild steel is one of the hardest to forge weld because of the higher temperature needed than high carbon steels AND need not to burn it. The correct temperature is just as the surface becomes a slightly liquid lemmony yellow. It helps to have the surfaces very clean before heating and fluxing.
On cable you are overheating as well. You need to heat, twist tighter, flux, heat, weld gently until you have a length welded and then heat and finish the internal welding. Often you want to cut several lengths and twist them together and weld rather than try to weld one thin piece.
In all steel the forge weld is often weaker than the surrounding metal due to decarburization. In the case of making cable Damascus the lower carb zones is what makes the pattern. If there was no decarburization and everything was uniform there would be no pattern to see when etched.
When you make cable Damascus the outside decarburizes a lot and you may need to grind off nearly 1/8" to get to good metal, less when drawn out (maybe 1/16"). The borax will all (mostly) squeeze out via the ends if you have a good weld.
When wrought iron is forge welded there is nothing to decarburize and the result is thicker than normal pure iron layers that are as strong or stronger than the surrounding metal.
The key is getting your fire HOT but not too oxidizing and heating the metal carefully to get good welds. Yep the pros make it look easy. . but they have failed welds as well.
|
|
- guru
- Sunday, 06/03/07 17:57:36 EDT
|
Looking for Employment: Troy, When the first words out of your mouth are, "I want to learn to make swords", you are not going to be taken seriously. They are going to roll their eyes, think OH NO, NOT ANOTHER ONE, and send you to their worst enemy down the street. There are thousands of would be sword makers out there that do not have a clue about the difficulty of the process or the work involved much less have any background doing anything.
What folks are looking for in their shops is a dependable hard worker with some SKILLS. You do not have to be an expert and it doesn't have to be in blacksmithing. Blacksmith and fabrication shops are looking for:
They are looking for people that can read drawings, cut stock to length +/- .010 EVERY TIME and not waste material. Reading drawings includes understanding scaling, proportioning, conversions of fractions and decimals as well as metric to English. All those things you are SUPPOSED to know and do without tutoring by the 8th grade (age 13-14). Errors mean failures that cost money and your JOB. This is the real world. So what is .8125" on a tape measure? Have to look it up. . too slow.
Someone that can arc weld and lay a good bead in any position using any kind of rod and any kind of welder without a lot of questions. Someone that has completed a welding coarse and understands the safety rules AND WHY those rules exist.
They are looking for workers that when their task is done they don't have to be told what to do next, THERE IS ALWAYS A FLOOR TO BE SWEPT AND A TOILET TO CLEANED. If you are the bottom man on the totem pole these are your jobs between EVERY assigned job. If I see you standing in a pile of dirt wondering what to do next YOU'RE FIRED!
They are looking for workers that don't break things. Every machine tool in a shop has the capacity to destroy it self OR hurt YOU. All it takes is one moment of stupidity to cost the shop tens of thousands of dollars in repairs and lost time. All it takes is one moment of inattention to hurt yourself, cause me a lot of paper work and raise my insurance rates. Hopefully you will quit after that because now I am looking for a reason to fire you. . .
They are looking for workers that if they don't know, ASK or better yet, get out the MANUAL and read it, THEN ASK if they do not understand. I became famous as an ace foreign car mechanic in one year because I read ONE booklet on adjusting English S.U. Carburettors. . . ONE little manual.
They are looking for folks that can operate more than one kind of machine and figure out others (without breaking them). You can learn a LOT by reading machine shop training manuals. Try Machine Tool Practices and Metalworking Technology and Practice (both current text books). Hoiw to Run a Lathe by SouthBend is also good. Just having studied these well will put you way ahead of the game without having turned ONE knob.
If you have no skills then there is little chance of more than a part time clean up job.
|
|
- guru
- Sunday, 06/03/07 18:51:06 EDT
|
Vicopper,
Thanks for the plan site. I've been making free hand scrolls out of 5/8"rnd, heated to red and beyond, and it takes forever going 2"-4" at a time!!! My vise is mounted to my work bench which is woefully underweighted (wood w/ a metal face), and only wall anchored which isn't enough for yardin" down on "heavy metal" in it's cold state.
|
|
Thumper
- Sunday, 06/03/07 19:50:32 EDT
|
Eric Thing-- I heartily second that applause for Frank Turley and his blacksmithing academy. I was an observer of his course not once but twice back in the mid-1970s, taking copious notes while my wife shot pictures, for magazine articles, then did a weekend workshop, and finally in 1991 took the course. Frank's detailed instruction, his close-- and sometimes brutal-- evaluation of the work one does, the historical perspective and the accompanying lore of the craft that Frank imparts, and not least of all the jokes, all make his school an invaluable, life-changing experience. I am proud to be an alumnus.
|
|
Miles Undercut
- Sunday, 06/03/07 20:32:57 EDT
|
Troy did you read the FAQ's I suggested? I know that you feel that your situation is different; but if you have all the skills then why not work for yourself over the summer?
If you need training and training in smithing and armourmaking and bladesmithing is not a short fast thing then you are asking for people to pay you to learn and then you will be gone by the time you start to be an asset. Sorry; few people in a business will do that.
If you still want to try to go that route, you might try over at swordforum.com---but you will get the same sort of responses!
For armour making you could ask if there is a local armourer at your local SCA group, (sca.org---navigate their website till you get to your local group); but again I wouldn't expect much money for a summer's work.
My suggestion is to see if a local welding shop could use a gofer and use that to hone your skills at welding.
Thomas
|
|
Thomas P
- Sunday, 06/03/07 20:34:19 EDT
|
Thanks Eric Thing and Miles Undercut for your kind words. My course is so good, I sometimes wish I could take it myself.
|
|
Frank Turley
- Sunday, 06/03/07 21:15:45 EDT
|
Benders: Thumper, A Hossfeld type bender is a lever operated device with a LONG lever. They must be anchored stout enough to resist all that leverage. You will have to do better than your vise and bench. I've rotated ton welding platens with a lever bender. . .
Back in my service station days we had a little manual tire changer on which we did all our odd ball work. It had a six foot lever that we often put everything behind. . It was mounted on a poured to fit spot of concrete that rose up into the hollow base and had four 1/2" anchor bolts. Never had a problem with it. When I moved we tried mounting it with red-heads (which pulled out) then expanding lead anchors which lasted longer but still pulled out with the first serious pull. THEN we used 16 or the red heads. . . still pulled out of the old hard concrete.
Something to think about anchoring a bender.
|
|
- guru
- Sunday, 06/03/07 22:33:31 EDT
|
Get a hydraulic Hossfeld; then the leverage is against the machine itself, not the floor.
|
|
vicopper
- Sunday, 06/03/07 23:15:12 EDT
|
You suggested I could make a concrete plinth to support my proposed power hammer. I will make the top smaller than the base, as you suggested, but how much should the taper be? At last I shall have a guru approved use for some of the tons of rebar that are piled up around this place ;-)
|
|
- philip in china
- Monday, 06/04/07 00:58:32 EDT
|
Guru,
Due to my limited shop size, I plan to put my bender under a shed roof attached to the back. I'll be digging deep and pouring a 300lb cement footing for it. I thought about making a stand that connected to my trucks trailer hitch for portabilities sake but scratched that idea cause I don't plan on doing much "on-site" work. Vicopper, I'm researching hydraulics or possibly a 12V linear actuator for the project also, however, $$ IS an object so I might have to stick with either brute strength or two small boy's and a donkey for my power supply.
|
|
Thumper
- Monday, 06/04/07 00:59:36 EDT
|
One way of anchoring to a concrete floor is to measure exactly where you need the fixing bolts before you lay the floor. A cardboard template of the base of the macine with fixing holes marked is an easy way of doing this. Use reinforcing mesh (but don't let Jock know you like to use rebar). Place that in the prepared hole before you pour in the concrete. Then weld threaded bar to the reinforcing mesh. This should be long enough so that it will be proud of the concrete floor and still long enough to go through what you are fixing down. Cover the threads with plastic or similar and pour your concrete. Once it has had chance to "go off" as we say in UK simply drop your machine onto the lugs, washer and spring washers and torque it all down. It really is very simple and that will not move. It will only be as strong as the concrete so if you are going to that much trouble make a good quality mix and lay it thick! 3:2:1 mix would be the minimum. To do some specialist jobs we used to use 3:1.5:1 (or 6:3:2) by volume but we needed hardness rather than mechanical strength although the MS of that mix is excellent especially if you pack it down with a compressed air poker which does make a tremendous difference. Also do not use ordinary round gravel. Get crushed gravel. The shape of it makes a much stronger mix- there is more to get a grip on.
Thumper I see you talking about 300 pounds of concrete as though we should all be awe inspired. That is about 75 litres or a couple of farm sized bucketfuls.
|
|
- philip in china
- Monday, 06/04/07 07:01:16 EDT
|
Forgot to mention in that too long posting. Another advantage of fixing like that is that the fixings do not rely on the torque to keep them tight.
|
|
- philip in china
- Monday, 06/04/07 07:03:27 EDT
|
Went to pick up the Hossfeld #2 bender yesterday. $300 and it came with a bunch of dies and such (about two milk cartons worth). As noted above, now I have to figure out how to anchor it and see if it has the dies I need to put eyes on the end of rods or bars. One aspect is hot bending vs cold.
|
|
Ken Scharabok (Poor Boy)
- Monday, 06/04/07 07:28:54 EDT
|
300# concrete: Thar is about 2 cubit feet or a couple bags fo quickcrete as Phillip noted. . . If it is keyed into an other concrete floor OR VERY hard ground it may resist considerable torque but would do little in soft soil or gravel. Note that I said I have rotated one ton platen plates with a typical Hossfeld type bender. IF you dig deep into hard compact sub-soil OR you have brick hard clay soil as we do in much of the Southern US then a small amount of concrete might do. Note that benders are also having a SIDE force applied to them, not purely rotational. The deeper you dig the better.
For anchoring high torque items the possibilities to look at:
There needs to be a good base plate, the larger the better.
IF you have a huge piece of plate that covers your floor then any mounting that won't break off is sufficient because YOU are now part of the device (standing on it). See my vice mount in the vice FAQ. However, this would be a waste of plate (for a large bender) unless its the deck of a ship or other such thing.
Again, the larger the base plate the lower the torque on the fasteners. Many benders have tubular stands with a small bolting flange. This is only sufficient if the anchors are set into the concrete when it is poured. Attaching the bender to a much larger plate (say a couple feet across) the torque on the fasteners is reduced greatly to where common expansion anchors MIGHT work (these depend on the concrete being just right and the holes not out of shape from hitting a hard piece of aggregate). It also depends on a concrete floor, not just a little square spot.
Increasing the anchorage distance using less steel is a good solution. Several long arms extending from the device is more efficient than a large plate and will resist torque much better. However, this assumes a large floor area and the bolt heads present a trip hazard. These arms could also be attached to posts set deep into the earth.
For mounting in soil I would bury a cross shape made of heavy treated lumber (6x6's). Each end should be anchored to a long bolt (threaded rod) set in concrete poured in post holes. I would extend the base of the bender for a couple feet in each direction with straps on top of the timbers. Cover everything with soil or gravel to prevent a trip hazard. This SHOULD take all one man can apply to a 6 or 8 foot lever.
This last theme could be applied numerous ways.
|
|
- guru
- Monday, 06/04/07 09:18:24 EDT
|
Smithing in New Hampshire:
Jake, as mentioned above, the New England Blacksmiths, www.newenglandblacksmiths.org is a great place to start. I'm Marc Godbout, one of the New Hampshire directors, and you can email me with any questions you may have.
Too bad you weren't a day earlier. I could have directed you to our meet this past weekend, in Lincoln, RI. There was a member there selling a few Peter and Henry Wright anvils. He re-faced the tops (and he does know what he's doing), and was selling them for $1 a pound, so about $150. He may have some left and I can get you in touch with him, if you like.
Also, we plan on having open forging at our Brentwood, NH site starting this summer. That will probably be once or twice a month. And there's a tool-making workshop coming up this June 16th for $25. Get info on that from our website.
So there is a good amount of activity going on in NH and surrounding states. Hope you can take advantage.
--Marc
|
|
Marc
- Monday, 06/04/07 09:34:46 EDT
|
Sloping sides on a plinth to raise hammer: Phillip, I would make the base a few inches larger in each direction for increased stability and balance. The amount is not critical, whatever looks good. Ideally it would be more than practical. Too much slope and the thing will get in the way of working around it or extending the treadle.
What is normally done is a hole is cut in the floor and several feet of the plinth is below grade and much larger at the bottom. The depth is determined by soil conditions.
|
|
- guru
- Monday, 06/04/07 09:40:03 EDT
|
Re-thinking this base, I have 6X6 timbers framing my shop,(12' span), so perhaps I can make a modified tripod or quadrapod setup spanning two of the frame posts. Since the torque is lateral, bolting the base to the concrete wouldn't have to be so intense and if I make brackets for the timbers, I wouldn't have to be concerned with pulling out lag bolts. Phillip, I wasn't out to impress anyone with the poundage, I posted here for advice and some brain-storming, if I had all the answers I wouldn't have to post here at all would I?
|
|
Thumper
- Monday, 06/04/07 11:56:25 EDT
|
Guru,
thanks for the info. Attempted again today and had some success, striking while at a high lemony yellow instead of sparkly made the whole difference. having trouble with getting the weld uniform though. tried welding something like figure 2 from "/iForge/tutor/jd_weld1/top_index.htm" page, and can generally get the middle and top welded somewhat decent, but the loose end gives me trouble, usually ends up flat, then I thin out that section of the stock. am I hitting too hard ? is it more advisable to tap gentle like very fast on that section to form the weld without thinning ? also, after (pretend) I have a nice solid weld, if I want to work with the piece afterwards, draw out, punch a whole, or whatever, should I stay at welding heat, or can I work at a med-high red, for example if I wanted to hit the top end and make a pyramid or something ?
thanks again,
-bruno
|
|
bruno
- Monday, 06/04/07 13:57:32 EDT
|
What are the sorts of things that can go wrong when producing sheetmetal assemblies and how can these be avoided?
|
|
mart
- Monday, 06/04/07 13:58:00 EDT
|
Mart, That sounds suspiciously like schoolwork (test) or a homework type question. We do not do student's work for them.
IF you can be more specific such as describe a project you are working on that would be different.
|
|
- guru
- Monday, 06/04/07 14:06:42 EDT
|
I am making a bbq out of a 55 gal oil drum. I have cut it in two and am trying to weld a lip around the cut edge. I have a craftsman 110 gasless wire welder and a lincoln 225 stick welder. Both of them want to burn out the sheet metal without getting the angle iron welded on. I have 6011 and 6013 sticks and have cut the amps down to 40 with no success. Minimum setting on the wire welder do about the same. Suggestions?
|
|
JLW
- Monday, 06/04/07 19:26:27 EDT
|
Welding Thick To Thin: JLW, The first thing you need to know is that there different thickness 55 gallon drums. The heavy ones are about 18ga and the light ones 24. A big difference in weldability.
The tricks to welding thick to thin ARE:
No gaps. The parts need to be tight. When the thin warps from heat STOP, cool it, reclamp and start again.
A heavy heat sink clamped to the back side of the area being welded can help prevent burn through. Put a heavy coat of barbecue black HT paint on it to help prevent sticking if there is melt through.
WELDING: Direct the heat toward the thick part and let capillary action at the edge of the puddle connect the two. NEVER direct the arc toward the thin stock. Keep the welds short (1/2" to 3/4") and space them apart about 2".
Rod sizes were not mentioned. I would use 1/16" (if available) or 3/32" E6013's. 1/8" will be too large.
For attaching sheet metal to thicker material many wire welders come with a spot welding feature. This times the wire and power to an adjustable increment. A special 90° nozzle is part of the setup.
Gasless wire welders use special flux core wire. Check with the manufacturer for specifics on welding sheet metal. However, I doubt you will get much help from Sears. The folks that KNOW (your local welding supplier) may not be all that helpful answering questions about a machine you bought from Sears. . .
|
|
- guru
- Monday, 06/04/07 19:45:47 EDT
|
Thanks guru. The smallest stick I have is 1/8. I will check out the welding shop for smaller.
|
|
JLW
- Monday, 06/04/07 20:59:52 EDT
|
To anchor to concrete I would drill the holes oversize, put in pieces of threaded rod and epoxy them in. I get the small kind with the mixing tube built in and they are about $7 and do a dozen or so small holes. The larger quart size that fit in a caulk gun you have to mix them in the tube and use it all in one shot. Make sure you blow the dust out of the holes first. If you drill clean through the slab I would think they would be pretty hard to pull out, but often times large voids (have seen 8" ones) under slabs because of poor compaction so if the hole isn't filling up that is why.
|
|
Leaf D
- Monday, 06/04/07 21:00:33 EDT
|
I was at a shoeing clinic a couple of years back, at Oregon State University, and a guy who does blacksmith stuff came up on Sunday and showed us how he braids metal. But he also showed us a way to antique the metal and then seal it so it won't rust. The antique part he did with a brass wire brush. But I don't remember what he did to seal it. Got any ideas? Thanks.
|
|
Tom Taylor/Horsepower Horseshoeing
- Monday, 06/04/07 21:00:51 EDT
|
Bruno,
I don't know what you mean by "loose end". I refer to a lap welding scarf as having a heel, face, and point. Assuming you get the face welded, the points should fade into the heels. When you lap, the heel of one scarf meets the point of the other. If the point shows after the first heat, you can flux and when re-welding, use lighter, rapid blows than previously on the shuts.
One of the reasons we learn to forge weld in 2007, is that the weld is forgable when we're finished. You should be able to shape it under the hammer. You don't need further welding heats to shape it, but rather, use good forging heats.
Different thicknesses of stock require varying force of the hammer blows. For example, you can't weld 1" square to 1" square with dink blows.
|
|
Frank Turley
- Monday, 06/04/07 21:22:23 EDT
|
JLW: If it turns out that Your drum is too thin to weld You might put a strip of 1/8 metal on the opposite side and plug weld through holes in 1 of the heavier pieces right through the drum and onto the other heavy part. While it can be done it is trickey to stick weld material thinner than the rod, with 3/32 rod 18 ga [.045"] can be done pretty reliably with some practice. For the wire welder use the thinnest cored wire You can get, or a gass kit and .023 solid wire.
|
|
- Dave Boyer
- Monday, 06/04/07 22:45:44 EDT
|
Cable Damascus
It is an inherent flaw in the cable damascus process that what gives the pattern are decarbeurized zones and crud that gets trapped between the fibres.
I assume you are using non-galvanized cable, with little or no rust. Even with the best of materials and ideal conditions, problems seem inherent with the process. My suggestion is to get an adequate lump and go with stock removal (if you really like the pattern that comes from the cable welding process).
|
|
Paul
- Tuesday, 06/05/07 02:11:20 EDT
|
For Troy
You might amuse yourself over the course of the summmer by learning some stock removal methods. Get yourself a file, some sandpaper and PGFB. If you work hard at a job this summer, you could probably afford a nice belt sander (Bader or Burr-King). A few dozen samples of your work will go a long way toward getting someone to take you seriously. Don't be afraid to take a handful of years before you produce anything worth showing. Have fun!
|
|
Paul
- Tuesday, 06/05/07 02:26:23 EDT
|
Hmm. I had noticed that in a couple of places the drum metal didnt burn off but sort of blew through like tubes stuck through to the inside of the drum. I will guess that is the basis of plug welding.
|
|
JLW
- Tuesday, 06/05/07 08:21:20 EDT
|
I recently built an oil burning forge from a 16 gallon oil drum, and it required a fair bit of welding. I used my new-to-me Lincoln stick weldler, and it was the first stick welding I'd ever done. Obviously, I'm *very* far from an expert. But one thing that helped me was a combination of stitch (intermittent) welding and backstepping. Keep your beads short and don't work long in one area. Make a short weld from left to right, then move several inches to the left of the first weld to start the next one. (You can reverse the directions if you prefer, of course.) Make the next weld short, too. Continue in the same fashion. If you need further welds along that seam, come back after things have had a chance to cool down. Your sheet metal has very little thermal mass, so it heats up really fast. If it's already hot when you start a weld, your odds of burning through -- which aren't good to start -- will be even worse.
You can combine this approach with all the stuff the guru suggested.
Good luck!
|
|
Matt B
- Tuesday, 06/05/07 11:38:17 EDT
|
Hello Guru,
I apologize if this is a double post, but for some reason I can't find my question of a few days ago. It seems the archives are missing a section from May 15th-31st. If you can point me in that direction I'd appreciate it. Otherwise, do you have any advice about how to make the spring and collar for a post vise? I've had difficulty finding a close-up illustration on the web to work from. I have an old vise in good condition but that is lacking a spring and collar and wish to repair it.
Apologies once again if this is a double post, but I can't find the first one.
|
|
Copper Heron Forge
- Tuesday, 06/05/07 11:48:04 EDT
|
Matt the going to the far side of the previous bead is not something I have tried but it makes sense. As you weld the joint heats and the work spreads apart. At the opposite end of the bead the work will have been tight and it will also be cooling when you back up. . . Neat trick. It doesn't solve all the problems but sure makes sense in situations where you need every little break you can get.
|
|
- guru
- Tuesday, 06/05/07 11:50:18 EDT
|
I keep a few pieces of heavy copper plate around for those times I have to weld thick to thin, or very thin work. The copper is put behind the thin stock to abstract heat from it, which it does very well due to its high thermal conductivity. If you don't have copper, sterling silver will work even better :-)
|
|
vicopper
- Tuesday, 06/05/07 12:35:12 EDT
|
Copper Heron Forge:
Go to the menu in the upper right of this screen and scroll down to FAQ's. From there, go to Vises, Blacksmith's, Post & Leg. There are some good pictures there that should give you what you need.
|
|
vicopper
- Tuesday, 06/05/07 12:47:11 EDT
|
Copper Heron, I just posted that archive (last week's) with the response. The FAQ does have photos.
|
|
- guru
- Tuesday, 06/05/07 13:08:12 EDT
|
Finding a Job - No Experience:
There is nothing wrong with dreaming as long as you have a realistic plan to achieve those dreams.
Finding a first or part time job has always been a problem for young people and the answers never get easier. Back in the 70's my brother-in-law had spent 3 years taking drafting in High School. He also had a lot of experience working on cars and motorcycles. So he was pretty handy with a wrench, understood how things worked but had no job experience. He tried for a long time to get a drafting job but instead ended up working construction. ALL the drafting jobs said "Experienced only need to apply".
A few years later one of my younger brothers and my other brother-in-law got a job sorting hardware for an old machine shop that was moving. They had a 50 year collection of nuts, bolts, screws and fasteners of every size type and material. It was ALL mixed and dirty and needed to be sorted to be useful. It was one of those shit jobs that nobody wants. Hours and hours of sorting through piles of little parts mixed with dust dirt and cobwebs. But THAT one job was what they were hired for. They were each given a cheap plastic size and thread gage and a stack of bin boxes and told to go to it and they only had two weeks. By the end of the first week they could both tell a #10/32 from a #10/24 and 1/4-20 by eye. They also knew the markings for high strength vs. low strength hardware and the difference between a SHCS (Socket Head Cap Screw) and a Torx and a philister head screw. They could tell zinc plated from stainless by color. They knew pop rivets from drive rivets and plain rivets and the various head types.
At the end of the two weeks they had both had the experience of a lifetime that would serve them both well in future jobs designing and building machinery, running inventory systems, debugging hardware. . . It was a PAID education in engineering fasteners! You never know what you will learn from a job.
My first summer jobs were mowing lawns (with a $2 lawn mower I bought and repaired), working in service stations (a job that almost no longer exists) washing cars and pumping gas, babysitting (related to a lawn mowing job). My wife sold Avon one summer (a sucker job that made no money) and worked in a factory putting grommets in circuit boards (back when things were actually do by hand on circuit boards). Our cousins out in the country picked bugs off long rows of tobacco and beans (something all done by Mexican laborers now, even on the "family farm"). In fact, the vast majority of jobs most of us did in the summer are now filled by immigrant laborers including many of those McJobs.
None of these relatively terrible but common jobs were easy to get. You had to search for them, have your own transportation. Today a few go begging. We need a part time worker to dig ditches to finish our drain tiles, move dirt and gravel to finish the landscaping and other similar jobs. Several have started, none have finished. . .
Available Jobs: As noted looking for a job in a blacksmith shop is tough. While there are thousands of such shops they are far less than 1% of metalworking shops. Most blacksmiths and bladesmiths work alone. Bladesmiths often need sub contractors for jobs like polishing and sheath making but no in-house employees. Armories are one in 5,000 of these type shops and usually have a waiting line of folks wanting a job IF they hire.
None of these shops are hiring the totally unskilled. AND most of the jobs available are for welders, machine operators, painters and Jack-of-all-trades types with lots of experience. Most blacksmiths can either get the forging out themselves or have a waiting line of folks with skills that want that position. None of these shops that DO have employees can afford a volunteer. That is because an unpaid volunteer must be insured just like a real employee and there are other costs as well.
SO, you have a choice of wishing for a one in a million job that you are unqualified for OR looking for a REAL foot-in-the-door job.
Look locally at places you can arrange daily transportation to OR use public transportation to get to. If your goal is that foot-in-the-door job then look at all kinds of metalworking, welding and fabrication businesses. Don't expect hands-on metalworking. Just being where the machinery is and metal is moving is a step in the right direction.
APPLY in person, in the morning when the place opens and be prepared to go to work NOW. Most places now use employment agencies to screen applicants but those that take walk ins might be desperate for somebody TODAY. If you say you are not ready to work today OR you need to go home and change then you have lost that opportunity. It is a common screening practice to turn down ANYONE not ready to work immediately. It is not unusual to be hired on the spot and questions asked later IF you are ready and willing to work.
You can learn a lot sweeping floors in a steel service center or metals distribution center. You get to observe the way metal is bought and sold and WHO buys what. Those are future job leads. You get to observe how cranes and fork lifts are used and the machines used to cut heavy plate and straighten coils. You may get to study how multi-station flame or plasma cutting equipment is used. You will associate with people that have worked in various metal working facilities (more future job leads). AND you may (with permission) be able to snag some metal scraps.
In fabrication shops the ironwork is assembled from pre-forged components. Often much of their work is common pipe rails. These guys get the lions share of what many consider "blacksmithing" or wrought iron work. While they do no or little forging the DO know how to get jobs, complete jobs and deliver them on time. They have all the tools of a blacksmith shop with the exception of the forging area. They have saws, shears, machine and hand torches, benders, welders . . . ANY position in a fabrication shop whether they do structural and bridge work OR nothing but production railings is a place to absorb how things are done.
If all else fails go for ANY McJob you can find or mow lawns and clean garages. . and spend your money on books and tools. Train yourself in any basic area of metalworking (see my post above about jobs and reading) and keep trying. .
|
|
- guru
- Tuesday, 06/05/07 13:15:33 EDT
|
Copper Heron Forge:
Here is a down and dirty while you come up with something better. Find a piece of large angle iron (1/4" x 4" x 4" will work, but larger and thicker would be better). Go to a lumber yard and purchase two concere anchor bolts. They look like an L. They are set down in wet concrete with the thrend end up to anchor down stills and such. Straighten out both, being careful not to bugger up the threads. Place the angle iron against the back of the vise at bench helght and hold the bolts (now essentually a rod threaded on one end) so about half of the thread thickness is on the other side of the angle iron. Measure at front and bend both over at 90 degrees at that point. Weld where the bolts overlap in front of the back leg together and cut off excess. Now mark and drill holes in angle iron for your now U-bolt tailored to your vise. Make a spring and bolt down to angle iron, then bolt angle iron to bench top.
|
|
Ken Scharabok (Poor Boy)
- Tuesday, 06/05/07 13:41:38 EDT
|
I have some bicycle hand brake springs that have gone limp. Is there any easy way to get some 'spring' back into them?
|
|
- David Stodolsky
- Tuesday, 06/05/07 15:12:43 EDT
|
David, The only non-destructive thing you can do is re-arc (bend) or stretch (coil springs). This requires carefully over traveling the springs in the opposite of their working direction but not TOO much.
On a safety related item like this you should just replace the parts with OEM replacements.
|
|
- guru
- Tuesday, 06/05/07 15:27:20 EDT
|
There is a CSI Board of Directors tonight. Members are invited to sit in and observe. Those who are willing to take some responsibility and put forth some effort are particularly welcome. We can use all the help we can get!
|
|
vicopper
- Tuesday, 06/05/07 15:46:20 EDT
|
Hi,
Wondering if you are familiar with any recipes for a nice wax finish suitable for forged steel items. I read something about using a microcrystalline wax and two other ingredients but I can't recall where I read about it. Our work is usually located indoors but it would be nice if the wax could hold up for a reasonable time outdoors, too.
Thanks for your time.
|
|
John
- Tuesday, 06/05/07 18:53:51 EDT
|
Railway line anvils
I came in a few days late for this discussion but I thought I'd add what I've come up with anyway. Here's what I'm working with at the moment: http://www.instructables.com/id/EJWFUXHF2DSDRG1/
Next additions will be something to hold hardie tools, then possibly adding to the anvil itself somewhat like shown in the previous pictures.
Leon.
|
|
Leon
- Tuesday, 06/05/07 19:04:04 EDT
|
-John
"Sculpt Nouveau" makes waxes especially formulated for different metals and available at reasonable prices. Probably cheaper and more professional to use that instead of some iffy home brew, especially if you count your time screwing around with it.
|
|
Leaf D
- Tuesday, 06/05/07 20:51:33 EDT
|
John, Listen to Leaf. Homebrew finishes are amateur hour stuff. Paint and finish companies have sophisticated laboratories and spend millions on researching the BEST products as well as having access to ingredients that are very difficult to obtain in small quantities. Let the PRO's do the work.
|
|
- guru Ex-officio
- Tuesday, 06/05/07 21:43:13 EDT
|
hi i want to be and old school black smith and want to know the fastest way to build a forge from the ground up useing the most premitive of methods and possibly a method for making fire brick im not sure if that is what it is called
|
|
elbert
- Tuesday, 06/05/07 21:54:12 EDT
|
RR-Rail AnvilLeon, Pretty neat. Sad not to see a reference to where the idea came from. Here are my drawings from my March 2000 iForge demo on Tools from RR-rail. These were based on an idea I suggested to SmithinScout slightly earlier when he was looking for a relatively small portable anvil. I've been suggesting using rail on end to folks ever since.
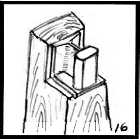 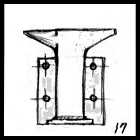 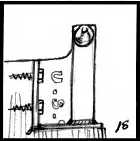
While there is hardly anything new in blacksmithing due to its 3000+ year history, this was an original idea (mine). RR-rail has been around for less than 200 years. . . The same idea has been picked up by the bladesmithing community but in the form of cylindrical anvils. Forging hard tool steels they realize the importance of having the mass in-line with the blow of the hammer. They also realized that most of the top of an anvil was wasted in their business.
For general smithing we take great advantage of the shape of the modern London pattern derived anvil using the horn to make bends and smooth curves, the step to support work as well as make bends, the open heel letting work wrap around a flat like it does a round on the horn, the hardy hole for punching and holding tools. But for straight forward efficient forging most of this mass is in the wrong places.
Folks have been making RR-rail anvils since the first short cut off piece of rail became available in the 1800's. There were quite a few small bench top anvils made in production that way well into the 1950's. But you will have never seen a piece set on end other than as guard or gate posts.
Typical RR-Rail anvils
Occasionally it is nice to get credit when it is due. Now that's a rant.
|
|
- guru
- Tuesday, 06/05/07 22:05:07 EDT
|
Primitive Forge, Old School: Elbert, You will catch a lot of flack talking like that. "Old School" blacksmiths took advantage of the most advanced technology of their times and were often the creators of that technology. Today smiths use machine tools, computer guided plasma torches and buy LASER cut pieces designed with CAD.
From the Ground UP: Try going DOWN. See "Cheap Forge, Budget Armoury" posted on Saturday the second above. You dig a pit and a trench put in a pipe and air source and cover the pipe in the trench. Viola' you have a primitive forge of a type still used in many places of the world.
Now if you want modern and efficient you buy or build a gas forge. However, building your own gas forge or power hammer is sort of like the Jedi Knight of Star Wars making their own light sabre, you are THERE, your basic training finished.
Fire Brick, properly known as, Refractory Brick: These are made of high temperature firing alumina clays with high temperature fill such as synthetic mullite or lighteners like vermiculite. Refractory bricks resist very high temperatures and as such require very high temperatures to fire. While this all sounds very high tech many of the needed materials are natural and found on the surface of the Earth IF you live in the exact right place. Porceline and refractory clays used for technical purposes such as refractory bricks and crucibles have been known since ancient times. But like any natural resource they are not found everywhere. So certain regions became known for their clay, brick, crucibles. . .
See Foxfire Book 8 article on Southern Potteries for information on groundhog kilns and making your own refractory brick.
|
|
- guru
- Tuesday, 06/05/07 22:30:58 EDT
|

Zulu Blacksmiths making a spear point 1879
OK, THIS is a primitive forge. The interesting thing about this scene is that it would be filmed as a 10 second scene in King Solomon's Mine staring Paul Robeson and Sir Cedric Hardwicke filmed in 1937 using extras that were in fact real Zulu blacksmiths.
A couple years ago a fellow from India sent us a photo of a poor local smith using a pit forge with an electric blower. The 19th Century meets the stone age. . . He said the clay was bonded with the waste from the "sacred cow".
A modern solid fuel forge is not much different. While coal or charcoal can be burned on a table or flat bottomed forge it is not very efficient and is hard to control. The best forges have a shallow fire pot the that concentrates the fire in one spot. This is no different than the pit forge. However, the rest of the forge acts as a place to conveniently store your fuel reserve which is constantly pushed toward the fire pot to keep the fire going.
While working on the ground is still common in the East we in the West prefer working standing up. So the pit is raised off the ground. First it was done with sone and clay, then brick. In the late 1800's forges started being manufactured of cast iron and today they are fabricated from steel. But in the end the fire in the fabricated steel forge is no different than that or the ancient pit forge.
See our article on Getting Started, study some books on the subject then ask us how to build the forge that is best for you. But if you want primitive, get two wineskins, dig a hole and go to it.
|
|
- guru
- Tuesday, 06/05/07 23:17:23 EDT
|
I very much understand your desire for acknowledgement of an original idea, and in the few things I have published I have always given credit if I have used a specific idea that was not my own. The anvil I built and documented was a case of parallel evolution of a useful idea, not outright theft of intellectual property as you suggest. I had not seen your sketches when I welded a chuck of rail to a plate and spiked it to a stump.
In some of the pictures of my anvil you will see some short pieces of rail that have been cut into a somewhat anvil-like shape. It was in attempting to use these that I realised they were unsuitable. I have seen the simple anvils the knife makers use, however I have not yet located a suitable piece of steel to use for this purpose. I was given a piece of railway line so of course I have used what I had available. I suppose the initial idea of using the rail on end probably came from seeing pictures of anvils made from round or square bar. At first I simply placed the anvil on top of a stump and spiked it down. This worked just as well as the final base but made too much noise. The new stump with the step cut into it does make the whole arrangement look very much like your sketch.
Even in very different contexts, with different tools and materials available, people often independently arrive at similar solutions. It is little surprise to me that another person working in a similar technological setting and with a similar goal in mind had previously done something like what I have done.
I did not steal your idea.
Leon.
|
|
Leon
- Wednesday, 06/06/07 04:15:41 EDT
|
Leon, If that is the case then I apologize. Many of our ideas have been posted for quite a few years on the web and off and the sources are often not attributed even when the article is copied in its entirety. Blacksmithing organizations have been given permission to use those artcicles (no others) as long as they give the source. So many of these have been reproduced in many places.
Withing months of our first series on anvils in 1998 someone had built a Yahoo page using all the articles in one page without attribute (out right copyright violation). Then they disappeared. Yahoo claimed no responsibility, and would not do anything about it without a court order.
Again, I am sorry. I'm glad there are some other folks out there thinking out of the box.
|
|
- guru Ex-officio
- Wednesday, 06/06/07 07:57:44 EDT
|
We produce ice crushing blades from 400 series stainless and our blades are getting dark spots and bowed at our heat treater. Can this be caused by furnace temp?
|
|
jen
- Wednesday, 06/06/07 07:28:37 EDT
|
Jen, The dark spots may be from leaks in the covering (either gas or foil) used to protect the parts. The temperatures required would darken all over. Reasons for warpage are numerous and difficult to track down. Here are some posibilities:
1) Design, large section changes.
2) Manufacturing, not machined all over leaving surfaces with different structure and internal tensions (may also be a supply problem).
3) Manufacturing, parts straightened or sprung to shape.
4) Heat treating, uneven heat, improper support, quench temperature or direction.
Any one of the above and others I have not thought of can cause warpage or bowing. If this is a product that has been manufactured successfully in the past then you need to carefully check to see what has changed. A minor cost saving step in manufacturing could be the culprit. If this is a new product or design then all the above need to be looked into, not just the heat treatment.
|
|
- guru Ex-officio
- Wednesday, 06/06/07 08:02:18 EDT
|
i understand utilizing resources with todays techs. but i want to do as much with my bare hand as possible right down to makeing my own brick from scrath from resorces i gather from land when i say primitive i mean it idont want cheap i want it built by my own hands i dont mind critism for the slang though should of known better
|
|
elbert
- Wednesday, 06/06/07 00:15:23 EDT
|
i live in oklahoma lots of clay and brush of all kinds what kind of clay and brush is recommended to make firebrick or where could i look up the recipe
|
|
elbert
- Wednesday, 06/06/07 00:26:55 EDT
|
Hi,
If I was to forge something from copper, is it food safe? Or is there any necessary treatment?
Thanks,
|
|
- Hayes
- Wednesday, 06/06/07 02:15:42 EDT
|
Two questions: what is "guru Ex-officio"? signify?
Railroad anvil - in your opinion, would a rail section in the standard orientation be more effective if one were to weld webs between the base flange and the bottom of the rail, perp. to the center web? I cant recall if this has been discussed. Of course, all the other problems remain with using the top of the rail. I can see that rail on end would still be better, just a thought.
|
|
Dave Leppo
- Wednesday, 06/06/07 08:15:59 EDT
|
Copper: Generally copper is OK for utensils. However, it can be problematic for cooking vessels. Copper is easily dissolved by acidic foods. Whether this adds a needed trace of copper or adds copper in toxic quantities is a question I cannot answer. Most copper cooking vessels are tined to prevent dissolving of copper. Tinning is an art that I have not been successful with, but it is like tinning a wire before soldering.
The other problem is that many copper alloys contain traces of lead. This we know is not suitable in even the smallest quantities.
If tin is used it must also be quite pure (lead free). The new plumbing solders are mostly tin and at one point some had some silver in it. Might be a good choice.
|
|
- guru Ex-officio
- Wednesday, 06/06/07 08:16:35 EDT
|
Ex Officio: Dave, that is my CSI board position. It stuck from the board meeting last night. I've cleaned it up since this AM.
RR-rail Anvils: Yes welding side plates helps take the spring out quite a bit. The best thing to use is the splicing "fish" that goes on the sides of a bolted rail joint. They are heavy and fitted to the rail. One on each side triples the web thickness.
However, in the end you still have a small anvil with the mass spread out longer than necessary. If well made it IS a good tool for light work and bench work. The material is heavy enough to make very nice sheet metal and armourers stakes and is as high carbon or better than most top quality anvils.
|
|
- guru Ex-officio
- Wednesday, 06/06/07 08:31:53 EDT
|
Hello everyone. I dont post here that much, but I wanted to share my photos from this last weekend's New England Blacksmiths' spring meet in Lincoln RI. This was my first meet, and I learned more in 3 days listening to people and watching people than I probably learned in the last year since I started putting a hammer to metal.
http://www.tharkis.com/images/hi/nebspring07/
Secondly is a question. I'm planning on building either a treadle hammer, or a power hammer, and have recently come upon a great deal for heavy stock for an anvil. I dont yet however have plans for exactly what I'm going to put together, but want to pick up the steel for a solid anvil while I can get it for just about scrap + cutting fee. What height should my anvil be for the best use? I'm just over 6'1" tall. What height should the anvil be on a treadle or power hammer ideally? 3 feet seems like it would be about right. I should be able to get a 3 foot section of 5.5 inch round (~242lbs) for 100$ including the cutting fee, which is about the same as scrap price, so I dont really want to pass up the opportunity to get the most expensive part of building a hammer at that price now and have to pay more later. (Particularly because scrap yards in my area are few and far between, and most of them that are there no longer allow picking due to liability problems)
I could get 3 feet of 6.5 round (~292 lbs) for ~140 cut as well, would the extra 50lbs be worth the extra 40$ when building a hammer? (again i'm not sure yet if i'm goign to build a helve style power hammer, ala krusty/rusty, or a treadle hammer... i just know that i need something to do heavy striking and drawing, and i cant afford what people are asking for little giants right now >_<)
Thanks for your advice !
|
|
jmercier
- Wednesday, 06/06/07 09:44:49 EDT
|
Machine Hammers: Jmercier, If I had the money, at those prices I would plan on TWO machines. Three feet is about right. A base and dies are going to add 3 to 4 inches which will be right for you. For the power hammer you will want to add to that anvil weight by welding heavy bar to the sides.
Go with the heavy stock for anvils and the lighter stock for rams. You will probably want 75 pound rams (5.5" dia. by 11.135" long more or less). Dies and fittings will add more.
The reason you want BOTH machines is that they are for completely different purposes. You cannot draw or do heavy forging on a treadle hammer. However, the manually controlled single blows of the treadle hammer are great for things that are difficult to do on the best power hammer. Heavy embossing, stamping and chasing are jobs for the treadle hammer. But reducing stock size, making long tapers, general texturing. . are ALL power hammer tasks.
A power hammer will revolutionize what you can do in your shop and greatly improve your productivity. A treadle hammer increases the quality of your art giving you the power and control that you do not get by hand or power hammer.
|
|
- guru
- Wednesday, 06/06/07 10:34:49 EDT
|
Natural Resources: Elbert, Read more closely then do some research. While refractory clay deposits are common globally there are only three or four good commercial sources for fire clay in the U.S. and them many smaller. But it is like mining gold. It COULD be in your back yard but it is very unlikely.
Your state will have a department of natural resources (maybe the Dept of Mines) that will have maps showing deposits of various minerals. That is the easy part. Then you will need to learn to recognize your minerals, sands and clays. High alumina refractory clay is white to beige and very slippery when wet. However limestone based clay is similar but usually a blue grey white. In any case you will need to test the clay in a furnace or forge. . . . Most clays are rotted or erroded (like sands) minerals. There are as many of each as there are minerals.
SEE FIREFOX 8 for the "recipe" You can buy copies on-line, find at your local library or obtain by ILL (Inter Library Loan). While you are at it you will need to study mineralogy and some chemistry. AND the other 10 Firefox books are a good study for anyone interested in "old ways". You may also want to study Theophilus, On Divers Arts.
I suppose you want to make your own steel as well. It is NOT that far fetched, many do. For raw materials see the paragraph above. Iron ore is often heavy and black. But there is also bog ore which looks like a large rusted rock. . . More studies in geology. You will also need to study primitive iron making. It is an ART and does not always work according to plan.
"Primitive man" You REALLY need to sit back, read a book or two and THINK. This is NOT Daniel Boone going off into the woods to build a cabin with an axe. Millenia before Boone people were trading for raw materials over vast areas. Stone age peoples traded ochre and furs for good flint (as rare as gold) and sea shells from distant peoples to make jewelry and beads from. The ancient civilizations of the Mediterranean traded bronze and iron from the Middle East, tin from Britain, amber from Germania, Ebony and Ivory from beyond the cataracts of the Nile, spices from everywhere and the ingredients of chemistry (sulfur, salt peter, cinnabar) from around the globe. Natural resources only found in abundance in a few places were traded from China to Ireland carried by Camel, horse, foot, boat, raft.
So called primitive peoples were also MUCH closer to the Earth than we are today. They knew what the local clays were good for, where to find certain kinds of rock, ores or sand and most important, they knew what they did not have.
You could spend a year learning how to make fire brick and that you don't have the raw materials within a thousand miles. It is not something you make unless you live in the right spot.
Early forges did not use fire brick, they used common red brick. However, clays that fire at sufficient temperature while more common than refractory clays are also found in specific regions. Low fire white clays like they use for ceramics boil and turn to a glassy white foam at forge temperatures. Red clays are common in the East and South East, thus the proliferation of red brick buildings. Southern red brick is shipped all over North America.
So you are back to what kind of clay do you have and testing it. Look to see if there are any brick manufacturers in your region. That is a good clue. Then talk to potters. Most stoneware clay is high firing compared to slip type clays.
Are you going to make your own lime cement as well? Pioneers did that too. Like making brick, it takes a LOT of fuel. IF you want to make a great bellows you will also need to raise a large oxen, slaughter it and tan the hide. Bellows require special nails as well. . . hmmmm the cart before the horse, where DO you start?
Starting from scratch is a good way to learn but it requires much of the knowledge before the doing. You must also pick and chose your learning activities and what available resources you are going to use. The earliest iron workers had thousands of years of bronze age technology to back them up. The early bronze age workers had many millenia of stone age technology (stone hammers and scrapers, pottery, knowledge of firing clays) to start THEM on their way.
All of technology from the stone age on is based on cooperation and division of labor. There have been specialists since the beginning of time. There have always been those that were better at one thing than the other and they traded with those that had other skills or resources. And when a project was too large for an individual the community worked together. LOOK at how many people are involved in forging the spear point in the illustration above.
|
|
- guru
- Wednesday, 06/06/07 10:34:57 EDT
|
Elbert,
YOu haven't yet even specified what type of firebrick you want to make, so ow can we possibly be of any help to you? There is high-temp, low-mass insulating brick, there is high-temp, high-mass structural firebrick, there is facing brick for kilns and ovens, there is firebrick for fireplace hearths, etc. The list goes on.
The specific use to which the firebrick will be put will determine the composition of the brick. Basically though, you're going to need to locate a source of high-alumina clay, some kaolin clay, some sort of aggregate like frit (broken bits of other firebricks), and possibly a lightweight filler such as vermiculite if you want to make insulating brick. All of which requires that you bea pretty knowledgeable geologist and brickmaker, shich I suspect you're not.
The primitive peoples did NOT make firebrick at first. They dug a hole ini the ground and used that. If it didn't work out, they tried a hole in another type of soil. In the process of fiinding the right soil, they probably started a few peat bogs on fire, spalled a bunch of limestone or sandstone or other rocks, (maybe losinig some eyes or other body parts in the process), and finally discovered the right soil conditions for their forge. That information would have been passed down from master to apprentice, possibly grudgingly and at the very end of the master's career. Jobs were scarce then, and trade secrets were guarded jealously. If you want to be really primitive, go dig some holes and build some fires; wear safety gear though, regardless of how period-incorrect it would be. You can't see squat out of a glass eye.
You talk about clay and brush; that would be fine for making adobe bricks, but you won't find them satisfactory for a forge. You could make an oven to bake bread, though.
Good kaolin clay is found in some regions of China, I know. Alumina is "found" by processing bauxite ore in a complicated electrolytic process involving millions of dollars of equipment. A lot of bauxite comes from Jamaica.
Go read "De Re Metallica", written by Agricola only a few hundred years ago, and see what they were doing in those days. You'll be surprised at the level of ingenuity, and the relatively primitive materials they worked with. Then step back another thousand years or so to the beginnings of the Bronze Age and you'll be in the realm I would call "primitive and doing it all by hand." Practice squatting down, because they didn't work standing up in those days. Forget the firebrick; they didn't have any, had no idea how to make it and didn't have the materials available in any event. For firebrick, you need trade routes across continents to get all the right materials together. That came well after the Bronze Age, I'm pretty sure.
Recipe for firebrick:
About 45% Silicon dioxide (SiO2)
About 50% Alumina (Al2O3)
A couple percent Titanium oxide (TiO2)
Trace amounts of Calcium, Magnesium, Sodium, Potassium to taste.
Mix well, bake at around 3000 degrees Fahrenheit until done. Test for doneness by poking with a toothpick. Plate and serve with collard greens and gravy. Serves four.
|
|
vicopper
- Wednesday, 06/06/07 11:15:46 EDT
|
Elbert I just wanted to pile on the fact that blacksmiths were forging for about 1000 years before "brick" forges were used; so if you are interested in "early" techniques eschew bricks!
Note in the picture of the Zulu forging the use of goatskin satchel bellows---fellow on the far right. You may want to start recruiting a bellows thrall and have them practice as using them does require practice.
Have you looked at the Primal Fires and other "neo-tribal" website. A group of people investigation early low tech ways of doing things---though we do allow "foresliders" to participate too!
"Mastery and Uses of Fire in Antiquity", Rehder, (ISBN: 0773530746) migh cover some interesting ground for you in how furnaces were built and fired back then. Also a Shire book on "Egyptian Metalworking" will get you back to the bronze/iron age transition with lots of good pictures of how they did things---from originals found on toumb walls, ceremics, etc.
Thomas
|
|
Thomas P
- Wednesday, 06/06/07 12:03:33 EDT
|
Forgot to mention that to do early style smithing you will generally need 3 to 5 assistants---it was NOT a solitary occupation; again note the Zulu picture: smith holding the metal in the forge; bellows thrall (and relief standing behind him) people bringing charcoal in baskets, striker using a rock...its *MODERN* labour saving devices that allow us to work in solitary splendour!
Thomas
|
|
Thomas P
- Wednesday, 06/06/07 12:07:27 EDT
|
Thank you for the fast reply. I'll see what I can afford, but it looks like if I want the most bang for my buck, and to do as you suggest and build 2 hammers, then I should get a pair of 3 foot sections of 5.5" round, total cost to myself ~200 + a tank of gas. Then I'll just have to be on the look out locally for structural steel and whatnot to build the rest of a hammer out of.
I'm trying to avoid buying new steel just because it costs so much ! At new steel prices, I could just about buy a hammer someone else has made already, and save myself the labor of learning how to use my welder properly etc >_< (though I need to learn to use this buzz box I've got anyways)
I know that treadle hammers and power hammers are used for different purposes, and eventually I've always planned on having one of each. I just need to determine which I'm going to build first. I just saw the deal on heavy stock and figured I'd get the 'anvil' for my project before anything else, since everyone I've spoken with says that the anvil part of either type of hammer is usualy the hardest part to get, and 50% of the cost of your hammer when you're done.
Again, thanks !
-Justin
|
|
jmercier
- Wednesday, 06/06/07 12:53:07 EDT
|
Guru,
You wrote, "You cannot draw or do heavy forging on a treadle hammer."
Why? I realize it's not nearly as good as a power hammer, but surely it's a big step up for someone who, like me, currently considers a hard swing with a four-pound hammer "heavy forging." I recently made a guillotine fuller that makes drawing out considerably easier than it was before, and it's still only powered by my arm swinging a hammer. Surely a good treadle hammer could only be a futher improvement -- even if it's not nearly as good as a power hammer. It'd at least let me harness the power of my legs, which can generate a lot more force than my arms. (If you hadn't guessed, a treadle hammer has been on my long term to-do list for a while now. But I won't be building one until my housing situation changes.)
|
|
Matt B
- Wednesday, 06/06/07 12:53:54 EDT
|
Oh you can draw with a treadle hammer, no doubt about it, it just isnt nearly as efficient / fast as using a hydrolic press or power hammer. Usually when I think of a treadle hammer, I think of being able to use hand tools, punches, cutters, etc with controlled blows. I know some people who do their repouse work with treadle hammers while sitting down. There's no doubt in my mind that a treadle hammer would be a HUGE upgrade over my 4lb hand sledge for drawing out.
My own debate to myself is, do i want the controlability of a treadle hammer first, or the rapid drawing and hard hitting of a power hammer for doing damascus for blades first.
|
|
jmercier
- Wednesday, 06/06/07 13:34:46 EDT
|
Treadle vs. Power: There is no substitute for power. Your body (if you are in good shape) can produce about 1/10 HP and for a very short burst 1/4 HP. SO, a little 30-40 pound JYH running 1/2HP can do 5 times the work you can. A 50-75 pound hammer using a 1HP motor can do 10 times the work you can and a 100 pound hammer can do 20 times what a well trained smith in good condition can do AND do it all day long.
While your legs can produce more force (it is actually part body weight) the horsepower ratio is the same. You cannot pump but so much blood and use up so much oxygen no matter how you deliver the HP.
Back to Power Hammers . . You CAN in fact produce a VERY hard blow, much harder than a power hammer due to the greater velocity of the hand hammer, the power hammer hits MANY times more in a given time than you can. More blows means the steel is worked more while it is hot.
For productivity in moving iron a power hammer is IT. Now. . if you do not want to produce work with long tapers, changes in section, heavy texture, special sections, all the things that make up the best artistic ironwork then go some other route.
|
|
- guru
- Wednesday, 06/06/07 13:53:37 EDT
|
IF you are really in doubt about how much better a power hammer is than other mechanical devices take a class at the Power Hammer School
Even if you never have a power hammer in your shop it is not a waste of time. You learn how metal moves, the use of dies AND most importantly of all, just how much you can turn out in ONE DAY. You may not buy that power hammer right away but knowing how much work you can produce in a given time will give the possibility of bidding on jobs that would pay for the hammer. Jobs that would take many months to do by hand (even if possible) can be done in a week on a power hammer.
Speed and efficiency also save fuel. This is an item that along with steel didn't used to be so much of a consideration in the blacksmith shop due to the low cost relative to the value of the final product. But as prices rise it becomes a more significant factor.
|
|
- guru
- Wednesday, 06/06/07 14:08:37 EDT
|
Which First? That is a difficult question and probably depends on what you make OR want to make. AND, while building both machines has some expense involved the power hammer is more expensive and slightly more complicated to build.
A very well equipped shop has both but I know many shops that have power hammers (even more than one) and do not have a treadle hammer.
The other way to look at is like this. You can do almost everything on a power hammer that you can do on a treadle hammer, but a treadle hammer cannot replace a power hammer.
I also want a fly press and a rolling mill. . .
|
|
- guru
- Wednesday, 06/06/07 14:20:13 EDT
|
Guru,
I wasn't questioning whether a power hammer is superior to a treadle for, say, drawing; in fact I conceded up front that it is. My question was basically this: given the choice between a hand hammer and a treadle (power hammer *not an option*), and the job of drawing out a big piece of round stock, wouldn't you rather use the treadle?
|
|
Matt B
- Wednesday, 06/06/07 14:25:10 EDT
|
Matt I would probably stick to the hand hammer for simplicity and flexibility.
|
|
- guru
- Wednesday, 06/06/07 14:56:41 EDT
|
am a fabrication teacher looking for a workshop that would bring me up to par.(Ihardly have any experience in blacksmithing) I would like to do this workshop in July or August. Please let me know if you know about any of them. I live in Canada, Calgary to be more precise.
Cheers
|
|
St�phan De Loof
- Wednesday, 06/06/07 15:53:35 EDT
|
am a fabrication teacher looking for a workshop that would bring me up to par.(Ihardly have any experience in blacksmithing) I would like to do this workshop in July or August. Please let me know if you know about any of them. I live in Canada, Calgary to be more precise.
Cheers
|
|
St�phan De Loof
- Wednesday, 06/06/07 15:54:29 EDT
|
Stephan, You are in luck. The Canadian blacksmiths are having a convention at Victoria BC at the end of June. See other links on their site.
See www.caniron.ca
|
|
- guru
- Wednesday, 06/06/07 17:13:16 EDT
|
Matt B: Consider option C - using a striker for heavy stock jobs.
|
|
Ken Scharabok (Poor Boy)
- Wednesday, 06/06/07 17:40:46 EDT
|
Gurus Den,
I purchased a Canedy-Otto #l8 drill press at a local iron salvage. It is not totally complete, my main concern is the missing mechanical feed mechaism. If anyone in this forum could tell me where I could get pictures and information on this press, if there is someone who would have spare parts I could purchase or with photos I could possibly fashion a semblance of this feed mechanism. I tried ordering the Canedy-Otto Tool Catalogue Reprint. But I have had no response. I would truly appreciate any information on the old No.l8. My mailing address and phone is Charles Pladsen
308 South Minnesota St. Apt.#3
New Ulm, Minnesota 56073
Phone 507-354-2333
|
|
Charlie Pladsen
- Wednesday, 06/06/07 17:41:21 EDT
|
While the justly regarded CanIron conference would certainly bring someone up on what smithing can and is doing these days; I don't think it will teach someone all they need to know to do it---or teach it.
Frank Turley's school in Santa Fe NM, USA is what comes to mind when needing to take a person new to the craft and turn out a smith.
Frank you have any classes running around then?
Thomas
|
|
Thomas P
- Wednesday, 06/06/07 18:22:35 EDT
|
RR Anvils:
Guru,
Many thanks, such an apology is rare. Many people as respected as yourself would continue to attack in such circumstances. I have now explored a great deal more of the Anvilfire site and have learned lots of new things to try. I have an electric blown charcoal forge working and a good source of free fuel. The novelty of being able to get steel really hot and hit it with a hammer wore off quite quickly and I’m feeling a bit limited with my small selection of tools. Next on my list are some bending jigs and hardie tools like cutters and bottom fullers.
I have acquired “Tool Making for Woodworkers” by Ray Larsen. Can anyone comment on this book?
Thanks,
Leon.
|
|
Leon
- Wednesday, 06/06/07 19:01:29 EDT
|
Ken,
Oh, if only a striker *were* an option! But this is just a hobby for me, and so far a solitary one. I'm growing my own striker, but he won't be much good with a sledge for another ten or twelve years. :)
|
|
Matt B
- Wednesday, 06/06/07 19:02:51 EDT
|
Hello,.... Just another question about an anvil I bought last weekend.It looks just like a William Foster but it does't say the name on the side any where.It does say in capital letters...LEWIS...and under that I can only make out...RAN...in smaller capital letters.Looks like there used to be more letters before and after the letters...Ran.I tried putting flour on the letters like Ken Scharabok suggested on his e-ebay site but it didn't help.Also on the other side it has the old english weight 1.0.11.If i'm doing the math right, thats 123 pounds.Someone told me that Peter Wright anvils look allot like William Fosters but sometimes did'nt say Peter Wright and LEWIS was probably just someones personal name.Thanks in advance for your help.
|
|
Ringer
- Wednesday, 06/06/07 19:07:10 EDT
|
Matt B,
Like Jock, I'd stick with the hand hammer for drawing, rather than go to a treadle hammer, if I didn't have a powerhammer (which I do). With a 3.5# hand hammer I can draw 1" bar down, albeit much more slowly and painfully than with the PH. The hand hammer allows much more control of movement than would a treadle hammer with drawing dies, in my opinion. YMMV
Using the hammer and the anvil to their best advantage will make a huge difference in onne's ability to draw out quickly. I use the corner of the hammer face and the radiused corner of the anvil as rapid fullering surfaces for quick drawing, and the hammer and horn base for quick smoother drawing. On the last heat I finish up the surface on the face of the anvil using the hammer flat-faced. Of course, you need a really good heat to move heavy stock with a hand hammer; orange won't do it.
|
|
vicopper
- Wednesday, 06/06/07 19:17:47 EDT
|
Canedy Otto Catalog: Charlie, We sell a Canedy Otto Catalog on CD. The Western Chief #8 is listed. This is a model with a heavy floor stand. I'm not sure the image has all the details you want but there are many similar mechanisms in the catalog, many viewed from the feed (left) side.
|
|
- guru
- Wednesday, 06/06/07 19:55:43 EDT
|
Ringer:
I went through the English anvils section of Anvils in American and can find nothing even close to having LEWIS as name or part of name. The RAN is likely part of WARRANTED. It would have mean the anvil was guaranteed to have a body of wrought iron.
Don't remember number exactly but it seems like Richard Postman has now documented some 230 English manufacturers of anvils on one nature or another.
If you can print out good images of the logo and weight stampings send them to Mr. Postman at 320 Fisher Court, Berrien Springs, MI 49103. Be sure to include a self-addressed, stamped envelope for his reply.
|
|
Ken Scharabok (Poor Boy)
- Wednesday, 06/06/07 20:03:07 EDT
|
MattB, build the power hammer. Growing you own strikers is lots of fun but most are only good for about 3 years then they discover the opposite sex, and you are outa luck:) I have grown and used up two strikers and the third is really in his prime at 17. I figure I may get a few more years outa him. The fourth one is a whopping 5' and 100# at 15, and has discovered boys so I think I lost that one on the vine:)
I built a rusty style PH, its on the junkyard hammer page here on Anvilfire. If you can scrounge, easy to make. I definetly get at least 5 times as much work out and hurt MUCH less.
|
|
ptree
- Wednesday, 06/06/07 20:07:46 EDT
|
Ringer, None of this rings a bell. However, I have seen some REAL wild guesses about faint old lettering that were way off.
Many old tools are stamped by the owners and often dates are used that have no relationship to the tool but to so event in the owners life.
Many of the old English anvils look a LOT alike but on close examination have differences. The reason so many look alike is they are hand forged. Odd reason to look alike isn't it? But what happens is a worker or a crew learned to forge anvils in one style and then started their own business or went to work for someone else. The shape of these things is not easy to forge and the techniques, blow by blow tend to be used as learned and the results the same.
Peter Wrights are probably the most beautiful of the English anvils. Their shape was a trend setter that was picked up in the U.S. bit not in England. One minor feature that PW's had was a shallow sometimes indistinct ledge on the leading and trailing feet edges (under horn and heel). A feature NOT found on PW's but common to all anvils derived from Mouseholes is the sharp ridge under the base of the horn where it started as tringular shaped then forged to an inverted tear drop. I believer the Fosters had this feature.
However, all these makers changed their styles over time and due to being hand made some details varied day to day.
|
|
- guru
- Wednesday, 06/06/07 20:09:32 EDT
|
This might be a promising treatment for Blacksmith's Elbow sometime in the future:
http://www.cbsnews.com/stories/2007/06/05/eveningnews/main2889125.shtml
|
|
Ken Scharabok (Poor Boy)
- Wednesday, 06/06/07 20:22:55 EDT
|
Thanks Ken and Guru for your input on my anvil.It has a great rebound and ring and a nice flat top.I paid $200.00 and was ready to pay $300.00.The horn is in good shape also.Someone had painted the sides with bright red paint but it comes off easily with a wire brush.I'v now got one 100# VULCAN.One 86# William Foster.One 109# William Foster and now one 123# English anvil with Lewis on the side.This is starting to be an expensive hobby. but I can't get enough of it.I'v been looking for a 200# or 250#er to keep at the house....THANKS AGAIN!
|
|
Ringer
- Wednesday, 06/06/07 20:52:46 EDT
|
Has any body got a good way to make large chunks of coal into small round consistant pea gravel size coal? I'v got 6 bags of heating coal but the chunks are as big as your fist.I know its not the best (bitumanis) or metalurgical coal bot it works ok for demo's except for some clinkers.I do some State Park re-enactments (Cival War era)and would like to use this cheaper coal for this and save my good stuff for home projects.
|
|
Ringer
- Wednesday, 06/06/07 21:10:46 EDT
|
Coal Sizing: No Easy ways . . In recent years I've seen lots of folks resizing fuel, particularly charcoal because for some operations (steel making, forge welding) the size has to be just right. They just take a hammer and small anvil or steel block and set a spell breaking up each lump. Coal is more difficult but the operation is the same.
If you needed to do a large volume consistently you would want a set of motorized crushing rolls. Shovel in one size and the small size comes out plus a lot of fines. . .
Breaking coal as a group in a shop is a good time for socializing. This is a ritual every morning at shops that use charcoal. They make up enough for the day and then get started with work.
Years ago I would have avoided doing this job and fought the oversized fuel. Today however, I KNOW how important it is to be properly sized for the job and how much easier the work goes. So it is a necessary evil.
|
|
- guru
- Wednesday, 06/06/07 22:03:53 EDT
|
Thanks Guru.I was hoping that someone has come up with a contraption of somesort like an old hand cranked corn husker or ice crusher or something.Seems like it would'nt be so hard to come up with as it is.I once saw an article where a guy took a belt sander and turned it upside down.Fabricated a box to sit on top of the belt while it was running and loaded the box with several 1x1" square blocks of wood.Turned the belt sander on and the resalt was a box full of 3/4" round balls.
|
|
Ringer
- Wednesday, 06/06/07 22:30:04 EDT
|
Ringer,
At the shop, we have a concrete pad about 3' square with a 1/4" thick x 12" tall plate enclosure on three sides. Our tamper bottom is made of about 3/4" x a 10"D plate. A vertical pipe is welded on, handle size, so it can be used by the worker while he/she is standing.
|
|
Frank Turley
- Wednesday, 06/06/07 22:32:34 EDT
|
Ringer,
Just make sure you never put all those anvils together in 1 place. It makes it tooeasy for your wife to count them.
|
|
- philip in china
- Wednesday, 06/06/07 22:49:28 EDT
|
Re: dark spots on stainless-- are you keeping the ferrous steel clear away from the stainless? If particles of ordinary garden variety steel get into contact with stainless, they will rust and show up as freckles. Wire brushing always does this unless you use a stainless brush.
Re safety with copper & food-- here is a little gem I picked up a while back off the Net where, beware, anybody who can fog a mirror can post. But it looks okay.
This article was published in FDA Consumer magazine several years ago. It is no longer being maintained and may contain information that is out of date. You may find more current information on this topic in more recent issues of FDA Consumer or elsewhere on the FDA Website, by checking the site index or home page, or by searching the site.
Is That Newfangled Cookware Safe?
by Dale Blumenthal
It's twice as hard as stainless steel, it conducts heat 28 times faster than glass, and it's nonstick for life. Anodized aluminum this new material
is just one of the many new inventions that have revolutionized the cookware
industry in the past 10 years.
Crock-pots cook dinner while you're at work, plastic coatings make the
perfect omelet child's play, and now, with coated anodized aluminum, you can
cook cheese to death without scratching the pan.
Is It Safe?
Questions about safety, however, have accompanied the introduction of
new types of cookware. Do scratches on a nonstick coated pan mean that we?ve
scraped a toxic material into our perfect omelet? Does aluminum from pots
and pans leach into the food we eat and cause health problems? Are there
precautions that should be taken when cooking with copper-clad pans? Do
glazed crock-pots contain dangerous amounts of lead?
Regulating these products also presents some unusual issues for the Food
and Drug Administration. You won't find a regulation anywhere on the books
that specifically addresses cookwares, says John Thomas, of the division of
regulatory guidance at FDA?s Center for Food Safety and Applied Nutrition.
But, Thomas adds, when a type of cookware raises safety concerns, FDA gets
involved.
Chemicals that migrate from cookware into food are considered food
additives (substances that become a component of a food or otherwise affect
its characteristics) and are therefore under FDA's jurisdiction. FDA
addresses safety concerns about housewares on a case-by-case
basis.
For instance, after a California family suffered acute lead poisoning
from drinking orange juice stored in a ceramic pitcher bought in Mexico, FDA
initiated a formal compliance action in 1971 limiting the amount of lead
that may leach from products used to hold food. In taking this action, the
agency relied on food additive provisions that prohibit adulterating a food
by adding poisonous and deleterious substances to the food. Since then, FDA
has tightened restrictions on lead. (See An Unwanted Souvenir: Lead in
Ceramic Ware, in the December 1989-January 1990 issue of FDA Consumer.)
In 1974, FDA proposed an amendment to the food additive regulations that
would require housewares manufacturers to file a food additive petition if
they planned to use certain substances in their products. (Exceptions would
be made if there was no migration of a substance to the food, or if the
substance was already generally recognized as safe by FDA.)
Although this housewares proposal has never been finalized, it
nevertheless has served as an advisory to manufacturers, says FDA food
additives consumer safety officer Kenneth Falci, Ph.D. For instance, says
Falci, many nonstick products are coated with a plastic that is regulated
and approved as a food contact substance by FDA.
Following is a review of materials in popular use in cookware today.
This review may serve as a guide to safe cooking.
Aluminum
More than half (52 percent) of all cookware sold today is made of
aluminum, according to Cookware Manufacturers Association executive vice
president Paul Uetzmann. But most of these aluminum pots and pans are coated
with nonstick finishes or treated using a process that alters and hardens
the structure of the metal.
In the 1970s, Canadian researchers reported that the brains of
Alzheimer?s disease victims contained abnormally high levels of aluminum.
The studies stirred a controversy about whether aluminum is the cause or
result of the disease. At the same time, many concerned consumers discarded
their natural aluminum cookware.
Stephen Levick, M.D., from Yale University School of Medicine in New
Haven, Conn., wrote in a letter to the editor of the New England Journal of
Medicine, out with my corroded aluminum pots.
John Koning, M.D., from Riverside General Hospital in Corona, Calif.,
responded, most ingested aluminum is recovered in the feces, and much more
is ingested by a person taking antacids than one could ever leach from an
aluminum pan. Dr. Levick has thrown away his pots and pans to no avail.?
Researchers still are investigating the connection between aluminum and
Alzheimer's disease. But according to Creighton Phelps, Ph.D., director of
medical and scientific affairs at the Alzheimer's Association, much recent
data support the theory that brains already damaged by Alzheimer?s disease
may permit entry of abnormally high levels of aluminum.
As FDA and researchers point out, aluminum is ubiquitous. It is the
third most abundant element in the earth's crust (after oxygen and silicon).
It is in air, water and soil, and ultimately in the plants and animals we
eat.
Many over-the-counter medicines also contain aluminum. According to the
Aluminum Association, one antacid tablet can contain 50 milligrams of
aluminum or more, and it is not unusual for a person with an upset stomach
to consume more than 1,000 milligrams, or 1 gram, of aluminum per day. A
buffered aspirin tablet may contain about 10 to 20 milligrams of aluminum.
In contrast, in a worst-case scenario, a person using uncoated aluminum
pans for all cooking and food storage every day would take in an estimated
3.5 milligrams of aluminum daily. Aluminum cookware manufacturers warn that
storing highly acidic or salty foods such as tomato sauce, rhubarb, or
sauerkraut in aluminum pots may cause more aluminum than usual to enter the
food. (Also, undissolved salt and acidic foods allowed to remain in an
aluminum pot will cause pitting on the pot?s surface.) However, aluminum
intake is virtually impossible to avoid, and the amount leached in food from
aluminum cookware is relatively minimal, according to Thomas.
FDA reviewed existing data because of consumer concern and formally
announced in May 1986 that the agency has no information at this time that
the normal dietary intake of aluminum, whether from naturally occurring
levels in food, the use of aluminum cookware, or from aluminum food
additives or drugs, is harmful.
Anodized Aluminum
One reason that aluminum became popular for cookware is that it is an
excellent heat conductor. Heat spreads quickly and evenly across the bottom,
up the sides, and across the cover to completely surround the food.
Now cookware manufacturers have developed a process for treating
aluminum that retains the heat conductivity properties of the metal, but
changes aluminum in other ways. The process, called anodization, involves a
series of electrochemical baths that thicken the oxide film that forms
naturally on aluminum. This supplemental coating hardens the metal, making
it more scratch resistant. Food barely sticks on the hard, smooth surface of
this altered aluminum, making it easier to clean.
Commercial Aluminum Company, the manufacturer of Calphalon, a
best-selling brand of anodized aluminum cookware, claims that a final stage
in the anodization process seals the aluminum, preventing any leaching into
food. Anodized aluminum cookware doesn't react to acidic foods, so these
pots and pans are top choices for cooking rhubarb and sauces with tomato,
wine, and lemon juice.
Nonstick Coatings
Before anodized aluminum made its cookware debut, nonstick coatings
stirred a mini-revolution in the American kitchen. Teflon, for instance, is
a trademark for a tough, nonporous material called perfluorocarbon resin
that permits cooking without the use of fats. It was first discovered by
chance in 1938 and then hurried into wartime production for use in radar
systems, in which other less durable substances had failed.
The noncorrosive properties of this stable plastic material made it a
natural for cookware. In 1960, FDA approved its use for food contact
surfaces, and cookware manufacturers began turning out pots and pans with a
coating that cleaned quickly and easily and that required less fat for
nonstick cooking. One of the first nonstick coatings to be applied to
housewares, Teflon soon became a household word.
Fry pans were the first cookware marketed with this nonstick finish.
Now, says the Cookware Manufacturers Association, almost every cookware and
bakeware item is available with a nonstick finish. There are griddles,
saucepans, casseroles, muffin pans, cookie sheets, Dutch ovens, egg
poachers, cake pans, deep fryers, and waffle bakers.
Because nonstick finishes may be scratched by sharp or rough-edged
kitchen tools, manufacturers recommend using plastic or wooden utensils.
Abrasive scouring pads or cleansers should not be used to clean them. Even
so, Tom Brown, an official in FDA's food additives section, notes that while
nonstick pans do abrade with hard use and particles may chip off, these
particles would pass unchanged through your body and pose no health hazard.
When heated for long periods at high temperatures, the resin decomposes.
However, a 1959 study, conducted before FDA approved the material for use in
food processing equipment, showed that the toxicity of fumes given off by
the coated pan on dry heating was less than that of fumes given off by
ordinary cooking oils. The study, conducted by the Haskell Laboratory for
Toxicology and Industrial Medicine, compared effects of inhaling of fumes
from resin-coated pans that were overheated?for four hours at 250 degrees
Celsius (482 degrees Farenheit) with corn oil, peanut oil, and butter.
The investigators, J. Wesley Clayton, Ph.D., and Gayle E. Raynesford,
also explored the possibility that long-term use of the coated pan also
increases the chance of food contamination with the resin. Newly coated
resin pans, an aged pan (a pan that had been heated at 250 degrees Celsius
(482 degrees Farenheit) for 159 hours), and a pan that had received
two-and-one-half years of domestic use were used to fry hamburger meat.
Researchers compared the results with those from frying hamburger in an
uncoated aluminum pan, measuring levels of fluoride, which serve as an index
to Teflon residue. (Aluminum contains traces of fluoride as impurities.) An
analysis showed basically the same amount of fluoride in the hamburger
cooked in the new resin-coated pan as in the one cooked in the plain
aluminum pan. Slightly more fluoride but well within safe limits showed up
in the hamburgers fried in the heat-aged pan and the old pan.
Cooking enthusiasts now are hailing Silverstone and Excalibur nonstick
coatings, which are made of three layers of the same plastic used on Teflon
and other perfluorocarbon resin-coated pans. This material is extremely
durable, and so inert (meaning it will not migrate) that it is used in
artificial arteries, hip joint replacement parts, and other surgical
implants. As with Teflon, however, it will emit fumes when overheated. Out
of caution, DuPont refuses to license housewares manufacturers to produce
from Silverstone burner bibs (the pans that are placed under stove burners)
because these pans can become extremely hot.
The newest rage, says a chef and salesperson in the cookwares section at
an exclusive Washington, D.C., department store, is a brand that combines
hard anodized aluminum with a nonstick coating. A Los Angeles Times food
critic reported last year that when testing such a pan, he toasted cheese to
death until it was crusty and browned and cooked a whole egg until it was
picture perfect. . . . Cleaning was a cinch. The Washington, D.C., chef
says that coated anodized aluminum is nonstick for life.
Stainless Steel
Consumers who don't buy aluminum pots and pans usually buy stainless
steel. Uetzmann says that stainless steel accounts for 43 percent of
cookware sold today. Stainless steel cookware and bakeware is exceptionally
durable. Says Uetzmann, Its attractive finish won't corrode or tarnish
permanently, and its hard, tough, nonporous surface is resistant to wear.
Like other steels, stainless steel is an alloy a combination of iron and
other metals. Unlike other steels, however, it contains at least 11 percent
chromium. This chromium makes the steel stainless all the way through.
According to the Cookware Manufacturers Association, stainless steel may
also contain other elements, such as nickel, molybdenum or titanium. These
materials can contribute special hardness, high temperature resistance, and
resistance to scratching and corrosion to the finished stainless steel alloy.
As stainless steel does not conduct heat evenly, most stainless steel
cookware is made with copper or aluminum bottoms. Manufacturers caution
against allowing acidic or salty foods to remain in stainless steel for long
periods. Although there are no known health hazards from leaching of the
metal, undissolved salt will pit steel surfaces.
Copper
Copper is called a noble metal by both cooks and chemists, but for
different reasons. Noble to a chemist means that the metal does not corrode
easily. To a cook, it means magnificent in appearance. To both, copper fills
the bill. (See Cookware as a Source of Additives, in the March 1982 issue of
FDA Consumer.)
Copper is an excellent conductor of heat, especially good for
top-of-range cooking. Cooks often prefer copper cookware for delicate sauces
and foods that must be cooked at precisely controlled temperatures.
However, copper cookware is usually lined with tin or stainless steel.
FDA's Thomas says that the agency cautions against using unlined copper for
general cooking because the metal is relatively easily dissolved by some
foods with which it comes in contact and, in sufficient quantities, can
cause nausea, vomiting and diarrhea.
The toxic effects of copper are well documented. I. Herbert Scheinberg,
M.D., one of the nation?s experts on copper toxicity and professor of
medicine at the Albert Einstein College of Medicine, cites a classic case
reported by the New York Department of Health in the 1970s. Children
attending a movie matinee bought soda from the type of vending machine that
drops a cup and fills it with carbonated water from one side and syrup from
another. The check valve for dispensing the carbonated water was made of
copper. Overnight, a significant amount of copper had dissolved into the
carbonated water. The children became ill from drinking the soda
contaminated with copper salts.
Cast Iron
The all-time classic is cast-iron cookware. It's been with us for nearly
3,000 years, since it was first used in China to cook rice, and remains a
staple among the glamorous additions in cookware stores. Cast iron is
strong, inexpensive, and it?s an even conductor of heat for browning, frying
and baking foods.
Cooking with cast iron also provides a source of an important nutrient.
Some nutritionists suggest that foods cooked in unglazed cast iron contain
twice or more the amount of iron they would contain otherwise.
Cast-iron utensils should be handled differently from other utensils. To
prevent rust damage, the inside of cast iron cookware should be coated
frequently with unsalted cooking oil. It should not be washed with strong
detergents or scoured and should be wiped dry immediately after rinsing.
Ceramic and Enameled Cookware
In 1830, a Bohemian craftsman found he could create a permanent, smooth,
glassy surface on cast iron by finishing it with porcelain enamel. This
highly durable glass is stain and scratch resistant and does not pick up
food odors.
Today, enamel-coated iron and steel provide colorful as well as
practical additions to the cook's collection. Cookware made properly of
enamel on these metals is safe to cook with, says Edward A. Steele, acting
director, executive operations staff, in FDA's Center for Food Safety and
Applied Nutrition. Steele says that because of the high firing temperatures
required, lead which could present a safety concern is not used in the
enamel for this cookware.
Lead, however, is used in some glazes for slow-cooking pots
(crock-pots). But, in tests done in 1987, FDA found that the amount of lead
that leached into food from these pots did not exceed FDA standards. (See An
Unwanted Souvenir: Lead in Ceramic Ware, in the December 1989-January 1990
issue of FDA Consumer.)
At the same time (1971) that FDA restricted the amount of lead permitted
to leach from housewares, the agency also established limits for cadmium
after it learned that this potentially toxic substance was sometimes
contained in the red, yellow and orange pigments used to color the interior
of enamel cookware. In the mid-1970s, FDA inspectors discovered excessive
cadmium levels in imported cookware and prohibited these products from
entering the country.
Cadmium was used mostly by foreign manufacturers. But, says Steele,
manufacturers have discontinued its use, and consumers today are not in
danger of cadmium poisoning from enamelware marketed today.
Best Choice Your Choice
The best choice of a pot or pan depends upon whom you ask and what you
want. A North Carolina father of three preteens relies on his nonstick fry
pan to create perfect Sunday morning pancakes with no mess with use of
little butter. A New York Times food critic features anodized aluminum in
his search for a better saut} pan. A member of a Maryland food cooperative
says she could never part with her familiar and durable cast-iron cookware.
The variety of pots and pans today offers something for everyone. And,
the best part is that all the different materials discussed in this article
can safely serve the needs of consumers.
Dale Blumenthal is a staff writer for FDA Consumer.
--------------------------------------------------------------------------------
FDA Home Page | Search | A-Z Index | Site Map | Contact FDA
FDA/Website Management Staff
Web page updated by smc 2001-APR-02.
Re: Canedy-Otto auto-feed-- I have a humongous old Canedy-Otto drill press, forget which noumber it is, and will take some snaps tomorrow of the auto-feed with my cheapo digital camera and Email to you-- if your address, unlike mine, is genuine.
|
|
Miles Undercut
- Wednesday, 06/06/07 23:03:10 EDT
|
Thanks Frank.I'v been crushing some of the coal in a large C-channel beem with a tamper but i get vary irregular shapes and i would like to get consistant pea gravel or about 3/4 to 1".My problem is i have gotten spoiled with some good coal i got at a hammer-in in Florida two years ago.Now i want to make this heating coal work as well as the exspensive stuff.
|
|
Ringer
- Wednesday, 06/06/07 23:05:19 EDT
|
Ringer,
If you have a gravel crusher operation in your area, you might try asking them if they would either crush/sieve your coal for a fee. Such operations also often decommission sieve screens and you can get pieces of it large enough to work for your own use. The stuf I got locally is heavy stainless or similar material with about a 3/4" mesh, and is tough enough to mash coal though with a large tamper. You still get plenty of fines, but I just use those, too.
|
|
vicopper
- Wednesday, 06/06/07 23:35:29 EDT
|
Guru,
I hope I am just about to close the deal on my first anvil (Ebay). As such I'm looking for some tips on maintenance of said anvil. I looked in the FAQ's and didn't find anything there right away, so I thought I'd take a shortcut and ask you instead. I really am a lazy bugger on Thursdays!
|
|
Craig
- Thursday, 06/07/07 01:36:48 EDT
|
Ringer,
I have been using some quite large chunks of coal lately. I get the coal at the nearby feed store. It makes healthy clinkers, but it cokes up fairly well. I found that if I surround the sweet spot of the fire with the large chunks, that they will "fractionize" easily as they acquire heat. I then chip pieces off with the fire rake, as I go.
|
|
Frank Turley
- Thursday, 06/07/07 08:01:34 EDT
|
Craig: #1 - frequent usage. #2 - occasionally spraying with something like WD-20 helps.
|
|
Ken Scharabok (Poor Boy)
- Thursday, 06/07/07 09:24:53 EDT
|
Anvil Maintenance: Craig, Use it. Oil it if you aren't using it. Paint it if you like.
Some things you do depend on how you use it and on the type of anvil (new vs. used vs. antique).
New anvils have sharp corners that need to be rounded off (dressed).
The amount of radius is personal taste.
Today most folks make a short heavily rounded area near the horn end on the far side of the anvil.
This is for doing heavy work on the corner and serves two purposes. ONE it that sharp corners are bad forging practice and that much heavy work on corners is similar to fullering. TWO is that the area where heavy work gets done tends to chip. Grinding the edge round reduces the likelihood of chipping OR if already chipped smooths the chips into a workable surface. Note that the heavy work area is the side AWAY from you and this differs if you are left handed. Some make the heavy work area a narrow place about 3" wide and other radius about half the side then taper gently all the way to the heel. Many also radius the near side similar to the far but not as much.
How much? Again it depends on personal taste but it also depends on the size of the anvil.
| Blacksmiths' Anvil Corner Radii |
| Weight |
Heavy Work |
Sides |
Heel Sq. Horn |
up to 100 lb.
45 kg |
3/16" (5mm) |
1/8" (3mm) |
1/16" (1.5mm) |
100 to 200 lb.
45 to 90 kg |
1/4" (6.4mm) |
5/32" (4mm) |
1/8" (3mm) |
200 to 350 lb.
90 to 160 kg |
9/32" (7mm) |
5/32" (4mm) |
1/8" (3mm) |
350 lb. UP
160 kg UP |
5/16" (8mm) |
3/16" (5mm) |
5/32" (4mm) |
Weight ranges approximate, adjust for class of work (heavy or light).
Adjust +/- .010" (.25mm) for personal preference.
(c) 2007 J.Dempsey |
If the anvil is old and used it may already be dressed. If the anvil is antique you need to carefully evaluate any changes.
If the anvil is old and has been weld repaired or machined and the corners sharpened then this was a waste of labor I hope you did not pay for. Machining also reduces the thickness of the steel plate AND depth of hardening leaving the anvil soft and easy to mark.
Used anvils often have cut surfaces that can be easily dressed out with a sander. AND for some reason every old anvil I have seen has had the tip of the horn hammered on and mushroomed. This should be gently dressed off. Note that the point of an anvil horn is blunt ranging from a 3/8" flat to 3/4" on large anvils. This is for safety.
Where old anvils have been badly chipped they should be smoothed out and the corners radiused as above. When chips are too deep for a radius to clean up just blend them in a little to remove sharp edges that may mark your work or chip again. It is MUCH better to gently dress anvil corners than to weld them up. Welding results in hard and soft places and conditions that are likely to produce cracking or chipping (again). Most anvils that are badly chipped would not have been if properly radiused to start with.
|
|
- guru
- Thursday, 06/07/07 10:22:05 EDT
|
Craig; with regular use there should be no maintainence requires. If you are in a climate/environment that promotes rusting you can start by cleaning the anvil and painting all but the working face and horn. Then if you will not be using it for a while, wax or oil the face and horn.
If you are in a cold environment preheating the anvil before use is both good for the work and for the anvil. Atli uses an old electric iron, some folks use pipe heat tapes around the waist. For the 400# one a used to use with a friend we would hang a paintcan full of wood scraps on the horn and heel and burn light them.
Thomas
|
|
Thomas P
- Thursday, 06/07/07 11:14:18 EDT
|
Rust never sleeps
As a cleaner / preservative on anvil faces and other tools, I have used "Break-Free CLP" (made by Armorholdings) with great success. It has worked well on silversmithing stakes; it does not seem to attract dirt like WD-40 or wax. A little goes a long way.
|
|
- Paul
- Thursday, 06/07/07 11:59:41 EDT
|
Cleaning Anvils: I have seen a LOT of old and some quite antique anvils on ebay cleaned down to bare metal. I know the dealer that does this and he says its what his customers want and pay the most for. But it just shows the general ignorance of antique values among those with more money than sense. In ANY other field of collecting the antique value would be reduced to less than half if you took a power wire brush to an item to remove the patina of age.
In general anvils stored indoors and well used rust very slowly. They build up a thick dense layer of smooth rust. Most often this can be cleaned without hurting it then oiled to preserve it. Once they are well rusted most old wrought iron anvils stored outdoors do not rust excessively unless laying on wet ground or places like manure piles (more common than you would think on farms).
You can clean and paint over this finish without hurting the anvil. The paint can be removed by a museum or colector at a later date and the rust patina remain.
|
|
- guru
- Thursday, 06/07/07 12:28:11 EDT
|
Treadle hammer vs hand hammer:
I'm going to buck the trend a bit and vote in favor of the treadle hammer for drawing. While it's nowhere near as fast as a power hammer (a safe assumption, as I don't have a PH), I find my TH with drawing dies is quite a bit faster than a hand hammer. My drawings dies are simple 1-1/4" round, tapered slightly at both ends and forged to make a crowned top. I also have about a 1/4" flat spot along the length of each die.
I made my hammer head lighter, 35-lbs, and kept the springs strong-ish to allow a quick return. This lets me hit faster, while the lighter head gives more control.
Using this arrangement, I have no problem drawing out 1" round, the biggest I tried so far. I've also used it to punch and drift a 3-lb hammer head, something I don't think I could have done by hand.
I liken a treadle hammer to the striker, as a few have already mentioned. A striker with a 12-lb sledge can move quite a bit of metal. Why shouldn't a leg-powered striker with a 35-lb hammer be able to move at least as much? And I bet that I, at the TH, have more control than if I used a striker.
The other thing is the effort itself. The amount of work is the same with a TH as with a HH, but the mechanics are different. Might actually be more work as you have to fight the friction of the TH, especially if you have a sliding one, as I do. But maybe that extra effort is countered by the greater mass of the heavier hammer. But the mechanics of repeatedly swinging a 4-lb hammer could easily be a cause of injury to the elbow and shoulder joints. The leg movement using the TH isn't very different than climbing or even running, so I would think it's more natural. I have a C-shaped spring connecting the treadle to the hammer connecting arm to cushion the sudden stop at the end. So far, my knee hasn't complained at all.
My perspective is that of a guy who doesn't have a power hammer to rely on. I often see statements like "the TH can't be used for drawing", and I wonder why it's so black and white. Those statements are usually, maybe always, from someone who has a PH available to them. Sometimes I wonder if those who have PH's take them for granted, and anything less, to them, is the same as hammering by hand.
So take that for what it's worth, probably not much more than what you paid for it :-)
|
|
- Marc
- Thursday, 06/07/07 12:45:43 EDT
|
Marc I think one of the issues is that people who *should* be using a powerhammer sometimes opt for the TH instead.
I've owned 3 powerhammers so far all of them cost me less than a standard purchased treadle hammer. I plan to build my own treadlehammer and have scrounged almost all the necessary steel for it.
OTOH I will draw using my HH with a nice round peen and the horn of my 500# anvil---or use the power hammer.
Thomas
|
|
Thomas P
- Thursday, 06/07/07 13:41:30 EDT
|
I hope that this is not a question that has been asked to death, but here goes:
How can one tell the difference between a forged blade and a stock-removal blade in the finished product?
Many thanks and keep up the good work. This site has been invaluable to me.
|
|
Rob Dobbs
- Thursday, 06/07/07 13:42:57 EDT
|
Rob, If both blades are well finished you cannot tell the difference. Only by cutting numerous sections out of the blade and making photomicrographs could you tell the difference.
There are some types of blades that can only be made by hand forging such as those with unusual laminated steel (Damascus) patterns. Otherwise there is no non-destructive way to tell
|
|
- guru
- Thursday, 06/07/07 13:52:26 EDT
|
Rob Dobbs,
Unless the forged blade has had no finish work (grinding) done on it, you really can't tell. Unless you do a microsscopic examinatin of the grain structure, which ain't exactly non-destructive. Maybe an X-ray analysis might work, I don't know. One of the resident bladesmiths might have better info.
|
|
vicopper
- Thursday, 06/07/07 13:53:07 EDT
|
Marc, The difference comes when you need to draw out that third, fourth or fifth heavy piece. For the jobs the TH is best at, coining, stamping, riveting and other heavy blow work where you have time to recuperate between pieces and can go all day long they are great. They are also good for light blow work where the blows need to be exact. I'll admit that the TH does a cleaner job than a hand hammer.
If you use a hand hammer with an equivalent drawing face OR use a bottom fuller the metal moves much faster that way as well. But most do not use this approach to heavy drawing and just use their regular hammer on the flat or edge of the anvil. So there is an apple and oranges comparison.
When I didn't have a power hammer and needed long tapers in anything bigger than 5/8" I would break out the cutting torch. Today in many shops that HAVE power hammers when they make long tapered hinges they have blanks plasma or water-jet cut.
But the beginning question was, "Which would you rather have IF you could either but not BOTH". The answer is the power hammer. It can do most of the jobs the treadle hammer can do AND it can do more longer, including drawing long tapers all day WITHOUT screwing up your knees.
Elbows and Knees. . . Many folks worry about their elbows but you should be worried about you knees if you use a treadle hammer a lot. Once knees are screwed up your total mobility changes. I never had problems with my knees until ONE day I helped a fellow chase cows on a hilly farm covered with a few inches of ice encrusted snow. I spent about 4 hours stomping through the ice on a slopped surface. . . That was 30 years ago and they have not been right since. It was one of those stupid moments that you do not realize how dumb it was until later. Up until that day I could spend endless hours on my feet standing or walking. After that I could not. Pain starts after an hour or so and gets worse and worse. More from standing than moving.
My treadle hammer project is a springless hammer. . .
|
|
- guru
- Thursday, 06/07/07 13:54:39 EDT
|
Thanks for the info. That has been a question floating around my brain for some time and only just got around to asking.
|
|
Rob Dobbs
- Thursday, 06/07/07 14:09:54 EDT
|
It's probably a difference in experience, since I have never had to draw out lots of heavy pieces. But I can't see how a 3rd, 4th, or 5th heavy piece would feel better with a hand hammer. After one big piece, my HH arm gets really tired, but after an equivalent with the TH, my leg wasn't. After a 1/2 day of forging biggish pieces, my shoulder and forearm are noticeably sore. But an equivalent amount of work at the treadle gets me real sweaty, but not sore. The treadle spring does a nice job cushioning the knees and the leg movement is more like what I do every day.
And maybe I'm not doing it correctly, but I've made a few RR spike things and I really do think I can draw faster with the TH. I've tried the anvil corner and the hammer peen, but the TH with the drawing dies get more done in a heat. Again, just my experience.
But I was referring to the question that was between a hand and treadle hammer. I think he spelled out that a power hammer was not an option, so I was writing to that. I went back and forth lots of times deciding which to build. I went with the TH because it just seemed that most of my projects lent themselves to that. If my income depended on it, I'd probably have both.
My knee story - This past Feb. I went with our church group to build a house for a hurricane Rita victim. After a week of just getting up and down, carrying lumber, whatever, my knees just screamed. I could walk forever, but stairs were a two-Advil job. It took about a month for the pain to go away. But if I just do a small honey-do project where I have to get up and down, the pain comes back. I'm just hoping that the problem eventually heals.
|
|
- Marc
- Thursday, 06/07/07 14:55:44 EDT
|
Hello all, I was wondering whether clay would hold heat (and/or reflect) heat better than mortar. The reason for this question was a forge that is being built. It is a solid fuel, and only a step above an earth pit forge. Right now it is a large (roughly 34" x 18" x 3") chunk of sandstone for the floor. I am building the walls of the forge by stacking rocks (sandstone, and some slate) and kind of mortaring them together with a dark greyish clay that is dug from a nearby creek (I am thinking this will harden after the first few uses and will work as well as mortar). This will be a less effiecent forge than a propane, or even brake drum forge, however, I would still like it to work as well as possible.
My questions are:
1. Should I go ahead and mix up some mortar, or will the clay work fine
2. What would be the best way for smoke to go through (open back, open top, or a small hole in the top).
3. Last would a hair dryer with a the heating element removed work for a blower? If not would a leaf blower be too much air?
|
|
- Hollon
- Thursday, 06/07/07 14:58:02 EDT
|
Hollon; you have tested that the rocks you are using will not explode when hot right? When building the Y1K forge and choosing the stones for cooking I have always tested first before people were ever around them. Some explod, some crack and degrade fast and some work fine.
I don't think there will be much heat difference between clay and morter. I've seen a lot of hill and frontier forges that were laid up with clay way back when. But they do need sheltering from the elements.
Thomas
|
|
Thomas P
- Thursday, 06/07/07 15:05:33 EDT
|
I didn't mean to create any discontent. I certainly wasn't knocking power hammers; I'd love to have one, and I hope to build one when my living arrangements permit it.
On that note, am I wrong to think that the cost of a building a simple power hammer like ABA's Rusty or Super Rusty shouldn't be much greater than the cost of building a treadle? They seem very similar in size and basic operation to some of the treadle designs I've seen (with the obvious exception of the motor).
|
|
Matt B
- Thursday, 06/07/07 16:17:48 EDT
|
Matt, As far as complexity and labor a JYH is not much different than building a treadle. Building an air hammer is more costly due to the expense of the cylinder, valves and plumbing. I recommend the NC-JYH "Tire" hammer over the rusty. The tire hammers use the vastly more efficient Dupont linkage. They can be built using a flat or bow spring which greatly simplifies the design and still has the advantage of the toggle linkage.
When you count up the number of holes to drill and the total number of moving parts in a treadle hammer they MAY be more complicated than a power hammer. When I built the EC-JYH I bolted most of it together and had extra flanges due to the long length of the axle and I think I only drilled 24 holes. 8 of those for that back post and flanges.
Cost of these DIY projects depends largely on luck, cunning, ability and expectations. Mostly luck. If you can get the steel cheap that is luck and or cunning. If you can do any needed machine work yourself that is ability. Then there was what you expect. I have high expectations when it comes to electrical work. I spent most of my budget on the EC-JYH on good HD electric cord, rubber compre$$ion fittings and misc electric parts. I also bought a couple new cans of paint because I expect something I build to look good when it is finished.
|
|
- guru
- Thursday, 06/07/07 16:43:34 EDT
|
A few questions.
I have an old mousehole anvil I'd like to sell. It's 143 pounds, has the edges pretty heavily radius-ed but otherwise in excellent shape... some dings, no sway, and a few cut marks in the shelf. Had a hard time dating it... 1820-1835 by the stamp, but it has a pritchel hole. Oh, also, the hardie hole is punched crooked, about 10 degrees off vertical. What should it be worth?
Also, about to buy a euroanvil. Mostly I do toolsmithing, with occasional "general blacksmithing." Will I always kick myself if I go with 175 lb. instead of 286? Thanks
|
|
drew
- Thursday, 06/07/07 16:51:27 EDT
|
Mark Pearce does some teaching in the Calcgary area his shop is called mystic forge.
|
|
- JNewman
- Thursday, 06/07/07 17:35:13 EDT
|
Hollon:
Sandstone can be risky in a high heat situation. As a sedimentary rock, it may contain sufficient chemical water to spall rather violently when exposed to high heat. I would seriously consider lining the thing with a significant coating (3/4" to 1") of an insulating rammable refractory. The slate I wouldn't use under any circumstances, since it will very likely explode and may even be slightly flammable, if it turnsout to be a shale-oil type slate.
|
|
vicopper
- Thursday, 06/07/07 17:35:35 EDT
|
Drew it would be worth about twice as much here in NM than back in OH where I used to live. Where do you live? Anvil costs still reflect location somewhat do to the fun of shipping them.
Also remeber that some anvils had a pritchel hole drilled at a later date.
Thomas
|
|
Thomas P
- Thursday, 06/07/07 17:40:44 EDT
|
I'd be worried about mortar spalling in a forge. I think they use refractory mortar for fireplaces (?)
|
|
Mike BR
- Thursday, 06/07/07 18:11:47 EDT
|
JYH pricing. I built the original version of my hammer for something like $43 in 2002. I had a fantastic scrap shopping experience as I hworked at a major machine shop. And since it was being closed, and the idiots that had bought us had greatly insulted and ticked off the help, they were tickled to do any machineing I needed as gov't jobs. I only had three cnc mills and two cnc lathes and a couple of 5 axis tool grinders in the tool room with perhaps perhaps the least experienced toolmaker having 16 years as a tool maker.
The modification to 45# and a spare tire drive on a rusty type hammer cost me another $50 or so. And mine was painted with fresh but scrap paint.
Scrounging and location make a big difference.
I wish I had know more when I built that thing the first time. with the talent and equipment I would have built a much better hammer of at least 100#, and a much more robust design, but eery thing I have ever built i could have done better 5 minutes after it was done
|
|
ptree
- Thursday, 06/07/07 18:53:40 EDT
|
Matt, no discontent - at least not on my end. The great thing about forums likes this is the diversity of experience. You've got full-time guys who've been doing this for years, and you have hackers like me. I like to hear about different points of view. I usually find one that matches mine and stand to learn a whole lot more.
As to the costs, I don't think I have $50 in my TH. You just have to be really loose following plans. I used the Clay Spencer inline plans as a guide to things like anvil height, spring sizes, etc. I would expect you could do the same with the NC-JYH power hammer.
|
|
- Marc
- Thursday, 06/07/07 19:12:39 EDT
|
Just wanted to say thanks to Guru, Frank, Philip in china and Vicopper for the info on the coal sizing.I just got off work and had a minute to step in. For now I will have to combine Guru's suggestion with Franks and work some of the big pieces down by hand and let the rest break up while turning to coke. But I will definetley be asking around for some sieve screens from gravel crushers.Their are several gravel crusher operations in and around Savannah Ga....and to Philip in china believe it or not, my wife was with me when I bought each of my anvils. I think she enjoys the smell of the coal burning, the ring of the anvil and the turning of my 1903 Lancaster blower.Got to go and thanks for your time....Todd.
|
|
Ringer
- Thursday, 06/07/07 19:36:55 EDT
|
Houston, the Eagle (or Turkey) has landed. We are now residents of the Lone Star State again and I am pigging out on Tex-Mex. Questions will be entertained again.
|
|
quenchcrack
- Thursday, 06/07/07 20:36:38 EDT
|
ptree said, "Every thing I have ever built I could have done better 5 minutes after it was done."
Truer words were never spoken, Jeff. I've always said that good judgment comes from experience, and a lot of experience comes from bad judgment. At least in my case that seems to be true.
I just pretty much finished up a number of alterations to my hammer, most of them correcting deficiencies I built into it originally. I took your advice on the secondary air receiver right before the hammer, by the way. Air in the bottom and out the top, as recommended, and the air is now MUCH drier than previously. The water trap hardly catches any, and there is none evident in the exhaust. Thanks!
|
|
vicopper
- Thursday, 06/07/07 20:42:42 EDT
|
Drew: You can do an eBay search on Mousehole and Mouse Hole in both active and completed listings. Should give you a ballpark estimate.
On Mouse Hole and a Peter Wright of the same size the MH will normally sell for 1/2 to 2/3rds of the PW. I suspect the shapes account for most of that difference, with the PW, as noted above, being the classic London pattern.
While Richard Postman gives 1830 as the year pritchel holes pretty well became standard in anvils it is just a guide. As noted above, some older anvils had the pritchel hole drilled later. You can usually tell by looking under the heel. Punched holes have a slight swelling under the hole while drilled one won't.
|
|
Ken Scharabok (Poor Boy)
- Thursday, 06/07/07 21:01:25 EDT
|
Just another question on power hammer/treadle. How would a hydraulic press fit in? I realise it may not be as versatile, but it seems like a quieter option compared to the JYH - especially in the suburbs. Obviously cost of hydraulics would increase costs somewhat.
|
|
andrew
- Thursday, 06/07/07 22:06:26 EDT
|
Have you ever heard a hydraulic power supply running? Kind of like a lower note hi-decibel skill saw running constantly. GNNNNNNNNNNNNNNNNNNNN. . . . Much noisier than the thunk thunk thunk of a small power hammer and carries quite far. Hydraulics necessary to do reasonable work is also quite expensive compared to other machines.
About the only quiet forging machine is a small roller mill like the McDonald Mill (see our reviews page). They make less noise than the roaring of a forge fire and much less than a gas forge.
|
|
- guru
- Friday, 06/08/07 00:48:32 EDT
|
|
|
[
CSI - anvilfire MEMBERS Group |
Getting Started in Blacksmithing ]
|
