| WELCOME to the anvilfire Guru's Den - V. 3.0 |
|
THIS is a forum for questions and answers about blacksmithing and general metalworking. Ask the Guru any reasonable question and he or one of his helpers will answer your question, find someone that can, OR research the question for you. This is an archive of posts from July 9 - 17, 2002 on the Guru's Den |
|
|
|
What are some good sources for Anvils ? Thanks for your replys and help ! Best Regards ! Bill |
| Bill Campbell - Monday, 07/08/02 23:39:43 GMT |
|
Anvils Bill, you talking about anvil shaped anvils, go to a blacksmith's meeting. Always an anvil for sale, or someone knows of one for sale. Wallace Metal Work that runs a banner on Anvilfire has anvils, as do many of the other advertisers. Anvils do not always look like anvils. Any heavy metal object will do. Many use a section of Rail Road track to get started. |
| - Conner - Tuesday, 07/09/02 00:01:56 GMT |
|
Rugg, the gas line on my Whisper Baby is about 8" above the forge body and doesn't seem to suffer from the heat. I have been able to get to welding temperatures if I run the forge for several hours before I even think about welding. My problem seems to be twofold: first, I didn't brush the joint enough and second, I smashed the daylights out of it on the first hit! I guess this is to be thought of as a first kiss, not a rape! |
| quenchcrack - Tuesday, 07/09/02 00:05:34 GMT |
|
This is a question about the sourcing of Chambersburg spares. The company I work for, Tristar Steering and Suspension Australia Limited is involved in production forging, and since Chambersburg Engineering is no longer, I can not think of any other way of finding out about spares. Our machine is a 2,500lb Chambersburg Seco Drop Hammer, and I am after the shock absorbers (part#340). Are you able to provide information (if so, contact details) of anyone who would be able to supply these spares? Best Regards Robert Smith Asst Manager - Purchasing |
| Robert Smith - Tuesday, 07/09/02 00:54:36 GMT |
|
Guru, I guess you probably missed my post since you were out of town. I'm just wondering what my best bet is with all those plant stands I treated w/ the zinc, primer , top coat that chipped on me. They don't seem to be chipping as much on me at this point, perhaps now that they've had more time to cure? Do you think I need to clean all the paint off them and start all over or is there a way to patch them up so they look decent? Also, do you ever treat w/ boiled linseed oil and will this hold up well in say, the bathroom? Thanks! |
| - Wendy - Tuesday, 07/09/02 01:00:22 GMT |
|
where do babys com from |
| john - Tuesday, 07/09/02 01:14:28 GMT |
|
john, Better get some one at home to explain it to you, with pictures. |
| Paw+Paw+Wilson - Tuesday, 07/09/02 01:43:09 GMT |
|
Wendy, Maybe the people that want to buy your stands don`t like the color you painted them. Go with boiled linseed oil and if said people want to strip that off they can do so easy and paint to a color they want. Don`t get too much time and money wrapped up in a simple project like this, good luck. |
| - Robert - Tuesday, 07/09/02 02:04:29 GMT |
|
John, if you havent figured it out by now it's probably best that you dont find out. You seem to be a bit slow on the uptake and we have enough of that in our gene pool already. (No, John I didn't misspell "jean"). So don't you worry your pretty little head about all that stuff. |
| adam - Tuesday, 07/09/02 02:10:06 GMT |
|
rugg; at my local hardware store I just found and installed on my forge, small flexable metal gas lines that are used for RV's and gas fireplaces. You can also plumb with straight pipe to get away from the heat if you want. |
| - Pete-Raven - Tuesday, 07/09/02 13:50:06 GMT |
|
Paw-Paw: Puppets might be a good idea too. |
| Escher - Tuesday, 07/09/02 14:24:05 GMT |
|
Wendy-- Robert's right, tempus fugit. Touch up those pesky plantstands with some spray flat acrylic. FYI I've got potracks & hooks I made 25 years ago, soused with used motor oil and then cooked it off with a rosebud (don't tell the EPA!) that haven't rusted yet in steamy kitchen environments. |
| miles undercut - Tuesday, 07/09/02 15:59:49 GMT |
|
Does anyone know where to buy flint to use with the strikers made from old files? I live in Texas and the State has a huge flint quarry in the panhandle that is now a State Park. I would assume that scavenging samples there is now a felony! Where else can I go? |
| quenchcrack - Tuesday, 07/09/02 16:57:00 GMT |
|
The best place to get anvils is where people want to get rid of them! Since shipping of anvils is so expensive where the heck are you Bill? Should our friends in NZ or the UK list their favorite sources or are you in the USA, and if so *where*? I found one Sunday at the fleamarket---it wasn't there but a fellow heard me *asking* a junk seller if they knew of one and he told me he had one he wanted to get rid of. A friend ended up buying it for trading stock and paid about 50 cents a pound for it---here in central OH. Sure there is always an anvil or two available at smithing get togethers---especially if you *ask* around; but in general you won't get a steal of a deal, the smiths *know* and love anvils. What you want is the anvil cluttering up a garage that a fellow has just banged his shin on for the umpteenth time and will be happy to *give* you the blasteed thing and help you load it to boot---so *ask* around, church, checkout line, Dr's waiting room, etc. Just learn how to evaluate an anvil and don't get stuck with an ASO! Thomas |
| - Thomas Powers - Tuesday, 07/09/02 17:04:03 GMT |
|
quenchcrack, Try a older unused railrode right of way, around here there is one that has good flint on it. A guy gave me some red and white Texas flint the other day, said the quarry is now closed, might be the one your talking about? I also go looking for arrowheads at old indian sites and pick up all good pieces of flint that I see. |
| - Robert - Tuesday, 07/09/02 17:21:53 GMT |
|
Flint Quarries: Gee guys, I hope it's not the one at: http://www.nps.gov/alfl/index.htm Over in the south of England they pave parking lots (er, "car parks") with flints. I brought several home to go with my Viking gear. When my friends visit England, I remind them to "raid the parking lots!" ;-) You might also check your local state geological service, or the published geological survey in the library to track down sources for flints. Sunny and hot on the banks of the Potomac. Some rain would not be amiss. Visit your National Parks: www.nps.gov Go viking: www.wam.umd.edu/~eowyn/Longship/ |
| Bruce Blackistone (Atli) - Tuesday, 07/09/02 17:37:36 GMT |
|
Atli, thats the one. Still about a 6hr drive from where I am. I guess I will go ask one of the local arrowhead hunters about something closer. I will check the RR ROW also, but around East Texas, I don't think flint is a common roadbed material. I think crushed beer cans is the usual material of choice! |
| quenchcrack - Tuesday, 07/09/02 17:44:49 GMT |
|
Chambersburg Spares: Robert, I'm mailing you an address that might help. There was a lot of backroom dealing going on at the Chambersburg sale and the ex-managers ended up with the plans and specifications. Parts went to individual buyers and scrap. You will have to make your own parts. . . |
| - guru - Tuesday, 07/09/02 18:03:01 GMT |
|
Escher, You're probably right. |
| Paw Paw Wilson - Tuesday, 07/09/02 18:32:02 GMT |
|
Hello, I am blacksmith's work designer from Lithuania, my works experiance 14 years.I am looking chance to work in USA for the half year, or 3 mounth. If you have interest write me. My works you can see on www.kaluva.ot.lt Best regards, Dainius Varnelis kaluva@tavi.lt |
| Dainius Varnelis - Tuesday, 07/09/02 18:35:07 GMT |
|
Hello,I am blacksmith's work designer from Lithuania, my works experiance 14 years.I am looking chance to work in USA for the half year, or 3 mounth. If you have interest write me. My works you can see on www.kaluva.ot.lt Best regards, Dainius Varnelis |
| Dainius Varnelis - Tuesday, 07/09/02 18:35:58 GMT |
|
Found this useful site with a lot of links to metals information: http://metals.about.com/mbody.htm |
| quenchcrack - Tuesday, 07/09/02 20:58:42 GMT |
|
Forge welding with gas I have a whisper mamma and it seems to weld pretty good at about 9-11 psi depending on air temp.Of course clean bare metal is best and get it just hot enough to make the flux stick (mucho flux)before you give it any serious heat. CFM |
| CHRIS MAKIN - Tuesday, 07/09/02 21:18:13 GMT |
|
Re: Finding anvils. My wife loves yard sales so while I'm indulging her fun I never fail to ask "got an old anvil you want to sell?" So far I've got a nice Wilkenson & what I beleive is a Solderfors that way. Both for well under $1.00/lb. |
| bbeck - Tuesday, 07/09/02 21:32:09 GMT |
|
Dainius-- Damned good work! I especially like the gates! Wish I knew of a job. If I hear of one, I'll yell. |
| miles undercut - Tuesday, 07/09/02 23:52:15 GMT |
|
Guru, your problems with plaster may have been less related to the heat, and more a cleanliness issue. I don't know, I wasn't there... Many plasters will set themselves off... I don't fully understand the chemical reactions that occur, but I've seen it happen (5+ years as a hod carrier, and 3+ years pouring statuary stuff). If you have any flakes or chunks from the last batch you mixed up sitting in the bucket when you mix up a fresh one, it goes off instantly. The chunks trigger the reaction in the fresh plaster. I learned this the hard way, when a 5 gal bucket I was mixing went off before I got it mixed (many hours chipping the paddle out of a big block). Gypsum is the worst (the stuff people used before sheetrock) plaster of paris and hydrocal types usualy aren't AS bad... but couple it with your heat issues.... |
| mattmaus - Tuesday, 07/09/02 23:54:36 GMT |
|
Flint. We use the word flint when chert, chalcedney, obsidian, etc are all used about the same. Quartz throws a good spark. Check local stream beds and road cuts for some rocks to try. Just get a sharp edge on the rock first, but you probably already knew that. You'd be supprised at what will throw a good spark. |
| Bob Harasim - Wednesday, 07/10/02 01:01:56 GMT |
|
Mattmaus, I've worked with plaster since I was very young helping my Dad make ceramic molds. I've also used plaster to make molds for art work and as intermediate molds in various processes and never ran into anything like this. I know to work fast with plaster but this was ridiculous. I was cleaning the mixing container and my trowel well between batches. It is possible there was contamination in the water or the 5 year old plaster was doing strange things. I just asked my Dad about it and he remembered having the problem once in a while but couldn't remember what he put in the plaster to slow it down. He seemed to think salt spead it up. We were in a hard water area and that may be why plaster that worked OK at home (we have very soft spring water) gave me trouble at a different location. |
| - guru - Wednesday, 07/10/02 03:00:53 GMT |
|
Robert Smith in OZ. Please send me a working e-mail address so I can send you the requested information. |
| - guru - Wednesday, 07/10/02 03:15:10 GMT |
|
I don't know how it would affect anything used for wax casting, but at both of the statuary places we had to go patch up any bubbles in the statues. The "patch" needed to stay soggy longer so we had time to use it. One of the places I was at just used a shot of lemon juice to delay the plaster in its set. Worked pretty decent, for keeping it wet longer, but seemed softer to me, than the hydrocal without the lemon juice. |
| mattmaus - Wednesday, 07/10/02 03:35:06 GMT |
|
Turley's back after a processor messup and two out-of-state workshops. I have a new processor with an anti-virus thingamabob installed. By the bye, that Velasquez painting with the scantily clad, astonish -faced smiths, apparently shows the god, Apollo, telling Vulcan that his wife is froggin' around. |
| Frank Turley - Wednesday, 07/10/02 03:38:43 GMT |
|
Plaster Notes: From the US Gypsum plastermaster.com/usg/ site. Cure C: If excessive alum, chlorine or sulfate are present in the water, plaster mix will set too quickly. Problems A and B were contamination. But I think it was a combination of the heat and hard water. A graph showed setting time of plaster to be fastest at 100°F and slower at both higher and lower temperatures. Salt (sodium chloride) will accelerate setting but is not recommended. Suitable accelerators are sold. Sugar and organic acids (vinegar) will slow the setting time and are also not recommended. For the historians out there USG claims casting plaster has been in use for 5,000 years. 2(CaSO4 * 1 H2O) 2H20 = (2CaSO4 * 2H20) heat I have mixed talcum powder (20%) with plaster to increase its refractoryness and improve surface quality without a problem. Some casting mixes recommend addition of fine sand to strengthen the plaster. Wood flour is also used to increase the porosity so that it drys better. |
| - guru - Wednesday, 07/10/02 03:52:18 GMT |
|
Quenchcrack, Email me with your mailing address and I will send you some flint. My 8 year old son and I went out for a walk the other day next to a near by gravel bank and filled a 2 gal bucket with the stuff. SHHHHH don't tell enyone...;) |
| kdbarker - Wednesday, 07/10/02 05:57:38 GMT |
|
I would just like to ask whether "metal fume fever" is fatal? Or do you just get extremely sick? |
| Nicholas - Wednesday, 07/10/02 07:09:10 GMT |
|
Nicholas, Look at the American Welding Society - Safety & Health Fact Sheet No.25 www.aws.org/technical/FACT-PDF.EXE/FACT-25.PDF |
| - kdbarker - Wednesday, 07/10/02 07:54:23 GMT |
|
quenchcrack, ON using flint. I use agate. We have a gem and semi precious stone show here about every 6 months. I buy a piece of agate for about a buck. This has already been cut thin. ( I think they use it to make wind chimes with ) I just break it into smaller pieces and it is ready to go. |
| Ralph - Wednesday, 07/10/02 12:47:34 GMT |
|
If the heat out side is the problem when casting. Why don't you just go inside and do it in the kitchen? check out this site http://home.c2i.net/metaphor/mvpage.html |
| - Bruce D - Wednesday, 07/10/02 14:40:58 GMT |
|
Metal Fume Fever KD, Good link. However, what this doesn't tell you is that other metals that cause similar reactions may be cumulative and eventualy dibilatating if not fatal. Copper, lead, bismuth and cadnium are cumulative. Your body absorbs them and you do not excrete them. Exposure to cadnium fumes (used in old galvanizing and plating hardware) can be fatal and in the least is debilitating. There is no cure and you can only treat the symptoms. The worst thing about heavy metal fume exposure is that mild poisioning by one can effect your tolerance to another. There is little medical knowledge of effects of combined heavy metal poisioning. Over the past few years I have had several people write to me looking for cures. One was the wife of a self employed welder suffering from various problems including liver failure due to heavy metal exposure. There was nobody to blame other than himself and nobody else to pay for medical care. It was very sad but not not unusual. AWS Health and Safety Bulletins You will note that the long term effects of many fumes are not known. Good ventilation is always your best protection. |
| - guru - Wednesday, 07/10/02 15:00:41 GMT |
|
Going Inside (plaster problems): This was at an outdoor conference and there was no option. We were in a shady place that was as cool as you could find outdoors. If I were at home I would have waited until late night. My shop is very well ventilated and relatively cool then. I'm afraid my home is not air-conditioned and the kitchen is probably hotter. But the plaster problems were a combination of hard water and the heat. The hard water seems to be the more important factor. If I had known then, we could have gotten a bottle of distilled water and avoided the frustrations. As to the referenced link on Microwave casting, "patent ceramic shell slurry". . ." then stuccoed with a magnetite sand". . ???? This page was on the web a number of years ago then dissapeared. I suspect the patent process had something to do with it. Melting: We also had some trouble adjusting our T-Rex burner at Fenby but that didn't stop us from melting a lot of brass very fast. Then last night while calcining the cast refractory furnace I was building before Fenby I raised the pressure on the burner to over 25psi. Something went "pip-pop" and cleared an obstruction in the burner orifice and after that the burner worked well keeping the furnace at a bright red on less than 1psi of propane. This furnace is designed to take up to a #6 crucible (6 pounds aluminium, 18-20 pounds of brass or bronze). Having it run on a very small amount of gas will be nice. Prior to heating the castable at high temperatures it was alowed to set and dry (what little it could in these humid conditions) for 5 days. Then a common propane torch was set in the burner hole and 1-1/2 bottles of propane consumed. This raised the temperature of the castable to something less than 200°F over an 8 hour period. Then the T-Rex burner was installed last night and the furnace brought up to a red heat over a 3 hour period. At 3am the furnace was shut down (I have to sleep sometime). The inside is fully calcined but steam was still coming off places such as where the burner enters. I will have a full report on this furnace after the first melt. |
| - guru - Wednesday, 07/10/02 15:48:35 GMT |
|
kdbarker, for some reason, I could not call up your e-mail address...I think my puter is configured wrong...or maybe it's me that's configured wrong! Anyway, thanks for the offer. I might try using some other silicate rocks, too. |
| quenchcrack - Wednesday, 07/10/02 16:55:51 GMT |
|
QC, Try kdbarker's name that is underlined. He didn't post his e-mail address the second time. |
| - guru - Wednesday, 07/10/02 17:51:11 GMT |
|
Heavy metal poisoning: I have heard that the herbs, bugleweed, yellowdock, lobelia, will combat pollution and draw out minerals and drugs out of the system. Epsom salts baths three times a week will soak poisons out of the system in addition to the herbs. hope this helps David S |
| DavidS - Wednesday, 07/10/02 19:12:14 GMT |
|
With the significant range and number of smiths on this page I expect everyone'll have a different answer to this question but that's why I'm asking it. How do each of you go about designing new projects? What do you find works best? |
| Lucky - Wednesday, 07/10/02 20:34:31 GMT |
|
Design, is a process that everyone approaches differently. Some people simply have an image of what they want in their mind and they express it in drawings or work. Others take various elements they have seen and combine them into their version. I start with the problem. Is this for me, for a customer, for an unknown customer? Is it to be a practical device or object or is it an object of fantasy? What materials do I want to use or what is available? And last, given these, what machinery or processes are available? AND is there enough money in the project that I can obtain or build necessary machinery/shop space in order to complete the project? Most of the time these limiting parameters are unstated but in the back of my mind and applied as needed. Then I start on paper. Sometimes the first sketch is IT, other times there may be a whole series of sketches. If the thing must fit a given space or an existing frame of reference I sketch that first. Many things like free swinging gates must have support in the way of a panel or diagonal members. Machinery or tools must fit the work. I build things in my mind and then on paper. Bull sessions can help if others are available to bounce ideas off of. I rarely have a clear picture of what I want to start. I am a "constructivist" and design often has many iterations. Start with the big picture and then fill in the details. Sometimes the details demand changing the overall design so I start over with the new details in mind. This is generaly the last iteration. But on simple things I often just make them from the picture I have in my mind. Almost always I start from scratch with my own ideas. But I am not the norm. Others must often look for sources to inspire or copy as they are not practiced artists. Most artists can draw in their mind as well as on paper and may iterations may pass but never through paper and pencil. |
| - guru - Wednesday, 07/10/02 21:36:40 GMT |
|
Design - I have a problem with getting an idea in my brain and not being able to get rid of it, so I am careful never to look at other's work for inspiration, except in a very general sense. If I want to design a table base, for example, I will scrupulously avoid looking at any pictures of tables and look, instead, at pictures of candle holders or bedframes. This way, I only see elements of a design, not the details, and I don't seem to find my mind locked into a certain mode of thinking about a given design. Sometimes, I find it useful, (if I am just groping about for "something, anything" to design), to force myself to use a certain thing for a design basis. For example, I designed a table base today by insisting that the design absolutely had to evoke an image of a butterfly. The result was a very smooth, sweeping design for the leg/base unit. I then decided that it absolutely had to be done by traditional smithing methods, that is, no hot-melt glue. All forge-welded and/or hand-drawn and collared. That influenced the design only slightly, as it opened up as many possibilities as it closed off. Now I just have to get busy and make the thing! Want to see some really nice curves and "movements" of line and form? Take a look at a calligraphy book sometime. The calligrapher's flowing, graceful curves and clever joinings of lines make good inspiration for forging. Practicing calligraphy is also a great way to teach yourself the eye-hand coordination that is so necessary to be a decent draftsman. (To be PC I should probably say "draftsperson", but I will be d@mned if I will!) Often, just practicing smooth curves with a pencil will result in a shape or two that please your eye and inspire a project based upon that shape. Nature is always a terrific source for design ideas. The much-vaunted "Golden Mean" proportion is found ad infinitum in nature. Look at the flowing lines of vines and leaves, the repetitive shapes of mountain ranges, the ripples spreading outward from a pebble tossed in a pond. They all have something to say about design. There are times when mechanical considerations become the overriding factor in a design and the creative elements have to be worked around them. This happens in designing pieces that have to move, or support something or perform a certain specific function. A fork with tines shaped like crosses might be visually interesting, but you could never get the spaghetti off it, could you? :-) Then there are the situations where building codes govern aspects of the design. The Uniform Building Code, for example, recently changed the allowable spacing for railing spindles from 6 inches maximum opening to 4 inches maximum opening. This can render a design that worked well wit the old specs completely ugly using the new specs. It doesn't do any good to snivel about it, you just have to adjust. And you DO have to know what will meet the specs. The previous is just a few of the methods I use for design. I've done a lot of different things over the years and I draw on all of them when designing. The one thing I draw on the most, is drawing. You need to be able to put on paper what you see in your mind, and that takes lots of practice. The better you can become at drawing, the better you will ultimately be as a designer. This applies to designing candlesticks or concert halls, the only difference is scale. Lastly, I don't recommend trying to copy someone else's work. It is usually frustrating and unrewarding. Look at it, see elements you like and can use, and work from there. Put something of yourself into everything you so. |
| vicopper - Wednesday, 07/10/02 23:29:20 GMT |
|
Hail all, Sorry I've been away so long, been very busy with work and taking some classes. I was wondering if anyone had a link to a site with documented medical studies on the exposure to UV and IR light that I could download and print off. I need something that I can point people to when they say "Young man I've been looking at torch flames for 20 years and never had a problem....now where are my glasses I can't seem to see them anywhere!" Thanx in advance for any info. Tim Join CSI... the view is cooler!! |
| Rooster - Wednesday, 07/10/02 23:45:17 GMT |
|
I've got 3 plans for building a new forge. All are pretty close to what Centaur Forge sells. One of my plans mentions painting with some type of heat resistant paint. Do you think this is neccessary or just leave it as it is? I bought my fire pot from Centaur, and doubt that I've got more than $30 in steel for the rest of it. Oh, it will be kept indoors, unless I end up doing a demo somewhere. |
| Bob Harasim - Thursday, 07/11/02 01:23:51 GMT |
|
Passed along from Lydia from the Longship Company and Vinland Viking Camp- Looks like a good find "Large Bronze-Age Factory Found Thought you'd be interested in this: http://ucsdnews.ucsd.edu/newsrel/soc/dlevymetalfactory.htm Lydia" |
| Bruce Blackistone (Atli) - Thursday, 07/11/02 03:10:10 GMT |
|
Tim, I don't know a great deal about UV and IR, but was talking to a couple of knowledgable chemists once, and they indicated that didymium glasses protect against something they called "sodium flare". They said that the "yellow" flame from the fire is the "sodium flare", simply defined. With that said, here is a quotation from "Van Nostrand's Scientific Encyclopedia", Fifth Edition. DIDYMIUM GLASS. Didymium glass is a special optical glass which is tinted with mixed oxides of neodymium and praseodymium to give very narrow and sharp absorption bands. One in particular falls at the wavelength of yellow sodium light, so that the glass, which is only faintly tinted to white light, is almost opaque to the yellow sodium light. |
| Frank Turley - Thursday, 07/11/02 03:40:52 GMT |
|
Now, me, with design, I am (blush, shuffle feet modestly, kick the toe tentatively) but a divine Instrument, rendering the Cosmic Urspirit as it manifests Itself through my hammer. And all like that there. |
| miles undercut - Thursday, 07/11/02 04:11:07 GMT |
|
Oops, I forgot, I smile shyly, too, when discussing design in my modest, earnest, but hushed, near-whisper. That's very, very important. |
| miles undercut - Thursday, 07/11/02 04:13:27 GMT |
|
Protective Lenses: Tim, we recently had a discussion on the subject and I did some research including purchasing an ASTM spec (which was money thrown away). Not all the sources agree however. . . I listed the URL's at the time but there is a LOT of reading and very little difinitive information. Maybe someone else can come up with better. 1) Damage from both UV and IR are cummulative over a lifetime. So you never know when you are going to reach that breaking point. Any time you see spots or feel eye strain due to bright light it is usualy an indication of some kind of damage. However, the exact exposure levels are vague and poorly defined. It seems there is a lack of hard knowledge on the subject. 2) Yes, didymium glasses ARE for sodium flare. Fine glass blowing is almost impossible without them. They ARE suitable for doing forge work but are rather expensive for that purpose. 3) One reference selling auto darkening lenses indicated that any filter lens is good enough and that after that the darkness is needed for comfort and visibility. There may be some truth to this but I think it a half truth. 
I have purchased the safety glasses shown with #2 green shades to sell for doing forge work. They are what is recommended for general foundry wear and as "flash glasses" when working around welders or under your welding hood as a backup in case you flash yourself (Note, current standards call for filter side shields that these do not have). A #2 filter is too light for brazing or welding with oxy-acetylene but for forge welding where the light is not as intense and the distance is greater these are the best that I could find. These are ANSI Z-87 safety glasses with snug fitting wire screen side shields the same as my regular safety glasses. They are much less expensive than didymium glasses. I have been wearing these in the shop while doing some brass casting and forge work and also wore them as sunglasses to get a feel for them. This past weekend I wore them while forging in near dark conditions. They filtered out the intense forge fire but did not reduce the light so much that I could not see to forge in very low light. Although I wore them as sun glasses (the amount of shade is just right), I do not recommend driving with them. They filter out almost 100% of certain reds such as on stop signs and stop lights. NOT a good idea. I wanted to field test these before we put them in the store. So far I am very happy with them. They are dark enough to make one comfortable looking into a very hot gas forge but not so dark that you cannot work with them. The color range they filter has a lot to do with this. They are the same green as #3 welding filters but not as dark. #3 filters are recommended for brazing and darker for flame cutting (the heavier the cut the darker the filter). This is very non-scientific testing. However, if you pay attention to the eye stain from bright sources and you do not feel the strain wearing a given shade then I feel it must be close to right. As I mentioned, there is very little specific science on this subject. OK --- I found the ANSI spec and ordered it. It supposedly has the recommended shades for all ranges of work. I'll report as soon as possible. . . |
| - guru - Thursday, 07/11/02 05:24:54 GMT |
|
Forge Paint: Bob, You don't need to paint it if you don't take pride in what you build or your equipment. It will rust but if kept indoors it will likely out live you. However, coal ash is very corrosive and hydroscopic. I paint forge parts with De-Rusto Barbeque Black. It is a graphite based paint. Parts that don't get hot can be painted with flat black to match. The high-temp paint chalks graphite when it gets old so it is best to use something else on the parts that don't need it. Flat black is easy to touch up. ITC manufactures a high temperature ceramic coating for metals (ITC-213) that I have been testing on gas forge parts. It has held up very well except on the stainless nozzel on the T-Rex burner I have been testing. The coating flaked off the part that got up to a bright red/orange but stayed put on the rest. I suspect the high coeficient of expansion of the stainless had something to do with it. It has held up in places where no other high-temperature paint can. |
| - guru - Thursday, 07/11/02 06:03:36 GMT |
|
Greetings Your Guruship; For some time, I was developing a shop notebook for myself, and whenever I would come upon something that looked particularly interesting in the iforge ,I would hit the "Print" button, and voila!, a reference copy would emerge. Lately, however, all I get is an icon that says " there are no pictures to print." Has something gone awry with my computator, or have things changed on your end regarding printing the demos? Regards, 3dogs |
| 3dogs - Thursday, 07/11/02 06:51:26 GMT |
|
Some years ago, I talked to the tech head of of the German factory that makes the feed-stock for most of the available didynium lenses. He was most emphatic in stating that they were inadaquate protection for exposures other than hot glass working and was quite concerned about his liability in that connection. There is published info to the contrary to be seen, but that was from the proverbial horses mouth.( a horse with a thick german accent? And I believed him?) A eyeglass rep for auto darkening lenses told me that they took out most of the ultra violet and infra-red,confirming what the good Guru heard, but he was selling them. |
| - Pete F - Thursday, 07/11/02 08:11:06 GMT |
|
Guru, could you point me toward a source for the material that has been talked about here used to coat the insides of gas forges? I cannot remember exactly what it is called, something like TC-100....the soft refractory in my Whisper Baby, on the back wall under the rear port is taking some serious abuse and I can forsee the need to make modifications there. Thanks. |
| quenchcrack - Thursday, 07/11/02 12:26:35 GMT |
|
quench, You are looking for ITC-100. |
| Ralph - Thursday, 07/11/02 13:37:51 GMT |
|
Hi, I'm just starting in blacksmithing. I'm 15 years old, and I was wondering, how many pounds of hammer should I be swinging? Thanks... Chance. |
| cmills - Thursday, 07/11/02 13:52:31 GMT |
|
Hammer Weight: Cmills, The weight of the hammer you use depends on your size, strength and skill with a hammer. Currently most smithing hammers are sold in metric weights, normaly in grams. In the past hammers were sold in ounces or pounds and fractions there of. When you first start out you should be using a relatively light hammer. My first hammer was a 28oz (800g) or 1-3/4 pound hammer. This is still a popular size. Later I bought a 4 pound hammer because that is what was recommended in many blacksmithing books. It was WAY too heavy for me at the time. I could only swing it a few strokes and accuracy was impossible. And this was from someone that had been using hammers since he was very young. I eventualy gave away that hammer. But I knew my old worn 28oz. hammer was too small. So I bought a 2-1/4 pound (1000g) and a 3 pound (1400g) hammer. I used the smaller of the two for about six months and then moved to the larger hammer which I used for many years. I tried the 4 pound (1800g) hammer when I was at my strongest and it was still much too heavy and cludge like. That is when I gave it away. After many years of sitting behind a desk and using a keyboard more than a hammer I am back to using my old worn out 28oz (800g) hammer. When I have heavy work to do I will pick up a heavier hammer but put it back down as soon as I can. Recently I bought a box of mason's tools and in it there was a short handled 8 pound sledge. We found it very useful doing heavy work but only for one or two heats. Recently I worked with a group of Boy Scouts, a few younger than yourself. I bought an 800g and two 600g hammers for them to use. Most prefered the 800g hammer, but with practice, swinging faster they should have been using the 600g (1.3 pounds or 19-20 oz.) hammer. More recently I worked with a very young small fellow of maybe 10-12 years old. The 600g hammer was still a little heavy for him. Carpenters hammers (NEVER use on for smithing) are sold in weights from 16oz to 24oz. You tire very quickly swinging too large a hammer so they come in different sizes even though the task is roughly the same. In smithing, accuracy is more important to develop than power. Increased power comes from daily work that increases your strength and speed. It is frustrating at first when the steel does not move as fast as you think it should. But that takes time to develop. Remember while practicing your accuracy, that speed increases power. Raise that hammer high and practice hitting accurately with hard fast blows. It is physicaly much easier than driving (pushing) a large heavy hammer, but it takes more skill. |
| - guru - Thursday, 07/11/02 16:18:49 GMT |
|
Chance you want a hammer that is the heaviest you can use for extended ammounts of time with precision and control. You will probably want a range of hammers from a couple of pounds to 5 or 6 pounds; but not expect to use the heavier ones much until your skill and muscles build up. Far worse to use a too heavy to control hammer than a too light hammer---the light hammer will just take longer to do stuff. The out of control hammer will ruin your work and damage *you* and your tools. Thomas |
| - Thomas Powers - Thursday, 07/11/02 16:22:27 GMT |
|
Ralph, thanks, where do I go to get this stuff? Is it expensive? Is it the right stuff to use? |
| quenchcrack - Thursday, 07/11/02 16:39:33 GMT |
|
Cmills, I would also suggest you check out the tutorial on iForge called "hammer control". The weight of the hammer is certainly important as is the height of your anvil, how you hold the hammer, etc. Check it out. |
| quenchcrack - Thursday, 07/11/02 16:54:15 GMT |
|
I would like to introduce the latest inductee to the ironworking frenzy, my nephew, Chance Mills of Florida. Currently he doesn't have anything for equipment or a place to put it. I will be assisting him as much as I can from 1500 miles away. Any suggestions on how to set up a smithy in a shoe box? Plans for the microforge will be of some use to start with but other suggestions for micro smithies would be helpful. Good to see you posting Chance, I'll be in touch via email. |
| - Mills - Thursday, 07/11/02 17:00:36 GMT |
|
QC, Yes, it's the right stuff to use. Gives the Kaowool liner a tougher surface, and actually increases the heat index. Talk to the Guru, he's going to be carrying it in the anvilfire store. |
| Paw Paw Wilson - Thursday, 07/11/02 17:02:42 GMT |
|
cmills, double the weight of the hammer and the force doubles. double the speed of the hammer and the force quadruples which brings up the subject of quadrefoils.... Thanks for the references, Paw Paw and Alan-L, but I don't have either book. I have seen F. Whitakers method of doubling back but that is very limited to a certain kind of finial. the q-foils in Jack Andrews book especially by Yellin sometimes involve three peice welds. The difficulty I was imagining was getting the forth weld that would have to be in the middle of the work hot enough without burning up the rest of the peice and then figuring out how to hit it since it is inside the rest of the surrounding work. Since this is basically four "c" scrolls welded together on their ends, I am wondering if one of the "C"s is cut in the middle and represents the fifth and last weld. Anyway, there does not seem to be very many people who are comfortable enough with this technique to wax as eloquently on it as they do on something like angle grinders or spiral stair-rails. It's a pity since this form is so vital in the vocabulary traditional blacksmithing. Sorry, if I reiterate on this iterating item in an irritating fashion. Larry |
| L. Sundstrom - Thursday, 07/11/02 17:03:13 GMT |
|
Mills, There are pictures of the bean can forge on Anvilfire news. |
| Paw Paw Wilson - Thursday, 07/11/02 17:03:41 GMT |
|
ITC-100 QC, We are setting up to sell it here and I have the inventory. I just have not had time to setup the zone charts for shipping in our new shopping cart. ITC Products Drop me a note with your ZIP code and I will get back to you on shipping. Please note that the cart is only setup for testing at this point. Recently I have been using ITC-100 on several crucible furnaces. It is excellent glue for laminating and holding Kaowool in place. It also bonds and hardens soft refractory surfaces. On a small furnace I lined the vent with ITC-100 to clean up the cobbled surface of the Kaowool. It made a hard durable surface. Note however that it is not an fix-all for Kaowool surfaces. It DOES make a durable surface but you have to consider that it is like a creame filled cookie with the Kaowool being the creame. You can still crack it or poke holes in it. I have not yet lined my NC-TOOL forge with ITC-100 but it looks to me that is would be easiest to remove the bottom to get access to the surfaces you want to coat. On the door leave the "seal" area uncoated as this acts as a gasket. For small areas I do not thin the ITC-100 in a seperate container. I have been using a short stiff artist's brush (similar to a glue brush) and have been adding very small quantities of water and working the ITC-100 into a slurry with the brush in the original container. This method of thinning with the brush is a common artists technique. It is slow but you do not waste material by putting it in a seperate container and risking over thinning it. Recently I have had several folks report problems with mice and birds chewing up the kaowool lining in uncoated forges to build nests. This is a disaster and it is well worth the cost of a jaw of ITC-100 to prevent needing to completely reline your forge! |
| - guru - Thursday, 07/11/02 17:07:24 GMT |
|
Hello, it's been a while. Looks like things are humming along nicely. Does anyone have a suggestion on a good alloy of stainless steel for a custom pickup exhaust system that will be hot bent? Thanks. |
| Stormcrow - Thursday, 07/11/02 18:21:37 GMT |
|
QC, not sure of the cost from the guru, but I bought a pint a few years back from a fellow back east. Cost 25 dollars plus shipping..... |
| Ralph - Thursday, 07/11/02 18:57:19 GMT |
|
Mills, First you get some balsa wood and carve a small anvil. Paint it black. Get some baling wire and fashon some small tongs. Make a small paper man. Paint appropriately. Place in shoe box..... easy.... Sorry I could not resist. All my hand tools currently fit into a small bag.(US Army surplus) It is about 24 in long. If you go with the small bean can forge that and most hand tools can fit into a milk crate. Add a small 50 -70 lb anvil and a hand cart for mobility and you have an instant portable shop... |
| Ralph - Thursday, 07/11/02 19:01:35 GMT |
|
hammer weight: It's an easy mistake for a novice to progress too fast with hammer weights. Muscles develop fairly quickly but the tendons and ligaments take much longer. If you dont give them time to catch up with your strength, you can injure them and that takes a LONG time to heal. Best to be patient and progress slowly. |
| adam - Thursday, 07/11/02 20:43:34 GMT |
|
Are any of you guys in the canton, OH area? I moved to this area a few months ago and have not made too many contacts here yet. I know there is an ABANA chapter in the area (my boss is a member) but I've been to busy to make it to the meetings so far. If you are near by, I'd apprciate the chance to meet you. Patrick |
| patrick nowak - Thursday, 07/11/02 21:15:11 GMT |
|
I have an old wood burning stove and would like to know if and how I can make a coal burning forge out of it? I will be making swords and plate mail armor with it. |
| Bart - Thursday, 07/11/02 21:53:05 GMT |
|
I have an anvil with very heavey rust scale, it chips off in your hands. What is the best way to clean this thing up while not eliminating or obscuring any marking or name under the scale? Is their some way to bring out cast or punched letters in such heavey scale? This is a 140lbs, old english style anvil (I think) with a visible 1.5 inch "P" on one side, has triangular profiled feet striaght across the top, the horn is sharp as it meets the body, it has a hardie and a pritchel and a 1/2- 3/8 inch face plate, smooth underneath with three handling holes. This thing was holding down a floating dock until they drained the pond. 24 oz hammer rebounds with a nice ring when the face is struck. Any info or healp is appreciated. Tom |
| thomas - Thursday, 07/11/02 21:56:45 GMT |
|
Wood Stove Bart, You are best off doing something else. A wood stove and a forge are two entirely different things. Old wood stoves have many relatively thin cast iron plates that cannot withstand the heat of a forge fire. See the current anvilfire news and the Japanese smiths. They use a very simple forge built of brick that is side blown. It does not need to be on the ground. The first of these I saw was in a short film about a polyanesian blade smith. His was elevated to a convienient stand up working height. It is a very simple design and seems to perform well. I recommend it to all would be bladesmiths. Throw a grate on top of this one and you can cook on it too! |
| - guru - Thursday, 07/11/02 23:16:10 GMT |
|
Very rusted anvil: Tom, Hummmmm. . . many cheap anvils or ASO's (Anvil shaped objects) are only good for anchors but this is the first time I've heard of a good anvil being used as an anchor. First, WEAR SAFETY GLASSES with side shields. Flaking rust is nasty stuff and if you get it in your eyes it can become embedded. A power wire brush on an angle grinder (or sander polisher) would be best. But a manual wire brush will do with a little more effort. After the loose rust is removed then apply Naval Jelly rust remover. Do this outdoors in the shade. You do not want it to dry. After soaking for several hours scrub with a brush and let soak some more. Then rinse and scrub off the remaining Naval Jelly. It doesn't hurt to rinse with some baking soda since the rust remover is an acid. Derust all surfaces including the bottom. Let the anvil dry and then give is a coat of black (spray) paint. Yep, this seems early but the metal is clean now. THEN, you will need to carefully grind the face smooth with an angle grinder. Finish with a belt sander and a coarse belt. When attacking heavy rust I use water on the surface with the belt sander. This cools the belt and make is last longer. Be sure the belt grinder is well grounded and your feet are dry and you are wearing rubber soled shoes. Belt grinders are not particularly designed to use wet. If the sides of your anvil are rough near the face (about the last 1/2" to 1") then grind that lightly also. The face of your anvil does not need to be perfect even though many will tell you so. A few pits will not hurt your work. Many will work out with use. Radius any chipped corners to keep then from chipping further or maring your work. Anvil corners DO NOT need to be sharp and they are actually detrimental to your work and your tools. It is easier to dress the horn than the face. Be sure to keep rolling your tools (grinder, belt sander) on the horn. Many old anvils have a soft horn and you can work it with a file. The tip of the horn does not need to be sharp. Normaly they have a 1/2" diameter flat on the end. This is much easier on your hip if you bump into the anvil! Often the tip of the horn is abused and is mushroomed. This should be ground off (the sides) and reshaped. But not to a sharp point. When you are finished you may want to wipe off the anvil and repaint before oiling. Everything is painted except the top. The horn is often painted to about half way up or a little less. Oil the bare parts with light oil and reoil when not in use. Anvils used every day do not need to be oiled as the use keeps the rust off. But unless you are a full time smith a little oil can prevent a lot of work later. . . This sounds like a lot of work but anvils are expensive ($7-$8/lb new) and valuable tools. They are not just a lump of iron but hardened and tempered tool steel with a shape that have taken thousands of years to develop. Anvils often last for generations of users and should be treated like something your great grand child may one day value. |
| - guru - Thursday, 07/11/02 23:45:01 GMT |
|
Hello, I'm wondering about how ironwork is made to a radius.(railings, fence, etc.) Is the frame bent and then the work is made to fit? Or is it necessary to have a large form to use? |
| - Kevin - Thursday, 07/11/02 23:54:56 GMT |
|
Stormcrow, most automotive exhausts are made from a ferritic stainless in the 409 or 409L class. This is magnetic at room temperature. However, so are the martensitic grades like 420 or 440 so your magnet is not the best decision maker in a junk yard. Better to buy it from a retailer and know what you are getting. |
| Quenchcrack - Friday, 07/12/02 00:23:28 GMT |
|
Guru, I am in area 75604. Since it is normal to lay the workpiece on the hearth with the end sticking out the front port, I wonder why the area right under the rear port is not a hard refractory like the hearth? I am forever poking the back wall trying to get things in and out of the forge. Well, I would rather fix this sooner than later. Thanks for the info. |
| Quenchcrack - Friday, 07/12/02 00:31:02 GMT |
|
I saw the reference to the bean can forge, but don't know where to find that in the news. Can someone point to which page it is on? Thanks. |
| Bob Harasim - Friday, 07/12/02 01:33:27 GMT |
|
CMills..In what part of Florida are you located? There are FABA regional chapters in the NE, NW, SE and SW. There is probably someone near you who would be glad to help. I am in north east Fla, near Jacksonville. Check out the FABA link on ABANA's Chapter page. Or go to www.blacksmithing.org. The annual conference is Oct 11th, 12th and 13th at the Pioneer Village in Barberville..about 20 miles west of Daytona. Lots of tools, a few anvils , forges and such. They also offer beginning and intermediate blacksmithing during the conference. If you come to Amelia Island you'll be welcome in my shop most anytime. |
| R Guess - Friday, 07/12/02 03:03:57 GMT |
|
SPAM: I just got spammed again by AnYang of China for the umpteenth time (see Volume 26 of the NEWS). They are now using a US based Chinese mail host in Sunnyvale, California called sina.com. Mail to "abuse @" bounced. Send your complaints to noc@STAFF.SINA.COM |
| - guru - Friday, 07/12/02 03:50:45 GMT |
|
Bean Can Forge We never covered that one and the original page was nowhere to be found the last time I looked. It was a 10oz. bean can with a layer of 1" Kaowool and a propane torch stuffed into a hole in the side toward the back. Big enough to heat short lengths of 1/4" stock. However, we do have an article on a "micro forge" linked to the burner plans article on our plans page. It is similar. |
| - guru - Friday, 07/12/02 03:55:44 GMT |
|
Curved Fence, Railings and Screens: Kevin, This is done several ways depending on the radius and the size of the work. Normally the horizontal pieces are bent to the curve, then holes for pickets are punched or drilled. In a large radius if the pickets have a wide decorative element they don't need to be curved. However, on a tight radius the wide elements might need to be curved. Most blacksmiths would do this by eye in a swage block or between supports. An unskilled fabricator might need a form. If the item has long diagonal elements or scroll elements going around the curve they would need to be matched to the curve. A diagonal line on a cylinder is an oval. Most smiths would bend this by eye checking it in place sighting down the assembly on a vertical axis. In the case of a curved stairway this is tricky and some type of guide might want to be built if more than one railing is being made in the same curve. Again, a lot depends on the skill of the worker. Forms or quides can be made for this type work in a number of ways. A shop with a set of plate rolls might roll a piece of 1/4" plate for a form. I have seen this done for large expensive jobs with multiple pinces. A much more economical method is to roll or bend bar stock to the needed curve and weld up a grid with vertical and horizontal members. Fixturing points can be attached to this grid and curves can be adjusted to it as well as using it to hold the work in place during assembly. Fixturing is part of the craft and this type of make shift frame has been made using an arc welder and odd stock for the quick and dirty by almost every major smith in the past century including Samuel Yellin. Curves are great. They increase the price of the job! |
| - guru - Friday, 07/12/02 04:20:45 GMT |
|
I just had a one hour training session this week in using the tools in a small blacksmiths shop at a boy scout camp. The idea was to give me enough info to teach the scouts some very basic things about blacksmithing. I made a very simple poker (bent at the end, round handle at top with a twist in the middle)using a few different tools. I am just looking for anything on this web site that explains the very basics. I think I can remember all the steps we used and all the tools we used but I don't think I remember all the names of the tools and would also just like written reinforcement of what I did but the guy doing the training didn't have any. I am concerned that by the time I get to take the boys to the shop it will be very fuzzy to me. Is there anywhere on this site that gives very basic beginning instructions and intro to the art of blacksmithing? Or another site that might? I saw what looked like an excellent book for beginners on blacksmithing but I didn't really want to spend $25 on a book because we will probably never get into it enough to spend the money. Any suggestions? Thanks for any help you can give me. |
| Chris - Friday, 07/12/02 04:52:50 GMT |
|
Chris, Because there ARE so many good books on the basics we have avoided them here. We are slowly getting around to them though. One hour is much too short a time to be instructed in blacksmithing. Just covering the safety rules and do and don't could easily eat up an hour. I spent 6 hours with a group of Boy Scouts and barely got through making a an S-hook and a tent stake with them. We have 140 "demos" on our iForge page. One covers hammer control and posture (There goes 1/2 hour). Some cover some very basic projects and I have labeled several as being suitable for Boy Scouts and meeting the merit badge project requirements. Several also cover tools and basic techniques. See our getting started article and book review page for books. If you really don't want to get into it then I recommend you don't. There are at least 10,000 blacksmiths (hobby and proffesional) in the US and most would be glad to work with your scouts. Most will have libraries with hundreds of dollars worth of blacksmithing books at a minimum and others many thousands of dollars worth covering everything from the history of metalwork, antique ironwork, artistic ironwork, blacksmithing and metalurgy. They are knowledgable in the subject and interested in sharing the information. Most do it because they LOVE it, not because they have to. |
| - guru - Friday, 07/12/02 05:12:37 GMT |
|
Printing iForge Demos: 3dogs, It sounds like a browser problem to me (your end). However, our older iForge demos all currently have code that forces them into a frameset with banner. For some reason this effects Netscape 4.0 but not IE. The most recent demos do not have this code. Bill Epps Returns: Starting in August Bill Epps will be back doing weekly iForge demos again. However, the NEW demos will only be accessable by CSI members. He figures that if they aren't worth a dollar each to you then you don't deserve them. We will still have free iForge demos but not at the rate we have been having them. |
| - guru - Friday, 07/12/02 05:24:52 GMT |
|
Guru, I checked out the Anyang Powerhammer site. While my tongs don't look much better than theirs, I don't sell mine either. I was impressed by the ASO, however. Must be what they use to make those tongs on! |
| quenchcrack - Friday, 07/12/02 12:29:53 GMT |
|
If you want to preserve as much as possible on your rusty anvil I would suggest electrolytic de-rusting, this is a DIY thing at home with a battery charger a tub of water some washing soda and a chunk of stainless. There are several good websites out there that cover this probably under electrolytic rust removal. (It's what museums use, BTW) Thomas |
| - Thomas Powers - Friday, 07/12/02 13:31:53 GMT |
|
AnYang SPAM: Well, I finally got their attention and recieved an appology and promise to stop spamming. Such is the power of the press. Or maybe their Chinese speaking American friend at sina.com explained SPAM to them. AnYang has promised to stop SPAMing. . . . So here I promise you we will never use this sale method and we will never send the sale letter to you and other USA customer.They claimed to remove anyone that asked to be removed from their list. However, they had not done so in over a year with any of the 7 addresses they were sending SPAM to me. I suspect they really have removed ME from the list now. So, if any of you reading this get further SPAM from AnYang AKA Chinahammers, please let me know or forward me a copy. I'll believe it when they really quit. |
| - guru - Friday, 07/12/02 14:21:15 GMT |
|
Bob, regarding the 1-brick micro forge, I built one of these and it works extremely well for stuff up to about 1/4". If you make one, remember to keep the tip of your propane torch about 1/8" OUTSIDE of the brick. If you put it inside, you will quickly melt the tip of the burner off. |
| quenchcrack - Friday, 07/12/02 16:41:05 GMT |
|
Ferritic Stainless: I have a nice chunk of stuff that looks like it might be such a blend, according to my machy's handbook. I'm looking for heat treat info on it. The tag says HR 416 Ann AMS 5610. At first I thought it was some nice 5160 or 6150 related stuff. Real easy to get dyslexic on the classifications~ The handbook says 51416 is a free machining blend. Means lead, right? |
| - Steve Howell - Friday, 07/12/02 16:54:45 GMT |
|
Free machining sometimes means lead but can also be sulfur. Certain steels are what is known as "sulphurized". 416 SS is listed as a Martensitic SS. Not recommended for forging where there are large deformations, the addition of sulfur or selenium for machinability cause red shortness. It can be process or isothermal annealed. Process - heat to 1200-1400 F in a salt bath or inert atmosphere, time dependent on section thickenss. Air cool. 86 - 92 HRB. Isothermal - heat to 1525-1625F, cool slowly to 1325F, hold for 2 hours. ~85 HRB Full Anneal - heat to 1525 - 1625 F in bath, inert gas or vacuume. Cool slowly at a rate no faster than 30-40F/hr. down to 1100 F. 75-85 HRB. To Harden, In a protective atmosphere, preheat to 1400-1450 long enough to equalize, Austentize at 1700-1850F 30 to 60 minutes for sections up to 1/2". Add 30 min per each additional inch or fraction thereof. Martempering in hot oil or or salt is suitable because of high hardenability. 375-415 HB. Temper at 400 to 700F. Cryogenic treatment is benificial at -105 to -320 F followed by tempering again. Heat Treaters Guide, Standard Practices and Procedures for Steel, AS |
| - guru - Friday, 07/12/02 18:16:27 GMT |
|
Paw-Paw Wilson, I have just finished reading your work to date on "The Revolutionary Blacksmith" I want to thank you, both for the tale of life, but also the time you spent on this... Thank You Mike Kruzan |
| Mike Kruzan - Saturday, 07/13/02 04:21:15 GMT |
|
RE Anyang Hammers. As a purchaser i found Anyang will try hard to tell you what you want to hear..but that's all I got from them..thus far anyway, and it's been a while. |
| - Pete F - Saturday, 07/13/02 08:28:37 GMT |
|
G'Day bloke's , Just brought a RAPID B SYDNEY hand crank blower , any 1 know anything about them ? Talked the bloke down from $120 AUS to $55 AUS . It's a little noisey in the gear's , hopin' some TLC & oil will fix that . Any info would be great chopper ( AKA ) Dale Russell |
| chopper - Saturday, 07/13/02 08:42:52 GMT |
|
Mike K., Thank you! I'm glad you're enjoying it. |
| Paw Paw Wilson - Saturday, 07/13/02 13:10:47 GMT |
|
I am about to purchase a welding machine for welding wrought iron components and similar metals. This is for decorative, ornamental, art design. I have looked at every type of machine available and I am still not certain exactly which machine is the right one for my use. What do you suggest? |
| Daisy - Saturday, 07/13/02 15:27:44 GMT |
|
R guess, sorry that I haven't replied yet. I'm going to summer school and that takes up very much of my time. Thanks for the offer, but I live in Miami (way down south) and if I ever did get the chance to visit it would be a rare occasion. I have review the calendar of events for FABA, but they are all far away and I have no way of getting there and staying the night in a hotel there or something as I am not 18 or older. That is nice of you to offer though. Thanks... Chance. |
| cmills - Saturday, 07/13/02 22:14:11 GMT |
|
Guru and friends, Where should I look for pictures, descriptions, or diagrams of "pioneer" forges? I'm particularly interested in the forges that were used on the Oregon and Mormon trails in the 1840's and 50's. I have guessed that they used clay or soil lined wooden boxes and water cooled side-draft tuyers. I'd like to find some idea of the dimensions, and I'd like to be able to back my guesses up with reputable documentation. Any suggestions? Thanks. |
| - IronRoads - Saturday, 07/13/02 23:05:37 GMT |
|
Old, Forges: Ironroads, Water cooled tuyeres were experimented with in the nineteenth century in the US but never became popular. They are problematic in cold climates where they freeze and break in the winter. The only place they have been popular is Great Britian and a few of the British colonies. The Pacific Northwest is too cold for this device except in very well established (read big city) smithys that were heated. In the early 1800's double chambered great bellows were the rule. Forges were typicaly side draft with a simple opening in either masonry (in a permanent forge) or clay in a less permanent forge. See my description of an early primitive forge in "The Blacksmith of 1776" on our story page. Forges of this description have been in use for thousands of years and are still commonly built. In some cultures a "shield stone" of soap stone or other refractory rock was used that had a hole in it for the bellows to blow through. The bellows nozzel was not attached to the forge or shield stone. It was seperated and blew air at the hole an into the forge. This was to protect the bellows and its nozzel which was commonly made of hardened raw hide. |
| - guru - Saturday, 07/13/02 23:29:21 GMT |
|
Guru and associates, Hi everyone. I recently went to the Quiet Waters Renissance Faire in Boca Rator, Florida and actually saw blacksmithing first hand for the first time. Ive posted here before but I think it was something like 5 months ago heh. Im looking for a swordsmith or a blacksmith who lives around Boca Raton who wouldnt mind instructing me about blacksmithing. Im 16 years old and I live in Coconut Creek, FL (about 5 mins away from Boca Raton) Thanks a lot everyone, Charlie |
| Ziggyz0m - Saturday, 07/13/02 23:30:43 GMT |
|
Guru, Thanks for the info about wooden forges. Good stuff. |
| - IronRoads - Sunday, 07/14/02 00:14:38 GMT |
|
Arc Welder: Daisy, it depends on how much welding you will have in your work and your buget. "wrought iron and similar metals" had better all be all mild steel and a little ductile iron. True wrought does not like to be arc welded and other metals require other methods as well as machinery. For the shop that does traditional work and only occasionaly uses arc welding in their work and for building fixtures a "buzz box" or AC transformer welder is all you will ever need. These are inexpensive and very durable. My little Miller 225 is over 30 years old and has been treated poorly (been in floods, high humidity, seen heavy use) and still works perfectly. The old red Lincoln "tombstone" welders are similarly durable. And these are the two I recommend. They both require a 240VAC outlet with up to a 90A breaker. These machines can safely be purchased used. If you are a fabricator and assemble all your work via arc welding then a MIG machine (wire fed sheilded arc) is the only way to go. MIG is fast and clean. There is no slag or flux to clean up. This is a major consideration on any large weldment. However, MIG machines can be expensive. You DO NOT want an off brand odd ball MIG machine. Generally you want a new Miller or Lincoln. I have an Airco that was orphaned when it was less than two years old. . . Now I scrounge parts for it at Radio Shack and my electrical supplier. Buy your welder from an established dealer. With your MIG machine you will need a leased Argon/Co2 cylinder and regulator. Most commercial duty MIG machines are modular. The power supply (transformer and rectifier) is a seperate unit and the wire feed and cable assembly a seperate unit. This must work together but on good equipment one can be replaced seperatedly from the other. Generaly power supplies have a VERY long life but the wire feed and related controls are not so durable. Most good sized MIG power supplies also have taps for standard AC and DC welding and may also supply power to a TIG unit for welding aluminium, stainless and odd alloys. Talk to your welding supplier about your needs and see what they reccomend. Go to other welding shops and ask who is a good supplier. When you purchase an expensive high-tech machine you will need consumables as well as support. So a good supplier is worth cultivating a relationship with. These units come without wheels or a cart. These are optional items. You will need to decide if it is going to be parked in one spot or if you will need to move it from place to place in your shop. If so, you will need to spend the extra bucks on a cart (highly recommended). |
| - guru - Sunday, 07/14/02 00:15:04 GMT |
|
You don't NEED to lease a gas cylinder for a wire fed machine. You CAN get the inner sheild wire, and use it. I'm told that you are able to get "hotter" with the inner sheild wire, but that it splatters at least twice as much. Splatter = pain in the rear to clean up. I get more than I care for with the gas cylinder. Also consider the size of your work. I use a little 125 amp lincoln for my stuff. I'm welding mostly sheet and it works great for 16-12 gauge steel (it works fine for lighter gauge sheet too, it's me that doesn't do so well with 22 gauge). I can't get a deep penetrating weld in say... 1/2 inch plate. On bar stock I can trust it to weld up to about 1/4th inch and that will hold up to heavy beating... I can make 1/2 inch bar stick... but I'm not getting a penetrating weld that I really trust to take a lot of abuse, and certainly not in a single pass. If you're doing really heavy stuff, you'd want something with a little more power than I have. I'll echo Guru's coment about cultivating a relationship with your supllier. Find a good one, and make them friends. I'll also echo the recomendation for a cart. I leave mine in one spot 99% of the time. It's nice that it has wheels, so I can move it to sweep. It's also been worth every penny for those rare occasions when I DID need it somewhere else. |
| mattmaus - Sunday, 07/14/02 03:49:32 GMT |
|
Wendy; To further confuse the issue; The Guru is right on as usual...the machine you get depends on your ambition and your budget. Not mentioned yet is the oxy-acet torch. The cost is about that of a dinky MIG machine but it is superior for cutting steel on a budget and extremely handy for heating small areas of work ( an important function). With practice, it will weld most metals over a wide range of sizes. It is the approach most complementary to blacksmithing. It does require more practice than the other methods but will do more things. A simple 180+ amp" buzz box" is the most enduring, versitile and economical choice by far. The cost of the machine and the rods is much less. Because of the choices in different welding rods, it will do many kinds of tricks. It does take a bit longer to learn to use than MIG and the slag has to be chipped from the welds each time. RE a cart. Once you have the welder, you can make your own cart quite nicely...and lots of other handy things too! A last note...do not admit that you have a welder to any purist blacksmith... sure loss of face. |
| - Pete F - Sunday, 07/14/02 06:30:59 GMT |
|
New Propane Cylinders: There has been some talk floating about that they may have restrictions in the valve and cannot deliver gas fast enough for some home built forges that need high pressure and flow. If you have good evidence of this I would like to know. The cure should be to open up the burner orifice so that it does not need as high a pressure to operate. I have found that a well designed burner like the T-Rex will operate on VERY low pressure compared to other burners. Later today I will fire up my Whisper Baby and compare how it operates on the same regulator as I have been runing the T-Rex. Pressure gauges are notoriously inacurate. Good ones state an error of 3% of full scale. On a 50 PSI gauge that means 1.5p PSI error at the bottom end. But the physics of gauge design make a 10:1 ratio VERY difficult and on a 50 PSI gauge anything below 5 psi is suspect. Many gauges have a closer to 10% error. Since many propane forges operate at pressures from 4 to 8 PSI this makes accurate comparisons difficult. On my big forge I have a pressure problem (as well as flow) because the solenoid valve I chose has an 0.050" orifice. This is not the discharge but an in-line valve. The result is that I have to run at 25 PSI. However, using a valve with a 0.10" orifice that could drop to 6 PSI or less. At the time I was looking at price rather than design considerations. . . the bigger valse cost three times as much. Welders: The question about welder selection said "arc". But Pete is right, you need oxy-acetylene AND an arc welder. In the small general shop the gas equipment is generaly more important because of its flexibility. But in a new fabrication shop where you should have a saw or ironworker to cut stock you could conceivably do without gas welding equipment for some time. But I do not recommend it. The BIG THREE items in a steel fabrication shop are the oxy-acetylene outfit, the arc welder and the angle grinder. There is no more efficient method of cutting heavy or large pieces of steel (affordable to the small shop) than oxy-fuel. There is no more efficient method of sticking two pieces together than an arc welder. And to clean up after both you need an angle grinder. In the modern shop these are equivalent to forge, anvil and hammer in basic necessity. |
| - guru - Sunday, 07/14/02 15:36:05 GMT |
|
How is the best way and temp to forge s-1 steel |
| Lester Beckman - Sunday, 07/14/02 16:27:05 GMT |
|
I have a spiffy new NC Tool forge on order. Going to be using propane to fuel it. I'm a little concerned about carbon monoxide. Several sources have given me different answers. Propane forges produce very little CO or else I hear that propane forges produce tons of it. Personaly I really don't care much about how much it puts out, as long as I don't kill myself with it. In the summer when it's nice, I don't forsee a problem, throw open the garage doors and let the breeze sweep it away and supply me with fresh air. I still want to be able to tinker in the winter time though. My garage is insulated pretty well, and I'm pretty sure that the forge will be able to keep me warm enough to play in the winter. That leads me to some ventilation concerns tho. My original "winter" plan was to open the garage door part way, and park a couple fans under it. It's been sugested to me that my fans should be up above, rather than down below. My questions come down to: Where do I want to locate my fans, it'll be easier to leave them on the floor, but I really don't have a problem cutting a hole in the wall and mounting some there either (with everything that I do, and everything my father uses in our shared shop adding some more ventilation isn't going to hurt a bit). Is carbon monoxide more or less dense than "fresh air". and when I mount my fans should they be intake (sucking clean air in)or exaust (pushing CO, paint vapor, welding fumes, etc. out)? |
| mattmaus - Sunday, 07/14/02 16:39:14 GMT |
|
Fans: Mattmaus, In small buildings not designed for forced ventilation this is always a problem. In the old days (I was still in my teens) when I was spray painting cars in an old carriage house we put box fans in the two front windows and furnace filters in the two back back windows. It was NOT very good ventilation but it did keep us from killing ourselves. People that have tested gas forges vs. coal forges report less CO from gas than from coal in the same shop. A smouldering coal fire runs hot enough to crank out a lot of CO when there is not enough draft for the chiminey to work properly. Hot exhaust gases collect near the ceiling no matter what the gas because the density differences are smaller than that caused by being hot. So a high vent is probably best for a gas forge. In a closed shop a gas forge should be vented outside. a small hood and stove pipe will do. Many folks set their gas forge in the bed of a coal forge where there was a hood. In the case of a gas forge you can install a sheet metal plate in place of a window and put a stove pipe penetration there. This used to be a common method of installing wood or oil heaters. However, the exhaust on both of these is hot enough that they should have a triple wall penetration flange as is now required by code in most places. A garage with no other door than the front may still have ventilation problems even with the door fully opened. In the event of a very slight breeze or air movement so slight that you cannot detect it toward the door, exhaust gases will build up in the confined space. This phenonenom has been known to kill people when the exhaust from a furnace is trapped in a temperature inversion and then moves into neighboring building. Stagnant air can be a killer. In my shop I installed a three foot soffit fan and have an opening in front of it over the forge area. The fan ventilates both the shop and the attic. If your garage has a finished ceiling you may want to consider installing a ceiling fan to blow air into the attic pace and then out the soffit vents. Most of these are two speed and you can run it on slow in the winter and fast in the summer. |
| - guru - Sunday, 07/14/02 17:44:40 GMT |
|
My husband bought this weird thing home from a yard sale. He said it was a blower for a blacksmith. It stands on a cool tripod thing and it has a hand crank. When you crank it, air blows out the bottom side. It is stamped Buffalo Forge, Co. Climax. What the heck is it? What should I do with it? I was going to stick it in my flower garden, but I thought I should check on it first. Thanks. Patrice |
| Patrice Curtiss - Sunday, 07/14/02 23:49:24 GMT |
|
I got to studying Bill Epps tutorial on making a small key-ring anvil in the iForge section. I wondered if I could make one smaller than that. So, how about it Guru? A contest to forge the worlds smallest anvil? The one I made today is 1.4" long from the tip of the horn to the end of the face and .75" tall. Anyone made one smaller? |
| Quenchcrack - Monday, 07/15/02 00:09:47 GMT |
|
Guru, I may have to disagree on the PNW being too cold for a water cooled tuyere. Depends on where in the PNW you are. We have one that is now almost 5 years old in the shop at Fort Vancouver NHS. NEver been a problem. NOw in the colder areas possibly. But if you use some anit-freeze in it no problem. Ironroad, I would imagine that the variety of forges was only limited to the smith and what he had at hand. I have made and used and have seen wood box forges. Lined with clay and dirt. they were not water cooled but they could be. I will do a bit of asking and see if I can also come up with historical info as well. |
| Ralph - Monday, 07/15/02 00:48:55 GMT |
|
QC, Now does this have to be forged? I ask because I have 'made' and anvil once that was about .8 micrometers long... of course it is now on a computer chip.... you could say it was a 'signature'... (grin) |
| Ralph - Monday, 07/15/02 00:55:10 GMT |
|
Blower: Patrice, if it runs fairly smooth there are a ton of blacksmiths that will probably double or triple what your husband paid for it. A hand crank blower replaced the bellows on a blacksmiths forge. They are no longer made so the demand is fairly high. |
| - guru - Monday, 07/15/02 01:04:49 GMT |
|
Ralph, antifreeze in the 1840's. . ? Mini-anvils I've seen them forged in the end of a 1/2" square bar. I haven't made mini-anvils but I forged 1/2" horseshoes from 1/16" rod with fullered grooves and bent caulks to go with an apple head blacksmith figure. I also made a ball pien and a cross pien hammer for the same. The shoes were hot forged but the hammers were made with a file and the eye drilled. Both hammers used wooden match sticks for handles. One of the smiths in our local group (CVBG) makes tiny tools. Your anvil over 1" is huge. But very small ones could be forged. The one on my anvil touchmark is only 1/4" long and it was mostly forged. All I would have had to do is slice it off the end of the bar. I was using a coal forge when I made the 1/2" horseshoes and the touchmark punch. Such small things easily get lost in the fire. . . |
| - guru - Monday, 07/15/02 02:37:18 GMT |
|
Wendy-- AutoZone sells a Haynes Techbook entitled Welding Manual basics of Gas, arc, MIG, TIG, and plasma welding & cutting. It costs around $12 and change. It is basically a guide to what kind of welding gear for what purpose and some guidance on how to use it. Damned good book for your needs at the moment. To add my 2 cents worth: be VERY cautious about buying anything 2nd hand, and buy the biggest, hairiest rig in whatever type you choose that you can afford. You'll use it. For example, 300 amps, AC-DC in an old Harris Dialarc is just simply better, more versatile, etc., than a Lincoln buzz box, although a Lincoln buzz box is a wonderful thing and a joy to behold. Be skeptical of house current plug-in low-amperage whiz bangs. |
| miles undercut - Monday, 07/15/02 03:45:13 GMT |
|
Wendy-- Correction: I said Harris Dialarc. I meant, of course, Miller Dialarc. Sorry. |
| miles undercut - Monday, 07/15/02 03:48:02 GMT |
|
Guru - 1840's Anti-freeze: Ethyl Alcohol, distilled from grain. Won't freeze at about any temperature you can forge in, has a reasonable latent heat, and isn't half bad (if properly aged in a wood cask), over a little ice. :-) Good for cuts, scrapes and snake-bite too, to hear the old-timers tell it... |
| vicopper - Monday, 07/15/02 04:06:26 GMT |
|
HOAX Anyone getting mail about a file called JDBGMGR.EXE and a little bear icon, it is a HOAX. DO NOT ERASE IT! And worse it is an OLD one (several years) and is running through our community. . . Don't believe me? Go here: Trend Micro Virus Encyclopedia, JDBGMGR.EXE Hoax |
| - guru - Monday, 07/15/02 04:57:43 GMT |
|
Oh Wendy, a last windy welding wonk's addendum. Our erudite Miles "biggest hairiest rig" comment applies to arc welders. On torches a pipeliner size is plenty and an aircraft type is lighter, easier to use and probably adaquate. Get a major brand like Victor, Harris, Smith etc. |
| - Pete F - Monday, 07/15/02 06:23:53 GMT |
|
Guru and Ralph, yes, the HUGE anvil was forged from 1/2" stock. I quickly discovered that forging it is not the problem: holding on to it is the problem. I started with a piece of 1/2" square stock about 1.5" long. Once you split it and begin to square it up, there is not much to hold on to. If Bill Epps makes these out of 3/8" sq. stock, he must be using needle-nose pliers and a tack hammer! |
| quenchcrack - Monday, 07/15/02 13:41:48 GMT |
|
Your Guruship; Muchas gracias, I used IE instead of Netscape and was able to print the iForge demos. Buenas dias le de Dios. 3dogs |
| 3dogs - Monday, 07/15/02 14:38:23 GMT |
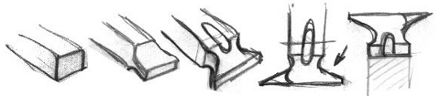 |
| - guru - Monday, 07/15/02 14:56:28 GMT |
|
Ahh. . its takes a couple narrow fullers too. I regrind old dull cold chisles for special fullers. Between step 2 and 3 there are two fullering steps. The space between the feet are fullered and then the waist. Step four you draw out and flatten the heal and round the horn. Don't draw out much if you want to keep it small. |
| - guru - Monday, 07/15/02 15:02:47 GMT |
|
IronRoads; on the trails they probably used a hole in the ground with a small bellows or even just the evening campfire. Carrying the extra weight of a clay full wooden box when you could carry water or even iron would be a waste! Now at a "shop" along the trail--then you could get fancy and clay lined wood works well in areas where the last rock seen was several weeks ago... Gas forge---I've run an *un-insulated* shop to over 90 degF doing some welding with my gas forge with the door open---I'd worry more about air than heat---though you could build a heat exchanger to scavange some of the heat going out. Thomas |
| - Thomas Powers - Monday, 07/15/02 16:39:15 GMT |
|
Guru, Who said that the water had to be vintage 1840's? GRIN |
| Ralph - Monday, 07/15/02 18:19:23 GMT |
|
I will frequently use some logs with some dirt shoveled over them for my "portable" Viking age forge. Sometimes the logs burn... no problem, plenty more to be used. "Cap'n! The crew is tippling the tuyere water again!" Visit your National Parks: www.nps.gov Go viking: www.wam.umd.edu/~eowyn/Longship/ |
| Bruce Blackistone (Atli) - Monday, 07/15/02 19:26:37 GMT |
|
Guru, Dang, just about the time I'm giving Epps all the gold stars for being clever, you come along and give an even better demonstration! Gonna try that on 1/4" round heated in my old micro-forge....then maybe I'll try it on a 10 penny nail! HA! |
| quenchcrack - Monday, 07/15/02 21:48:33 GMT |
|
Has anybody ever installed a fence. I'm wondering about the details of installing an artistic fence (about 6 ft. high into cement, as well as finishing. The posts could be tubing installed onto a "knife plate" that is set into the concrete, or should they be solid? Any help would be appreciated. Also I'm wondering about welding and torch heating the painted metal at the time of intallation of the fence panels. Is this advisable? Obviously the paint will burn off from the heated area and need to be finished again. Thanks a lot. |
| - Kevin - Tuesday, 07/16/02 00:50:26 GMT |
|
Fence Work: Kevin, The answers depend on the class of work. Most good wrought work is solid except for the occasional very large post and these are sometimes forged from heavy structural tube or pipe to reduce their weight. When set into masonry picketts and posts are set into drilled holes using epoxy, lead or grout. Lead is the old way and still used by some smiths. Epoxy is much stronger than than concrete grout. When set into concrete filled post holes below ground the steel parts are often galvanized. When there are masonry columns it is best to set anchor bars in the masonry and bolt the fence sections to the anchors. In most cases the anchor bars penetrate the column sticking out on both sides. Any part that is subjected to heat must be refinished using the same approximate processes as in the shop (clean, zinc coat, primer and top coat). Welding flux must be carefully removed (by sandblasting if necessary) as it is hydroscopic (absorbs water from the air) and causes paint to flake and rapid corrosion. Most smiths avoid field heating and welding if at all possible. However there are many cases when a complete forge setup is taken to the job site where there is a critical or difficult fit. Besides being anchored into masonry fences often have back braces and on rails support brackets that wrap around the side of the masonry. Long spans often have mid supports. |
| - guru - Tuesday, 07/16/02 01:40:14 GMT |
|
Kevin- I do that kinda thing all the time, i would recommend core drilling the finished concrete, then grouting or epoxy in. The bad thing about pouring plates in the concrete is, the finishers are tired when it's time to put your plates in, they rarely put them where you want them, and the mud is semi-set when they tap them in, so the slab is not solidly connected around your J-bolts, and the plates wiggle. There's probably a 'concrete sawing' hombre in the yellow pages, he can core-drill exactly where you want, how deep you want. Get a bid from him, and pass the savings right to the customer. The other advantage is you have more levity to plumb and level before grouting, you can weld all the sections together, then adjust everything in the open hole. crown up the grout so rain and snow don't lay in and raise heck, pour one hole at a time till you get the set up time figured out. give her hell, buckaroo |
| mike-hr - Tuesday, 07/16/02 02:32:47 GMT |
|
Anybody have any working experience-- good or bad-- making and using a rig built from the plans for the ABANA-Sandia "recuperative" forge? At a glance it seems a tad labor-intensive, and to lack capacity for handling long stock. |
| - berndt noezairres - Tuesday, 07/16/02 04:15:47 GMT |
|
Lester, ref S1 tool steel, my Jorgensen stock list from 1988 sez: Forging. Start at 1850-2050F. Do not forge below 1600F. Annealing. 1450-1500F, Max cooling rate per hour 40F. Hardening 1650-1750F in oil. Tempering 400-1200F, Rc hardness 58-40. |
| Frank Turley - Tuesday, 07/16/02 04:44:18 GMT |
|
Guru, Micro-Forges: Does anyone have any plans for a micro forges or any websites that have any plans? Gas would be preferable. Thanks, Charlie |
| Charlie Z - Tuesday, 07/16/02 05:01:51 GMT |
|
Kevin, After core drilling the concrete use pour-rock to anchor the fence. |
| - Robert - Tuesday, 07/16/02 07:05:34 GMT |
|
BN; Yes, the Sandia forge is both labor/time intensive and has a problem with long stock. Cutting a back door in them is problematic. However, they are quiet , enduring and very efficient. I, on the other hand, am neither |
| - Pete F - Tuesday, 07/16/02 07:29:45 GMT |
|
Micro Forge Charlie, See our plans page under the "Stupid gas burner". At one time there used to be a plan for a "bean can" forge on the web but it is currently gone as many things on the web do. It may have even been due to liability . . . who knows? It was simply a 10-12oz tin plated "bean" can (or whatever canned vegatable you like) with a 3/4" hole poked in the side 1-1/2" from the bottom (becomes the back) and some wire legs attached to raise it off whatever surface it sits on. The can was lined with one layer of 1" Kaowool. An angled hole is poked in the kaowool where the hole is in the can and a propane torch stuck in the hole. The torch should just barely be engaged otherwise you will melt the end off the nozzel. See our micro forge article for the approximate arrangement. I recommend you use a cheap torch. Be sure that the can you use is an old fashined tin can. New cans are sometimes plastic lined or have tin lids on plastic bodies . . Even with the VERY efficient Kaowool the outside of the can is going to get hot. These little mini-forges are suitable to heat 1/4" (7mm) square or 5/16" (9mm) round stock. If you choke the front opening a little (about 50%) with a piece of Kaowool it is possible to get a welding heat. Even though these are a cute little forge that you can setup on a heat resistant counter or stove top in your kitchen: THIS IS NOT A TOY! Forges and furnaces can be built in all sizes using similar techniques. The big difference is the BTU of the burner and the thickness of the insulation. A week ago I built a little crucible furnace from a small freon cylinder (9-1/2" dia. x 14" tall). It was made similar to the description above except it had a half fire brick in the bottom as a floor and two layers of 1" Kaowool. It also had a lid with a 2" vent hole made from the cutoff end of the cylinder. The lid was lined with two and a half layers of 1" Kaowool fitted so that it was flat on the bottom. The Kaowool was glued together and vent hole was lined with ITC-100. It was barely big enough for a #1 crucible. The burner was a T-Rex I am testing. We melted brass in it all day. It only took about 5 minutes to melt several pounds of brass. Most of our castings were a failure due to my inexperiance with lost wax (see the iForge demo) and the short turn-around time. However the little furnace that only weighed a couple pounds performed beautifuly. I was in a huge harried rush and didn't get any photos (then gave the furnace away) but I am going to build another because it was so easy. I built it in one evening (without a burner) after working a week on a larger furnace using castable refractory. The big one wasn't ready and I needed SOMETHING the next day. The bigger one still took several more days to complete after the refractory had a week to set. It is also heavier than I had hoped so it is not very portable. . . I'll be reporting on both these furnaces in the near future. We currently stock 1" Kaowool. A short length 24" wide will run $5.75/ft. plus shipping. Longer lengths are less per ft. |
| - guru - Tuesday, 07/16/02 15:10:06 GMT |
|
ABANA Sandia Forge: This forge is indeed more complex than others to build. But the recuperative system is very efficient and increases the forge temperature. I do not completely agree with the design. However, it IS a proven forge. I've been working on one where the preheat is in a front hood over the door/vent. There would be a small back door for long stock like an NC-TOOL forge. But no matter what you do, this calls for some sheet metal work to make the heat exchanger and direct the hot air into the burner. All enclosed gas forges have a stock size/length limitation. Even when you have a back opening, manuvering a long piece in and out THROUGH the small tunnel is not nearly as convienient as setting it on a open forge fire. Most smiths end up with a variety of forges using the most convienent and efficient gas forge most of the time, and then using the others as needed. |
| - guru - Tuesday, 07/16/02 15:32:41 GMT |
|
Wanted: Plans for a Traditional Japanese Forge Surely someone here knows where i can find this! I am looking for a workable set (dimensions etc.) of plans for a traditional Japanese forge. I have the book; Craft of the Japanese Sword by Yoshihara, which has dimensions for the box bellows etc., but i really would like some plans for the construction of the forge itself. Materials etc.. any help would be appreciated. Also, anyone know of a bulk source for good hardwood or softwood charcoal in or near Texas? Thanks in advance. Great website! RC |
| RC - Tuesday, 07/16/02 16:54:43 GMT |
|
RC, a couple of questions first: What part of Texas? and have you ever done any smithing before? Bladesmithing is a lot more difficult than it appears, especially if you are going to make a Japanese sword. If you are experienced smith, forgive me for telling you what you already know. But if you are a novice, you would do well to start by building one of the many coal or gas forges listed on this site and learning the basics before you embark upon making something as complex as a Japanese sword. IF you have ever watched a bladesmith or blacksmith and thought it looked easy, it was because they probably spent years mastering the craft. It ain't easy, but it is certainly worth learning! |
| quenchcrack - Tuesday, 07/16/02 17:15:29 GMT |
|
Quenchcrack: DFW area specifically... I've been smithing for over 16 years now, and a collector of Japanese blades for well over 20. Would like to build a small J. forge and start on very small blades (no larger than Tanto)to begin with and develop some technique. Have done some damascus work etc.but I am weird and would eventually like to build a completely traditional kaji-ba here at the house. |
| RC - Tuesday, 07/16/02 18:49:09 GMT |
|
Japanese Forge We have photos in the current NEWS (Volume 26). It is two parallel walls of brick open at the front and the blast comes in from the side at the bottom or the bottom center (no fancy tuyere). At the back there may be a low wall (a single brick) to help keep the fuel from pushing out the back. I would build one just wide enough to stack bricks as needed between the side walls. Traditionaly these are built on the ground but I have seen a film of a Malasian smith that had one built on a raised masonry platform to work standing. The height of his side walls were about two feet above the bottom of the forge. It looked to be made from stone covered with mud or cement. His "box" bellows was cylindrical about one foot in diameter and appeared to be made from a hollowed out log. This is a simple yet very effective design for long work of any type. |
| - guru - Tuesday, 07/16/02 19:27:12 GMT |
|
Dimensions for forge above. . . nobody measured these things, they just BUILT them based on what their father and grandfather used. Each making his forge to suit himself or possibly making improvements. If you want to be truely traditional you just LOOK and then build. Work out your own dimensions if you need them. Ask yourself what units your traditional Japanese smith used. Surely NOT the European inch or the modern meter. Most traditional units were like the cubit or foot. Everyone was born with one. Each was slightly different but was good enough. If I build something using my cubit and you use yours we will both build the same thing to the same proportions but just a slightly different size. When I measure MY cubit I get 18". The "standard" cubit is said to be 20" but the standard Royal Egyptian cubit is 20.63 inches. Somewhere the Ancient Greek cubit was given as 17.5 inches. When I was studying the Kithara (a musical instrument) in Greek vase paintings I made a scale for each image based on the elbow to finger tip measurement of one of the people in the painting. Then I measured in fractions of a cubit. I was not surprized to find most of the dimensions were simple fractions of a cubit (1/2, 1/3, 1/4) or multiples such as 2/3 and 3/4. Comparing a dozen or so images I found the dimensions all very similar and the tolerance within the range of average adult "cubits". When I made my drawing I used "my" 18" cubit. For all practical purposes it was as accurate needed. The proportions were what was important for the craftsperson that lived prior to blueprints to remember. With a straight edge, divider, your arm and a few simple ratios you could build anything. And still can for the most part. |
| - guru - Tuesday, 07/16/02 20:07:22 GMT |
|
Whoops! After all that. . . I screwed up the units on the bean can forge. They are not 8oz. . . more like 24oz. You need a BIG can about 4" to 1-1/2" in diamaeter. Should have used used hands or cubits. . . settled on inches (derived from the King's thumb). |
| - guru - Tuesday, 07/16/02 21:01:57 GMT |
|
Jock, Just have them use a #10 can. That's the size used in resturants, and you can probably scrounge one for free. |
| Paw+Paw+Wilson - Tuesday, 07/16/02 21:25:24 GMT |
|
Or a big fruit juice can. |
| Paw Paw Wilson - Tuesday, 07/16/02 21:32:12 GMT |
|
Ancient units are usually something that everyone could relate to at the time. The cubit, the foot, the hand, etc. Measurements for time were a bit more abstract. When I was teaching silversmithing, I was also busy recreating many of the methods used by the noted Renaissance goldsmith/sculptor Bienvenuto Cellini. In one of his Treatises, he called for leaving a piece in a fire for "as long as takes to say four Ave Marias." This one was a bit of a reach for me, not being either Italian or Catholic. I had to go to the local Catholic Church and get a couple of the priests there to say some Ave Marias for me in Latin (and Italian, just in case), and time them. Thirty years down the road, I can't remember how long it worked out to be, but I still remember how to say a Hail Mary which takes about the same time in English as an Ave Maria does in Latin. I'm sure other cultures used similar methods for their timekeeping before the clock became commonplace. My Catholic friends were all envious that I was able to tell a priest to say twenty Ave Marias instead of having the priest tell me to say them. :-) |
| vicopper - Tuesday, 07/16/02 22:20:19 GMT |
|
Vicopper, That's cruel!! If you knew how many Ave Maria's I've had to say over the years! |
| Paw Paw Wilson - Tuesday, 07/16/02 22:39:57 GMT |
|
Charlie Z. Miniforges, Wayne Goddard's $50 Knife Shop This is a great book for anyone trying to start blacksmithing with nothing. We all did that! He assumes everyone knows about garage sales,thrift stores, the local scrap yard and not to proud to dumpster dive! How to make a forge with an old BBQ grill and hair dryer. I ruined my Webber like that 10 years ago. He shows how to make a forge out of a single fire brick and a propane torch. Lots of good pictures on his homemade belt grinders. I just found a 2 horse 220 motor at a garage sale for mine! You don't alot of expensive tool to set up a shop, just the desire. |
| Steve Paullim - Tuesday, 07/16/02 23:24:29 GMT |
|
ANSI Z87.1-1989 Practice for Occupational and educational eye and face protection: This is the second $40 ANSI standard I've purchased on this subject trying to get an answer on safety glasses. The first copy was the Swedish standard in English. I should probably mail it to OErjan. . The copy now in hand (Z87.1-1989) doesn't say much. In fact it is useless unless you have precision light measurement equipment to test actual light conditions. There are very general guides to welding shades but for all other "special" applications it simply states that "THE RESPONSIBLE INDIVIDUAL SHALL ENSURE THAT THE PROPER ULTRAVILOET, INFARED, AND VISIBLE PROTECTION IS PROVIDED." It mentions that didymium lenses may not be applicable for that purpose. All of industry except welders are classed under "Special purpose lenses". That includes foundry operations and "glare". So you are back to the light measurement equipment. But even THEN there does not appear to be any standard on maximum exposure. OSHA refers to the CDC Office of Health and Safety, Centers for Disease Control and Prevention and THEY say: Suitable protectors shall be used when employees are exposed to hazards from flying particles, molten metal, acids or caustic liquids, chemical liquids, gases, or vapors, bioaerosols, or potentially injurious light radiation. But do not define how much light radiation is injurious. They refer to a chart that says the same as the ANSI spec that says a shade 1.5-3 is used for "Cutting, torch brazing and torch soldering". However they refer you to www.preventblindness.org. . Under "Workplace Eye Safety" they say "wear approved safety glasses" and they refer back to OSHA. No help there. The OSHA regulation 29 CFR 1910.133 - Eye and face protection, has the same chart and refers one to ANSI-Z87.1. . Every time I look for something that refers to an ANSI or ASTM spec all I ever find is a bunch of circular references. So, we are back to my last post on personal testing and lack of eye strain. And a statement made long ago by my welding supplier that the local foundry (now closed) used the glasses I show above with the #2 filter lenses. Only once was work distance referenced and this is a critical factor in all types of radiation protection. One web page I found had references to a variety of articles as a starting point for eye protection research. One snyopsis noted that too dark a filter can cause other safety problems such as the worker not being able to see well enough in general. And another suggested research needed to be done on the problem of what filter lenses are safe to wear while driving since some filter stop lights and traffic sign colors. Nothing is simple these days. . . The Bouton, ANSI Z87.1 #2 shade Green Filter safety glasses above will sell for $14.25 plus shipping. Up to 4 pairs ship for $5. |
| - guru - Tuesday, 07/16/02 23:50:48 GMT |
|
Tradtional Japanese Measurement: Japan's tradtional historic measure of length, is called the kanejaku, which originated in China. It has been in use since approx. 700A.D. This unit is comprised of the shaku, the sun, and the ken: 10 sun equal 1 shaku and 6 shaku equal 1 ken. This unit has been used for centuries in ,China,Taiwan and Korea. Some tradtionalist still use this as a measure to this day. In the Japanese kanejaku system, one shaku equals about 30.303 cm, down to the smallest unit,called the bu, which is approx. 3 mm. Just thought I would through this in since old time measurement came up. As for the forge, I would just like to get an approximatset of normal dimensions, since I would rather just have to build it one time correctly. Anyone knowing of a source for further photos would be appreciated. Kampai! |
| RC - Tuesday, 07/16/02 23:57:22 GMT |
|
Hello All, Its been a long time since I posted anything, good to be back. About six months ago I built a brake drum forge from the plans on this site, and started the VERY basics of smithing. This was in Northern Utah. Since then, I've joined the Army, and got stationed at Ft. Bragg Nc. When the movers packed up my stuff, I wasn't there, and they brought my anvil, BUT NOT MY FORGE! The dirty buggers. I no longer have the means at my disposal to build one, and I was wondering if anyone one knew where I can get a complete coal setup relatively inexpensively. Also where to get coal around here. Thanks alot. |
| Bond, James Bond - Tuesday, 07/16/02 23:58:59 GMT |
|
You mean that there are other ways to measure stuff OTHER than with your feet, or thumb, or arm? It's well worth ANY craftsman's time to spend a few minutes measuring yourself. With practice you can get really accurate, and it's great for those days that you've left a tape measure in your other trousers. The cubit (elbow to fingertip) is VERY handy, as well as the thumb (inch or so) and the foot (obviously, I've got mine memorized to about 1/4th inch tolerance in 2 pairs of boots). If I have a relatively flat surface, I can lay my fist flat on it, and stretch out my pinkie and thumb, that's about 8 inches (and you can inch worm it along easily). Finger width makes a handy half inch. If you have a little cash in your pocket, a dollar bill is right about 6 inches. |
| mattmaus - Wednesday, 07/17/02 00:24:48 GMT |
|
Dempsey Vertical Brass Furnace (DVBF): Jock- I'll poll the Camp Fenby list tomorrow and see if any of our folks got pictures of the furnace in operation. Otherwise, I'll be glad to take some detailed photographs to be scanned and sent to you. It's presently stored out of mouse range and I'm working on a secure container until we get the new burner ready. Mr. Bond: A base as large as Ft. Bragg may have its own blacksmithing/metalworking facilities attached to the motorpool or industrial plant. I know our NPS National Capitol region does, just to unbend the metalwork that gets bent up. It may pay you to poke around, and it will certainly get you into some more interesting areas where the work gets done. "We are the infrastructure; all that other stuff is just entropy in action." (Uncle Atli's Very Thin Book of Wisdom) |
| Bruce Blackistone (Atli) - Wednesday, 07/17/02 03:07:53 GMT |
|
Atli, Don't worry. I've found another Freon can that was a "gift" from Ntech via Paw-Paw. . . If you have space THEY will come. . . (THEY = Junk) I'm going to make a burner for this one and I will make two if it works. . Yep, B,JB needs to make friends with the right people on base. . . I'll bet there is a full metal shop somewhere there. |
| - guru - Wednesday, 07/17/02 04:00:39 GMT |
|
JB, check with Post Engineers. They used to be over near 18th Airborne Corp. HQ. |
| Paw Paw Wilson - Wednesday, 07/17/02 04:02:51 GMT |
|
Larry I think I figured out A way to make the q-foils you asked about. start by welding up three joint at equal lanthes the forge to final shape. bend out the final joint at a right angle to the rest of the part weld last joint then bend back and reforge to shape. one thing is to localise the heat away from the weld in the center of the bends when bending the weld joint out to close and you can't get the twist out. MP |
| MP - Wednesday, 07/17/02 04:41:26 GMT |
|
quench, fired up the forgemaster again on sat. @ 13psi, could not get to welding heat on 3/8" square. since i am a novice, i have been practicing basic techniques (tapers, free scrolls, drawing out ((to see if i can really draw out the reins for tongs by hand)) hooks. right now my preference hammer is a 1000G swedish. i plan on trying a 32oz ball peen. the biggest "barrier" my novice eyes can see in using gas is that you cant concentrate the heat and there is a limit to the size of the work that you can fit in the "furnace". eventually, ill get a coal set up. like to hear novice experience. |
| - rugg - Wednesday, 07/17/02 06:06:08 GMT |
|
Rugg, heat transfer is based upon the temperature differential and a really hot forge will put the heat in faster than one that has just been fired up. Putting the iron under the gas flame in a cold forge allows the iron to gain heat from the gas and radiate it back into the cold walls. Most of the heat is transferred by radiation, ie, the radiation from the glowing refractories or the incandescent gas flame. Now, if I remember my physics, radiation falls off as the square root of the distance between source and target. SO...I wonder: if you put two half bricks into the forge, with a small space between them, centered under the gas flame, would you not reduce the distance from the source to the target and enhance heat transfer enough to get a welding heat? What do you think, Guru? |
| quenchcrack - Wednesday, 07/17/02 12:27:16 GMT |
|
QC, that sounds reasonable. But I think the best thing to do would be to fire up the forge then do something else for 20-30 mins till the forge is at an even and uniform heat thru and thru. |
| Ralph - Wednesday, 07/17/02 14:26:26 GMT |
|
Bricks in Forge: Burner performance is related to the enclosed volume of the forge. Changing the volume can cause the burner to not function at all (fire back, poping and flame out). As mentioned previously, gas forges LIKE to run lean. When run rich or even neutral they do not always reach maximum temperature. Increasing the gas can ofen result in a colder forge and wasting gas. The trick is to find just the right balance. However, some burners, even commercial ones are not very forgiving. I have found that the T-Rex I am testing will run at almost no pressure as well as 20-30 PSI. But the air adjustment has had little or no effect. It is a VERY friendly piece of hardware. One thing the do-it-your self folks (as well as T-Rex) are doing is adding a flare to the end of the burner with a ratio of 12:1. It makes an amazing difference in performance and ease of operation. In my new crucible furnace I cast in a long flare. It may be one reason the T-Rex operates at such a wide range on this unit. I have also noticed that I can not make the T-Rex run lean. It runs right or rich. But I hae not spent a lot of time experimenting with it. On the other hand blower type burners can run very lean and they always run VERY hot compared to naturaly aspirated (atmospheric) forges. Many commercial forges do not have flares and I expect that has something to do with the narrow opperating range. I have also noticed that even Kaowool lined forges need heat up time. Even though the Kaowool has no (or little) thermal mass the brick floor of the forge does and it needs heat up time. Small efficient forges work partialy on stored heat and it is the reason they run hotter than the free air burning temperature of the Propane or NG. Thus it takes heatup time to reach the maximum temperature. As long as the mass of the forge is absorbing heat it cannot run at the maximum needed for forge welding. Once it is at full heat the energy goes into the steel. Adding bricks to the forge will also increase heat up time. Adjusting the volume of forges is common practice to get them to perform. But it is an art like many of the things we do. Most professional smiths like to do it with a block of kaowool or refractory board so that it is easy to adjust and doesn't add a lot of mass to the forge. |
| - guru - Wednesday, 07/17/02 17:46:12 GMT |
|
Within the next year I will be builing a new home and I am looking for a brass manufacturer that can make window treatments for my new home I am wanting these window treatments to be made of brass in the form of cornice boards I will be able to provide the measurements and the specific design that I am wanting. will also be able to provide a photograph of exactly what I am referring to. All other details needed by the manufacutrer can be worked out in the future I am simply at this point trying to establish if such a request can be met. I found your web-site through by the "Google" search engine in hopes that yo could be of any assistance. Thank You for any assistance you are able to provide. Sincerely, Francene Woods |
| Francene Woods - Wednesday, 07/17/02 18:30:15 GMT |
|
Folks just a small bit of trivia... 100 years ago today the first Air Conditioner was made. By a fellow named Willis Haviland Carrier. At the time he was forking for a company called Buffalo Forge....(see does have smithing content! ) Here is a link to some more info http://www.global.carrier.com/details/1,,CLI1_DIV28_ETI3676,00.html |
| Ralph - Wednesday, 07/17/02 19:17:03 GMT |
|
I have to take a Mechanical apptitude test in order to qualify for a "Screw Machine Machinist" position, but have been unable to find an example of one on the web. Can you help locate one for me or tell me what type of questions I might run into? |
| Armand LaPointe - Wednesday, 07/17/02 19:39:07 GMT |
|
Brass Cornices: Francene, It is a relatively simple project but the specifics will determine if you will need a brass foundry to do the work or another manufacturer. These parts could also be fabricated, rolled or forged. The first thing to remember is that brass is denser than steel and the parts you need may end up being very heavy. However, if the shape is a simple molding then it may be able to be rolled from sheet stock which would be much lighter than castings that have relatively thick walls. So you are either looking for a foundry if the work is sculptural in nature or a manufacturer of rolled architectural brass. In both cases the costs may be significant. There are fixed costs that do not change whether you want one or a thousand parts. In the foundry work the patterns (carved from wood) may cost more than the actual parts. The same goes for rolling dies. To roll the work may take several passes under different rolls that are each closer to the final shape. Then as a "one off" job most manufacturers will see your project as a nusiance and as such refuse to bid on it or price it very high hoping you will go away. Many jobs like this are brought to manufacturers by people that do not carry through or did not have a clue to the costs. The result is that many shops do not even like to bid on this type of odd job because it is a waste of their time. If the work is relatively narrow then it may be possible to forge the shape. This would likely be the most cost effective manufacturing method as the setup is a small part of the job. There are probably many small shops that can do this type of work but I do not know of any specificaly. However, I do know some foundries that specialize in odd and artistic work. There are many metalworkers in the blacksmithing community that would setup for such a job given the price were right. SO, the answer is YES. Your project can be done provided you are willing to pay the price. If you would like to send me a photo or a sketch of what you want then I may be able to give you more specifics as to how to proceed or suggest possible vendors. |
| - guru - Wednesday, 07/17/02 19:48:06 GMT |
|
Apptitude Test: Armand, This is a little bit out of my area and I am a firm believer that standardized tests are a huge waste of time and will be the downfall of Western civilization. So now. . we flash back 40 years. . . I remember questions about gears and levers (pullies maybe). Given a diagram of a bunch of gears which way does the last gear turn? I do it with little arrows but when there is an even number of gears the rotation is oposite the driver. If an odd number it is the same. Counting gears is faster. What are the ratios between two gears? Six gears? The ratio is the reduced fractional value of the teeth on the gears. Divide and reduce. Algebra at work. On a long flat gear train without step gears (two gears on the same shaft) you ignore all but the first and last gear. The ratio is between them and the rest are windage (good word, look it up). If there is a step gear in the train then you work out the two ratios and multiply for the final ratio. If the first set is 3:1 and the second 2:1 then the ratio is 6:1. However, if the first is 3:1 and the second 1:2 then the final ratio is 1.5:1 (you divide). If you LOOK at the gears is is easy to see. However, gear ratios are often bastard things like 2.16666:1. Levers are simple ratios and proportions. Back to algebra. Given a lever 8' long vs. one 5' long and there is a weight of 50 pounds on the 8' end how much force or load does it take to balance the load? (8 * 50) / 5 = answer. . . Pulley questions are similar ratio things. Most of this stuff is from elementary school science and high school physics. The important thing is to understand the logic and be able to work out the simple math. Flash forward 3 years. I was given an occupational apptitude test. The point was to find out what job you where inclined to like or be good at. This was the world's stupidest test. At the time I had just given up an art career because I didn't want to fight the BS. Sucsessful artists do not need to be talented except in the area of BS. At the time the art world was over flowing with BS artists like Andy Whorhol and many lesser BS artists. . . Hopefully we are over that but I don't think so. So, back to the test. . . It asked
SO, when you come to questions about you interests. Lie. You will know which ones were written by someone that doesn't know a screw from a nut. Just lie. Tell them what they WANT to hear. It does you no good to honest or right when answering morons. Just tell them what they want. . . I made the mistake of answering honstly on a security test. "Have you ever been late paying bills? When, how often and how much?" Stupid question. Everyone has been late paying a bill a time or two unless someone else does it all for them. . . I said Yes, Ocassionaly, no specifics. The result of THIS was a man to man discussion with the head of security. I told him it was none of his business (wrong answer). I also told him that the company he worked for (a nuclear utility in the South) did not pay THEIR bills on time when THEY had the money. And that this occasionaly had to do with when and why *I* couldn't pay my bills. . . More wrong answers. The security guy was getting very upset. More so than befits a head of security. He went away (apparently to talk to someone higher up), then came back, scribbled something on my report and that was that. Apparently they needed me. But it WAS the wrong answer. Everyone else just lies. There are some questions you don't want to know the answers to. In those cases you should not ask. But there are many of these on various government and industry questionairs. So people lie. The system TEACHES people to lie. And we wonder why we have an Enron. . . Armand, Simple physics, ratios and look at the parts diagrams. I'm sure you will pass. |
| - guru - Wednesday, 07/17/02 20:41:54 GMT |
|
Is it viable to own a blacksmithing business in canada. |
| kevs - Wednesday, 07/17/02 21:22:53 GMT |
|
Armand; in America there is the ASVAB (Armed Services Vocational Aptitude Battery) test which is pretty much as the Guru describes. You may be able to search out info on it and find a "practice" test or two. (I took it back in the late '70's; missed a question, they told me I had had the right answer and had gone back and corrected it to the wrong one...) Thomas |
| - Thomas Powers - Wednesday, 07/17/02 21:43:50 GMT |
|
well at work yesterday while transferring a resident from wheelchair to toilet, her knees buckled, and my back is thouroughly trashed, i want to continue on my path of discovery in smithing, but my hand crank champion forge is not usable given the limitation of movement caused by my back injury, hence my question: can i retrofit my current hand cranked blower with an electric motor without much difficulty? i can stand up and hammer and using small stock still do the hammering but i cannot crank the forge,,.. bad week so far lol. thanks for any information |
| Mike Kruzan - Wednesday, 07/17/02 21:57:29 GMT |
|
Thanks everyone,Paw Paw, I'll see if I can get near some engineers, but they don't tend to like MP's much. I asked around the motor pool, and they said they didn't know of any metal working places on post. I'll keep looking though. Can anyone hook me up the the NC chapter of ABANA? |
| Bond, James Bond - Wednesday, 07/17/02 22:07:16 GMT |
|
Mike, bad news. . been there. Yes you can motorize your old handcrank blower. BUT, there are problems. First, I think the input is about 25 RPM. That is VERY slow and you do not want to run the blower faster, it is not designed for it. Second, if you use belts you don't want to use a lot of tension. That will wear out the bearings. It will also take several stages of belting since 3:1 is most practicle and 4:1 is stretching the limits. On an 1800 RPM motor you will need 72:1 reduction. that would be 3 or more pairs of reduction at 4:1 each. Actualy 3 sets at 4.2 comes very close. That is 3 each 2" pullies and 3 each 8.4" pullies plus bearings and shafts for the two idler shafts. There is a lot of start up torque on a hand crank blower so you will need a larger motor than the blower would normally need. This flywheel effect is built into the heavy fan for the purpose of being hand crank. Motorized blowers use light weight fans because they do not want a heavy startup load. That amount of reduction is a LOT to setup. It is almost easier to build your own blower from a small motor. I would recommend that you find, buy or scrounge a suitable e;ectric blower. There are many options. The very nice blowers the Kaynes sell are a good price and will save a lot of time and effort. Your hand crank blower is worth more than what they cost and if you sold it you would be cash ahead. There are also blowers available from HVAC and home appliance parts suppliers. Ask about Dayton blowers. I suspect the one I used to buy for $25 is now $50. These have the CFM (about 140) but not the pressure head. They work great on gas forges and small coal forges but are under powerd for a big forge. On the other hand they are small enough to run on a light dimmer. However, I use ceiling fan controls because they are a little heavier duty. Hand held blow dryer fans work well. However, you will want some distance between the plastic housing and the forge. I have scraped several copiers and printers that had pretty nice small blowers in them. . this stuff is where you find it. AND. . since we are into motions that hurt and those that don't, I've found that working a bellows with an overhead handle to be easy on the back. If you can still hammer, a bellows might be the thing. |
| - guru - Wednesday, 07/17/02 23:15:12 GMT |
|
thank you for the input guru, i would go with a blower but my setup sets outside (i know its horrible on the equipment) i plan on picking up a small metal shed kit to house the stuff in asap, but i dont think that a bellows would hold up well in the weather... i will give this more thought thanks again |
| Mike Kruzan - Wednesday, 07/17/02 23:26:45 GMT |
|
Guru: Your answer to Armand's question seems inappropriate, off topic and wrong. You sound like a guy that feels the world has treated him unfairly and is more than a little bitter about it. Misrepresenting yourself and skills on an apptitude test is the surest way to ensure that the test will be of no use and a waste of time. Armand: I suspect the fact that you are not aware of what type of material will be covered by the test implies that you are not qualified for the job, may be not. OSHA Personal Protective Equipment Standard, 29CFR 1910.132 has a section on protective light filters. So does the non-ionizing radiation standard from OSHA, both available free at www.osha.gov. The National Safety Council's Industrial Safety Handbook (an excellent book)also covers these shades, relates them to the metals involved, temperature, amperage, type of welding, etc. NIOSH (National Institute of Occupational Safety and Health)also has some info on thier page, www.niosh.gov. I have heard positive things about automaticaly dimming shades that are photosensitive and quickly darken to the appropriate shade. They clear up when the arc disappears so you don't have to flip the shield up all the time. MSA, North, etc. make these devices. Tom |
| thomas - Wednesday, 07/17/02 23:38:12 GMT |
|
BJB, Contact the Triangle Blacksmith Guild. That's the NCABANA group closest to you. The NCABANA president is also the leader of that group. His name is Jimmy Alexander, 919-471-0184, or email him at: JimA136040@aol.com |
| Paw Paw Wilson - Wednesday, 07/17/02 23:50:55 GMT |
|
Kevs /// Blacksmith shop /// Viable? The answer is: Ta Dah,,, No answer can be given. People up here would need to know what part of Canada you are interested in. The country is more than 3,500 miles long, covering all kinds of climates etc. What kind of blacksmithing do you have in mind? Farriery, art blacksmithing, farm blacksmithing, etc., etc., What kind of opperation do have in mind. For example, a small country shop, or one in the city, or, perhaps, a large sub-contracting operation in a major metropolitan area like Toronto, Montreal, Vancouver, Halifax, or a large country set-up in the Amish, Mennonite area around St. Jacobs Ontario.. (near Kitchener Waterloo). How much money can you invest in the business? A modest shop in Toronto will be much more costly than a similar business in, say, Sudbury, Ont. or Red Deer Alberta, or Ecom- Sekum, Nova Scotia. You can do it. I know of a successful large shop in Montreal and another in North Toronto, and I am sure there are other such shops in other major Canadian cities. The Kitchener-Waterloo St.Jacobs area has a sizeable shop that is listed in the links section of this site. (I forget the name. Alzheimers?, probably) Some of our C.S.I. members have shops in smaller urban areas like North Bay, Kingston, and Peterborough, etc. etc. I have taken a lot of space to ask a whole bunch of general questions. Help. Send us a little more information (and I'm certain one of us will give you a practical answer). Regards to All, SLAG. |
| slag - Wednesday, 07/17/02 23:59:15 GMT |
|
DISCOVER CARD = SPAMMERS: For several months I have been getting a flood of SPAM mail from an outfit called freezefinds.com, freeze or promotionserver. Among the SPAM is offers to obtain a DISCOVER CARD. DISCOVER CARD admits to using freezefinds and I have been writing back and forth to their service department for over a month with no resolve. So, as of today, we no longer take DISCOVER CARD. It will take me time to remove their logos from all our forms but it will be done ASAP. There will also be notices posted as to the reason we no longer take DISCOVER CARD. I am sorry if this causes some of you inconvienience and I am sure this will cost me more than DISCOVER CARD. But spammers ARE criminals and cyber terrorists and I will not do business with them. |
| - guru - Thursday, 07/18/02 00:14:08 GMT |
|
|
|
|