| WELCOME to the anvilfire Guru's Den - V. 3.0 |
|
THIS is a forum for questions and answers about blacksmithing and general metalworking. Ask the Guru any reasonable question and he or one of his helpers will answer your question, find someone that can, OR research the question for you. This is an archive of posts from January 17 - 24, 2006 on the Guru's Den |
|
|
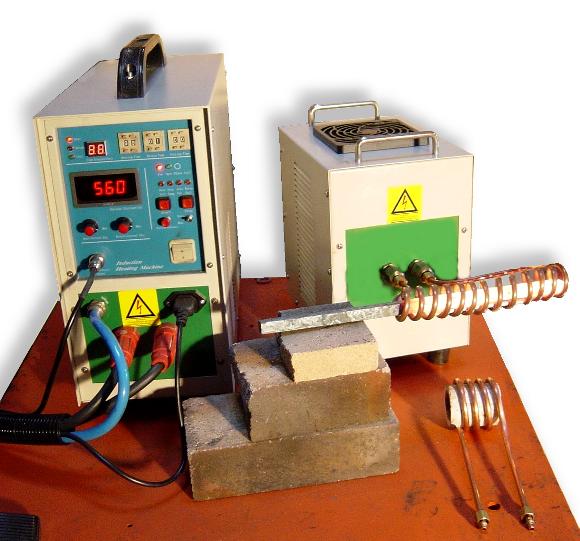 Grant Sarver Induction Forge Heater 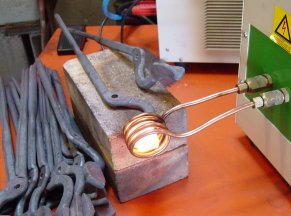 |
| - guru - Tuesday, 07/11/06 13:50:08 EDT |
|
Dave Boyer: Thats a lot of juice for doing nothing! This induction unit has the contactor on the primary too, so power draw is like 2 amps. OBTW: I used to use my 'ol Goldstar with the foot control "on" even when stick welding at the bench. Sure nice to have that amp control. |
| - grant - Monday, 07/17/06 01:01:59 EDT |
|
Grant: Did You use the HF to start the arc allso? Speaking of the HF on these machines, Mine isn't working, makes a weak spark if really close, or nothing. The points are clean and set at .008 as per the spec. My guess is the capacitors might be shot, but I havn't checked the ohms on the HV transformer yet. Any ideas? This machine had been sitting for a while before I got it,I don't think the owner before Me ever got it working. Actually Mine is an Airco, so the serial #'s in the specs may be irevelant. |
| Dave Boyer - Monday, 07/17/06 02:47:12 EDT |
|
I origionaly sent this to Anvilfire FAQ but realised this is probabely a better place. I was reading through your sword crafting guide and found myself at odds with the statement of spring leaf swords being a urban legend. Our local blacksmith has made a sword out of a spring leaf. Given, It's impossible to do without a forge and a profesional sharpening service. He heated it up to an amazing heat before forming it. Apparantly after he treated it he found it was too hard to put an edge on, he wore through an entire stone in the effort. In the end he sent it off to a friend who owns a company that makes and sharpens blades. They used a laser to put an edge to it. If you would like I can probabely obtain some photos of the sword. However it is possible to form a sword from a leaf, if being difficult to the point of being impossible by any real standard. |
| Rayn - Monday, 07/17/06 06:12:32 EDT |
|
A friend, knowing I've been wanting to get try blacksmithing for a while, gave me what I can only describe as a stainless brick. Which alloy, he doesn't know. It's roughly 12"x4"x3" milled all sides. Until I spend college fund money, it's as close to an anvil as I'm going to get for a few years. It's soft, a firm whack with a peening hammer leaves a good ding. I've lurked enough to know the issues: not enough mass, too soft. But, until I can afford a Peddinghaus, I'd like to use it as a door into blacksmithing for small things. My question is this: is there a SAFE way you can recommend that I can get this thing heated and quenched so it's not so soft? Can I mitigate mass issue by "casting" it into a concrete pillar that would set the "face" at right height, and leave about an inch of the "brick" sticking up? |
| jgourlay - Monday, 07/17/06 06:26:37 EDT |
|
Rayn, Without knowing more than what "an amazing heat" would be and without knowing what treatment was given, it is difficult to comment. However, after hardening a sword, it must be tempered. The local smith may not have tempered it. |
| Frank Turley - Monday, 07/17/06 08:56:29 EDT |
|
Ryan, I think that that part refers to a website where they advocate *cold* straightening a leaf spring and then grinding it down to a sword like object---no forging involved at all! This technique gives most smiths the willies what with the possibility of inducing cracks and the damage to the human body of whaling on a pice of tempered spring with a large hammer trying to "damage it" back straight. Spring steel alloys are often suggested for swordmaking; though in general we suggest that you buy *new* stock from a spring maker or steel supply company and not be *guessing* on if that spring is ready to snap from use damage. If it was too hard to sharpen then he did the tempering wrong and the blade may be much too brittle for safe use! Please get it checked before someone gets hurt! Thomas |
| Thomas P - Monday, 07/17/06 10:45:58 EDT |
|
If its too hard to grind an edge, then its much too hard for a sword and is liable to shatter. As Frank explained it would have to be tempered. Blacksmiths work spring and blade steel with carefully graded temperatures characterized by their colors. Too high a heat will ruin the steel. A smith sometimes has need of some amazing grace but never an amazing heat! |
| adam - Monday, 07/17/06 11:00:48 EDT |
|
jgourlay; unless that SS brick is an alloy that can be quench hardened all heating it up and quenching it will do is to *soften* it more. Most SS alloys are not quench hardening. Thomas |
| Thomas P - Monday, 07/17/06 11:03:13 EDT |
|
jgourlay-- why ruin what sounds like a beautiful paperweight? why make smithing harder than it already basically is by tormenting yourself with jive tools and material? this is like making a sword out of a vehicle spring. It can be done, just as your stainless brick can be used to pound upon. in both cases, so what? give yourself a break. get off to the right start. get something better. |
| Miles Undercut - Monday, 07/17/06 11:09:57 EDT |
|
I think jgourlay is trying to achieve what I've seen as a Japanese swordsmaking anvil, although his choice of steel (not much a choice as a lazy way out of finding the right material) is off. You dont need a Peddighaus or P.W. or brand new brand name anvil to start off with, especially if your on a budget. I'm sure there's a FAQ here at Anvilfire that could give you more than I can. All I CAN say is listen to these guys, they know what they're talking about and WILL point you in the right direction every time. |
| - Nippulini - Monday, 07/17/06 11:29:50 EDT |
|
My shop has a concrete floor. What is the best way to mount my bender and air compressor so that they can't move around? |
| - Laura - Monday, 07/17/06 11:59:21 EDT |
|
jgourlay 12x4x3 is approximately 40# which would be nice for jewelry but almost useless for forging any iron except wire and small nails. It would make a nice bench block. 75# is just about the very minimum. Concrete wont help - though welding it onto another piece of heavy steel would. Sure a really skillful person with a lot of time can make even a 20# sledge hammer work as an anvil. Smiths in Asia do this all the time. You will have a very hard time learning with such a tool especially on your own and it wont be fun. So skip it. The most important thing is mass and shape. Hardness is a luxury that one can do without. In fact its not really desirable in a first anvil. Go by a scrap yard and see if you can pick up a piece of RR track, heavy shafting or heavy plate. Try to get at least 100#. Better still sniff out your local smithing group and chat with them. They will know where the heavy iron is! :) |
| adam - Monday, 07/17/06 12:13:33 EDT |
|
Rayn, I have been doing stock removal weapons for years, and forging weapons for a couple now as well. From what you say, it sounds like the blacksmith who made that blade does not know much about bladesmithing. If he heated the spring and forged out a rough sword, the next step that he should have done would be to aneal the piece (heat it, let it cool very slowly, making it softer). After the anealing, all the beveling and final shaping is ground in. Durring this process, I actually put a rough edge on the weapon as well, that way all I have to do after the heat treatment is clean up the blade, then do just a slight amount of grinding to hone up the edge to where I want. Then it is a common practice to nomalize, at least once, which helps to releave some of the stress from the forging and grinding process before the hardening. And everyone else who posted is right as well, after the heat hardening, the blade must be tempered to relieve excess stress and prevent it from being brittle. But it seems to me that even if a leaf spring were heat hardened down from a welding temperature (which would ruin it anyways, it would fracture and crack all to pieces) and it were very hard, you would still be able to grind it, granted it would be more difficult and time consuming and would eat at a wheel faster, but the whole wheel gone just to try and sharpen sounds a little far fetched to me. I could see that if he were trying to grind in all the beveing as well, but not just an edge, there sould not have been that much material. Oh, and like others have commented, if that blade has not been tempered, it will fracture, the moment a goodamount of stress is placed on it. In fact, with a true and well made sword, one can flex the blade a substancial distance and it will return to true, no bending nor breaking, but if you were to try that with a superhardened piece of spring with no tempering, it would break and be very dangerous, as pieces could fly off in all directions and serously harm others. So, unless that sword is just a display piece and it will see no use, I would not ever use it, for cutting tests, combat (if it has a sharp edge, dont use it either way, too dangerous), or anything else that might stress the blade. Oh, and as for it being impossible to make a sword out of a leaf spring, it is not, its just most in their right mind would not want to since there are easier things to do. I believe that the leaf spring swords talked about in the sword making myth page, were the kinds that people think that you can make by just tearing off an old piece of car suspension, then grind it into a "sword." Well, one could do that I suppose if the leaf spring were straight (like Thomas said, cold straightening a spring is not the way to go, if you even could do it cold, which is not too likley with out an infinate amount of hammering). As for the grinding its just the amount of grinding that exists in doing a stock removal weapon the size of a sword out of a non annealed piece of steel the grade of a leaf spring is basically madness, possible, but no where near worth it for all of the time and grinding equipment you will go through (wheels, belts, ect). Now, you can forge out some decent stuff beautifully with it, if you know the proper steps to make a blade and how to properly heat treat. |
| - TarAlderion - Monday, 07/17/06 12:58:14 EDT |
|
jgourlay, my best advice is to check ebay. In a noble gesture my dad bought one of the anvils off of ebay that are the mexican made anvil (i believe they claim they are made in mexico out of american steel ) because he thought that it would be nice to have a nice flat faced anvil for finishing work. i think the anvil weighs around 100 pounds. now , before i start a whole other string of discussions , remember that this is just a starter anvil and upgrade as soon as possible. while these ebay anvils are not that massive, they will work for small work (or in my case for smooth finishing work ). Personally, I started out on a RR track anvil that was made of light gauge rail. The whole thing weighed maybe 30-35 pounds. I learned alot (like how many lag screws it takes to keep a light anvil attached to a stump) but it was a start (and one that I would not reccomend to anybody else.) |
| - sandycreekforge - Monday, 07/17/06 13:02:07 EDT |
|
Note regarding glass torch work: "Beadmakers" usually refer to themselves as lampworkers (which identifies them as opposed to folks who make beads out of other stuff, and lampworkers make other things as well), and they refer to their heat source as a lamp, burner, or torch. It is worthwhile to note that a lampworker's torch nowadays is a SURFACE MIX burner, meaning the propane (usually) and oxygen do not meet and mix until they reach the burner head, and they actually meet and burn in open air. This makes it much easier to vary the oxidizing/reducing characteristics of the flame to an extreme degree and change the flame's length without changing tips. Stainless block (brick): This is a 40lb chunk... fairly sizable. If you want to get started on some 1/4" stock, Jgourlay, I would encourage you to do so. |
| T. Gold - Monday, 07/17/06 13:22:14 EDT |
|
Laura- to fasten your bender and compressor to a concrete floor, you need to drill holes in the concrete, and then use a special concrete anchor bolt. You can rent a hammer drill designed to drill concrete at most rental yards, they dont cost too much for a day. Around here, they make you buy your own bit- about 10 bucks. Then you need some concrete bolts. I find that the sleeve anchor style is the easiest to use- I bolted my bender down with 4 "Lok-Bolts" from Powers- www.powers.com look under mechanical anchors. I used a 5/8" diameter by about 3" long, tighten em down tight with a wrench, and have since bent somewhere around 20,000 parts with it in the last ten years. A good industrial supply house or fastener company will carry a much better selection of these than a home improvement store will. There are other types that rely on pounding in, or pins that make the anchor expand, but I find they screw up a lot more often- the sleeve type are usually a lot easier to set, and hold just fine for what you need. |
| - Ries - Monday, 07/17/06 13:31:27 EDT |
|
So, i got like 80 pounds of Anthracite Finings by accident, how am i supposed to light them? apparently the local historic village uses this same stuff, Heritage Park, in Calgary alberta, anywyas, i know its not going to be that great for forgning, but i would think it can still be done, help me |
| Cameron - Monday, 07/17/06 14:39:16 EDT |
|
sandycreekforge my son works for the railroad and he replaces the trucks under the rail cars. i asked him what they did with the wheels and axels that had to be replaced, and he said they rebuild all the axels and wheels if it was at all possible to rebuild them. ron60. |
| - ronald rumfelt - Monday, 07/17/06 15:01:17 EDT |
|
ok...when u heat metal to forge it it in to shape u let it cool slow so the grain size would get larger right (but if it doesnt i would think its from heat being "knoked out")and thus making the metal less dense and weeker so would u not have to harden it more than 2 times before quenching on the 3rd???if so how would u know the# of times u would harden it |
| thomas mayhugh - Monday, 07/17/06 16:39:04 EDT |
|
Grant, How well would your induction unit work for forge welding damascus billets starting in the 4"x4" range and working down? Would you have to have multiple coils and if so, what increments would you suggest? You mention already welding with your set-up. Did you use flux and if so, did it have any effect on the coils or other components? Any idea as to how heating a 4x4 layered billet would heat differently than a 4x4 tube with steel powder in it for mosaic damascus? Thanks Patrick |
| Patrick Nowak - Monday, 07/17/06 16:54:41 EDT |
|
Laura, My 5hp Ingersoll-Rand T-30 60 gallon compressor jus tsits on the floor on a rubber mat; no anchors. I use a six foot length of 1-1/2" rubber hose betwee the receiver and the air lines to absorb sudden changes and vibration. In a year, the compressor hasn't moved at all. I prefer to use drilled anchors for securing tools against movement. Depending on the type of tool and the stresses involved; I may use lead anchors and lag bolts for a bender, since the loads are mostly lateral, but for a compressor which vibrates considerably, I would probably use threaded female anchors setin expanding grout. Then I would put a vibratio damping mat between the compressor and the concrete floor and bolt it down ,using an anaerobic thread locker on the bolt threads. For really jumpy things like powerhammers, I'd go with threaded anchors epoxied into deep holes in the concrete ( at least 8" deep), and the anti-vibration mat and bolts with anaerobic thread locker. I would prefer to cut the floor and pour a proper foundation, with anchors cast in place, but that may not be a viable solution in every case. With power hammers, you can pretty much count on any fasteners coming loose if they're not sealed or safety-wired. |
| vicopper - Monday, 07/17/06 17:00:14 EDT |
|
Uh Cameron; why not ask the folks near to you how they are managing to use the fines? I know that bituminous fines are used by mixing with water and letting the sludge coke into a solid mass that can then be worked like regular coked coal. Thomas, larger grain would not necessarily be less dense I would think that single crystal would be the most dense. Modern alloys generally have additives to help prevent or slow down grain growth and of course forging is a method or reducing grain size---mechanical deformation leading to dislocations leading to re-nucleation of grains... However most bladesmiths normalize their work several times before hardening, three times has been accepted as a "magic" number with diminishing returns increasing after that. After normalizing you then heat and quench---generally only 1 time though there are some alloys that do improve by multiple hardening runs---they can be a pain in other ways too so they are best not to start out on. After quenching you *IMMEDIATLY* draw temper on the blade and again most bladesmiths will do this several times as well. thomas |
| Thomas P - Monday, 07/17/06 17:44:33 EDT |
|
Ineed to know what would be the lenth of the ark of a cegment of a circle that has a cord lenth of 42 in and a cord hight of 12 in and a radiaus of 24.375???? (how long of a pice do i need to cut ??to bend the ark) |
| Bill E - Monday, 07/17/06 18:24:35 EDT |
|
Bill E: Sounds suspiciously like a homework question. Now if you are using it in a particular application than that is a different story. |
| Ken Scharabok - Monday, 07/17/06 18:49:39 EDT |
|
Hi Bill Epps circumference of 76.5375 divide in half is 38.36875 I think. My thinking cap is not on very tight at the moment. Better have someone else figure this on |
| - mousehole - Monday, 07/17/06 18:51:23 EDT |
|
Hi Ken It is Bill Epps. He is a bit old to be in school. You math guys better help him on this one. I am pretty tired and just took a WAG. :) |
| - mousehole - Monday, 07/17/06 18:52:49 EDT |
|
Ries and Vicopper thank you for the help with fastening to concrete I really appreciate it! Laura |
| - Laura - Monday, 07/17/06 18:58:58 EDT |
|
ok well what is normal izing and how is it done also what would u say is the best materials to use for making a sword and i dont care how hard it is to make a blade from them i just want to know wich combo would be best and y |
| thomas mayhugh - Monday, 07/17/06 19:28:06 EDT |
|
which is the best book to read for learnign all there is to know about forging |
| thomas mayhugh - Monday, 07/17/06 19:29:45 EDT |
|
Thomas: Right here would be a good place to start: http://www.anvilfire.com/FAQs/swords_faq_index.htm |
| Rick - Monday, 07/17/06 20:01:13 EDT |
|
Bill? Why not draw it out and measure? |
| JimG - Monday, 07/17/06 20:15:05 EDT |
|
OK, I need to correct an error in one of my posts. The operating efficiency of an induction coil used for HF pipe welding is indeed about 20%. However, the system efficiency of an induction unit used to HEAT a tube or a billet is the operating efficiency to the bus times the operating efficiency of the coil. Now we know that the bus efficiency is about 80% and the coil is estimated to be about 60% (more or less depending on how well matched it is to the load) and we get a system efficiency of about 50% more or less. Way too many big equations for me to work out but I think the realistic efficiency would be in the 50-70% range, not the 20% I quoted earlier. Sorry for the confusion, Grant. Don't quote me on the price of the Tocco unit, it was over 6 years ago that I saw it in their shop and I didn't write anything down. Maybe it was $5000. Tocco bought Ajax Magnethermic last year and I am sure their prices went up to offset the purchase of Ajax. I just got back from the social event of the year in Left Tennessee: The Grand Opening of a new Tractor Supply Store! YEEEHAAA! |
| quenchcrack - Monday, 07/17/06 20:58:06 EDT |
|
Thomas: Durring the process of forging and grinding a blade, different sections are heated and placed under stress in doing so, different grain sizes will form over the length of the blade. This inconsistancy can cause problems with blade performance when finished, as well as some problems durring the heat treating. To normalize, the enitre length of the blade is heated consistantly to about a cherry red (to keep it simple)or so, then allowed to cool uniformally, in doing so, the grain size in the blade will become more uniform over the entire length and areas of different grain and stress will be removed. Often normalization is repeated multiple times to ensure that the grain is as uniform as possible before the heat hardening. As for good blade making steel, it has to have two qualities to be considered a blade worthy material. First, it must be hard so that it will hold an edge, and it must be flexable and resialiant so as not to either bend or break when put under the stress it will face in battle. High carbon steels are the only thing to use, mild and medium grade are far too soft, wont hold an edge and will bend very easily. I would not recomend any stainless either, 440 is about the only grade that you can do a blade out of, but that is best left for knives that arent of the size nor under the same stress as a sword. The other grades of stainless are very soft and almost "gummy" if you will. So, personally I would not go with anything besides a high carbon steel. Spring steel (5160) is very good for swords, its hard enough to hold an edge and it is extremly flexable and resialiant so it wont fracture. Some of the more common blade making steels are the 5160, Q-1, W-1 & W-2, 1095, and 52100 just to name a few. Basically any steel with a carbon content greater than .5% carbon is good (high carbon, spring, and tool steels). Now, if you were to do pattern welded, laminated, or damascus blades, you would forge weld a high carbon with a lower carbon, but that is a different story. I would say that spring steel is the best choice for a sword due to its huge amount of flexability, it hardens up nicly, and holds a good edge. |
| - TarAlderion - Monday, 07/17/06 22:23:48 EDT |
|
Sorry noticed a mistake. Its not "Q-1" its O-1. And I also forgot to throw in that the entire 10-series will make good blades. 1060 (basically spring) and 1050 are a little tougher for sword use than the upper 1084 and 1095. |
| - TarAlderion - Monday, 07/17/06 22:41:55 EDT |
|
Heat Treatment: The absolute best way to find out how to heat treat and weather to normalize after forging is to get the handbook from the steel manufacturer and follow the directions. This of course doesn't work on "junkyard" steel. Some steels shouldn't be normalised after forging. None of the tool steels I ever used were supposed to be heated and quenched more than once, and tempering on MOST steels is supposed to be done for 1 hour at temperature plus 5 minutes per inch of thickness, 1 time only. There are a few tool steels that are to be drawn twice, not necesairily to the same temperature. When "running the colors" to get a diferential temper on a blade You CAN NOT temper for 1 hour, so some of the blademakers are tempering multiple times to try and make up for the difference. |
| Dave Boyer - Monday, 07/17/06 22:44:25 EDT |
|
Bill E: I got 50.617" by calculation. I didn't lay it out, If I goofed it could be WAY OFF. |
| Dave Boyer - Monday, 07/17/06 23:01:16 EDT |
|
That looks suspicously like Bill Epps. I recognize the handwriting from his iForge demos :) We do Bills homework here and most anything else he asks! Bill theres a slight error in your numbers : the height, half the length of the chord must form a rt triangle with the radius as the long side - this would require a radius of 24.187" so I am going to assume thats the case. Then the angle subtended by the chord is 120.51 deg , very slightly over 1/3 the circle so the length of the arc will be 1/3 the circumference ie 1/3 of 2Pi x 24.187 = 50.66" check my work! |
| adam - Monday, 07/17/06 23:10:50 EDT |
|
PS if I use your number for the radius I get an arc length of 51.27. Like Dave says, I would lay it out to be sure. I can do math but I never mastered arithmetic :) |
| adam - Monday, 07/17/06 23:18:19 EDT |
|
Adam and Dave I am glad your math caps are on. I was asleep at the wheel on that one. :) |
| - mousehole - Monday, 07/17/06 23:25:40 EDT |
|
Adam: Where Did You get 24.187 from? I used the same method as You, but used 24.375" for the radius [hypotenuse] 21" for altitude and 12.375" for the base to get an angle of 118.9795 deg. total. or .3305% of the circumfrence. |
| Dave Boyer - Tuesday, 07/18/06 00:44:30 EDT |
|
Still having modem and PC problems. . . be back later. . updating software. GRRRRRRRR |
| - guru - Tuesday, 07/18/06 00:59:48 EDT |
|
Dave I understod the chord length was 42" and the distance from the center of the chord to the center of the circle was 12" so root(12^2+ 21^2) would be 24.187" the radius of the circle - this gives an angle of 120.26 deg. But if you assume the radius is correct and calculate the height the answer might be what you calculated - too sleepy to check. I do think those three numbers that Bill gave are slightly inconsistent |
| adam - Tuesday, 07/18/06 01:13:16 EDT |
|
Patrick: I wish there was a better answer, but induction falls flat when it comes to pattern welding. First, 4 X 4 requires a fairly low frequency (500-1000Hz), second, equipment for heating a 4 X 4 is usually a comercial billet heater. And lastly laminates really screw up the magnetic field, that's why they use a laminated core in a transformer. The tube filled with powder would be even worse. sorry Quenchcrack: Thanks for the update. The discussion has been fun and it really helps me understand where I'm not giving all the needed information and where any confusion might creep in. |
| - grant - Tuesday, 07/18/06 01:13:20 EDT |
|
Well, I used 24.375 radius, 42 chord length, 12 height and get an answer of 50.6167 from my CAD. Actually you only need the radius and one of the others. |
| - grant - Tuesday, 07/18/06 01:19:15 EDT |
|
Hmm, guess you don't need the radius if you have the other two. So, any two will give you the answer. |
| - grant - Tuesday, 07/18/06 02:07:41 EDT |
|
To Bill E: My apologies. Didn't associate name with you. |
| Ken Scharabok - Tuesday, 07/18/06 02:26:33 EDT |
|
Adam: The rise of a chord is from the chord to the diameter. Asuming that is what Bill is using for hight, when I saw Your answer I checked the sides 12.375", 21", 24.375", and it does make a Rt. triangle, so I figured that the 24.375 radius was OK. Grant, You COULD solve for the radius knowing the length and rise of the chord, I used to do that to figure the bullet nose radius for pilot pins, but it is another bunch of steps. I guess not an issue with CAD, fortunatly We had calculators when I was doing it, be a real bear with a trig table, pad,& pencil. |
| Dave Boyer - Tuesday, 07/18/06 04:03:18 EDT |
|
Yet another induction question: This is only to satisfy my technical curiosity. Would the induction affect the heat treatment of a higher carbon steel? I was just wondering of those emag eddies would somehow scramble the normal formation of grain. |
| - Marc - Tuesday, 07/18/06 08:36:56 EDT |
|
Marc, The first time I saw induction heating at work was at the GE Forge and tool works, a horseshoeing tool supply. They used it to harden the hoof nipper blades. Just a portion of the blades was heated, the business end and a little behind. This was done on both blades at once after the riveted assembly. I don't think there were any adverse effects, as GE is considered top of the line. Chords and Arcs. I am not too savvy when it comes to geometry or cad calculations, but did we miss something by not asking the cross sectional dimensions of the stock to be bent? Are we working with the mean diameter of the stock, the OD, or the ID? |
| Frank Turley - Tuesday, 07/18/06 09:23:48 EDT |
|
Bill Epps, Final Answer: First I checked Bill's numbers. When you have more than the minimum to define what you need they can be inconsitant. Bill's numbers of Cord = 42, Rise = 12 and Radius = 24.375 are correct, according to my old copy of Mass2 (based on MACHINERY'S HANDBOOK). There are several ways to calculate the answer. The constructivist method I use is to determine the angle of the Isosceles triangle created by the cord and radius with the center of the circle one corner. Using a right triangle for half of the Isosceles you use half the cord and the radius minus the rise. Dimensions = 21, 24.375 and 12.375 In this case it is 118.98 degrees. That is .3305 of the full circle. So the length of the segment is .3305 times the circumference of the full circle. So, 48.75 times PI = 153.153. Times .3305 = 50.6167... Correct Answer: 50.617" segment. Dave and Grant had the right answers. However, the whole thing is so close to being 1/3 of a circle and the angle being 120 degrees I would check the layout and see it that was what was intended by the designer. IF that is the that case the segment is 51.051. |
| - guru - Tuesday, 07/18/06 09:46:23 EDT |
|
Frank, I assumed Bill was talking about center lines as he has done enough of this to know. But it is a good obsevation and he did not state it as part of his question. I'm still checking in via dial-up on a backup PC (which I spent all weekend rebuilding. . GRRRRR). Had to do a clean install of Windirt and lost tons of files and old programs. |
| - guru - Tuesday, 07/18/06 09:53:31 EDT |
|
Fancy Math: I defined a lot of questions in my old Mass2 calculator similar to the way it is on the on-line Mass3j by allowing any of the possible knowns to be entered including area and sometimes volume (see Polygons). This means setting up a lot of cases in the programming but that is irrevelent as the user does not care what goes on behind the scenes. What the user wants is simplicity and the flexibility to enter what they know. Sometimes what you know is that you want X volume in Y length in "this shape". OR they want to do some "what ifs" based on an odd variable. Too few computer based calculators work this way. |
| - guru - Tuesday, 07/18/06 10:12:57 EDT |
|
We all agree that half the chord, the rise and the radius form a rt triangle with the radius on the hyp. What do you guys get for root( 12^2 + 21^2)? I get 24.186777 - not 24.375 |
| adam - Tuesday, 07/18/06 10:40:44 EDT |
|
Adam, You need to make a clear diagram. That is the hypotenuse of the right triangle between the cord and the arc or the cord of half the arc. That sits on top of a right triangle under the cord. 12, 21, 12.18677 top triangle (cord of 1/2 the arc) 12.375, 21, 24.375 bottom triangle (half the Isosceles). Calculating the top triangle serves no purpose. I did the same then tossed it. The bottom triangle is used to find the angle or sweep of the arc which can be used via proportioning the curcumference to find the length of the segment under the cord. |
| - guru - Tuesday, 07/18/06 10:57:52 EDT |
|
We are using the same method - the key is to find the angle swept out by the arc - theta then s = theta/ (2pi)r Now using just the Radius, r, and the Chord, c the arc length s and the angles in radians: s = 2* asin(c/2r) * r = 50.61674614 but also s = 2*atan(c/2h)*r = 51.26794786 and s = 2*acos(h/r) *r = 51.48279432 We are ALL right and Bill is wrong! Sorry Bill! He gave 3 numbers where, as Grant pointed out, only two were needed. Those three numbers are inconsistent, so depending on which two you pick for the calculation you can get three different answers |
| adam - Tuesday, 07/18/06 11:14:15 EDT |
|
ummm errata ... s = theta * r where theta is in radians |
| adam - Tuesday, 07/18/06 11:15:10 EDT |
|
ronald , thanks for the heads up on the train axles , I had a feeling that that was what happened (couldn't see any corporation scrapping out that much steel unless absolutely neccessary.) I mentioned it earlier, and now I've finally got around to doing the math. This is in the vein of me building something similar to the KA75 (or at least based on the same general idea). So i did the math, and as close as I can figure the anvils on those hammers weigh only about 200-225 lbs. If the hammers really produce 500psi of striking force ,this seems like an awfully light anvil for that much for that much force. Is there some math or mechanical principal that I am missing somewhere? Thanks everyone, -Aaron @ The SCF |
| - sandycreekforge - Tuesday, 07/18/06 11:37:11 EDT |
|
Math Errors: Adam, Nope, you are still confused and need to start over and draw a clear diagram. Your logic is incorrect. Bill's cord, height and radius check out. There is only one right answer and Grant, Dave and I got it right. The proof is VERY simple geometry. Half the cord (42") is one side of a right triangle = 21". The radius given MINUS the height is the other side = 12.375". The result, the hypotenuse is the radius given 24.375 (48.75 dia. circle). THEREFORE: All three givens are true and there is only ONE true answer and no inconsistancies. From these the length of segment is 50.617". Start at the begining. The half segment cord distance you keep calculating is a red Herring having nothing to do with the solution. The fact that this thing is so close to a 30-60-90 triangle also lends itself to many false assumptions. |
| - guru - Tuesday, 07/18/06 12:02:37 EDT |
|
Note: what's "industry standard" is not always the best way to go---just the cheapest. Particularly in knifemaking when we are discussing blades much thinner than the standard 1" cross section that most of the tables in the books are based on. Cycling tempering helps as the change helps "jar" a bit more down to tougher state---at least that was the explination a research metallurgist at Batelle Institute told us when I worked for the swordmaker. BTW 1020, 1030, 1040 are 10 series that don't make decent blades and pattern welded billets do not have to be high carbon/low carbon mixes; many makers use high carbon/high carbon but with differing alloying elements. Thomas |
| Thomas P - Tuesday, 07/18/06 12:13:52 EDT |
|
Hammer/Anvil Ratios: SCF, There are many long discussions on this subject that have been repeated over and over here. See our archive of April 1-7, 2006 with the efficiency chart notation. Simply put: 1) You must forget theoretical energy calculations most are full of errors and do not reflect the real world. 2) The ratio used is the weight of the anvil vs. the weight of the moving ram and attached parts (drive rod, die). 3) The greater the ratio the more efficient the hammer up to a certain point. Cost effectivness changes over time. As steel or cast iron for mass increasses in cost the cost effectivness of large anvils has come down. 20:1 gives you a 70% efficient system and is considered to be the best ratio for a heavy duty hammer. 15:1 (59%) was long considered a "normal" ratio for power hammers. 10:1 (39%) is commonly used today due the cost of steel. The loss in efficiency goes into anvil movement which is resisted by the floor or stretching the machine frame. This results in vibration. A heavy foundation can reduce the vibration and improve the effeciency. When building a JYH you use what you can find. However, I have known folks to build hammers with hollow pipe anvils. They work but are very noisy and will bounce themselves off the floor. There is a significant amount of loss and more noise than work. The KA does have a very low anvil to ram ratio. I think they offer an optional heavy base plate that improves the ratio considerably. This was a design choice so that more money could be put into the dovetail dieholder design. |
| - guru - Tuesday, 07/18/06 12:27:13 EDT |
|
okay I see now - this is a semantics problem. We all have the same diagram but with different names. In my diagram the HEIGHT is the shortest distance from the center of the circle to the chord. And it turns out that thats the same diagram my mathbook uses. If you take the HEIGHT to be the longest distance from the chord to the radius then you do get three numbers that make a rt triangle and those values in the formulae above give your answer |
| adam - Tuesday, 07/18/06 12:43:45 EDT |
|
...If you take the HEIGHT to be the longest distance from the chord to the CIRCUMFERENCE sorry again :) |
| adam - Tuesday, 07/18/06 12:44:35 EDT |
|
Copper safety Can I use electrical wire for forging and soldering and penny welding or do I need to worry about beryllium. Can I assume that if the wire is soft it doesnt have any beryllium? |
| adam - Tuesday, 07/18/06 12:49:22 EDT |
|
ok hi carbon"/"spring steel are basicaly the best but what about that one um...tungsten i read thayt stuff is like better than titanium "gram to gram" and my dad had also said that spring steel is the best to use...(he was/is one fine welder/engineer) |
| thomas mayhugh - Tuesday, 07/18/06 13:05:27 EDT |
|
Adam, Copper wire is something like 99.999% pure copper. Yes you can use it for forge brazing or penny welding. Berylium is used in making bronze spring wire and hard braonzes used to make tools. The hard berylium bronze wrenches and hammers are called "spark free" and are required for working near flamable vapors and explosive atmospheres. If you find a wrench, hammer or pry bar made of a pinkish bronze then it is probably berylium bronze. The hazzard of berylium is the metal itself when machined, ground of polished. Anything that makes dust. The dust causes a reaction in the lungs that is so similar to pnemonia that it is almost always misdiagnosed. With sufficient exposure the wrong treatment you die. |
| - guru - Tuesday, 07/18/06 13:08:11 EDT |
|
Steels: Thomas M, There are thousands of alloy steels. Each has advantages and disadvantages. Some are better for one application than another. Tungsten steels are very heat resistant and have great advantages at high heats. Most have other alloying ingrediants. The disadvantage is that if you are making a knife it is difficult to temper soft enough thus being brittle in thin sections and is difficult to sharpen due to the alloy content. Cobalt also increases steels heat resistance and increases hardness. Cobalt HSS (High Speed Steels) are the best for drill bita and milling cutters. But the heat treating is difficult and expensive, not something to attempt in a blacksmith shop. Alloy steels typically include nickle, chrome, manganese, tungsten, cobalt, vanadium and others. Some have a small amount and others have so much alloy that there is little or less iron than other constituants. They range from low carbon to high carbon as well as high and low amounts of the alloys. What makes a good steel for punches and hammers is not the same as a good steel for cutting edges and those for cutting steel are different than those for cutting wood or flesh. Check out Machinery's Handbook for starters. Then any of the books on bladesmithing. If you are serious the ASM metal/alloy references are good. See also our review of Metals for Engineering Craftsmen. |
| - guru - Tuesday, 07/18/06 13:26:20 EDT |
|
o hey i thought i mite just give some info on me im 15 ill be 16 in sept ive been intrested in this stuff as long as i can remember i live in culpeper va.(a bum rag town) dont believe anything u read about this place sofar ive made a few designes (cant spell) and iv only grinded things sofar but the material i got to make the stuff was from bud k but rite now i cant really aford much to start a forge but i was thinking about this "wok" version of a grill from lows and use coal or this gas grill but im not sure which would be hotter or less on the wallet anyway thats o lil' bout me and thak u guys for your help so far i really apresiate it!!! |
| thomas mayhugh - Tuesday, 07/18/06 13:26:43 EDT |
|
thanks for the simple breakdown on the numbers , guru , i think i can work with what i have . My concern was that there was a mechanical reason that the anvil was relatively light, but since it seems to be an economic reason, I'll just throw as much mass as i can under it. I have a (practically) unlimited supply for scrap semi axles. I have four now, and i think that with three or four more i should be able to get enough mass (and if not i also have a virtually unlimited supply of lead tire weights to make up the difference). i also have a piece of one inch plate with a 30" diameter for the base. looks like the only expensive part is going to be the control valve and cylinders ;) |
| - sandycreekforge - Tuesday, 07/18/06 13:29:08 EDT |
|
thomas m. the book that the the guru mentioned , Metals for Engineering Craftsmen is available as a PDF format ebook at http://195.92.230.85/Publications/articles/Publication_tcm2-7494.asp this is put out on various sites by the British government, so I'm pretty sure downloading it doesn't break any laws. This agency also has several other Ebooks about blacksmithing at http://195.92.230.85/Index.asp just type blacksmith in the search box and it should bring up 4 different Ebooks in PDF format. Enjoy. |
| - sandycreekforge - Tuesday, 07/18/06 13:41:32 EDT |
|
Copper, thanks! I had heard that busbars have berylium so I wondered how pervasive that stuff was. But ordinairy elec wire needs to be very soft. I assume that if the copper is soft or can be annealed to soft it wont have Be. |
| adam - Tuesday, 07/18/06 14:15:42 EDT |
|
Thomas P: you are exactly right about the lower 10-series, not enough carbon to be decent for blades. I got caught up in other things and accidently forgot to exclude those (thats what you get for beign too general). I did mention at least .5% carbon though, which I suppose technically would exclude them (glances away). My mistake. Oh, and I didnt mean to come across as pattern welding having to be high carbon to low carbon mixes, but, that usually tends to increase the contrast in the coloration. I myself have done some high to high carbon stuff. Its difficult to write what I mean sometimes, I suppose, especially when I dont want it to be ten pages. I usually mess these things up when I am trying to condense or simplify. Thomas M.: As for setting up a forge, it depends on what you intended uses are. I don't know if I would recomend messing around with grills. Usually they arent shaped quite right for what is needed, and there are pleanty of better things you can do for less money. If you want to use coal, and you want something cheap, you can go with the breakdrum design, and use an old hair dryer with the heating element disconnected for a blower. For a gas forge, you will need a bit more. The gas grills will not get anywhere near hot enough to do any forging with the way they are, their insulation factor is far to low to hold the type of heat needed in forging, plus that burner system doesnt have the punch to generate the heat you need. It sounds like your main goal for the forge is weapons production. I personally use a propane forge. There are pros and cons to each type of forge and it really depends on what you are after in your work. The reason I went with a gas forge was that, first of all, in my situation, propane is easier to come by, and cheaper than buying coal. Gas forges are also a bit easier to use, you just turn on the gas and light it up (then adjust gas flow and oxygen intake to get it running where you desire, a neutral flame, oxidizing flame, reducing flame, ect.) With the coal forges, you have to know what you are doing when setting up the fire, and how to build it right for what you need (which I am not the person to ask about coal forges). Propane forges are also a bit more economical in fuel usage, and you can get them hotter, easier. The type of forge a person uses is really comes down to personal perefrence. Coal is no better than gas, and gas is no better than coal, just depends on what you want to use. For more info on forges, check out the FAQ, cant beat it. There are lots of things about forge construction, operating stats, and whatever else you need to know. Oh, and a note on titanium, and tungsten in blade uses. Jock has it down perfectly in his post BTW. As for what I want to say, firstly, titanium has been taken and exagerated by hollywood and turned into a high tech sword material that far surpasses anything else, kind of like what they have done reguarding the katana and japanese bladesmithing. Katanas and folded steel do not posess the ability to cut cleanly through other swords, cement pillars, cars, and what ever else. They are like any other sword or knife, they were not better than the weapons produced in europe durring the medieval period either. Infact, all of the hollywood combat they do with swords is improbable, you never parry/block/deflect blows with the edge of a weapon, it will ruin the weapon, causing chiping and big gouges to form in the blade. Physically what is done with blades in the movies would destroy them. Sorry about that little rant, I just cant stand that type of thing. Back to titanium, it is not what you would want to use for a sword blade. It sounds cool, is light weight and extremly strong, but it would snap on you in an instant. Its far to difficult to work with with out special equipment and skill. The other thing is, you dont want a sword to be that light, it needs to have weight and mass. The mass creates momentum in a swing which increases the force of impact the blade has upon contact. And, I dont think you could afford to use titanium in a blade, that stuff is very expensive. Stick with the steel. |
| - TarAlderion - Tuesday, 07/18/06 14:35:57 EDT |
|
On the KA-75. I remember a brief conversation with Bob Bergman at one time on it. He remarked it wasn't intended to be a forging hammer, but rather either a substitute for a striker or for one shot die/jig work. I have a friend who has an ornamental ironwork shop in the general area. He has a 25 LB LG for light/delicate work and a large, self-contained air hammer for heavy stuff. To compliment it he has a KA-75 run off of a fairly standard portable shop compressor. Say he is putting the flame waves at the top of a finial. He has top and bottom dies ready to go in the KA75. After forging one stroke of the KA-75 puts in the waves. However, name escapes me, but there was someone at a recent Quad-State who was using a KA-75 to forge hammer heads. As I recall he was having difficult due to the compressor recycle/refill capacity he was using. Perhaps Nathan Robertson, Jackpine Forge (jpine@paulbunyan.net). For those not familiar with him he makes custom-made blacksmithing tools, such as an assortment of hammer heads. |
| Ken Scharabok - Tuesday, 07/18/06 16:43:47 EDT |
|
On the KA75. I am mostly using the hammer for the punching , cutting , "striker" purpose. The few times that I will use it for drawing will be helped by the fact that i have a large shop compressor , and I also have the tank off of an old compressor to use as a "dump" tank that will get installed right next to the hammer (much the way they recommend on the KA75 website. But for the most part i am going to use the hammer as a striker. Thanks for the heads up on these issues. And if I ever do decide that I need it for drawing purposes i can always "reverse engineer it" and fix it up with more of a kinyon style air system. Aaron @ The SCF |
| - sandycreekforge - Tuesday, 07/18/06 17:57:39 EDT |
|
Induction for pattern welds: I would have thought the biggest problem for pattern welding in an induction heater would have been getting an even heat. You couldn't do it at low frequency though. While the billet may be large, the layers are thin & so require a high frequency. That's why laminated cores are only suitable for low-ish frequency transformers - once freq. gets too high, they get hot. Given that the flux density will not be evenly distributed & so cause uneven heating, I'm not certain if conduction would carry the heat through to the centre in a reasonable time. |
| andrew - Tuesday, 07/18/06 19:31:46 EDT |
|
Which side of this hammer has the rounding face? Why is one side octagon, and one side square? (overlength link removed) |
| - Tyler Murch - Tuesday, 07/18/06 20:57:07 EDT |
|
Tyler, I think this is this is Tom's design. The square face is traditionally used on the continent of Europe, and apparently, Tom likes that. The rounding face on the octagonal end is often used by horseshoers to "break the toe" (make the toe bend) and to concave the inner foot surface of a horseshoe to help prevent sole pressure. The typical American rounding hammer has two circular faces of the same diameter, one of them domed, one of them with an extremely slight "rocker". Rounding hammers are designed for farriers, but many blacksmiths use them and have them as part of their "hammer arsenal". |
| Frank Turley - Tuesday, 07/18/06 21:13:34 EDT |
|
Conduction between laminates is problematic. Guess it's no worse than with a gas forge, it's also heating from the outside. given the relativly long soak time in either case it might work O.K. Guess I need to do some R&R (or is that R&D?). It's not something that comes up in industrial aplications. Patrick: How thick are your layers when you start? 4 inch square is pretty big, 2 inch would make pretty big blade. How long are you talking? The reference depth @ 100KHz (the max frequency of this machine)is around .060. That means when the material is less than about 1/8 thick the lines of the magnetic flux start crossing and cancelling each other out. Due to the magnetic qualities of steel it will heat to a little above Curie (the non-magnetic temp) and go no further. Now that is with magnetic flux on both sides of the part, not sure what would happen with a laminate. I think the same thing. |
| - grant - Tuesday, 07/18/06 21:14:54 EDT |
|
Thanks Frank. I was at a guys shop last weekend who had all Tom Clarke and Hofi hammers. Decided to make my own. I could use that rounding face for tomahawks. |
| - Tyler Murch - Tuesday, 07/18/06 21:50:20 EDT |
|
Tyler: I have several of those hammers. In fact I believe Tom started making them after I special ordered a couple. The sq face is a european style hammer face with a watch glass curve as is typical on a forging hammer face. The octagonal is a rounding face - about a 2.5" dia radius. Its a very nice combo IMO, when I need a straight pein I use the far edge of the anvil. I have it in 2.5# 3# & 4#. The hammers are *beautifully* forged and finished. I would love to have a 5# version too. |
| adam - Tuesday, 07/18/06 22:45:30 EDT |
|
Grant, I am not actually doing any laminated billets myself, so the question was hypothetical. However, I do have a friend who is in the buisness of providing mosaic damascus to blademakers. His typical starting stock is 1.5 wide x .125 thick. The assembled billet is 4" thick. He ends up working this down to a large variety of sizes and lengths and then performs various manipulations and re-welds to achieve the final pattern. Right now, he is using a large NC Tool forge, but I was hoping the induction unit you have might be a viable alternative since his forging is limited to long skinny bars that are generally straight. Patrick |
| patrick nowak - Tuesday, 07/18/06 23:10:37 EDT |
|
I did mess up (the angle was 60deg ) 5 divisnions I was to busy trying to figger out the ark that I forgott what the angle was thanks |
| Bill E - Tuesday, 07/18/06 23:43:00 EDT |
|
PS octagonal rounding face - doesnt need to be octagonal its just pretty. If I were making one I would likely leave it square - point is with the rounding face you arent going to use the edges like you do on the regular forging face. I used this hammer when I took Franks class and every now and then he would dis it pointing out that a round forging face can be used at any angle wrt to the anvil face. A square face is best used standing at the heel of the anvil so that the vert edges line up with the edge of the anvil. When you do this you get awesome scissoring action for drawing out. |
| adam - Wednesday, 07/19/06 00:04:29 EDT |
|
Adam: I would be really surprised if busbars had berylium, as it lowers electrical conductivity. Resistance welding contacts have some berylium, but as much as a harder point would be desired, the content is kept low enough to keep resistance from being a problem. Except for silver any alloy I know of increases resistance in copper, so electrical conductors are generally close to pure copper. |
| Dave Boyer - Wednesday, 07/19/06 01:28:38 EDT |
|
induction: Grant, the books I have here recommend using two frequencies, a high frequency up to the curry point, and then a low frequency (by an order of magnitude) to bring up to welding temperature. They suggest this is only economical for large industrial machines, but given the capabilities of large IGBT's and power MOSFET's etc these days, I don't see why this would be the case. Perhaps they refer to need for some kind of feedback to identify the currie point - which would be the smith in this case. |
| andrew - Wednesday, 07/19/06 03:16:21 EDT |
|
Bussbars, Maybe some exotics special purpose bussbars are alloy, Only special treatment I know, Many are tin plated to afford corrosion resistance. But bussbars are all copper, Non anealed so they retain better strength are left workhardened from the last passes through the rollers at the mill. Unlike wire thats annealed prior to being insulated, But its still hard to a degree, Not deadsoft. (Conductors within firealarm cable typically remain much harder than typical TH insulated conductors, a notable and irritating exception. I dont know if there is a legitimate technical reason for it, Or its just cheaper manufacture and the Alarm Business in general is too dumb to realise its an inferior product) Wire needs to have flexabilty to ease installation and reduce damages from pinches etc. BTW, Whats this about avoiding copper in the forge? I heard alot of warnings thats an old prank to pull on a Smith is to toss a bit of copper (penny) into the fire, Somehow it buggers up the ability to forgeweld? The only cure is to stop work and clean out all the firepot and fuel then start over? Seem odd to me, As copper is so reactive to oxygen at high temperature, I would think if it does something bad the effects would only last a short time until the copper all melted out then whatever is left behind oxidised. So, Whats the true story?? |
| - Sven - Wednesday, 07/19/06 04:48:25 EDT |
|
Shopping at Fazzios Steel in New Jersey, the place has a regular area for metal stock and next to it 3 warehouses chock full of odds and ends, nuts and bolts, old tools, safes, ball bearings, anything, you name it. So, I'm there getting my usual stuff (junkyard art, sculptures, etc.) and I notice a very odd piece that nobody could identify. It's a rectangular block of iron set in a rectangular wood stand about 2 feet tall by 3 feet long. The iron block is about 8 inches by 2-1/2 feet, at one end of the face is a round groove, runs about 6 inches or so with another round groove going across the other groove. The wood stand has heavy iron strapping around it. It has a pretty cheap price tag ($59) but nobondy knows what it is. I suggested its use for blacksmithing and they agreed. What is it? I feel like I should have bought it or at least taken a shot of it. |
| - Nippulini - Wednesday, 07/19/06 08:31:38 EDT |
|
oops..... when I said (junkyard art, sculptures) I meant I was shopping for stuff to MAKE (junkyard art, sculptures) with. |
| - Nippulini - Wednesday, 07/19/06 08:33:00 EDT |
|
Dave & Sven. Thanks. I overheard some conversation somewhere - mebbe the hammerin - where I picked up this morsel of wisdom about berylium in busbars. I have put copper in my forges, both gas and coal, for penny welding etc and never noticed any effect on subsequent forge welding |
| adam - Wednesday, 07/19/06 08:46:28 EDT |
|
Lead Tire Weights: SCF, I've posted rants on this before so I will not repeat it. Don't use them. The ONLY purpose for lead is if for some very critical engineering reason you need the high density for space reasons OR you need the softness (lead hammers, lead anvils). Otherwise most uses of lead ESPECIALLY in power hammer and treadle hammer rams) is dumb and enviromentaly problematic use where steel is a much better application. Bundled JYH anvils: If the bar you have is fairly even diametered or straight it can be bundled to make an anvil. The pieces all need to be welded to each other periodicaly and the top ends aligned very flat so that a heavy cap can be set atop and welded on. I recommend several straps wraped around the whole like big collars and welded on. I posted a drawing of doing this with flat stock here somewhere and will have to look for it. . Odd Piece: TGN, It definitely sounds blacksmithy but could be any kind of shop special. There was a time when they cast lead and zinc elements around pickets. . . What makes me wonder about this piece is that it is so large. A smith dressing a cross joint would use a relatively small tool. This thing SOUNDS huge. As a repousse' form it would be on the scale of something like the Statue of Liberty. It also sounds like the kind of thing that there should be a pair. . . The world is full of this kind of odd stuff. |
| - guru - Wednesday, 07/19/06 08:58:48 EDT |
|
Math Question: Bill, I gave the answer in one of my posts where I guessed it was an even angle based on the layout. When the angle of the segment is known: 1) Calculate the full circumference (diameter * PI). 2) Divide the known angle in degrees by 360. 3a.) Multiply the circumference by the fraction above (#2). 3b.) OR if the angle is an even division of the circle skip #2 and just divide the circumference by the number of divisions (in this case 3 for 120°). When the angle is unknown then you have to calculate it. Often when you layout things like this you must fudge either the angle or the distance. Your dimensions sounded like good even construction dimensions but they scewed the angle just a bit. If that is the case then go with the answer we gave for those because it will give a better fit. But we all know that if we are making more than one we make the first sample the best we can then correct it. The following pieces will all be cut to the corrected dimension and be as perfect as we can make them. |
| - guru - Wednesday, 07/19/06 09:14:28 EDT |
|
Induction Billet Welding: Grant, There may be less problem than you think. The pieces are usualy tack welded at the ends to hold the bundle together. This should help the magnetic and electric conductivity. Except for a very few rare makers that are using shim stock and razor blade steel most starting billets are only 5 or 6 quater or 3/16 inch bars about 2" wide. Once the first weld is made the rest are most often made two slabs at a time. You said that you could forge weld a couple pieces held together or a bundle like basket twists. This should be no different. But I am sure you ae out testing it now. . . The other billet that is now common is the mosiac Damascus billet. These start as a bundle of 1/4" or 3/16" square (sometimes round) bars. They are usualy two alloys and stacked in a grid to make a pattern. Billets are fairly short then drawn out to reduce the size of the resulting pattern or image. Later these are built into other billets or slices sawed off and assembled mosaic style. . . |
| - guru - Wednesday, 07/19/06 09:35:15 EDT |
|
Weird Block of metal: I've seen anvils with channels milled in them used industrially for things like chain welding where they wanted to preserve the roundness of the stock. What signs of wear does it have? Looks forged on or could it be a large die from a press now being used as a JYA? Thomas |
| Thomas P - Wednesday, 07/19/06 10:30:06 EDT |
|
"Dis that hammer face." Adam & All, I have a method of fullering, top and bottom, over the far, radiused edge of the anvil with the hammer, so that I don't always have to reach for top and bottom fullers. It is similar to a normal hammer blow, except that you "pull" the hammer head toward you at the last of the swing. I can fuller more easily with the round (circular) face, because I can catch it from various angles. That particular process is more difficult with the square faced hammer. As for "scissoring", it can be done with a round or square faced hammer. When you're blacksmithing, you're not always standing by the heel and drawing. You are doing beaucoup processes which have nothing to do with drawing iron on the anvil face: bending a scroll, bending a corkssrew, hammer upsetting, working in the vise, etc. We can talk about the American ethos and a bit of history. We know that the Dutch and Germans were quite early settlers in what is now the eastern U.S., but the English language and English ways predominated over time. In my huge, 1894 catalog of tools*, the circular faced hammers are favored over square. On the "Machinists' Hammers" page, all have circular faces, including the ball peen. On the "Solid Cast Steel" page, we have engineers', blacksmiths', and planishing hammers. All have circular faces save one planishing hammer. "The Sledges" page depicts all circular faces. The boilermakers' hammers have circular faces. Horseshoers' hammers are shown with circular faces. Square or rectagular faces are found on stone, spauling, and brick hammers. The American blacksmiths' hammer evolved, and it is not too unlike the Continental square faces hammer. It is formed of square stock, the difference being that the working face has the corners chamfered enough so that the face can be made circular. When I came to blacksmithing from horseshoeing in the 1960s, I brought the round faced hammers with me. In my shop now, I have a large assortment of hammers and sledges, some of them having square faces. The French hammer has a slightly rectangular face with NO corner chamfers. Most Continental hammers have a little bit of corner chamfer. I've never seen a Japanese forging hammer that didn't have a circular face. A lot of hammer styling is regional happenstance. With the resuscitation of American smithcraft beginning around 1970, catalogs began to appear which depicted all manner of hand hammers. I think this is good; we can now pick and choose. *Manning, Maxwell, and Moore, New York, Chicago, 1894. |
| Frank Turley - Wednesday, 07/19/06 10:40:42 EDT |
|
Thanks guru, I'll keep that in mind. SCF |
| - sandycreekforge - Wednesday, 07/19/06 11:26:18 EDT |
|
Tyler- dont post those long URL's (web addresses) it screws up the width of the window, making the text go way off my screen over towards the driveway, which makes it hard to read. |
| - Ries - Wednesday, 07/19/06 12:37:10 EDT |
|
Out of curiosity I followed the link that was posted a few days ago to Tocco and called to find out what their small 5/10 kw TOCCOtron AC induction unit suitable for typical blacksmith work would cost; about $15,000 with all the items needed except the individual coils. Looks like Grant has come in at the right price point. |
| - Bob Johnson - Wednesday, 07/19/06 12:55:20 EDT |
|
Out of curiosity I followed the link that was posted a few days ago to Tocco and called to find out what their small 5/10 kw TOCCOtron AC induction unit suitable for typical blacksmith work would cost; about $15,000 with all the items needed except the individual coils. Looks like Grant has come in at the right price point. |
| - Bob Jhonson - Wednesday, 07/19/06 12:55:51 EDT |
|
i was reading the safty thing on here and activated charcoal cartridges seem to be good to use but do i really need one for the work i would be doing (weapons forging) i read the coal/charcoal page and it seems charcoal is a better choice for heating is this right or should i use something els (i need inexspensive and hi heat)or is gas the best o thank u for the recamendation on the book but is "new age of the anvil" good i was told about it by a midevil blacksmith at this renasants fair he was doing iron work mostly knives and spear tips |
| thomas mayhugh - Wednesday, 07/19/06 14:19:44 EDT |
|
I bought a 90 pound anvil and face is marked quite a bit. Can it be resurfaced? Thanks, rusty |
| rusty - Wednesday, 07/19/06 14:43:43 EDT |
|
Andrew: Yes, the resonant frequency from below curie to above curie can differ by as much as 20:1. Fortunately this machine has a range of 30 - 100KHz, which covers most of what we (blacksmiths) want to heat. As we talked about earlier, the machine automatically adjusts the frequency to the tank circuit (within it’s range). Lower frequency machines and higher frequency machines cost more. They build a lot of machine in the midrange and get economics of scale. The components used in my machines are ubiquitous. While a lower frequency would work on pieces ˝ inch and over, it would not work on anything smaller. A higher frequency machine is more dangerous and has poor penetration depth. These are radio frequency devices and require FCC certification and shielding and a whole slew of things I don’t want to get involved in. Working with a little too high of a frequency only limits the depth of the initial heat penetration, the balance is by thermal conduction. With too low of a frequency, you can’t heat above Curie. Actually the machine does not need to know when the part reaches Curie. It only needs to resonate with it. As the permeability changes (for whatever reason), so will the frequency. |
| - grant - Wednesday, 07/19/06 16:26:31 EDT |
|
Bob Johnson: Why thank you, Bob! Actually 5-10 KW is a little low, did they have a 15KW single phase machine? Most American machines I've seen in this size are three phase and cost a minimum of $20,000.00! |
| - grant - Wednesday, 07/19/06 16:30:52 EDT |
|
Rough Anvil: Rusty, You want to do as little as possible to prevent thinning the face too much. An 18" belt sander used with a coarse belt (60 to 100 grit) works well and prevents making worse dings. A flap face wheel on a small 4-1/2" angle grinder can also be used but you need to keep it moving constantly or you can make dips. A big 7" HD angle grinder can also be used but should only be used by someone with lots of experiance as they can make an 1/8 ding as fast as you can say DING. I use all three when available. If you do not own any of these grinders then the 4-1/2" are the least expensive. There are some for less than $20 but they are often throw aways. If you remove 95% of the marks you will often just have places that are just discoloration that can be ignored. Many of these will "heal" from use. In fact, if an anvil has a lot of chisle dings they should be closed up by lightly hammering all over the surface BEFORE doing any filing or grinding. Do not have anyone weld on it or machine it. Some old anvils only have a 1/2" thick face and others that are solid steel the hardness is less and less as you go into the face. Many anvils have been permanently ruined, turned to junk, by folks that said they knew what they were doing. . . |
| - guru - Wednesday, 07/19/06 16:49:04 EDT |
|
Rusty, Yes, No, or Maybe depending on information you haven't provided us. What type of anvil is it---cast, forge welded, cast iron with or without a tool steel face? The maker will help tell us this. How thick is the hardened face---if it has one? What kind of damage---how deep? If it is a traditionaly made anvil it has a hardened face of limited thickness and anything you do that decreases that thickness is moving that anvil toward boat anchor status. In general we suggest you go over the face with a belt sander or a flap wheel on an angle grinder---harder to not make mistakes with an angle grinder. Don't try to clean all the dings off, you just need a couple of inches in the sweet spot for most forging work. If the face is soft---see the anvil FAQ for the ball bearing test---You may want to try planishing it smoother before grinding. WARNING: There have been a number of people who have ruined anvils by clamping them down to a milling machine table and milling the top parallel to the bottom never realizing that they were *NOT* parallel to start with having been forged freehand using steam hammers. By doing so they have milled off large ammounts of the precious hardened face to make it parallel to the base that nobody cares about. If you *must* go this route clamp the face to the table of the mill and true the bottom to it and then flip it and mill the least ammount possible off the face. Welding on the face: if you have to ask about the proper method/rod to weld on high carbon HEAT TREATED steel you probably don't want to attempt this... Thomas |
| Thomas P - Wednesday, 07/19/06 16:58:50 EDT |
|
Thomas Mayhugh, Have you read our "Getting Started" article and followed the links? New Edge of the Anvil is one we recommend and have reviewed. The review is old and needs updating with more images but it is a very good book. Charcoal and coal each have their advantages and disadvantages. Charcoal is very clean burning and you often do not need a chimney (just good ventilation). However, it makes dusty ash that blows around AND some grades make hot fleas that are almost as bad as arc welding sputter balls. Even in tropical countries folks using charcoal like to wear full covering (long sleaves and pants) to help protect from the fire fleas. The poping hot fleas vary according to kind of wood used. Dense resinous wood charcoal tend to be worse than good pine or oak. Good coal makes a hotter denser fire. Its smoke MUST be vented outside the shop. Coal quality varies greatly. Where with charcoal the only variability is a slight difference in density and the quantity of fleas there is coal that will almost NOT burn. Coal ranges from nearly pure carbon down to mostly slate or "oil shale". In hardness it varies from anthracite to peat. There is infinite variety and only the best is really suitable for blacksmithing. However, the best is VERY good and much more efficient than charcoal. Wearing a respirator mask in the shop 100% of the time can be expensive. The filters have a limited life even with fairly clean air and the masks themselves wear out. Wearing a respirator mask is also stressful ESPECIALLY in hot weather and can lead to other problems. In fact in most industry you must pass a specific physical prior to using a respirator mask. However, there are times when you absolutely should wear a mask. It is also best to have the correct filters for the specific job. They make combination particulate and activated charcoal filters but they are more expensive and can be a waste. Hazards consist of dusts and particles that can be removed by filter paper and fumes and gases that go right through filter paper and must be removed by the activated charcoal. Most hazards are not both and half a combination filter will get used while the other half does nothing. Identify hazzards and have a mask with flters for each. Also be sure to have spare filters. They do not last forever and as they clog the stress of using them goes WAY up OR you start sucking air around the edges of the mask. Also note that masks only work on clean shaven skin AND must be fitted to your face. Wearing a mask over a beard is pointless. Masks come in different sizes and those for a large round face or large head will not fit someone with narrow thin features or a small head. Also note that "hospital" type masks are just about worthless. While they WILL collect some dirt most of it goes around the edges. These things are designed to prevent spit dropletts from a cough or sneeze from being projected OUTWARDS, not to stop inward traveling dust. Unlike a respirator these actually work BETTER with a beard as the air going around the edges may be filtered by you beard. . . but do not count on it. |
| - guru - Wednesday, 07/19/06 17:17:51 EDT |
|
Thomas M.: I do primarily weapons. As I stated earlier, the type of forge you want to use depends on your own personal preferance. There can be some other factors which influence your forge choice as well, such as if you live in an urban area and are going to be working in a backyard setting, coal forges tend to produce a great deal of smoke which may not be looked kindly upon by neighbors, also the availability of fuel sources and cost in your particular area. I know for me, coal is a bit more expensive and difficult to come by where I live. Now, you can make your own charcoal, which is about as cheap as it gets, you just need some scrap pieces of wood (I think hardwoods work best in this case). Now, the good thing about coal forges is you can build one for little to nothing, you just need some sort of container to hold the fire (break drum, or any thing like that) and a blower, which can be as simple as a hair dryer with the heating coil disconnected. Coal forges do take a bit more work setting up and preparing the fire for work however. They take some time to light and get going, and you have to know how to build the fire right and where to keep it for the maximum heat. Propane/gas forges cost a bit more to make, but are a lot more efficient (in most cases) and easier and faster to run. I built my forge out of an old propane cylinder that I first knocked the stem off, then filled to the brim with water to prevent an explosion (anyone who welds should know this, but) never attempt to weld or cut anything that has held flamable materials, even if you think it is clean, the porosity of the metal may still have some traces of the material left, and if you cut into that, or weld it, there is a high chance for an explosion, which will kill or seriously injur you. The only time it is safe to do something like that is if you have had the container professionally boiled out with acid and filled with an inert gas, or you completly fill the container with something like water so there is no air exposed in the container (but that wont work to well if you are trying to weld or flame cut. Just if you are using something like a cutoff wheel or something that sparks.) Anyways, after I cut open the cylinder, I made some openings in the front and back, a couple of holes on the top to recieve my burners, and hinged a door. Then I welded some legs on it and gave it a coat of high temp paint. Then I insulated the body with some kaowool, gave that a couple of coats of ITC-100 and dropped in my burners (atmospheric Reil design). Overall I think it cost me about $150 to build my forge, the insulation was the most expensive part (but I ordered enough to insulate about 4 or more forges, so its actually a bit less $ than that. Plus that is including buying a new propane cylinder to fuel it). So it will cost more to build a propane forge, and it will take a bit more work, but as far as the fuel availability, you can get it anywhere, and its not too overly priced. Plus, all you have to do to start it up and work, is open the gas, strike the flame, and let it heat up. Plus, its a whole lot easier to get it hot, my forge will get passed forge welding temp in just a few minutes (not sure how hot it runs exactly because I lack a pyrometer, but It is probably somewhere close to 2800-3000 degrees F). The propane also burns cleaner and you dont have to worry as much about oxidizing, burning up your piece in the coals or contaminating it, and no nasty smoke for the neighbors to complain about. So as far as simplicity of use, I would say you cant beat gas, but that is my own opinion and what works best in my situation. I will probably try to set up a coal forge later on when I get more time and after I have taken care of some other things for the shop I could use first. So, there is my views on forges. If you want some more details about how I built my forge, and what I used and/or some pics. Drop me an email. |
| TarAlderion - Wednesday, 07/19/06 18:01:44 EDT |
|
Sandycreekforge, Bundling those semi-axles by welding will be pretty difficult. The alloys used in Class 8 trucks are a Chrome/nickel alloy with the addition of managanese to add fast deep hardening by induction. Welding is very difficult. Old axles, say 1960 or 1950 or even before may be 4140, also difficult to weld for this application. |
| ptree - Wednesday, 07/19/06 19:02:27 EDT |
|
Copper in the forge: There may be some basis in science for keeping copper out of your forge. Liquid and vapor phase copper can penetrate steel at the grain boundaries. This weakens the grain boundaries and the steel can literally crumble apart. Copper in most electrical contact devices is usually very pure because, as has been mentioned, alloying lowers the conductivity of any pure metal. |
| quenchcrack - Wednesday, 07/19/06 20:47:12 EDT |
|
Rusty, other than a little dressing with a belt sander, anvil repair should be done by someone who knows his welding and knows his anvils. It is quite common for people to want to repair their first anvils when in fact, as Thomas pointed out, its probably not necessary and once you get a feel for the work you will look at it quite differently. |
| adam - Wednesday, 07/19/06 22:36:11 EDT |
|
I have plates of pure copper and pure titanium either brazed or high temp soldered together. I'm trying to get them apart. How hot will I have to get the solder to "make a parting of the ways" so to speak? Will a hand held propane torch (benzo)do the trick? It's enough copper and Ti that i couldn't carry them in one trip and the $ from recycling is going into my forge fund. thanks chris |
| Chris R - Wednesday, 07/19/06 23:16:08 EDT |
|
Chris R :It all depends on how big they are and what EXACTLY was used to join them. Copper conducts heat really well, so there must be enough heat to get the entire thing hot at once. Silver solder will take red heat, brazing will take a brighter red heat. If they were solid state bonded You would have to melt the copper off, probably not practical. What will the scrap guy give for them "AS IS"? If You could get a forge of any kind together as a heat source, You might stand a chance at getting them apart, A small propane torch alone probably won't do it even with a makeshift enclosure unless they are really small. |
| Dave Boyer - Thursday, 07/20/06 01:54:24 EDT |
|
I am looking for information on making a jew's harp, jaw harp, juice harp, trump. I would appreciate any information and help. Thanks, Chris |
| Chris Brown - Thursday, 07/20/06 08:13:58 EDT |
|
Jews Harp: Chris, There are books on making folk musical instruments and I THINK this one is covered. Sadly my books that would have it are packed for moving and are several hundred miles away. Information for making musical instruments in general is fairly rare. The best places to find it are university libraries where they have a music program. The best (world wide) is the music library at the University of Virginia in Charlottesville, VA. They have a better collection than the Library of Congress which is the second best in this regard in the U.S. The UVA libraries are open to the public but their schedules are erratic being closed during exams and holidays. CALL before making the trip. The music library is seperate from the main library and much easier to use if not a little difficult to find (sub basement of the music building). If you are intrested books on making musical instruments this collection is worth traveling any distance. What makes the UVA collection different is that they have a buying program to purchase all books on this subject no matter where they are published. The Library of Congress collection is made up entirely of books supplied via copyright applications and as gifts. MANY forign publications do not make it there unless they are copyrighted seperately in the U.S. I have a number of books on this subject that are not in the LOC. Books of this nature are a lot like some of the books in our field and others that come into print one time in a limited number and that may be the last. Folks that are serious buy them when they can. Libraries often have them but if they are not used they get culled so the only choice is private and special collections (such as UVA's). |
| - guru - Thursday, 07/20/06 08:57:28 EDT |
|
Grant, May I suggest a useful feature for your induction forge? Because your controller is already tracking the resonant frequency of the work coil, why not detect its abrupt rate-of-change as the work piece passes through its Curie temperature and signal the blacksmith (say with a sound)? This would be helpful for heat treating purposes, if you are using the Curie temperature to indicate when to quench something. At the least the user would get continuous training in matching the heat color with the nonmagnetic point. |
| Walking Dog - Thursday, 07/20/06 09:01:20 EDT |
|
Thanks for the information guru. I will check the local university. Thanks again Chris |
| Chris Brown - Thursday, 07/20/06 09:02:00 EDT |
|
Another copper question: What precautions should one take against copper oxides when working with that metal? Thanks |
| adam - Thursday, 07/20/06 09:04:08 EDT |
|
Chris, If you do not find something let me know. I had planned on leaving my musical instrument books packed up but I get numerous questions on some related subjects. Next time I am at "home" I will pick up those boxes. |
| - guru - Thursday, 07/20/06 10:25:19 EDT |
|
I have a wrought iron decorative rack that has a mirror in the middle, a shelf below the mirror and hooks (for hanging coats or whatever), I had to have a iron bar attached to this piece in order to hang it on my wall (so it could be attached to the wall into the wall studs), now how do I get the dark color (flat blackish/grayish color) in the new iron? |
| Roxann Foster - Thursday, 07/20/06 10:26:50 EDT |
|
Copper, Copper Oxides: Although we are surrounded by copper items, work with wire, wear copper jewelery the metal and its compounds are toxic if ingested. If you burn copper in the forge it may not prevent a forge weld but it may poison you. Generaly the problem is with grinding or buffing brass, bronze or pure copper. This puts lots of fine particles of the metal in the air which you breath, thus it gets in your mouth and lungs, you ingest it and should be able to taste it. That nasty metalic copper taste is a warning that you should have been wearing a filter respirator. Copper is not as toxic as other metals like cadnium or lead but it IS a heavy metal that can cause problems if you absorb enough of it. In general you can work it as much as you want, just be carefull when making fine particles or dust. |
| - guru - Thursday, 07/20/06 10:38:56 EDT |
|
Roxann, The general color of forged iron and steel is from the surface oxidation called scale. This is a blue grey when fresh and dry and becomes a dark grey-black when oiled or waxed. Scale occurs when the steel is heated to a red heat or greater (1500°F or more). Your best bet is to clean as sand the metal surface and then paint it. Flat black spray paint will not match but will be close. Otherwise you can let it rust. Light rust when waxed makes a dark brown similar in tone to scale. On very old pieces of unpainted ironwork the finish is often a combination of rust and scale. When places are scratched or the scale rubbed off the steel will rust. Oiling or waxing darkens the rust and it nearly blends into the waxed scale finish. Scale and rust (browning) are both natural finishes but the require constant maintenance by cleaning and re-waxing. For practical purposes and low maintenance paint is better. |
| - guru - Thursday, 07/20/06 10:49:48 EDT |
|
Jew's harp/ jaws harp (never hear "juice" harp). Many years ago I used to play these. It is a very simple instrument: A small frame of soft steel shaped like a key or a spring fuller with a thin blade of spring steel between the jaws of the frame. The size of the harp and the length of the blade determine the range. The pitch is varied by changing the shape of the mouth and the throat. You ought to be able to make one from a picture www.jewsharpguild.org/ |
| adam - Thursday, 07/20/06 12:01:35 EDT |
|
I am getting into more rod bending on various projects. Am looking at the HF metal bender owner's manual (available at their site). While it shows 90 degree bends for U-bolts and such, it doesn't show the ability to put say a 1" ID eye on the end of a 3/8" rod. Does it have the capability to do so? (I doubt I would be bending more than 3/8" rod so don't need a heavy-duty model.) |
| Ken Scharabok - Thursday, 07/20/06 13:52:17 EDT |
|
Adam, Thanks for the web site. Juice Harp is a back woods name for it, probably a mispronunciation. Jew's/Juice sounds the same with my Southern Louisiana Accent.hahaha How is the blade attached to the frame. In one picture it looks like it is set in the frame and others look rivited. Would this affect the tone and range. Also you wouldn't happen to remember the thickness, width and lencth of the blade for roughly a "C" scale. Guru, I called the local university, educated people can be hard to communicate with sometimes, I don't believe they have any books on instrument making(but not sure if they understood what I was looking for). So I would appreciate any information you can share from books Thanks again to both of yall Chris |
| Chris Brown - Thursday, 07/20/06 14:26:44 EDT |
|
Bender:, Ken, Making a centered eye is usualy a two step process on this type bender. Make the bend (usualy about 60° and then the loop. The bend must be acurately made from the correct distance from the end. Sometimes you flip the eye over after making the loop THEN make the centering bend. Libraries: Chris, Most decent University libraries have their catalog on-line. I start there. You can often go to the Library of Congress site and they have links to the databases of thousands of other libraries. The harps I have seen were braded AND the joint pinched closed. I suspect the tight joint is to prevent rattle or buzz. Can't remember other details. |
| - guru - Thursday, 07/20/06 16:10:10 EDT |
|
andy@scf i asked my son about the railroad wheels and axels and where they were repaired. he told me they were sent to jackson south carolina to progressive railing. he did not know the phone no. nor the mailing add. maybee this will give you a place to start if you are still interested. ron60 |
| - ronald rumfelt - Thursday, 07/20/06 16:18:16 EDT |
|
the harbor freight bender is an unadulterated piece of you know what- but some people still manage to get good work out of it. However, the steel is low quality, nothing is heat treated, and the design is based on somebody looking at a picture of a real bender- kinda like trying to actually have babies by phone sex. The reason you buy a real bender, like a hossfeld or di-acro, is not because you are bending giant things- its because they are actual working tools made from real materials, and as such, keep the swear words down in number when using them. The way to make a true, centered eye on the end of a rod is to use a v shaped die, not just a set of three pins. There is no reason you could not make real tooling like this for a chinese bender- I would suggest going to the hossfeld website, (www.hossfeldbender.com) and looking at their "bending rings and coils" illustration. Then download their free catalog for the number 2 bender, and check out the number 16B eye bolt bending dog- this is what you would want to make. You can use 3" long pieces of any size of pipe as mandrels to make your circle vary in size. Just remember, while your parts are flying thru the air and you land on your rear after that harbor freight pin snaps, how much money you saved. It will make you feel a lot better. |
| - Ries - Thursday, 07/20/06 17:16:00 EDT |
|
Are large truck axels made from different materal than other vehicle axels? I have three pieces of one; one 3 ft piece, and two 1 1/2 ft pieces. I would like to flatten them and possibly make some daggers or swords, but I'm not sure if the big ones are different than the smaller ones. Should I just use it for hilt components, etc.? Thanks in advance! ---Rob |
| - Rob - Thursday, 07/20/06 17:38:14 EDT |
|
Jews Harp: Chris its been a long time and I knew nothing about metalworking at the time. I seem to recall both riveted and welded blades. I dont think it makes a difference so long as the blade is clamped tight and cant rattle. The smallest were about 1.75" long made from something like 3/16 stock and the largest that I used was about 3.5" long made from about 3/8" stock - sq stock in both cases. There were a couple of tricks to playing one of these. Firstly, the jawpiece must be set very firmly against the front teeth with the lips wrapped snug around them. If you chicken out and hold it tentatively you will get a nasty buzz as it rattles against your teeth. The other was to relax the tongue and throat so that the resonance occurs in the throat not the mouth. When you figure out how to do this the sound changes from a tinny twang to a rich deep tone that feels as if it comes from the stomach. I recommend practicing on a smaller version first - if you mess up with the bass it will rattle your skull in a way you wont forget. I came across these things when I lived in Israel with a community of young Jewish Americans who had taken them up because of the name. I could find no real connection between these instruments and anything Jewish. I assumed that the name was a corruption of "jaws" harp. But then language often defies logic. It may be like French Toast, which the French seem not to have heard of or Danish Pastry which the Danes call "Vienna Bread". Language is a quirky thing. |
| adam - Thursday, 07/20/06 18:54:28 EDT |
|
Rob, For about the last 18 years at least, the following applies to axles;( all diameters are the center of the unforged axle) 1 3/8" and less truck axles C1050H bigger than 1 3/8" to class 8 semi's, say 2.5" 1541H At some point they axles become non truck and are often 4140 The H behind the number is for an alloy that has been modified with Manganese for FAST, DEEP hardening, in these sections by induction scanning heat treatment in automatic machines. These alloys are sensitive to speed of quench, and subject to grain growth if held at HT temp for too long. They are often specified as needing temper within 45 minutes. They tend to quenchcrack. I always suggest an oil quench, followed by a quick temper. In the axle industry, they do not normalize before HT. The use a polymer modified quench that is expensive, difficult to maintain, and if not QUENCHCRACKS! The axles are straightened after temper, while at temper heat, and boy do they have to push a 2.5" axle hard to take a 1/2" bow out! As I used to have access to unlimited drops, I played a bit, and provided metal to a number of smiths. One makes a lot of hammers and really liked the 1541H in unforged bars for hammers. He oil quenched. |
| ptree - Thursday, 07/20/06 20:22:07 EDT |
|
Would it be possible to get the email address for Tom Nelson or Bertie Rietveld? I would like to ask them some questions about their power hammer. Thanks, Tom Ashworth |
| - Tom Ashworth - Thursday, 07/20/06 20:37:07 EDT |
|
Jew's Harp: If I remember the one a friend had, the spring fit into a groove that was swaged shut around it. He only managed the twangy sound and the ocasional scream when His tung would get pinched between the spring and frame. |
| Dave Boyer - Thursday, 07/20/06 21:41:06 EDT |
|
Would it be possible to get the email address for Tom Nelson or Bertie Rietveld? I would like to ask them some questions about their power hammer. Thanks, Tom Ashworth |
| - Tom Ashworth - Thursday, 07/20/06 21:42:31 EDT |
|
Axels: In adition to the quality forged parts mentioned by Ptree, You might run across some that are pure junk from small sports cars. I broke 2 in My Austin Healy Sprite, I think they may have been cast. The gut wrenching torque of the 1098H engine is legendairy, able to wring off 1" diameter axles. LOL :) |
| Dave Boyer - Thursday, 07/20/06 21:48:56 EDT |
|
Blades from axles: I know darn little about swords, but it seems that the diameter of most axles is pretty large, and You will have to draw it out a whole lot to get the section down to what a sword should be. Any comments from someone more knolegable? |
| Dave Boyer - Thursday, 07/20/06 21:55:34 EDT |
|
The diameter of the axel is 1 5/8", if that helps anyone. |
| - Rob - Thursday, 07/20/06 22:09:36 EDT |
|
Rob: That is a bit over 2 square inches in cross section. Do You have a big power hammer? |
| Dave Boyer - Thursday, 07/20/06 22:35:35 EDT |
|
ptree - I'd differ with you on the meaning of H behind a steel . 1541 already has additional manganese when compared to a standard 10xx series steel. The H indicates that it has been manufactured to a hardenability specification - it's guaranteed to meet certain hardenability limits proved in the past by reporting the results of a jominy test. The chemical limits for an H steel are typically wider than for the non H variety - wider carbon range, wider manganese range, wider chrome, and wider molybdenum (Cr & Mo not being applicable to 15xx and 10xx steels). That way an individual mill can figure out the least expensive way to produce that steel and still meet the hardenability requirements. When we were working alloy steels to hardenability bands, back in the 70's we usually used max manganese and carbon and minimum chrome and molybdenum - less expensive that way. The only issue with large rounds was if I didn't have mid range CR & Mo, they usually didn't resist temper temperatures adequately to meet ASTM requirements of 1 hr/inch of thickness/diameter at minimum temperatures of 1100 F for B7 bolting stock. Regards, Gavainh |
| - Gavainh - Thursday, 07/20/06 23:00:23 EDT |
|
Extra Alloy Designations: I have found that many of these are proprietary designations and are not consistant. Rhyerson used to sell a steel designated 4140H. This was pre-heattreated steel to some specified condition. I think it was one of those hardened but tempered soft enough to be machineable and ready ti use AS-IS steels. |
| - guru - Thursday, 07/20/06 23:31:38 EDT |
|
British Car Axels: Yep, they were notorious for getting sheared but it has nothing to do with engine power or poor steel. It was the combination of a low (high reduction) differential and an oversized flywheel needed to smooth out the primitive British 4 cylinder engines that were designed for delivery trucks and tractors then hopped up for sports cars. . . Drop the clutch and that big flywheel is rough on axels. The worst combo ever built was the Nash Metropolitan (AKA Austin A40). This had the MGA size 1500 CC engine coupled to the same 13" wheel rear axel used in the AH Sprite and MG Midget. You only had to reve the engine to near full torque RPM and side step the clutch ONE TIME to shear one or both the axels. Both is a real trick but I did it with a slightly modified engine. . . . The replacement racing axels were some real "hi-tech" alloy ha ha ha ha h. . . like 4140. They held up quite well. Very few OEM axels broke in Sprites and Midgets unless abused and the replacement racing axels were indestructable in those cars. Broke a few, replaced many. . . |
| - guru - Thursday, 07/20/06 23:41:53 EDT |
|
Nelson and Rietveld, SA JYH Haven't heard from tose boys in a LONG time. I can probably answer some questions on that hammer as I was consulted on its design. |
| - guru - Thursday, 07/20/06 23:44:21 EDT |
|
Pre Heattreated steels & AH Axels: There are or at least were a lot of pre heat treated alloys available, some like 4140HT You could recognise by the name , but many more were brand names, Brake Die, Lustre Die, HyTen B3X are a few I can remember, as well as a slew of mold steels. The ones I mentioned are between 250-325 Brinell, readily machinable, but stronger and more wear resistant than machine steel. The Sprite axles were really poor material. The failure point on Mine was from stress risers at the end of the splines to the point of engagement in the spider gears. There was not a clean break, but a fracture from each spline to the center of the axel, a fatigue failure. 1 spline "tooth" and it's pie shaped root was completely free of the stub. There was about 1/4" between the spider gear and the end of the spline, this part of the axel was twisted slightly as well, with cracks at both ends. A Honda Civic had more power, better traction and the half shafts in those were about 5/8" diameter compaired to the about 1" in the Sprite. We NEVER broke a half shaft in a Civic, and We beat them pretty hard. I will add that this Sprite had 150,000 miles on it, and that is a lot on a Sprite. |
| - Dave Boyer - Friday, 07/21/06 01:43:48 EDT |
|
Gee, I never broke an axle on my Austin Mini Cooper. (grin) Of course, prior to taking the engine up to 1250cc, it barely had enough power to stay ahead of its own shadow. But boy, would it corner! I won many a race DOWN twisty mountain canyon roads. Fun car, no doubt about it. OTOH, I had a 1966 IH Scout that would cheerfully snap axles. It had half of a V-8 and a gigantic flywheel left over from some implement production. The stroke on that engine was as long as your leg and developed enough torque to climb almost anything, at an idle. I once towed a loaded semi twenty miles to a truck stop with that little Scout. But dorp that clutch just once in 2WD low range and both rear axles were toast. Ask my brother how he learned that. (grin) |
| vicopper - Friday, 07/21/06 08:35:03 EDT |
|
AXLES: Yup, I popped 2 of 'em on my '64 Spridget without even half trying. Luckily, it was still under warranty for both of them. BMC knew there was a problem, and my dealer had a supply on hand. Still a fun car, though. |
| 3dogs - Friday, 07/21/06 10:40:22 EDT |
|
Dave Boyer, nope no power hammer. Grin! I've tested a piece of it already though, and I believe I can flatten it out without one. Ask my family, they will tell you that I've done things that they never thought I'd do or finish. If nothing else I'll do it just to do it and prove that I can. I'd love to be around when an axel brakes! My brother's a car guy, maybe I can follow him around everywhere until one does.-Grin! |
| - Rob - Friday, 07/21/06 11:08:05 EDT |
|
Bad spelling, b-r-e-a-k-s. |
| - Rob - Friday, 07/21/06 11:09:16 EDT |
|
Guru - re the SA-JYH - can you tell me how the speed and force of the hammer is controlled. In their write-up they state: "We can consistently deliver single blows, soft blows, and full force hard blows at full speed." Thanks. |
| - Tom Ashworth - Friday, 07/21/06 11:34:43 EDT |
|
Ries: Looks like a new Hossfeld would run over $800. I know someone with one sitting largely unused so have made them an offer more than I know they paid for it. Question in general though. Can the metal be headed somewhat before being put in the bender to facilitate the bending - or would it stretch the metal too much. |
| Ken Scharabok - Friday, 07/21/06 12:03:15 EDT |
|
Ken- I am assuming you meant to say "heated" and misspelled it? Yes, a hossfeld or similar bender will work just fine with hot metal- in fact it expands the capacity. I had to make a U shaped bracket to go around a tractor driveline a while ago, and it needed to be pretty tight radius, in 1" x 4" flat bar. So I bent it hot on the hossfeld, and got it exactly right in one bend. You need to think the process through to make sure that the dies wont leave impressions in the hot metal that you dont want there. In some cases, it makes no difference, but in other cases you would use a bigger die, or a special die to spread the load over a bigger area, so you still get your bend without getting a big die impression in the hot metal. A new hossfeld is indeed about $800. And worth every penny of it. But it will require serious studying of the manual to get the full use out of it, as there are literally a hundred different ways to set it up. A hossfeld will bend 3/8" hot rolled round cold without blinking-I bend 1" stainless cold in mine all the time- but with a smaller chinese bender, heat might be helpful. |
| - Ries - Friday, 07/21/06 12:44:00 EDT |
|
ZA-JYH: Tom, This hammer like many is controlled by a slip belt clutch. When the clutch is properly setup and has a good smooth linkage you can have a wonderful control "touch". The other thing that helps give good control is smooth snug fitting guides. A loose floppy ram is hard to control and does unexpected things. For all the poop on this kind of linkage you should get the Dave Manzer Little Giant tuneup video from us. It is the only source of information that will explain exactly what is happening and how it should happen with the Dupont/Little Giant style linkage. |
| - guru - Friday, 07/21/06 12:50:53 EDT |
|
Benders, The folks at Shop Outfitters originally made the scaled down version of the bender that HF is selling a import knock off of. Contact Shop Outfitters, buy their bender, they will KNOW something about how it works and what it can do. OR buy the Chinese version and then take Chinese lessons then TRY to get some input. . . HA AHA AHA A hA HA. . .. Since it is a knock off, they know nothing! Although the Shop Outfitter's bender SEEMS high (Only $600 compared to Hossfeld at $800) it comes stock with a wide range of dies which the Hossfeld does not. In fact, I have two Hossfelds (well 1.75) and no dies. . . This is not unusual. Ocassionaly you will find a used Hossfeld with a full complement of dies but it is unusual. Tell Shop Outfitters I sent you! Note that hot bending of the aforementioned eyes in 3/8" (10mm) bar can be done in a VERY simple bender consisting of a post and pin. Wrap the work around the post with its end held by the pin, flip over and bend against the pin to center the eye. It can be done as fast as saying it. Hot, this can be done on stock up to 5/8". 1/2" is most common and easy to do. |
| - guru - Friday, 07/21/06 13:03:13 EDT |
|
Ken sometimes we "head" or prebend a litte of our material to give the machine a easier bite to start the run. But that is the part we cut off. |
| daveb - Friday, 07/21/06 13:08:34 EDT |
|
Have tried to find the specs of the super sucker top cap for a forge flue. Any help will be appreciated. Thanks |
| - Rob Thompson - Friday, 07/21/06 14:04:18 EDT |
|
Rob it is on our plans page. |
| - guru - Friday, 07/21/06 14:47:03 EDT |
|
New info on the axel; it's at least 45 years old. |
| - Rob - Friday, 07/21/06 15:12:27 EDT |
|
Hey, is there any part of a Gas Lawnmower engine that can be used as a Blower? ive been using a double action bike air pump, and im tired :( thanks |
| Cameron - Friday, 07/21/06 17:37:11 EDT |
|
ptree, thanx for the advice on the axels, i'd love to use a chunk of 8 or 10 inch round for the anvil , but since the axles are free.... one thing i thought of: You mentioned that the axles probably had a high content of chrome/nickel and manganese. What are your thoughts of using stainless rod or nickel rod? I know both of these types of rod are available from the local welding shop in decent sized rod. Would these types of rod make the welding any easier? Please note that the welds will probably be backed up by some type of banding or strapping around the outside of the "anvil". Thanx, Aaron @ The SCF |
| - sandycreekforge - Friday, 07/21/06 17:49:57 EDT |
|
Shop outfitters compact bender only comes with the dies to do simple radius bends, and a small sharp right angle die. The hossfeld comes stock with the ability to do more right out of the box than the shop outfitters. It doesnt have those 7 little pieces of round bar, but it can do more without them than a shop outfitters bender can with them. It is bigger, better built, and able to take all the hundreds of other dies hossfeld makes. Shop outfitters only makes about 3 other dies for their machine, and it is not compatible with the hossfeld dies. So if you buy one, you have to make all your own dies for special uses. Hossfeld has rooms full of patterns for special dies, going back over 50 years- I just cant see how the extra 200 bucks isnt completely worth it. For less than the shop outfitters, you can buy a real hardened and machined hossfeld clone, without much tooling, from american benders- www.americanbender.com- $548 for a stripper model. I challenge anyone, any time, to beat me in terms of speed, accuracy or capability, with my hossfeld versus any bender you can come up with, including a $3000 di-acro (yep, current list price on a Di-Acro number 4 is about 3 grand.) |
| - Ries - Friday, 07/21/06 19:45:59 EDT |
|
Ries, A lot of people have Hossfelds, Americans, Shop Outfitters and yeah, Harbor Freight benders, and I would venture to say that most of them, (including me) know very little about using them to any advantage at all. I've looked at the HF instructions (a joke), some of the Hossfeld instructions (hard to see the pictures in a photocopy) and still feel pretty vague about it. What I'm saying here, is that there is an obvious audience for an instructinal video or demo on using the Hossfeld-type bender. And, Mr. Niemi, Sir, you seem like the ideal candidate to deliver that demo. SO, what do you say? Think you can put together something that will teach us unwashed masses how to do some good with these things? |
| vicopper - Friday, 07/21/06 20:22:11 EDT |
|
I just gotta chime in here. Ries is right on the money regarding the Hossfeld. I've done hundreds of jobs that would pay for new Hossfeld in one day. I even used to bend 2" 4140 (hot, of course) to very sharp 90 degree bend using the two extension handles (total of 8 - 10 feet). I'm not sure that the Harbor Freight or Shop Outfitters benders are made of heat treated alloy like the Hosfeld. After about ten years I had to bore out and bush the center holes. Ther are a million things you can do on a Hossfeld, they even have a punch and a flat bar shear. |
| - grant - Friday, 07/21/06 21:25:02 EDT |
|
I have one of the first shop outfitters benders made. Bought to prove a job out for the boiler shop, and then used in the R & D lab for years. Got it when they moved the plant. I would love to have a hossfield, but the price of $0 was too good to pass up. I too would love to have an instructional vidio on the Hoddfield. I found the manual for the Shop Outfitters to be plain and easy to use. |
| ptree - Friday, 07/21/06 21:52:36 EDT |
|
Gavaing, I have to defer to your answer on the meaning of the H. It is indeed referring to hardenability, as I noted and indeed 1541 does have managenese. The real issue is that welding these alloys are a real tuff job. Rob, I have never seen these axle alloys welded and can offer no advice other than to suggest that the cost of Ni-rods is high enough to make the risk a poor one. I would save the axles for tooling and hunt for a better choice. Someone mentioned using axle for knives. I do not think that axle alloy is a good knife alloy. It is very tuff, springy and fatique resistant when properly heat treated but hot that hard. If I remember correctly, the axles were Rc 52 as quenched and dropped back to about Rc 48 when tempered. |
| ptree - Friday, 07/21/06 21:58:36 EDT |
|
Vicopper, I too had a IH Scout with the 196 ci half a V-8. Boat loads of torque. I had a top loader three speed, no range and that thing had a zero slip axle. Note that I did not say a differential, as it did not have a differential. It had an axle that did not allow any differential in wheel movement! Fun on wet roads! Scouts were the use it up by putting it in a little truck that somebody will buy. I still loved it. |
| ptree - Friday, 07/21/06 22:04:04 EDT |
|
Reis: If you produce a DVD on using a Hossfeld I know someone who markets things of this nature on eBay. Just something to think about. |
| Ken Scharabok - Friday, 07/21/06 22:04:54 EDT |
|
Rob: My point is that if a good sword finishes at about 2 to 2 1/4#, You will be starting with a chunk of axel 4" long. An easier rout would be to start with about 26 to 27" of 5/8" diameter coil spring wire. But I am not a blade guy, just a lazy one. |
| Dave Boyer - Friday, 07/21/06 22:14:51 EDT |
|
Anybody know what a mouse track ball is made of? I just got a new mouse, so I peeled away the rubber coating. I haven't done any testing on it yet. |
| - Nippulini - Friday, 07/21/06 22:27:51 EDT |
|
Mouse balls? No way am I gonna touch that one! |
| vicopper - Friday, 07/21/06 22:38:38 EDT |
|
TGN: I wouldn't expect it to be anything special, there are little rollers in there that the ball turns that make the curser move, I think it is just something to make it heavy enough to roll and not slide. |
| Dave Boyer - Friday, 07/21/06 23:52:48 EDT |
|
I will work up to doing a dvd- first I gotta do a few live demos, to work out the kinks in my presentation. It is definitely true that most people dont know how to use a hossfeld type bender. I have had mine for almost 25 years now, and have found that it takes a full time employee in my shop about 2 years of working with it before it becomes instinctive- that is, before they have the main setups memorised and can actually use the machine. Even then, there are some things that I still do myself- freehand bending of complicated shapes to match drawings, for instance, or getting that 36" diameter circle perfectly flat all around on the table. At some point, becoming a Hossfeld educator is in my future. |
| - Ries - Saturday, 07/22/06 02:43:11 EDT |
|
I just acquired a very rusty Trexton anvil around 150 lbs. I read the earlier answers on surfacing an anvil. It seems like a belt sander would be the way to go. What about the rest of the rust on the body and legs, horn, prichtel, etc? What would be the best way to prvent rust from returning in the future? |
| Hank - Saturday, 07/22/06 06:47:46 EDT |
|
Track ball from mouse... heh heh, mouse balls. Is that like moth balls? Anyway, I just finished playing with it. Magnetic test, yes. Spark test, comparitive to mild steel, weldable, holds heat no melting. So I'm gonna say that it is simply a mild steel ball bearing. Pretty cool, huh? Now I just have to find out where to get a whole bunch of worn out computer mice and remove the track balls so I can use them for welding projects. |
| - Nippulini - Saturday, 07/22/06 08:36:45 EDT |
|
Here's another request for the Hossfeld video. And thanks, Reis, for posting Hossfeld's link. Their catalogs are pretty useful. For example, I never realized that these benders are also a good leverage-type tool. Hossfeld's shear tool showed yet another use for this tool. Also, I did see several Hossfeld user manuals on eBay. Those might be nice to have. However ... I've got one of those HF benders ($69.99 on sale right now), and I have no doubt the Hossfeld, American Bender, and Shop Outfitters are far better tools. But it does a pretty nice job for the part-time haccker like me. A whole lot better than not having any bender at all, which is what I'd be stuck with if I only had the $500+ tools to choose from. And I've landed on my butt in lots of places for free, so saving around $400 is still a good deal for me. But I don't make a living at this, so there's no way to justify, on financial terms, paying that much extra. The pins are indeed soft, but an upgrade with 5/8" cap screws would cost maybe $12. The fit can be a pain, though. The lever arm is a rough fit in the main part, making it sometimes difficult to line the holes up. I "upgraded" a little by getting some long cap screws and mounting the dies on top of the tool instead of between the bars. This would be for lighter, or hot, stuff. But it's nice not to have to take things apart to fish a bent piece out. Anyway, this is just one home-shop hacker's view. |
| - Marc - Saturday, 07/22/06 08:41:10 EDT |
|
Hank, That is an old mis-marked "Trenton". Anvils were cheaply painted from the factory. The paint varied from Japan black (laquer) to a tar based mix. Since all anvil surfaces get some use and others are exposed to hot scale and ocassionaly torch flames the paint does not hold up. Anvils also attract condensation, usualy in the morning due to their mass which stays cool from the night air. Between the condensation and the chipped paint they rust. The rust on the body is the best protection against future rust as long as it is not crusty loose rust. Either oil it or paint over it but do not remove it. I paint mine with whatever black paint I have laying around. I've used hi temperature barbeque flat black and hardware store gloss black, both in spray cans. The bare or polished surfaces need to be oiled if not in regular use. I use WD-40 for short term. Heavier oil or specific rust preventitive sealers should be used long term. For long term storage the working surfaces should be painted as well. On really old anvils I use oil only on both face and body. |
| - guru - Saturday, 07/22/06 08:43:18 EDT |
|
TGN, The IBM FRU (Field Replacement Unit) may be a good sorce for used mouse balls. http://www.top20fun.com/funny_jokes/5529.html It is an oldie but a goodie |
| habu - Saturday, 07/22/06 10:18:17 EDT |
|
Rust preventative: Cosmoline™, that gooey, gunky compound that the military just loves to slather all over weapons and machine tools for shipment and storage, is basically a "petroleum jelly." Guess what works just as well, is easier to clean off, and is available just around the corner? Yep, you guessed it; Vaseline™ petroleum jelly. A $2.00 jar will coat every tool in your shop, keep them rust free for more than a year, and will still wipe off with a dry rag. Hard to beat that. |
| vicopper - Saturday, 07/22/06 10:24:06 EDT |
|
Hossfeld Manual: Note that Hossfeld has a very nice manual which they sell through dealers like Centaur Forge. However, the manual is short of how-to and is mostly a photo list of all the dies they make. Many of the operations are not intuitive, especially those that use the bender like a press rather than a sweep bender. A video demo would be worth while to a lot of folks. Videos: I have recently reviewed a number of these and most are badly produced. I have also edited films in my youth and I know how hard it is. It is a BIG job. I know better than to try it again. It used to be that filming was the hard part, but today filming is the easy part. However, you want to do everything possible to prevent it from looking like a home movie. Common mistakes include walk throughs by exteranious people and pets, passing cars and trucks. Phones ringing and people talking in the background are preventable. If it happens, REPLACE the sound track with a voice over and or music. Also DO NOT make a big speach more than the brief introduction to the viceo, short and sweet. If you have a long explanation have it used as a voice over of the processes invloved. If you video this, FINE. But cut it out latter and use only the voice as above. Pans and zooms are distracting and a deadly sin in video. Big multimillion dollar film makers get away with it but it is an art. Don't do it. If you must change views, cut out the transition. Lead and ends of scenes need some extra time for the editor. Do not start "just in time" and quit the moment the action is finished. Otherwise you will lose bits of the beginning and ending in editing. Editing either makes or breaks a video. In the world of DVDs a how-to video can be broken down into seperate chapters and SHOULD BE. Those that convert from video to DVD should add a chapter index. Transitions from one chapter or scene to the next DO NOT need fancy digital effects in a how-to film. This is not a rock and roll music video. Chapters also do not need big title lead ins and credits at the end. I hate it when every chapter in a DVD has long repeticious title and end credits. It is a waste of everyone's time. ONCE it enough. Finally, although you can edit video on a home computer, many systems do not have the disk space or the power to do the job properly. The result can be fuzzy and out of focus from over compression of the frames. Many software packages also do not make good industry standard files that auto-start. If this is not your full time business then don't do it. Hire someone that knows what they are doing. Keep it simple and stay focused on the subject. The difference between a well produced how-to video and an amatuer one is big. In the end it means dollars and cents. The same video produced right that should sell for $50 or so is just barely worth reproduction costs at $5 if poorly editied. Also note that a few folks that call themselves professionals do not know what they are doing or are bad designers and do ugly work. Ask for expamples of their work and look at them CLOSELY before spending your money. |
| - guru - Saturday, 07/22/06 10:35:40 EDT |
|
Soft Bender Pins: I use shoulder bolts or their technical term, "Die stripper bolts". For building benders and replacing pins. In my Hossfeld I replaced a couple bolt/pins with L-9 bolts. Very tough but not as hard or precision as the die stripper bolts. For plain pins standard dowels work as well. |
| - guru - Saturday, 07/22/06 11:40:47 EDT |
|
Benders and Benders: The advantage to the small benders is they take little room. On the other hand they all need to be bolted down OR mounted on a very sturdy bench. No matter where you put them they need a lot of free space around them. One of the best ways to anchor these machines is on a weld platten. The platten, usualy starts at a ton in weight and makes a very sturdy bench that is difficult to move. If it DOES move then a couple small bolts ususaly hold quite well as they are in shear only and not being pulled out. To mount a bender on a platten you want a base plate with one or more pins to fit the holes in the platten. A single bolt or a hold down is usualy sufficient. This makes it easy to mount and remove. Stow it under the platten. I make my platten stands and heavy benches with a shelf of bar grating about 8" to a foot off the floor. Although they collect clutter if you are careful and only put things on the shelf that go with the bench then it is convienient tool storage. |
| - guru - Saturday, 07/22/06 11:52:41 EDT |
|
I've just looked through the plans page for a hand cranked bender for bar stock. I've seen thes tools on "Biker Build Off" on Discovery and a couple other shows that I cann't name off the top of my head right now. Does anyone have plans for these tools or know where I can take a look at a set of plans? Thanks, Will |
| Will - Saturday, 07/22/06 12:35:43 EDT |
|
Sorry, I should have been more clear in previous post. I didn't realize there had been so much discussion about benders lately. I'm looking for plans for a roller bender that uses three dies driven by gears powered by a large hand wheel. One of the dies is mounted in such a way as to allow it to be adjusted up and down to change the angle of the bend. Again thanks, Will |
| Will - Saturday, 07/22/06 13:13:38 EDT |
|
Thanks for the advice fellas. The anvil was in a rotting shed for God knows how many decades (I'm in Alaska). It had chunks of rust flaking off of the body. I removed most of the loose stuff with a file. I just didn't want to proceed with grinding without knowing whether that would destroy the temper/heat treating/hardness of the face. I figured on oiling the body, but didn't know if oil would mess with the material I'm beating on if I put it on the face. Vaseline! Excellent. One further question, and perhaps I should look before I ask. Are there any plans for a fume hood around? I have a plate steel box, about 4ft x 3ft, for a coal forge in my shop. I need to vent the fumes safely through the roof, about 15ft up. Hank |
| - Hank - Saturday, 07/22/06 15:23:57 EDT |
|
The JD squared benders are not that much more money than a harbour freight one and look like they are as strongly built as a #2 hossfeld. I think most of the attachments for a hossfeld could be used on the JD squared. http://jd2.com is their website. |
| - JNewman - Saturday, 07/22/06 19:22:48 EDT |
|
sorry that was www.jd2.com |
| - JNewman - Saturday, 07/22/06 19:24:03 EDT |
|
Forges: Hank, Oil is slightly flamable but so it paint. Stuff burning off is part of blacksmithing. Just avoid burning of zinc. See our plans page for the Super Sucker hood and the side draft hood plans. Both work well. Hoods OVER the forge generally do not work well due to the mix of cold air and warm. Remember that all the air at a hood opening moves toward the stack and if too much is cold then there is no draft and a smokey shop. Rolls Shop Outfitters has a ring rolls. Only the upper middle roll is powered. The lower two are raised by a hydraulic jack. A screw works as well. Better rolls power two rolls but this requires gears. The smaller Shop Outfitters roll is of this type. |
| - guru - Saturday, 07/22/06 20:37:42 EDT |
|
I found some refrigirated air air conditioner parts perfect for a propane forge. I always read about insulating a propane forge, but is it 100% necessary? In other words, could I get off without insulation, or it a must? Thanks in advance! ---Rob |
| - Rob - Saturday, 07/22/06 22:24:26 EDT |
|
I have to once again agree with Ries that the Hossfeld is a cost effective and accurate bender. I find that their manual is fairly clear and easy to follow. I admit that for the most part I have always been a believer in buying quality tools that will last a lifetime even if they cost a little bit more but in a commercial situation the cost of a Hossfeld is immaterial. I purchased mine over twenty years ago and it paid for itself in time savings on the very first job. I've since purchased some special tooling from Hossfeld but have also made up lots of tooling of my own to fit it. I've used it for everything from bending elliptical copper bars for balconies to bending right angle steel brackets for my motor drive products. Buy the original and help a good American company survive against the trend for cheap and shoddy copies of the original. |
| - SGensh - Saturday, 07/22/06 22:34:20 EDT |
|
what parts of an airconditioner will hold up when you heat them to 2000F which is the working temp of a good forge. No you dont need any insulation at all. Insulation is a just a luxury for those of us that werent born into great wealth. You can make do with a 6" dia burner and propane tanker in your driveway. We are currently fighting a nasty war in the Middle East just so that you can do this. |
| adam - Saturday, 07/22/06 22:51:28 EDT |
|
JNewman: That JD bender does look nicely made and the price is pretty good. Too bad they don't make other tooling for it, everything they have is for bending tube very slow with amplified power. I don't think Hossfeld tooling would fit as the working princple of the two machines is different. From their website it dosen't sound like they are made of heat treated alloy, but they look well made and finished. |
| - grant - Saturday, 07/22/06 23:43:44 EDT |
|
Rob: Adam's point is not to be taken lightly. The better You insulate the better it will work, from several standpoints. A light Kaowool insulated forge will heat up quickley and can run OK on a 20# propane tank like a gas grill uses. Firebrick or refractory cement take a long time to get hot, and if You need a lot of gas flow a 20# tank will get really cold and stop giving out gas, altho there is still a bunch in it. Sheetmetal housings will ONLY hold up if there is reasonable insulation, fiberglass like used in houses will melt before the forge is hot enough to use. I built Mine with a 5/8" thick [on the average] hard refractory liner and insulated it with over 2" of soft refractory mixed with vermiculite, 3 parts vermiculite to 1 part refractory cement by volume, this insulates OK [not great however] but the hard refractory liner takes a long time to get hot due to it's mass. |
| Dave Boyer - Saturday, 07/22/06 23:44:05 EDT |
|
Guru, Thanks for the lead on the Rolls. Is mild steel tough enough to make gears from? If not what steel do you recomend? I have som from leaf springs off a truck. My shop is limited but I am resourceful. I have downloaded a good, clean picture of gears from wikipedia and with Photoshop I was able to clean up the picture enough that I have created prototype gears from foam core that mesh nicely. My next step is to make a working model of my bender from wood. Once I have the bugs worked out I plan to make the real thing. I have a good stock of heavy guage scrap steel and plan to grind some of it into gears but I don't want to waste my material or time if it will fail when put to the test. Thanks again. Will |
| Will - Saturday, 07/22/06 23:44:39 EDT |
|
Will: You would be better off to scrounge the gears from junk, or to use sprockets and chain. For gears to work properly they need to have involute shaped teeth and be made reasonably acuratley. What equiptment do You have acess to? |
| Dave Boyer - Sunday, 07/23/06 00:32:13 EDT |
|
JD2 benders are great- but they are designed to do one thing, and one thing only, and that is bend relatively thin wall round and square tubing. They sacrifice a lot of the flexibility of a hossfeld, to make them better than a hossfeld at tubing bending. If all you want to do is tubing bending, like for a roll cage or a motorcycle frame, they are the best, and very reasonably priced as well. But the cost of the dies do add up- most people only have a couple of sizes, though, so its not too bad. None of the standard hossfeld tooling will fit a JD2 bender, as it is designed to work differently. I gotta say I am skeptical as all get out about all Shop Outfitters tools- they seem to have made their original copy of the hossfeld without understanding anything about why a hossfeld is designed the way it is. They "redesigned" most of the major parts, leaving out the stuff that was designed in for a reason, and simplifying everything mindlessly. Then, the chinese knocked off their bender by looking at pictures of it- so they are even more out of the ballpark. For instance, in a hossfeld bender, the primary bending mode uses a 2" square by 4" tall block of cast iron to hold the steel in place. Then, for the center die, it uses a teardrop shaped die. This enables you to bend past 180 degrees, but it means that the metal is held between 2 pieces of flat diestock, 2" worth on each side. Shop outfitters decided this was too hard, so they omitted the block entirely, and changed the center die to a cylinder. Now, as blacksmiths we understand that if you use fullering dies, which have a minimum contact area, we move the most metal. And if we use 2" flatting dies, we move less metal. Shop outfitters dies are unwittingly designed like fullers, leaving the maximum possible dings and dents on your metal. Hossfeld dies are very cleverly designed to clamp the metal with more force, and not leave dings. Similar errors were made in just about every other part of the Shop Outfitters design, and of course the chinese stuff is even worse. And what kind of sense does it make to not make your product accept hossfeld dies, when hossfeld has spent so much money and time making patterns? I have visited the hossfeld factory, and there are patterns there for hundreds of sections of material. The shop outfitters ring rolls have similar design flaws. there seems to be a cult of "its only good if I can build it in my garage" these days, as exemplified by Shop Outfitters, along with the old style Scotchman Ironworkers, and many of the tools being sold to hot rod guys, where the tool maker considers his tool better if he ignores all existing designs, engineering knowledge, and modern techniques, and designs the product so it can be made with a cutting torch and a stick welder. CNC job shops are everywhere in america these days, and the work you can get from them is precise, quick, and dirt cheap. I know quite a few CNC machinists that own $200,000 to $300,000 worth of CNC lathes, mills and grinders, and they charge $50/hr. I cant make a living at that, but in almost any city in america, you can get cnc work done for that- so why wouldnt you take advantage of that when making tools? Me, I just dont get it. I try to learn something new every day, and make my work better and better, using the best tools and equipment available. I read a dozen or so metalworking trade mags a month, learning how the "really" do it. So when I see tools that are shoddliy designed, with no real understanding of why they are doing things the way they are, and then the designs are compromised further to fit an arbitrary set of tools or processes, I just have to shake my head. |
| - Ries - Sunday, 07/23/06 01:17:08 EDT |
|
Gear Strength: Will, Gears are made from everything from cast iron and brass to die cast zinc and hardened steel. Material and gear size is dependant on loading and performance. You don't build an aircraft engine with monster cast iron gears. . . nor will they take the high RPM. My old Champion bender which is a pretty good design has gears about 8" in diameter with #4 diameteral pitch teeth (big about 1/2") and over 1" wide. Below the top drive gear there is a small pinion which has the the hand crank attached. This has about a 4 or 5 to one reduction for added leverage. Instead of a hugh wheel the machine has a reasonable size crank handle about 16" long. The gears on this machine were rough as-cast gears. Today laser or waterjet cut gears could do the same job if the proper CAD template was supplied. This particular tire bended would easily bend 3" wide 1/2" thick stock or 3/4" square down to about an 18" circle. We bent 1" channel with it but the concentrated load from the legs of the channel cut into the cast iron roller tire and wrecked it. We had to make a mild steel replacement. We also used it to roll 1" pipe for a circular railing on a machine. Although this roll would do some things on edge it did not do them very well. It was good for flat and square stock. You can roll round but it helps to have quide grooves to keep the bar from going into a spiral. If I were to build a bigger or different rolls I would copy this design except for the two seperate roll adjusting screws (it was quite primitive). The adjusting roll needs either geared screws or a single large screw. Somewhere recently I saw a copy of this design. . . . I would offer a photo of this machine but it is a three hour drive from where I am at the moment. |
| - guru - Sunday, 07/23/06 08:49:20 EDT |
|
Bending. I'm out of the bending machine loop. I guess I'm back in the dark ages; I'm still using the anvil, bending forks and hickeys. A Shop Outfitter representative came to my shop a couple of years ago, a personable young man, who thought I could use the tooling and could recommend it to my students. I knew what their finished scrolls looked like (no class), and I had a firegoing, so I quickly made a penny scroll out of 3/8" x 1". I believe that the salesman was new to any kind of metal work, and he was knocked out by what he saw. We had a cordial visit and I took his literature, but he left realizing that I wasn't going to promote Shop Outfitter tooling. A friend who does fairly small bending in a production setting, tells me the he like the Di-Acro hand operated bender. |
| Frank Turley - Sunday, 07/23/06 09:03:04 EDT |
|
Cheap Tools: Ries, I agree with you whole heartedly. I have not used a Hossfeld a lot so I do not know all their advantages. Those I have used and own are ancient and missing parts. I AM surprized at Shop Outfitters prices on their benders. To be so much less well built than Hossfeld they should be a lot cheaper and at least be close to competetive with the Chinese imports. It is one thing we manage to do in this country is compete against slave wages by using better technology. . . but it does not always work. The same goes for DIY tools. You can buy a BigBLU for just a little more than it costs to build your own air hammer (IF you build it as heavy). And the BigBLU folks take advantage of that CNC machining capacity you are talking about. They have the best die system on the market. The sophisticated shapes require very precise machining of the working surfaces as well as careful hand dressing. CNC makes them affordable. Care in craftsmanship makes them the best. Where I am dissapointed in many import tools is the ones that just plain do not work. . . rarely are they returned so the same cheap junk just keeps getting sold to "the dumb Americans". |
| - guru - Sunday, 07/23/06 09:14:40 EDT |
|
OK, I'll find some Kaowool then. One last question on it; How long will a 5 gallon propane tank feul my forge, on average? Thanks again! ---Rob |
| - Rob - Sunday, 07/23/06 09:24:17 EDT |
|
Hand Made Gears: Will, Before making gears by hand you need to study the subject in depth. As Dave pointed out gear teeth have an involute curve to the surface. This curve varies for every diameter gear and the simplest gear cutters must come in sets with a range to each cutter. The bigger the gear the flatter the surface. On precision gears the geometry is generated by machines which create the exact curve for every gear. But there are also many other details. The pitch diameter is not exactly where you think it would be and this determines the spacing between the gear centers. Operating clearance must be put into the teeth and the less precision the gears the more clearance there must be (making the teeth slightly thinner). Machinery's Handbook has a good section on gears and so do many gear catalogs like the old Boston Gear catalogs. Most machinist text books cover the subject as well and you need to study all of them. Many gears have been made by hand and some clock makers still cut them out with a jeweler's saw. However, there have been gear cutting machines available since the 1700's when precision gearing was first understood. They had dividing wheels and special cutters. Making gears is not something to be taken lightly. When I said they could be laser or torch cut this meant from a very precision mathematicaly generated CAD template that included the necessary kerf offset and the tooth clearance for the expected precision. For a hand cranked machine this would work quite well BUT to get the gears right might take a couple tries. I would want to generate the template with an automated program so that precision adjustments could be made easily. This means custom graphical programming. I've done it, but not for this purpose. |
| - guru - Sunday, 07/23/06 09:36:57 EDT |
|
Rob a well designed small propane forge typically runs about 8 hours on a 5 ga tank. Making a small gas forge is quite easy but designing one is darned tricky especially if you have little experience. There are a lot of mistakes to be made. Almost every week we get the question: "I designed and made my own propane forge but it wont get hot - please advise". I strongly urge you to copy a well tried design for your first forge. Ron Reil's mini forge would be an excellent choice. Find it in the Links in the drop down menu on this page. |
| adam - Sunday, 07/23/06 09:41:51 EDT |
|
Yesterday, attending the Company picnic in shelbyville KY, I observed a bug eyed sprite on a side road, sitting on aired up tires, painted flat plack, and being used as a flower planter! The cockpit was overflowing with colorful flowers, well tended. Having worked on a few of these, as well as other British cars, I can only imagine that the owner decided that he was fed up with the work required to keep it on the road! |
| ptree - Sunday, 07/23/06 09:46:19 EDT |
|
Back when I was a British Sports Car mechanic we had a poster. On it was an MG Midget, top down driven by a beautiful young girl with flowing read hair, an Irish Setter runing along side of the car. The caption, "I don't want to BE a millionair, I just want to live like one." I actually had a customer buy a new MG Midget because she had been told they got 40 MPG. This was back when the best VW or Japanese car got 30 MPG. . . I pointed out that was true but the clutch we had just put in (which requrired removing the engine and front end) would have to be replaced as regular as clockwork no matter how you drove and the same with the universal joints (about three times per clutch). But they sure were FUN to drive. And yes they were expensive to maintain but did you EVER see an ad for a VW Beatle that did not say "brand new rebuilt engine". And 1970's Toyotas were no more dependable. Engines that disintegrated after the 12,000 mile warantee were the usual NOT the exception. Auto engineering has come a long way. I expect to buy a car with close to 100K on it and get a 100K out if it myself with minimal upkeep. |
| - guru - Sunday, 07/23/06 10:20:39 EDT |
 Champion Tire Bender Bernard Tapple sent me this photo of the same bender I have. The frame is two heavy cast plates that are held together by two bolts and spacer tubes. The rollers are cast 3" diameter cast iron cast onto ~1" steel shafts. All the bearings are steel on cast iron with oil. The far roller just sets in two "U" shapes in the frame. The middle roller sets in a ~1" hole in the far frame and a 3-1/8" hole in the near frame using a bushing to fill the hole. The middle shaft is held in place by a washer and a cotter pin on the far side. The adjustable roller rides in two little square busings that the screws press against. There are brass rules on both sides of the frame and brass pointers on the bearings to help keep the rolls straight. This is the only place I have thought about modifying this machine. A set of sprockets and a chain so that you only needed to crank ONE side would make the operation much more convienient. I've used this bender a lot and you spend much of your time adjusting the screws. The gears are as-cast and bored with cut keyways. I think the keys are about 1/4". The pinion is as small as can be made (about 15 teeth) and has cast side flanges to support the teeth. This was common practice in the old days of as-cast, cast iron gears. As mentioned the crank has about a 4 to one reduction. On the far side the middle gear has a place to put the crank as well but I have found that it was only usefull without reduction on thin material (say 1/4" or less). It is not unusual to drive these benders with a big drill motor. This is a very good bender and works much better than the others I have used. It has a very durable frame design and would last just about forever even with abuse. |
| - guru - Sunday, 07/23/06 11:06:13 EDT |
|
The champion tire bender was designed a hundred years ago, and it made perfect sense at the time. But today, we can buy all kinds of stuff cheap, off the shelf, that you couldnt get then. Back then, castings were dirt cheap, and high quality, while decent bearings were fiendishly expensive, square tubing didnt exist, and storebought threaded rods and bolts an expensive novelty. My advise is skip Gears altogether- there are a couple of good designs for roll benders that use a direct drive for the driven roll, and are very simple to build. Check out www.rdhs.com for a very simple 3 roll bender made from square tubing, store bought pillow blocks, and almost no machining. www.bossbendersusa.com also has a variation, using a hydraulic jack for pressure. Personally, I think the jack idea is a bit of overkill- my 5hp power rolls, that will bend 2" square tubing with 1/4" wall, use a simple 1" diameter threaded rod for down pressure, and they work just fine. Making your own gears is fun as a hobby- but to do it right requires a big milling machine, rotary table, and special shaped cutters- none of which is cheap. And to become a decent machinist is no one day process, either. Most real machine manufacturers leave gear making to the pros. |
| - Ries - Sunday, 07/23/06 15:27:50 EDT |
|
help me Obi Wan Guru! I am looking into buying a power hammer and have narrowed it down to two, The Big Blue and The Phoenix Power hammer, the info from each one of the hammers contradicts the other, I need one thats quiet, durable, and reliable. but I am also looking for versatility like more die options which the Big Blue has as far as the Uri Hofi Dies. I am also confused about the hammer to anvil ratio. Can you please recommend one you think is the better of the two? Steve |
| - steve chilingirian - Sunday, 07/23/06 15:58:39 EDT |
|
Thanks to all for advise on benders. I have decided to do it manually for now. If I cold bend the initial 60-90 degree bend I can crank out a pretty good and consistent eye in one heat using the propane forge and simple eye jig. For my whole hog roasting skewers I was cutting off 2 1/2" of 3/8" rod and welding it on the 3/8" shank as a T-handle. The eyes just look so much more professional and really don't take a significant amount of time longer than the T-handles. I usually make them in batches of 36. Rob: I suspect when you said A/C parts you were referring to compressors. Probably not a good idea to go cutting into them. You likely have an excellent forge body in an empty 30 lb freon bottle at the same source. Pretty well an excellent size for two atmospheric burners. You can insulate ends and sides with 24" of 1" x 24" insulating blanket material. It is sold in the Anvilfire Store and on eBay. Several of the Anvilfire advertisers sell propane forges. Just scroll down to the bottom on the NAVIGATE anvilfire link at the upper right. You can find the Anvilfire Store there also. |
| Ken Scharabok - Sunday, 07/23/06 16:03:50 EDT |
|
Steve / power hammers - you got several answers on the Hammerin where you first posted your question, including one from Guru |
| adam - Sunday, 07/23/06 16:45:17 EDT |
|
Rob: Ken is being modest. He makes and sells small propane forges. I dont think I could make one for what he charges and I have an awesome scrap pile plus allsortsa metalworking tools. Get one from Ken. Its a great deal |
| adam - Sunday, 07/23/06 16:47:10 EDT |
|
hi my name is jacob, it seems you do not like sword making questions but since i am already in the process maybe you will give me some advise. i have some blacksmithing experience from metal sculpture classes in college and i know a local smith who has given me some lessons. i have currently started a few blade projects, first with mild steel to practice the shape and now i have made one out of coiled spring steel. right now the blade is to shape and is being annealed (i am going to anneal it three times before i harden and temper to help with any flaws i put in it) my question is of the nature of the chasing and finishing work. is it best to do the sanding and grinding after it has been annealed and is soft, or will the queching and tempering cause more flake. and if i sand and grind it after i have tempered it, couldnt the heat create a different temper? thank you i greatly appreciate your time in investigating my question Jacob Elmslie |
| jacob elmslie - Sunday, 07/23/06 17:44:19 EDT |
|
I saw some lump charcoal at Lowes, and I was just wondering what people pay for it? It was $5 for 10 pounds, I know that would probably be enough for someone barbecuing but as for blacksmithing and using that as a fuel occasionally would this be efficent? Thanks -Boogerman |
| - Boogerman - Sunday, 07/23/06 19:10:53 EDT |
|
$7.95 for 20 lbs. in the winter. $8.95 in the summer |
| - Tyler Murch - Sunday, 07/23/06 19:46:17 EDT |
|
at the prices I'm paying for it, it works out about the same as propane, boogerman |
| - Tyler Murch - Sunday, 07/23/06 19:47:26 EDT |
|
Torch Q: I have a small Harris torch which I like a lot but the valves are rather loose in their threads and tend to drift - I was thinking a touch of blue loctite might help but I am reluctant to use anything that might clog a jet. Also, while welding leaves onto rose stems, I found myself fighting a stiff hose. Is there a more supple hose available? I know there is the 1/4" stuff for the meco and Little torch but I think this guy needs 3/16". 6' of something supple would help a lot. Thanks |
| adam - Sunday, 07/23/06 20:14:15 EDT |
|
Adam, It sounds like the valves just need to be re-packed. Take one apart and see what it takes, then get the stuff form your local welding supply. My little Airco uses some proprietary (and no longer available) neoprene ring with a goody cross-section. I had to make my own form o-rings; flaky, and I would never recommend it to anyone else, but it worked for me. |
| vicopper - Sunday, 07/23/06 20:54:01 EDT |
|
thanks Rich. I'll try that - though I live in Victor country - might have to send off for parts. I found some lightwt hose at the henrob site |
| adam - Sunday, 07/23/06 21:53:42 EDT |
|
Heat Treating: Jacob, There are a variety of orders of operation. After forging and annealing you can rough grind leaving the edges thick. If you are going to do any engraving this is a good time. After hardening and tempering you finish grind. However, it IS possible to finish grind then carefully protect the metal from oxidation and do the heat treat then do nothing but the final finishing by sanding and polishing last. Various bladesmiths do it different ways and some of the method is dependant on the exact processes to be used. Grinding CAN effect the temper if you overheat the blade but fine finishing will not. Wet grinding or slow speed grinding can avoid overheating. Those who heat treat last often use methods like salt baths to heat the metal thus avoiding scaling the metal. Others use clay as in the Japanese method or variations of the process. When hardening the heat is often brief and does not create much scale. |
| - guru - Sunday, 07/23/06 23:28:46 EDT |
|
Adam: I don't know about the smallest Harris torch, but the 85, 62 & 43 series and all of their cutting torches use a pretty thick rubber [of some type] washer, and seem to last really long. Have You snugged the nut under the knob to compress the rubber washer more? |
| Dave Boyer - Sunday, 07/23/06 23:37:04 EDT |
|
adam-- try tightening what I guess is the packing nut located under the adjustment knob just a bit. That keeps the adustment from wandering. If that doesn't do it, next try calling Harris tech support. Truly helpful people. Matheson Tri-Gas carries Harris, MIGHT be able to help but I would not bet on it. They do, however, have lightweight hoses. They call them "whips." |
| Miles Undercut - Sunday, 07/23/06 23:46:52 EDT |
|
Adam, I had a torch behaving much like yours. My welding dealer as a deal where you drop off the torch, and they have a rebuilding service. Mine was completly gone through, including bead blasting the exterior ans a new cutting tip, and at $40.00 are real bargain! I do not know if they do mail order, but it is "Weld Rite" in New Albany IN. If interested, I could get the phone # |
| ptree - Monday, 07/24/06 07:17:37 EDT |
|
Steve, I answered your question on the Hammer-In. Currently the problem is availability. How soon do you need your hammer? This year or next? BigBLU's are ready to deliver today. In fact for flexibility you can purchase two Big BLU's for the price of many other hammers in the same size range. Interchangable dies are great you cannot beat two hammers setup side by side to do different operations. Many smiths do this with many types of hammers. The Phoenix does hit harder but not just due to increased anvil mass. It has a longer stroke and different valving system. It is beautifully built and I would love to have one in my shop. However delivery is quite slow and this will not change until the price of the hammer increases by 50% or more. The hammer that many smiths swear by and will have no other is the Kuhn. They are well made and beautifully engineered. It used to be their low anvil mass was offset by an enourmous solid steel base. Today they come with a hollow box that is to be filled with concrete. This is due to cost and availability of heavy steel plate and not a very good solution in my mind. The other thing to look at on all small power hammers is the foundation. Little Giant, Bradley, Fairbanks, ALL specified a heavy foundation. However, they ALL run just fine on your shop floor just as do the new hammers that advertise that they do not need a special foundation. . . Well, they need it just as much as the old hammers and for the same reasons. It reduces vibration and adds to the effective mass (but not very efficiently). It all comes down to economics and how permanent your installation is. Today folks are constantly moving hammers and changing shops. A century ago they expected a machine to stay put. But I still know people that cut a big hole in their floor and pour a couple yards of concrete to setup a 100 pound hammer. . . |
| - guru - Monday, 07/24/06 07:27:38 EDT |
|
Maxim Magazine: anvilfire and the guru are quoted in the current issue of Maxim on blacksmithing as an unusual job. |
| - guru - Monday, 07/24/06 08:46:52 EDT |
|
Torch: Dave, Mile & ptree - thanks all for the advice. I will fiddle with the packing nuts. Also good to know that Math Tri Gas does Harris stuff - I get my welding gas from them. They come up to my town once a week - which sure beats driving on US284 with a bed full of gas bottles. I will ask if they have a rebuild service. |
| adam - Monday, 07/24/06 09:42:37 EDT |
|
We recently purchased some Kaowool #8 from you. The last time I purchased this item (from another supplier) was in 1994. The composition/mfg process of the material has changed in that time and this new material is not useful to us. It does not hold together like the last item purchased. Do you know if the manufacturer has changed the material since I last purchased it? Is there a product available like the last one I purchased? I could use the 1" thick if it was more similar my previous purchase. Thank You, Ralph Sadowski |
| Ralph Sadowski - Monday, 07/24/06 09:55:30 EDT |
|
Anyone have a history on William Foster anvils? |
| adevine - Monday, 07/24/06 10:24:14 EDT |
|
adam-- I do not think Tri-Gas does a rebuild themselves. Valley has, or at least had as of a few years ago, a guy on tap who does it on the side. Harris will take it back, maybe, and just simply replace it, possibly for a better deal than a new one. They did same with my Craftsman two-stage regulators, after I went through much nonsense with Sears. They can't rebuild-- getting rid of the solvents involved in cleaning out the torch is too much hassle, they told me. |
| Miles Undercut - Monday, 07/24/06 10:31:16 EDT |
|
adam-- I forgot: you need to check with Harris and get a repair acceptance number before shipping the equipment to them. No tickee, no washee. |
| Miles Undercut - Monday, 07/24/06 10:32:53 EDT |
|
Jacob: On most of the blades I do I usually first do all of the forge work as close as possible to the desired shape of the blade. I hammer in the rough beveling as best as I can, and I even forge in the fullers (spring fuller set up for blades). Then, I usually go over the entire blade after the rough shaping with a lighter more precision hammering, and almost planish the hot steel, geting rid of the high and low spots as best as possible. This cuts down a lot on the grinding process. From here the blade is annealed. I then will do a rough grind to get the blade to shape. Then I kick it up into a medium grit and hone the shape a bit more. When it looks good and is to the point that I could go into a finishing grind, I heat harden the blade, immeadiatly after this, I go and grind away the scale in a few places along the edges (so I can see the temper colors run) and tip and temper. After the temper I will sometimes go back into a heavy grit for a pass or so to get rid of the scale which tends to be quite tough to grind off. Then I go into the finishing grinds and polishing. Now, you will ruin the temper if you overheat. Now usually you know you have ruined the temper if the steel turns the temper colors. What I do to prevent overheating the blade is I have a bucket of water near the grinding setup, then when ever the blade starts to heat up (which I dont use gloves so I can feel it) I cool it off in the water. Never ruined a temper yet. Now the tip edges or small sections of the blade heat up very fast and they are the easiest place to ruin the temper. So if you are careful, you shouldnt have a problem. Salt baths and things like that that prevent oxidization in the heat treating process are very nice because then you dont have to worry about over heating durring the grinds, but they are a more complicated set up that most beginners dont have. |
| - TarAlderion - Monday, 07/24/06 11:37:58 EDT |
|
Well if Ken doesn't chip in first I can look up what Postman has to say about them---though he may have more to say in his next book as I have heard he has spent a lot of time researching english anvils. I have a WF from 1828 with 9/10's of the face missing and the heel broken off. But for US$5 it was worth it for the wrought iron... Thomas |
| Thomas P - Monday, 07/24/06 11:45:45 EDT |
|
TarAlderion, when I worked with a swordmaker using a lot of high alloy steels we used to sandblast the blade after heat treat; a lot cheaper on grinding belts than removing the Ni and Cr oxides! Thomas |
| Thomas P - Monday, 07/24/06 11:49:08 EDT |
|
Ken, I believe that these tanks are for freon. The metal seems to be pretty thick on them as well. Well, Ken how much are these small gas forges you build? Give me some time and I'll try to get some extra money to buy one from you. (Kepp in mind I still have to pay for that mission trip, plus a hunting trip and archery supplies for that) ---Rob |
| - Rob - Monday, 07/24/06 11:59:14 EDT |
|
thank you for your help everyone. the steps were somewhat of what i expected to be. so i will take the blade to a belt sander after it has finished annealing (do you at this time do edge filing?), and then harden and temper the blade (or now do i do edge filing?)and then do one more coarse and fine sanding by hand, any good suggestions for the finest finish i can modestly afford? will a real dense sand paper work or do i need to use steel wool ar anything else? id prefer as mirror finish as possible. after the blade is finished i am going to protect it with asphaltum and etch it with ferric cloride. i bought some gun blueing (which ive never used before) and am going to try to get the etching lines a blue color. thanks again |
| jacob - Monday, 07/24/06 12:32:53 EDT |
|
oh and one more question about heat hardening. since i am working with spring steel and i want the back edge soft, do i just heat until the edge side turns reddish orange, and should i not bother hardening the tang? thanks |
| jacob - Monday, 07/24/06 12:34:42 EDT |
|
sorry but i have yet another question of hardening... the forge im working at has a water quench and another one, i forget what exactly it is, but it cools much faster, since i am working with a high carbon steel (although it has probobally lost alo due to my over working it) just i just go with the water quench? what might be the difference i would notice by using the more aggressive coolant? |
| jacob - Monday, 07/24/06 12:38:31 EDT |
|
Jacob, I fyo wan ta mirror finish, there are no shortcuts. You grind, then file, then sand, working from coarser to finer grits in succession. After that, you begin polishing and buffing, again from coarser to finer grades of buffing and polishing compounds. It takes a lot of work the get a mirror polish on a blade. If you try to do differential hardening on a high carbon steel, you run a serious risk of quench cracking. Better to harden the entire pice, and then selectively temper to get the varying hardnesses you want. With thin sections (under 1") of high carbon steel, oil is generally the preferred quench medium. Water and brine are too fast a quench, often resulting in cracking. Always start with a slower quench and only sswitch to a faster one if it is necessary. |
| vicopper - Monday, 07/24/06 13:04:37 EDT |
|
thanks, i will try to do an oil quench, but once the blade has been quenched and fully hardened, (the whole thing heated to a reddish orange) and i temper it, wont only the edge be tempered or softened, and the back be still hard? i have also heard that spring steels should be air cooled when being tempered. |
| jacob - Monday, 07/24/06 13:16:52 EDT |
|
No kidding Thomas. That is some mean stuff to grind off. But, I can generally get it with a used 80 grit or so and a bit of patience. I would go with the sand blasting, but I dont have a sand blaster, so I am stuck with the belts. Jacob: As far as the edge of the blade goes, that is generally the last thing I do. I would not recomend trying to put an edge on the blade before the heat treatment because when it is that thin, the oxidization will eat the edge away very quickly and you will have to re-grind it in anyways. You can get all of the beveling in and maybe a rough edge when the blade is annealed, then after the heat treatment, you will have to get all of the oxides off and then go into your finishing grinds. In the finishing grinds, you can do it by hand or use the belt grinder. I use the grinder. I use an 80 grit belt for most of the rough grinding and shaping after forging. Then before the heat treatment I go with a 120. After the heat treat I usually do a pass or so with the 80 grit again to knock off the scale. From there I go for another pass with the 120, then to a 220. From the 220 I then either do a wet grind by wetting the belt, which will make a smoother grind, or I oil the belt (WD40) and do the same thing. I then go to a 400 grit from here, plain, then wet or oiled. Then repeat with a 600, 800, and finally 1000. After the 1000 grit wet/oild passes I take it to the bench grinder with a buffing wheel. I start with a rougher compound, against the grain of the grind, then I go with the grain, and against it ect, until uniform. And usually it is fairly close to mirror finish here, but I usually go with a finer compound and do the same thing, against the grain, then with it, against, and finally with. It doesnt cost too much to put a decent mirror finish on a blade. You just need a buffer and a couple of types of compound, one more abrasive and one less. Now if you are going to go by hand in the finishing it will take some more physical work (and I find the grinders work better anyways). You will want to sand in series of grit like on the grinder starting rougher and going finer. And you will probably want to use oil in the sanding on some of the finer passes. I know of many makers who finish their blades in a satin finish with a scotchbrite pad and some WD40. But you could use some really fine steel wool and oil for your final pass before buffing and you should get a decent result. Oh, and as for the etch, if you are going to etch a design in the blade, I would recomend you do that before the polishing. If you do it after, you could risk messing up the polish on the blade and end up having to re-do it anyways. Then if you are going to blue it, do that last, just be very careful not to get it on the finished parts and only in the etch (mask it off and what not). As for the heat hardening, if you are working with spring steel it is generally best to just harden the whole blade like vicopper stated, then differentially temper. As for the tang I harden mine, then temper them a lot more than the blade. You want the tang to have some resialliancy and not just bend (like it would after annealing). So I harden it, then temper greatly, and especially the very end of the tang if it is to be peaned down to hold on the hilt assembly. This way, the tang will flex and not bend at the guard. With the high carbon steels and quenching, water is not usually the best bet. You can use water/brine if it has been heated some. This will reduce the rate of cooling and reduce the risk of fractures. But the best bet is to go with the more dense oil which will cool it slowly and prevent the fractures all together. Oh, and as for the heat hardening temperature, a bright orange color in the steel might be too hot. You dont want to over heat the steel and then quench, that can result in problems. You want to heat to the critical and then quench. Critical temp will vary slightly per grade of steel, but, you can just test with a magnet. When the steel is no longer magnetic, it is at critical and ready to quench. Oh, and what type of sword are you making, just for reference? |
| - TarAlderion - Monday, 07/24/06 13:56:01 EDT |
|
Oh, I forgot. To get different tempering on the blade you can do it a number of ways. But if you just stick the whole thing in the heat you are right, the edges will temper faster and more than the thicker spine of the blade. To solve this, you can do some different things, you can take a piece of red/orange hot metal (with some mass to it so it will hold the heat) and place it along the spine of the blade (center for double edged, back for single) and some sandwhich the blade in between. This will usually start the temper colors to run, then just pull the hot metal off when it gets clost to the edge. now, if the colors dont run, you might need to pre heat the blade a bit and try it again, or heat the metal, place it on the blade, then put it in the residual heat of the forge and they should run. Just be careful not to over heat the spin or let the temper effect the edge too much. And generally with the temper you will want to let it air cool. |
| - TarAlderion - Monday, 07/24/06 14:04:20 EDT |
|
Kayne and Son will be demonstrating Induction Heating, Forging, Pipe Forging and Forge Welding at our monthly meeting of the WNC Blacksmiths on August 9th 2006. See you at 7 pm! |
| Steve Kayne - Monday, 07/24/06 14:45:29 EDT |
|
We expect to have an open forge for the induction heating unit soon. All those interested please contact us. Steve |
| Steve Kayne - Monday, 07/24/06 14:46:44 EDT |
|
Did I mention that this is Off Center Products Induction Heating system? Wizard Grants Brainchild..... Steve |
| Steve kayne - Monday, 07/24/06 14:51:42 EDT |
|
More on tempering: it is suggested that you temper the entire blade to the lowest temperature you want on it---usually for the edge. Do it in a good temperature controlled oven if possible and repeat several times. *Then* draw the rest of the blade further back with a torch, tempering tongs, etc; protecting the edge by placing it in water, using wet rags, etc. Thomas |
| Thomas P - Monday, 07/24/06 14:53:10 EDT |
|
Koawool: Rob, There are many grades and types of Kaowool. The two thicknesses we carry are differnt types. The 1/2" 8# is "kaowwol". It is a coarse grey crumbly material. The 1" is "high purity cereblanket". It is a white fibrous material that is more like fibreglass where the other product is like rock wool. The 1" is a much better product. Anytime anyone asks about the 1/2" we are careful to explain the difference. We also state on our page that it is not the same product as the 1" The reason we have two different grades is that is what our supplier carries in stock. Thermal Ceramics lists dozens of types and thicknesses but few are actually in production all the time. If you like I can send you a sample of the 1" cc:mail |
| - guru - Monday, 07/24/06 15:17:20 EDT |
|
Hello there I was wondering if anyone knows of a good substitute for Slaklee Basic l to use in the Super Qwench |
| John Bankston - Monday, 07/24/06 15:31:49 EDT |
|
Jacob: Wet-or-Dry sand paper comes in grits up to 8000, which is finer than many buffing compounds. Gears: While involute gears are far more efficient than primitive gears, primitive gears still work. I have a clock that has been running nearly 100 years with "lantern" pinnons - Pinnons made of wires held in place by two brass disks. I've seen clock movements far older than this one using primitive gear tooth shapes which were still running. I'd be surprised if the gearing in the Guru's old grist mill didn't employ lantern pinnons or something similar. |
| John Lowther - Monday, 07/24/06 15:33:58 EDT |
|
Packing nuts. 1/2 turn on each nut and the flame now sits nice and stable. Thanks! I think I will get it rebuilt sometime when I can spare it for a couple of weeks. I really like this guy its the 5090 with the on off lever on the handle so that the torch can be turned off and set down w/o disturbing the settings. |
| adam - Monday, 07/24/06 15:36:38 EDT |
|
Yep, that's one of the nicest little torches I've ever used. I wish they were still available, I'd get one in a minute. As it is, I'll have to buy a separate Gas EconoMiser for my little torch. |
| vicopper - Monday, 07/24/06 15:44:36 EDT |
|
Sorry guys, I meant Shaklee Basic 1 |
| John Bankston - Monday, 07/24/06 15:50:54 EDT |
|
Rob: I am Poor Boy Blacksmith Tools. You can click on the NAVIGATE anvilfire box and then scroll down to the bottom and click on the name. It will take you to my store in eBay. However, it is a lot easier to look at my inventory if you go to www.ebay.com, then to Advance Search in upper right, then to By Seller. I am eBay seller scharabo. Ask for 200 results per page at the bottom of that search page. Once in my listings simply search on the keyword of propane. I currently offer four variations of the Freon tank forge: 4" x 5" front opening, 4" x 6" front opening (for farriers to accommodate larger shoes), double insulated (2" insulation) and one with a closeable rear opening. These do not come with a regulator, pressure gauge or hose. You need to purchase them separately. I recommend either Zoeller Forge (do a Google search) or www.tejassmokers.com. The latter has an excellent selection and free shipping (at least last time I purchased from them). William Foster anvils. From Anvils in America by Richard Postman they were likely manufactured in Sheffield, England from 1816 to 1864, with most falling in the 1830s and 1840s. They were one of the very few to put the year on their anvils. They were all likely multi-piece construction. Differ from most English anvils in that the stone weight is on the opposite side from the name. They made several styles, including a double horn. Personally I would put them at the same quality of Mouse Holes of the same period. |
| Ken Scharabok - Monday, 07/24/06 16:07:33 EDT |
|
Ken do your forges get "Scharabok hot"? (old SOFA joke...) When I talked with Postman about trying to reface my William Foster the old way he warned me that WF used a fairly low grade of WI for the body of their forges---perhaps why the weld failed on the heel of mine. Thomas |
| Thomas P - Monday, 07/24/06 16:37:15 EDT |
|
thank you fro your advise to a young beginner blacksmith/ bladesmith. you have definately cleared up some sequential issues ive been considering. as for the blade it is my third blade, the other 2 were about 8in blade and 5-6in hande, one a double edge and the other inverted like a syth. the one im annealing right now is about a 12-13in blade and has a curved handle like a persian daggar. i am taking a jewlery making course in the mean time, its a littel ambitious but i would like to inlay the handle with either bras, copper or silver and some bubinga veneer. i will probobally cast the furniture (i have had some experience at a bronze foundry) thanks again for all the comments peace |
| jacob - Monday, 07/24/06 17:15:30 EDT |
|
I'm finding that when I clip ornamental parts together, I get them tight enough to hold securely but not tight enough to prevent all movement, so I rivet the pieces before applying the clips (I've pre-welded on some pieces but I like the technical/mechanical aspect of riveting better). I've used butt joints, scarfed joints and just plain sloppy overlapping joints, none are 100% effective and I'm wondering if pre-riveting is the norm for this application. If it makes any difference, I'm doing small stuff, using 1/4, 3/8 and occasionally 5/8 square rod, Maybe bigger material gives better results, don't know. Anybody got any insite or suggestions? |
| Thumper - Monday, 07/24/06 17:29:19 EDT |
|
Another question, I "make" my rivets out out of nails (I trim and pein the heads for a rustic look), can anyone recommend a supplier where I can purchase mild steel and brass round head rivets of various lengths and thickness besides ebay? Thanks |
| Thumper - Monday, 07/24/06 18:16:51 EDT |
|
Does PROFORGE have a web site? If so can someone list it here? Thanks |
| Perry H - Monday, 07/24/06 18:24:24 EDT |
|
Ken, is there any way I could get one designed for forge-welding as well? |
| - Rob - Monday, 07/24/06 18:50:50 EDT |
|
Rob: I don't design these forges with forge welding in mind; however, a couple of people have told me they do so on a regular basis at a fairly low pressure. One said he added a second layer of insulation and coated it inside with ITC. The atmospheric propane forge I use can't reach forge welding temperatures with the opening it has, but once it is hot I can close off about 2/3rds of the opening with a insulating firebrick and raise it to forge welding temperature. On guaranteed forge welding capability, well, I'd rather leave that up to the professionals. I believe Larry Zoeller will sell you a model pretty well guaranteed to be able to forge weld in. You can find his site by doing a Google search on Zoeller Forge. |
| Ken Scharabok - Monday, 07/24/06 19:33:16 EDT |
|
Harris 50-9 Seems to be still available http://www.atlweldingsupply.com/product.asp?itemid=82&catid=50 I just bought a selection of welding tips from them I called Harris about servicing this torch - not helpful "what you do, sir, is take it back to the dealeer and if its still under warranty..." "But maam, I didnt buy it from a dealer" "Well sir, what you need to do is go to the dealer you bought it from..." ... "No sir I dont see any kit for it - youd have to ask your dealer about that" ... "Sir I cant tell you if we still make the torch - your dealer can help you with that". This is customer service? But I found a torch servicin outfit that will rebuild it for about $40. |
| adam - Monday, 07/24/06 19:44:14 EDT |
|
Adam, I took a grungy old torch in and got back what I feel is a like new torch for $40. such a bargai that I am going to take my minuture A/O cutting combo torch in for a rebuild as well. |
| ptree - Monday, 07/24/06 20:13:58 EDT |
|
I am presently doing an exterior gate and the finish will be "rust". I am obtaining this rust by first sand blasting the gate than by spraying it many times with water and salt. I let the gate outside and in 3 days there is a very nice rust finish. I then removed the excess of rust with "iron wool" and... Now what pruduct can be put on the gate to protect and to keep this "rusty" finish for an exterior use ????? I hope it is understandable !!!!!! |
| André Boudreault - Monday, 07/24/06 20:57:32 EDT |
|
adam-- I am sorry if I steered you into an unpleasant encounter with Harris. I have had many occasions to seek technical help from them, and have always found them to be just fine. |
| Miles Undercut - Monday, 07/24/06 23:47:10 EDT |
|
|
|
|