| WELCOME to the anvilfire Guru's Den - V. 3.0 |
|
THIS is a forum for questions and answers about blacksmithing and general metalworking. Ask the Guru any reasonable question and he or one of his helpers will answer your question, find someone that can, OR research the question for you. This is an archive of posts from October 1 - 8, 2003 on the Guru's Den |
|
|
|
A note to note that the CBA Octoberfest is this weekend See you there . . maybe? |
| - Pete F - Wednesday, 10/01/03 03:29:37 EDT |
|
Thanks Rich, Guru & Marc for your advice. I am making a cylindrical burner with a 1" ID SS tube. This should be about right for my forge which is about 600 cu in. I do want it somewhat overdriven since I would like to ramp up to welding heat quickly when I get home from work. If it is still too big, I can slip a 3/4" pipe inside to reduce the bore an increase the velocity. The old burner design would get to white heat in 30 mins which was nice - but it wasted a lot of gas doing so and wouldnt stay there because of back burning problems. Tonight I will try gouging out the burner opening in the refractory shell. If my hole saw doesnt cut it then I will try brazing on carbide points (cute idea!). I guess I could use a piece of black pipe for this but if my hole cutter fails then I will have a newly worn out hole saw - how convenient! :) Since this will be a kludge - I am also fixing to ram up another forge liner with a round burner aperture. Has anyone tried mixing sawdust or vermiculite in with the refractory to make it less dense? I would like to make some custom firebricks for use around the mouth of the forge? |
| adam - Wednesday, 10/01/03 10:48:22 EDT |
|
Vicopper, Thanks for the SS info. Never thought of hammer & anvil iron transfer... I'll try some more aggressive surface removal. |
| Dave C - Wednesday, 10/01/03 11:36:12 EDT |
|
thanks guru. I will follow your advice. I will sharpen the axe as it is and keep it. It used to belong to my grandfather and has been lying around for the last 60 years since he died. It has two different color sections. The bottom 2 inches (the bit) is lighter in color than the rest of the axe. I believe it must be factory made with the bit welded on. There is an even line where the join is. Someone told me it is a connecticut pattern. Thanks again |
| bill hickey - Wednesday, 10/01/03 11:42:54 EDT |
|
Hinge question: Building a set of strap hinges for a bedroom door. 2" wide 24" long, rolled (not welded) eye, 1/2" pin. Door to weigh ~100#. Questions: Is 2"x3/16" strong enough for this application, or should I go to 2"x1/4"? Am I going to be okay with a rolled, rather than welded eye? Thanks! -JIM Question |
| -JIM - Wednesday, 10/01/03 11:59:14 EDT |
|
I am a 35 yr old part-time smith from So. Oregon who has been banging away on a 120 lb Hay Budden for about 5 yrs now. I just brought home a 1929, 264 lb Soderfors from my uncle and look forward to trying it out. Unfortunately, at some point in it's life, someone thought the entire face was a cutting plate so there are some chisel marks left behind. They aren't too deep, but would defintely mark up my work. My question is what would be the most effective way to clean it up? |
| Tim Holloway - Wednesday, 10/01/03 12:37:36 EDT |
|
Jim, It's a whole lot easier to over engineer while planning than it is to re-engineer after the project is finishd. I'd use Ľ" stock. Tim, I'd use a belt sander with an aluminum oxide belt. Probably start with about 60 grit. Just let the sander "ride" around on the plate without adding any pressure. Let the weight of the sander do the work. Most of the scars will come off this way and the surface will stay flat. |
| Paw Paw - Wednesday, 10/01/03 12:49:08 EDT |
|
Hinge Load: Jim. This is a complicated question. My gut felling is that yes it is heavy enough. Look at standard hinges, they are about 14 gauge with rolled eyes. However, most exterior doors have three and they are about 4" wide. If you are really worried about it then jury rig a door (or door like frame). THEN put your weight on the door. . Teenagers do it all the time so this IS a fair test. The door itself only puts a small load on the hinges. The bottom hinge takes the weight and the top hinge takes the outward moment of a fraction of the weight. If the bottom pintle can take the weight and the top loop the seperation stree then you are in good shape. Note that the outward pull is roughly the weight divided by the ratio of the distance between hinges and the width of the door. EXAMPLE: If the hinges are 5 feet apart and the door 2 feet wide the ration 2:5 = .4 x Load. Use 1/4 of the door weight (half supported on the bottom and the balance at the center of the door - it is probably less). Then add a 200 pound adult. That is 225 pounds times .4 or 90 lbs pull. That is STATIC with nobody jumping on it. But you get the point. |
| - guru - Wednesday, 10/01/03 13:21:04 EDT |
|
I'm a project manger for a sheet metal company 42yrs old. We make a lot of steel framing for roofs/ framing work. We are making a kitchen hood that has a hipped top. On the radiused corners the customer wants angle iron, vee down, to radius along that corner. They also want a straight lined hammer finish. We've never done any of this before. Any help or advice |
| 10bender - Wednesday, 10/01/03 13:55:50 EDT |
|
Thanks for the hinge info.... I think I will go with the 1/4". just to have an extra margin. |
| -Jim - Wednesday, 10/01/03 14:09:22 EDT |
|
Anyone know where I can find plain steel balls, 5/8"? McMaster only has tool steel and alloy balls, and Online metas doesn't seem to carry them at all. Thanks! |
| -Jim - Wednesday, 10/01/03 14:11:42 EDT |
|
Tim: I've got a 110 lb Soderfors that had some chipped edges on it and I used a hand-held belt sander to clean it up. I was VERY careful to do as little cleanup as possible and to change directions frequently while sanding. I also used a variety of grits. Cleaning up the flat part of the face should be relatively easy since you can just let the belt sander ride along on the face. My first choice, however, would be to work around the marks and not touch the anvil. Whatever you do, however, please take it SLOWLY and always do as little as possible on each pass. |
| tanix - Wednesday, 10/01/03 14:27:41 EDT |
|
Balls of Steel Jim, are you sure McMaster didn't have them? I know I got some 1/2" mild steel balls from them just last year. |
| MarcG - Wednesday, 10/01/03 15:58:01 EDT |
|
Checking again, under metals/steel/balls S-2 (Rc 52-60) Chrome Steel (Rc 63) Carbon Steel (1010-1020, Rc 60) M50 (Rc 21, but expensive!) All of which I think would be too hard to easily drill through. Or am I mistaken? -JIM |
| -Jim - Wednesday, 10/01/03 16:25:49 EDT |
|
Jim, The carbon steel Rc 60 is a mild steel ball. |
| Paw Paw - Wednesday, 10/01/03 16:50:17 EDT |
|
Jim, Try ARCH IRON, atwww.archirondesign.com. they show balls from1/2" to2 3/8", and they do list 5/8" and note that they are forged and may be plus or minus "a few 1/16"s" good luck |
| jeff reinhardt - Wednesday, 10/01/03 16:58:12 EDT |
|
Really? I had though mild steel was softer than that.... T Do I need to anneal these before drilling? Thanks for straightening me out! |
| -Jim - Wednesday, 10/01/03 16:59:40 EDT |
|
FLOURSPAR.... oooo, sounds dangerous, therefore fun. My shop is only a tin roof over my equipment (a tarp over the forge, anvil etc when not in use). I think I'll set up a fan though just in case the wind is not on my side. I'm guessing that I'll be able to smell the fumes, yeah? The NC forge floor is thoroughly pockmarked due to much welding excitement (everytime I forge I gotta weld something...). What will the ITC-100 or -200 do for me?? Will it eat through the metal shell of the forge as well? Thanks for all the info, I'll let you all know how it goes!!!!! |
| Rodriguez - Wednesday, 10/01/03 17:44:18 EDT |
|
Flourspar ceramic grade... is that what I'm looking for on the Kickwheel Pottery website?? |
| Rodriguez - Wednesday, 10/01/03 17:54:17 EDT |
|
Mild Steel Balls: The hardness is listed wrong or you read wrong. There are various Rockwell scales. Rc = "c" scale. But you MIGHT need to anneal them. All you can do is get some and try. |
| - guru - Wednesday, 10/01/03 17:59:02 EDT |
|
Flourspar Rodriguez, Yes I think so. You want the type that has the highest CaF content (98% I think). It comes from Italy and France. |
| - guru - Wednesday, 10/01/03 18:02:00 EDT |
|
Rodriquez, The ITC-100 will make a hard shell on the Kaowool. It is a high heat refractory. Your forge will reflect the heat better, and thus work more effeciently. Also, it will resist the flux better. |
| Paw Paw - Wednesday, 10/01/03 18:13:24 EDT |
|
the mild steel balls in McMaster are case hardened - why? |
| adam - Wednesday, 10/01/03 18:16:14 EDT |
|
DIIK, Adam. (Darned If I Know) |
| Paw Paw - Wednesday, 10/01/03 18:25:03 EDT |
|
Should I anneal [or not] A used leaf spring for making a knife, before forging, quite the fight going on here, I say anneal and rough form with a mill then forge, save time, and no prob with the bend in the old spring, and how the heck do the guys from Nepal do it? They cannot have our equipment, but are superb Knifemakers |
| Keith - Wednesday, 10/01/03 18:39:38 EDT |
|
Kitchen Hood: 10bender, Bending that corner V down is going to be tricky. It COULD be done cold with the right bender (a special) but would be MUCH easier to do hot. You will need a simple bending jig like we show in our 21st Century page article on benders. Then heat the section to bend with a rose bud torch while supported on and against some fire brick (to conserve and reflect heat). Then just bend it around the jig. You will probably need some tongs to work out stray curves. Angle bent the hard way goes pretty easy hot and with any kind of guide. The hammered finish is another matter. I'm not sure what a "straight lined hammer finish" is other than a 1950's primitive ball peen dent finish. . . a dent here and then another dent . . Looks like $#!*. Is this on the hood or just the frame? Good hammered finishes are quite an art to produce, very time consuming and just palin HARD work. By hand you cover the surface with depressions from a ball peen hammer until they overlap and cover 100% of the surface. Normally this is done cold. The size of the dents can vary but there should be an even randomness. By machine you use a power hammer and a texturing die. See the Kayne and Son web site under Texturing Tools. You will need a power hammer to use with the texturing tools. See any one of the following advertisers, BigBLUhammers.com, Strikertools.com or CentaurForge.com. If this is a ONE time job on the frame it can be done with a hammer and anvil for about the cost of the machinery. |
| - guru - Wednesday, 10/01/03 18:40:35 EDT |
|
Do I anneal a well used leaf spring? (or not) I say anneal and rough form, saves time, then forge, making a knife, |
| - Keith - Wednesday, 10/01/03 18:42:20 EDT |
|
Case Hardening: Its cheaper than solid steel. And what good is a soft steel ball??? |
| - guru - Wednesday, 10/01/03 19:22:36 EDT |
|
Keith: never made a knife but I have made a bunch of tools from leafspring and grader blade. I torch cut the rough shape, clean it up with the grinder and then forge to final shape. Sometimes I anneal after forging. If you want to rough it out with a mill you had better anneal first or you will use up a lot of end mills. |
| adam - Wednesday, 10/01/03 19:24:33 EDT |
|
Spring Steel: Keith, If you are going to forge it then annealing is not part of the process. Forging IS rough forming at temperatures far above annealing and is much faster than "machining" IF you have a forging machine (a power hammer). About 5 minutes for a sword length blade (most of the time waiting for the forge). If you are going to machine (stock removal method) then you want a nice new professionaly heat treated piece of steel. You start with a band saw, not a milling machine. Then go to a heavy duty grinder for stock removal. Then finish by hand with files and sand paper. For forging most preforms are flame cut. But that is only for gross shaping or to increase closed die efficiency. There is not that big of a change in dimensions in a blade to make it worth while. |
| - guru - Wednesday, 10/01/03 19:36:02 EDT |
|
Jim, Most steel balls are used in machine elements or as valve balls in check valves. For a check valve, My previous employer used 440c stainless in the standard valves, and other materials as needed for chemical resistance. The softer 300 series stainless balls did not last long. For a machine element, most desire a very accurate ball, and often hard as well. The best, most spherical balls, IE ball bearings are heat treated for hardness, but also to yeild a precision grindable ball. If you are willing to pay, balls with spericicty in the millionths are ready and on the shelf. Standard ground, 440c balls are available up to about 8" off the self. These make great tools as they are very smooth and very hard. If you have a valve repair shop in you area, they may scrap ball check valves from time to time, and may part with balls for a little money. Welding to the 440c is a bit of a trick. Try 309 ss rod, and be sure to keep your eyes covered untill the slag is off the welds as it flies off like a bullit. |
| jeff reinhardt - Wednesday, 10/01/03 20:18:44 EDT |
|
double screw vise on ebay without the chain. starting bid $750, buy now for $1k! what were they fetchin @ quad state?? just added a sweet mouse hole 176# to my harem..i must have a problem; i cant stop looking at it.... |
| rugg - Wednesday, 10/01/03 21:43:51 EDT |
|
I was looking at the i-forge demo tonight on how to "drill" a square hole for a bloster plate, and talked to my tool and die maker brother, he sugested using a EDM (electro discharge machine) to clean the edges of a milled round hole to make it square. when I told him that the edges of my trenton anvil hardy hole were mushroomed in and that the 7/8 hole was an inconvient size, he sugested that we EDM the hole to an even one inch. My question is there any danger in doing this, ie tempering or detaching the face. The anvil would be compleatly covered in the tank with coolant. thanks in advance. habu |
| habu - Wednesday, 10/01/03 22:28:54 EDT |
|
Habu I can't see anything bad that can happen from the edm process. If you have access to that machine for FREE and you want a nice even square hole, go ahead. I would put a radius in the corners though, possibly a 1/8"r, to avoid the possibility of stress risers from the corner, thus under load, breaking the heal of the anvil off. Be sure to slightly round the face to hole also, again to not have any square or notched places for stresses to start from. Most hardy tools are made for a specific anvil by the smith though. This makes a nice fit in the hardy hole and keeps things tight. But nothing in the edm process should damage the anvil. |
| Wayne P - Thursday, 10/02/03 08:35:57 EDT |
|
Habu - I don't know why that wouldn't work. The pieces that I've seen done with EDM came out of the coolant cool enough to handle with gloves (and in some cases, bare hands), so I don't think loss of temper would be an issue. If the face was welded properly to begin with it shouldn't harm that, either. If I had the ability to EDM a new hardy hole, I think I'd put it up near the front of the face though, where there's more anvil mass underneath it. Many of the European anvils are made that way and it seems like a good idea to me. It also gets any tooling out of your way while using the face if you're right-handed. |
| vicopper - Thursday, 10/02/03 08:36:28 EDT |
|
Larger Hardy Hole: Habu, First consider the width of the anvil face. Some are too narrow for a wider width. However, many folks have standardized on 1" on a range of anvil sizes. The radius suggestion is an absolute but I would not use that large a radius. 1/6" = 1/8 round and that is plenty to prevent stress concentration. Make the hole a CLEARANCE hole for 1" (1.010") not exactly 1". Grind a healthy radius at the top when finished. EDM is regularly used to sink dies in pre hardened steel blocks. Almost all auto body dies are sunk entirely by EDM. The advantage is that the uniform thickness block is easier to heat treat and a failure does not destroy many hours of die sinking. It can also be done with much lower skilled operators. Better economics all around. |
| - guru - Thursday, 10/02/03 10:05:23 EDT |
|
Vices: Rugg, The one double screw vise at Quad State sold immediately for $650 or $750 on Thursday. It was for resale later but I did not notice the price. One at the 98 ABANA (NEWS vol 4 page 13) conference sold for $200, $400 and finally $650 (I think). It was mounted on a nice stand. A lot has changed in 5 years and prices on rarer equipment is going up quite a bit. Compared to the very nice HEAVY vises at Quad State this is over priced if you are looking for a TOOL. If you want parrallel jaws then look for a good heavy Columbian or Prentice chipping vise (looks like a machinist vise without rotating base). These are much better vises and they are not selling for collectors prices. 125 to 150 pound leg vises were selling for a dollar a pound at Quad State. If I had money to put into tools I would have bought them ALL. A few months ago I bought a 125# vise for $225 and thought it was a DEAL. On the other hand the small leg vises at Quad State were selling for what was relatively high prices. Dollar prices for little 30 to 60 pound vises were about the same as the huge vises. . . All these tools (vices) are generally under priced and now is a good time to take advantage of them. Vises were made in the same quantities as anvils (millions) but wear out, break and lose parts at a higher rate than anvils. SO, I am estimating that there are less than half as many good leg vises. You can also take advantage of more than one vise in a shop that only has room for one anvil. New vises start at $300 US and are not as stylish as the old ones. On the other hand a large American made machinist vise was selling for $1800 a few years ago. Prices have come down but this is because all that is available are imports. For $600 you can buy a very nice NEW HD 6" vise from McMaster Carr. Used you should be able to pick up the same for $200 or less. |
| - guru - Thursday, 10/02/03 11:21:11 EDT |
|
Just got the balls I needed order from Arch Iron. Thanks for all the help! -JIM |
| -Jim - Thursday, 10/02/03 13:52:33 EDT |
|
Hey Rugg, You're a tool freek, but what blacksmith isn't? Take it as a compliment. You'll look at that anvil for a long time, I'll betcha'. |
| Frank Turley - Thursday, 10/02/03 14:10:20 EDT |
|
Dear Rodriguez, If you are meaning FELDSPAR, there are several to choose from. They are sold in flour form so I think that is where you are confused. The Best is Kingman but the mine closed and they are asking a dear price for it. Feldspar is one of the three ingredients in Clay, Feldspar, Ball Clay, fireclay and Silica. These are mixed differently to produce the clay you want. It is also used in kiln wash which I use in my melter to protect the walls at higher heat. I have seen people coat k110 Kaalwool with it to prevent heat shrinkage, but I haven't any news on how that works. You can find it at your local clay store or brick manufacturer. |
| mahaffeyesq - Thursday, 10/02/03 14:32:39 EDT |
|
Paw-Paw and Tanix, thanks for the tips on anvil cleanup. It responded well to the ball bearing test, so with a little sanding it oughta be like new again. |
| Tim H - Thursday, 10/02/03 15:04:08 EDT |
|
mahaffeyesq, No, it is Flourspar or Flourite, Feldspar is a completely different mineral. Flourite is primarily Calcium Flouride. Flux grade is 98%. Feldspar is a Potassium, Sodium or Calcium/Sodium, aluminum silicate. Read our Borax FAQ, see a book on iron smelting or minerals. |
| - guru - Thursday, 10/02/03 15:20:00 EDT |
|
Ball Bearing Test: Please be sure to read my description of how to run this test. Others have described it as throwing the ball at the anvil or dropping it from several feet. This tells you nothing. I use a heavy hand held belt sander to dress anvil tops and an angle grinder to dress the corners. Sharp chips along the edges should be cleaned up first to prevent tearing the belt later. Making a little dip out of a corner chip is preferable to welding and possibly damaging a larger area of the anvil. I use both grinders on horns. IF there are obvious high spots or the tip of the horn is mushroomed I go after it with the angle grinder. Then using the belt sander I roll it over the curve. To do a first class job on the horn you need to set the anvil on its sides and upside down. Since it sees little use it is good to paint the bottom 2/3rds of the horn to prevent rust. |
| - guru - Thursday, 10/02/03 15:45:39 EDT |
|
Painting hinges & bolts If I am making a slide bolt for outdoor use, how much "slop" should I leave in the slides to compensate for the paint and primer? What can I do to protect moving parts like this from rust, when the will be scraping across each other for years? For hinges: how tight should the eye be on the pin? I am drifting the eyes out with drifts the same size as the pin. Will this be too tight? I am guessing you don't paint the pin or the inside of the eye, so how do you keep it from rusting? Oil for outside, but inside? Thanks in advance! |
| -Jim - Thursday, 10/02/03 17:00:56 EDT |
|
Jim, Slide bolts can have pretty much slop. If you want, you can allow 1/32" or so. You can paint, but there will be a wear factor. Once paid for and installed, it's up to the purchaser to maintain it. The hinge should be tight on the pin, yet swing. I forge weld the eye on a strap hinge slightly undersized, and drift it to size. You can get a slight "machine finish" on the inside of the barrel by drilling it out, if so desired. The drill will usually be grabby if a drill press is used. I put the barrel in the vise and use a variable speed pistol drill. It's safer. Even if the barrel and pin seem tight, the oil and weight of the hung door will allow movement. You don't paint the pin or the inside of the eye. Use oil wherever you can. Some smiths make a brass washer which fits over the pin and provides a bearing surface. Penland Craft School put out a tee shirt a while back that had the saying, "Rust Never Sleeps". There is such a thing as "fair wear and tear" combined with rust. It can't be a constant concern. I tell my customers that the hinges will only last 300 years. I have strap hinges in my collection that are over 200 years old. One big one, a single, shows a wear pattern, so you can tell whether the door was right or left handed. But the wear is negligible. And when I make head and foot bolts, sometimes called cane bolts, there is a spring tensioner sandwiched between the escutcheon and the bolt. It definitely cause scraping almost immediately, especially on the corners and portions of the face of the bolt. I just can't lose sleep over that. |
| Frank Turley - Thursday, 10/02/03 18:24:27 EDT |
|
Thanks for the conformation on the edm work on the anvil, my brother assured me it would be "NO Problem". (The same Kid who is making a cannon to shoot bowling balls from a oxy tank). he had assummed a radius on all edges an corners, I guess it is SOP for his line of work. Today he showed me a mold that he picked up from another plastic injector, that was being scraped, 3200 lbs of H13... talk about anvil envy. they gave it to him for halling it off. Thanks again habu |
| habu - Thursday, 10/02/03 18:40:42 EDT |
|
Super quench needs Shaklee Basic I. I live in Finland, so i can´t get that. What is formula of this wetting agent. Anything worldwide i could use to compensate it? |
| Rabarberg - Thursday, 10/02/03 20:28:35 EDT |
|
Guru Can bi-metal blades be used in a horizontal bandsaw without coolant and still get reasonable life out of them ? I would like to eliminate the mess of using water based coolant if possible. Thanks Chris |
| Chris S - Thursday, 10/02/03 21:07:21 EDT |
|
Rabarberg, The Shaklee Basic I is surface tension releaser. Or a wetting agent. I am certain that the formula is either a trademarked item or a trade secret. |
| Ralph - Thursday, 10/02/03 21:13:25 EDT |
|
Rabarberg, Duh, I should have read your message better... You already knew what it was..... I am not sure what is a reasonable replacement. I know quper quench was made to replace the lye solutions as it ( lye solutions) is much more dangourous to use and dispose of. |
| Ralph - Thursday, 10/02/03 21:18:13 EDT |
|
So, i just need to make some tests with other chemicals that lower surface tension. Thanks anyway. |
| Rabarberg - Thursday, 10/02/03 21:23:12 EDT |
|
Rabarberg - I'd probably start with trying something like propylene glycol, if I couldn't find a strong non-ionic surfactant. Dishwasher soap might work, and it also contains wetting agents. Let us know what you come up with. |
| vicopper - Thursday, 10/02/03 21:28:20 EDT |
|
Greetings all, it's been a long haul trying to find fule for the forge, but I found I guy out here in Vegas that sells charcoal. Got some questions. I've been using Mesquite (SP?) and it seems to serve well. Is there something else I should use? Also, I've noticed that the steel changes color, and seems to get harder, I take it that's the extra carbon? And How do I make spanish Steel? |
| Robert Hahn - Thursday, 10/02/03 22:19:36 EDT |
|
Rabarberg- wetting agent- another non-sudsing wetting agent that you might try is Kodak photo-flow. A few drops of this will break the surface tension of several gallons of water. vicopper as a art major may have some experance with this. again let us know. |
| habu - Thursday, 10/02/03 23:17:06 EDT |
|
Habu is correct. The propylene glycol I mentioned is the main ingredient of Kodak PhotoFlo. It is also the main ingredient of the new "environmentally friendly" antifreezes and coolant for solar heating systems. |
| vicopper - Thursday, 10/02/03 23:22:41 EDT |
|
Hi, I am interested in blacksmithing, but I was unable to find any welding courses around New Haven, CT. Does anyone know any schools in the area, or have any other options. Also keep in mind that I'm a student and don't have car, so idealy, course would be in New Haven, or at least in some of the cities that have Metro-North going through them. Thanks, Tom |
| - Tom - Thursday, 10/02/03 23:24:14 EDT |
|
chris s- i have an old wells #8m horizontal bandsaw, it works about three hours a day, every day, fridays only mean the next two days are those we hope we have enough stock to last till monday... i use lennox super .035 x 8/12 vari pitch blades. i never use spray mist or coolant. the current blade has been in use since february, shows no sign of breaking down. always cut flat stock on the flat, if you start cutting 1/8" flat bar on the edge,i think it rakes the teeth to much. good luck. |
| mike-hr - Friday, 10/03/03 00:37:18 EDT |
|
thanks frank, i take that as a compliment. |
| rugg - Friday, 10/03/03 02:12:56 EDT |
|
hi, since I can't take my forge with me for demonstrations and living history events, I want to build some thing portable and period. I've seen several examples from the viking era and a few from the american civil war, but one isa bit too early, and ACW is far too late. Does anyone here have/know of _period_ pictures or other examples of field forges dating let's say, post viking and pre renaissance? thanks matthijs |
| matthijs - Friday, 10/03/03 06:32:04 EDT |
|
Matthijs, American Revolutionary War period work? |
| Paw Paw - Friday, 10/03/03 08:45:44 EDT |
|
Matthijs: If you haven't taken a look at these two books, pull them from an interlibrary loan: On Diverse Arts by Theophilus, (ca. 1100) © 1963,1979 Cyril Stanley Smith; ISBN 0-486-23784-2, LoC 78-74298; Dover Publications, NY. The Pirotechnia of Vannoccio Biringuccio, ca. 1540, translated and edited by Cyril Stanley Smith and Martha Teach Gnudi; ISBN 0-486-26134-4. These books bracket your era. Also, there's not a LOT of change in the basic technique. What I would suggest is that you take an appropriate forge from Biringuccio and "portableize" it. Not only would your guess be as good as mine, but it might be better than mine, or a number of other scholars. When lacking hard evidence, you need to extrapolate. We'll see what the rest of the crew has to say. Bright and frosty (first frost in the Tidewater) on the banks of the Potomac. Visit your National Parks: www.nps.gov Go viking: www.longshipco.org |
| Bruce Blackistone - Friday, 10/03/03 08:46:48 EDT |
|
Mesquite and other "gourmet" charcoals are often incompletely charred so that you get the "flavour". It is usable but tends to smoke more and give off more sparks, it is often more expensive than regular chunk charcoal. Bottom line: you use what you can get! Medieval Travel Forges, sounds like a hole in the ground or campfire to me! Since they did not suffer from rules forbidding modification of their surroundings it was easy to stack some turves or stones (fire safe ones!) to build a forge anyplace they needed one. Carrying the weight of ecen a basket filled with clay would have been a much bigger problem, much medieval travel was done by packhorse as the roads would not support the use of carts! (NB in Postman's new monograph on the Mousehole Forge he mentions that the terrain was so difficult that packhorses were still used until the 18th century! IIRC) So to build a "portable" medieval forge you need to build something that looks like it was built on the spot from local materials; but can be moved perhaps building in a steel tray that can be hidden but then lifted and carried by several stout people, though a forge can be surprisingly small, especially when side blown with small bellows, any width that the blast does not penetrate to is just a waste of charcoal and you generally want depth for a charcoal fire. Off to a hammer-in Thomas |
| Thomas P - Friday, 10/03/03 08:52:42 EDT |
|
Saw Blades: Chris S., Mike-Hr pretty much covered it. The high quality blades will last a LONG time run at the right speed and not used to cut too thin of metal. I always use WD-40 to lubricate the blade and saw. Quality of the weld is critical on cut off saws. These band saws twist the blade putting very high stress on them. Poorly welded blades will break long before they dull. The high tech blades require sophisticated welders to do the job correctly AND need a well trained operator. Blade speed is critical. Saws with HSS alloy blades can run 240 FPM in stainless and annealed tool steel but last longer run at half that speed. I get very long blade life at 240 FPM cutting mild steel. However if you try plain carbon steel blades or cheep bi-metal blades at that speed on stainless they will have a short life. Alignment and guide clearance is also critical. Few saws come with good instructions and they are often not well adjusted from the factory. The cheap little import saws often do not have full adjustability and can never be made to cut straight OR get good blade life. You can easily pay for a GOOD saw in blade costs using a cheap saw. The little Rigid saw I have (no longer in production) was the original small 4" cut off saw that everyone copied. It is all cast iron and had large ball bearing guide rollers. It is a good machine. Sears made a knock-off with a pressed steel bed. It is hard on blades and VERY difficult to adjust. Straight cuts are impossible. The little imports replaced the large guide bearings with little cam rollers. These are too small to hold the blade straight and usualy cannot be adjusted. These saws LOOK just like mine but are junk. For $25 more in parts they COULD have been a good saw. Blades that last for months in a small saw cutting dry or with light oil will last years with the proper coolant. Coolant also allows higher cutting speeds AND higher feed rates. A saw with coolant can cut the sam stock at least twice as fast as one dry cutting. If production rates are a concern OR just waiting for the saw is costing you money then a coolant system can quickly pay for it self. |
| - guru - Friday, 10/03/03 10:12:07 EDT |
|
Portable Forge: Two items are needed for a primitive portable forge, a bellows or air source and a tuyeer. The period you are looking at in Eurpoe used double or paired bellows in shops. In the Far East they used box bellows. Both are semi-portable in small versions. However, IF you have the labor a hide over a pit will do. Tuyeers vary greatly. The most ancient is a simple tapered clay tube. Several of these could be nested together to make a longer tube to reach from air pit or bellows to fire pit. These were a cheap almost disposable item that were used for glass furnaces, ceramics kilns, smelting furnaces and forges from the beginning of the time. If you don't need absolute authenticity a couple pieces of 1-1/2" pipe would do. The Viking forges (shown below, photo courtesy Atli) used a soapstone shield stone "tuyeer". Some of these have been built with pipes connecting the bellows to the stone but in classic use the tapered raw hide nozzels of the bellows pointed AT the smooth radiused hole in the stone. They were not connected directly to it. This provided pneumatic valving that prevented hot smoke from being sucked into the single valve bellows on the intake. I believe this only works with the short distance through the shield stone and may not work with a pipe tuyeer (testing required). 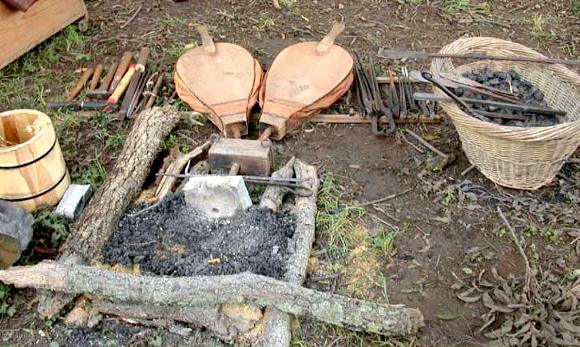
Viking Forge at Hastings 2003 : Photo courtesy Bruce 'Atli' Blackistone The problem with all primitive portable forges is that they were in or on the ground. This was a common working position up until modern times and is still common in the Middle East, India and S.E. Asia. However, Westerners are used to working standing up at a bench height forge and anvil. Working on the ground is something hard to get used to requiring tough (young) knees and different muscles. Along with the photo above Atli provided one of him working at a small block anvil on a stump. The problem is that there are no pictures of early portable forge operations. However, there ARE images of Greeks working on the ground in ancient times AND modern craftsmen doing the same today. I seriously doubt that someone that had to pack all their tools, stock, food, weapons and belongings on a horse would haul a heavy anvil stump with them when the ground would sufice. In the modern era small prospectors forges were made for this purose and they were VERY small indeed with about a 12" pan and a small hand crank blower that fit into a wooden box about 14x14". On the other hand, a group traveling by foot and pack animal, that was wintering over or spending time in one location may have made more permanent arrangements using local materials. We have a photo from the American land rush era where a fellow has his forge build out of sod and rocks at bench height. He has a large bellows and his anvil is on a stand but he was traveling by wagon not single pack animal. Even so, he did not waste effort on anything he could find localy to assemble a forge. Pit forges are often a trough with the air comming in from the side like a Japanese bladesmiths forge. The narrow width keeps the fire small and the length provides space for extra fuel and long work. Building a temporary make-do forge used to be a common thing that every blacksmith knew how to do and had practice doing. IF you do not think digging a hole in the lawn everywhere you go is appropriate (it is not) then carry a stack of bricks sufficient to build a trough forge on the surface of the ground. I have thought about building a light weight version of a trough forge from Kaowool covered with a thin coat of refractory mortar and ITC-100. Its frame would be made of wood, chicken wire and a little sheet metal. . . Beats hauling several hundred pounds of bricks. . . |
| - guru - Friday, 10/03/03 11:16:29 EDT |
|
Chris S, Have been using a pair of the cheap 4" x 6" horz./vert. cut off band saws for about 10 years. As the Guru noted, these saws are poorly adjusted from the factory, and are hard to adjust. That said, I was able to adjust, and get very good life from bi-metal blades, running dry. The tricks required to get the life that you pay for on these blades are as follows; do not cut through a section that is too thin. You need at least 3 teeth engaged and more is better. Too few teeth strips the teeth. Do not let the stock move in the vise. A shifting part will put a kink in the blade. Run a reasonable feed, and speed. I use a Lennox Die Master II with a 9 to 14 tooth varable pitch. The varable pitch is better for running many different cross sections. For thin tubing, I use the same blade in a 28 tooth pitch. I get very good life, and have noticed that the blades hang around long enough to rust. I have a spare blade hanging by each saw,to allow changing back and forth from thin to thick sections. These blades will rust as they hang, and then breakage has occured from the pits. I oil my blades lightly and have not had this problem for awile.(I have a dirt floor shop in the Ohio river valley and 96% relative humidity is a constant summer companion) I have a solid alcohol stick lube I bought from RIO GRANDE years ago that I use occasionally on the cutting teeth. I think it was called BURR LIFE. Seems to improve life and surface finish, but does not leave a visible residue. 63 degrees and 39% relative, love the fall!!! |
| Jeff Reinhardt - Friday, 10/03/03 12:26:50 EDT |
|
Hi, I need a idea on a motor mount and belt system. I have a old power 25 little giant powerhammer. It does not have a motor but used to run a flat belt from above. I want to put a 1725 one hp motor I have on it. I have thought a great deal about it but am afraid I will mount it wrong and ruin the machine. Can you help? |
| Ken - Friday, 10/03/03 14:33:09 EDT |
|
We recently converted a line-shaft machine to run with an electric motor, 1725 rpm. The speed reduction required of the motor is quite severe we had to go to a 3" pulley on the motor to keep the hammer at rated speed (your speed and diameter may vary) this has the problem of such a small pulley driving the hammer, it tends to slip. You might want to consider a jackshaft for speed reduction. We went with a flat belt, as it is more convenient to change the belt when the time comes. We mounted the motor above and to the side of the hammer and drive it with a flat belt. Our motor is mounted to the wall and the hammer is turned so that when you work the hammer, you are facing 90 deg. to the wall. In other words your shoulder is facing the wall. I have seen motors mounted to the side of these hammers and all of the conversions I have seen were custom jobs. If you have a predrilled through hole in the frame of the hammer you might want to start there. The frames can't be welded on with ease and I wouldn't recommend it in any case. You might make your motor mount so that it clamps to the frame. Whatever you do, remember, you need to adjust the belt from time to time so make provisions for that. |
| Wayne P - Friday, 10/03/03 16:15:57 EDT |
|
burner follow up: The new 1" ID SS burner (ROUND!!)works great. The forge takes a bit longer to ramp up to welding heat but the flame is stable at all temps down to idle and I can set the mixture as rich as a I like. Also, the mixing is much better and I have less scale. Still a bit overpowered for the forge chamber but thats how I like it :) Seems obvious in retrospect but if I hadnt asked on Anvilfire Id still be scratching my head whereas now I am forging and scratching my behind. So thanks a bunch, Guru, Rich and Marc. Although I like venturi burners, they are kind of marginal at 7000'. Also, the county will give me a "high pressure" natural gas line at 5psi max which means it will have to be blown. So the next step will be to experiment with a larger orifice. The refractory wall pretty much fell apart when I tried to modify it so it's time to start on a new forge. |
| - adam - Friday, 10/03/03 17:09:28 EDT |
|
Powerhammer speed,Wayne? What size pulley is on your LG? What speed are you running it at? I have a 10inch pulley on my 25lb Jardine and had to put a 2" on a 1725, to get it down to about 350 bpm. I think the formula is take your final speed, times it by the pulley on it, and divide by motor speed to get the pulley size needed on the motor. Of course someone will correct me when I'm wrong.......... Jim |
| JimG - Friday, 10/03/03 19:06:47 EDT |
|
Adam, where are you at? 7000' sound like it might be close by I'm living in Longmont, CO 5280ish, |
| habu - Friday, 10/03/03 19:38:31 EDT |
|
habu - Longmont = small world - Been there often. my step son lives over on Monarch Drive next to the prarie dog farm. Where is your smithy? I'll be back there in a couple of months and I'll drop in to warm my tush. |
| Jerry Crawford - Friday, 10/03/03 20:23:44 EDT |
|
Hi I am 13 years old and i want to be a sword/blacksmith but i was woundering where i might find a sword/blacksmith so i can be apprienteced. I live in Estacada Oregon(its a very small town). I know the basic stuff about it but I think the best way to learn it is to experience it. |
| Ben - Friday, 10/03/03 19:52:22 EDT |
|
Ben, Bladesmithing is the top of the skill level in blacksmithing. You need to start at the bottom with basic forging, then tool making and metallurgy. Bladesmithing also includes materials engineering, in depth knowledge of heat treating, art and design. You have not lived long enough to have studied the most basic of references in the field. There is no such thing as an old fashioned apprenticeship. These were a form of endentured servatude that is now illegal in this country and most of the world. Without the garantee that the apprentice was going to work for a full 7 years on top of their apprentice fee the system ended. Today no instuctor or Master smith can afford the time to teach you the basic technical knowledge of the trade based on an apprenticeship type labor exchange. Most smiths in North America must value their shop time at $100/hr MINIMUM to make a living. Can you can afford to pay that much for personal lessons? How many years at minimum wage will you have to work to pay back tens of thousands of dollars? As an underage newbie your value in the shop is a negative value and may stay that way for several years. You cannot waive the right for your parents to sue if you are hurt so there are significant insurance premiums to pay just to let you in the shop. You cannot legaly drive so getting to and from is difficult or an expense and you are no good for a gofer for the same reason. You do not know how to operate the machinery or have the skills to perform basic maintenance tasks. Life experiance means a lot when you are "shop help". There is not but so much sweeping to be done. Have you ever changed a flat tire? Put a water pump on a V-8 engine? Dissassembled a series electric motor and repaired the brushes or and induction motor's centrifugal starter? Wired a ground fault outlet? Replaced the wax seal in a water closet? Can you even identify these items or even know what I am takling about? Can you find the jack in your mother's car and use it to change a tire? Do you know what glaziers points are? The difference between lacquer and varnish? Can you distinguish oak from maple wood? I was surprised to find out that my 29 year old apprentice had never changed a tire in his life (until last week) . . . Those that expect to work with their hands in their own shop must learn many things. Doing almost everything for yourself is one of them. And if you cannot fix a flat on the boss's truck or fix that leaking shop toilet then what kind of help are you? Think about it. The modern blacksmith shop is a very technical place and is as much a machine shop as forge. MIG, TIG, Plasma, oxyacetylene, EDM, CNC, HSS, TNG, CAD-CAM are all shop terms having to do with equipment found in many shops. Bladesmiths use hydraulic presses, rolling mills, belt grinders with platens and contact wheels. . . they etch using mixtures of caustics or acids. How is your chemistry? Do you know the difference between HCl and H2SO4? How to make a solution from each? Grinding grits on belts and wheels are a subject that you can spend YEARS studying. If you focus on shop practices, read everything you can find, study trig and calculus, take college metallurgy classes, read and understand history, art, research how we got here (technologicaly), then when you graduate from college you MIGHT be ready to study in a Master Bladesmith's shop. . These are things that you do NOT need a Master smith to teach you. These are things that you learn in school, Things that you teach yourself, things that life teaches you. Things that will take another 10 years of your life or more. The top people in bladesmithing today have masters and doctorates in metalurgy. THEN they have spent a lifetime in there shop figuring out how to apply what they have been taught. And every day they still learn something new. Those without the papers in their field have often studied MORE than enough to have earned thier Phd. FOR NOW see the books I recommend in our getting started article. STUDY them. Then purchase the complete set of Jim Hrisoulas bladesmithing books and study THEM. Then find the books or take the classes necessary to understand ever word in those books. That will take you at least a couple years and if you read close and are sure that you understand every word THEN you might "know the basic stuff". Between all this reading, look at the other things you can do on our getting started page. Build your own forge. Don't know how? THAT is step one. Blacksmiths MAKE many of their own tools. Learning to make them ALL is your first challange. When you can build a forge from junk that is in your house or garage TODAY, and use that and a hardware store hammer to make a pair of tongs, then a chisel and a punch and then maybe a better hammer. . . THEN you might say, "I know the basic stuff", but by then you may know what you do not know. I should hope so. You can also take blacksmithing classes at places like the Turley Forge Blacksmithing School (see THE GURUS above), and John C Campbell and Penland. You can go to these with no knowledge but it helps a great deal to have studied the basics first so that you take the best advantage of the experiance. These cost some money, start saving NOW. Can't go alone? Convince a parent or guardian that THEY might enjoy pounding on some white hot iron. If you have specific questions along the way we will be help you. This is a resource like no other in the history of mankind. ANYONE, even you, can get advice about archane metalworking subjects from working smiths, some masters, many amatures from all over the world. Do not abuse this gift, it may not last. Time to respond to "How to become a Swordsmith" for the hundredth time: 2 hours 16 min. |
| - guru - Friday, 10/03/03 22:12:13 EDT |
|
Same that response to Ben and add it to the FAQ! |
| Paw Paw - Friday, 10/03/03 22:23:17 EDT |
|
habu - Small world isn't it? I was born and raised in Boulder, and got my BFA from CSU in Ft. Collins. Always bought my vegetables, in season, from Tanaka Farms. The last time I saw Longmont, it had grown beyond my belief. Hover Road wasn't a farm road anymore, it was a series of shopping malls! Is Dusty Johnson still shoeing horses around there? |
| vicopper - Friday, 10/03/03 22:59:13 EDT |
|
Habu: I live near Santa Fe NM. |
| adam - Friday, 10/03/03 23:29:57 EDT |
|
Vicopper, Dusty got out from under a long time ago. He is a very successful teacher of saddle making, runs a saddle making school, and has out some pretty good videos. Google Dusty. |
| Frank Turley - Friday, 10/03/03 23:36:38 EDT |
|
P.S. I think he's in Longmont. |
| Frank Turley - Friday, 10/03/03 23:37:12 EDT |
|
Thanks, Frank. The last I saw Dusty, he was shoeing some, doing his magic some, and I was teaching him to make silver jewelry. He was making some pretty decent pseudo-indian stuff. Good to know he's making out. |
| vicopper - Friday, 10/03/03 23:44:28 EDT |
|
vic you and I took a remedial summer school together in the 9th grade (algebra if I remember), you dated my my bride before she met me ( I always was better looking) grin. We still have a painting that you gave her when you visited her when she was living in NM. I'm still waiting for you to become famous. The Diagnal hi-way is 4 lane from Boulder strait through to Firestone. Longmont pop. almost 80000. Tanaka farms is gone. My dad still lives in my great-grandparents home in Valmont, a stones throw from my great-grandfathers smithy. est 1892 to 1972 The family ran it untill 1948. Jerry the smithy is 10sq ft of garage and the drive way on kansas ave. its strickly burnt fingers and a large "Humble pile" but if you want to stop by I'm a willing learner. if it has been a couple of years since you have been here the prarie dogs have been deported to boulder and their town is converted to $400,000 homes for unemployed programers. My son in law is shdwdrgn on anvilfire and got me started in this about 6mo ago. our latest project: http://sourpuss.net/projects/treb/ Adam my brother-in-law used to work a quarter horse ranch near Espanola (Pojoaque), we used to go there quite a bit before he retired. love the area. Vic- Gen and Charley Force are still kicken in TorC, shdwdrgn and I built him a gasser for his birthday (76). he is still the best "Lier" I ever met. |
| habu - Saturday, 10/04/03 00:46:37 EDT |
|
Dusty is in Loveland (20 miles north) http://www.pvsaddleshop.com/index.html |
| habu - Saturday, 10/04/03 00:52:04 EDT |
|
Ben, check your middle school and high school industrial art welding programs. Print a copy of the Guru's response and create your plan if you are serious. Keep reading this site. There are many good people here who share much information. |
| - ironspider - Saturday, 10/04/03 01:05:05 EDT |
|
Holy smokes! Its old home week here in Guruville! THAT is one of the things I love about this. Adam; is mespucheh (sp)the word ? |
| 3dogs - Saturday, 10/04/03 02:03:56 EDT |
|
Hmmm, I lived in Longmont for about 4 years, almost 22 years ago. daughter was born there..... |
| Ralph - Saturday, 10/04/03 02:27:59 EDT |
|
Guru and others Thanks for the tips on bandsaw blades, I'm going to quit using the water coolant and switch to dry with occasional wd-40. The coolant has removed most of the paint from the pan on my Grizzly saw. It's a Chinese saw but one of the mid level ones and is cutting pretty square after some adjustment but I can't brag about their paint job. Habu - You spend some time in Okinawa ? I think it's the only habitat of that deadly snake (habu). I was there for a couple of weeks two years ago training under an 83 year old martial arts instructor. Anywhere we went on the island we were always joking: " this place is crawling with Habu " - C |
| Chris S - Saturday, 10/04/03 07:54:45 EDT |
|
Chris: I trained in Okinawa for 3 years under a 10th degree black belt, Miyahira Sensei. Okinawa Shorinryu. Course, my trip was paid for by the U.S. Air Force. :] |
| Bob H - Saturday, 10/04/03 08:51:57 EDT |
|
Jock et all, please help me with gas-oxy cutting. I am sure there are volumes written about it in the archieves but I have alot of trouble navigating them. I would just like to hear from people who have discovered the secret to fine cuts. What causes the cut to fill back up with molt. what should the tank pressures be, how far off the material should the torch tip be. Thanks, Larry |
| - l.sundstrom - Saturday, 10/04/03 08:53:09 EDT |
|
habu - I didn't put the screen name together with your given name...duh. Say high to Marge for me. And Gen and Charlie when you talk to them. Gen made the best posole' I ever ate. I guess this should really be sone in the Hammer-In and keep this for Q&A. Salud! |
| vicopper - Saturday, 10/04/03 08:56:00 EDT |
|
Larry - The torch tip should have the small light blue point of flame just touching the metal. Backfill is usually caused by incorrect speed of cut or too low an oxygen pressure. I set my oxy to about 35 and the acet to about 7, but that is just what works for my torch on the 1/4" stuff I'm usually cutting. YMMV Check on eBay or elsewhere for the old college textbook on welding. I don't have it in front of me and can't recall the title, but it is red. (grin) Ther important thing to remember on cutting is that the oxygen jet is there to feed lots of additional oxygen to the metal, causing it to burn itself away. Too many people think the purpose of the jet is to blow molten metal out of the cut, and that is what results in cruddy cuts, slag and backfill. A cutting guide really helps because it allows you to focus on travel speed and tip location and not worry about following a line. Others will chime in with much better information I'm Sure, but this might get you started. |
| vicopper - Saturday, 10/04/03 09:04:40 EDT |
|
Larry - Errata note: That should read, "small light blue pointS of flame." There are more than one. Also, it should read 25, NOT 35, psi on the oxy. Typo. |
| vicopper - Saturday, 10/04/03 09:11:27 EDT |
|
habu - I was just out there a few weeks ago and there was a moritorium on traping the dog's. Seems the local animal rights folks have a thing about live traping & relocating but the birds of prey couldn't eat them fast enough. Seems silly to me - wish people would attack real problems with as much passion and as vociferously as they do this insignificant stuff. GURU - re: your reply above to the young chap wanting to learn. Thank you for taking the time to respond to his query as you did. I know it took time for you to craft that reply but it was factual without being condesending and abrupt. Very well stated and I applaud your effort. Now, file and save that reply cuz your gonna get it again next month (grin - double grin) |
| Jerry Crawford - Saturday, 10/04/03 10:33:57 EDT |
|
habu - I was just out there a few weeks ago and there was a moritorium on traping the dog's. Seems the local animal rights folks have a thing about live traping & relocating but the birds of prey couldn't eat them fast enough. Seems silly to me - wish people would attack real problems with as much passion and as vociferously as they do this insignificant stuff. GURU - re: your reply above to the young chap wanting to learn. Thank you for taking the time to respond to his query as you did. I know it took time for you to craft that reply but it was factual without being condesending and abrupt. Very well stated and I applaud your effort. Now, file and save that reply cuz your gonna get it again next month (grin - double grin) |
| Jerry Crawford - Saturday, 10/04/03 10:33:58 EDT |
|
vic ,chris, bob see the hammer-in for habu info |
| habu - Saturday, 10/04/03 10:36:59 EDT |
|
...is anyone else having this problem posting? |
| Jerry Crawford - Saturday, 10/04/03 10:37:02 EDT |
|
Jerry, Exactly why I suggested he put it in with the FAQ's. Problem? What problem, what problem, what problem, what problem, what problem? (grin) |
| Paw Paw - Saturday, 10/04/03 10:49:39 EDT |
|
hello all i was wondering if i could ask you guys a question about stainless steel.How do you get the black burn marks out after welding or overheating i've trying wire brushing and buffing but nothing seems to work any advice would be of great help thank you |
| real_ale - Saturday, 10/04/03 11:08:40 EDT |
|
Cris S About paint and water based coolant. About five years age I moved an entire plant, about 250 machine tools. During the move we pressure cleaned and repainted all the equipment. I did a little research with the coolant makers and found that they recommend ONLY two part epoxy or two part polyurathane paint. They say that the emulisifiers in the coolant enter the microscopic shrinkage cracks that are always in solvent cured paint and break the adhesion. Only cataliticly cured paints work. I can say that after 5 years of daily exposure to these coolants the two part cured paint looked intact, versus a few months to fail standard paint. By the way, these coolants will attack seals if the right material is not used. Butyl, and natural rubber are quickly attacked, with nitrile(buna N) and floropolymer(Viton) working well. If you are using these coolants, and they are getting rancid quickly, first, keep the tramp oils out,skim them off. When you dump the coolant, clean out all the sludge, and rinse with a disinfectant. You will get much better life. Last but not least, carefully mix to the right concentration. These coolants depend on the water to flash off and remove heat, and the oil portion to lubricate. As time goes by the concentration increases, so add make up at half strenght. Too much oil and it smokes and tool life decreases. too much water and not enough lubricity, and tool life decreases. |
| - jeff reinhardt - Saturday, 10/04/03 11:18:43 EDT |
|
Real ale, Stainless steel that has been heated to the point of having scale, can be cleaned by abrasion or electro-chemically. The abrasion method is the one most choose, and requires that you use ONLY stainless steel brushs, or grinding and sanding media that is only used for stainless. If you use common steel or media that has been used on common steel you will charge the steel into the stainless surface and soon see rusting. |
| - jeff reinhardt - Saturday, 10/04/03 11:22:11 EDT |
|
Guru, A very thoughtful response to a young mind that has but a glimmer of the input required for the Idealized sword he wants. Definetly shoud be on the FAQ page, top of the list. Should also probably be a FAQ with definition of a balcksmith and a farrier. Maybe a definition of toolmaker ans bladesmith as well. |
| - jeff reinhardt - Saturday, 10/04/03 11:25:46 EDT |
|
Jerry, I think the you have a sticky key or mouse button. . . Or bad switch on same. It is hard to answer some of these questions without leaning a little hard. I had one fellow write a scathing reply after I stated that he "had a lot to learn" - he was an industrial arts teacher and wanted to know if welding a piece of channel over the face of an anvil would be a suitable repair. . . He DID have a LOT to learn and I felt he had no business trying to teach blacksmithing unless he had actualy picked up a hammer and forged a piece ONCE. I didn't say that and wanted to in a response to his letter but instead I just said nothing. Some folks can't take any advise at all. And once in a while I follow the saying of "If you can't say anything good don't say anything at all". BEN, If you read my bio (click on the picture of me top left) you will see that I was using machinery and building things with wood steel and fiberglass when I was 13. I had also been reading MACHINERY'S HANDBOOK for two or three years at that point. See our book review. But I am about one in 500 million. Maybe one in a couple billion. . . I have yet to meet anyone in this business that even knew what MACHINERY'S HANDBOOK was until their mid 20's or later. I have never met or heard of anyone in the last 100 years that actually read engineering references before college age. 200 years ago it was different. There were no children's reading books. People learned to read by reading the books their parents owned. In most households that was the Bible. In others there might also have been be a copy of Euclids Geometry and Plato. In an engineer's library there may have been a rare copy of Moxon or Diderot's Encyclopedia. There were many others but none were "light" reading. It is only in the last 35 years that there have been good readily available books in print about blacksmithing and bladesmithing and in the last 20 years the number has exploded. You can fill a small library with nothing but blacksmithing and bladesmithing books. Add to those several good references on welding, machine work and machine operating manuals and you will have more than a "small" library. Then anyone that is serious about the business must have copies of some of the pricey ASM metals references. There are thousands of metal alloys and the only way to be able to identify and discuss them is by having those encylopedic references. You can easily spend tens of thousands of dollars on a personal engineering library. It is not something you do all at once. And it is often something that cannot be done with just money. Many worth while references are out of print and may never be printed again. Books like the Oxford University book on James Watt and the Steam Engine, the Autobiography of James Nasmyth, the works of Eric Sloane, catalogs and manuals covering the machinery of the past 150 years which many of us still use. Many old catalogs like the OLD Timken Bearing manual were fantastic engineering references. The old Starrett catalogs had instructions for how to use measuring tools and how to adjust and maintain them. Newer catalogs just list the items and often poorly describe them . . . FORGET useful application information. A good specialty library often takes a lifetime and serious investment to assemble. I've been collecting books for 40 years. You could spend years in my library and not read it all. And much of it needs to be STUDIED not just read. . . |
| - guru - Saturday, 10/04/03 12:03:49 EDT |
|
Cutting Torch: Larry, When cutting thin steel if you have too much preheat the melt flows back together in the kerf. Some of this is adjustment, some is tip size, some is speed. Go too slow for the tip size and you make to big a melt zone. All that should be melting is the leading edge of the cut, the rest should be burning out. Tip size is critical for clean cutting. Each size tip has about a 1" range and you SHOULD be in the range. If you are at a point where two sizes overlap the smaller tip will give cleaner cuts. For sheet they make little two preheat hole tips. One reason the Hen-Rob torches do such fine work is that they are designed for small fine work and have very fine flame and jet orrifices. On heavy plate (2" and up) the torch body itself has a lot to do with capacity and cleanliness of cut. A comfortable position and a steady hand are important. I always try to make sure I can move the torch smoothly for a distance before starting the cut. When you get to the end of that distance STOP, reposition and start again. 4-5" is about the max for a dead steady cut. Guides can help or hinder. Victor makes a torch with a little motorized wheel to propel a hand held torch at a steady speed. I have seen cuts that were just as screwed up and rough as any made with one of these. It still takes skill and a steady hand. Edge guides are the same. Various methods have been used to setup a machine torch. I have cut heavy plate using a torch supported by an arm attached to an engine lathe. The medium fast feeds on a lathe are perfect for flame cutting. We rigged a machine torch with a remote oxygen valve so that when the cut was ready to start it could be operated completely from the control side of the lathe. But it can also be done with a hand held torch clamped to the carriage. Be sure the torch is well away from chips and oil in the chip pan. |
| - guru - Saturday, 10/04/03 14:57:52 EDT |
|
do you have any convesion tables for tap drill sizes on this site? |
| - John - Saturday, 10/04/03 16:49:13 EDT |
|
John, No, that is what MACHINERY'S HANDBOOK and various machinists references are for. Most industrial places that sell drill bits have give away charts (like the one on the wall above my desk). Holo-Krome makes a slip chart with socket head bolt dimensions that includes drill and tap sizes. vanheimrhorses (Clarice) your pub registration mail bounced. |
| - guru - Saturday, 10/04/03 17:21:14 EDT |
|
Guru, I am blessed that my father gave me a Machinery's Handbook many years ago that was quite old, a 1940 edition. It lists many good blacksmithing items including how to scarp various weld joints and tong demenisions. Also how to color metals etc. I do not know how anybody can work without one. Mine cost my dad $1.00 at a yard sale. I think the current ones are over a hundred. You are correct about most young people not getting exposure to anything about mechanics. I used co-op's in my engineering lab for many years, and the typical co-op was a third year engineering student at a very well known school. Most had no idea that a 1/4 inch bolt would have 20 threads per inch or that a 1/2" would not. None could use a micrometer or caliper. Most could do a cad drawing, but if asked to do a stress calculation on a bolted joint they had just designed, would be happy to report a stress of 350,000psi in the bolt.No clue as to the real meaning of the 350,000psi. We have the best college system in the world, but the worst practical/vocational system. We have a serious problem in that there is a lack of status for anyone who works with their hands. |
| - jeff reinhardt - Saturday, 10/04/03 17:53:53 EDT |
|
The big problem with the new generation of computer jockies is that they don't know when the answer is WRONG or why. It can be a case of garbage in gargage out OR. . the computer can be broke. My Dad was doing a some simple trig calcs on a little Cassio pocket calculator. The answers didn't seem right. . . so he tested some plain conversions. The COS and SIN of 30° were reversed! The COS = .5 and the SIN .866. Any other angle worked correctly. There was a serious bug in the chip! How many were made this way? Who knows. . . Would YOU catch the error? There are lots of places that as you near 0 or 90° that the answer becomes infinity. This can break (crash) many computers and some software catches the problem and others do not. The divide by zero error is also a tricky one and it has to do with the way chips do math. That is why it is always a serious error that always needs to be trapped for. Like the guy that doesn't know a HEX bolt has six sides (I've seen drawings with 5 and 7) software requires some hands-on mathematical knowledge too. . . The other educational based SNAFU is the teaching of the metric system. In the US, Canada, England and Austraila many people, manufacturers and shops still use the English Inch/Foot system. The US is the worst. Take a metric casting drawing to a patternmaker ANYWHERE in the US and you will either be told "We don't DO METRIC" or, "Conversion will cost $XXXXX" . . . We were once given a set of French machinery drawings to convert to English. They were already half and half. The French were using as much localy available English hardware as was available. The English system is still reality in the US and schools are teaching to a pipe dream. Don't EVEN get me started on conversion to the metric system (there is nothing standard about it and the countries using it can't agree on standard useage of it). AND it is anti-nature. In the real world things come in wholes, halves, quarters and so on. . . Both systems are arbitrary and do not equate to anything universal. I can go on for days. . . I've had experianced workers that didn't know which side of a metric/English rule to use. In a nuclear plant that will remain anonymous, they have a 10ton bridge crane in their hot-shop. It spans about 50 feet. The bright guy that designed it didn't know that you base beam design more on deflection than on stress. . . ESPECIALY on cranes. Put 3 tons on that 10 ton bridge and it sagged so bad that the motorized trolly couldn't climb the hill! In fact it would roll to the lowest point and not move. . . We never put more than 5 tons on the crane. But I KNOW how much it would sag fully loaded (28"). Imagine doing a 1.5x rated load test. . . Some fool will do it eventualy and drop the entire crane. At test load it should have deflected less than 1/2". In the slide rule days you had to keep track of the decimal places in your head or on a scratch pad. It was common to "slip a digit" if you were not careful. Today we have decimal places out the wazoo and NASA engineers can't keep miles and meters straight. . . They also think Bill Gates NORM of having to reboot a machine over and over to get it to work due to a flaky OS is OK. . Want to teach a kid a #10-32 from a 1/4-20? Give them a job sorting ALL your old mixed hardware into correctly labled bins! PRACTICAL experiance. . . MACHINERY'S lists for just under $100 when current and new. But are usualy available for $75 new. The $100 price is what students get hit for. A year later you can buy the same volume on the net for $28. Older ones go for about $25 and I have paid as little as $15 for good condition copies. A few years ago my dad was complaining about needing a large print edition and now it is my turn. . . Guru's Christmas list - Large print MACHINERY'S any edition. |
| - guru - Saturday, 10/04/03 20:00:22 EDT |
|
ON THE Road again: I will be in Norris, TN at the Museum of Appalachia with Paw-Paw for the next week. I should be able to check in once in a while but after an eight hour day doing demos for kids I'll be BEAT and just want to go to bed. . . See y'all there! |
| - guru - Saturday, 10/04/03 20:02:43 EDT |
|
Matthijs, Barney, etal. Thanks for the postings on the Calendar of events page. "Smeden van vuursteen tot staal" sounds like a blast and a good excuse to go to the Netherlands! Perhaps our calendar will make it easier for folks to plan long distance travel in time to travel to other countries (time to get a passport guys!). I haven't figured out how I am going to handle past events but we WILL keep some type of archive so that people can see what events already happened and will possibly happen again on the same approximate dates. If a date is set but you don't have details please feel free to post your event now and then send me an update later. |
| - guru - Saturday, 10/04/03 20:16:38 EDT |
|
Hi. I recently got over 600lbs of aluminum stock for a $150 and I want to forge it. What is the forgable temperature range of 2024 and 7075 wrought aluminum alloy. I tried it once and it crumbled to peices so I know I got it to hot ( 900 deg. F ). |
| Rigel - Saturday, 10/04/03 20:27:58 EDT |
|
hi all!! iv'e never been able to find information on the 2 anvils i use most of the lettering has been wore off. the first anvil has M&H followed underneath by MT under that H_ _ E followed by 1.2.0. the second is in even worse shape. A_M TAG, _ _ GE, SHEF_ _ _ D, KIE, PATE, 1.1.27 {these numbers are quite fancy in their shape}. also this anvil has 2 square holes in front under the throat of the bick. any help would be greatly appreciated. Lastly i found a Brown Boggs 15A in the scrap yard i believe it is a break of some sort but for what i'm unsure many thanks. |
| kainaan - Saturday, 10/04/03 20:29:00 EDT |
|
Guru if your dad has a computer, machinery's handbook is available on CD and the text, graphs, and graphics are scaleable. the only draw back is that it is hard to thumb through while on the Throne. I got my copy through kbc tools for about 40 bucks 25th edition. |
| habu - Saturday, 10/04/03 20:55:41 EDT |
|
Kainaan, The first anvil is M&H Armitage Mouse Hole, made in England, mostly for export. I'm not sure about the second one, but Sheffield might be sandwiched in there. The numbers, British Imperial: The 1st is one hundredweight [112 pounds]; the 2nd is quarters of a hundredweight [28 pounds]; and the 3rd is odd pounds. Jeff Reinhardt, Amen to your comments about use of hands. I get students very occasionally, who I swear have never had a screwdriver in their hands. We say somewhat jokingly, that the conventional wisdom about a blacksmith is that he wears a size 48 shirt and can look through a keyhole with both eyes (at once). Little do they know! I came into this thro' the backdoor of hot shoeing, AFTER obtaining a liberal arts degree. I bought the 20th edition Machinery's Handbook new in 1978, but I don't recall how I found out about it. I now have a 1940 edition as well. Good stuff, but I'm still playing catchup ball. |
| Frank Turley - Saturday, 10/04/03 21:06:47 EDT |
|
frank Turley, thank you very much for the info on my anvil that anvil was my great uncles he would be glad i'm useing it. everthing else in the shop was stole when he passed. |
| kainaan - Saturday, 10/04/03 21:44:48 EDT |
|
Both of those anvils are M&H ARMITAGE mouseholes. Use of tools. . . In the past two years I have helped Atli with the Boy Scout Merit badge jamboree in Northern Virginia. Both years it was unusual to find 2 out of 10 BOY SCOUTS that had ever used a hammer, EVER. They had never built a tree house, dog house or a Soap Box Racer much less anything else. These are kids that go camping and take part in outdoor activities. . . Sadly the few hours spent with us would probably be their last experiance with any REAL use of tools. . . Have YOU taught your child how to change a flat on your car yet? Gotta start somewhere. Book CDs: Some work, some do not. I live on my PC and use various references on-line and from CD but MACHINERY'S is not one I could use. Dad has a PC but hates to use it. I don't blame him. . too many RUDE grandchildren installing too many games and junk on the machine. . . #1 rule of PC's the P stands for PERSONAL not PUBLIC. I use MACHINERY'S setting on my desk while I put formulae into spread sheets or other programs. OR while working away from the PC. Although I work with half a dozen windows open all day I hate using one as a reference while working in another. . Some books are meant to be BOOKS!. I wrote a mass and volume calculation program with database back in the 1980s. Our on-line Mass3j is a VERY light version of it. The real thing has a thousand material database and an AISI steel sections database. Not only does it do all kinds of geometry but it calculated stress and deflection in beams. It all fit on a little 3.5" diskette. Today there are engineering suites that do similar things and a much wider range. None match Mass2 for what it did but theses are the type of things that are replacing MACHINERY'S on PCs. PC's make mathematical references dynamic. Static references on PC's are a waste of the computing power and only glorify the mouse and GUI. The only advantage to books on CD's is that they are CHEAP and (relatively) easy to publish. |
| - guru - Saturday, 10/04/03 21:54:43 EDT |
|
guru, thank you too. is there a way to know the ages? by shape,size? |
| kainaan - Saturday, 10/04/03 22:06:38 EDT |
|
Kainaan, Normally I would tell you to take rubbings of the trademark side of the anvil, and scan them and send them to me vial email, because the arrangement of the various elements is crucial to dating Mouse Hole anvils. If you can get them to me by tomorrow night, that will still work. I'll be on the road all of next week, and MAY have email access, if I do it will work any time next week. |
| Paw Paw - Saturday, 10/04/03 22:37:54 EDT |
|
(cough) Give the young a little credit, Guru... I'm 17 and I know what Machinery's is... (grin) Also read the complete 1967 ed of "The Science and Practice of Welding", and other such good stuff. Maybe one in 250 million is the accurate figure? Still don't get what's wrong with people these days... like the Guru's said before, it's a downward spiral. Anyone ever read the original "Buck Rogers" book, the one that eventually spawned the TV show? The "bad guys" in the book were the Han, most of whom were extremely physically weak due to inactivity... they took vehicles everywhere, they never walked around. They had nominal rulers of their societies, but the real rulers were the MAINTENANCE WORKERS! These people held the real power in that society... because they were the only people physically suited to doing anything more than pushing a button. Interesting and a little bit disturbing... not to mention a little bit too familiar. Obligatory blacksmithing content: Found out the stump I got a week ago is ironwood. Good stump material, but relatively brittle. PPW, you've mentioned banding stumps to keep them from splitting before... how do you do this? Just nail a steel strap around the stump? Suggestions would be appreciated. Winter rains are actually starting... yesterday at 6:30 it looked like it was 8:30 in town... Signing off from Kaneohe, Hawaii. |
| T Gold - Saturday, 10/04/03 23:17:13 EDT |
|
T. Gold, Measure the circumference of the stump. Cut a piece of 3/16" X 1" strap to that length. Drill a 1/4" hole 1/2" from the ends of the strap. Bend 1" of the strap 90° Wrap the strap around the stump so that the two 1" bends face each other. Insert a 1/4"/20 X 1 1/2" machine screw through the two holes. Put a lock washer and nut on the end of the screw. Tighten the screw. As the stump shrinks over time, you'll occasionally need to give the screw another turn. Should last you for many years that way. I prefer to remove the bark before doing this, but others leave the bark. I think it lasts a little longer with the bark off. |
| Paw Paw - Saturday, 10/04/03 23:43:32 EDT |
|
T. Gold - Congratulations on being one of the few young Americans who seems to be demonstrating at least some of the skills and attitudes necessary to prolong the humaan race. I had no idea you were as young as you are. Reading your intelligent, articulate and mature posts led me to believe you were much older. Now, can you please clone yourself or reproduce promptly and prodigiously to help offset the ever-increasing numbers of lazy, rude and incompetent youth flooding the population? (grin) I have access to a huge saman tree (like a mahogany) that is down and needs cutting. I can get some 10' diameter stumps if I just knew where to borrow a 5' chainsaw. And someone really brave or foolish to operate it. That tree is so huge and such dense wood that one could easily carve a giant one-piece combination stake plate, shop bench, sinking stump, lunch table and recliner out of it. And there it sits unused because I can't figure out a good way to carve it up. There is such a thing as too much of a good thing, I guess. (grin) I did get one good stump out of a limb about 20" diameter, and there are others to be had, so I'm not complaining. |
| vicopper - Saturday, 10/04/03 23:59:26 EDT |
|
That's bend 1" of the strap at 90° on each end. |
| Paw Paw - Sunday, 10/05/03 00:00:05 EDT |
|
Rich, perhaps an old fashion crosscut type saw..... |
| Ralph - Sunday, 10/05/03 03:00:25 EDT |
|
A really Large, Long cable saw. . .? On really BIG stuff like this the saw notch is often wide enough to insert the entire saw. Most chain saws (in good condition) will run upside down. One cut is made normally and then the other upside down. The material in between is split out. You lose some width each time due to the saw not having 100% freeboard on the near side so you start about twice as wide as the saw. . . a LONG saw helps but a normal one will do the job. The BIG timbre guys use chain saws to rip these big logs into select sections so they can get as much radial sawn wood as possible out of the log. Those cutting Sitka spruce for musical instruments carefully study the end of the log then layout a cutting diagram. Huge slabs are cut and those in turn go to the specialty mills or verneer mills to be made into sound boards for piano, harp. viol, cello, bass and guitar. . . |
| - guru - Sunday, 10/05/03 04:10:23 EDT |
|
From Cracked Anvil: Tom Joyce Santa Fe, N.M. blacksmith wins MacArthur 'Genius Award' of $500,000.My reply . . . I've been doing it all wrong. . . Congratulations Tom! |
| - guru - Sunday, 10/05/03 04:33:52 EDT |
|
Vicopper: Thank you. I really appreciate hearing things like that. (grins, deflates head) Moving right along. Have you called local tool rental places about renting a 5' chainsaw? Ten-foot-long Nichrome wire? (That would take a while, but might work...) What Guru suggested with the widened saw notch would work too, and the material loss wouldn't be TOO bad (given the huge volume of material to begin with). If you can afford it, a bunch of those inexpensive "survival" cable saws linked together would work too. Maybe put handles on the ends of 10' of bandsaw blade and get your best friend (or your wife? :) to help out. Maybe one of these: http://store.yahoo.com/allpetvetsupply/istcwes001.html Just throwing ya a bunch of ideas to consider. Some are more plausible than others. YMMV. PPW, sounds good to me. I'll be doing that soon, then. Maybe add some sort of tool-holding loops or something too. Be a shame to just have that strap on there plain (grin). 80 degrees and 69% humidity (read that as "Hot and sweaty") in Kaneohe, Hawaii. |
| T. Gold - Sunday, 10/05/03 05:34:30 EDT |
|
I'm sorry if this question has been asked before. I read that for beginners anvils it was not recommended that one use I beam. Just wondering why that was. |
| Peter Caldwell - Sunday, 10/05/03 06:05:32 EDT |
|
Hellow i am lieven from belgium europe and i have just bought a power hammer that is made in germany. it is a RUTTER and is hydraulic with a hammer 37kg. if anybody now something about this hammer pleas let it know. thank you |
| - Van West lieven - Sunday, 10/05/03 06:17:53 EDT |
|
Jock and Vicopper, Thanks for your help on flame cutting. I went home and turned down the flame and got a much cleaner cut. Now if I could just cut a perfect circle. Larry |
| - l.sundstrom - Sunday, 10/05/03 07:51:50 EDT |
|
T. Gold, I want to second that I thought you were a bunch older also. Don't change your ways of communication. You will do well. What Paw Paw said will work well for the stump strap. Another option is to forge the ends of the strap so that a wedge can be driven in to tighten. There are a couple of ways to do this, but the strap usually overlaps itself and the ends loop back with the wedge between the loops. A third option is to drill two 3/16 holes through the shank of a 3/4" lag bolt (a hex head machine screw will work too) and install the lag bolt into the side of the stump, but not all the way in. Take 3/16 aircraft cable and wrap it once around the stump and put the ends of the cable through the holes in the shank of the bolt. One end through in one direction, the other end through from the other. As you tighten the lag bolt farther, the cable wraps around the lag bolt shank and gets tight around the stump. The friction between the lag threads and stump, especially in ironwood, will keep it tight. There are more than 80 species of wood that are called ironwood. ("Know your woods", Albert Constantine) All wood I am aware of rots far slower if bark is removed. There are more options for strapping wood. |
| - Tony - Sunday, 10/05/03 08:24:02 EDT |
|
Paw Paw thanks again. just to let you know the time everyone takes here [answering questions, doing the research ]at anvilfire is greatly appreciated. did a little searchin myself on the M$H armitage lastnight they were in buisness from 1650 to 1850 .the anvil was made of six pieces that i had no idea,and apparently peter wright worked there before manufactureing his own anvils neat stuff !! as for the etching i will do that as soon as i can get hold of a scanner.thanks again and a very safe trip for you this week. |
| kainaan - Sunday, 10/05/03 09:28:04 EDT |
|
Echo of the GURU, My four kids have know that to get a learners permit to drive, They must demonstrate the ability to change a flat, cut off the end of a ruptured hose and re-install, change oil,change a V-belt, and spark plugs. I tell them I do not care if they ever do it again, but the knowledge is lifelong. So far my 17 year old daughter changes her own oil to save money, has helped rebuild the front end and helped replace a cracked head. among other things. This is one female that will be very hard to rip off at the repair shop. My second potential driver is learning the required things. The requirement to learn to earn that permit is a potent carrot and stick. OSHA requirements for 18 years old to work with most any power tools in industry has crippled this and future generations, The loss of SHOP classes is also to blame. To give the local school credit, they require a JOB and HOME class at the jr and high school level. This gives all the kids some light exposure to things mechanical as well as survival home ec. skills. These classes are good but only scratch the surface. I would propose that a survival skills class be mandated nation wide. Include: basic home electricity, basic nail fastening,basic auto care,basic cooking, basic sewing,tools and use,ETC. Won't happen but I rail on. |
| - jeff reinhardt - Sunday, 10/05/03 09:51:24 EDT |
|
T.gold, I also weigh in with a thought that you were older. Keep it up and you may rule the local world as the only guy who understands and can fix anything! Tends to yeild praise, but not a lot of richs. Still very, very rewarding. |
| - jeff reinhardt - Sunday, 10/05/03 09:54:02 EDT |
|
Frank Turley, We are all still playing catch-up! When we catch-up, its generally cause we have passed on! My father was the most technically literate man I have ever know, and he was still learning till the day he passed. He was able to pass a lot of knowledge on to me, but alas, as a often not very attentive youngster, much was missed. Been trying to make up for it ever since. |
| - jeff reinhardt - Sunday, 10/05/03 09:58:39 EDT |
|
According to info received from old friend, Miles Undercut, Tom Joyce of Santa Fe is the recent recipient of the $500,000 MacArthur Fellow Award. The money will be parsed out over a five year period. There were 24 recipients this year. The MacArthur Foundation, located in Chicago, gives the awards as a "surprise". Some winners thought it was a joke, when called. The awards are presented to those who are bettering the human condition through their efforts. I say we owe Tom our congratulations. |
| Frank Turley - Sunday, 10/05/03 10:08:49 EDT |
|
Torch Cutting: In addition to the business about pressure, preheat and travel speed, I have found the following tips very helpful. Clean the surface with a grinder down to shiny metal. Rust and other crud will interrupt a cut. If the underside is heavily coated, clean that too. For thick cuts, put a mirror on the floor in front of you, propped up so that you can see the underside of the cut. With practice you will know when you are cutting through cleanly but this will get you dialed in much faster. (dont use your wife's favorite makeup mirror for this - when you return it to here with spark marks all over the glass you will be sleeping the garage next to your torch) Mark the cut with a whiteout pen. It will remain clearly visible even when hot. (Frank Turley taught me this). If you need a finer line, scribe through the whiteout line. Restart cuts on the waste side of the line and then return to the line. Use a cutting guide and "lube" the edge with soapstone to stop the torch tip grabbing when it gets hot. (I got this from www.iforgeiron.com where there is also a neat design for a cutting guide). The thinner the metal the more you need to lead with the preheat. Meaning the the more you tilt the tip out of vertical to point in the direction of the cut. Invest in a decent mask! My cutting improved dramatically when I spenT $20 on a full face shield with the right tint for cutting and threw away the cheapy goggles that came with the set. Invest in a decent pair of gloves. Good cuts take concentration which is hard to maintain when the backwash from the flame is peeling the skin off your left hand. Make several practice cuts in the waste part of the metal before starting the real cut. I would really appreciate any additional tips or corrections |
| adam - Sunday, 10/05/03 10:58:37 EDT |
|
Perfect Circles: Larry, if you have a bunch to cut or in heavy plate I have a "Bug-O" cutter. Its a little magnetic base circle cutter. Does circles up to about 8-9" then has a dead zone to about 12". I've cut 6" plate up to 4 feet in diameter with it. |
| - guru - Sunday, 10/05/03 11:40:13 EDT |
|
"Bug-o" makes about every cutting guide you can imagine, and 27 you can't. We used them all over the boiler shop that was included in my previous employ. A really neat place to learn, as it was a 118 year old co. We had a boiler shop that employed about 600,an ice machine shop with about 80, a steamdrop forge shop with about 80 and a valve and fitting shop with about 500. From 1981 it withered away till it was broke up in 1996. Mostly the building stand empty on the 53 acre compound, although the forge is still active as is the ice machine shop. For the techno-freak, there was about every technology to see and learn. |
| - jeff reinhardt - Sunday, 10/05/03 13:00:23 EDT |
|
would somebody be able to give me an idea as to how i can get the burn marks of off stainless steel i've tried brushing and buffing but it doesn't work any help would be good thx |
| real_ale - Sunday, 10/05/03 13:25:27 EDT |
|
could you guy's tell me how to get the burn marks out of stainless steel after welding thanks |
| - real_ale - Sunday, 10/05/03 13:26:36 EDT |
|
Both 2024 and 7075 are theoretically forgeable. The aircraft industry forges 7075, not sure about 2024 specifically, but the 2000 series is forgeable. 7075 should be forged between 750 degrees and about 810 degrees, according to my ASM metals handbook. 2000 series alloys are forged at a slightly higher temp- maybe 780 degrees to 850 or so. In either case that is a very low temperature for someone used to forging steel, and a very small range of forgeability. This means practice with samples, a dark room, possibly using an oven timer for time in forge, and expecting to screw up quite a few times until you get it down. Forging aluminum is tricky, but a lot of people have gotten quite good at it. You could buy a tempstick, for about 10 bucks at my local welding supply, or mail order from MSC or Mcmaster Carr. I have a friend who uses the same piece of wood, and touches it to the aluminum as he heats it. When the wood scortches, he knows its hot enough. Of course, different species of wood, even wood from different trees, will have slightly different temperatures of flammability. And he's not lending his piece out. But in general, lower temps than you thought, for shorter periods of time in the forge, and lots of practice. |
| - Ries - Sunday, 10/05/03 14:15:11 EDT |
|
JEFF REINHARDT The other side of the coin is that my Mother taught me how to do many things, including how to start a handsaw without cutting yourself or buggering up the edge of the board, which is a real challenge for a little kid. My Father needed an electrician to change a light bulb, but he was what a kid needed in other ways. I too lament the loss of basic skills being taught in schools. I was blessed. |
| JOHN M. - Sunday, 10/05/03 15:23:02 EDT |
|
Real_ale, Read the posts after your last time, you were answered fairly quickly. Use your scroll key, this isn't a chat room. Peter Caldwell: I-beam makes a rotten anvil because it is too bouncy. You can do very light work on it, but it's really worth the effort to find a big hunk of solid material. Remember you don't need a big work surface! Most anvils are 3.5 to 5 inches wide at the face, and most smithing is done in one small part of the face and one or both edges. I have forged on a chunk of 3/8 x 12" H-beam, but it was not terribly satisfactory. |
| Alan-L - Sunday, 10/05/03 15:34:04 EDT |
|
Real_ale, Read the posts after your last time, you were answered fairly quickly. Use your scroll key, this isn't a chat room. Peter Caldwell: I-beam makes a rotten anvil because it is too bouncy. You can do very light work on it, but it's really worth the effort to find a big hunk of solid material. Remember you don't need a big work surface! Most anvils are 3.5 to 5 inches wide at the face, and most smithing is done in one small part of the face and one or both edges. I have forged on a chunk of 3/8 x 12" H-beam, but it was not terribly satisfactory. |
| Alan-L - Sunday, 10/05/03 15:34:09 EDT |
|
Real_ale, Someone already answered your question. You have to file, sand or grind it off. Stainless scratches easily but is abrasion resistant (oxy-moron metal). You never buff ANYTHING until it is bright clean and smooth (almost shiney). Then stainless takes a special buffing compound made for stainless only. Peter Caldwell, I beams, H beams and M beams are soft and springy. Only the absolutely heaviest (with 2" thick flanges) makes sort of an anvil. All the rest will not do. FORGET "anvil shape" - What you want is a solid block, a cube or a very short cylinder. A heavy sledge hammer (over 10 pounds) makes a suitable anvil. On the road. . . TTFN! |
| - guru - Sunday, 10/05/03 15:35:03 EDT |
|
Sorry about the double post! Got a "document contained no data" error message the first time I hit the post button. |
| Alan-L - Sunday, 10/05/03 15:35:50 EDT |
|
AHA! I'm not the only one with glitches in my keyboard! |
| Jerry Crawford - Sunday, 10/05/03 15:43:43 EDT |
|
Peter Caldwell, Some suitable hunks of metal for a make-do anvil. Railroad track,hunk of 4" or bigger barstock on end, Die insert, Very large bolt set into a stump, Most any hunk of steel with dept in the axis being struck. Good luck |
| - jeff reinhardt - Sunday, 10/05/03 15:46:25 EDT |
|
Oops should be depth in the axis being struck. |
| - jeff reinhardt - Sunday, 10/05/03 15:47:42 EDT |
|
Peter Caldwell, To locate something suitable for a makeshift anvil, check with your local highway maintenance department or heavy equipment operator. Places that use heavy equipment often have all sorts of odd pieces of old shaft, hydraulic rams, axles and bearings that are no longer useful to them, but valuable for you. They're usually happy to have you cart them away. The big pieces work for anvils, dies and swages, while the smaller pieces can be forged into hammer heads, top tools, chisels and other tools. As Jock and others have said, forget about finding something anvil-shaped. Look instead for something that has a reasonable flat area backed up with plenty of solid metal behind it. A big chunk of shafting about 5" in diameter and 5' long would be ideal, in most cases. You bury about three feet of it in the ground and work on the end. You could work stock up to about 3" THICK on that "anvil", because it would have a mass of about 150 kilograms (330 lbs) and ALL of that mass would be directly below the striking area. You could weld a socket on the side of it to hold hardies and bick irons to handle the duties of square edges, round horns, etc. You just have to think outside the box, sometimes. |
| vicopper - Sunday, 10/05/03 18:14:10 EDT |
|
can any one here give me some basic use info on a coal forge. i am just out of art school. and have been spoiled by access to the gass forge please help dog_golde@yahoo.com |
| douglas - Sunday, 10/05/03 19:44:37 EDT |
|
Douglas, Might I suggest that you check out the Bookshelf reviews and select a basic blacksmithing text book? Any of the good texts will have a chapter on fire management. Click on the pulldown menu at the top right of the screen and go to Bookshelf. You can also check your local library or use the Inter-Library Loan service. |
| vicopper - Sunday, 10/05/03 19:54:28 EDT |
|
a chunk of rail road track can make a good. anvil |
| douglas - Sunday, 10/05/03 19:57:28 EDT |
|
Lieven, I hate to tell you this, but neither Jock or I either one have ever heard of the RUTTER hammer. Double check to see if it is hydraulic or pneumatic. It may be similar to other hammers. |
| Paw Paw - Sunday, 10/05/03 20:25:05 EDT |
|
Thanks very much for the advice. I'll keep it in mind as I look through junkyards etc. Thanks again |
| Peter Caldwell - Sunday, 10/05/03 20:31:36 EDT |
|
Jeff Reinhardt, You may not win, but you and I are reading from the same page. By the time every one of our kids left home, they had all worked at least one summer with me, doing contract finishing on houses. Boys AND girls. |
| Paw Paw - Sunday, 10/05/03 20:39:46 EDT |
|
Peter C. If you find a piece of RR track remember to set it into the ground and use just the bull head and the web for your anvil. Actually, many smiths never use more than that much of their anvil. |
| Paw Paw - Sunday, 10/05/03 20:41:01 EDT |
|
To all, Just back from the CBA (Ca. Blacksmith Assoc.) fall conference "Oktoberfest". Once again, Peter Fels dazzled the crowd with his knowledge, techniques, and God given talent. His creative talent is rarely equalled (or exceeded). E.A. Chase performed an amazing demonstration of Reposse' (sp?) using air hammers and Corkey Storer demo'ed his technique of air hammered steel plate. An exceptional display of unique and unusual (although a bit loud) techniques. A great time was had by all!!! |
| Tim Cisneros - Sunday, 10/05/03 21:28:40 EDT |
|
Paw Paw I'm just making sure i'm understanding this properly. I've got a length of rr track at home that is approx. 4 foot. I should get an end cut flat and then stand it up out of the ground and use the top nicely cut end to pound on? |
| Peter Caldwell - Sunday, 10/05/03 23:31:32 EDT |
|
Peter, Exactly, I'd sink it into the ground so that the "good" cut end is at a good working highth. The point is that you want as much mass under the hammer as possible, and that's the way to get it with a piece of track. Anvil's cut into the "traditional" anvil shape are too spring due the the web not being as thick as the bull head. (BTW, just for clairication, the part of the rail that the train runs on is the Bull head. The other side is the base, and the portion between the two is the web.) |
| Paw Paw - Sunday, 10/05/03 23:34:45 EDT |
|
Paw Paw Thanks a lot for your help. Its good to have somewhere to ask questions (even if they may appear stupid) and have them answered honestly and professionally. Much appreciated. Pete |
| Peter Caldwell - Sunday, 10/05/03 23:47:54 EDT |
|
If you must use track for an anvil, try to locate some 175 lb. bridge crane track. It has a WHOLE lot more crown and web than railroad track. It's not near as bouncy, either. Every time I have a chunk of it on my tailgate, it goes quickly. |
| 3dogs - Sunday, 10/05/03 23:48:56 EDT |
|
Jeff, Boogering, not the other word. This is a family-fun forum. |
| Frank Turley - Monday, 10/06/03 00:03:35 EDT |
|
Douglas, I have a coal forge, and while fire management techniques are not difficult, the coal fire does require a bit of attention to keep it going, convert the coal to coke, and keep the clinkers down so the fire remains clean; also, management is important for keeping the smoke down to a minimum so your neighbors stay happy and you don't have an unscheduled interview with your local fire department. I picked up some good quality coke today (our AABA chapter ordered two tons from Mid Continent Coal and Coke, Chicago IL), and had a coke fire going in my forge for about four hours today. The difference between coke and coal is astounding; virtually no smoke, clinkers much reduced, hot fire, very clean, virtually odorless. Drawback to some might be that the coke requires a constant air blast to keep going, so hand crank blowers and bellows would not be so good, but with an electric blower I would say coke beats coal hands down any day. Others with more experience might point out drawbacks I did not encounter in one session, but so far I would say coke is a real winner. It also goes a tad further than coal, and is virtually the same in price. Here in AZ shipping is the killer hence the large quantity order. I would think if you are going to build a large coke fire you might contemplate lining the tuyere with clay, or getting a water cooled tuyere like they use in England where coke is used a lot. It seemed to me that the scale cleaned up easier than the scale from a coal fire, just a first impression. |
| Ellen - Monday, 10/06/03 00:37:00 EDT |
|
guru, atli, pawpaw, thanks for the feedback on medieval forges, my design is getting more developed by the day. I'll post some pictures when i'm finished. on "smeden van vuursteen tot staal": next time, i'll post it a bit earlier. |
| matthijs - Monday, 10/06/03 07:47:17 EDT |
|
Peter C., We'll sometimes make a joking answer, but you'll find the correct answer in the same message. Matthijs, Answering questions is what we do. (grin) The guru and I will be a bit out of touch for the next week. We leave this morning for a 5 day show in Tennessee. We should have email and site access from the motel, but never know for sure until we try it. |
| Paw Paw - Monday, 10/06/03 08:12:48 EDT |
|
Ben, seek out your local Artist Blacksmiths Association chapter. In Florida it's called FABA. We meet one Saturday per month. Chances are there will be a member near your home. One of our members is 15 (makes some really nice knives) and his mother brings him to the meetings. We have a number of members in their early teens. The demos are good but you can also get hands-on experience in the beginners classes. The cost? Dues of $20/year include a newsletter and they feed you good. Learn how to make a Bowie using a leaf spring before attempting a sword. |
| Ron Childers - Monday, 10/06/03 08:57:38 EDT |
|
Hey, I just wanted to know in the slack-tub pub and got referred here, did the Spanish Conquistadors wear chainmail armor? Thanks. |
| mortem - Monday, 10/06/03 09:34:40 EDT |
|
Books: I waited till after the mail came on Friday to leave for a hammer-in; just in case my copy(s) of "Steel before Bessemer" showed up. (Saw a demonstrator's copy at Quad-State and when I got home I searched and ordered it before getting my jacket off) It didn't show up on Friday but came Saturday when I was gone...sigh. It has a lot of good info *especially* the footnotes referencing *where* the info came from. (*MORE* books/journal articles I *have* to hunt down!) Jock, I hate to mess up your claim; but I was reading engineering texts back in HS as were a bunch of my friends; course our fathers worked for Bell Labs and we were exposed to the '60's space race in grade school. Shoot I have one friend who was being published in academic journals whilst in high school! My copy of MH is a 23rd edition bought for me by my wife for $5 at the Library book sale---*nobody had checked it out in several years so they "de-accessioned" it. It now shows traces of grubby finger prints. (all books get the hands washed before accessing, *some* books get the hands *SCRUBBED*!) At the hammer-in my book box was heaver than my smithing tool box and when one fellow commented on my bringing my smithing library I was rather flabbergasted---finally told him it was a rather small subset canted toward a particular area a fellow had asked me to bring stuff on. *Eternal* *Vigilance" is required to build a library cheap. Visiting used book stores on vacations, looking for english books in foreign used bookstores (they sell cheaper, just like foreign books sell cheap in US used bookstores); Jumping on a new source---I got the only used copy of "Steel before Bessemer" that I could find on-line---you can get a rather good but spotty collection. The in-filling is what gets expensive; but if you do it slowly and steadily it's a cheaper vice than smoking. One trick in getting a library that sparks envy in people: buy the new books when they go on 1/2 price sales at remainder stores and wait 15 years till they are out of print, (unfortunately after they are re-printed they are not as impressive). As for teaching kids to use tools, we have become a risk adverse society and many folks are unwilling to let their kids "fail" and deal with the damage. I let and encouraged my kids to climb trees knowing that a goodly number of my friends growing up broke bones doing that. I wouldn't let my daughter drive her own car without knowing how to change the tire and even showed her how to use a fulcrum and lever to raise my PU with a *flat* up far enough to get the jack under the frame in the correct place. (and blocking and safety concerns while doing so! *When* it goes wrong, what will happen and how can you keep it from hurting you or the vehicle) She changed out the radiator in her car last month and wants to practice changing the oil by doing it to my truck...she's shy, quiet, thin and a reader and is donating a year to "City Year". I'm rather proud of her. Thomas "when the guru's away the untergurus will play) |
| Thomas P - Monday, 10/06/03 11:26:55 EDT |
|
Mortem, the conquistadors wore some plate armour which sometimes had pieces of maille in places like the armpits. During the 16th century the maille shirt was several hundred years out of date for armour and even full plate was gradually dieing out even while fancier examples were being made for parade use. Conquistadores are usually shown with breastplates and morions and not full suits. Maille was shipped to Jamestown for their use, (dump the obsolete weapons & armour on the colony) Thomas |
| Thomas P - Monday, 10/06/03 11:33:26 EDT |
|
Sy-eeb,Sy-eeb and y'alls may I ask yous a question?I aquired some 1/2" steel plate,to be used for a top for a welding table.I laid down three pieces and tack welded them together.When I decided one day to weld a 90 degree angle with the help of those magnetic positioners.I laid them on the table and couldn't get them to stick.I used a rare earth magnet and it barely held to the under side. I took my cutting torch and cut off a piece.I had to more the torch extremely slow or the cutting would stop and I would have to back up and heat. I gave a piece to my buddy smith {Tim Suter}-A professional smith,to test.He can up with as follows;well rust pitted,can be torch cut,tough to cut in a chop saw,relatively hard but punch marks,spark test similar to 52100 bearing steel,non-magnetic.What is it?What are is uses? I could burn off some pieces and send one to who ever is a professional with this sorta thing,for analizying.I will have a piece sent to you old wise and all knowing Sy-eeb.Please help me with this problem,fellas. |
| BUB - Monday, 10/06/03 11:38:23 EDT |
|
Frank, I did not understand the boogering comment. |
| jeff Reinhardt - Monday, 10/06/03 11:55:17 EDT |
|
How much material, in cubic inches, does it take to forge a typical long sword blade? |
| Sean - Monday, 10/06/03 14:53:08 EDT |
|
Sean, in general you don't calculate cubic as much as weight. As a typical sword weighed around 1 kilo for over 500 years (with fittings!) You would need about that much steel to start with. You do have some losses and if doing pattern welded steel they may ammount to 50% of the starting weight! (I'm alloting the weight of the fittings for loss) The better your smithing skills the less waste you get as you can smith to close to the final size and don't decarb as much. Of course we need to know what do *you* mean by "longsword" The knightly sword of the 13th century, a bastard sword, zweihander, katana, no-dachi? The term is not very exact. (notice I didn't throw in claymore as that term is used for two different swords and an antipersonal device as well. Thomas |
| Thomas P - Monday, 10/06/03 15:09:22 EDT |
|
Matthijs, Is there any way you could give me details about your shop forge? I am in the prossess of setting up a charcoal burning brick forge and I rather like the picture I saw of yours. |
| Myke - Monday, 10/06/03 16:18:30 EDT |
|
I'm doing a report for 8th grade History on blacksmithing in colonial times and how it differs today. i was wondering if u could give mesome info on how blacksmithing is done today and, if u can, tell me sort of how it was done in colonial times. please answer this A.S.A.P. because the report is due in a couple weeks. thanks a lot. good luck with ur work. |
| Dino - Monday, 10/06/03 16:40:44 EDT |
|
Marc, How did the power hammer gathering go? |
| - jeff reinhardt - Monday, 10/06/03 16:40:59 EDT |
|
Just for some info for us all...: I emailed Kickwheel Pottery Supply about the purity of the flourspar that they sell..."The percentage of Calcium Fluoride is between 80-90 percentage. KPS"... Is this enough of a purity for flux? I believe that you sais "98%" would be good... still lookin'... Not so chilly but obviously the end of summer is near, here in the Land of the Famous Floating Rock... |
| Rodriguez - Monday, 10/06/03 16:54:30 EDT |
|
Gentelmen, where can I go on the internet to buy used equipment. i.e. hammer or gas forge. |
| Jamal - Monday, 10/06/03 17:18:49 EDT |
|
Jarnel Try some of the banner advertisers here on Anvilfire. |
| - jeff reinhardt - Monday, 10/06/03 17:57:20 EDT |
|
Dino - I commend you for getting an early start on your report. If you look at the various pages on this website, you will see that most of what we do is no different than it was in Colonial times. The most significant difference is the use of electricity to power operations that, in Colonial times, would have been either animal-powered or water-powered. Even before Colonial times there were power hammers, grindstones, and other tools operated by waterwheels or animal-power. Currently, we use electrically operated power hammers, blowers, grinders and other tools, although there are a number of blacksmiths working today who don't use any electrically operated devices at all. One other significant change is that during Colonial times, most forges were fueled with charcoal made by cutting/burning the local forests. With the discovery of coal and the depletion of the forests, coal became the common fuel. More recently, the difficulties of getting good coal or local ordinances against pollution have caused many smiths to switch to propane gas as a forge fuel. Go to your local library and check out blacksmithing books by Alex Bealer and Alexander Weygers, jboth of whom will give you some of the history of the art. There are also older books on the subject that jgive a view of what blacksmithing was like in the Renaissance and earlier, such as De Re Metallica, The Pyrotechnia and Cathedral, Forge and Waterwheel. All are very worth reading. Have fun! You might also consider locating a blacksmith in your are and talking qwith him/her. Most of us are too willing to talk. (grin) |
| vicopper - Monday, 10/06/03 18:51:36 EDT |
|
Dino, As vic says, smithing is essentially the same as it was in colonial times. Still, there quite a few differences that would catch the eye of a colonial smith were he to find himself in today's world. Here are some that come to mind. The abundance of cheap steel. Steel and iron used to be expensive materials. Ordinairy people couldnt afford much of it. Today it is so cheap it gets thrown away. New metalworking processes - arc welders, gas torches, grinders, power hammers and power tools all found in a modern smith's shop. The abundance of cheap, alloy steels. Colonial smiths had very little steel (as opposed to soft iron) and used it very sparingly. Today's smiths can order from a wide range of specialty steels most of which are quite inexpensive. With this one should add that the modern smith has (or should have) a sound knowledge of metallurgy relevant to his craft. In olden times metallurgy was part magic, part superstition and part practical experience Difficulty in getting good help. While today's smith has power tools, he usually doesnt have an apprentice and thinks long and hard before accepting the expense of hiring a helper. In colonial times labor was much more affordable. Loss of status: The smith used to be an important figure - central to the functioning of rural villages - today he is a curiosity - an oddball who tries to get a bit of respect by calling himself an "arteest" |
| adam - Monday, 10/06/03 19:18:40 EDT |
|
Well, we made it. I've misplaced my local ISP connect info so this is a temp hookup. . . CaF2, Flux grade for making steel is supposed to be 98% but I know folks use the stuff sold by KPS for welding. |
| - guru - Monday, 10/06/03 19:42:49 EDT |
|
Jock, You and Jim have fun, we'll take care of things until you get back. Hmmmmmm...now where did he leave his checkbook? (grin) |
| vicopper - Monday, 10/06/03 20:20:54 EDT |
|
Jock, I sent an email about coming up late Wed. in order to play on Thursday. If that makes sense, as much as anything to do with blacksmithing does, then let me no either with a direct email or on the guru site. Thanks. Hope you guys are having a good time. David Galloway |
| PapaDoc - Monday, 10/06/03 20:35:10 EDT |
|
I recently acquired an old blower which is completely caked in mud. The mechanism is still in operating condition and the handle turns freely, so I don't think that the dirt got inside. The major components are cast iron. After I get all of the mud off, should I oil or paint it? Are there any cleaning agents that I should or should not use? Thanks! |
| - David Christiansen - Monday, 10/06/03 20:45:23 EDT |
|
hay im just starting and i dont have much munny to do any thing with. what do you think i should do |
| - joshua b - Monday, 10/06/03 23:44:15 EDT |
|
Dino: I'm impressed that you've given yourself a couple of weeks. We have a lot of posters in grade school contact us the night before. You'll actually have time to read some of the books! To add to what VICopper posted; another excellent book, and now back in print, is Colonial Craftsmen [And the Beginnings of American Industry] written and illustrated by Edwin Tunis. My out-of-print copy was published by Thomas Y. Crowell Co. NY, (c) 1965; LoC 75-29612; ISBN 0-690-01062-1. Go to your school or public librian and see if they have a copy, or have them request a copy through inter-library loan. Since it's back in print it should be available. Mr. Tunis does have a few glitches in the text, but if your teacher isn't a blacksmith, he or she won't notice. ;-) He does give some excellent general information, and his illustrations are wonderful. Also in print is The Blacksmith [Ironworker and Farrier] written and illustrated by Aldron Watson (ISBN 0-393-30683-6). He's a lot less "Colonial" than the Tunis book, but still has good information. Lastly, visit Hopewell Furnace and Saugus Ironworks National Historic Sites on the internet ( www.nps.gov/hofu/ & www.nps.gov/sair/ ) and be sure to click the "in depth" button on the right. If you live anywhere near these National Park units, a trip is well worth the effort. Good luck on your paper, I'm sure you'll do well. (And if you do do well, be sure to let us know so that we may bask in your reflected glory. ;-) Visit your National Parks: www.nps.gov Go viking: www.longshipco.org |
| Bruce Blackistone (Atli) - Monday, 10/06/03 23:57:24 EDT |
|
Dino: I'm impressed that you've given yourself a couple of weeks. We have a lot of posters in grade school contact us the night before. You'll actually have time to read some of the books! To add to what VICopper posted; another excellent book, and now back in print, is Colonial Craftsmen [And the Beginnings of American Industry] written and illustrated by Edwin Tunis. My out-of-print copy was published by Thomas Y. Crowell Co. NY, (c) 1965; LoC 75-29612; ISBN 0-690-01062-1. Go to your school or public librian and see if they have a copy, or have them request a copy through inter-library loan. Since it's back in print it should be available. Mr. Tunis does have a few glitches in the text, but if your teacher isn't a blacksmith, he or she won't notice. ;-) He does give some excellent general information, and his illustrations are wonderful. Also in print is The Blacksmith [Ironworker and Farrier] written and illustrated by Aldron Watson (ISBN 0-393-30683-6). He's a lot less "Colonial" than the Tunis book, but still has good information. Lastly, visit Hopewell Furnace and Saugus Ironworks National Historic Sites on the internet ( www.nps.gov/hofu/ & www.nps.gov/sair/ ) and be sure to click the "in depth" button on the right. If you live anywhere near these National Park units, a trip is well worth the effort. Good luck on your paper, I'm sure you'll do well. (And if you do do well, be sure to let us know so that we may bask in your reflected glory. ;-) Visit your National Parks: www.nps.gov Go viking: www.longshipco.org |
| Bruce Blackistone (Atli) - Monday, 10/06/03 23:58:07 EDT |
|
joshua, off hand I would say read the getting started area. then read teh archives, and also read the books that the getting started area suggest.... Join a local smithing group |
| Ralph - Tuesday, 10/07/03 00:01:15 EDT |
|
Well, that was an interesting glitch- When I hit post a dialog box came up and said something like "no data in the" ...? so I hit it again and got the same box and a double post. Oh well, when it comes to computers, I'm an axe user, not an axe maker- These are mysteries! Hope Paw Paw and the Great Guru are doing okay. Off to bed, far too late, on the banks of the lower Potomac. |
| Bruce Blackistone (Atli) - Tuesday, 10/07/03 00:03:03 EDT |
|
DINO; Another good source would be the writings of Eric Sloane. Good luck, 3dogs |
| 3dogs - Tuesday, 10/07/03 01:07:39 EDT |
|
Dino, The blacksmith of today is primarily in a world of art. Many early smiths were expected to sharpen plowshares, put iron tires on wheels, and repair farm machinery. Currently, most smiths are doing ornamental ironwork and sculptural pieces. |
| Frank Turley - Tuesday, 10/07/03 07:59:46 EDT |
|
Dino: Some further thoughts- (See; if people wouldn't wait to the last minute, then we could be more helpful, like now. :-) In the Colonial era you're dealing with work by hand and eye. Making any single thing or unique object (a cooking pan, a ladle, a trivet, a hinge) is relatively easy. Forging a number of identical pieces (gun parts, for instance) is difficult. If I have to forge six ladles, and they can have a little variation, it’s no problem; if they have to be exactly alike, holding exactly the same volume of liquid, it’s going to take me considerably longer. After the industrial revolution (and now) it’s easy to use machines to punch out 1,000 stainless steel ladles an hour, and you could not tell the first from the last. Instead, some modern blacksmiths find their niche making unique, one-off items, such as: “A special ladle, hand forged with inlaid brass, based on a 18th century Pennsylvania style, and just the thing for your favorite cook.” Machines enable modern industrial blacksmiths to pound-out axe heads by the bin; in the colonial period, it was pretty much “no two alike.” There are advantages and disadvantages to both. Mass production = lower costs and consistency, but not necessarily a superior product. Hand production = uniqueness and custom features, but it is not cheap and you’re reliant on the skills and knowledge of the craftsman. Hope this helps. Maybe Jock should cut and paste our responses and edit them into the FAQ? Clear and cool on the banks of the Potomac. Visit your National Parks: www.nps.gov Go viking: www.longshipco.org |
| Bruce Blackistone (Atli) - Tuesday, 10/07/03 09:11:48 EDT |
|
Myke, Link to a rather crude diagram, since I don't have any pictures on this computer: http://marcel.homelinux.org/~matthijs/forge2.GIF the work surface is flat and roughly 1x1 meter and 1 meter high. the air from the bellows flows through the pipe visible in the arch and then through a 2cm thick , 20cm diameter iron plate with 7 8mm holes in the middle. this plate is set in clay, providing an relatively airtight seal between the plate and the surrounding bricks. the hole in the back is for long stock, when not in use it is closed of on the other side of the wall with a piece of wood. the front and richt side's ofthe chimney are supported by heavy iron strips which are connected to a roof beam(bold lines). the chimney tapers to about half the with of the base and is about 6 meters high (measured from the ground) All sizes are estimated. I use this forge with coal, I don't have any experience with forging in charcoal, so I don't know if it will work in this setup. Please let me know if you need to know more. matthijs |
| matthijs - Tuesday, 10/07/03 10:30:10 EDT |
|
found a picture: http://marcel.homelinux.org/~matthijs/902.jpg |
| matthijs - Tuesday, 10/07/03 10:44:15 EDT |
|
Treadle Hammer: I am thinking of building a treadle hammer. It would need to be a fairly compact design to fit in my shop. I have seen designs ranging from the very simple to the very complex. http://www3.sk.sympatico.ca/hirkw/treadle_hammer.htm http://magichammer.freeservers.com/page8.html http://auroraforge.com/blacksmithing/grasshoppers.html I'd appreciate any advice. Some specific questions: Is it a significant advantage to engineer a sliding ram as opposed to just having the head swing in an arc on the end of the pivot arms? Why not use weights instead of springs to counterbalance the head? Since they are not designe to flex, why use leaf spring for the pivot arms? Whats the ideal hammer to anvil mass ratio? (Most hammers seem to be around 50#) Why not use a a simple Oliver style with a single pivot arm? The hammer head won' stay vertical but so what? |
| adam - Tuesday, 10/07/03 11:10:10 EDT |
|
I recently purchased a small power hammer and would like some information. The brass tag on the column reads: Modern Power Hammer Modern Sales CO. Grinnell Iowa Licenced by Grinnell Mfg. Co. It has a casting number 30 on the column and another on the base, I assume it is the date of casting ( 9 1904 ) I would like to know the correct RPM of the main drive shaft or any information pertaining to this hammer. I would like to get it running for my use. Any help would be greatly appreciated. Thank you! |
| Eddie Shannon - Tuesday, 10/07/03 11:25:55 EDT |
|
Adam - I'm no expert on treadle hammers, but a few things come to mind. A straight-line head as opposed to arcing would avoid the "wiping" blow of a hammer moving in an arc. Also, it allows different heights of top tools, dies, etc to be used without altering the head-to-anvil relationship. I've toyed with the concept of using weight for balance. It seems to me that counterbalanced weights would still be added mass and therefore add momentum to the hammer blow. Of course, they would also add to the inertia you have to overcome to get the hammer head moving from rest. After drawing a hundred or so different designs trying to defeat the laws of physics, I finally decided to just focus my efforts on building a good pneumatic powerhammer. One blow or a thousnd, they'll give you the power and control to what is needed. Noisier than a treadle hammer, though. As for using leaf spring, that's because they're already designed to take shock loads and come with ringed ends ready to put in pivot blocks. It's just handier. I have seen a treadle hammer that was built using 1" rebar for the arms, punched and drifted pivot points and all. I'm not at my home computer, or I would give you the link for that one. The ratio for anvil to hammer is 15:1 or better for powerhammers and 33:1 or better for hand hammers, so I figure a treadle hammer would fall somewhere in between. I have to say, however, that most of them that I have seen had much lower ratios, often as little as 150# of anvil mass for a 60# hammer head. Forging efficiency would certainly go down that way, but since treadle hammers are primarily used for die or tooling operations, the effect is probably less noticeable. As for not using an Oliver type, try to imagine that hammer head hitting a chisel at some angle other than pretty much perpendicular. The image of that chisel flying across the shop is enough to make me want the hammer head to be square to the work. That is why many of the parallel-arm designs have a provision for adjusting the height of the pivot points, so a more nearly perpendicular blow is delivered. With any mechanical device, you have to make the adjustment ahead of time, not "on the fly." For hand work, my arm adjusts automatically. I do like the concept of the Oliver just sitting there ubiquitously behind the anvil, ready to strike that mighty blow at any time. What about a sliding-head treadle hammer that had casters and could be moved into place over your regular anvil? Vertical adjustment accomplished with a scrounged hydraulic jack? All sorts of unlikely possibilities here. (grin) Fundamentally, I think the issue is whether you want something simple and adequate, like a plain treadle hammer, or something elaborately engineered and complex like Bruce Freeman's Grasshopper treadle hammer. Or maybe you just want a powerhammer, after all. |
| vicopper - Tuesday, 10/07/03 14:03:32 EDT |
|
How is "steel wool" manufactured? I was asked this question recently and a google search turned up nothing. Tim |
| slattont - Tuesday, 10/07/03 14:08:36 EDT |
|
Tim - Steel wool is actually sheared from steel sheep. (grin) Seriously, I found this tidbit: George Brady's "Materials Handbook" (11th edition) claims that steel wool "...is made from low-carbon bessemer wire of high tensile strength, usually having 0.10 to 0.2% carbon and 0.50 to 1 manganese. The wire is drawn over a track and shaved by a stationary knife bearing down on it, and may be made in a continuous piece as long as 100,000 ft. [almost 19 miles!] Steel wool usually has three edges but may have four or five, and strands of various types are mixed" (p.757). |
| vicopper - Tuesday, 10/07/03 15:07:01 EDT |
|
Rich, Thanks for your comments. The rebar treadle hammer is in Hellenkampf's shop in Santa Fe - I go visit there every now and then http://www.iron-to-live-with.com/iron/treadlehammer.phtml I really like his work! On the counterbalance design it seems to me that one would just divide the hammer weight (or torque) on both sides of the pivot. Parallel linkages also give a sideways "wiping" movement as they swing through their arc. This is no different from the single arm Oliver. This effect is minimized when the arm is nearly horizontal. So I think an adjustable pivot point is very desirable and not hard to engineer (along the lines of a Clay Spencer hammer). Yep what I really want is a power hammer and a treadle hammer and an air hammer .. and a fly press ... and a new truck and ... and... My neighbors and my budget constrain me - which is probably a good thing |
| - adam - Tuesday, 10/07/03 15:19:59 EDT |
|
What are constraints? (grin) Yes, the parallel arms still have a wiping blow, but at least the hammer head is always perpendicular to the work. On the Oliver, the hammer head itself is only perpendicular to the haft of the hammer. If that is not parallel to the work, then the hammer head is not only travelling in an arc, it is also at an angle. Nasty. I really liked the simplicity of Hellenkampf's hammer. He seems to get good results from it, doesn't he? Somehow, I doubt if my results would be quite the same. Probably has something to do with operator skill. (grin) On the counterbalance, I just haven't figured out how to beat the inertia. That is a function of mass. Not that it really matters, because you have to overcome the spring in other designs. At least the counterbalance design would add the mass of the balance weight to the striking mass. Should give a "deeper" blow, I think. |
| vicopper - Tuesday, 10/07/03 15:53:02 EDT |
|
Treadle Hammer Design: A lot of time and effort has been wasted on parallel motion treadle hammer linkage. There are two simple solutions, 1) use a guided ram. The roller blade design works well. 2) Use parallel arms and design so that most work is done when the arms are perpendicular to the work. There is little or no "wiping" motion at this point. Do all the striking at the same height. Use spacer blocks on the anvil to keep the striking height optimal. Counter balance does not work on lever arm hammers. When the blow occurs the counterweight is also moving and must be stopped. This puts tremondous force on the pivot. There IS a way to do it using a counterblow sytem, leverage and the anvil as the counter weight (I have designed one). However, the anvil moves UP a small amount just as the blow occurs. Some folks have said they could not work this way, I do not think it would be a problem as the motion would be very little and part of the overall motion of hands, foot and tools. But someone would have to bulid and test it. And it IS more complicated of a design except the lack of springs. This design requires a "guided" anvil with heavy pivots and carefully balanced leverage. Several notes about treadles: Some plans call for a lead filled head. This is just plain dumb. You do not need to contaminate your shop needlessly with lead to make a hammer OR radiation sheilding. Use steel for the ram. Works for rad sheilding too as long as the mass is equivalent. The other issue is that most treadles do not have heavy enough anvils. A treadle hammer needs a heavy mass for an anvil just like a power hammer or shop anvil. Without it the hammer is less efficient and more shock goes into the floor. There were some nice air assisted treadles at Quad State. They worked manually or gave single powered blows like the KA hammer. |
| - guru - Tuesday, 10/07/03 19:12:57 EDT |
|
Youse guys, Almost got it right. Steel wool comes from a hydraulic ram. Helmut Hillenkamp [spelling}. |
| Frank Turley - Tuesday, 10/07/03 19:18:13 EDT |
|
Getting Started on the Cheap: This past week I discussed primitive forges (see above). You can heat steel to a white heat using charcoal, a hole in the ground and blanket. There are better ways but this is the lowest tech and requires NOTHING except conviction and some knowledge. In many primitive places anvils are very expensive. Many smiths use a heavy sledge set into the earth or a stump in the earth for an anvil. You can purchase a smithing hammer for $8 to $18 at flea markets or the hardware store. Channell locks can be used for tongs until you make your first pair. The one thing I DO reccommend that you do is purchase NEW steel to work with. Find a welding shop or machine shop that will sell you small quantities of mild steel bar. 3/8" square, 1/2" square, 3/8" x 1" rectangular, 1/2" round. You will be MUCH less frustrated working with these sizes. So, you can start for as little as nothing or $25 or so. OR you can purchase a new gas forge, anvil, tongs and hammers for around $1,200 US. Many creative people assemble the same equipment with no budget. The trick is KNOWLEDGE. You need to know what works, what toolos look like and have some imagination. If you can afford to access this site you can afford to purchase or borrow the books necessary to learn what you need. |
| - guru - Tuesday, 10/07/03 19:27:16 EDT |
|
Guru, your mention of a counterblow system reminds me of an air hammer design I was working on... two 20lb sledge heads clapping together,... drawings to come soon. If someone wants to steal my idea please build it, otherwise at least wait for the sketches and calculations (grin). Maybe we could put together a "Start from Nothing" kit, Guru... two pairs of fireplace bellows, a 1" masonry bit, and a list of scrapyards in the purchaser's area (VBG). Raining on and off in Honolulu, Hawaii. |
| T Gold - Tuesday, 10/07/03 20:06:02 EDT |
|
Sir: I would like to know if there is a paticular name for the type of machine that bends square tubing. Or a paticular brand name you would suggest. I am trying to find out where one can be bought and if there are any used ones out there for sell. I'm going to try my hand at some fence building and I'm having a hard time bending 3/4"square tubing with a jig. Any help you can give me would be great. Thank you in advance. |
| - Mike - Tuesday, 10/07/03 20:20:10 EDT |
|
Hammer Anvil Ratio: The ideal for a heavy duty commercial hammer is 20:1 giving 70% efficiency. The norm is 15:1 on older hammers including Little Giants. Many modern hammers are 10:1 and as low as 8:1. But these often expect a heavy heavy concrete foundation. In comparison consider a "general" shop anvil of 200 pounds and a heavy smithing hammer of 4 pounds. That is a 50:1 ratio. In power hammers the anvil mass is also related to the rapidity of blows. Most anvils are on foundations that return the anvil to its original position aftet the blow. But this takes time. The shorter the distance between blows the more likely the anvil will not have time to return to position. SO, a larger anvil that moves less is used. Probably the slowest operating hammers are treadles and therefore could use less anvil except for the efficiency issue. |
| - guru - Tuesday, 10/07/03 20:56:46 EDT |
|
Thanks Guru for your advice on treadles. A simple parallel bar linkage with a moveable pivot will be easy to make. There is a design in Blacksmith's Journal in which the pivot is mounted on a separate plate which simply clamps to the main post. The plate is adjusted by a jack screw. Simple and easy - not much more complex than the basic hammer. I have an aversion to over engineering what should be a simple machine. I have plenty of heavy scrap so a 15:1 mass ratio will be no problem. What do you suggest for the length of the pivot arm? Hellenkamp (sorry I misspelled your name, Helmut) writes that he chose long pivot arms to minimize the the radial (sideways) motion. However, I need a compact design and I plan an adjustable pivot height. What do you think is the shortest length that will work well? |
| - adam - Tuesday, 10/07/03 21:23:39 EDT |
|
Benders: Mike, benders are benders. Most non-specific or specialized benders use dies to fit various size tubes, pipes, structurals and solids. Benders are either manual such as the Hossfeld or Hydraulic. You can also get a hydraulic assist on the Hossfeld. Dies can also be used on various presses. The type of bender depends on the number of bends or production rates. No matter what type of bender you use the dies need to be the right fit and no tighter than the minimum possible radius for the section and alloy. Various manuals give the minimum bending radius. |
| - guru - Tuesday, 10/07/03 21:26:07 EDT |
|
Should we not mention that there were other "colonials" than just the English? Wow your teacher and discuss *spanish* colonial smithing. matthijs looks like it will run with charcoal with no problems. Remember that charcoal takes less blast so ease up on the bellows, remove top weights from it, etc. Charcoal also like a *deep* but not wide fire so stacking some firebricks or adobe along the sides to narrow and deepen the fire "pot" will often help. Unlike coal, pretty much all the charcoal in the firepot will catch on fire and be burning during use. No stores of unburnt fuel to rake onto the fire---keep "spare" fuel out of the forge. Damp charcoal throws off more sparks, letting fresh charcoal sit a while on top of the fire to drive off water before putting the blast to it can help make it a more "polite" fire---but wastes time. Charcoal throws off a lot more infared radiation onto you as you don't have that insulative layer of coke to shield you from the fire. Clean out the ashes on a regular basis as they will build up and lessen the "working" zone. Thomas |
| Thomas P - Tuesday, 10/07/03 21:30:33 EDT |
|
Hossfeld Benders: Centaur Forge is a dealer for them and has manuals. Dies for specific sections are special order. |
| - guru - Tuesday, 10/07/03 21:37:29 EDT |
|
Treadle Arm Length: The longer the arm the straighter the motion and the deeper the throat. I wouldn't use arms withs centers shorter than about 18". |
| - guru - Tuesday, 10/07/03 21:41:15 EDT |
|
matthijs, Thank you; that gives me enough to start with. The .gif image was especially helpful. |
| Myke - Tuesday, 10/07/03 21:45:40 EDT |
|
i am looking at a champion forge, cast iron with blower attached and a hood. two wheels and it is portable. have heard that "fire clay" should be used. why?? to partition off the coal pile?? would it damage the forge not to use it?? one more. i have not tried to bend round stock to look like winding and wondering vines, but i like the effect. what tools are used to do this? need a torch?? thanks!!! |
| - rugg - Tuesday, 10/07/03 21:47:38 EDT |
|
Reading Engineering Refs: Besides MACHINERYS, I was reading Science Newsletter, back when it actually had some serious breaking new science. At age 10, 11, 12 . . Glad some of you others had such strange reading habbits. But perhaps that is why we are all here? ANd perhapps the numbers are still as low as I think. |
| - guru - Tuesday, 10/07/03 22:15:14 EDT |
|
Claying Forges Rugg, it depends on the weight of the forge and the pan material. Steel forges do not need to be clayed. Thin cast iron forges of around 1/4" need to be clayed. The only factory diagram of a forge that was clayed that I have seen created a fire pot over a flat grate and sealed the crack between the tuyeer and the pan. Sort of a small toilet seat clay shape. Fire clay is not necessary. Any clay can be used. It can reinforced with a little portland cement. A bed of ashes or sand in the forge pan can do the same thing but mixes with the coal and makes a dirty file. Viney forms can be created hot or cold, it is done strictly by eye to keep a fresh randomness. |
| - guru - Tuesday, 10/07/03 22:37:36 EDT |
|
Thanks for the info. I seen a bender on a tv show and it looked like you ran the tubing under a roller. the tighter yo made it the tighter the radius. I thought benders such as the hossfeld only bent tight corners like for making boxes and such. i would be making large arcs for fence projects and such. let me know if I'm way off base. Thanks |
| - Mike - Tuesday, 10/07/03 22:46:04 EDT |
|
Thanks for the info. I seen a bender on a tv show and it looked like you ran the tubing under a roller. the tighter yo made it the tighter the radius. I thought benders such as the hossfeld only bent tight corners like for making boxes and such. i would be making large arcs for fence projects and such. let me know if I'm way off base. Thanks |
| - Mike - Tuesday, 10/07/03 22:46:26 EDT |
|
Roll benders have limits and also need special dies for square tubing. |
| - guru - Tuesday, 10/07/03 23:18:01 EDT |
|
Rugg, Vines: bending fork, bending wrench, needlenose tongs, anvil horn, inertia (hitting the anvil with a heated rod). The torch is helpful, easier than running back and forth repeatedly to the anvil and/or vise. |
| Frank Turley - Wednesday, 10/08/03 08:21:28 EDT |
|
Jock, Just to be safe, if my bottom die in my 50# lG is divoting, what should I do to case harden and not crack it? |
| - andrew - Wednesday, 10/08/03 09:53:21 EDT |
|
Jock, one more, is there such a thing as a small, table top tommy hammer for small work with the name Mouse Trenton on the flywheel?, It don't have a clutch, it does seem to have a fullering small ram. What the heck is this thing?... Paw Paw, I will get you a picture.. |
| - andrew - Wednesday, 10/08/03 09:56:15 EDT |
|
Guru, could you please tell us what the odds have been raised to for someone with one ticket for the iron in the hat drawing? |
| dragon-boy - Wednesday, 10/08/03 10:59:43 EDT |
|
Dragon-Boy, not too good, as I will have the winning ticket.... |
| Ralph - Wednesday, 10/08/03 14:24:33 EDT |
|
Hey! Ralph can't have the winning ticket, I do! |
| Alan-L - Wednesday, 10/08/03 14:48:09 EDT |
|
Naw guys, I've been there and seen the thing up close, you don't want it! I drooled all over it, sorry but I already claimed the sucker then and I still do now, besides, I have poor student syndrome on my side. All I gotta do is pray for it and it's mine(which I have been! devoutly) |
| dragon-boy - Wednesday, 10/08/03 16:38:32 EDT |
|
Ok, so I'm giving my charcoal forge a chance for redemption. I believe my problem was not getting enough air to the fire... a few modifications, boom, lots of air. So I've got the air flow that I need... but still not hot enough. Added bricks to the sides so that I could build a deeper fire... still not enough to get welding temp out of... So my question: Whats the ideal charcoal forge setup to be able to heat up 18" stock and to maximize heat production and retention and fuel usage? What should the tyure look like? At the moment I'm using my coal forge for the charcoal (neighbor complained about the coal smell...). Is the round firepot too small or too deep? (9" x 3"). Please feel free to dopeslap me with questions that I haven't thought of yet. Thanks for your time and effort! This site ROCKS!!! |
| Rodriguez - Wednesday, 10/08/03 17:00:37 EDT |
|
Rodriguez - You need a fire that is about 8" deep or so with charcoal. A few bricks around the sides to make it a fairly narrow fire will help conserve fuel, but you can't really cheat on the depth if you expect to get to welding temperatures. The hottest point in the fire will be the point where the air blast is fully preheated by the lower part of the fire, so don't try to jamb your workpiece down deep into the fire. The incoming air will actually be cooling the fire at that point. I'm assuming you meant 18" long, rather than cross-section. If you did mean cross-section, you'll need a truly HUGE fire. Still, to heat a piece of 1/2" square bar for a full 18" of length will take a pretty good-sized fire. It will need to be 8" or more deep for the entire 18" length, which will consume a lot of charcoal. You might want to consider planning your work so you only need to heat a section 4" to 6" long at a time in order to conserve fuel. I'm sure you already know this, but I'll include it for others reading this who might not know. Charcoal briquettes, which are made of compressed charcoal, raw wood, coal, dirt and old tires etcetera is useless as a forging fuel. No amount of it will ever reach welding heat and it is filthy to work with. You need good REAL charcoal made from nothing but wood. The denser the wood, the better the charcoal it will make, as a general rule. Damp charcoal will make more sparks and will cost you heat as it use calories to boil off the water. As for the tuyere for charcoal, I use a grate with several 3/8" holes in it. Real charcoal makes no clinker, so you can use small holes. If you are dt\etermined to heat long lengths of stock, then make a tuyere that is longer with a couple rows of 1/4" or so holes. Charcoal seems to prefer an air blast that is high volume as opposed to high pressure, so have plenty of air holes. A steady blast will produce much higher heat than short furious blasts. The charcoal forge I use is made from an old 100# propane cylinder. It is 14" diameter by 9" deep, with cutouts in the rim about 2-1/2" opposite each other to allow stock to be put level into the heart of the fire. My tuyere is 1-1/2" pipe to a flange with a 3/8" thick grate with 3/8" holes, about 10 of them, if I recall. I used to use a crank blower but changed to electric to get the controlled, steady blast that charcoal needs to develop high heat. That's my experience, your mileage may vary of course. |
| vicopper - Wednesday, 10/08/03 17:54:37 EDT |
|
i am in the prosess of makeing a baton, my costomer wants it make out of the strongeist metal possible what should i use? |
| seth - Wednesday, 10/08/03 18:41:24 EDT |
|
Seth, Probably tubular chromoly 4130...but why? You're not gonna' drive a truck over it. |
| Frank Turley - Wednesday, 10/08/03 19:57:23 EDT |
|
Seth, a boton, as it what a cheerleader carries? Or the little stick some Officers carried? If so use something light like aluminum tubing.... |
| Ralph - Wednesday, 10/08/03 20:00:03 EDT |
|
Seth, I think that police batons are made from either aluminum or titanium. Obviously, baseball bats are aluminum. Either way, you'll need to heat treat it, and also choose the correct alloy. I am not really familiar with nonferrous metallurgy, so I am note going to bother with suggestions. I will however mention that to a metallurgist "Strongest" means ultimate tensile strength. However, your customer may really mean something else like "hardest", "toughest" or "best material for the job". Generally "best material for the job" is the way to go, but this requires an understanding of the intended application. For example: Does the customer intend to use the baton as a personal defense tool, a ball bat, something to bang against fences with, or is it going to hang on a wall or sit under the local bar. I've been assuming this is a short baton, like that used by the police, but it could be a long like a staff. Also keep in mind that weight is important. Tungsten is probably one of the strongest metals, but it is also very heavy. So it seems to me that you need a bit more information to satisfy your customer. Good luck. Patrick |
| Patrick Nowak - Wednesday, 10/08/03 20:12:47 EDT |
|
Seth, If money is of no concern try titanium. It is very light and very strong. A bit difficult to forge, but some grades cold work ok. Guru or others, am making a general purpose blacksmiths hammer for myself. Wonder as to best hardness in C1050 for a hammer to be used only on hot steel? Samples quench to Rc60, need to temper back, looking for ideal for long life and best face surface retention. Thanks |
| jeff reinhardt - Wednesday, 10/08/03 20:15:41 EDT |
|
I am anticipating the arrival of an which will need some light cleaning - what's the best way to remove dried drool? Belt sander? |
| - adam - Wednesday, 10/08/03 20:30:10 EDT |
|
Do any of you know how to finish osage orange? Had I been smarter, I would have bought more than enough for the one knife handle that I have installed and I could have tried different treatments, but alas and alac... |
| anvilboy - Wednesday, 10/08/03 21:03:12 EDT |
|
Vicopper, Awesome response! Thank you, thats exactly the information that I was looking for. Concise yet detailed. You've given examples with the principles involved... now its up to me to create my own forge using those principles (don't tell me 'how' to do it, just what I need to consider while doing it). Cool. I made another knife from 3/4 cable again... then got creative, and ended up butchering the poor thing... well, I've got 65 more feet of cable to go...! Is there a place on this site that is like a gallery for *CSI MEMBERS* ? Was thinking that I could post a pick of the first one I made... and other worthy ones to follow... Going to set up the first annual "Trucks-Driving-Over Batons Rally International Invitational Spectacular"... |
| Rodriguez - Wednesday, 10/08/03 21:08:15 EDT |
|
Thanks in advance for the osage orange information. Wife needs to use the phone - still on dialup... |
| anvilboy - Wednesday, 10/08/03 21:14:00 EDT |
|
Anvil Boy: I like to use Tung Oil, on my Osage. Now, that is not related to what Adam has done to my anvil! Anyways, I use several coats, with a good buffing with OOO steel wool in between coats. Now remember, when shearing them steel sheep for your wool, to make sure the sheep is properly grounded so as to prevent shock! I better stop now before I get too carried away. :] |
| Bob H - Wednesday, 10/08/03 21:21:41 EDT |
|
Rodriguez - The only photo gallery is the Yahoo Anvilfire Ussers Gallery, open to all who visit here. In practice, it seems to be mostly CSI members who use it. Click on the drop down menu and look for Users Gallery. I'm looking forward to seeing the results of your efforts. |
| vicopper - Wednesday, 10/08/03 22:14:50 EDT |
|
Jeff, On my truck axles, I harden in water, then put the head in the vise vertically, face up, and try to do a "rim temper". It's hardly ever perfect, however. After removing scale from the face, I forge a turned eye on 7/8" or 1" square bar leaving enough straight for a rein (handle). The eye just fits around the face. I take a sparking heat on the eye and drop it over the hammer head using it as a heat conductor. When the center of the face is a dark straw (465şF), I quench. Works for me, although I don't have a Rockwell tester. The old books say the face should be straw to keep it for "hollowing" in use over time. |
| Frank Turley - Wednesday, 10/08/03 23:25:33 EDT |
|
|
|
|