If anyone is interested, there is a study being conducted in Australia at the University of Wollongong on the health effects of welding fumes. Should have been done a long time ago, I guess. The article I read is at the following address:
http://www.myfen.com.au/articles/Welding-fumes-a-serious-OH-S-issue_z61989.htm
|
|
Craig
- Sunday, 10/07/07 23:20:54 EDT
|
Ries, thanks for throwing those names out there. I checked out all their websites last night. My interests run more toward bladesmithing, so I'm not really familiar with modern artist-blacksmith work. There's some very impressive stuff on those pages.
|
|
Matt B
- Monday, 10/08/07 09:54:15 EDT
|
Going back to Friday and Antimony, pure antimony has a melting point of 630.63 degrees C, or 1167.1 degrees F per info from Los Alamos National Labs. I don't think anyone is using that for spitting lead.
For reference the same source lists the melting point of lead as 327.46 degrees C, or 621.4 degrees F.
There are low melting point metals, that could be used for such an act - I believe McMaster Carr sells some of them.
|
|
- Gavainh
- Monday, 10/08/07 12:31:29 EDT
|
I was asked by a potential buyer if I could make a glass blowing furnace out of a 50-lb Freon bottle. Technically it would be within my capabilities with say a 6" x 6" opening in the upper side. Inside would be roughly 10" x 14" with 1" Durablanket. However, my only experience to glass blowers is at artsy-fartsy shows where someone is using glass rods to make figurines and such. Would it be a practical furnace for a hobby glassblower?
|
|
Ken Scharabok (Poor Boy)
- Monday, 10/08/07 12:53:13 EDT
|
I have Fe2O3(rust) and want Fe3O4 or magnetite. Does anyone know a reliable way to make this, or would it simply be easier to get magnetite?
Thank you
|
|
- Chem geek
- Monday, 10/08/07 12:59:45 EDT
|
Ken, The glass blowers that use a furnace are melting a pool of glass in the bottom. This is WAY different than a forge and way different than table top glass blowing even on a small scale. The bottoms are hard refractory lined and sealed with something that does not dissolve in the glass and discolor it. When melted, glass is a more universal solvent than water.
|
|
- guru
- Monday, 10/08/07 14:12:35 EDT
|
Chem Geek, This is way over my head. Somewhere in the packed up part of my library I have a set of books known as The Chemical Formulary. The method MIGHT be there. However, the indexing is poor and you have to go book by book. They include common and new methods including patented processes for producing everything from face cream to explosives. It is a reference set for commercial chemists and manufacturers.
One review says ". . 15 volumes from 1933 to 1957 with recipes for everything from pyrotechnics to vegetable soup! Includes recipes for hair die. . "
Amazon.com has a listing.
|
|
- guru
- Monday, 10/08/07 14:20:05 EDT
|
If I'm not mistaken, scale is magnetite. Heat steel (or rust) in a forge, and you'll get it. Any blacksmith should have plenty -- in fact it's my most consistent product (grin).
|
|
Mike BR
- Monday, 10/08/07 14:32:33 EDT
|
Glass blowers actually use up to 4 different kinds of heating devices.
Furnaces, which is what the Guru refers to, are for melting hot glass, and keeping large quantities of it molten. These are almost always vertical in format, and made from castable refractory.
Glory Holes are much like forges- horizontal furnaces that are usually used to keep a piece hot while you are working on it- I would guess this is what Ken was asked to make- and they are often made of insulating blankets like Kaowool.
Then there are Garages, which are also for keeping stuff hot in between working on them, more like a kiln with garage doors, and Annealing ovens, which are usually electrically controlled kilns.
You can see examples of them at www.hubglass.com and at www.denverglass.com both of which sell commercially made versions.
Since a commercial glory hole can cost 3 grand quite easily, I can see why somebody would ask Ken if he could make one for a few hundred.
|
|
- Ries
- Monday, 10/08/07 18:59:58 EDT
|
I'm a mechanic, not a metal worker, but my mouth has gotten me in trouble. I need to make repetitive bends (curves) in 1/4 x 1 1/2 HR steel, about 38 inch radius, pieces about 33 inch long. Which would serve me better, to make a wooden or metal form to bend it over, or to build a ring roller.
|
|
Rentaratchet
- Monday, 10/08/07 20:51:23 EDT
|
Gallium has a melting point of 85.5�F. and a boiling point of 4,357�. It is used for semiconductors.
|
|
Plato
- Monday, 10/08/07 21:46:42 EDT
|
Nelson,
As a coal forge blacksmith, I would soak (without blower) the springs in a reasonably hot coal fire. That shoud bring them to hardening temperature, evenly thick to thin, without much trouble. You can handle them with a simple wrap of baling wire. If the wire get hot, it won't abstract heat from the springs. You might also handle the springs with red hot tong jaws. Same principle. Quench in oil. Guru's idea of tempering on a hot block is good. Put the thick side of the springs on the block. Draw to a pale blue or "ocean green".
|
|
Frank Turley
- Monday, 10/08/07 21:49:33 EDT
|
Can anyone point me to info on a Little Giant No. 1 punch/shear combination machine. This is a hand operated model. Specifically, I am looking for the punch and shear capacity.
Bernie
|
|
Bernard Tappel
- Monday, 10/08/07 22:04:08 EDT
|
I had to straiten a 1/2" piece of steel today that was part of a bent Itch to tow a trailer. After heating the part with my oxy Acetelene torch I could not find a tool strong enough to bend it back in place I bacially did it wiht my hammer.
For some reason I felt that i was doing it the hard way. It was warp, all I would have had to do it my wrench was strong enough was to bring it back in it's original position by forcing it back in the righ place.
Any suggestions?
|
|
dan
- Monday, 10/08/07 22:22:10 EDT
|
dan-- trailer means road means other vehicles with passengers endangered if that hitch you torched fails. (Or is this just for farm and ranch use?) You insured, licensed, bonded, insured, AWS-certified to do this kind of work? If not, my suggestion is: you get that trailer-- on a trailer-- to a shop that is, and pronto.
|
|
Miles Undercut
- Monday, 10/08/07 22:44:11 EDT
|
Manual Shear Punch: Bernard, Centaur Forge recently carried a popular line of these but they are no longer in their catalog. I'm afraid these old manual tools are becoming a thing of the past.
Is there a particular reason you are looking for one of these old manual machines? They had to be solidly anchored and required a LOT of force on a long handle to do their jobs. Punch presses and iron workers replaced these machines when small motors became common. While a small ironworker is not cheap they turn out a LOT of work with no manual effort other than feeding the stock. Tooling for punch presses is not of the quick change manufacturer made variety but the machines are cheap and can be setup for dedicated use. However, if you use two die sets, one for shearing and one to hold standard punches and dies you can change tools in a few seconds. You can use punches with a die holder only but it takes careful alignment each time it is changed. the same dies sets can be used in hydraulic presses and flypresses.
|
|
- guru
- Monday, 10/08/07 23:22:20 EDT
|
Trailer Work, straightening parts: Dan, listen to Miles.
While truck bumpers and trailer frames do not look like much their shape is designed NOT to bend. The steel is also often a higher strength grade than common mild steel. The combination is TOUGH.
The easiest way to handle parts of this type is to take them OFF the vehicle. Then on a weld platen (AKA Acorn plate) anchor with dogs and chains, then heat to a low red and use a long pry bar to ease it back into shape. You can also use a suitable press AND they make portable frame jacks that chain to the part and use a hydraulic cylinder to do the job.
Using the weld platen and pry bar technique I straightened a pair of heavy farm tractor front axles (like oversized Ford I-beam axels) in about 5 minutes. The farmer said he couldn't believe it. . . (he had tried). I even had some bright orange paint to cover the burned paint. . .
|
|
- guru
- Monday, 10/08/07 23:34:48 EDT
|
"Yes. Note that while grill components are low pressure I believe the hoses are designed for worse case situations where liquid fuel gets in the lines from tipped over bottles. This can result in much higher pressure than the regulator is set to. Go to the dealer read the label and ask questions."
I'll do that. Thanks for the information, everyone!
|
|
mike3
- Tuesday, 10/09/07 03:54:25 EDT
|
I need to forge a tiny part. It is a new pin for the buckle of the collar for my dog. He has bent the old one which was just a stamping. This is a weak point in the collar which is otherwise pretty well made for a Chinese product. Any suggestions for something so small with that turn at the bottom? I have some small stock which I can draw out small enough.
|
|
- philip in china
- Tuesday, 10/09/07 08:01:18 EDT
|
The last chapter of the story about my new anvil is that it finally arrived. I still have not had the final bill for duty, customs inspection charges etc. I am absolutely delighted with the anvil (and the other few bits and pieces). As you know I have absolutely minimal facilities here. What is the best way to fasten a 280 pound London Pattern anvil to a tree stump?
|
|
- philip in china
- Tuesday, 10/09/07 08:03:58 EDT
|
as of late i have come to truely realize, that my blacksmtihing abilities are limited because i have no way to make a weld. i have no welder, and i'm using a forge which doesn't get hot enough to forge weld. so right now i guess i'll have to stick with "S" hooks and drive hooks. maybe a cindle holder or two. BUT I NEED A WELDER!!!!
Jake
|
|
- jake
- Tuesday, 10/09/07 08:36:13 EDT
|
phillip in china: I would simply use part of a nail. Heated to above red should be workable with a neddle-nosed pliers for the loop. Other end might be worked cold. Perhaps heat to about 400 degrees F and quench in vegetable oil to try to give it a bit of rustproofing.
I suspect on that large of an anvil gravity will do wonders, so you may just have to use clips at the corners to keep it in place.
|
|
Ken Scharabok (Poor Boy)
- Tuesday, 10/09/07 08:51:22 EDT
|
Jock:
I have one of the Little Giant NO 1's that I picked up in a package deal with some other equipment from an old shop. I was just trying to find out a little more about the machine and it's capacity. You are right, it does have a LONG handle and the handle is not removeable like the one on my Edwards 10b.
|
|
Bernard Tappel
- Tuesday, 10/09/07 09:35:22 EDT
|
Jake, I knew a guy who had his troubles welding. He told me that he became one helluva riveter.
|
|
Frank Turley
- Tuesday, 10/09/07 09:36:52 EDT
|
8500 original sketches and plans with matching photographs of the respective workpieces, further some literature, decorations and the diploma of Otto Schmirler (located in Vienna, Austria) for sale. Please make me an offer per email if interested.
|
|
Rene Winkler
- Tuesday, 10/09/07 10:55:06 EDT
|
frank that is a good point. but in order to make the tools required for proper riviting and maknig tenons and things liek that don't you need to be able to weld to make the tools?
JAke
|
|
- jake
- Tuesday, 10/09/07 11:28:41 EDT
|
Chem Geek,
Just curious what are you aiming at? Thermite?
I have been looking @ Thermite myself, not sure if it is pratical or safe enough, but for a rural shop without electricty or a torch it sounds tempting for flat metal.
|
|
- Roger
- Tuesday, 10/09/07 12:26:56 EDT
|
Making magnetite from rust: it's a lot harder to make magnetite from rust than rust from magnetite. Why do you need magnetite? If it's for smelting you can smelt the rust. If it's for a different use I'd look for a source of magnetite---it's sold for pollution control purposes quite cheaply. For small ammounts most smiths have a pile around the anvil/triphammer---I sweep mine into a coffee can to reuse next time I do a smelt---just to keep my "frugal" chops in!
Thomas
|
|
Thomas P
- Tuesday, 10/09/07 12:30:41 EDT
|
I don't know why, but sometimes scale looks crunchy and crumbly.. never been tempted to try it out. Gotta stop forging without breakfast.
|
|
- Nippulini
- Tuesday, 10/09/07 12:53:04 EDT
|
Guru/Thomas,Thanks for your advice i was thinking something kind of similar and your right the cuphilted rapier is ideal it will give me plenty of surface area to work with. I also so decided i will get an existing blade(plain) so that i can add a small piece of my own engraving, don't worry i've been practicing alot and i've really got the hang of it. I'm just starting the design process now which will be fun coupled with all the amazing stuff i'll be able to put in my notebook as research. I have n't read that book but i have seen plenty of examples of magnificent repousse armour,the thought did cross my mind but even im not that crazy,ive settled instead for a simple bowguard for my next project,but im getting ahead of myself. I will have to get on to my local library for that book or the bookshop. Thanks again and im sure ill be back to ask you lots more questions.
Fiona
|
|
- Fiona
- Tuesday, 10/09/07 13:55:37 EDT
|
Hi Miles,I decided to go another way and get the blade ready made,not that im not willing to give it a go but i have a million other projects and ill end up having a nervous breakdown if i dont stand back and admit when im complicating the hell out things.There are alot of things i just can't do.lol. Thanks for the vote of confidence though.
Also theres a Blacksmiths in Ballymurphy about an hour from where i live.I keep meaning to visit although im not sure if its still open.
Fiona
|
|
- Fiona
- Tuesday, 10/09/07 14:23:24 EDT
|
Ptreeforge. Hi there i think thats fantastic that you've taught your daughters the art of forging, unfortunatly in Ireland the art of forging is a dying trade. Its such a small country too which dosnt help. It seems like there are so many places in America and i suppose that its such a large place that you could find almost anything. thanks for getting in touch and i'll keep you posted.
Fiona
|
|
- Fiona
- Tuesday, 10/09/07 14:35:04 EDT
|
Fiona, If you are looking for a blade give the foum 'British Blades' a try, there are dozens of custom blade makers, and they will be able to point you to a supplier of 'ready mades'
http://www.britishblades.com/home/index.php
There are still loads of good smiths in Ireland,(I think artistic smithing is increasing in populatirty in the UK & Ireland) most notible is 'Bushy Park Ironworks' (you can google them) - They are Dublin way, The owner Colm is a nice bloke and im sure he would give you a tour, I recall (we were having a few beers at the recent BABA conference, so the momory is hazy! ) hes got at least 10 blacksmiths full time employed (which in smithing terms is a massive business :)
|
|
- John N
- Tuesday, 10/09/07 15:49:59 EDT
|
Dear Guru,
Thanks for your time.
I'm a very amateur smith, and I would like to know the feasibility of case hardening cutting tools made from mild steel, specifically woodworking chisels. From what I've read, Japanese chisels are made by forge welding a piece of high carbon steel, which formes the cutting edge, to a wrought iron backing. The advantage, supposedly, is that a)there's less high carbon steel to sharpen, so the process goes quicker. b) the softer backing supports the harder cutting edge, allowing it to be heat treated harder than european style chisels (and so with better edge retention)with less chance of cracking or chipping of the cutting edge during use because the softer backing supports the more brittle cutting edge. Now, my question is wouldn't deep case hardening achieve the a similar result? Because woodworking chisels are only sharpened from one side, the outer cutting edge would always be the hardened steel, and you would retain the low carbon steel inside with the same supposed benefits. I came across a vague mention, in an old book, of native americans only sharpening their tomahawks on one side, and the author speculated it was because they were case hardened. Is there any validity to my thinking? Thanks in advance for any information
|
|
Gavin MacRae
- Tuesday, 10/09/07 15:51:43 EDT
|
Gavin, The story about trade knives comes from Alex Bealer's The Art of Blacksmithing. I guess some think books published in the late 1960's are old. . . Hard to tell if this story is true. However, case hardening only makes a very thin hardenable layer. The layer is also not homogeneous, the amount of carbon decreasing with depth. See our Case Hardening FAQ.
Most steeling techniques were developed when steel was very rare and expensive compared to wrought iron. Almost as soon as good steel became relatively plentiful the practice stopped except in some cases of traditional manufacture and where it made a great difference in the durability of the part. In the case of the Japanese smith many things they do are strictly due to tradition. Usually the same fellows that follow these traditions also make and refine their own steel. If you want to follow tradition, follow all of it.
If you want a better more durable tool use a modern alloy steel.
|
|
- guru
- Tuesday, 10/09/07 17:30:21 EDT
|
Anvil and Stump: I like both portable so I use semi-circular pieces of wood fit between the feet. The anvil just sets in between the pieces which are attached with a couple nails and at least one lag bolt.
Others like their anvil tight to the stump to help reduce ring. You can glue it down with silicon bathtub caulk, OR glue and bolt it down. Most bolted anvils use a bent or angle iron clip bolted to clamp down on the heal and toe of the anvil (under horn and heel). The old Peter Wrights had a flat on the feet for this purpose. If you are patient and let the silicon set at least overnight you will find it difficult to separate anvil and stump.
A "traditional" method of attaching anvils to stumps is forged staples driven into the wood over each foot. It is a lousy method and it is common to see several staples that have been cut and replaced as anvils changed or there was a need to remove it from the stump.
I have a Hay-Budden that has two 3/4" holes drilled in toe and heel. It MAY have been a factory mod as this anvil is a very early anvil with farrier's features. Since the holes break through on 45° inclines I doubt it would bolt down well. However, it would set on two pins driven into a stump and not move around.
Fisher and some other cast anvils had bosses with bolting holes on the feet. Some were recessed, some protruding (late Fisher).
|
|
- guru
- Tuesday, 10/09/07 17:47:57 EDT
|
Gavin,
I remember reading a supposition that blades were only sharpened on one side of knives etc traded to the Native Americans because the folks making the trade goods had welded the small bit of steel to the side of the blade not in the center. If sharpened on both sides it would have exposed the soft iron after several sharpenings. I do not recall who wrote this.
|
|
ptree
- Tuesday, 10/09/07 18:12:17 EDT
|
Fiona,Certainly in the US blacksmithing has made a resurgance, and I expect that the same is true in Ireland. Indeed it is true that the US has many places, and indeed is quite large. I was very surprised when I went to Europe in the '70s as I could hop a train and cross several countries before lunch. To simply drive from the lower end of my State where I live to the northern end takes ALL day. And we have 50 states, some smaller, and several that are probably bigger the Ireland. The thing is that we are often very spread out. I suspect that you can easily hop a train and visit a blacksmiths shop and be home in a day.
Good luck, and by the way, Irish folks fleeing the famine settled much of my area, including the Fitzgeralds, my Da's Ma's maiden name.
|
|
ptree
- Tuesday, 10/09/07 18:19:06 EDT
|
Roger,
I am trying to make crucible damascus steel for my chemistry class, and I read that much of the iron ore from india was magnetite, so I figured I would try to use that to get the formula closer.
Thanks for all the help and answers on everyones part, I really appreciate it
chem geek
|
|
- chem geek
- Tuesday, 10/09/07 18:35:57 EDT
|
Gavin-
As a former Timber Framer with 10 years of the trade under my belt I have to say that all of the chisels I used, and all those my friends used, and all those used chisels I have seen at antique stores and flea markets, were sharpened on both sides. The thing is that the flat side might not look like it gets much attention, but proper sharpening technique is to polish the flat side on a superfine stone each time you sharpen the bevel side. Your chisel is only as sharp as the back is flat and smooth. This added up to about 1/64 to 1/32 of an inch of wear on each chisel per year depending on use. That's for full time heavy use, but even on a hobby grade chisel you will quickly wear thru case hardening. Not to mention the lack of stiffness of mild steel if the chisel is to be struck. Stick with high carbon alloys.
|
|
Jud Yaggy
- Tuesday, 10/09/07 18:50:39 EDT
|
Gavin, you can get .015 / .020" case hardening on mild steel, so if you 'ding' the chisel and regrind it youve lost your edge. Ive never had much (any) joy with the 'case hardening powder' you can buy for home use.
As jock says for a 'user' tool start off with a known tool steel, or use an old file / farriers rasp & oil harden / temper.
|
|
- John N
- Tuesday, 10/09/07 18:54:08 EDT
|
Chem Geek; Dr Feuerbach in her thesis "Crucible Steel in Central Asia" postulates that blooms from a bloomery were used as the raw material for wootz damascus steel.
I have used both red and black oxidies of iron in bloomery smelting and have not noticed much difference in the end product.
How were you planning to smelt the ore before you melted it in the crucible for wootz?
Thomas
|
|
Thomas P
- Tuesday, 10/09/07 19:04:31 EDT
|
chem geek: You need to learn about the effects of vanadium on damascus (ie, wootz) steel. The iron ores used in India for Wootz apparently had a lot of vanadium in it. When this ore was exhausted, the wootz steel business died.
|
|
quenchcrack
- Tuesday, 10/09/07 19:18:42 EDT
|
Thomas- I was under the impression that magnetite was the smelted iron from the ore. Is that not true? (man i would feel stupid if that was the case) If you have any good ideas for how to smelt it, if I need to, I would be glad to hear them. Otherwise, I will do more research and find a way.
Quench Crack- I have read about this also, and I have compiled a list of some of the different compounds in it, like cobalt nickel vanadium silica carbon and others. My plan is to melt these in when I am melting the magnetite in the crucible. Is this not a good plan? I could not see why not but if anyone knows more than me please speak up, I love learning especially when it is not because of my mistakes. ;-)
It is worth mentioning at this point that I am a budding chemist and blacksmith (if even that) and am facinated by the stories of damascus. I am trying to create it with limited knowledge about everything involved. Anyone that would like to comment, I would appreciate it very much. Thank you all for the knowledge that you share here.
chem geek
|
|
- chem geek
- Tuesday, 10/09/07 20:28:33 EDT
|
Chem Geek: I am glad you are in a school system where you can still do projects like that. The lab safety gurus have just about destroyed lab based chemistry instruction.
Red rust is Fe203 (iron III oxide) Magnetite is Fe3O4 which is Iron in the 8/3 oxidation state oxide. The roman numerals don't work very well for fractional oxidation states. Both are oxides. Magnetite will eventually, in the right circumstancws further oxidize to red rust.
John Odom, Retired Chem teacher.
|
|
- John Odom
- Tuesday, 10/09/07 21:07:03 EDT
|
One thing further: some folks don't like fractional oxidation states, and point out that Fe304 is an equimolar mixture of Fe0 (Iron II Oxide) and Fe203 (Iron III oxide) in a particular crystaline structure.
|
|
- John Odom
- Tuesday, 10/09/07 21:11:34 EDT
|
Chem Geek,
Magnetite is an ore from which you can smelt iron. After you've smelted that iron -- as in a bloomery -- you can try melting it in a crucible (with a carbon source and a carbide former like vanadium -- a small piece of any number of tool steels will do) to make wootz. If you want to skip the smelting step, you can start with some old wrought iron.
Be thankful that your chem teacher will let you try this.
|
|
Matt B
- Tuesday, 10/09/07 21:53:05 EDT
|
Jake,
There are a multitude of mechanical fastening methods that can be employed in place of welding. Rivets, collars, twists, etc. The tools required to do riveting are nothing more than a punch and a hammer. The punch can be made easily with no need for a welder. Many older punches and other top tools such as chisels, fullers, swages can be made without any welding at all.
Tenon swages can be made from heavy enough stock that all you do is draw out the material in the middle to make the handle/spring. No welding required.
When I think about it, almost all the tools necessary for traditional joinery can be made with nothing but traditional joinery; no welding required. Sure, a welder is quicker and easier in many cases, but the point is, it *can* be done without one.
Learning to do traditional joinery is a necessary step in learning to be a well-rounded and competent smith.
|
|
vicopper
- Tuesday, 10/09/07 21:56:02 EDT
|
Guru, on anvil mounting, my 100# Wilkinson is mounted on a stump by the bottom center hole (is there a name for this?). I do this so I can spin the anvil to suit the task. Is this wrong? Should the anvil be set more permanently? Remember, I use this anvil for mostly light work so I really don't see the anvil bouncing or walking while I'm forging.
|
|
- Nippulini
- Tuesday, 10/09/07 22:05:35 EDT
|
My response to Rene Winkler re the Schmirler material...bounced.
|
|
Frank Turley
- Tuesday, 10/09/07 22:47:38 EDT
|
Frank, Send the mail to ralph.mayer@COUNTRY.COM
Our decryption system is still broken on these types of addresses. It took me a couple weeks to develop many years ago and fixing it, which may take as much time, has not been in the cards lately. . Most Sorry.
|
|
- guru
- Tuesday, 10/09/07 23:19:16 EDT
|
Nip, The center hole on anvils that have them is one of the handling holes for forging the anvil. There is no special name for the hole (that survives). Setting the anvil over a spike using this hole is an imaginative mounting. Nothing wrong with it, I had just never thought or heard of it.
|
|
- guru
- Tuesday, 10/09/07 23:22:32 EDT
|
Smithing in Ireland: Fiona, I agree with the others. Over the years I have been in contact with a number of blacksmiths in Ireland. There are many more there today than there was in my home state of Virginia, USA in the 1970's and Virginia is 150% the size of Ireland. Today there are many more blacksmiths in Virginia but most are still several hours of travel from one and other (on the World's most efficient highway system).
In little Costa Rica which has a third world economy, is a third the size of Virginia and little history of good ironwork (lots of bad arc welded stuff), I have met a half dozen smiths and there are AT least that many more we have not found. And with a very inefficient road system in a mountainous country most if not all are with a couple hours of one and other. In various countries of Africa we have had many contacts with blacksmiths. We are everywhere.
When you start looking and following up on finding folks in various trades you would be surprised at how many there are even in so called "dead" trades. It is like finding old tools. One may search for years to find an anvil and then once they have one they will find dozens more. It is one of those perversities of life. On the other hand, the Internet is wearing away at such things and finding things, people, information, is infinitely easier than it was even a dozen years ago.
Today, I spent about 8 hours in a hospital waiting room (a friend was ill, not my self), and almost every person there except children had a cell phone and ONE child had a toy cell phone that looked just like the real thing! Everywhere you looked there were people on their own personal phones. As recently as 5 years ago only a couple people there MIGHT have had a cell phone and 10 years ago none would have. This is a huge social technical change. The world is changing FAST and the cell phone and the Internet are a big part of it.
|
|
- guru
- Tuesday, 10/09/07 23:48:39 EDT
|
I've got more questions about the gas forge. How long would a fill of a 20 lb propane tank last using the burner design on the gas forge FAQ page (which is what I've been following), with a quite small forge (4x6x8 in. box size (192 in^3 volume))? Also, does one need to use that Kaowool stuff for the insulation/refractory, or is there any alternative? I don't like the idea since I've heard the stuff gives off some sort of nasty particulate, and I don't want to breathe that in. Could one build a gas forge with insulating firebrick?
|
|
mike3
- Wednesday, 10/10/07 00:52:58 EDT
|
Regarding anvils and stumps, I thought the tripod stand that Tom Clark has in his school worked well when I took a class there. I believe it is based on the Hofi stand, as shown on the iForge - Anvil Stands. The anvil appears to be held in place with small "keepers" at the four corners of the anvil that are welded to the base plate.
I recently received a new Peddinghaus No 12 anvil and planned on bolting it to a 1.0 inch plate that the 3 legs will be welded to. Would two 1/2 or 3/4 inch NC bolts torques into threaded holes in the bottom of the anvil be enough to hold it? A sheet of thin plywood or rubber might also be a good to help reduce the ring. I have stuck a magnetic ground clamp to the under side of the straight sided horn, which helped dampen the ring, but more would be appreciated.
Any comments or suggestions are most welcome.
-Bob
|
|
Bob Johnson
- Wednesday, 10/10/07 00:57:33 EDT
|
If you give a child an old cell phone to play with be sure to take out the battery(s). Recently one repeated dialed 911 on the one she had been given.
|
|
Ken Scharabok (Poor Boy)
- Wednesday, 10/10/07 08:40:08 EDT
|
Mike3,
I wouldn't worry about the particulates from the Kaowool, (as industry tests show it is not really a concern), and it is a much better insulator than even soft firebrick. In a small forge like yours, if insulated with two inches of Kaowool, you might expect a 20# cylinder of gas to last about twenty hours of forging at fairly high heat. If you constantly run at welding heat, then it will last less time.
If you're really concerned about both the particulates and efficiency, then coat the Kaowool with ITC-100. That stops the particulates and increases IR reflection, increasing thermal efficiency.
|
|
vicopper
- Wednesday, 10/10/07 09:15:34 EDT
|
The best thing I've found for an anvil stand is a four-legged metal stand with the anvil glued down using silicone construction adhesive. No ring, no movement, and four legs are more secure than three when you're dealing with a high center-of-mass object.
Also, using four legs allows me to have side shelves mounted on pivots on the stand. These are really handy for holding tooling, and can swing out of the way if I need to work under the horns on my Nimba. I got that great idea from Ralph Sproul, a terrific blacksmith in New Hampshire.
|
|
vicopper
- Wednesday, 10/10/07 09:19:29 EDT
|
Refractories: mike3, Almost all refractories have some problems. Except for dense fired refractories most produce some dust which contain some silicates which are a problem if you breathe enough long enough. Silicates are also a problem in sand that is used for processes where it breaks down into fine dust.
Kaowool is a relatively safe replacement for asbestos. It does result in a very small amount of dust particularly when used a very high temperatures. To reduce dust it should be covered with a product like ITC-100. Kaowool type products are used for the burner chamber in oil furnaces, to insulate fireplaces and in commercial forges and for fireproofing and insulating steam pipes in buildings (all uncoated).
About the only time dust is a problem is when rebuilding an old forge as it tends to build up behind and underneath the lining. At this time a HEPA type vacuum cleaner should be used to remove the dust and a filter mask worn during the process. Installers that work with the product daily or on large projects should also wear protective clothing and a filter mask.
There is no safer substitute for lightweight refractories. The alternative is to use a castable refractory which will also result in dust under use OR heavy refractory bricks. Both of these result in a much heavier longer to heat up forge.
|
|
- guru
- Wednesday, 10/10/07 09:23:27 EDT
|
Does anyone have advice on using an acid bath(I have muriatic acid) to remove scale from forged steel? I have many small scrolls and need to de-scale them before welding. I'm concerned that the acid, if not neutralized or rinsed properly, will cause the steel to rust afterwards. Thanks
|
|
mark
- Wednesday, 10/10/07 09:32:28 EDT
|
Want to know how to color steel/metal. Saw an interesting article where someone colored the hummingbirds which were engraved in steel/metal with shades of amber, red, blue and green with the colors sort of blending in places. Think they said some kind of acid or chemical was used to achieve the targeted coloring as casehardening was not mentioned anywhere. Thanks.
|
|
Tinsmith
- Wednesday, 10/10/07 09:51:31 EDT
|
Acids: Mark, Descale with the acid, rinse, neutralize with a baking soda (sodium bicarbonate) solution, rinse again. Be sure to have a plan to dispose of the partially killed acid.
|
|
- guru
- Wednesday, 10/10/07 10:43:09 EDT
|
Coloring Metal: Tinsmith, Coloring metals is specific to the metal and its condition (clean, tined, plated). On bright steel a little heat produces temper colors. Like the surrounding bright metal it must be protected from further oxidation and rust with a coat of clear lacquer.
A reoccurring crafty method of producing metal art is to use bright finished thin steel sheet that has a minimum of protectant and cutting it out with a fine oxyacetylene torch. In the cutting process you get black edges and a rainbow of temper colors blending away from the edge. Areas can be colored with the soft controlled application of heat. It is an art that requires practice but it is very fast. Afterwards the work is lacquered to prevent rust and loss of the color. While many TONS of metal art have been produced this way it is a short lived, compared to well finished metal, and hard to maintain product. Once it starts rusting it is not repairable. It is temporary art.
Bright copper reacts similarly but with different colors including a nice gold. It is much harder to protect. Titanium has the brightest of all the temper colors and they can be manipulated with a combination of chemicals and heat. However, the colors from heat alone are fantastic.
The methods of coloring metals are legion and as broad as chemistry itself. Machinery's Handbook has a few industrial methods. There are also books on gun bluing and patination. Most require rather nasty chemicals and all self preservation, health and safety warnings apply.
|
|
- guru
- Wednesday, 10/10/07 11:01:21 EDT
|
Anvils Hold Downs AGAIN: I repeat, I personally do not believe in bolting down an anvil unless it is for anti-theft purposes. All you need is something to keep it from walking or bouncing off the stand (which can be dangerous if it falls on part of your body or a sleeping pet). Unless you are setting up a VERY VERY permanent shop that only you or other people that use your exact anvil height you will move or adjust your anvil on a regular basis. I've moved anvils hundreds of times and within the same working space for different purposes and different users. Your anvil may set in the same place for years or be moved daily. I often move mine around to suit the size of the work I am doing an which forge it best for that work.
BLOCKING: I use blocks between the feet of the anvil. Others use strips of wood or metal surrounded the entire base of the anvil. The only disadvantage to this that I have found is that if you change anvils they often do not fit and the blocking must be changed (anvils get bought, sold, traded, upgraded but stands rarely go. . .). A nifty alternative to blocking is TGN's idea of a spike or pin in the center hole of an old forged anvil. Same idea, works well (except for rotation forces) and has the same minor problems. You COULD drill a hole in an anvil without one for this purpose.
WELDING: For all I care you can WELD your anvil to your stand. It has been done in the past and it will be done again in the future. It is fast, efficient and fairly permanent. Removal leaves those tell tale broken weld beads of grinding marks.
LEAD: They have also been leaded in (lead cast around the feet in a pocket then hammered to tighten) to reduce ringing. Not recommended in modern shops. Silicon caulking is used for this purpose today.
BOLTING: Many anvils have been modified for bolting by through bolts and a few came with bolting holes. I have yet to see one that had drilled and taped holes but it has probably been done as many have had the base machined flat on large machine tools and used as parts in machines.
STAPLES: The most common method used historically are spikes bent over the corners and forged staples driven into the stump. I have also hat to cut off bar wrapped over the feet and welded to a steel stand. These methods are commonly used because they are quick easy EXPEDIENT blacksmith measures.
CLAMPING: The second most common way of anchoring an anvil solidly is with clamps of some sort. These vary from flat plates pulled down at an angle with lag bolts to nicely forged or machined to fit step clamps for the heel and toe of the anvil.
STYLE: One of the most artistic clamping arrangements I have seen is in our iForge anvil stands article. Jim Carouthers used railroad spikes with threaded ends for nuts to pull them down tightly. I personally do not like all the clutter on the stand but the RR-spike hold downs are VERY stylish.
WEDGING: Wood or metal wedges could be used to hold the anvil down like putting dies in a dovetail. I've never seen this down but it would work.
You could even anchor your anvil with a big permanent magnet OR electro magnet. . . However, this might have a tendency to magnetize your anvil which in turn will collect scale and metal chips.
|
|
- guru
- Wednesday, 10/10/07 11:02:01 EDT
|
Chemgeek:
I have used straight magnetite ore in a graphite crucible to produce a crucible steel, be rest assured the end product is nothing near wootz! Matt B, Thomas P, and Quenchcrack are pointing you in the right direction.
|
|
Alan-L
- Wednesday, 10/10/07 11:18:02 EDT
|
Anvil hold-downs:
Nip, the big Hay-Budden in my local guild's shop sits on a pin in the base handling hole atop a sheet of rubber much like your setup. Lets the anvil cause premature deafness with no danger of it falling off.
I like the silicone caulk and clamp-down method myself, because I feel it helps retain energy from the hammer and it's quiet. In other words, it's more efficient since the anvil isn't wasting energy by vibrating around on the stand.
I have used this method on a 150 lb Peter Wright and a 220 lb Refflinghaus, both of which would pierce your eardrums if left unsecured. After the caulk and clamps, they sounded like a Fisher, i.e. just a dull thud. The Refflinghaus still wants to ring if struck on the tip of horn or heel, but at least it doesn't cause pain.
|
|
Alan-L
- Wednesday, 10/10/07 11:23:47 EDT
|
Chem Geek. you have to smelt the magnetite; it's only an ore of iron. Tai Goo, IIRC has smelted magnetite sand in a crucible to get iron/steel by heating it above 1000 degC with a carbon containing compounds. It's carbon monoxide at high temps that pulls the O2 off the iron to reduce it to metal. You will need to control the atmosphere of your heat furnace to make sure that O2 does not mess up this balance.
I smelt ironsand in a northern european bloomery to get wrought iron.
May I suggest you ask around the primal fires wootz forum or the swordforum.com metallurgy/bladesmiths forums?
Thomas
|
|
Thomas P
- Wednesday, 10/10/07 11:33:06 EDT
|
Melting in a crucible: this is not like melting wax. You will have to deal with considerable oxidation at high temperatures unless you create a slag to cover it. Depending on the slag type, you may still lose all your alloys to the slag. You have chosen a difficult project and it will require more investigation on your part to determine what slag composition you need and what % recovery you can expect on your alloys to assure there is sufficient alloy content to achieve the wootz structure. Go to www.steelynx.net and scroll down the menu on the left hand side. You may find a website that can be of some help (archeo-metallurgy comes to mind). Good Luck!
|
|
quenchcrack
- Wednesday, 10/10/07 12:53:40 EDT
|
Anvil hold-down:
My Fisher has bolt-down holes. Personally, I like mounting it to the stand. My stand is a contraption I welded together when I first got my welder. I just wanted something to weld up. You can see it here: http://ironringforge.com/HomeProjects/AnvilStandBack.jpg
There's a piece of wood between the anvil and the I-beam. That was to keep the I-beam from clanging, as the Fisher is a normally quiet anvil.
Anyway, the reason I like it bolted is it makes it easier for me to move around. I just use my two-wheeler to put it where I want it. Otherwise, I would have to lift the anvil off and find a place to set it down, Then move the stand. Then pick the anvil up again and put it on the stand. It's only 140-lbs, but that's enough to make me feel it the next couple days.
|
|
- Marc
- Wednesday, 10/10/07 13:26:24 EDT
|
Wootz: Try going here: add the HTTP in front of the colen ://dark.unitz.ca/~gthomas/myweb4/replication_of_wootz.htm
|
|
quenchcrack
- Wednesday, 10/10/07 13:38:18 EDT
|
If you can't get the paper to display, I downloaded a copy into Word format. I can email it to those genuinely interested (note: this specifically excludes the mildly curious).
|
|
quenchcrack
- Wednesday, 10/10/07 13:40:32 EDT
|
if i were going to buy a welder. what would you suggest for a semi-advanced blacksmtih.
Andrew B.
|
|
- Andrew B.
- Wednesday, 10/10/07 15:31:22 EDT
|
Anvil Hold-Downs: My eldest daughter is using chains for her little 50#. A round turn around the waist from each side with two chains, and then a lag screw into the stump through the ends of the chain on each side. Easy removal and adjustment. (Just for backup I gave her some steel for strapping, too, if she wants something a little more firm.) Still warm, but at least it rained at the farm last night.
Visit your National Parks: www.nps.gov
Go viking: www.longshipco.org
|
|
Bruce Blackistone (Atli)
- Wednesday, 10/10/07 15:35:21 EDT
|
Over Thinking: I walk 140, 200 and 300 pound anvils all over the shop ON THE STAND without having them bolted to them. . . . It is not a problem if you have a good stand design. I only use the box design shown in our stands demo.
In the shop I am working in now I inherited two stands, a steel stand, it is going AWAY with the anvil and there is a tippy laminated stand that had to be bolted to the floor. . IT is also going away. I have four of my box stands. They are light, stable, easy to move, easy to move anvil off and on and do not stick out and make a trip hazard like triangular stands.
|
|
- guru
- Wednesday, 10/10/07 16:04:37 EDT
|
I had a good look at Mr Uri Hofi anvil and 3 leg stand a couple of months ago, and it was remarkably stable.
My 330lb london pattern sits on a 'box' of 2 " thick pieces of timber, with an angle iron 'picture frame' round the top to stop it walking off.
Using a magnet is quite the silliest way to stop an anvil moving ive ever heard, other than perhaps putting somthing heavy on top of it.... :)
|
|
- John N
- Wednesday, 10/10/07 16:47:20 EDT
|
I noticed that my large anvil on a stand of 3 large wood baulks was working it's way over toward the edge. I repositioned it with a crowbar and it's now held in place with two sixteen penny nails, one in the center of the side cutout on both sides. Seems to be all that was needed.
Of course now the temptation is to take one of the smaller ones and tap the handling hole and make a screw with a large wingnut end on it to use with the steel stand, just bore the correct hole in it...
Thomas
|
|
Thomas P
- Wednesday, 10/10/07 17:02:33 EDT
|
Andrew, buy an AC 225 from Lincoln. Buy them at Lowes for about $265. Buy an AC/DC if you know how to really use it. I have one for sale in Houston, $200 including the wheel kit and two waterproof cylinders of rods.
|
|
quenchcrack
- Wednesday, 10/10/07 17:04:43 EDT
|
Anvil stands: I built an A-frame for my 167# German Pattern. It is held down with chains and 4 lag bolts. I built a shelf at the bottom and put a 100# block of steel on it to lower the center of gravity. It stays put with no ringing and the stand does not walk around. Ya'll do have access to 100# blocks of steel, don't ya?
|
|
quenchcrack
- Wednesday, 10/10/07 17:07:17 EDT
|
I'd like to bounce an idea off you guys...
Given the relative rarety and cost of a good leg vice these days, how effective do you think an offset vice, mounted on an upright length of 80lbs/yd rr rail or good solid RSJ, would be as a substitute?
|
|
Craig
- Wednesday, 10/10/07 17:11:18 EDT
|
The other day a friend asked about the assertion that laminated steel would be more crack resistant (like plywood) than homogeneous steel. I responded to that people who assert such things do so mostly because they like to think they can make better steel than the likes of Crucible, with their billion dollar mills, million dollar research programs, and high tech quality control.
Comments?
Just personally, I'd love to have a pattern welded (or wootz) sword to look at and hang on the wall or to use as a ceremonial sword, 'cause they look really cool, but for a blade I'm actually going to use, give me a blade of a known tool steel.
Quenchcrack - Great link on wootz.
|
|
John Lowther
- Wednesday, 10/10/07 17:11:25 EDT
|
On second thoughts... that stupid. An offset would... offset? the benefit of the heavy post. A nice wide engineers vice?
|
|
Craig
- Wednesday, 10/10/07 17:13:14 EDT
|
Mark,
I use vinegar for removing forge scale. An overnight soak followed by a light sanding/brushing works pretty well, and it's not a hazardous waste problem. (This is just the less-hazardous version of the process the Guru recommended.) Of course this probably isn't a very good method if you're in a hurry.
|
|
Matt B
- Wednesday, 10/10/07 17:29:18 EDT
|
Craig,
If you can't find a leg vise, look for a really big (200#) chipping vise. They're big enough to withstand some hammering forces. Modern cast iron vises are pieces of junk for the most part and won't tolerate any sudden forces at all.
A really big machine vise vise such as on a milling machine or shaper would be fine, but it would be a high crime to pound on one.
|
|
vicopper
- Wednesday, 10/10/07 18:15:46 EDT
|
Matt B,
Is killed acetic acid less of a haz-mat than killed hydrocloric acid, given that the same contaminants will be in both? I'm not knowledgeable enough about chemistry or enviro science to know the answer, but I'd be interested to hear it.
|
|
vicopper
- Wednesday, 10/10/07 18:18:25 EDT
|
"About the only time dust is a problem is when rebuilding an old forge as it tends to build up behind and underneath the lining. At this time a HEPA type vacuum cleaner should be used to remove the dust and a filter mask worn during the process. Installers that work with the product daily or on large projects should also wear protective clothing and a filter mask."
However what about during the initial installation for the first time setting up the forge? I'm not planning on going and cranking out forges daily, by the way. Would that one-off occasion still be so hazardous as to warrant the extra blow to the cash (and I am _not_ rich(TM), by the way.) trying to get the safety gear?
|
|
mike3
- Wednesday, 10/10/07 18:20:43 EDT
|
My gas forge (like many, I think) has a piece of kiln shelf on the floor, with kaowool underneath that. I guess you *could* build the walls and ceiling the same way -- kiln shelf on the inside for protection; kaowool on the outside for insulation. The door(s) would be tricky and might want to stay kaowool only.
A forge built that way would take longer to heat up and to respond to temperature adjustments, and the heat poured into the lining would be wasted as shutdown. On the other hand, the extra thermal mass might help heat large pieces faster. On a forge that runs all day, the longer heat-up and energy loss as shutdown might not be significant.
I agree with Quenchcrack on the welder. A MIG would be easier to use, but you'd probably need to spend $1,000 plus to get a rig heavy enough to weld everything you'll likely want to. You can also buy small quantities of small quantities of specialty stick electrodes (like hard facing or NI-rod) and switch over in seconds. With MIG, you'd need to buy a whole spool of wire (if what you want even exists), maybe buy a new gas cylinder to go with it, and go through a tedious change-over procedure.
|
|
Mike BR
- Wednesday, 10/10/07 18:27:02 EDT
|
Rich,
Come to think of it, that's a good question. I've never hesitated to pour rusty vinegar down the drain, on the assumption that it's basically water water and rust. But there *are* other alloying elements in most steels, so . . . ?
|
|
Matt B
- Wednesday, 10/10/07 18:31:32 EDT
|
Craig; at Quad-State I generally see 50+ post vises for every 200# chipping vise. In Ohio post vises were usually half the price of a standard size machinist vises at the fleamarkets.
I don't know where you are at but a postvise might not be such a difficult thing to find...I bought two 6"+ ones out here in NM for what I thought was an outrageous price US$75 a piece.
There is just no substitute for a good postvise
Thomas
|
|
Thomas P
- Wednesday, 10/10/07 18:45:57 EDT
|
John Lowther, glad the link worked. As far as laminated steel goes, I would think that it would be more crack resistant than a solid piece of steel of the same hardness as the middle layer of laminated steel. Typically, the hard stuff in laminated steel is Rc 64 which is technically harder than woodpecker lips. Now, don't go thinking I don't respect Crucible and modern steelmaking technology; it pays my wages, too.
|
|
quenchcrack
- Wednesday, 10/10/07 19:00:10 EDT
|
Vise Substitutes: Craig, One of the most important features of blacksmiths leg vises is that they are forged not cast iron. 95% of all machinist vises are cast iron, are rare few are cast ductile iron or low carbon steel. A MUCH smaller percent are forged steel vices. Ridgid tools sells the Peddinghaus forged steel vice and you can get a leg kit for it. It will set you back more than NEW leg vise or enough to buy 3 to 5 used ones. . .
Heavy old chipping vices (bench vices without roating base) are great tools when you find the 100 pound and UP models. Most are ductile iron or a high grade casting of some type. They will take SOME pounding and a lot of heavy use but they are still not a forged blacksmiths vice.
However, you can never have enough vices, says the man with about half a ton of them and always looking for more-better. All kinds are good but if you are going to do much heavy work using a hammer it better be a blacksmiths vise.
|
|
- guru
- Wednesday, 10/10/07 19:49:49 EDT
|
Thomas,
I'm in Australia, and I go to the local flea market nearly every second week, but never seen one there. They seem to be fetching between $150 and $200 on ebay (when they are on ebay at all). Given that the $AUD has almost caught up with the $USD in the last month or so, I wonder what the freight cost would be??? With the apparent scarcety of them here, I might stand a better chance of finding a good quality one from the US...
|
|
Craig
- Wednesday, 10/10/07 19:52:34 EDT
|
Waste Acids: Interestingly enough hydrochloric acid when properly killed leaves a few inorganic salts and whatever waste metal was dissolved. However, any organic acid mixed with various metals results in organic compounds and soluble metals. . . Neither is good. Almost all metal has some lead in it and that ends up in the waste.
|
|
- guru
- Wednesday, 10/10/07 19:53:57 EDT
|
Welders: A good 240V/60-90A buzz box AC welder will teach you how to arc weld and earn enough money to buy a more expensive welder. While MIG machines are nice they are expensive to maintain and do NOT like sitting for a long time. Wire rusts, gas leaks, electronic failures. . . and they have a habit of parts no longer being available. Leave a buzz box for 20 years and all you need to do is brush off the cobwebs and hit the switch. You might need to dry your rods. . . TIG machines are even more expensive, highly technical and you need lots of training to use one properly.
The high tech machines ARE money makers if you have the volume of work for them at a rate that justifies their replacement every few years. Go to any large welding shop where the owner just can't part with old equipment that MIGHT be repairable and you will find a small mountain of uselss MIG machines and components. . . OR go to a shop where someone buys welding equipment at auctions. . . and you will find an even larger mountain of useless equipment.
|
|
- guru
- Wednesday, 10/10/07 20:30:12 EDT
|
Mike, I said RE-building and LARGE projects. When, in the scale of humanity and a DIY project, is a bread box sized forge that might weigh 20 pounds a large project?
|
|
- guru
- Wednesday, 10/10/07 20:33:27 EDT
|
Craig, these items ARE more scarce in OZ for a number of reasons starting with the age of the country in colonial terms.
Shipping is going to be a fair bite unless you can wait a long time. When we ship books by surface, slow boat as it were, they take from 3 to 6 months.
NOW. . the thing to do is to come over here and buy a few tons of tools and books and ship them home in a container. You end up paying a fraction of a dollar a pound. . .
|
|
- guru
- Wednesday, 10/10/07 20:38:11 EDT
|
The best anvil fastening that I know about is in Holford's "The 20th Century Toolsmith and Steelworker". Two flat bars with a hole in each end are fit, one under the horn, one under the arch of the anvil, and sitting on the base. There is a slight overhang of the bars. Threaded rods attached below on either side of the anvil stand, go through the holes and are secured with washers and nuts. Little by little, I'm changing over from buried wooden stumps to steel boxes filled with sand. I learned about the sand idea from Otto Schmirler's "Werk und Werkzeug des Kunstschmieds." I like the idea that the sandbox stands are movable, yet they seem to stay put when the anvil is in use. I arc weld the threaded rods to the sides of the box. In New Mexico, we're usually close to "arroyos" (dry washes) where we can gather sand at will.
|
|
Frank Turley
- Wednesday, 10/10/07 22:09:08 EDT
|
Andrew: I too suggest a 230 volt stick welder to start out. The 115 volt transformer welders seldom work well enough to use, and a 115 volt invertor welder while usable is a good bit more expensive and has the potential for more problems as they have electronic components, and You might not be able to repair it Yourself. I must disagree with Jock, as there are quite a few 30+ year old TIG and MIG machines in industry still cranking out parts every workday, but they are more complex to maintain Yourself, and some of those old wire drives are plum whore out as they have fed literally many tons of wire. A setp above the Lincoln 225 "Toombstone" is the Lincoln Idealarc 250 or Miller Dialarc 250. Sometimes these can be had used for about what or less than what a 225 costs new. DC output while desirable is by no means necesairy for most work.
|
|
- Dave Boyer
- Wednesday, 10/10/07 22:24:06 EDT
|
Anvil Stand: I am using a Hofi style 3 legged stand under My 158# anvil. The top plate is steel 2" thick and the legs are 2x4x1/4" rectangular steel tube. This weighs 145#, and the 2" thick plate is a lower "anvil" for upsetting use when parts are a convinient length to use it. The anvil is fastened with bolts through angle iron that captures the anvil feet tapped into the plate. The 3 legs works for Me as the floor has a drain in the middle and is sloped to it. This setup is not tippy. When I get a suitable chunk of plate I will make another stand for the 350# Fisher. Nobody else works in My shop, so I don't need to change the hight.
|
|
- Dave Boyer
- Wednesday, 10/10/07 22:35:38 EDT
|
Guru,
HA! My Mrs would have a conniption if I parked a container load of tools in the back yard! And I think the conniption would turn into convulsions when I told her the price...
|
|
Craig
- Wednesday, 10/10/07 23:53:38 EDT
|
Craig, leg vices probably are nearly impossible to find in Sydney, but they do pop up regularly out in the sticks. I picked up a nice medium duty 4 1/2" one a few weeks ago. I bought it after seeing it at 3 markets in 3 weeks. Figured I was meant to have it. I was surprised it hadn't sold as it's all complete and in good nick. It's yours for $110 if you want it. I'm near Port Macquarie.
|
|
- Graham Moyses
- Thursday, 10/11/07 08:03:00 EDT
|
greeetings all. well it's almost christams time. and i've been trying to think what i can get for my son. he is a journyman blacksmith. he has his journyman papers from Sweden. i'm hinknig toolwise what he may want /need. i know this is rather vuage. but i'm at a loss here i've never done any blacksmithing before, so i don't know what's out there and what's useful or not. thanks for the help
Jonah
|
|
- Jonah
- Thursday, 10/11/07 08:40:00 EDT
|
Jonah,
In your situation, I would go with a gift certificate from a blacksmith's supply house. Scroll down on the menu list to the Advertisers Index and contact a few of them. That way, your son can get what he wants/needs with no guesswork involved.
|
|
vicopper
- Thursday, 10/11/07 09:39:28 EDT
|
Gifts for Blacksmiths: Jonah, It depends on his field and your budget. Books are always good if you know what he already has. The large book The Masters of Italian Ironwork is a very nice gift that many smiths will not purchase for themselves due to price. See our review.
If he is interested in tool making and bladesmithing in the U.S. (steel designations vary world wide) the ASM (American Society for Metals, International) has some references that are almost indispensible to the professional that does a variety of work with different alloys.
However, they are expensive and few purchase them.
The Heat Treaters Guide (to steel) is very good. For more general information the ASM Metals Reference Book is very handy for information about all engineering metals and has a lot of the heat treating information form the above but not in so much detail.
The first non-blacksmithing book I recommend to every metalworker is Machinery's Handbook. See our review.
If he is interested in the history of blacksmithing and buys lots of old tool then Anvils in America is the world's only anvil reference and a good gift. We sell a lot of these this time of year and folks buy it world wide.
Big BLU Power Hammers now has a series of blacksmithing Videos and MAY have some new ones before Christmas. See our reviews and their page for samples.
There are many others but these are at the top of my list. See our book review page for many others. Artisan Ideas sells most of them, We sell Anvils in America and ASM sells the ASM references.
TOOLS are a good but tricky gift. Some folks know exactly what they want and are willing to wait rather than have something different. Others are begging for tools of all types and if they have duplicates can trade to other smiths. And then there are the folks that insist on making all their own tools. If you are thinking tools I would ASK. However, here are some suggestions.
BlacksmithsDepot and maybe others sell a little 1" wide Hot Slitting Chisel made out of a super alloy (molybdenum air hardening alloy steel). They are long and thin and work fantastic. I've seen these little chisels burried in several inches of steel at an orange heat and still going. . . However, they ARE thin and can get damaged. It does not hurt to have more than one.
BigBLU Hammers has a 10 piece set of short fullering tools and punches designed for the power hammer but they work in all kinds of other applications. Sets of matching tools are rare in blacksmithing and these are nice. Big blue also sells punch and drift sets in four sizes.
In the area of tools you could spend anywhere from $10 to $10,000 . . . A new power hammer would make a nice gift to launch someone into business. You will need a LARGE Christmas tree.
Many of the blacksmiths tool dealers also have gift certificates.
|
|
- guru
- Thursday, 10/11/07 10:09:45 EDT
|
Quenchcrack, I can see how the three-layer laminate like some of the Japanese toolmakers and Scandinavian knife makers use can be a BIG advantage: Putting a layer of something that gets extra hard, like M-2 between two layers of an extra tough steel makes a lot of sense. However, most of the pattern welded blades I've seen have both steels present in the edge. . . I suppose that results in 'em cutting as though they were serrated, without all the complicated grinding, but. . .
|
|
John Lowther
- Thursday, 10/11/07 11:28:51 EDT
|
i have about a $100 buget set by my better half. and she doesn't want to spend much more than that per kid.
|
|
- Jonah
- Thursday, 10/11/07 11:32:38 EDT
|
Jonah
Ask your son for a list of what tools he could use from what suppliers. Same with books. One christmas my family did this with me. I received three very nice hardie tools I really wanted. They made me super happy at less than $100 dollars. They could have just guessed and spent three times that and not made me as tickled as I was with the gifts.
|
|
- sparky II
- Thursday, 10/11/07 13:05:46 EDT
|
thatnk you very much spraky i jsut asked him. and he said spring swages are what we really needs ..
Jonah
|
|
- Jonah
- Thursday, 10/11/07 13:21:08 EDT
|
One of the secrets of laminated steel is that carbon has a fast migration rate at welding temps, so for thin layers it's pretty much the same carbon content everywhere by the time you get a bunch of layers. (4 times to welding heat is often quoted) *Unless* you use something like pure Ni that blocks carbon migration; (but does not harden at all).
One reason pattern welded blades can be tougher is that they are really lower in carbon if you mix a High C with a Low C and they come to a weighted average somewhere in between. (why you may want to use two high c alloys to keep the C up there)
Now a simple San Mai (three layer) piece can get around that as you really should do it in a single welding session and gummy sides will help support a brittle center layer.
I have a personal belief that carbon migration helps keep a piece together in heat treat as there is not sharp demarcations between the alloys that will react differently and shear the weld. instaed there are gradual changes that don't concentrate the force on the weld as much.
Thomas
|
|
Thomas P
- Thursday, 10/11/07 13:48:01 EDT
|
Jonah, Blacksmiths Depot is the place for them and there are MANY types. Unless he said which type (details) you had better go with the gift cert.
|
|
- guru
- Thursday, 10/11/07 14:46:27 EDT
|
Plywood Cracking and Steel comparison. . : This is not a very good comparison. First, the alternating directions of grain in the wood prevents plywood from cracking or breaking. Wood being very directionally strong in nature.
In laminated steels you DO have directions of grain but this is not normally used in alternating directions. The layers, as noted DO have some advantages. When a soft ductile layer supports a thin brittle layer you get the best of both worlds. Consider how hard razor blades are (very). But due to their thinness they are very flexible. A thick piece of the same material would break rather than flex. Now. . if you surround that hard thin razor with soft mild steel you get a stiff blade with a VERY hard edge.
The trick to laminated blades is that there are many laminations and often different types of materials are used in different parts of the blade. Some is for hardness and strength and some for stiffness and decoration. The result is almost organic in complexity and the variations in design infinite.
|
|
- guru
- Thursday, 10/11/07 14:54:59 EDT
|
"Mike, I said RE-building and LARGE projects. When, in the scale of humanity and a DIY project, is a bread box sized forge that might weigh 20 pounds a large project?"
Well, it isn't. But I just wanted to be sure that it would not be real bad, that's all.
|
|
mike3
- Thursday, 10/11/07 16:24:50 EDT
|
Mike, The state of California classifies Kaowool as a known carcinogen along the same class as fiberglass insulation. Think about the ton or so of fiberglass that is installed in all homes, schools and public buildings, as well as the amount handled by installers. . . .
|
|
- guru
- Thursday, 10/11/07 16:44:24 EDT
|
Mike,In relation to Kaowool fibers. I believe that ANY thing fiberous inhaled, that is of the right size is dangerous. That is based on being an certified asbestos abatement supervisor for years. That said, the following is what I advise folks about the risks of asbestos and other fibers;
Asbestos is a naturally occuring mineral. Magnesium silicate. Occurs is relatively pure deposits in many places, and is a contaminant in many other minerals. In many parts of the world,including large parts of the US dust stirred up on a road way etc is asbestos containing. It has been used since recorded history practically. Man has know that it is bad to inhale the dust of asbestos since recorded history practically. It appears that mans natural defenses in the respiratory tract do a pretty good job against low doses. High doses overwhelm these defenses. Smoking overwhelms the defenses in a huge manner. Smoking and being exposed to large doses over time is very likely to cause an ugly death in a time frame of 10 to 40 years.
Kaowhool is a mineral fiber, and if broken up into the same size dust will also be inhaled. I do not believe that kaowool is of the same shape as asbestos. Asbestos fibers are hollow, and when friable they make nice aerodynamic shapes that float very well. I do not believe that kaowool has this same shape. The fibers that hurt you are too small to see with the naked eye. The dangerous fibers are 1 by 4 microns as I recall. The average human can resolve down to about 40 micron in good light. If however you can see dust from a friable source you can assume that smaller stuff is also present.
With that said, I do not and have never smoked. I avoid breathing ANY dust, of any material. I do breath dust with every breath all day, as dust is in the atmosphere. I do wear a HEPA rated half or full mask respirator when I know extra dust will be present. I do start my gas forge and leave the area for a few minutes as I see dust expelled in the initial light off. I do have excellent ventalation just above the gas forge. I do caot my forge with ITC-100 and try to maintain a good coated condition.
Your milage may vary.
|
|
ptree
- Thursday, 10/11/07 19:05:13 EDT
|
guru thank you for all the advise. i think the gift card is the way to go as well. i just ordered him a $50 gift card to blacksmthi depot and a $50 gift card to Centuar Forge. does that sound liek he can get some useful stuff. like i said i don't know what's useful and whats not. but i've heard him talk of centuar forge. and you pointed me towards blacksmtih depot. i hoep he's happy with it.
thanks again everyone.
Jonah
|
|
- Jonah
- Thursday, 10/11/07 20:33:38 EDT
|
FYI (For Y'all's Information), the main carcinogen associated with Kaowool (I have said this before) is NOT present when you first get it. It is present only after the Kaowool has been taken above a certain temperature -- somewhere around 1800degF if memory serves. It (the carcinogen) is CRYSTOBALLITE, which is some fairly unpleasant stuff as far as carcinogens go. What this means is that during installation and initial handling, the stuff is pretty much harmless -- no worse, as Ptree mentioned, than fiberglass insulation. After first firing, though, it becomes a hazard. ITC-100 is good. Kiln shelf might work, as someone described earlier. IFB (Insulating Fire Brick) bypasses most of these problems, but is quite a bit more expensive generally...
P.S. No, I'm not dead! And it's still hot and sunny in Kaneohe, Hawaii, with the Blue Angels screaming overhead...
|
|
T. Gold
- Thursday, 10/11/07 21:40:58 EDT
|
Graham,
We might want to have a chat about that there post vice...
I am in Sydney, so I don't know what that means for freight.
craig_sari@bigpond.com
|
|
Craig
- Thursday, 10/11/07 22:22:40 EDT
|
Hello. I recently watched John Crouchet's "The Fly Press" video and watched as he used a foot operated (hands-free) oxy-acetylene torch. Do you know who manufactures this unit and where I can purchase one? Thanks!
|
|
Mark
- Thursday, 10/11/07 22:41:23 EDT
|
Mark, The valving most people use for this is called an economizer valve and they are available from most welding suppliers. The valve is lever operated, opens and closes both gases and has a pilot light to relight the torch. There are many ways to arrange this device. The normal method is to just lay the torch on the lever. I think Pete Fells was the first to use one foot operated.
|
|
- guru
- Thursday, 10/11/07 23:21:43 EDT
|
Hello
do you think it's possible to make a japanese anvil ( for katana)
I find hard to mak ean anvil, what it is possible to make ?
thanks
Sam
|
|
Sam
- Friday, 10/12/07 02:03:07 EDT
|
Sam, a japanese anvil is basicaly just a very large heavy, rectangular chunk of steel. the ones i've seen were about...7" wide, 10-11" high, and about 14" long. i found a piece about that size in tool steel for a friend of mine at the junk yard. only cost about $20 it weighted about 80#. i think your question was about making one. i htink it would be eaier and cheaper to buy the piece of steel. theoretically i think you could make it by forging liek it used to be done. but it would be a waste of time in my opinion when you could jsut go get a piece..
hope that ranting helped Sam.
Andrew B.
|
|
- Andrew B.
- Friday, 10/12/07 08:24:53 EDT
|
Sam, See our FAQ's page, second article, Anvil Making. Also note what Andrew had to say. THINK before you obtain or make such a traditional tool. The Japanese used theirs buried in the ground, probably supported by a post or wood extending further into the Earth. The traditional smith sits cross legged at this anvil. This is a very uncomfortable position unless you have spent years getting used to it.
Otherwise, a good anvil is just a compact heavy block of hardened steel. Shapes vary and have developed over the centuries to what we in the West consider a "standard" anvil. A Japanese smith can make the finest blade on a Western anvil as well as their traditional anvil.
Now. . the Chinese use an anvil that is shaped like a well rounded loaf of bread. No flat face. They often have side arms for bending between or dished surfaces next to the domed forging surface.
|
|
- guru
- Friday, 10/12/07 09:07:04 EDT
|
i'll have to find a picture of those chinese anvils Guru. i've never seen one. have you used one before?
Andrew B.
|
|
- Andrew B.
- Friday, 10/12/07 09:17:06 EDT
|
Photos from our friends Sean and Phillip in China.
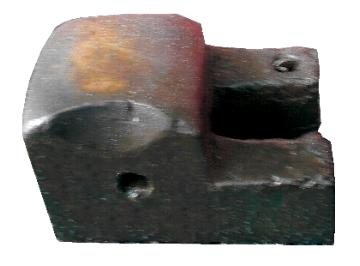
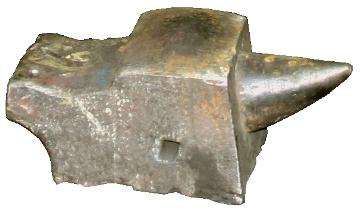
These are two different styles. The top one is said to be a fabricated box filled with low grade cast iron. The horn on the second is not a common feature.
No, I have not used one. However, smiths all over the world use crowned surfaces to increase the efficiency of their forging. We use the horn in many cases. I have seen a swage block in Pennsylvania with the concave corner section identical to the first photo.
|
|
- guru
- Friday, 10/12/07 09:43:01 EDT
|
that looks very interesting. how big are they do you know. they look rather small
Andrew B.
|
|
- Andrew B.
- Friday, 10/12/07 10:34:49 EDT
|
Hey guys ,Boy do i feel silly i knew there were a few blacksmiths in ireland but when you really look there are quite alot i just wasn't looking hard enough. Its also a very good point that blacksmiths in the U.S would be far apart i just never really thought about it,living over here you just forget how big America really is i've only ever seen it on a map but i'd love to visit one day. I can drive from one end of my country to the other in less than a day,and i havn't left here too often i can tell you.lol. I think i need to see a bit more of the world and will when i finish college. Thanks for all your help.
|
|
- Fiona
- Friday, 10/12/07 13:29:41 EDT
|
Guru, in reguards to cell phones I think nearly everyone in Ireland has one including children as young as 5 and 6 there is even a special phone you can buy for kids that can only ring 5 set numbers put into the phone. Im 24 and an oddity i only started surfing the net last year when i got a part-time job in an internet cafe i hadn't a clue about computers, thankgod a friend of mine owns the shop.lol I was always more into reading and scribbling but i have to admit i wouldn't be without it now its been such a help for research for college and anything else i've wanted to know. That said i'd choose a good book any day.
Fiona
|
|
- Fiona
- Friday, 10/12/07 14:06:36 EDT
|
Where can i find plans for the foot operated oxy fuel "dragon" that i see used in fly press demos? thanks
|
|
ventosa
- Friday, 10/12/07 14:07:38 EDT
|
John N,Thanks for the tip,both of them.Will have a look.
Would love to see the real thing.
|
|
- Fiona
- Friday, 10/12/07 15:10:55 EDT
|
Andrew B... A block of steel the size you described (7x11x14) would weigh over 300#.
|
|
- djhammerd
- Friday, 10/12/07 18:35:34 EDT
|
thank you dj then i knew it was heavy. i was alittle over staed on the fact that the piece i picked up for a friend was almostthat size. i jsut used it this morning and it was much smaller maybe 3X4X9 weighing at abround 75#-80#
sorry for the incorrect information. but i believe i was correct saying that 7x11x14 is around the appripriate size for a japanese anvil?
Andrew B.
|
|
- Andrew B.
- Friday, 10/12/07 18:53:26 EDT
|
Ventosa,
Not sure what you're talking about when you say "dragon", but a foot-operated oxy/fuel torch rig is straightforward enough to make. It is made based around a "gas economiser" valve sold by welding supply stores. As far as I know, there are no plans, per se, for the things, you just get the valve and make something around it to do what you want it to do.
My foot-operated torch arrangement is done in such a way that it can be used as a regular economiser valve, i.e. the torch hangs from the valve lever and when you pick it up you wave the tip across the pilot flame to ignite the torch. It also has a clamp arrangement that holds either the welding torch or the cutting head in a position with the tip to the side of the pilot flame, and the valve lever depressed by an arm. When you step on the pedal, the arm raises to release the gas lever and the torch tip rotates sideways across the pilot flame, igniting it. Step on the other pedal to swing it back and shut off the gas. Not too complicated, really. It took me about two hours to build it, including forging the torch-holder clamp, wing-bolt and welding up the various bits and pieces. Plans? Nope. It works like a dream, though.
|
|
vicopper
- Friday, 10/12/07 19:12:10 EDT
|
Interesting Massey hammer on eBay (UK) item number 230180561231. Has anyone here seen this type of powerhammer working?
|
|
Bob
- Friday, 10/12/07 19:18:25 EDT
|
Hello, I figured that I'd ask this question here in addition to IFI since many knowledgable smiths are here. I just obtained this HUGE stake anvil and I was wondering if anyone knew of any ways to help try to put an age to it. I've got pictures up at http://www.tharkis.com/images/stakeanvil/index.html
It weighs between 120 and 125lbs, is 24.5 inches tall, 22 inches long from tip of each horn. The top has a 9" face 4" wide and there's a close to 1" squareish hole in one side. Looking at it you can see how the whole anvil was forge welded out of tons of layers and pieces of metal, including some voids in places and a few places like on the leg where you can see a forge weld didnt completely hold. The leg is a nice forged octogon with a little bit of a taper, from 3.5" to 5" at the top with the flange at the bottom 5" wide as well.
I've seen some large stake anvils before, but this one is significantly larger than any iv'e ever seen before. I'm mostly wondering if there are any identifying factors which could help me place this anvil in age. It was found in a barn up on the east coast of Maine and I picked it up on ebay for an extremely reasonable price.
|
|
jmercier
- Friday, 10/12/07 19:18:47 EDT
|
I need to now how to start the coals ina forge. Ive heard make a normal fire and add coal to it. but i do not know if this is the best thing to do. what do you recommend??
|
|
- Jacob Lockhart
- Friday, 10/12/07 20:35:21 EDT
|
jmercier
cool stake anvil
|
|
- sparky II
- Friday, 10/12/07 21:05:48 EDT
|
Has anyone ever heard of a Jet Model US 10 hand shear? I recently purchased a used one. It was originally sold by the JET TOOL company. They no longer make this unit. Last made in 1993. Am trying to find an owners manual. Would like to talk to someone who has one or has used one. I've contacted the Jet Co. and they have very little if any info on this unit. This is a pretty beefy unit. The specs say it will cut 3 1/2" x 9/16 flat stock. Any ifo or leads would be appreciated.
|
|
Bill Bruce
- Friday, 10/12/07 21:24:59 EDT
|
jmercier, There were some anvils not quite that large sold out of the Kenneth Lynch collection, Wilton, Connecticut, a few years back, and they looked a little like yours, but of more recent vintage. I believe they came from France. They were without the hole. You have a beautiful collector's piece there.
|
|
Frank Turley
- Saturday, 10/13/07 00:15:10 EDT
|
Being in the NE, I'm wondering if it might have been a ship's anvil? I suspect many whaling ships had a small blacksmith shop/area. Remember in Moby Dick Captain Ahah had a special harpoon forged which was then quench in blood donated by the crew. Long cruise ships may have also. One of those aboard the HMS Bounty was a blacksmith and set up a shop area when they reached Pitcairn's Island. One of his first jobs was to alter sabers into machettes.
|
|
Ken Scharabok
- Saturday, 10/13/07 07:46:37 EDT
|
Guru, I wrote in earlier regarding a Lord Of the Rings fireplacce commission I had staryed it turned out to be a doublesided fireplace glass door job that is turning out quite well . The client would like to keep the steel in a clear finish . I have put several bits of steel with different finishes on top my gas forge as an experiment ... tung oil, a beeswax mix, and clear laquer .. the laquer is holding up best , but do you know of anything better?
|
|
lydia
- Saturday, 10/13/07 11:32:18 EDT
|
Oh boy!. All this chat about spelling and I missed a bunch! Mea Culpa.
lydia
|
|
lydia
- Saturday, 10/13/07 12:17:31 EDT
|
Lydia; I'd go with using forged stainless steel and forget a finish.
Ken and still to this day the place where the HMS Bounty's forge was set up on Picairn Island is known as "Bang Iron Valley"
Jmercier it depends a lot of what kind and how good your coal is. @ith decent coal I build a kindling fire and let it burn doen to hot coals then start the air on low and start addong green coal along the sides and finally lightly over the top and gradually add more until you get the pillar of smoke.
It's much nicer to have some coke left over form the previous fire as you can start that up withput so much smoke and be able to work sooner.
Thomas
|
|
Thomas P
- Saturday, 10/13/07 12:41:10 EDT
|
I've always used pine cones to light my coal forge. I have a bag of coke from the good folks at Kayne and son. I can't get it to light. Does anyone here use bagged coke? How do YOU get it started?....Thanks.
|
|
- Donnie
- Saturday, 10/13/07 16:30:35 EDT
|
Coke: Donnie, Due to the low volatiles in coke it takes a much hotter fire to get it started and a constant blast of air. If you are using a hand crank blower it may be difficult. Most folks use an oxy-acetylene torch to start coke. A small coal or charcoal fire also works well. It IS possible to start with wood kindling but it is tricky.
|
|
- guru
- Saturday, 10/13/07 16:55:55 EDT
|
Clear Finishes on Wrought: I had a fellow in the UK write about a job where he, the customer had specified a polished finish on a fancy wrought iron rail. The smiths tried their best and did an AMAZING amount of grinding and polishing. The customer was complaining that rust sposts were showing up under the lacquer and there were discolored places where field welding had ben done. The fellow wanted to know what I thought, IE should he sue for bad workmanship.
I explained that the only place the smith had failed was by taking the job. They should have just refused to try to produce such a work. The smith should have politely explained why. I also noted that the "contract" the customer sent was a very poor description of what he wanted and that he had would have a difficult case proving that he did not get what he wanted. In fact, he had not specified a finish at all. I told him to have the work professionally painted at his expense.
I never heard back, nor knew the smith. However, I suspect that both the customer and the smith were left unhappy.
The highest temperature clear finish is epoxy. However, there are severe corrosion problems from the epoxy itself under certain circumstances. ALSO, when hot enough to burn it makes a HORIBLE acrid stink. . .
Around a fireplace I would use wax if the customer wants a "natural" finish and tell them that it must be reapplied and that there WILL be rust and ocassionaly the wax WILL melt. . .
Otherwise I always use a graphite based high temperature paint.
The lacquer may hold up, it may not. It depends on how hot the parts get. AND clear finishes often have problems with water absorption and rust under the finish.
As Thomas noted, if the customer wanted a natural or "clear" finish I would have insisted on using stainless and doubling the or tripling the price (The materials will cost 8 to 10x steel but you would be avoiding paint). Howerer, it sounds like you are well into the job.
|
|
- guru
- Saturday, 10/13/07 17:34:32 EDT
|
OLD Stake Anvil: It is just a guess but I would put the age of this one at 300 to 400 years. Made in Europe somewhere. . .
|
|
- guru
- Saturday, 10/13/07 17:40:26 EDT
|
Posting from my old dial up connection. . . Boy is it SLOW! I see I need to a better job of archiving. . . . DSL has me spoiled. Be on the road a few days every week for a while.
|
|
- guru
- Saturday, 10/13/07 17:45:12 EDT
|
How does one accomplish the trick of melting glass into a loop of steel using a coal forge ? I've seen it done a few times, without welding little clips to the loop to hold the glass in place, but cannot seem to master it without the glass cracking.
|
|
- larsen
- Saturday, 10/13/07 18:18:46 EDT
|
I have a local steel suplier but I am looking for incorporating copper into some of my work. I have seen some simple copper rivet as oppose to steel. I have also seen some small diameter copper wire to wrap around joints. I have also only heard that some smith are capable to inser somehow copper into the steel.
Anways, I like the idea of mixing Steel with copper... where can I buy copper?
Thanks in advance
Dan
|
|
Dan
- Saturday, 10/13/07 20:11:28 EDT
|
Larsen,
Your glass is craking because the glass and the steel are not cooling down at the same rate. Try to use Ceramic Fiber blanket and once your glass in in place, take your piece and squeeze it between two layer of the blanket.Let it cool down for about 1 hour
I suspect, it will work. If not www.warmglass.com is the most comprehensive Forum on glass work on the planet. I am sure you will find somethere that Have done it
Good Luck
|
|
Dan
- Saturday, 10/13/07 20:15:40 EDT
|
Hello All, I am trying to locate the proper forum to post my query. Perhaps here.
I am in the market for an electropneumatic hammer. I am leaning towards a turkish hammer from tom clark but am considering the striker 88 as well. If anyone on this forum has done any extensive work behind one of these I would be very interested in your observations.
thanks
|
|
james gonzalez
- Saturday, 10/13/07 21:11:35 EDT
|
Dan, Copper does not mix well with steel except as a minor alloying ingredient. The one exception is electrical ground stakes. These are copper clad steel and can be forged at just below the coper melting point.
Copper is commonly layered with brass, silver and other non-ferrous metals in a Japanese process called Mokume' Gane' (Wood Grain). A stack of thin sheets is clamped together between two steel plates and heated until just below the lowest melting point alloy in the stack. It is then given a whack or squeezed in a press. The result is removed then rolled or forged to shape. Patterns are developed by various methods similar to laminated steel.
The best copper wire is electrical grade. You can get solid wire up to about 3/16" (#6).
Copper sheet can be purchased in various places including our on-line metals store. Click the STORE link
|
|
- guru
- Saturday, 10/13/07 21:30:07 EDT
|
This post is basically a waste of your time so please ignore it. I have little desire to forge anything but do find it interesting. I came upon your sword smith article and I thought it looked interesting, so I read on. and I wanted to say it was well written and very educational there is just one part that confuses me. What does Atlantis have to do with swords? Also what you have stated about it is just a theory.
|
|
- Bored mostly
- Sunday, 10/14/07 01:37:43 EDT
|
Hello from western Australia,
I'm trying to mix a wax to finish my forgings,mainly small articles.I,ve found a recipe which uses microcrystalline and polyethylene waxes.Found a source of microcrystalline wax but cannot find the polyethylene wax I need in Australia.It's called Poly A wax in the US .If anyone knows another name for this or another smith from oz can help I would be most grateful as I've been looking for this for a year or more.
Regards Brian.
|
|
- Brian Puckey
- Sunday, 10/14/07 05:13:21 EDT
|
Brian Puckey,
I'm not aware of any polyethylene waxes that are used for finishes, per se. Mostly they're used for mold making, rather than surface treatments. Where did you find the recipe for this particular finish?
|
|
vicopper
- Sunday, 10/14/07 07:32:24 EDT
|
hey guru, i found an old farriers file yesterday. and was gongi to make a knife out of it. but up till now i've only ever used leaf and coil springs for blade. How would i heat treat the file to give it maximum hardness and toughness. would it still be a dip in warm oil. for leaf springs i so a full dip quench then selective temper it. would i still do that for the file. Thanks
JAke
|
|
- jake
- Sunday, 10/14/07 08:28:06 EDT
|
Brian Puckey: I did a www.google.com search on poly A wax and it only come up with poly waxes. None specifically called Poly A.
|
|
Ken Scharabok
- Sunday, 10/14/07 08:51:16 EDT
|
Donnie,
I use the local coke here in China. I just start with wood and paper with a bit of air flow, then put a bit of blacksmithing coal on to get the fire going. I then simply use the coke. I am in a fortunate position because the furnaces here now run on coke so I have a free supply and can keep my electric blower on all the time. Stop blowing and you will lose your fire very quickly.
|
|
- philip in china
- Sunday, 10/14/07 10:16:13 EDT
|
Atlantis: Bored Mostly, Since Atlantis is mostly a myth told by Plato as history he took from Egypians from the single statement "the great sea traders disappeared when their island sunk beneath the sea" everything else IS theory. The facts are that the Minoans were the major if not only sea traders on the Mediterraneans during their time. They were so secure on their island bases that they had no military. If you attacked them at the beach just just didn't bring you trade in the future. When their second island (volcanic) base of Thera exploded reducing itself to a small sliver of its former self known today as Santorini it also buried about 80% of Crete in 6 to 12 feet of ash. The path of these deposits have been tracked form Santorini to Crete and are roughly the amount of debris that Arthur Evens found the Palace of Knossos buried under. With their main port and fleet destroyed, their ruling capital destroyed, their agricultural lands destroyed and a huge segment of their population killed all in one week the Minoan culture disappeared. Others then filled this hole in Mediterraneans trade and the Minoan culture became myth.
A lot more accepted history is based on fewer fasts. However, the myth of Atlantis has become a kind of religion and wild stories are told about a great city with technology far beyond anything man has yet achieved. . . GREAT FICTION. All based on what the Egyptians told Plato. Plato even made up the NAME Atlantis. . . It is just as much fiction as the TV series Stargate Atlantis (based on the myth).
What does it have to do with swords? It is another myth about the superiority of ancient technologies. . Which are myths that make great stories but have no basis in fact. Modern technology is not only superior, we know WHY it is superior. Science tells us things that the ancients could not even guess at. The knew what worked and followed what the knew religiously but in the dark as to what was really happening.
|
|
- guru
- Sunday, 10/14/07 13:12:45 EDT
|
Wax Blacksmith Finishes: These are amateur formulations for varnish. Look carefully at the ingredients in a can of old fashioned varnish, waxes, oils, solvent, drier. . . Varnish makes a poor finish for metal as rust continues under the finish. It is used on wood so that it can breath giving off and absorbing moisture with changes around the wood.
If you want a good reliable finish buy paint.
|
|
- guru
- Sunday, 10/14/07 13:19:21 EDT
|
Heat Treating an old File: First, you need to know that some farriers files are made of very cheap steel, often case hardened as they are a throw away tool. Second, ALL junkyard steel rules apply. See our FAQ on junkjard steels and our heat treating FAQ. If the file is of good steel you will heat treat it similar to the way you have treated spring steel (the can even be the same steel).
|
|
- guru
- Sunday, 10/14/07 13:23:04 EDT
|
are there any tricks for finding fancy grains (tiger, curly) in a maple tree? or do i just go sawing the first hard maple i find and see whats inside?
|
|
- coolhand
- Sunday, 10/14/07 16:31:41 EDT
|
When buying paint for your work remember your not stuck with just the colours and sheen the paint companies provide. I wasn't happy with flat black, and the gloss was too glossy, so I now use a mixture of flat black, and a colour in a gloss and I am real happy with the way it looks. I would suggest though that when blending paint you stick with the same brand.
|
|
JimG
- Sunday, 10/14/07 17:05:36 EDT
|
coolhand,
look for knots and blemishes in the tree. Often its the imperfections that create the fancy grains. Just make sure it's dry before trying to use newly harvested wood (made that mistake on a knife handle a few yrs ago).
|
|
- nathan
- Sunday, 10/14/07 17:13:16 EDT
|
Thanks Dan, Warmglass.com is a wealth of information. I appreciate the direction !
|
|
- larsen
- Sunday, 10/14/07 17:37:38 EDT
|
I need advice on how to forge a fuller into a knife blade.
I have already forged the blade, but I have never attempted a fuller.
Most people I have asked have either never tried one or don't want to take the time to explain it. Any tips or advice is welcome, even if it is to wait until I have more experiance.
|
|
Mike k
- Sunday, 10/14/07 20:35:22 EDT
|
Guru,
Is there info in the archives on repairing or replacing the screw in a post vice? I recently acquired one stampped Iron city and the screw is stripped or rather worn down.
|
|
David
- Sunday, 10/14/07 20:46:43 EDT
|
Mike k,
Forging a fuller in a knife blade is no different than forging a fuller in anything else, really. It is just pickier work that shows your errors magnified a hundred times.
You make a fuller that is the right cross section to get you what you want and then drive it into the blade the correct depth all the way down the blade. This means you'll probably want to get somewhat shallower as you progress down the distal taper, and you'll want to make your fuller with radiused and rockered ends so it tracks and terminates nicely.
I wouldn't try to do the full depth of the fuller in one pass, either, unless I was using my flypress and a fence. One slight error in tracking and you've screwed the pooch on the blade. Better to start with a very shallow pass to set the course and then deepen it once you have someplace you can feel the fuller following.
If you're doing a fuller on both sides of the blade, you have to have a matched pair of fullers and a jig to hold them in proper alignment to each other or you'll have a real mess. Guess how I learned that? (grin)
Remember too, the metal displaced by the fullering is going to spread the width of the blade. I'd suggest making a test piece or two from something cheap and easy to determine how much spread to allow for and get the feel of the tooling before I tried it on a blade I had time invested in.
Keep in mind that you don't have to *forge* a fuller; they can also be milled or scraped into a blade. In fact, you'll probably want to make a special scraper to do the finish work on the fuller you forge, in order to save time on hand filing and sanding.
|
|
vicopper
- Sunday, 10/14/07 22:40:15 EDT
|
David - vise screw: I think someone mentioned using the screw and nut from a scaffold jack. It is a little finer thread than most vise screws, but it should work OK. That is how I plan to rebuild one I have.
|
|
- Dave Boyer
- Sunday, 10/14/07 22:55:59 EDT
|
Fancy Wood Grains: Besides knots and blemishes any stress on the tree creates grain changes. Curly maple is caused by compression on the inside of a curved tree due to missing limbs or another tree leaning. It is much easier to see the grain effects when you split a section. Curly maple splits with an obvious wavy surface.
Finding and milling this kind of wood is an art learned from years in the trade. In large tree work the various sectiones are mapped out on the end of the log then carved out with a chain saw. Each piece is then sawed to get the best or most useful lumber out of the log. Most fine woods for musical instruments are done this way.
|
|
- guru
- Sunday, 10/14/07 23:08:15 EDT
|
Vise Screw Repair: Remember that both the screw and the nut will be worn. Good reason to have a small lathe in the shop. . .
Note that early nuts were made by wrapping square stock around a screw, fitting it in a tube OR wrapping flat stock around the coil to create a tube. The whole was forge brazed together.
A matching nut can also be made by casting babbitt or zinc around a well sooted screw. These are hard to fit to a leg vise but work well in other vises.
|
|
- guru
- Sunday, 10/14/07 23:16:58 EDT
|
I was going to try to melt some scap steel, But I need a crucible. Is there any way to use something around the house, like a ceramic jar or could I make a crucible out of ITC-100? any sugestions would be appresiated.
|
|
Troy
- Sunday, 10/14/07 23:47:00 EDT
|
More Paint: This is one I have been repeating for over 10 years and practicing longer, LOOK at automotive finishes. They are durable and infinite in variety. THEN, consider what can be done with a spray gun and several colors of paint. Shading, highlights, blends. The paint can be a work of arti in itself and SHOULD be if you are producing high class work.
The second thing I have been telling folks if if Hollywood can make wood and plaster look like stone and metal, then blacksmiths should be able to finish their ironwork to look like iron. . . For that unpainted look you use dull silvers and grey blacks applied in blends. Then texture and highlights can be added by hand. Apply this over galvanizing or cold galvanizing and you have a lifetime "natural" finish.
Good automotive finishes last 20 years outdoors om automobiles that see miles of wind, grit, wear and tear. .. Most rust comes from sand and trash that has collected INSIDE the fenders. Apply the same finish over a galvanized or cold galvanized surface and you have a finish that will last 40 years or more.
Compare this to the recommendations to strip wrought iron every five years or so and refinish. . .
|
|
- guru
- Sunday, 10/14/07 23:54:27 EDT
|
Is there a formula for the volume of air to use in a forge? I am about half way through constructing my brick forge and want to know if it is worth my while sourcing a bigger blower.
|
|
- philip in china
- Monday, 10/15/07 07:37:54 EDT
|
vicopper
It's a recipe for a Renaissance type wax.I came across it a couple of years ago on an Australian Museum website then again in the July newsletter at the Blacksmith Guild of Virginia website which gave the name of the wax.There are so many different grades of polyethylene wax I gave up my last search in frustration.Hope this helps and thanks to all of you for your quick response.
|
|
Brian Puckey
- Monday, 10/15/07 08:04:43 EDT
|
Phillip, There are charts in older machinery handbooks for multiple forges. The problem is that every forge is different and the size of the fire varies according to the work. after a fire is going 100 to 150 CFM is more than enough for the "average" to small forge. Typical forge blowers run 300 to 500 CFM. Forges also require a certain amount of head or pressure. I would try what you have then upgrade after.
|
|
- guru
- Monday, 10/15/07 08:19:11 EDT
|
Speaking of larger blowers, I've put my gas forge plans on the back burner for now so to speak; I realized that I'd be much better off building it wherever I'm moving to in 5 months. That being said, I've constructed a crude solid fuel forge and was planning on using an old vacuum motor I 'procured' for the blower, but I've run into a bit of a conundrum for the control mechanism, I'd like to use some type of dimmer switch for the control, but the electrician I work with said something about it drawing too much power for a common light fixture dimmer, about on par with a hair dryer, I think (he doesn't speak very much english), and buying one 'strong enough' is going to set me back about $100; does anyone else have any suggestions? I know pretty much nothing about electrical equipment... So if the dimmer route is bust or unfeasible, would I be alright creating some kind of intake/output limiter like a flap or valve? Or would that burn the motor out? Would it matter which side I installed it on? In general, would a vacuum motor even be on the right track? I'm pretty confident it's powerful enough, but then again this is my first attempt at building something like this, so what do I know? Any advice at all is greatly appreciated!
|
|
Kajiya-In-Training
- Monday, 10/15/07 08:38:57 EDT
|
vicopper
Hi again.
Seems to have disappeared from the virginia site but found it on i forge iron site.This is a short version.
Three parts microcrystalline wax to one part poly AC (or "polythene A," if you get it from a conservator's supply place). I bought my wax from a company called Genwax.
Once again thanks.
|
|
Brian Puckey
- Monday, 10/15/07 08:53:25 EDT
|
Troy,
No, there is nothing you can use for melting steel. Doing so is not a backyard project. What will you use for slag to control loss of elements? What will you use for the heat source? The crucible needs to withstand temperatures of about 3,000 degrees and the solvent effects of the molten metals and slag. Nothing at home will do that safely.
|
|
vicopper
- Monday, 10/15/07 08:53:35 EDT
|
Kajiya-in-training,
A vacuum cleaner blower is likely to put out way too much air if un-restricted. A dimmer won't handle the load, for sure.
You can restrict the INTAKE air without hurting the motor. The less air that comes in to a blower, the less air the motor is trying to compress, thus reducing the load on the motor. when you restrict the output, you are putting more load on the motor because it is trying to compress the air against resistance.
|
|
vicopper
- Monday, 10/15/07 08:56:30 EDT
|
Brian,
Polythene A, a hard polyethylene wax, is available from Conservation Resources. It is opaque, so it must be mixed with the microcrystalline wax to be useable, I suppose. It is reported to be very durable. That might be a wax finish that actually works, who knows? Time and testing will tell, I suppose.
http://www.conservationresources.com/Main/section_39/section39_06.htm
|
|
vicopper
- Monday, 10/15/07 09:01:50 EDT
|
Kajiya in training,
So split the air that comes out. Put 1/3 into the forge and waste the rest. See how that works. If it isn't enough swop so 2/3 goes into the forge. Trial and error is a great teacher. (See how I can answer other peoples' problems but still post my own).
|
|
- philip in china
- Monday, 10/15/07 09:19:02 EDT
|
Actually, I've used dimmer switches on blowers salvaged from vacuum cleaners that worked fine. I'm currently running a Buffalo 2E blower on a dimmer switch. The dimmer switch usually lasts for several years and will finally burn out, but they are cheap to replace. $5 US around here.
|
|
Bernard Tappel
- Monday, 10/15/07 10:12:56 EDT
|
Here's what I use for speed control on my blower. It'll handle the amps and it costs a lot less than $100. As to whether it's hard on the blower . . . ?
http://www.harborfreight.com/cpi/ctaf/displayitem.taf?Itemnumber=43060
|
|
Matt B
- Monday, 10/15/07 11:23:00 EDT
|
Matt, I've been looking at those. I want to try one the next time my switch fails. You can't run those or the dimmer for that matter on an induction type motor. Only the universal type motor that runs on brushes will work as far as I know.
|
|
Bernard Tappel
- Monday, 10/15/07 11:40:55 EDT
|
Hi,i have seen on tv and suchlike a machine i would like to aquire,but as i don't know what it is called i'm not getting very far.It is for setting a curve into steel tubes,box sections and suchlike. It consists of three wheels,one of which is adjustable and is powered sometimes by an electric motor and other times by a large crank wheel.Hope you can help,S.Cairns
|
|
sam cairns
- Monday, 10/15/07 12:30:20 EDT
|
Hello everyone, I am back with more questions.
1)Where would a good place be to look for information on crucible smelting?
2)I have a question about my gas forge that I was planning to use. It was originally a venturi forge, but I want to set it up to be used with a blower, so I can get it hotter, and also so that I have a better control of what type of flame is being produced at a point in time.
The gas comes out of a nozzle into about a 12 inch tall one inch diameter tube that leads into the top of the box part of the forge. (everyone can see it from this perfect description right? ;-) ) Can I simply rig some type of blower system that will push the air into these upright tubes, or do I need to let the air and propane mix before it comes out of the nozzles? Do I need to try to clarify what I am talking about or are my horrible descriptions enough?
Thank you all for your time and patience and great help
Chem Geek
|
|
- chem geek
- Monday, 10/15/07 12:35:08 EDT
|
The old rheostat dimmers will work on universal motors---the one that use brushes. The new dimmers that chop the waveform with a triac will not work well and will burn out fairly quickly.
Dan you can hard solder or braze copper onto steel or inlet it into steel---or just wrap it around it! (you can soft solder it to steel as well but it's not as rugged.
As to where to buy it---I buy mine right over there! (or wouldn't it help to tell us at least what COUNTRY you live in?)
I have had very good luck buying copper at the Albuquerque NM, USA Habitat for Humanity Re-Store, which sold me 2 full rolls of grounding wire for US$5 a roll. I also bought some heavy wall brass pipe there and some solid brass kick-plates.
In columbus OH there is a non-ferrous metals scrap yard that was nice to deal with. Specialized roofers and plumbers often have copper scrap.
Copper is quite expensive these days.
Thomas
|
|
Thomas P
- Monday, 10/15/07 12:43:46 EDT
|
chem geek,
What kind of information are you looking for re: making crucible steel? Thomas P already pointed you toward some forums where you can find folks who've actually done what you propose to do -- and done it many times. (Not only that, but some of them have done it with propane.) Here's the link to Primal Fires, which can be a little hard to find if you don't know where to look: http://p222.ezboard.com/fprimalfiresfrm24 I'd also suggest the Bloomers & Buttons forum at Don Fogg's forums. No link since Fogg's is easy to find.
If you're looking for a more academic resource, perhaps one of the metallurgists can help.
|
|
Matt B
- Monday, 10/15/07 14:31:11 EDT
|
Blower control:
I used a fan speed control for my blower, a 60cfm squirrel cage blower. This has been maybe 3 - 4 years and no signs of burning out. It's not just the higher current draw, though. Motors have coil windings in them and become what's called inductive loads. Lamps are resistive loads. That changes the controller design somewhat, enough that using an inductive load on a resistive controller could cause the burnout.
But since then I've come to the opinion that a mechanical gate on the input is the best way to go. That might even be free if you have the stuff lying around. The only problem might be the noise. Vacuum cleaners are pretty loud.
|
|
- Marc
- Monday, 10/15/07 15:55:56 EDT
|
Norfolk latch question:
My church has an original Norfolk latch on the main door that they'd like me to improve. This one's thumb lifter only extends far enough to lift the bar. People new to the church have a hard time figuring out how to open this thing as they leave. Now, I suppose having a church with a one-way door is not the worse thing in the world :-), but we'd still like to have that hook that I've seen on most other latches.
How far does that hook extend past the door? And how is it normally operated? Do people lift the hook and pull the door open using the hook (one-handed operation), or do they lift with the hook and pull with a handle?
I've also seen bars with lift knobs on them. This is definitely a two-hand deal. Which is the best way to go?
--Marc
|
|
- Marc
- Monday, 10/15/07 15:56:26 EDT
|
I am interested in working with someone to design and then have build a "spit jack" for an outdoor grill. Any idea who might be interested in taking on a project like this?
|
|
Stephen Salzer
- Monday, 10/15/07 16:32:01 EDT
|
Marc,
The door to the smithy at a museum I sometimes volunteer at has two thumb latches and handles. The one lift bar is under the other. Both lift bars have a pivot point and when the bottom one is used it pushes up the top on that then pushes the latch bar up.
I'm not a good enough wordsmith to explain properly without a picture. I hope you can make sense of this.
|
|
JimG
- Monday, 10/15/07 17:03:11 EDT
|
Hi again,
Further to a previous post of mine, re auto coil spring punches, I came to the conclusion that it's probably the most practical way for me to make my first set of punches. That being said, I have two more questions. For your "average" (I know you don't like to generalise junkyard steels) auto coil, what colour is most likely to be right for tempering in a punch application? Also, can a drift be plain mild steel, since it doesn't suffer the same kind of impact?
|
|
Craig
- Monday, 10/15/07 18:31:09 EDT
|
Craig, Drifts get quite a bit of abuse and should be something better than mild steel. For tools like this I do not harden, I just forge and let air cool. If made of spring steel they are very tough without hardening. For punches I would harden the end. A nice golden yellow is a minimum temper and works good for many hard tools. Used for hot work they are going to get tempered much softer in use.
|
|
- guru
- Monday, 10/15/07 18:44:57 EDT
|
Door Latch: The hook is the lifter inside the door and is designed to fit the hand but is also scaled to the size of the door. The thumb part is pushed down pivoting on a pin and lifting the latch. Inside it is just lifted.
|
|
- guru
- Monday, 10/15/07 18:51:29 EDT
|
Chem Geek, See the books by Chastain on our book review page. All see backyard foundry sites for more info.
Yes the gas and air should be mixed outside the furnace for efficiency.
|
|
- guru
- Monday, 10/15/07 18:53:27 EDT
|
Thanks, but I know how the latch operates. My question was if the inside hook was used to both lift the bar and pull the door open, or do people lift the hook with one hand and then pull a separate handle with the other? My wording wasn't the clearest.
JimG, I'm interested in that latch setup. Where was the pivot on the inside thumber? To get the travel needed, the pivot would need to be at least a 1/2-inch away from the place where the lower lifter lifted the upper. Maybe some extended version of a Suffolk latch?
|
|
- Marc
- Monday, 10/15/07 19:12:13 EDT
|
i live in north central west virginia and i am looking for a reputable coppersmith or possiably a blacksmith that can repair a copper kettle the iron or steel bail was rivetted to the kettle both sides have pulled out i dont want to travel more than 3 hours do you know someone that you would reccomend thanks kevin
|
|
kevin cunningham
- Monday, 10/15/07 19:39:50 EDT
|
Marc, the pivot on both of them is right where the thumb latch goes through the handle plate. The upper thumb bar is long enough to go to the latching bar. The lower one doesn't go all the way through the door. An advantage to using this system in my mind is that you don't have to modify the outside latch at all. The two bars aren't connected in any way but gravity. Anything not clear ask and I'll try to help.
|
|
JimG
- Monday, 10/15/07 19:44:53 EDT
|
Stephen Salzer,
I'd be happy to work with you on your spit jack, or any other blacksmithing/metalsmithing project you have. My shop is located at the Lawaetz Museum just outside Frederiksted, St. Croix, U.S. Virgin Islands. Drop in anytime, I'm usually here.
If my location isn't convenient to you, (unlikely, I know), let us know where you are and one of us is probably somewhere within reach. Mail order can get pricey on large steel items, y'know?
|
|
vicopper
- Monday, 10/15/07 19:51:03 EDT
|
Vicopper,
If Stephen is ever close to me he could always drop in and we could make it together. I have all the materials we would need in stock and am looking for projects like that all the time.
|
|
- philip in china
- Monday, 10/15/07 20:38:33 EDT
|
JimG, light dawns on Marblehead. That makes perfect sense. And it gives an inside handle that people will recognize.
Thanks.
|
|
- Marc
- Monday, 10/15/07 21:02:36 EDT
|
I am looking for the origin of and information about an meat cleaver that belongs to my father. The only distinct thing is the words Wrights and Smoke on the blade. the first being above the other in fancy script. Can anyone help??
|
|
Meghan
- Monday, 10/15/07 21:54:28 EDT
|
Andrew B
I measured my anvil (which is the chinese one with no horn). The main block is 7" x 7" x 9" tall. As you see there are also 2 extensions. I didn't measure those as you can see from the picture what size they are.
On the underneath of the anvil it is quite clearly made by welding a box out of plate with angle iron corners and then some cast metal is poured in.
The whole thing actually works much better than the cast iron anvils which China exports to USA.
I know Guru et al have said this a million times but I shall repeat the cast iron chinese anvils make a novelty door stop and are probably ok as theatrical props but do not imagine you are going to do any forging on one of them. They are soft, porous, ugly and downright useless. I know. I have 3 of them. They were all I could get.
|
|
- philip in china
- Monday, 10/15/07 23:09:51 EDT
|
Door Latch; Normally the "hook" is the pull. However, you could fit pull over top of it. It would not be the same shape as the outer pull. It might also be confusing to those that do not understand the latch is hidden.
Note that in many public buildings the latch is required to work by pushing only. This is known as a panic latch and should be workable in the dark by someone in a panic and without being familiar with a specific latch. Check your local building codes.
|
|
- guru
- Monday, 10/15/07 23:37:40 EDT
|
> My name is john lewicki and this is the 3rd email I have sent you . . .
John, Your mail has repeatedly bounced. Yahoo says you do not have an account
|
|
- guru
- Monday, 10/15/07 23:52:05 EDT
|
|
|
[
CSI - anvilfire MEMBERS Group |
Getting Started in Blacksmithing ]
|
