Psykotika: In a material that can be both cast and forged, there is generally a finer and stronger microstructure within the material after forging than in the cast state. With regard to "folding" steel, The current actual process is drawing the material out to a great length, then cutting that length ino shorter sections that are stacked and forge welded into a single chunk, and repeating to get the desired number of layers. The result if different alloys are used is that the material can be twisted and re forged, and after finishing, it can be etched and there will be a pattern formed by the differing alloys. This is of no practical value, but has an astetic apeal. For greatest strength use a modern high strength alloy, mess with it as little as possible and have it professionally heat treated.
|
|
- Dave Boyer
- Wednesday, 11/07/07 22:37:00 EST
|
Harley: I've only seen the KA-75 demonstrated. Essentially, as named, it acts as a substitute for a striker. Friend in area has one. When I was there he was making a flame effect on the ends of gate finials. He forged out the shape on his powerhammer, then used the KA-75 with dies to put in the curves in one blow.
All I have seen them operated on was small portable compressors. Quickly run out of oomph. Don't know how one would do for forging on a large shop compressor.
|
|
Ken Scharabok (Poor Boy Blacksmith Tools)
- Thursday, 11/08/07 02:23:54 EST
|
Thanks Ken,
With that in mind I guess I will need to see some videos and gather more input on the KA 75. So lets see...takes up less space than a large PH , is useable with a smaller compressor (allready in the shop) or build a Kinyon style hammer, dish out $$ for a much larger compressor (which will an advantage to other needs in the shop). What is a poor hoby smith to do .............
|
|
Harley
- Thursday, 11/08/07 03:46:22 EST
|
Question about Pure Iron:
Thank you for responding to my question on pure iron.
When you say .008%, do really mean eight one-thousandth's of one percent? Let's say for example we had a quantity of 1,000,000 marbles. 10% of the whole would be 100,000 marbles. 1% of the whole would 10,000 marbles. If that 1% (10,000) was divided into 1,000 pieces, 1/1000 would equal ten marbles. Then 8/1000's or .008% would equal 80 marbles. Am I understanding you correctly there? Out of every 1,000,000 iron atoms, we would have 80 carbon atoms? I wonder if that could be put into geographic terms to more easily visualize that.
If that is correct, it might be that this level of purity would be adequate for my purposes. In this application we are looking at the behavior of iron under certain conditions, and would like to eliminate as much as possible any behavioral characteristics associated with other elements.
In regards to another thing you (the Guru) said, I would like to better understand what is the difference between pure iron at .008% carbon content, and .008% carbon steel? You seem to be drawing a distinction there, but .008% carbon steel, appears (to me) to be the same thing as iron with .008 carbon content. I thought the definition of steel, is simply iron with some carbon in it. Is that the same thing, or is there a nuance there that I am missing?
If it is the case that those who make this European .008% carbon content iron, do not, in fact, make 4 inch square bars that can be cut into the cube I need, is there any technical problem with purchasing an appropriate quantity of smaller stock and having them simply melt it down and pour it into a 4 inch cubicle mold? Doesn't the low carbon content make it melt easier, i.e. at a lower temperature?
Thank you for your time.
|
|
Steven
- Thursday, 11/08/07 06:24:07 EST
|
Steven,
We need our resident metallurgist, Quenchcrack, to deal with this more thoroughly . I have seen a printout on the European "Pure Iron", and there are many elements in it other than carbon and silicon; they are, however, in trace amounts. Sometimes iron, as iron, is made in small amounts for chemical and physical study in laboratories. Armco Steel, now under another name, used to make "zero carbon iron" for enameling purposes. Initially, it was made into vessels, glass enamel lined, to handle acids and caustic materials.
It is not so simple to melt already made iron or steel and pour it. You're dealing with flux, slag, and "atmospheric attack", especially by oxygen. Cast iron is pourable, because it has the right composition, a high carbon content, and the carbon becomes a mechanical mix of graphite in the final cast product. Cast iron is definitely not pure iron, but a whole other ball of wax.
|
|
Frank Turley
- Thursday, 11/08/07 08:08:00 EST
|
Steven, I am still unclear on the concept. Yes, your .008% analogy is correct. However, having low carbon steel (or iron) does not imply high purity. What about all the other elements that are common residuals? I refer to Mn, S, P, Si, Cr, Mo, Ni, Cu, Zn, Sn, O2, H2, N, etc. Commercially produced "steel" is made from either scrap iron or iron ore. The BOF steel made from iron ore will have lower residuals but it will not be pure. To get a "pure" iron, it needs to be processed by zone-refining under a vacuum. I hope you have a BIG government grant for this project because this degree of purity will break the bank for most research projects.
|
|
quenchcrack
- Thursday, 11/08/07 09:06:48 EST
|
Steven, just a thought here. Try contacting a company that sells calibration standards for spectromenters. I am sure they do not have one 4" square but they might have some pure iron samples that could do.
|
|
quenchcrack
- Thursday, 11/08/07 09:43:38 EST
|
IRON
Iron and Melting Temperatures: As carbon increases the melting point decreases. Pure iron melts at around 2800°F and high carbon steel about 2600°F and cast iron as low as 2200°F The high carbon also increases fluidity greatly which makes cast iron easier to cast.
Pouring Iron: When casting a high temperature melting metal there is a huge amount of shrinkage upon solidification. This can produce a hollow that extends from the sprue to nearly the end of the casting called a "pipe". Preventing this or closing the pipe is what a great deal of modern steel manufacturing is about.
It is possible to crucible melt pure iron with a flux cover in a sealed crucible and slowly let it cool to produce a tight ingot or "button". This requires a round bottomed crucible. Afterwards the button could be forged or cut to the desired shape. Note however that iron tends to crystallize in some bizarre ways and the results may not be as solid as you might think. R&D may be required to get your sample. . .
Carbon and Alloy Steels: Technically any carbon makes iron a "carbon steel".
A high carbon steel only has 1% carbon and medium carbon (spring and durable tool steels) .60%.
High strength structural steels have .20% to .35% carbon.
Special low carbon steels have .08% carbon and it is difficult to obtain lower carbon steels.
So when you speak of steel with less than .01% carbon it is STILL a carbon steel. In fact the people that work "pure iron" or "double ought" low carbon steel with. .008% carbon can tell the difference between working it and working wrought iron which has much less carbon.
The confusion is in the product sold as "pure iron" which in fact is just a very low alloy steel.
Many ingredients in steel at .01% and less effect the way steel behaves. Almost all steel has some silicon, most modern steels some manganeses. The cleanest steels made with scrap include lead, copper, aluminium. . . in traces but even at .005% or less they effect the quality of the steel. So while this percentage may seem VERY low it is significant in steel making. AND all those small percentages add up to something more than thousandths of a percent AND do effect the properties of the steel (ductility, corrosion resistance, weldability).
Blacksmiths often deal with nearly pure iron in the form of wrought iron. This is an ancient product that is no longer made commercially. It IS made by a few researchers. Wrought is pure iron or very low carbon iron with inclusions of silica slag (remains of ore and flux). In processing wrought these inclusions are drawn out into thin layers between bands of pure iron. When wrought corrodes is has a wood like grain structure that is often quite obvious. This is the material that smiths can tell the difference in how it feels and works under the hammer compared to .008% carbon steel.
However, when wrought is processed further the layers or bands of silica nearly disappear and you have a nearly homogeneous silicon iron (.015 to .005% silicon) OR you just have scaled down wrought with very very thin layers of iron with even thiner layers of silica slag. When this corrodes you often cannot distinguish it as wrought from the grain.
Your Purpose: A 4" cube of chemically pure elemental iron is a very large sample. Purity is also something that must be defined and specified for the purpose. IF you need absolutely pure laboratory grade iron the best I know of is only 99.95% pure vacuum deposition grade and is supplied by Cerac Advanced Specialty Inorganics. 18.2 pounds (8258 grams) in 3 to 12 mm pieces was priced at about $1000 in 1991. The only available other available forms were smaller screened pieces and near powder at that time.
|
|
- guru
- Thursday, 11/08/07 09:55:53 EST
|
KA-75, Harley, I was looking into one once upon a time, and a smith (I would rather not say his name in a public forum, email me if you want to know who it was) I really respect and consider a bit of a mentor suggested that there are better choices out there that I would be happier with.
|
|
JimG
- Thursday, 11/08/07 10:58:23 EST
|
Harley,
You might ought to actually try one out before deciding one way or the other. If you call Bob Bergman, the seller of the KA-75, he might be able to point you to someone in your area who has one you could try.
Nathan Robertson, a friend of mine who makes very desirable hammers and lots of them, uses a KA-75 for his work. He does enough that he has worn one out and purchased another to replace it. Apparently, he really likes the machine.
My preference is for a power hammer, because I like the reciprocating blows for continuous whacking away. I can still get single hits when I want them, so it does what I want. Cost me about a grand and a half to make mine, significantly less than a purchased unit of any type. That's figuring my time at about a buck an hour, of course. :-)
Just some more for you to consider.
|
|
vicopper
- Thursday, 11/08/07 11:19:12 EST
|
Pure Iron: micro alloying of steel does seem to have a disporportionate effect on it's properties from what I have read.
To get a chunk that size of very high purity you will probably have to buy smaller sizes and melt it in a vacuum using induction heating. Of course such a cube will then probably end up with very large grain size as you try to deal with shrinkage by slow cooling. You will also get a sort of zone refining effect from very slow cooling as well; unfortunately all the "trash" will be in the center.
(Interesting to note that when AT&T signed the First consent decree and threw open all of their previous patents including the one for the transistor, the one for zone refining wasn't included as it was granted minutes after the decree went into effect. Zone refining was the only commercial method at that time of making Si pure enough for transistors.)
Thomas
|
|
Thomas P
- Thursday, 11/08/07 12:19:31 EST
|
Even melting pieces of high purity iron at home or in the lab without the vacuum will result in high levels of atmospheric components like O2, H2, H2, and N. Observe that Nitrogen is next to carbon on the periodic chart and has similar effects on iron, though not as significant. Perhaps NIST has such material for sale.
|
|
quenchcrack
- Thursday, 11/08/07 12:23:03 EST
|
Thomas, we had a zone refining set-up in our physical metallurgy lab at CSM in 1966. We never got to play with it, though. It was a toy for the Grad Students only. You are correct in observing that the result of this process is a cast, not wrought, structure.
|
|
quenchcrack
- Thursday, 11/08/07 12:28:07 EST
|
I have some of the short, weld-on trailor axles that they sell at northern tool. I'm thinking of making hammers out of these pieces. Does anyone have advice or experience with this steel? Have you made tools w/it and heat-treated it maybe? Thanks
|
|
mark harrington
- Thursday, 11/08/07 12:54:17 EST
|
I beg to differ with the Guru about the carbon content of wrought iron. It can vary significantly depending on how it was made and who made it, but it's always there. The silicate slag and the stringy structure of the iron is what gives it that buttery feel under the hammer. I know of two samples of wrought iron from different sources that somebody had analysed, and they both came in at about 0.2% carbon. Basically 1020 steel in micro-rod form, mechanically admixed with iron silicate glass.
|
|
Alan-L
- Thursday, 11/08/07 13:39:15 EST
|
Harley,
The KA75 does have it's points (mostly what you've mentioned) small size in a small shop is a big help I'd suppose. If you decide to go with a bigger hammer, get thee to equipment auctions of some or all sorts. We picked up an big IR T30 compressor for pocket change at the last one we went to (still getting that set up by the way, a metal shaper fell into my lap and the compressor got bumped on the list). One of the local smiths around my area has a KA75 (she also has a 25lb LG for drawing work). It does work nice for what it's meant to do. She's also running off of a relatively decent sized compressor (50 gallon, 5 or 6 HP IIRC). The extra tank capacity seems to be the big benefit with that hammer as she can use it in a pinch for continuous blows. Myself, I've decided to either save up for a Phoenix or Big Blu, OR to build the hammer that I've been brainstorming on for a while now.... gonna call it Frankenhammer. However, raising the tower above the shop, installing the massive lightning rods, and building ten foot Jacob's ladders is the big obstacle I'm hitting right now :)
-Aaron @ the SCF
(And no... the shaper didn't literally fall into my lap. That would hurt.)
|
|
thesandycreekforge
- Thursday, 11/08/07 13:58:18 EST
|
Can you rejuvenate fatigued spring steel? Is there a way to add Silicone and reheat treat this steel to give it it's original properties. I'm asking for the purpose of giving
an antique watch spring new life.
Thanks
|
|
Al Dippel
- Thursday, 11/08/07 14:00:00 EST
|
www.pureiron.co.uk/ These guys sell "Pure Iron" they say it is minimum 99.8% pure they have an analysis of other elements on their web site. They sell 3" billet which could be upset to 4" with a reasonably large hammer.
|
|
- JNewman
- Thursday, 11/08/07 14:31:10 EST
|
A couple of days ago I mentioned Milwaukee Tool & Equiment Company sold blacksmithing tools and equipment. Received a price list from them today. O'h My God!!! (Rounding prices) Cast steel anvils $10 lb and up. 4 1/2" leg vise $2,300 - 6" - $2,700. Swage blocks from $530 - $7.400. Bottom swages $140. Top swages $170. Flatters from $170 to $180. Tongs $120 - $140 each.
Believe I'll pass.
If you want a copy of their blacksmithing catalog I can e-mail forward you a copy. (scharabo@aol.com)
|
|
Ken Scharabok (Poor Boy Blacksmith Tools)
- Thursday, 11/08/07 14:53:56 EST
|
High Priced Tools: This is the same as books that Amazon does not stock and the publisher does not give them a discount due to their paperwork and slow pay. They just take the LIST price plus a cost to handle ordering and shipping then multiply those costs by TWO. The new price is
NONSTOCK PRICE = 2 x (list +15%)
THEN you wait for them to order the book (or tool) and re-ship to you. Many suppliers do this as a "service" to their customers that do not want to go out and shop for the item themselves. If you take Kayne's or Centaur Forge's prices and double the delivered cost plus a handling fee those are the prices you get.
|
|
- guru
- Thursday, 11/08/07 15:21:57 EST
|
Spring Steel: Al, Truly fatigued springs are usually full of fine cracks and cannot be saved. Springs that have just been overloaded, "taken a set", or been bent out of shape can be re-arced (bent back into shape). However, prior to re-arcing a spring it should be cleaned and inspected for cracks. A magnetic crack test can be run or a die penetrant test. On steel with many fine cracks the die penetrant test is often best. Look up "Magnaflux" for the products to do this testing. If the spring is crack free then simply but it into a press and bend it back to shape. These processes may be difficult to perform on a small spring.
There is no such thing as realloying a part. Reheat treatment is not recommended unless it was wrong in the first place.
|
|
- guru
- Thursday, 11/08/07 15:27:31 EST
|
I went to the 3W.puriron.co.uk site and while it is very low in residual elements, it is not really chemically pure. The level of residuals in their product would have a measureable affect on the physical properties of Iron.
|
|
quenchcrack
- Thursday, 11/08/07 17:22:05 EST
|
I think it's important to remember that the terms for ferrous metals are generally artifacts of history, and often relate as much to the process by which a product made as to its chemistry or physical properties. It took me years to figure out that the difference between malleable and ductile iron had nothing whatsoever to do with the distinction between malleability and ductility (not that I understand the subtle difference between those properties anyway). There are things you can figure out, and then there are things you just have to learn.
|
|
Mike BR
- Thursday, 11/08/07 18:53:59 EST
|
Thanks to all who chimed in on the KA 75. I have the plans for the Kinyon hammer. Muskettforge has built one and I have tried it out. I may just go that route. In the long run bigger IS better and a larger compressor will be a welcome addition to the shop. This will just take a bit longer to accomplish. What is that old saying ? Ah yes......Good things comr to thoes who wait.
|
|
Harley
- Thursday, 11/08/07 19:09:37 EST
|
My work has halted basically because I'm out of materials for this week. What do you guys find to be more economical in the long run, a charcoal forge or a propane one? Keep in mind that since I live in a fairly populated city I buy all of my charcoal from department stores in 8lb bags for about $9.
Also is kaowool really necessary or could I make the forge entirely out of adobe?
|
|
Nabiul Haque
- Thursday, 11/08/07 19:34:50 EST
|
Wrought Iron. I have forged my share of it, including a small stock of Swedish charcoal iron that I have, and I have never found it to feel buttery soft under the hammer, nor have I found it easier to forge weld than mild steel. However, I read these things all the time.
|
|
Frank Turley
- Thursday, 11/08/07 19:55:38 EST
|
What is way scraping? I have heard of "scraping the ways". Why and how is this done. Thanks, JM
|
|
Jason M. Mecum
- Thursday, 11/08/07 20:29:40 EST
|
Nabiul; my double burner aspirated propane "pipe" forge uses less than a gallon of propane an hour---I can run a 6 hour class with the forge on the whole time and still have some propane left in the BBQ sized tank. So you can check with the local refill place (tank swapping at a store is much more expensive!) to see how much per hour a similiar system would run you.
Note you will want to keep your charcoal forge to do bits that won't fit in a standard propane forge set-up
Using adobe as the liner/insulator would quickly drive the price of using propane past where you could have bought kaowool and used it and been much happier with it!
Thomas
|
|
Thomas P
- Thursday, 11/08/07 20:32:40 EST
|
Pure Iron:
Perhaps buttery is in the eye of the beholder.
My thanks to Frank, quenchcrack, guru, Thomas, Alan, JNewman for taking the time to give me some useful feedback on my question. I see several leads in there that I can follow up. And a lot more to think about. And probably some more questions.
I certainly have a new appreciation for the fact that making pure iron might be far more difficult than making pure water.
Though I also see that those who have chosen to intertwine their lives with iron, appear to be, as a group, wise, helpful, and humble.
|
|
Steven
- Thursday, 11/08/07 20:34:00 EST
|
or should I say iron and fire.
|
|
Steven
- Thursday, 11/08/07 20:35:45 EST
|
like the center of the earth.
|
|
Steven
- Thursday, 11/08/07 20:38:21 EST
|
Jason Mecum,
Scraping of ways is done to the ways of machine tools. The ways are the surfaces that tool carriages, cross slides, supports and centers move on, and must be perfectly flat, perfectly parallel and dead level for the machine to produce accurate work. Rough machining is done first in the manufacturing process to get a generally "true" surface, and then scraped by hand to get it perfect. When a machine tool is moved, it must be leveled with a precision level to get the ways in a perfect plane. After that, it may be necessary to scrape the ways in spots to correct slight imperfections or to correct damage done during moving.
Hand scraping of machine ways is an even more "lost" art than blacksmithing. Fifty years ago, there were a goodly number of men who had the skill to scrape ways properly. Nowadays, there might possibly be as many as ten in the U.S. Times have changed.
|
|
vicopper
- Thursday, 11/08/07 21:11:12 EST
|
Does anyone know a good and accurate/precise way to test for the amount of carbon in a sample of metal? I have a VERY basic chem lab setup to do stuff with.
Also, tahnks for all the help you all have been, and does anyone mind if I quote them and give them credit in the presentation I am putting together for my expirement?
|
|
- chem geek
- Thursday, 11/08/07 22:05:44 EST
|
Scraping and Scrapers: See this iForge demo for some details.
Before precision grinders the ways and running surfaces of machine tools where made perfectly flat by scraping and bluing (using a precision flat and Prussian blue paint). The flats themselves were made by hand as well bluing in and scraping using three different surfaces against each other alternately until they blued perfectly and would wring together (hold together from atmospheric pressure when touched together). These flats were then used to test the surfaces of part being made either by hand or machine.
After surface grinders scraping was used to put on a "chipped" surface that had a sort of checker board effect from scraping at different angles. I is thought that the semi random direction of the fine scratches on the surface held oil better and reduced wear. It DEFINITELY shows when the surface is wearing. . . I have also seen chipped finishes put on by the ignorant that RUINED machine tools.
Besides flat surfaces it is still common to scrape and fit cylindrical bearing journals on large machinery. This is particularly common on babbitt bearings due to their softness and difficulty in machining a fine finish on babbitt.
|
|
- guru
- Thursday, 11/08/07 22:12:58 EST
|
Fuel Costs: In general the market keeps various fuels somewhat in line with each other. Those that have used both real charcoal and propane and coal in commercial quantities claim the fuel costs are similar and there is little advantage to changing from one to another. As oil costs skyrocket other fuel suppliers including charcoal will raise their price. It is called the world fuel price.
However, there ARE cost advantages to different fuels. IF you tend your solid fuel fire well and do not let it get too big and do not let it burn up extra fuel when you are done then it can be VERY efficient. Solid fuel forges also allow you to have a very small fire OR a very large fire in the same forge so there is an efficiency there.
Solid fuel forges are also easier to forge weld in and generally require less maintenance.
Gas (propane OR NG) forges require the same amount of fuel to do large work as to do small work in a given forge. So small work is VERY inefficient in a large gas forge. To be fuel efficient you need to have different forges for different size work. So there is an equipment (and space) expense to remain efficient. Gas forges also work better when up to a good preheat and then kept there so they are most efficient in all day use. They are MUCH more efficient for heating billets or bars to feed a power hammer than a solid fuel forge that needs constant fire maintenance.
The refractories used in gas forges tend to fail over time and need to be replaced and the light weight refractories are prone to attack by flux and scale. So maintenance is an issue with gas and oil forges.
SO, for the smart hobbiest a solid fuel forge is the cheapest to run and maintain. However, a gas forge with a built in lighter SURE IS convenient and clean to use.
|
|
- guru
- Thursday, 11/08/07 22:30:05 EST
|
Steel Carbon Testing: Chem geek, the best you can do cheaply is the spark test. Obtain a range of samples from pure iron to HSS as a comparison. You should be able to tell within +/-.05% or a little more carbon. You can also detect various alloying ingredients by spark testing. See our review of Metals for Engineering Craftsmen for a spark chart. But I highly recommend comparison testing.
|
|
- guru
- Thursday, 11/08/07 22:35:27 EST
|
Scraping Ways: I would guess there are quite a few more than 10 who actually still do scrape ways. There are companies that rebuild machinery in place, and this is still the way to do it. That "chipped" surface was refered to as "flaked" where I last worked, it does hold oil. My Granddad told of a new machine built without the flaking, and the slide would stick rather than move smoothly. After flaking, it functioned properly. There are air and electric scrapers used as well as the hand tools. Streight edges, surface plates, precision levels and optical devices are among the other tools used for truing ways.
|
|
- Dave Boyer
- Thursday, 11/08/07 22:59:24 EST
|
Mike, in support of your comment, I submit the terms "Marquenching" and "Austempering". C'mon, were clunky, nerdy metallurgists and engineers, not writers, poets or linguists.....these terms are an afterthought I guess.
|
|
quenchcrack
- Friday, 11/09/07 09:03:09 EST
|
Question regarding claying a disc blade and bar stock fire pan and fire grate:
I have fashioned my first coal forge fire pan out of a disc blade and a three inch (width) flat stock rim that a friend helped me weld on. We cut a hole out of the center of the disc blade to seat around the mouth of the blower. For the grate I forged two rings and welded cross bars, all of 1 inch bar stock, that would fit into the blower mouth. When this removable fire grate is installed into the blower mouth at the bottom of the pan it sits about 2.5 inches off the bottom. I was told I should use fire clay to futher protect the bottom of the pan. My question is: should I make the surface level of the clay flush with the top of the grate, or a bit taller so that the grate sits in a depression in the clay? If I did the latter, would the depth of clay cause problems later, say maybe cracking due to uneven cureing as it would have to be roughly 3 inches deep around the fire grate?
Thanks very much for any advice.
|
|
brett
- Thursday, 11/08/07 23:34:58 EST
|
Claying Forges: Brett, there is no need to clay a steel pan forge unless it is very thin steel. Claying was used to prevent thermal shock to cast iron forge pans and in ONE recorded case to produce a firepot shape in a flat bottomed forge. A firepot (depression at forge tuyeer) helps create a more focused controllable fire. The fire is hotter and does not spread so rapidly through the reserve fuel. In a steel forge it is much more efficient and more maintenance free to fabricate a proper firepot.
However, I think you have a serious design problem. The blower should not be attached directly under the tuyeer opening. A LOT of burning fuel, clinker and ash fall down the grate or tuyeer opening in a forge. There needs to be a right angle turn at that point (usually made with a "T") and an ash dump taking advantage of the open leg of the T.
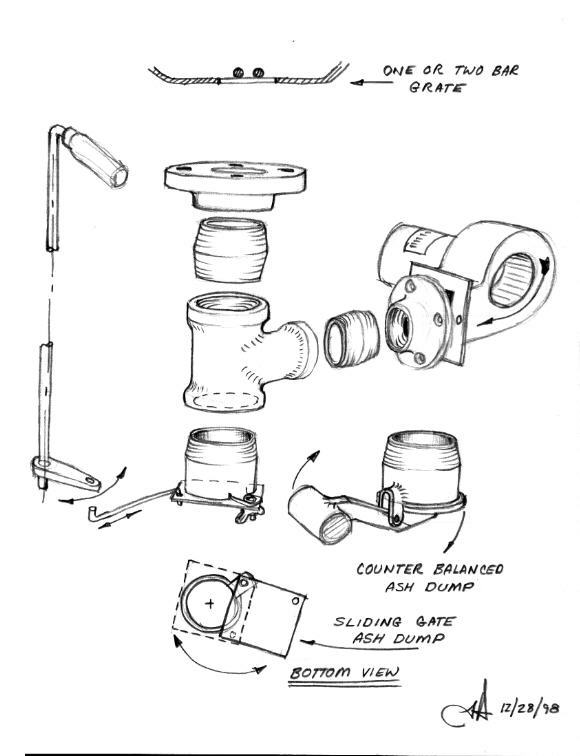
I should probably note on "My First Forge" article that this is a bad idea. The reason I got away with something that LOOKS like it was the forge blower was HUGE and could launch 1" lumps of coal with its blast. It was also not attached under the "firepot". There was so much excess air even when throttled back that air from its 4"x5" outlet would create a good blast through the 2" diameter tuyeer after crossing a 3" gap. Any debris that fell through the tuyeer would be blown to the sides and out of the blower and forge. . .
|
|
- guru
- Friday, 11/09/07 09:28:38 EST
|
Brett,
You're making a version of the old, round riveters' forge. The tuyere (air entry grate) on the old ones was flush with the bottom of the hearth. There was no firepot. To go ahead with your plan, I would weld the tuyere grate flush with and under the disc's central hole where you can't see it from above. If you weld it above and line it, I think you'll lose some of the dish shape of the disc. I'll let someone else chime in on what to use for a lining. Fire clay can be a pain and if not cured and "tempered" properly, it cracks. As guru notes, you may not need any lining.
This kind of forge will get you down the trail for a while if you build careful, high banked fires. The hot spot/sweet spot/heart of the fire will be a ways above the tuyere, not on the hearth. You will need to clean your fire from the top, but that is true even with a rotating clinker breaker in a fire pot. Clinker wants to stick to mild steel, so you will be chipping clinker from the grate occasionally. Proprietary clinker breakers (tuyere balls; tuyere valves) are of cast iron, a little less chance of the clinker sticking.
As guru notes above, you should build an ash barrel with perhaps a kicking ash door on the bottom, and with a right angle air entry into the barrel.
If you get serious about smithing with coal, you will eventually get a cast iron fire pot with cast clinker breaker. The firepots are about 4" to 4.5" deep. The British smiths will often use a side blast forge instead of a bottom blast.
|
|
Frank Turley
- Friday, 11/09/07 09:50:20 EST
|
Scraping Ways: Dave, I suspect I got the term "chipped" surface from the fellow that ruined machine tools with his deep chisel cuts. . . As you noted I think "flaked" is the proper term.
Today it is used most often as a final finish but as you noted it is still used for checking and correcting the flatness of more expensive machines and on things that do not fit or cannot be taken back to a large grinder.
In the past it was the final stage in hand making precision surfaces in a process that started with chiseling a finish surface onto a casting, filing and rough scraping flat to the eye, then precision scraping and bluing. These are the techniques developed in the 1700's that carried us into the height of the industrial revolution of the 1800's and were still in use until precision surface grinding of precision machined surfaces came into being.
It is this ingenious system and very hard work by highly skilled laborers that made the machines that made the industrial revolution possible and brought us to where we are today.
As blacksmiths we like to think we were the key to creating it all but it was these chiselers of cast iron that made the machines that replaced the blacksmith for many purposes. . . Of course WE made the chisels and files!
|
|
- guru
- Friday, 11/09/07 10:24:40 EST
|
I have little experience working with copper alloys. However, I am interested in Native American artifacts. I would like to know which copper alloys Native American craftsmen of the 1890's would have used to make, for example, copper medallions? Secondly, if they used an alloy, such as brass or bronze, would such alloys have had different metallic compositions than the alloys used by contemporary White craftsmen? How would they have differed? Finally, would Native Americans have employed different processes to work the metals than those used by their White contemporaries? For instance, would Native Americans have been able to use wood fires to forge bronze or brass? Could they have gotten wood fires hot enough? Or would they have had to use forges just like White blacksmiths of the era employed?
Thanks for the help!
Mark
|
|
- Mark James
- Friday, 11/09/07 12:27:16 EST
|
Mark, I am not expert on this but here are my thoughts.
The northern North American peoples never had a high degree of technology and most of the civilizations that would have supported metal working disappeared by the Colonial period. These folks worked native copper as found in the ground without smelting ore or using heat. You have a stone age society using stone tools to work the softest of native metals. The Mound builders and others that gathered in large numbers would have eventually developed metal technology but did not survive to so so.
The southern North American peoples in Mexico had some metal technology but mostly used native gold and copper. I do not believe they had brass or bronze until after the Spanish conquest.
The blacksmith forge was introduced in the Southwest by the Colonial Spanish in the 1600's.
As soon as European technology was brought to the Americas in the 1500's everything changed and there is no telling who did or knew what. This is a very complicated part of the history of the Americas which was mostly a period of great decline by the native population.
|
|
- guru
- Friday, 11/09/07 12:52:05 EST
|
Guru,
I've been tapering hot rolled round stock down to a fine point for a project. The stock is 3/8 inch and I'm taking it down to a point with the taper being 2.75" to 3". I've run into a problem with the tip splitting. I think it may be because I'm letting the metal cool too much. Or it may be because the center of the stock isn't getting enough heat. What do you recommend to test this hypothesis or is there a simple quick fix that is to obvious for me to see?
Thanks for any help.
Will
|
|
Will
- Friday, 11/09/07 13:00:40 EST
|
Spliting points: Will, There are a number of causes for this. One that you cannot fix is steel with a cold shut OR a shear crack in the center of the bar. This is not common but it does occur.
A common problem is working the point too cold. For long tapers like this you want to forge behind the point first then forge the point. By creating a lump on the end that holds the heat it cools less as it is forged and thus is not worked cold. If you are not working that fast, take a second heat.
A cold shut caused by closing a "fish mouth" is one of the most common problems in forging points. If you start work too close to the point (and OR with a surface heat) a fish mouth forms on the end of the bar. As you draw the point out this closes but is either a hollow or a split. When the point is being finished it opens up.
If you work at too steep an angle when starting a point then a fish mouth almost always occurs. However, what often happens is that as the stock gets smaller the hammering force is proportional greater and the fish mouth is corrected by the stock bulging out. This is the unintentional or accidental "fix" that often lets us get away with bad technique.
To prevent this you want to be sure you have an even heat THEN when you forge the point start back a good distance (two diameters or more) and striking the work nearly flat. IF you are forging correctly the end will bulge OUT instead of IN as in a fish mouth. Once this outward bulge is started the point should continue to grow out of it and not form cold shuts.
IF you are using the heat retention method the fish mouth cold shut problem usually is not an issue.
|
|
- guru
- Friday, 11/09/07 13:35:16 EST
|
I have a hand rail that I am working on that has spans from 94.5 inchs to 129 inches. i need to make a curved top piece but I want all the ends to be at the same hieght where they mount to the wall. How do I figure out the rise for each section and make them all the same arch. I know that I want the lowest part(where it mounts to the wall) to be 36 inches and the tallest part in the center to be 38.5 but with the spans being different I am having trouble with figuring the angle to have them rolled to being that they will be different.
|
|
matt
- Friday, 11/09/07 15:38:38 EST
|
Re pointing: I like to cut the end of the stock at a sharp angle so you don't forge the point out as clean it up and move it to the middle. Really speeds up the process as it's the tip that generally requires the most drawing down.
BTW are you doing the tapers square and then rounding them?
Thomas
|
|
Thomas P
- Friday, 11/09/07 15:43:30 EST
|
Mark James: For the time period you're asking about, the alloys the Native Americans used were the same as the rest of the country. Where do you think they got it? You also need to do some research on nonferrous metalwork; most of it is forged cold and annealed when it work-hardens. This is easily done in a wood fire. I would expect more use of expedient tools for punching, etc. just because of expense and availability.
The Navaho silversmiths are an exception. They borrowed casting technology from the Spanish, using bits of old potsherd as crucibles, charcoal as fuel, and a small hand bellows as blower. They carved molds from tuff, a soft volcanic rock, and cold-hammered the silver on whatever sort of anvil they could find. The silver itself was coin silver, and they preferred Mexican coins because of their higher silver content than American coins. "The Navaho Silversmiths" by Adair is an excellent book on how this all worked.
I'm sure Frank can weigh in on southwestern metalwork traditions as well.
|
|
Alan-L
- Friday, 11/09/07 16:35:18 EST
|
Curves, Arcs, Cords. . : Matt, your word picture is unclear to me. Not sure what you are making and how rise is part of the curve.
Often things like this are easiest done by trial and error. However, a proper scale drawing can reduce the the trial and error to some test drawings and scaled measurements.
|
|
- guru
- Friday, 11/09/07 16:48:10 EST
|
Frank weighing in. I think the topic has been pretty well covered.
From my early anthropological readings, I remembered that shield-like forms that we term "coppers" were made by natives on the coast of British Columbia. Pre-contact coppers have not been found, although they may have been made. After white contact, cleverly made and decorated coppers were made as status symbols.
In the Wisconsin Lake Superior basin, native peoples found copper nuggets in veins and were able to hot and cold
fabricate spear and arrow points 3,000 to 6,000 years ago. I'm not certain that copper was smelted from ores, however.
Gold has been mentioned. Since fine gold does not work- harden and it's found free in nature, the natives of Mexico, meso-America, and South America were able to flatten nuggets and make jewelry and sacred objects.
In southern New Mexico, the Santa Rita mine was opened by the Spanish soon after their occupation of the area. While at the Museum of New Mexico, I curated one of the rawhide ore buckets. It was flat-hoop banded top and bottom with copper hoops, and the rest was bound with rawhide, including rawhide bail and lifting rope. I'm told that they used "chicken ladders" in the mine. These were logs with notched steps cut into one side. Leaning at the proper angle, the steps were horizontal.
|
|
Frank Turley
- Friday, 11/09/07 18:53:37 EST
|
I just wanted to mention something, that is not widely known, that Thomas A. Edison, the inventor of the incandescent electric light (1879) also got into the mining and refining of iron ore in a major way, at the center of which was an electromagnetic separation process, around which he built a massive effort to try to make economical the extraction of low grade iron ores in eastern U.S. mining areas, principally in New Jersey --- attempting to process thousands of tons of ore a day which was a leap ahead of anything anybody else was doing in this area in the 1890's. All the money that he had made up to that point in the establishment of (DC) power generation systems to enable everyone to have electric lights in their homes and businesses --- he was a millionaire many times over --- he poured every penny into this effort to process low grade iron ore in an economical manner.
When it was finally made apparent that the market was not going to cooperate with him, primarily because of the fall in ore prices, because of new discoveries of large deposits of high grade iron ore in the upper Midwest, he had to abandon the effort, with his fortune completely spent, and about $300,000 in debt. The massive rock crushing machines he had designed, and they were huge, which reduced huge boulders to a powdery dust, from which his electromagnets could draw out the iron, was eventually applied to the manufacturing of cement, which proved generally profitable through the 1920's. His fortunes however were primarily recovered through the refinement and manufacture of his phonograph, invented before the electric light, and through the manufacture of his motion picture inventions.
But I thought it was interesting, and might be of interest to the folks here, that when you look at an electric light, you are also looking at a technology, the inventor of which, who was also a big time friend of iron. He gave everything he had to it.
|
|
Steven
- Friday, 11/09/07 19:14:02 EST
|
Thomas P
I'm actually a functional designer not even close to being a blacksmith so it never registered with me to do the tapers square. I guess it would be faster. I did try to cut the ends at a steep angle but I kept running into the same problem. Before the weather drove me inside I had started to taper with the lump on the tip but apparently I was not leaving a large enough mass. In this particular case I have a design reason for forging them round. I'm off setting the center line of the taper so that I get a more graceful arc as I curve them into a hook. I discovered the look one day when I was just working out some styles. Sort of three dimensional doodles.
Thanks for the suggestions.
And thank you, Guru, for your help.
|
|
Will
- Friday, 11/09/07 20:58:20 EST
|
Guru, your advice to Will was spot on, however, wasn't it the practice eons ago to do the point first? With wrought iron's fibrous nature was it more of an issue then?
|
|
Roland
- Friday, 11/09/07 21:26:13 EST
|
Guru,
Just read your comments and advice on fuel costs. The key thing for me is the availability of solid fuel. I have to drive about 45 miles to get a good grade of coal (the source for which I found through this web site) and I have to be there at 7AM before the crews drive their trucks out to make deliveries. With my work schedule I have to be creative in getting this coal. I also use charcoal that I make myself. The cost is in time rather than cash. For simple bending I strike up a nice wood fire. I know that's frowned on by some but it works pretty well for me. Another thing I have to keep in mind is that every so often there are restrictions on burning during droughts. A gas forge would suffer from fewer such restrictions and I'm planning to construct a small one for that reason and the convenience of being able to run down the road to my local hardware store for a tank if I need to.
These are just some things I've been considering as I learn more about metal working.
|
|
Will
- Friday, 11/09/07 21:33:02 EST
|
Pointing Round: If you rotate and try to forge round the effect is like trying to roll a point. The result is internal splitting or tearing of the steel. This in turn results in a split point. Forge square then octagonal then knock off the corners lightly.
|
|
- guru
- Friday, 11/09/07 23:20:44 EST
|
Fuels and Cost Savings: Every situation is different. That coal you are buying would probably cost less overall if you purchased in bulk and let a professional trucker deliver it to you. Less trips, less transportation cost, less lost time. But this takes capital and a storage location.
Real wood charcoal can be purchased. While it may seem expensive it should be a much more efficient use of your time to let someone else do the coaling. YOU are a metal worker with machinery, they are a coaler with a hole in the ground. Your labor rate should be more than enough to allow the coaler some profit and you still be ahead. . .
Smoke of all sorts is a problem in many locations. In high fire risk areas I worry much more about sparks from grinding or torch cutting than the non-existent burning fly ash from coal. However, it is often other's opinions that count. They will also try to shut you down for ANY open flame and may consider a gas forge "open". Better start saving for an induction forge such as the Kaynes sell. Yeah, the white hot steel is a hazard too. . . but no flames getting it that way.
How you look at these things from a commercial standpoint is completely different than as a hobbiest. Ease and convenience are big factors. However, with oil prices DOUBLING in one year due to current "oil" administration policies. . . you had better own your own wood lot to make charcoal because propane is going to go out of sight. . There will be another huge increase in steel prices again soon. If you are looking at heavy steel purchases or saving some old machinery from scrap in the near future you had better do it NOW.
|
|
- guru
- Friday, 11/09/07 23:35:10 EST
|
Forging a point.
One of my students who was also my teacher, Harry Jensen, served a one year apprenticeship in Denmark before the Nazis took over the country. He said that he literally got kicked in the butt by a journeyman for forging behind the point and then towards it. I belive he was working wrought iron, and if so, this enhances splitting. Roland mentions this above.
I always forge the point first, but I make sure that the MIDDLE of the hammer face hits the end of the bar. It's not an edge-to-edge blow. I lift with my holding hand so I get an angle from the anvil as well as the hammer. I forge the point square and somewhat blunt, then work backwards to make the angle more acute and to control the length of the taper. I use forceful, rapid blows, holding the bar end at the far, radiused edge of the anvil. At Turley Forge, we say "S.O.R." for short, meaning square, octagonal, round.
The occasional split can be forge welded if you work quicker than a snake a-strikin'.
|
|
Frank Turley
- Saturday, 11/10/07 00:10:37 EST
|
I forge points the same way Frank talks about. A short, square point first, the lengthen the taper from the point back. On 3/8" round bar, I'd first forge it square with a few quick blows, then make the short point and finally do the taper. Then to octagonal and finally round. Works for me.
|
|
vicopper
- Saturday, 11/10/07 00:37:40 EST
|
I forge most points just as Frank and Rich describe. I seem to remember from a demo, may have been Hofi, that too light blows when forging near the end of the bar, drawing or pointing will cause the dreaded fishmouth just like a surface heat. The outer layer is worked but the inner not as much.
When pointing at the power hammer, I usually do a short square taper, almost a chamfer with the hand hammer first.
|
|
ptree
- Saturday, 11/10/07 08:36:34 EST
|
The dreaded fishmouth.
This often occurs when I'm forging a tool taper under my 25# tripper. I make an allowance for it and crop it. Thence to the grinder/sander.
|
|
Frank Turley
- Saturday, 11/10/07 10:01:40 EST
|
Hello, I was working on I forge project 48, the nail header and the nails. I guess I need to start with square stock, but I was having a dreadful time making the shoulder for the nail head. I got the stock to fit through the hole, but when I tried to flatten the head it just went on through the hole. I guess it just show how inexperience can really foul something up. I did finish one nail after about an hour, and because I could not get the shoulder right, I just bent what was supposed to be the shoulder over at a 90. (but in my defense I started with about half inch re barb, because it was free, so I had a lot of drawing to do. And after to failed attempts I went back to the anvilfire as I was trying to do this from memory, so I also drilled a hole in some stock until I can make a better nail header) It's not pretty but I can hit it with a hammer and the pointy end will go into wood, and for that small success I do not consider it a wasted day. I am still learning how to control the hammer, and the fire. Too many irons in the fire is one for me, I am often burning my iron. any suggestion on the shoulder, the concept looks simple, in I forge, but I am finding that things are a little harder when they are on the anvil, as opposed to the computer (grin). Any suggestions would be most welcome! Thanks
|
|
Sean in China
- Saturday, 11/10/07 10:18:57 EST
|
Now this may be just a bunch of BS, but I have read that the somebody, possibly even the Russians, started to build a telegraph line in Alaska way back in the late 1800's, and that the native americans up there would swipe the copper wire to make stuff with.
None of the Northwest Coast copper work I have seen dates any further back than that era- so it might just be true.
|
|
- Ries
- Saturday, 11/10/07 10:33:39 EST
|
Fish Mouth and Points: Frank, when Grant Sarver setup a friend of mine in the impact bit sharpening business one of the machines needed was a punch press setup as a "nipper" to cut off bad point ends. The cutters were two pieces of high speed steel cutter bit turned on the diagonal so there was two 90° "cutting" edges. For hot cutting this works fine and the edges last a long time. The bits can also be rotated so there are four edges to use. The machine sits next to the power hammer and takes less than a second to use.
This is a good application for old style punch presses.
|
|
- guru
- Saturday, 11/10/07 10:52:57 EST
|
Sean,
Point the nail before shouldering and heading. It helps to point the small stock on the middle/base area of the horn. It can also be done on the anvil face; see posts immediately above. Once you get the point and reasonable taper, you shoulder on two sides only over a relatively sharp edge, giving quarter-turns back and forth, using half-face blows. When you notch it and wring it off, the
head will probably be off center. From the gitgo, the very first blow should be an angle blow to try to center it over the header hole. Use as many blows as necessary. When centered, give a a "three clout" or "four clout" faceted head.
It helps to draw a soapstone or whiteout concentric circle or square around the header hole, so that you can use it as a guide when centering the head.
Next comes the problem of making multiples all about the same length. Make a soapstone or whiteout mark on top of the anvil for practice, say 5/8" from the shouldering edge of the anvil. After pointing and tapering, put the point on that mark each time that you shoulder. Mucho practice!
When driving, a blunt point is less likely to split the wood than a sharp point. Barbs can be put on the nail shank with a cold chisel to help keep it from "outenin". Mild steel nails quenched at a red will harden slightly which helps keep them straight. If it is a clinch nail, let it normalize and drill a pilot hole. In fact, when installing hardware, for instance, use pilot holes for everything. It's embarassing to split a $3000 hand carved door.
|
|
Frank Turley
- Saturday, 11/10/07 10:58:33 EST
|
Sean, I need to make a replacement sketch for a nail header instruction I did a couple years ago. . .
In most books you see the bar tapered, the part notched, the taper stuck in the header and the nail twisted off then headed. . . This sort of works sometime.
In reality you start with larger bar than you need and draw out the nail over the edge of the anvil leaving a rough round shoulder for the head. Then above this you notch, place in the header and twist off. You now have a rough head that just needs five quick blows to finish as a truncated pyramid. The nail should still be loose enough in the header to fall out with a simple tap of the header on the anvil.
|
|
- guru
- Saturday, 11/10/07 10:59:58 EST
|
The nail body should be square, right? Frank, should the quarter turn start on the corner or the flat of the nail? I am sure I am probably making this more difficult than it should be. In time I want them to be the same length, so the chalk line is a great idea. Right now My main concern is getting them to look like a nail instead of a deformed fishing hook!
|
|
Sean in China
- Saturday, 11/10/07 11:37:04 EST
|
The nail shank is square unless it's a horseshoe nail; then it's rectangular, but that's another ball game. The quarter turns are on the flats.
|
|
Frank Turley
- Saturday, 11/10/07 12:09:31 EST
|
Cutting Tools:
Re the Guru's post on cutting with a punch press, the same operation can easily be performed on the power hammer with an appropriate spring cutting tool. The tool is made using two pieces of medium-carbon alloy steel like 4140 or, better yet, S-7 or H-13. The Two cutting heads are forged from pieces about 1/2"x1"x4", with the middle 2-1/2" of one edge beveled to a 90 degree cutting edge. The 3/4" on either side of the cutting edge are not beveled to provide stops so that you don't whack the cutting edges together when you complete the cut. Weld the two heads onto a spring handle just as you would for a spring fuller and you're good to go.
The cutting edges can be handily forged using a V block on flat dies, or they can be machined if you have a milling machine. I learned this one from Steve Parker, and it took him only a couple minutes to forge a pair of bits that looked as good as machined ones.
For cutting stock where you're going to be drawing a point, this method saves a LOT of aggravation and time. Likewise for making balls on the end of stock, etc.
|
|
vicopper
- Saturday, 11/10/07 12:56:48 EST
|
For my beginning smithing students their "real" instructor wants them to make a couple of nails. As they are limited on time and skill I have them shoulder with a guillotine fuller and then draw back from the shoulder to the point.
I also made *2* headers one slightly smaller than the other so a nail that fails on the big one can often be saved on the small one.
Me if I needed a bunch of old fashioned nails I'd go to Tremont Nail Co!
Thomas
|
|
Thomas P
- Saturday, 11/10/07 13:12:13 EST
|
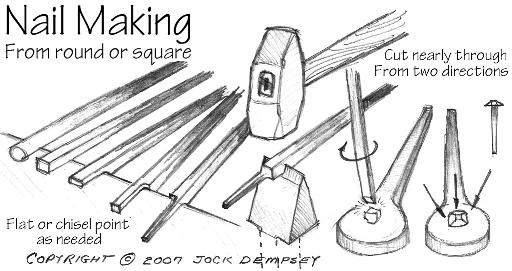
Above is the way most folks are making nails today. This works very smoothly. The hole in the nail header is relieved underneath so it is not too deep and the hole is tapered (larger at the bottom). Drawing made for Poor Boy Tools.
The drawing below made for Paw-Paw's book is the way many books show using headers with the exception of leaving a lump on the point as it is forged. This method of stock isolation is relatively new. In this case the nail rod must be larger than the hole in the header and the taper forged beyond the shoulder. This method works but is a little trickier than above.
When I make heavy spike nails from 1/4" square bar stock I clamp the pointed spike in the vise and head it there. For large spikes that you want to use a header on you can use this method to make the initial upset and shoulder then transfer to a header.
When using a header for bolts and such the bar must be upset to catch and form a shoulder when heading.
|
|
- guru
- Saturday, 11/10/07 14:46:27 EST
|
NORMALIZING:
I'm making a throwing hawk for a friend out of a ball pien hammer, I don't do blades and don't want to have to do this one twice!! When do I normalize the metal, after the last forging and before grinding and cleanup, or when I temper the blade at the end? Thanks
|
|
Roland
- Saturday, 11/10/07 14:49:39 EST
|
Going back to Native American copper use in what's now eastern north America, there was lots of prehistoric use of native copper nuggets. No evidence of smelting, though.
After contact, there's a lot of adaptive reuse of things like copper kettles and their iron bails and lugs, with arrow points and knives being made from such.
Since the original question was for the 1890 period, I made the response I did. Adaptive re-use still happens. For years the preferred raw material for tin tinkler cones on fancy-dance regalia was the lids off snuff cans.
|
|
Alan-L
- Saturday, 11/10/07 16:33:27 EST
|
Roland normalizing is performed after forging and prior to further heat treatment. However in forgings with large section changes annealing is often recommended instead. To normalize the part is either left to air cool after the last heat if throughly hot after working (usually not in hand work). Or it is given a last heat and let air cool.
"The normalizing of steel is carried out by heating approximately 100 oF above the UCT (Upper Critical Temperature) followed by cooling in air to room temperature. "
This results in a relatively uniform steel microstructure. Some steels do not benefit from normalizing.
|
|
- guru
- Saturday, 11/10/07 16:33:37 EST
|
Scraping machine ways,
When I refurbish the rams & stuffing box assemblies of hammers I 'scrape' the surface of the ram with an electric 'flatting iron' grinder, and check with a blued ground flat block - I then draw lots of little circles about 1 1/4" dia all over it once ive cleared any high spots, (in nice, evenly spaced lines)
I dont know how effective it is, and doubt the hammer will work much better when its done but it looks real pretty (you can tell Ive been working with metal to long !! :0 ,
I always tell folks its to hold an oil film, who knows though? - I just like making a job look 'right' even if mechanically its already ok ( I doubt the grinder moves more than a couple of tenths of a thou per pass!!)
remember a bit of pride in your work costs nothing !
|
|
- John N
- Saturday, 11/10/07 18:56:07 EST
|
Sword Making: Saw program on TV (How Is It Made). Piece of tool steel was placed in an automated shaper which turned out a rough finished blade in about an hour - including blood groove. Blade was then heated in a bath of liquid salt, quenched and hand-finished.
|
|
Ken Scharabok
- Saturday, 11/10/07 20:26:05 EST
|
On YouTube there are a number of videos of the production going on in Chinese shops where they are cranking out hundreds of hand made swords. Except for the use of a power hammer the techniques are more than ancient. Rows of guys hand grinding by working the sword back and forth across a wet grind stone setting horizontal on top of an oil drum. .
The 21st Century includes the most modern as well as thousand year old technologies both used to compete in a global economy.
|
|
- guru
- Saturday, 11/10/07 20:45:35 EST
|
Ebay Auction Ads: These were something new we were trying and it seemed there was some interest. I thought it was nice to see some of what was for sale in our area of interest. . . Then their system broke down and started serving ads for Nintendo, Channell 44 and Guicii shoes. . . We had ZERO interest (click throughs) in 24 hours! This is compared to 20-30 average for the group of ads we were running. SO I pulled the prominent ads.
I'd like some feedback of what you folks think of having the ebay ads. I figured we discuss them enough that we should earn something back. However, these ads work differently than others and do not pay unless the person clicking the ad signs up for an ebay account OR buys something in a certain amount of time. It is not a pay per click system like the google ads. You also need to see what happens in the long run to know if they are paying. . Having the system break down the week after we sign up is not helpful.
|
|
- guru
- Saturday, 11/10/07 21:15:53 EST
|
Jock, I don't think much of the ebay ads. Unless they paid you very well, it wouldn't be worth it to us readers.
|
|
- John Odom
- Saturday, 11/10/07 21:31:53 EST
|
I don't like the eBay ads. I can barely tolerate the Google ads. I realize something has to fund this site, but if the auction ads aren't that much return on investment, I'd dump them. I check eBay fairly often anyway.
|
|
vicopper
- Saturday, 11/10/07 22:21:36 EST
|
I just wanted to say thanks to everyone who weighed in on the taper and point question I had last night. I spent a big part of this evening working on the technique and with a combination of the advice I did a VERY satisfactory job of a 12" taper with a fine point on 1/2" hot rolled round stock. I know my customer will be impressed when he sees the final piece.
Thanks especially to the Guru and to Thomas P
|
|
Will
- Saturday, 11/10/07 23:24:52 EST
|
I actually clicked on some of the ebay ad's out of curiosity, I think I saw one or two ASO's.
|
|
Nabiul Haque
- Sunday, 11/11/07 00:06:07 EST
|
Ebay Ad Selection: Ad servers do not give you a lot of choice in how you select or filter ads. Key words are used to try to get ads that appeal to your users. On this page I am using a VERY tight filter "blacksmith anvil" to get the most applicable items.
The problem is that the key word system on ebay is very abused and one of the most abused phrases is "blacksmith anvil forge iron". You see everything from toys and video games to post cards and car parts listed under this category. in actual blacksmiths tools you see EVERYTHING listed with the key word "anvil" in it. . . so I have used the tightest filter I could here.
However, ebay DOES give you some choice. Google ads are based strictly on what their computers think your users are interested in and what keywords their advertisers pay for. Some advertisers who have anvil, forge, blacksmith, iron, steel in their business name and are not related to any of those subjects (anvil brand mixers for example) stupidly try to buy the key words with their name in them. . . So we get some very odd stuff occasionally. "Blacksmith apps" commercial kitchen management software was a recent one. However, google has what they call a "competitive ad filter" where you can block specific web addresses.
Sadly there is no way I can block the ebay ASO ads. All we can do is try to educate people.
As to ads on the forum pages, they may stop in the future as they do not pay very well. Ads in other locations do much better. We cover too wide of topics here and many of the ads are either the wrong category or the same over and over. This has been a learning process and I am still learning.
|
|
- guru
- Sunday, 11/11/07 08:55:30 EST
|
The ad that appeared to the right of the page for the 15# anvil on eBay is interesting. It is clearly a cast iron ASO but the seller said: "The boxes say cast iron but they turned out to be cast steel so I am passing along the savings". Right. I just hate it when I want to make something out of cast iron and the foundry makes it out of cast steel. Two different metals, different shrinkage, different methods to make and pour it. This person is incredibly cynical and malicious in his advertising. Jock, I would not want Anvilfire to be seen as associated with people like that.
|
|
quenchcrack
- Sunday, 11/11/07 09:22:50 EST
|
Anyone know a guy in New York city by the name (Jim Garvey) I have looked everywhere but cant find his number or info. far as ive heard hes a blacksmith did some iron work in the NYC subways, and on the statue of liberty. I am living in NYC at the moment. and looking for any type of blacksmith shops around.
thanks
|
|
Cooper
- Sunday, 11/11/07 10:12:53 EST
|
GURU
I had to laugh. One of the eBay ads was from johnnie8acres.
|
|
- Tom H
- Sunday, 11/11/07 11:05:52 EST
|
Yeah, I've thought about having a link to an ebay buyers guide. . .
|
|
- guru
- Sunday, 11/11/07 12:01:31 EST
|
Alan L, A little correction.
Male fancy-feather Indian dancers used sleigh bells and sometimes open-ended "sheep bells" for dancing.
The rolled tobacco can lids for jingles was used by female jingle dress dancers beginning about 1930, the provenance probably being Whitefish Bay, Canada. The jingle dress dance is now widespread in the powwow world, the jingles being attached in rows to the decorated dresses.
The powwow announcer's joke going around: If there's such a thing as reincarnation, I want to come back as a jingle.
|
|
Frank Turley
- Sunday, 11/11/07 12:16:39 EST
|
Quick question, what kind of volume would I need in a hand operated bellows for a forge of about a square foot in size and half a foot deep? My last attempt using an old binder a garbage bag and some pop bottles didn't prove even close to the amount of air needed to get a forge started.
|
|
Nabiul Haque
- Sunday, 11/11/07 12:19:29 EST
|
James Garvey is still in NYC, as far as I know- he has a website you can use to contact him.
www.jamesgarvey.net
Anyone who is not familiar with his work should check him out. Besides being more than competent at small scale traditional blacksmithing, he has done a series of awesome street furniture in NYC, mostly forged fluidly from 2" round bar, including his IRT subway station, with 2" round bronze lines threading thru the space.
|
|
- Ries
- Sunday, 11/11/07 13:25:33 EST
|
I'm pretty well set to try a forced air propane burner. I have pretty much everything I need except a propane hose with 1/4" or 3/8" MPT or FPT fittings on each end. I'm having a hard time finding one locally. Is this typically something that needs to be ordered, or is it the sort of thing I ought to be able to find in a brick and mortar store? If so, where should I be looking?
|
|
Matt B
- Sunday, 11/11/07 13:26:18 EST
|
I am working on a rosette projet. I found in the 1996 issue of the blacksmihting journal a section about die to be used with a blacksmihtin magician. The concept is very smart and look effcient... Until i tried.
Essentially a 5/8 round strock is inserted in the top fuller and a die is serving as a punch. So far my s7 round stock is not holding. In fact it mushroom inside the top fuller but that is another problem
I guess my question is where I can find a 5/8 stock that i can use to insert in my top fuller and what kind of metal should i use to make my die. Square. round tear drop etc that they dont bend under the pressure. For some reason the people using Fly press must have to same issue if they are not using the right metal for their die.
Not even sure if I make sense here. I hope so, if not I will try to expalain again
Thanks in advance for your input
Dan
North Troy, vermont
|
|
Dan
- Sunday, 11/11/07 14:05:21 EST
|
Dan, For hot work of this type you can usually get away with mild steel for limited production. S7 should be more than adequate for high production runs and even cold work if properly heat treated. Annealed it may mushroom under heavy use.
Note that a punch is usually a male part that is used alone or with a female die. Your word picture leaves me confused as to what the problem is.
We have a whole series of flypress and general press tooling articles on the iForge page. Most of the tooling being demonstrated is mild steel. Where slender punches are in use they are H13 or S7. A2 would work as well. All are sold in the annealed condition so that they can be machined to shape and must be heat treated prior to use.
|
|
- guru
- Sunday, 11/11/07 14:33:40 EST
|
Hoses: Matt, Standard hose should be available from a propane equipment distributor (like and RV store) or a welding equipment store. Most welding equipment suppliers have hose assemblies but will also put together custom hoses with any ends you want.
|
|
- guru
- Sunday, 11/11/07 14:36:57 EST
|
Matt,
I had my propane hose made up at Fairfax Propane. Make sure you bring your checkbook, though . . .
|
|
Mike BR
- Sunday, 11/11/07 14:57:36 EST
|
Frank:
Thanks for the corrections and dates! I know you're in the Powwow world; I am not.
|
|
Alan-L
- Sunday, 11/11/07 16:51:54 EST
|
My male part of the die is a 5/8 round stock made of H13 that is inserted in a 5/8 plus 1 hair hole in the female part that is a piece of steel that is 3/4 by 2" wide and 6" high. The male part mushroomed inside the Male part.
I might not have heat treated properly neither the male part H13 or the female part S7.
Where can I find the procedure to heat treat the H13 and the S7. That might solve the problem
Any suggestions where to buy H13 and S7 in small quanities ot make dies and punch
Thanks
Dan
|
|
Dan
- Sunday, 11/11/07 19:32:29 EST
|
Tool Steels: Dan, There are varieties of places to buy tool steel. You can get many tools steels in a variety of cut lengths from our On-line metals store. McMaster-Carr also has small quantity order service.
We have heat treating information in our Heat Treating FAQ. There is also information in the on-line store. For many of these hot work steels it is possible to not get them hot enough prior to quenching. However, DO NOT overheat, heat as evenly as possible and quench in the proper warmed quenchant.
|
|
- guru
- Sunday, 11/11/07 20:10:41 EST
|
Mushrooming: While the type of tool you are making should be possible to make without mushrooming it is difficult to judge on struck tools. Even with the best hardening and tempering the tool MAY mushroom some. Because of that possibility the shank should have a very slightly tapered section before the end, a heavy chamfer AND a slightly crowned end. This can all be shaped by hand with a file and sandpaper or on a belt sander but is best done on a lathe.
Normally struck tools want the struck end tempered to where it may mushroom under heavy use rather than crack or spall. However, struck tools that fit a holder should be very hard to avoid mushrooming. Note that ALL tool steels should be tempered some amount and that hot work steels can be tempered at considerably high temperatures.
To the best of my knowledge the steel sold with the Smithing Magician is SAE 4140 and does not get extremely hard. However, a socket made of it should be hardened (oil quenched) and tempered. The struck end is normally very tapered so that it could swell and is tempered fairly soft.
|
|
- guru
- Sunday, 11/11/07 20:27:18 EST
|
I checked out the Hey Buddy anvil on the eBay ad. Nice anvil and right now is fairly priced. I just wonder where the sellers got the idea that a "nice ping" was a desireable feature? Who defines "nice"? According the American Association for Anvils, Spec A250-BHIT, the frequency of the ping shall be between 250 and 550 kilocycles per second when rapped with a steel mallet weighing not more than 2% of the mass of the anvil. The anvil shall he hit with a mallet speed no to exceed 2 feet per second. The anvil shall be struck on the face 1" from each corner and the results averaged. The duration of the resonance shall be a minimum of 4 seconds. The anvil shall be securely mounted to a sound-attenuating block weighing not less than 50% of the mass of the anvil. The person conducting the test shall affirm and avere that he has read these specifications and the test results are true and accurate."
|
|
quenchcrack
- Monday, 11/12/07 08:29:56 EST
|
I happened across an EXTREMELY (to my laymans eye) old looking blade over here in Northern Japan, it resembles nothing more than a short Gladius, maybe more of a dagger size, it may be copper or brass, it's not magnetic and has a bluish/green hue to the corrosion, looks almost like someone pulled it up in a fishing net; do y'all happen to know anyone who might be able to tell me something about it? The fellow who sold it to me hadn't a clue... Thanks much!
|
|
Kajiya-In-Training
- Monday, 11/12/07 08:32:51 EST
|
Quenchcrack.
All of my Hay Buddies passed the ping test except one, and it was mounted on a sound absorbant material. I'll re-do it.
|
|
Frank Turley
- Monday, 11/12/07 08:44:07 EST
|
I realize this is a technical forum, and hope you don't mind me asking the following question for a novel I'm writing in which someone is manacled. I'm wondering about how a manacle would be put on and taken off by a smith--probably a farrier in a small village, with roughly medieval technology. Could the manacle be made from a horseshoe? Would the rivets be hot when hammered in? (Very scary for the person in the manacle, I would think). Would you use a chisel to break off head of rivet to undo the manacle? Or would they have had steel saws of some kind that could get through iron?
I found an example of a slave manacle on the web, which looks about the right level of crudeness: http://www.library.cornell.edu/olinuris/ref/moravia4.html (scroll nearly to bottom of page). I had pictured more
of a flat band around the wrist with only one rivet, but this one looks even more impossible to escape from.
Sarah Micklem, www.firethorn.info
|
|
Sarah Micklem
- Monday, 11/12/07 08:53:30 EST
|
Ebay Prices: In the past month I have bid on a couple ebay items and lost on all. I went 30% over my set price for a lathe at the the last minute in a bidding war (stupid thing to do) and still lost. Most of the good anvils I have seen went that way. Looked reasonable until the real bidding started. . .
I shop for a variety of things on ebay (looking at fork lifts now). But anything with the slightest hint of rarity or a poorly know market price often goes for way too much.
That lathe I bid on was an unused virtually NEW 1960's Craftsman lathe. It still had the cosmolene on the ways. But anything loose had been lost. That included the standard components, face plate, centers, tool post, a lever, motor pulley (special size two step) and change gear set. Seller claimed you could still get parts from Sears. . He was wrong. You need to know what you are bidding on. I thought it was worth $800 (they are only an "OK" lathe) but it went for $1050 and would have been more if I had kept bidding. . .
Hopefully the guy that got it knew what he was bidding on. The parts to make it usable will mostly have to be found on ebay. But chucks to fit will be new at $400. By the time it is a usable tool he will have another $1000 in it not including a stand. I have another like it that has all the parts but lots of wear and tear. I was just going to swap them out and keep the old one for spares. . .
Anvils can be found reasonably priced at blacksmith meets. Craftsman lathes in perfect condition are much rarer. But you have to know what something is worth.
|
|
- guru
- Monday, 11/12/07 09:07:55 EST
|
Sarah Micklem.
Manacles.
I found an English set of manacles on eBay which are similar in form to the Cornell referenced one. If one hole overlays the other, an iron rivet can be inserted and a rivet head hammered at room temperature on an anvil or other block of steel. When end-hammered, the metal thickens (upsets) and swells into a shaped rivet head. To undo the manacle, a cold chisel could be used. Filing or the use of a stone abrasive could also be employed to remove a rivet head. I believe that hacksaws were available in the Middle Ages.
I doubt whether a farrier would have made manacles, especially out of horseshoes. Farriers specialized in making shoes, shoeing tools, and in the Middle Ages, they doubled as veterinarians.
I would differ with you in our interpretation of "crudeness." The pictured manacles are cleverly and skillfully forged and most likely made by a blacksmith, not a farrier.
|
|
Frank Turley
- Monday, 11/12/07 09:48:09 EST
|
Quenchcrack, I'm not familiar with that spec but it doesn't seem to make sense. The spectrum of a 2 ft/sec hammer blow probably isn't going to have a significant amount of energy above 20 khz and, even if it did, you couldn't hear it.
|
|
Mike Ferrara
- Monday, 11/12/07 10:00:11 EST
|
Mike, yeah, ya need special instrumentation to do this test. :-)
|
|
quenchcrack
- Monday, 11/12/07 11:34:19 EST
|
Frank Turley,
Thanks for your answer, and the correction on crudeness factor. Here's another image from the Kansas Historical society (of a leg shackle), much more what I had in mind--no fancy hinge or anything: http://www.kshs.org/cool/shackle.htm Plus there's a hero blacksmith story to go with the picture!
Could something like that be improvised, and how long would it take?
Sarah
|
|
Sarah Micklem
- Monday, 11/12/07 12:36:41 EST
|
Hi, I have been looking for days now for a reference site on Anvil Serial Numbers and of course have no access to a library if they would even carry such book. My Anvil is stamped Hay-Budden Mfg Brooklyn, NY and has serial number of 196877......Please help me!!!
|
|
Dana
- Monday, 11/12/07 12:38:07 EST
|
Hi Dana
You're anvil was manufactured in 1912.
|
|
- Burnt Forge
- Monday, 11/12/07 13:00:18 EST
|
This info can be found on page 303 of "Anvils In America" by : Richard A Postman. This book is available in the anvilfire store.
|
|
- Burnt Forge
- Monday, 11/12/07 13:02:20 EST
|
Burnt Forge,
Thank you so much!!!! You have been such great help!!! I am done being stressed!!!
|
|
Dana
- Monday, 11/12/07 13:07:09 EST
|
Your very welcome
|
|
- Burnt Forge
- Monday, 11/12/07 13:08:06 EST
|
Burnt Forge,
Hello again! Just curious, how much do you think the estimated amount of the 1912 Hay Budden Anvil might be worth?
|
|
Dana
- Monday, 11/12/07 13:51:58 EST
|
Bronze Blade: Not a clue here. Jappanese bronze implements are a pretty rare specialty.
|
|
- guru
- Monday, 11/12/07 13:57:02 EST
|
Prisoner or Slave Shackles: One of my first commissions was to make ten sets of legirons for a movie production. These had two omega shaped pieces with holes on the flanges. A chain link was welded in one side and a nut and bolt went in the rivet side. Pairs were assembled with about 24" of chain in between. When locks were used a primitive screw lock was common. While this was a good paying job it was rather depressing thinking about what they were used for while making them.
The one piece shackle you showed is closed and riveted by a blacksmith and much have the rivet chiseled out and pried open by a blacksmith or metal worker to remove. Escape is impossible without cutting the metal.
Any blacksmith could make something like this for you. Its about an hour's job once scheduled and in the shop, longer if you need a pair with chains. No improvisation to it. If a blacksmith makes it, it is the REAL thing.
|
|
- guru
- Monday, 11/12/07 14:09:35 EST
|
I see Blue Blade Steel is still using Pirated information from Anvilfire. Maybe they meant to call themselves "Blue Beard Steel".
|
|
quenchcrack
- Monday, 11/12/07 14:13:53 EST
|
Thank you, guru.
Chiseling out the rivet would involve lots of hammering, right? How long would that take? Would it dull the chisel and if so, how would the smith sharpen it (given roughly medieval tech).
|
|
Sarah Micklem
- Monday, 11/12/07 15:22:36 EST
|
Bob, looks like they lifted the temper chart with the reference indicators but dropped the reference material. I'm sure Jock will not let them get away with it. The internet is huge, but we have eye's everywhere.
|
|
daveb
- Monday, 11/12/07 15:38:11 EST
|
Hi Dana
Many factors go into the value of an anvil. The most important is weight class, condition, style and maker. You have a desired maker. I would need a weight and a good clear photo to give you a proper estimate. Without these I can only guessing depending on condition and weight class of a Hay Budden being valued at .50 to 6.00 dollars a lb.
|
|
- Burnt Forge
- Monday, 11/12/07 16:18:25 EST
|
Anvilfire: The optimism
Pirated information can be looked at as the best form of flattery. :)
|
|
- Burnt Forge
- Monday, 11/12/07 16:25:06 EST
|
Dana
You can post a photo over at www.forgemagic.com and I could review it and give you a current USA internet market value. You can also send a photo to my email address.
|
|
Burnt Forge
- Monday, 11/12/07 16:29:24 EST
|
I just finished reading the shackle article. I found it quite interesting and romantic, but I find it difficult to believe that a smith/foundry owner would bury iron evidence rather than simply tossing it into the foundry or forging it into a nice candle holder or something. The part about the smith dropping a 20 pound iron ball in the well also makes me wonder if the story is legit. 20 pounds of iron was worth too much to a smith to just throw away. It makes for a heroic story that the smith was so disgusted by the idea of such torturous slavery, but I feel that it lacks common sense and logic from the standpoint of a metalworker.
|
|
- Nippulini
- Monday, 11/12/07 16:53:48 EST
|
Rivet Cutting: Sarah, Removing the rivet only takes a couple seconds IF you have the right tools (hammer, chisel, punch, anvil).
Medieval tool steel was not much but it was also cutting relatively soft wrought iron. A chisel would be sharpened then just as today, on a grinding wheel (foot or hand powered), hand stone OR possibly with a file. As long as the smith did not strike the top of the hardened anvil face with the chisel he could cut dozens of rivets with a good chisel.
Where this gets difficult is with incomplete tools. Without an anvil it will be hard to properly support the rivet. In this case it is on a human extremity and unless well supported the force of the hammer is going into that. . . Its a messy business and can get very bad.
|
|
- guru
- Monday, 11/12/07 16:55:38 EST
|
I sent a mail to the folks at Blue Blade Steel. Need to call them. . .
|
|
- guru
- Monday, 11/12/07 16:58:38 EST
|
Rivet Cutting:
Many thanks. This is very helpful. --Sarah
|
|
Sarah Micklem
- Monday, 11/12/07 17:24:18 EST
|
Hiding the Evidence. . . Nipp, it may have just been fear and lack of imagination. Then again a story. . .
An acquaintance was complaining about certain government officials sticking their nose into his business to the local Sheriff. The Sheriff who also does not like outside interference into HIS business says, "Well just don't get greedy. If you bury em' you got to bury their car with them!" You get the point.
Now, a blacksmith can't do much with a cast-iron ball. It will always be a cast iron ball and as such, evidence. I think the word "foundry" was missused in the article or not an iron foundry. In an iron foundry as you noted, it would have been just so much cast iron scrap and gone in a few days or hours.
There are lots of stories of criminal acts where the evidence is not well disposed of. Fear, lack of imagination, greed. . . just CAN'T get rid of that nice knife, gun, car.
|
|
- guru
- Monday, 11/12/07 17:25:29 EST
|
Hey guys, if it weren't for criminals being stupid most of the time, we wouldn't catch half as many as we do. With all the easy and quick ways to dispose of *any* kind of evidence, it always amazed me that we found any at all, but find it we certainly did.
Those who not only evvectively dispose of all the evidence, but also conceal the very fact of the crime usually get away with it, unless simple bad luck trips them up. Fortunately, there aren't many really smart ones, just mostly dopes who seem to do everything wrong. Almost as though they don't even pay attention to the information available on every cop show on TV. Go figure.
|
|
vicopper
- Monday, 11/12/07 17:51:40 EST
|
Quenchcrack,
Re. the specifications for anvil ping is the average an arithmetical mean or a geometric average?
|
|
- philip in china
- Monday, 11/12/07 19:14:57 EST
|
Hello, I was recently working on a very small piece of curved metal for a motorcycle fender that is made of 1/8 mild steel (yes it really is 1/8 thick). I tig welded a couple stand offs to it that were one inch round and I let it cool normally. After it cooled I went to mount it to the stand offs I had already mounted on the bike frame to find the fender stand offs were in very slightly maybe 1/16 total. I thought I would have been safe for the metal shrinking upon cooling due to its thickness. My question is how I can expand the fender out again. The fender piece is only about 6" by 10" big. If I heat it and cool it rapidly will it stay? Will it affect the curve in the fender? How do I heat it (torch/oven)? How hot? Like I said it is maybe 1/16 that it needs to spread apart but with both stand offs being the same size it is noticeable that they do not line up properly. Thanks alot for any advice you can give, Garett
|
|
Garett
- Monday, 11/12/07 19:17:42 EST
|
Sarah,
The primitive shackles I have seen in museums etc. in England were a different and much simpler design. A length of bar is upset at one end. The other end has an eye punched through it. The shackles for the legs (or wrists) are two roughly semi circular pieces of bar. Each end of the semi circle has a ring forged which is large enough to splip over the straight bar. The correct size of shackle is chosen for the size of the convict . (Some were made to accomodate children). These then slide over the main bar. Once they are both in place a rivet (or later a padlock) goes through the punched hole and the job is done. These woul have been very difficult to escape from unless the rivet were to be cut.
When we ruled India a neat idea was to rivet a ring round the ankle. Attached to this by a simple link was alength of fairly light bar. It doesn't prevent the convict from walking and doing normal activities but any attempt to run..............
|
|
philip in china
- Monday, 11/12/07 19:32:50 EST
|
Mike BR: Thanks for the tip. In the end I went ahead and ordered a hose that will do fine, for less than $20 -- including shipping.
|
|
Matt B
- Monday, 11/12/07 19:58:05 EST
|
I am making a chisel set with fine tapers. The metal is an old piece of high carbon steel I found in the junkyard, and in quite hard, but I would like to know what I should heat treat it at. Can you help me out?
|
|
Luke Castonguay
- Monday, 11/12/07 20:47:40 EST
|
I usually stick with things like coat racks, lanterns and the occasional tool, but this is my first time making a chisel
|
|
- Luke Castonguay
- Monday, 11/12/07 21:04:38 EST
|
Article concerning Abana's future.
http://poaba.wordpress.com/
I do not agree or disagree. I am merely posting so all can read it and contact the Abana folks to add their two pennies.
|
|
Burnt Forge
- Monday, 11/12/07 21:40:49 EST
|
Matt, I think that's about half what I paid.
|
|
Mike BR
- Monday, 11/12/07 22:08:43 EST
|
Luke: There is a section on heat treating on this site. To find it click on the "NAVIGATE anvilfire box and then on the 21st century box. You will see an article on heat treating. At the end of that article there is a link to another article about heat treating "junk yard steel" a term used for any unknown steel. Read these articles.
|
|
- Dave Boyer
- Monday, 11/12/07 22:29:12 EST
|
Mike,
If it makes any difference, it's only an eight-footer. And they're a little vague on the fittings, so it might end up running me another $6-$7 for parts to adapt it to my regulator and burner. We'll see.
|
|
Matt B
- Monday, 11/12/07 23:36:02 EST
|
Leg Irons,
I just saw "Cool Hand Luke' for the 20th or so time. But this time I viewed the scene carefully how his legirons were constructed and attached.
It appears his legiron was made of 2 semicircles of 10mm dia. or so roundbar, each end was flattened and punched with about 5mm dia hole. Their ends overlap and are riveted acting as a hinge, leaving the other end un-riveted.
When applied to the Prisoners leg, the ring was closed on a end link of the chain, a rivet passed thru the 2 holes in the flattened ends of the semi circles. A big hammer was set on the ground to serve as the anvil, the rivet struck by a few sharp blows with a smaller hammer.
I expect throughout history there would been (and still are!) scores of variation of legiron constructions.
The Smith in the one village making them to his own tastes,
Then the Smith the next village away followed their own.
As Kingdoms grew etc, Of course Bureaucrats come into play, Needing to justify their jobs and exert their levels of controls, Thats probably when standardised design to at least a regional level came into being.
|
|
- Steve
- Monday, 11/12/07 23:57:54 EST
|
ABANA'S Future: Keep it on the Hammer-In please. See my post.
|
|
- guru
- Tuesday, 11/13/07 00:26:57 EST
|
Luke, Junk steel.
Are you sure it's high carbon? What material are you intending to cut with it? Why a fine taper? How fine? With junkyard steel, it's like guessing at tomcats.
|
|
Frank Turley
- Tuesday, 11/13/07 06:40:14 EST
|
Philip in China, a simple arithmetical average plus or minus the standard deviation is implied. I would certainly expect to see a distribution histogram of frequencies with full Six Sigma analysis, though.
|
|
quenchcrack
- Tuesday, 11/13/07 08:22:05 EST
|
Tring to find someone intersted in buying a #10 edwards cold shear. Any info would be grateful. Thanks
|
|
Gene Boyd
- Tuesday, 11/13/07 14:22:25 EST
|
Gene, post your notice on our Hammer-In page. It stays posted for a month where this page is archived every week. Be prepared to send photos by e-mail.
|
|
- guru
- Tuesday, 11/13/07 14:29:58 EST
|
Question about homemade castable refractory, doesn't the pearlite/vermiculite expand and crack the furnace cement apart when it's fired?
|
|
Nabiul Haque
- Tuesday, 11/13/07 18:15:47 EST
|
Quenchcrack, Is that rev 1 or rev 2 of the A250-BHIT? I believe at the AAR committee meeting of 2006 there was serious discussion of the mallet metalurgy and hardness and also a strong vote for a mallet speed specified to a tighter rate, as it was alleged that unscruplus vendors were using a particular mallet metalurgy to cause a in spec ping from cast iron ASO's. A Frankie something or the other comes to mind as the vendor.
|
|
ptree
- Tuesday, 11/13/07 18:21:05 EST
|
ptree, you may be right about the revision. As I recall, some vendors were using mallets shaped like tuning forks. They were then claiming the anvil had a nice ring when it was actually the mallet that was ringing.
|
|
quenchcrack
- Tuesday, 11/13/07 18:33:50 EST
|
Guru,
I have tried my hand at forge welding again, and my failure this time has me a little puzzled. I was trying to close a ring in the same manner as I was taught to close a chain link, with what our teacher called a "hand-shake" shaped scarf. It worked in the class to join 80-90% of the material, with a stubborn bit of scarf left open. I thought I could overcome this at home with the use of some borax flux, but the result was that the entire weld popped open as soon as I tried to re-shape it (at near-welding temp). Is it possible that there was too much flux trapped in the interface? I used the residual heat from the formation of the scarf to melt the flux into the join, simply by dunking the hot ends into the pot of borax.
The last time I tried to do something like this with the flux was an experiment. I made most of the weld stick, let it cool and then forced it back open from cold to see how good it was. The interface where the weld came apart on that occasion was white, with a finely grained profile. Is that a clue as to what I'm doing wrong?
It's getting mightily frustrating!!!
|
|
Craig
- Tuesday, 11/13/07 19:11:12 EST
|
Craig.
My students often get excited and hit too hard right out of the fire, and that causes the material to "shear" apart.
Three, four, or five light licks at the start might help. Then hit harder.
In addition, an oxidizing fire will cause the pieces to slip apart. You don't have to dip the material in the borax. You get a snowball of flux that way. Just sprinkle a little all around the area to be welded.
|
|
Frank Turley
- Tuesday, 11/13/07 19:20:02 EST
|
Thanks Frank, but I was being very careful not to displace the molten steel by hitting too hard. I saw a lot of other students do exactly that when I was getting my training.
The oxidising fire may still be the problem, though, I guess. It's a brake drum forge, with coke for fuel, but the way I've made it, it has a few holes in the bottom that are still open to the outside atmosphere. Would that lead to an oxidizing environment in the heart of the fire?
Apologies for my chronic disrespect for the common comma... It's a disease I have.
|
|
Craig
- Tuesday, 11/13/07 19:55:14 EST
|
Homemade Castable Refractory: Nabiul, water absorption and the necessity to slowly dry refractories that have not been in use in a long time is a common problem.
Vermiculite generally does not absorb water but it does weaken the refractory if very much is used. Pearlte is similar in how it effects the refractory.
It can takes days or weeks to properly cure a castable refractory and a full day to calcine it sufficiently to take full forge temperature. Patience is the key to building with castable refractories. Patience is key to firing up forges in long disuse.
|
|
- guru
- Tuesday, 11/13/07 20:02:40 EST
|
Craig, I have had a lot of problems working in shallow fires with coke. The ash is often different and may contaminate the weld. This can be both a fuel problem or a forge cleanliness problem. Those "extra" holes letting air into the sides of the fire many also be a problem.
|
|
- guru
- Tuesday, 11/13/07 20:20:18 EST
|
Is there a particular type of wood that makes a better stump to set your anvil on or does it just depend on what you find works well for what you are doing? Are the old cast steel anvil stands better to use than wood? Thanks, for any input.
|
|
Robert Cutting
- Tuesday, 11/13/07 20:23:40 EST
|
Matt's hose is longer than mine. (Hmm, that didn't sound right, somehow . . . .) Maybe there's a difference in quality (enough already), but I suspect the local propane dealer just doesn't feel compelled to compete on price
|
|
Mike BR
- Tuesday, 11/13/07 20:26:50 EST
|
Ohh boy, my castable refractory looks like granola from all the vermiculite that I used. I could only get the furnace cement in a tiny 1 pound tub for the cut throat price of 7 bucks. I'm only making a open charcoal burner though so I'm hoping the cookie tin won't melt away.
|
|
Nabiul Haque
- Tuesday, 11/13/07 20:44:43 EST
|
Guru,
Have you any advice on how to make the ash and clinker funnel down to the ash dump in a brake drum? Although I don't think this particular problem was related to forge cleanliness (I tried to get the weld done as soon after getting the fire going as possible), I have noticed that a lot of garbage tends to collect in the hollows of the uneven surface at the base.
Also, is the "hand-shake" scarf the most effective way to weld two ends of a round bar together? Would a pair of simple opposing tapers be more appropriate?
I think I will plug those holes and see if it makes a difference...
|
|
Craig
- Tuesday, 11/13/07 21:02:30 EST
|
Robert Cutting,
I don't personally think it makes much difference what kind of stump, stand or mound you put your anvil on, as long as it is stable, and as long as the anvil has enough mass on its own. A lightweight anvil could possibly benefit from a very dense, high-mass stand, provided that the anvil and stand were coupled very, very tightly. In practice though, most anvils are either just sitting on the stand or lightly constrained, and little or no effective mass-coupling takes place.
I have used pine, hickory, cottonwood and mango for anvil stands. Currently, I use fabricated steel stands and have the anvils bedded in a polymer construction sealant to kill the ring. This has been the most satisfactory solution for me to date. I absolutely hate a ringing anvil!
The old cast factory anvil stands were cast iron, not cast steel, by the way. At least, all that I have seen were.
There is an IForge demo on anvils stands, I believe. You might check that out for further information.
|
|
vicopper
- Tuesday, 11/13/07 21:34:03 EST
|
Craig,
What you are calling a handshake scarf is the right scarf for that joint. It forces the flux and dross out of the joint as it closes from the center of mass out, which is required to get a good weld.
My guess is that your coke fire in a brake drum forge is probably somewhat shallow, keeping you from getting a really neutral or slightly reducing atmosphere in your fire. Typically, coke takes a constant blast of air to stay burning, so you need the fire to be deep enough to burn all the oxygen before it gets to your workpiece. With bituminous smithing coal, you can get the fire hot and damp the blast down so you get a reducing fire that is still hot enough to weld, but I don't know if you can do that with coke. My guess is that you can't sustain a high heat without the blast.
|
|
vicopper
- Tuesday, 11/13/07 21:40:05 EST
|
Handshake Scarf: While this is correct it can be made wrong. Try to keep the majority of the mating surfaces convex. If flat they are so-so but if concave (curved in) they collect and hold swarf. See our iForge welding demo for diagrams. The thin edges end up convex or flat but this is a fact of life.
|
|
- guru
- Tuesday, 11/13/07 21:50:05 EST
|
Vicopper,
Thanks for the input. The demo was quite informative especially since I'm still in the collecting necessary tools stage. I think one of the steel stands would probably suit my needs best and they can be modified and moved easier than a log. I was also wondering how best to kill the ring without impeding the use of the anvil. Lots of good information to work with.I just figured the factory stands were cast steel because of the lack of rust on the one I was looking at. It had been outside for a long time and still had a nice smooth finish and patina that I haven't seen on cast iron. Thanks again.
|
|
Robert Cutting
- Tuesday, 11/13/07 22:29:43 EST
|
Robert, Bedding in the anvil with silicon rubber grout and bolting it down snuggly has been one of the better ways to reduce noise.
|
|
- guru
- Tuesday, 11/13/07 23:21:59 EST
|
Yeah, Mike, that's wrong. Occurred to me too, though.
|
|
Matt B
- Tuesday, 11/13/07 23:28:24 EST
|
I am wanting to buy some steel online for making damascus blades. I am not really sure what would be ideal. Is $12.00 a lb reasonable for recarb free l-6 and 0-1 tool steel? Demestions 1/4'' thick, 2'' wide, 3'' long. Can someone help me out? Thanks!
|
|
Troy
- Tuesday, 11/13/07 23:52:00 EST
|
Tool Steel Prices: Troy, flat stock is often the most expensive tool steel and is very precision. The reason L6 is commonly used by bladesmiths is that many band saw blades are made of it so it is available as scrap in nice large flat pieces. Price is also a factor of section size and quantity purchased.
Our on-line store has 01 (3/16" x 1" x 18" x 3 pieces) or 2.8 pounds for $49 plus shipping. That is $17.5 per pound US. Then they have 1/8" x 2" x 18" x 5 pieces 94.40, 6.38 pounds for 90.40 or $14.17/pound. As you see as the section gets larger the price per pound is lower. This is because it it precision ground flat stock and the finishing is expensive. They did not list 1/4" but it should be about $12/pound according to the above.
McMaster Carr has O1 in 1/4" x 2" x 72" (10.2 pounds) for $89.12 or 8.73 a pound. So if you are in the U.S. you can probably get it for less than or about $12/pound delivered to your door step. McMC is usually high but in this case the price is not bad. I would have to buy from them rather than my own store. However, this is based on a 6 foot length. Most often in tool steel we only need a short length.
Note that if you bought 1/2" x 2" x 72" the price is only $114.84 for 20.4 pounds or 5.63/pound. So you could save a LOT for a few extra heats forging and welding. Look at a simple progression with cutting in half:
2 (1/2 O1, 1/2 MS), 4, 8, 16, 32, 128, 256, 512 (8 steps)
But if you draw out longer and cut by thirds
2, 6, 18, 54, 162, 486 (6 steps)
OR fourths . . 2, 8, 32, 128, 512 (5 steps)
SO, you can start with thick stock, draw a little more and re-laminate more pieces and cut out a lot of steps. A rolling mill or hydraulic press really pay off in reducing steps.
There is a lot of theory as to what is the most efficient in making laminated steel. A few years ago smiths were buying razor blade stock and laminating it in a sealed stainless tube. The result was about 100 layers in the first heat. Drawn into a 1/4" or less bar that is 400 to 500 layers per inch. The advantages here numerous, the very clean steel welded in a closed atmosphere assuring good clean welds, the single welding heat if 400 to 500 laminates per inch was sufficient as it often is, AND there was very little waste. The disadvantage is the steel for this method is expensive. I think the first guy that did this obtained a scrap coil of the razor blade stock and combined it with shim stock.
Others work their billets short or in squares to reduce the amount of weld surface area. The smaller the weld area the less likely there will be a failure or inclusion. There is also less area the clean up and prepare so there is reduced waste.
Price per pound of starting steel in this field is almost inconsequential compared to your time. However, there are people who do not value their time at all and people that value their time very highly.
Waste is also a serious issue in making laminated steel blades. The final product may be only 10% of what you started with. Commercial makers do a lot to try to reduce the waste as possible as a small efficiency can really improve your profits.
SO, there are a lot of factors to weigh in the difference between buying expensive thin stock, less expensive thick stock or machinery to reduce the stock with.
|
|
- guru
- Wednesday, 11/14/07 08:35:49 EST
|
I have an old forge with a hand crank blower that I would like to fire up. What should I use for fuel, etc ?
Thanks, John
|
|
john
- Wednesday, 11/14/07 10:33:00 EST
|
John, A solid fuel forge can use a variety of fuels. Charcoal, coal or coke. Even wood pellets have been used.
Charcoal should be real wood "lump" charcoal not molded briquettes. Briquettes are mostly sawdust and glue.
Coal should be a good high grade bituminous or "blacksmiths coal". Coal comes in infinite grades and most are not very good for blacksmithing.
Coke most commonly comes in large lumps for foundries. This is not suitable to use unless broken up into small pieces. Foundry coke is also rather dense. It is better to purchase blacksmithing coke. Coke also burns VERY hot, needs a continuous forced air supply and should be used in heavy duty forges designed for coke.
Wood is the fuel of last resort. Wood makes proportionaly more flame and smoke than the other fuels and the smoke burns the eyes. After a wood fire has been going a while it becomes a charcoal fire which is very good. However, at that point you are getting low on fuel and more fresh wood must be added. Most smiths with no source of charcoal prefer to make their own.
|
|
- guru
- Wednesday, 11/14/07 11:11:45 EST
|
Chain link handshake
This is an exposition; it is easier to show it in person. First, it is the 21st century; what is the raison d'etre? Are you really going to fix a chain or weld a ring onto a chain using this method?
In any event, let's say you're right handed working on a London pattern anvil, horn to your left, radiused edge near the horn. You're using 3/8" round x 7¼" with 90° cut ends for a link. You bend into a "U" with equal leg length, 7/8" between legs.
I think most smiths begin shouldering the scarf over the radiused edge with half-face blows holding the right hand leg at a 45° to the front anvil edge. The position of the link is with the left hand leg lowered 3/8" below the anvil face, over, but not contacting, the cutting table. The inside "corner" of the right leg is into and onto the top of the anvil face about 3/8" or a tad more. After each blow, pull your holding hand a little bit to the left, the tong reins moving in an small arc toward the horn. When finished, the point of the "mitten shaped scarf" should be about 1/16" thick. The scarf will pull toward the inside of the legs.
The left leg was lowered in order to make the scarf a bit cattywampus, so when you finally close the two scarfs together, they will bypass each other instead of banging together.
Another method to use, if you're accurate with the cross peen, is to use the peen at 45° to draw the material off the "corner" of the cut end, working on the anvil face.
When closed into the handshake, they SHOULD NOT MEET IN A SMOOTH CURVE as seen on a finished link or as is seen in lots of books. Each bend should be a little bit abrupt, so that the scarfs meet and cross at a 90° angle. Furthermore the ends of the "mittens", the fingernails, so to speak, should PROTRUDE SLIGHTLY BEYOND the crossed section. There should be no gap between scarfs. When closed and the inside of the link is inspected, you should be able to observe a smooth "S" shaped curve where the scarfs meet.
Think about it. The scarf shoulders are at 45°. Therefore, the scarfs should meet at 90°.
Upon further inspection, a small portion of the legs adjacent to the scarfs will be straight, not curved.
If borax is used, flux at a bright heat, so that the flux melts right away.
In a coal forge, a few incipient sparks usually won't hurt, but a big shower means that the steel is burning. Weld on the face close to the near corner of the anvil face. Hit on both sides of the scarfs, turning the wrist over.
You probably won't have time to spin the tong reins in your hand. Then take to the horn, holding the link 35° to 45° and with the tong reins toward you.
Swing the reins away in an arc, hammering with repated, rapid, vertical blows.
By using this method, you will be welding towards the point of the top scarf.
When the link is turned over, you repeat this action.
Also, if done properly with control, you will get a little extra thickness into the weld area, looking perhaps like a Gothic arch as viewed from the flat side.
Old hand-forged links often had this peaked look, the smith realizing that forge welds were normally weaker that the parent stock.
With A36, it usually takes two heats to get the weld. With the second welding heat, the link usually goes straight to the horn, holding it at various angles, including vertically, to allow the horn to get rid of the shut inside the link.
While welding, the link will open up wider than desired in the finished link, but it will be gaining a nice, oversized curve. The final steps are in closing the curve to the correct radius, leveling, and letting the link normalize.
Whew! It's only a link.
|
|
Frank Turley
- Wednesday, 11/14/07 11:14:20 EST
|
Guru,
Do you think 1045 will make good hammers if properly heat-treated and normalized? Thanks
|
|
mark
- Wednesday, 11/14/07 13:32:47 EST
|
Mark, Yes.
|
|
Frank Turley
- Wednesday, 11/14/07 13:46:16 EST
|
First, thanks to all who answered my questions on blade profiling a couple of weeks ago. Now, using the stock removal method what jigs might you need to make a blade. Assume the blade smith was a hired hand in the shop and not a skilled craftsman and that you wanted to reproduce the same blade over and over. For example a katana.
|
|
Mike
- Wednesday, 11/14/07 14:24:52 EST
|
Jigs and fixtures: Mike, Jigs and fixtures are jigs and fixtures. There is no simple answer to this. They are almost all custom designed by tool makers that understand the process, the part and the production quantity.
If I need to drill 10 holes I will probably lay each out by hand and drill them individually.
If I need to drill 100 holes in sets or in special relationships to the part and must be fairly accurate I may make a simple clamp on drill jig from mild steel.
I HAVE made and still have a drill jig made of wood with a metal bar for making wood book covers. The complexity and materials of the jig depend on the application and precision needed. Consider this, thousands of long rifles were bored and rifled on wooden machines with just a minimum of steel parts. . . This is some of the earliest machine/jig making for relative precision.
If I think that drilling job may be repeating and 100 may turn into 500 or thousands I'll invest more in the jig and put in replaceable hard steel drill bushings and have built in clamping. This requires machine tools (or a high degree of skill) to make the jig.
If the job is tens of thousands I would invest in a small CNC mill and an operator to run it.
If the job quantity is approaching millions I would look into a CNC machining center with an autoloading robot. It would also need a materials handling feed system, chip removal and parts removal and finishing sub systems.
You start with needing a simple jig and end with a full fledged automated factory. It is all based on quantity.
Blade grinding is normally done by hand even in modest quantities. Jigs for grinding could vary from a work holder with sliding guide that is manually operated to a mechanically driven system on ball guides. Low production parts are manually clamped in the machine and removed when finished. As production rises an automated magazine and part feeder is added. . .
In some applications you would want to machine first (coarse chips) then grind (fine chips). Profiling in quantity would best be done on a waterjet system.
If you need specifics on this kind of tooling and do not know how to do it yourself then you hire a tool and die designer OR start the long process of learning the trade. However, the folks that are successful at low quantity production are usually DIY types. If you need to hire an engineer then you better have a product that you are going to sell many thousands of.
|
|
- guru
- Wednesday, 11/14/07 15:36:03 EST
|
On wells. A year or so ago someone was selling a couple of anvils on eBay they said they were bringing up out of an old well. Showed pictures of their lifting framework. A year or so ago I purchased a Dunn & Murcott anvil from a contractor clearing a site in Brooklyn, NY who said they discovered it while digging around an old well. True or not?
On the apparently urban myth about Union troops breaking off the horn or heel from anvils they found during Southern raids, I suspect dropping them down a nearby well (or into a river) may have been just as effective of a technique if they wanted to put them out of operation.
I have several old handdug wells around the farm. I spoke with one of the sons of the a former owner of part of it. He said it was the summer job of a brother and him. Fairly easy going until they hit water. Each morning afterwards they would have to bail out the water and then mix further digging with continuing bailing. He said when they came back to the house in the evening their mother made them strip naked on the back porch, put their muddy clothing in a pail for rinsing out and then bowl bath before they could put on fresh clothes and come into the house. When deep enough it was stone and mortered up to the top. He noted at the time they hated the job, but looking back on it, it wasn't all that bad of an experience.
|
|
Ken Scharabok
- Wednesday, 11/14/07 15:37:53 EST
|
I have some stainless steel surgical instruments that I would like to get melted down and cast into wedding bands for me and my fiance. I have been unable to find anyone that may specialize in this type of work. Since the sentimental value of this project is so important to me I am not as concerned about the cost or looks of the finished product. Can you help me find someone?
|
|
Toby Florek
- Wednesday, 11/14/07 16:41:44 EST
|
Stainless Jewelery: Toby, Melting and casting stainless is a job for a large foundry. What you want is a jeweler that can (or will) forge and shape the stainless into shape. Depending on the instruments and the amount of material in them there may be some welding involved. If there is insufficient material for forging then you are out of luck.
The problem with a job like this is you need either a custom jeweler that works in stainless OR a jeweler that knows a welder/blacksmith type that can do the rough work and then the jeweler the finish work.
Note that stainless jewelery costs considerably more than silver even though the metal is about 1/16th the price. It is the labor and difficulty factor. Stainless is generally difficult to work and some processes are not within the capability of the typical small jewelers equipment, even on small items like rings. ALSO, many surgical instruments are made of high strength grades of SS. . . As custom work they will cost much more than gold and have zero scrap value.
One of our members here, Nippuliini, makes stainless jewelery for piercings and may be able to help you.
|
|
- guru
- Wednesday, 11/14/07 17:41:31 EST
|
Toby,
For what you want, you'll need to find a custom surgical appliance company, one who has the capability to cast stellite in an inert atomosphere, induction furnace. It's a good thing that money is no object, as I expect you'll be looking at a price in excess of a thousand dollars.
Stainless steel simply cannot be cast by the methods that jewelers use, so you're into medical or aerospace stuff, and that's big bucks any way you slice it. I'd suggest you look into platinum instead, and mount the surgical instruments on a nice plaque with an engraved inscription.
|
|
vicopper
- Wednesday, 11/14/07 17:41:52 EST
|
Anvils and Wells: Ken, While the broken horn sapper myth is a story that holds water (even though a myth) your well story does not.
While it MIGHT be a quick expedient to drop an anvil down a well to hide it your own story about well digging says it would be out and in use the next day or so. NOW. . . IF it was unknown that the anvil had been dropped down a particular well OR in a specific spot in a river then it might be a different story.
Note that wrought iron anvils that have spent a great time under water corrode and split to the point of uselessness.
I had a fellow try to sell me a couple anvils that had been lost in a local river at some time (reason unknown). There had been a recent flood that changed the river bed and turned up tons of interesting items and he had rescued these anvils. They were split so forcefully from the expanding wrought that the steel faces were split as well. There was a gap running length wise in the horn of about 1/2" wide that you could see through!
I asked the fellow if he had gotten them out of the river. He was silent for a moment then asked, "How did YOU know?"
I said, "Well, they have been under water for about 100 years. . ."
Now, if they had been in FILL in a well... and being NEAR a well means little. Especially in an urban environment that has seen multiple uses.
Cast anvils would not have this problem. Just lots of rust.
|
|
- guru
- Wednesday, 11/14/07 18:04:39 EST
|
Toby, I am both a blacksmith and a former jewler, much as Vicopper is a blacksmith and used to be a jeweler.
One small diffenence is I worked in a factory that used tons of stainless every year.
Both the Guru and Vicopper point out that SS is much harder to finish and that is very correct. Welding SS is both easy and almost impossible. Depends on the grade. The simple surgical tools like forceps are made form 300 series SS and are pretty easy to weld. The 400 grades run from hard to weld to nearly impossible, especially in small sections. May I make a suggestion? Like Vicopper suggests, mount the surgical tools in a lovely frame, and ask the intended for rings that were given her by former boyfriends, and if you have anything similar, perhaps a ring given, and returned, then go to a good comercial jewler and ask to have those made into the rings you desire. Save some of the metal for a baby ring for the future, and trade the excess for at least some of the work. The ladies often find the bit about forging a new tomorrow from the past very semential. For reference, one mans jumbo high school ring in a size 10 yeilded enough 10 karet gold to make two nice rings and three sets of light earings. How do I know this you ask? I did this for my own wife, and many friends in college. I did let them forge on the sheet, and the couple thought actually working on their own rings was pretty cool as well.
If you absolutly must have rings made from the instruments, a lost wax process can be used to make the one offs, but it will require a high temp furnace to melt the SS, and that usually means very expensive especially for a one off.
Good luck.
|
|
ptree
- Wednesday, 11/14/07 18:46:17 EST
|
Guru, I have a small cast steel anvil, the one I brought to demo on at the CSI hammer-in, that was retrieved from the burnt out ruins of a family blacksmith shop. My next door neighbor's uncle had the shop on the family farm in Ak. It was in very wet ashes and debris when he dug it out after I asked him to look. He had told me about the shop, and that it burned down about 50 years ago. Next trip to a family visit he looked and found it. It was pitted pretty deep on the face, about 0.060 to 0.090" deep. I sanded it a bit and have used it as a "you can use this till I need it back" for about 6 years now. And by the way the thing is a "Vanadium Steel" 70# and harder than woodpecker lips.
Quenchcrack, this one was off the scale on the AAR A-250 BHIT test.
|
|
ptree
- Wednesday, 11/14/07 18:51:53 EST
|
If I were to make a hammer out of 1050 steel, what would I quench at (non magnetic?), and what color would I temper at (I might use a temperature crayon for tempering, so if you know the temperature, that information would be helpful).
Thanks
-Hollon
|
|
- Hollon
- Wednesday, 11/14/07 21:47:25 EST
|
Also, another unrelated question, why would high speed steel be used in woodturning tools (I know in particular that Sorby uses HSS)
|
|
- Hollon
- Wednesday, 11/14/07 21:49:24 EST
|
Hollon: I see no particularly good reason to use high speed steel for wood turning tools. Do they say what grade of high speed? I know a lot of tools are marked "high speed" but they fall way short of properly heat treated M2, a REAL high speed steel I am quite familliar with. While M2 is suggested for some wood cutting aplications, I don't think it will hold up any better than D2 or D3, and they are easier to heat treat.
|
|
- Dave Boyer
- Wednesday, 11/14/07 22:46:02 EST
|
I've got a client in need of a spiral staircase. The typical mass produced kit does'nt appeal to either me or my client. We both like the appeal of the hand forged look. The part that really eludes me is the spiral nature of the top rail and any other part that requires this spiral effect. Can you point me in some direction that would assist me in designing and ultimatly manufacture these tricky parts Please?
Thanks, Arlo
|
|
Arlo
- Wednesday, 11/14/07 23:41:30 EST
|
spiral rail-- get a copy of Volume 5 of the Foxfire series, re: blacksmithing and gunsmithing, and take a good hard look at how the canny old mountain gunsmith derives his patterns for rifling his barrels. You can loft your plan for a spiral rail in precisely the same way, just scale it up. Tip No. 1: round rail is one helluva lot easier to deal with than maintaining the lateral level top on a flat rail as it rises. Either way you will need to make a jig simulating a couple feet of the compound curve. Tip No.2 Do not let anyone else install your rail brackets. Tip N. 3: read the Uniform Building Code on finial stick-outs and baluster spacing.
|
|
Miles Undercut
- Wednesday, 11/14/07 23:57:51 EST
|
Hey im new to forging. I have a few questions. First i live in a small town its very difficult to find an anvil. So i went to plan B which was trying to find a rail road rail. Long story short the rail company will not sell them to the public, so plan B would be to go to the station house at night and steal one. Id rather not do that unless i have no other options. If you have a better idea i would really appreciate to hear it. Also i built my furnace out of cinderblocks. id just like to know if this is the way to go on the furnace? My last question for now is, for forging iron/ steel metals. Ill be using coal, so should i use anthracite coal or the softer easier to burn coal, or i have been told it is better to mix the two coals for a better hotter burn?
Thank you.
Regards, Thompson.
|
|
Thompson
- Thursday, 11/15/07 00:27:13 EST
|
Hammers and HSS Turning Tools: Hollon, Check our Heat Treating FAQ and Temper Color Chart with hardnesses for carbon steels.
HSS is good anywhere that heat would be great enough to reduce the temper of a cutting tool. Much wood turning is done at incredible speeds and a fine edge can easily over heat.
A decade or two ago there was a turner making "ultimate wood turning gouges". I think he was using O1 or A2 but it COULD have been D2. They were 1" round drill rod with about a 5/8" ball or radius mill groove milled down the length. It was beveled from the outside. Heck of a heavy duty tool. Note that "drill rod" is a common term for any kind of round tool steel but is usually W2 or O1. "Drill Rod" could easily be confused with HSS by those writing the sales lit.
All these steels air cool in thin sections and have high temper ranges. When you temper at near a read heat it is pretty resistant to softening from tempering.
Currently you can buy special wood turning tools that use first class cobalt HSS steel cutter bit inserts. These use the same high grade steel used for metal turning lathes. Using lathe cutter bit material avoids all the heat treatment and gets you some of the worlds absolute BEST tool steel there is. I also use tap shanks for this type of thing because they are round and fit a round hole better and seem to be as good or even better steel (IF you by first class taps).
For really high speed turning of abrasive woods some folks use carbide tipped tools. But these are terribly hard to get and keep a really fine edge on. Any rework requires a diamond wheel and a lot of skill. I do not recommend them. In many trades the ability to easily resharpen an edge is more important than how long it holds up (within reason).
As Dave noted I really doubt that anyone would be making true M series HSS turning tools. Ever price out really BIG long drill bits (1" and larger)? VERY pricey largely due to the steel and the heat treat, AND these are very high production compared to turners tools.
|
|
- guru
- Thursday, 11/15/07 00:29:05 EST
|
Stainless jewelery from surgical tools: I cannot believe what I am hearing from BLACKSMITHS!
Compared to silver, stainless is a bite to work but it is just not THAT difficult. Years ago I made a stainless ring for my daughter using twisted and flattened 1/8" 308SS bare welding rod. The rods were twisted together cold, flattened and rolled into a ring hot, then arc welded (TIG would have been better). It was then buffed using standard white stainless compound followed by Tripoli for just a tad more brightness. She wore it until it was too small for her.
Stainless Rings made from fancy floral pattern table ware that was originally hot forged was a craft show staple for many years. Closure was often made with silver solder.
Turned rings from solid are not that difficult. I made my (now ex) wife's engagement ring on a small lathe. She wore it for 25 years. It would not be difficult to machine a ring from a forged or a bent and welded blank. Sure it takes a metal turning lathe larger than a typical jeweler's lathe but doesn't EVERY decent blacksmith shop have a lathe??? (wry grin)
I've also known dozens of weldors that made gorgeous stainless belt buckles from artfully welded together short lengths of stainless pipe and tubing that was then polished to a silver brilliance. They are a popular craft of nuclear and chemical industry weldors. No forges or anvils necessary.
Where the trouble is that many of the folks with the jewelery making skills (from an artistic and scale standpoint) do not have forges or heavy torches and TIG welders (or full sized lathes for that matter). And YES it is not a casting job. That is merely a misunderstanding of the technology by the customer who should not be expected to understand the details of metal working.
And LAST, there are surgical instruments and there are SURGICAL instruments. Some are pretty darn heavy and have a lot of material in them. I have several surgical tools given to me by a doctor that retrieved them from a trash bin. One is a set of 8" stainless steel lineman's pliers. They are about worthless for what they were made for (typical bad joint action and too soft of bits). But they have enough material in the handles for a couple dozen forged rings. The rest of the tools are much lighter but have plenty of material for multiple wedding bands.
|
|
- guru
- Thursday, 11/15/07 01:17:23 EST
|
Rail Road Rail and Concrete Blocks: Thompson, The U.S. rail system is rapidly being scraped out and shipped to Japan and China to make cheap goods to sell back to us. There are scrap yards with MOUNTAINS of RR-rail in many parts of the country. Most will begrudgingly sell you a piece (they rather sell it by the thousands of tons and are not setup for pounds at a time).
THAT said please read everything in our Anvils From Rail Road Rail article.
Also note that anvils CAN BE BOUGHT new and used and UPS most probably serves your area. See our advertisers for NEW anvils.
AND small rural towns are where you FIND good used anvils. . they hid in sheds, under manure piles, in basements, under work benches in the local garage. . . ASK around!
Cinderblocks: NO, concrete is not the right material for any high temperature application. The cement either turns to dust from the heat OR spalls (explodes) from the expanding steam. Stone is also a problem unless you are familiar with the heat resistant qualities of the stone. Soapstone is one of the few that is easily identifiable.
Forges are built from one or more of the following materials. Red clay or refractory (high alumina clay), red brick, fire brick, steel, cast iron. Wood has been used for supporting a forge but is generally not recommended today. Those cinder blocks make a good base to build on top of.
The best blacksmiths coal is high grade bituminous (soft) coal. Mixtures do not work well unless fine ground (about like coarse sand). The behavior of various coals is different enough that mixing them would be confusing. But good coal is also getting hard to find so we often use what we can get or use alternate fuels. Charcoal (the real stuff) was used for thousands of years world wide and is still the primary smiths fuel in many countries. Gas and oil forges are also becoming popular due to the difficulty getting coal.
|
|
- guru
- Thursday, 11/15/07 01:39:50 EST
|
Ok great thank you for such the fast response you guys are awsome. I just read alot of things iv found on your website sorry for the same repetitive questions you always get. Also thanks for letting my know about the cement furnace. Im glad you told me that so i dont get blinded or something. Ill also put an ad in the local newspaper for an anvil maby i will get lucky. I will also look on your advertisers page for the new anvils. My last question for now. If i built a cement furnace already would it be possible to line the interior with firebrick? Or would it be safer just to tear it down to the base and rebuild it out of the heat resistant materials you have listed?
|
|
Thompson
- Thursday, 11/15/07 01:52:22 EST
|
Thompson, As long as the cement or concrete is not directly exposed to the forge fire it will be OK. Distance or a layer of brick will take care of it. But the spalling problem is good to remember for all kinds of situations. Such as:
Dropping hot iron on a concrete floor (will ruin a smooth floor)
Using a cutting torch over concrete (results in large deep pits).
Doing ANY high temperature liquid metal work (casting) such as brass, bronze or iron over a concrete floor.
Arc welding steel setting on a concrete surface.
The spalling is not only dangerous but it is VERY destructive to concrete floors. Think about it when working on a patio, sidewalk, garage, basement. . or anywhere else that has a concrete floor.
In many shops it is common to toss forge work on the floor to cool. If you have a concrete floor then use a protective sheet of steel or a bricked over area to put hot work on.
|
|
- guru
- Thursday, 11/15/07 02:04:05 EST
|
Ok thank you. Very helpful tips.
|
|
Thompson
- Thursday, 11/15/07 02:21:13 EST
|
hello I wish to make acouple of hammers ,but rather than recycle a truck axle or similar. i want to use new tool steel. What grade of or name or where can I find such information. Greatly appreciated Regards Darryl. Brisbane .Australia
|
|
Darryl E White
- Thursday, 11/15/07 05:17:17 EST
|
Hammer Material: Darryl, Blacksmiths usually make hammers from what is available, either new or used. This ranges from SAE 1050 to S7. Most of the letter series tool steels are over kill (a lot higher grade than necessary) but many smiths stock them for hot work tools such as punches and hot cutters. However, if making hammers in quantity SAE 1050 is often used as well as SAE 4140. The later being an alloy steel is tougher than 1050 but is not recommended to be used at the same hardness. However, for a blacksmiths forging hammer it is suitable.
All these and many more will make a good hammer. In tool making it is often the care in handling and heat treatment that is more important than the specific steel. However, if making something in quantity, then manufacturability, price and availability enter the equation.
|
|
- guru
- Thursday, 11/15/07 08:33:34 EST
|
i got some copper square rod, and was wondering. about how much wrok i can do to it before it will needto be anealled. and also to aneal it could i jsut use a small pronane torch. or would i need to put it in my forge.
JAke
|
|
- JAke
- Thursday, 11/15/07 09:14:32 EST
|
I am trying to make a steel striker for using with flint to start fires - the hard way. I have taken an old file, heated it with a torch and bent it in a "C" shape - then reheated it and cooled in oil. I cannot get the steel to throw a spark with the flint. Is there a different type of steel I need to use? A different heating method, or different cooling method? And yes, I know I could just use a match.
|
|
David Ignaszewski
- Thursday, 11/15/07 09:18:47 EST
|
Annealing Copper: Jake, this is entirely a matter of experience. Some say they can feel the metal getting harder. I can only tell when I have gone too far.
One thing about copper is that the highest purity such as used in wire and buss bars is very ductile and can be worked a LOT before work hardening. Copper that is less pure or contains significant oxygen is not so ductile and work hardens faster.
Another thing to know is that lots of little blows that do little deformation with work harden a surface while the metal below is still ductile. It is best to move the metal with as few blows as possible (like any forging).
Annealing is actually best done with an air/fuel torch such as your propane torch OR even a bonfire. Forges and oxy-fuel torches get too hot and it is easy to melt the piece rather than just getting it hot enough. Annealing temperature is a very low red that cannot be seen in bright daylight. Melting temperature is just a little higher.
|
|
- guru
- Thursday, 11/15/07 10:21:08 EST
|
Am I too late? Hey Toby, I have NO experience whatsoever with casting, but listen to these guys... casting stainless isnt woth what you are trying to accomplish. Yes, I use 316L SS to forge my jewlery with. In my opinion (and the entire body piercing, medical and dental industries) 316 steel is the best for biocompatablity. Also, MOST surgical tools are NOT 300 series, usually they are 400 and are VERY magnetic and DANGEROUS for long term exposure to the body (ever heard of complications from a clamp left in someone after surgey? If it were good 316 implant grade steel there would be no problems) so really, avoid surgical tools alltogether. Forging: I like to take round stock, hammer it into flat stock, turn into a ring, then weld the ends. Lathe: Guru does have a good idea, take 5/8" or 3/4" stock and lathe out the interior (basically make tubing) then slice off as many rings as you want (my smithy has no lathe [wry frown]). For finishing, I sand progressively finer, bead blast, then polish then buff (I use a rouge called "Fabu-lustre" that is designed for white metals... it is INCREDIBLE!). Another method (if you dont have a welder) is an open end design ring. I wear a mini horseshoe from 5/16" 316 stock everyday.
|
|
- Nippulini
- Thursday, 11/15/07 10:48:02 EST
|
Sorry about the double posting, but this was my original intent today until I scanned the past few days of posts.
I would like to (finally) set up some business cards. Something along the lines of "Blacksmith, sculptor, welder" across the top with a graphic of an anvil and tongs, then my contact info at the bottom. I really like the anvil drawing on the cover of Charles McRavens Practical Blacksmithing, but am slightly afraid of copyright infringement. What kind of business cards do YOU guys have? Did I leave anything out? Technically I could add "jeweler", but I don't work with precious metal or jewels.
|
|
- Nippulini
- Thursday, 11/15/07 10:53:37 EST
|
Flint and Steel: David, File steel is generally the perfect steel for this. Test it with another file to be sure it hardened. Reharden if necessary. It also helps to grind the surface of the striker clean as scale and decarburized metal does not spark well. And last, it helps to have a narrow edge like the corner of a square section as the striking edge. The spark is created by pealing off a piece of the hard steel with enough focused energy that it ignites the steel chips. Good hard flint is required but the flint does not "spark". A narrow edge takes less overall force.
|
|
- guru
- Thursday, 11/15/07 10:54:42 EST
|
Business Cards: Nipp, Yes you would be infringing on a copyright. I have a plain anvil graphic (black silhouette) that I made for myself years ago and have let a number of folks use. It is based on the original anvil drawing the anvilfire logo used. I will have to THINK about where it is hiding. . . But it never hurts to make your own.
Note that you are a weldOR not welder. . One is the person, the other the machine.
It is best to keep business cards fairly clean an simple. A graphic that stands out helps folks to find them in their collection. Your stage name the full TGN might make an impression on people. Something like this (found the graphic but it is OLD low res)
T H E G R E A T N I P P U L I N I

Blacksmith, Metalsmith, Weldor Call BR-549
The above graphic for personal use. Not for distribution. I'll post a higher res cleaned up TIFF version shortly (click image for TIFF).
|
|
- guru
- Thursday, 11/15/07 11:24:43 EST
|
Thompson,
Don't go stealing rail. It's wrong AND stupid. If you can't find rail or a used anvil to purchase, get something else. Check out the Anvil Making FAQ that Jock has put together here. The possibilities are nearly endless. You need to get past the idea that a chunk of steel can't be an anvil if it doesn't look a certain way -- like a London pattern anvil, or a piece of rail (which is generally a poor anvil anyway, if it's used in the orientation that makes it look most anvi-like). Wrong. Just about any heavy chunk of steel can be a satisfactory anvil. Exercise a little creativity. Thievery is the lazy way. Laziness and lack of creativity are not good character traits for a would-be blacksmith.
|
|
Matt B
- Thursday, 11/15/07 11:30:48 EST
|
David-- You might not be taking the striker up hot enough before quenching. After forging, heat the striker-- "chispa," it's called in Spanish, for "spark"-- up really high, at least to a low white, just below where it starts to throw sparks and quench it in water as quickly as possible. You have maybe a second, max, to get it into the water. Tempering is not necessary. So it's brittle, so what? As Jock says, though, decarburizing the business part is essential. Simply do a light grind on the striking edges of the striker. To use, strike a sharp edge of the flint with the chispa a snapping, grazing blow.
|
|
Miles Undercut
- Thursday, 11/15/07 11:51:21 EST
|
Darryl, hammer steel.
I really like 4140 steel for it's durability and ease of heat treatment, and it is what I use for all my hammers now. I buy mine from speedymetals.com. They have it in square and round bar.
|
|
- TM
- Thursday, 11/15/07 14:01:56 EST
|
The tools did not specify what particular steel it was, it just said Sorby High Speed Steel (and may have said Sheffield, England below). I myself am not a woodworker, but I was just looking at some tools and noticed that.
|
|
- Hollon
- Thursday, 11/15/07 15:53:12 EST
|
Not to cast aspersions on any woodturners out there, but HSS turning tools would also tolerate more carelessness with the grinder, in terms of heat buildup, during resharpening. Some might consider that a benefit in its own right.
|
|
Matt B
- Thursday, 11/15/07 16:19:52 EST
|
guru i got the copper from onlinemetal.com i belive it is 110, H04 copper. i'm making fredricks croses i already tried one with a piece of 3/8" and it worked wel.. but i need a cross made from 1/4" that is no more than 1.25" tall. so...i'll probably end up annealing it several times.
JAke
|
|
- JAke
- Thursday, 11/15/07 18:56:03 EST
|
Hello all.
I bought a striker.
I have a Little Giant#50 new style with brake for sale.
$2,600 FIRM
James
Boston
617-288-8686
|
|
james gonzalez
- Thursday, 11/15/07 19:14:56 EST
|
My chinese sledgehammer has started to chip when I use it to hit a heavy chisel to break concrete. What can I do to it to prevent this from happening?
|
|
- philip in china
- Thursday, 11/15/07 19:41:13 EST
|
Phillip in China. Buy an American made or British made sledge:)
I have seen Chinese hammers made from cast. also cast and then hit once in a forge. Not much to do with those, but if a real forged hammer you may be able to temper back.
|
|
ptree
- Thursday, 11/15/07 19:54:49 EST
|
Guru,
While you may be surprised at what you heard from Blacksmiths, don't forget that BOTH Vicopper and I started as Goldsmiths, and may have a little experience with what customers expect in wedding rings. I would be loathe to accept a commision for wedding rings made from surgical instruments that are unseen and undescribed. And yes I do know a little about finishing SS. And Stellite and Monel. I have made rings from all three. But, and this is a big but, I did not make wedding rings to be worn for a lifetime, and not from items like surgical instruments.
And if you think SS is hard to finish, monel is much tuffer as is the inconel 625 I made the earrings from and Stellite 6 was really really bad. I did these as gifts for really good friends at the valve shop that could never ever have afforded to pay for the hours that went into them.
As Nipp notes, most of the surgical instruments I am aware of are 400 series, for the strenght and hardness. Many of the 400 series are real buggers to weld, and then crack rather easily after. Most of the disposable instruments are made from garbage alloys from Pakistan. I have a nice collection from the 4 childbirths and other hospital visits, and there is not one piece in the collection I would consider worth forging into something to wear for extended periods.
And so, no, I don't think making wedding rings from surgical instruments is a good idea.
|
|
ptree
- Thursday, 11/15/07 20:11:16 EST
|
Chipping Sledge: Philip, Be warned that if the steel is over hard those chips come off like bullets and can be quite dangerous. If they just break off (crumble). . well, Ptree had it right, get a new tool. I've worked on some cheep import hammers for folks (dressing, rehandling) and I was amazed that those selling them here were not up to their neck in law suits. The one I redressed had the face out of square about 1/8". The one I rehandled had tar worked around a loose fitting handle then painted over to hide it. Both were far from ready to use tools and I told the owners they should replace them ASAP.
|
|
- guru
- Thursday, 11/15/07 21:20:28 EST
|
HSS & Shop made tools: Another source of fully heat treated M2 is a drill blank. These are the same length as a jobbers length twist drill and ground .0002" under nominal size. Reamer blanks if You can find them are .0002 above nominal. To cut these a cutoff wheel in the bench grinder works well. M2 is a great steel for edge holding, has good red hardness and good abrasion resistance, so it is hard to grind. In cold work aplications it wears about the same as D2. The H series tool steels are hot work steels, and while they are red hard, they are not intended for edge holding. Note that "edge holding" refers to an edge suitable for chip making or stamping in cold steel. H13 & H21 are suitable for a hot cut.
|
|
- Dave Boyer
- Thursday, 11/15/07 22:19:59 EST
|
Guru, here in the dry southwest Idaho climate rust is not a problem in my shop with the garage door open using my propane forge. For this winter though, I would like to have the garage door closed. I tried it once before, but experienced some rust colors developing on my table saw across the shop as well as on other polished steel surfaces. What is the best rust free (from propane) and safe way to work in an enclosed shop for the winter. Safety of course is first concern, and rust is second.
Thanks,
Arlo
|
|
Arlo
- Thursday, 11/15/07 23:23:26 EST
|
More re: strike-a-lights-- My smithing sensei, Frank Turley, tells me I am only partly right in calling a fire-starter a chispa. Says Frank, in the book he wrote with Marc Simmons, Southwestern Colonial Ironwork, University of New Mexico Press, "The general term for this artifact in colonial Mexico was eslabon, meaning 'link,' because of its resemblance to a chain link. In New Mexico, however, it was called a chispa (spark)." This is from p. 122 in the book, which is an absolute classic of history and technology and should be on every smith's bookshelf.
|
|
Miles Undercut
- Thursday, 11/15/07 23:55:27 EST
|
Gas Forge and Rust: Arlo, The exhaust from your gas forge is a mixture of CO, CO2 and H2O. About 1/3 H20 by weight or 1/2 gallon of water vapor for every gallon of fuel burned. That is what creates the rust.
The CO (carbon monoxide) varies with the adjustment of the forge and can be a whole lot or very little. When using a forge in a closed shop you should have a CO meter and alarm. CO is very bad for you and chronic exposure can contribute to heart attacks and other problems. However, it is good for the steel. . .
You need a vent stack over the forge to use it in a closed shop. This is often a hood type affair. The waste heat is generally plenty to vent the forge but you need a fresh air vent if your shop is very tight. Otherwise gaps under doors do the trick. The hood is sized by how far the dragon breath extends from the doors and vents. You want to catch as much as possible by not make the hood too large or it becomes inefficient.
Modern natural gas furnaces are so efficient that they vent the CO2 exhaust through a light duty aluminum vent and the water through a plastic pipe. Drains or sumps are more critical than the gas vent!
|
|
- guru
- Friday, 11/16/07 00:38:55 EST
|
|
|
[
CSI - anvilfire MEMBERS Group |
Getting Started in Blacksmithing ]
|

