| WELCOME to the anvilfire Guru's Den - V. 3.0 |
|
THIS is a forum for questions and answers about blacksmithing and general metalworking. Ask the Guru any reasonable question and he or one of his helpers will answer your question, find someone that can, OR research the question for you. This is an archive of posts from December 9 - 17, 2002 on the Guru's Den |
|
|
|
Jock, I tried a crude helical mixer in the tube on a sidearm with a .035 orifice. No regulator. Just needle valve. It made the flame coming out of the flare a "little" more bushy, but not more than about 10%. It did kink the flame off to one side about 10 degrees. I think that would go away if the helix ended an inch or two before the flare. Low end control suffered a little. The defined inner cone could not be established with the helix. It was .080 aluminum, fit tight, was full length down the 3/4" by 10 inch pipe nipple and was about 1.5 full twists. I didn't have enough tension on it when I twisted it so it had the usual flats spots. I'm sure it added some mixing if there was some going on in the tube, but didn't seem to help an open flame in a sidearm. Since I'm messing around and trying stuff, want me to try anything else? I like to play. Tomorrow I may try smaller orifices and see what it does in a concentric burner. Pete F. I tried some fine (40 mesh, .010 wire) stainless mesh over the air entrance to the sidearm. It did diffuse the ingoing air and bushed out the flame a little. Didn't hurt it at all. Might be a little help. Coarser mesh might give more turbulence, but I wonder if the sidearm needs it. |
| - Tony - Monday, 12/09/02 00:35:41 GMT |
|
Daryl, I will look at the hammer in tomorrow. Out of time tonight. |
| - Tony - Monday, 12/09/02 00:36:52 GMT |
|
JG...I have a similar forge. I use Jim Hrisoulas's method of protecting the forge floor. Buy some cheap kitty litter, sprinkle it about 1/4" thick on the floor. Cast a refractory in a form the size of your forge floor, and about 3/4" thick. The flux will eat the sacrificial casting. I replace it whenever there is a deep depression. If it eats through, the kitty litter does a good job absorbing it. Of course the idea is to replace it before it eats through. Remove the damaged sacrificial floor while the forge is still hot. After it cools vacume out the loose kitty litter and replace with more litter and castable floor. I have used this method of about 7 years now and my forge floor is still in pretty good shape. |
| R Guess - Monday, 12/09/02 02:05:26 GMT |
|
I'll answer for triw [William]. Arizona. |
| Frank Turley - Monday, 12/09/02 03:47:27 GMT |
|
Thank-You Frank |
| triw - Monday, 12/09/02 08:03:15 GMT |
|
I have tried making the russian rose and after a couple of tries did so but the bottom of it looked rather bad. Does anyone have any suggestions as to how to make it look better at the bottom? I will admit that I didn't make the stem as small as it should have been, but I am looking for advise for the future. |
| 888 - Monday, 12/09/02 14:51:37 GMT |
|
re-rose I will pass allong the advice the friend that tought me to make them gave me, on the last 3-8 petals( dependant on the size of the rose) dish out the bottom (side with the stem) to a nice half round this along with notching the bar on both sides helps to start the petals curling under, clean them up with a hammer (lite tapes) on the face after you have rolled them up. also if you thin out the last few petals a bit more it helps, gives more materal to play with. on a side note I find these easier to make from 3/4"/1",for large ones 3/16"/1/2" for Med and 1/8"/3/8" for smallones (this size makes a great ladys hair pin) |
| MP - Monday, 12/09/02 15:20:56 GMT |
|
Guru- I am making some candle sconses out of 1/4" wire for my wife but cannot find metal candle cups to weld to the wire. Where can I find these items. Thank you. |
| todd - Monday, 12/09/02 15:48:26 GMT |
|
Candle cups: Todd, Kayne and Son sell pans and cups. They are on the drop down menu and on our advertisers directory. Look on their supplies page. Pans are a bit of a pain to cut. I made my first from flame cut 16ga (.070 plate). It took a lot of time to clean up by grinding. Some folks have chisled them out. . also a lot of clean up. I made cups from 3/4" EMT (electrical conduit). The dies are shown in iForge demo #88. I needed lots of pans so I setup a punch and die AND built a 20 ton hydraulic press. This cut 2.5" diameter blanks from up to 16ga steel. I also did quite a few in brass. It took a couple weeks to build but in one day I cut a several years worth of pan blanks. . . See "Hydraulic Press" on our 21st Century page. Starting at iForge demo #101 we have a whole series of candle sticks using a great variety of methods. One way to make a cup from small stock is to wrap it around a mandrel. If you forge the end to a point or a flat you can made a decorative curl on the end. The rest is just wound up. Cups WITH drip pans can be made this way and are rather interesting looking. In this case the pan goes on top of the cup. Combination pans with cups can also be made by sinking a cup in the middle of a piece of flat plate. This must be done hot or well annealed. If the cup is shallow then a spike can be used to support the candle better. In fact, plain pans with a spike can accept a wide range of candle sizes where a cup usualy is a poor fit to all. . . |
| - guru - Monday, 12/09/02 16:17:17 GMT |
|
Russian Rose: This is one that takes some practice to make. The one in our demo was rather cylindrical at the bottom. As MP noted above if you dish the larger petals (on the end) so they cup under the rest it looks a little better. Another option that is more difficult to forge is to leave a buldge in the stem under the flower (like in nature) to help fill the bottom. To do this you start with slightly larger stock, fuller slightly where the petal section starts, make a right angle bend, then when you flatten the petals do so on the edge of the anvil so you do not flatten the part below the bend. After the petal section is notched and flattened, fuller (neck down) just below the "buldge". Roll the rose then draw out the stem starting at the fullered area. This will create a more natural efect and the buldge will fill in under the inner petals which should be rolled above it. This is fairly detailed forging and will take practice. Generaly you throw away three or four before you get one that works to your satisfaction. After making a dozen or so they will (should) start looking pretty good. . . If you set out to make the classic dozen long stem roses then the last few should be pretty good. . . In a group the poorly made ones will not look so bad. |
| - guru - Monday, 12/09/02 16:35:54 GMT |
|
And if you put the prettiest rose in the very center, surrounded by the not so great roses, and finally surrounded by the good roses, the total effect will be of the center rose. Don't forget the tiny scrap of black felt in the bottom with a drop of essence of rose on it. That should be good for a little more than a thank you kiss. (grin) |
| Paw Paw - Monday, 12/09/02 16:55:06 GMT |
|
Gurus, I am attempting to make a tea tray for the spousal unit. The currend design is to have the sides/ends come up perpendicular to the bottom (clever huh?) and then curve out to finally end up parallel to and above the bottom, sorta like a flair, the problem I am having is mitering the corners (suprise). It seems to not be a miter, but a cope. It seems to be a curve, but I am having trouble getting it right. Now I know that the curve must depend on the curve of the side/end itself (mussent it?), but what is the relationship? Or, am I making this way too dificult, and I should just get the files going? Thanks, And Todd, I will resist giving you the standard answer, but it is dificult to bite my fingers. |
| Tim Pilcher - Monday, 12/09/02 17:12:32 GMT |
|
Hey Guru- I posted a message last week about finding a blacksmith in my neighborhood. I appreciated everyone's help on Anvilfire. However, I contacted two people from the ABANA site and neither one has responded. Any other sugestions? |
| Sharon - Monday, 12/09/02 17:27:08 GMT |
|
Sharon, FABA (Florida Artists Blacksmiths Association www.blacksmithing.org) is a very active group. The meeting link lists schedules for December and January. Their next meeting is a Christmas party on the 14th but if their's is like ours they will also have demos at the meeting. GO! They have a full January schedule too. They also have an officers page with phone numbers. This is one of the few groups that keeps their web-page up to date. More on Candle Pans: We tend to think conventional round but other shapes work. Triangles can be formed into floral shapes (including the cups) and squares can have the corners curled (up or down). An octagon is close enough to round that if hammered into a dished shape with texture OR if decorative grooves are formed you cannot tell it from round. In thin sheet a wood block (and even a hardwood fuller) can be used to form ribed shapes. This works great in annealed brass up to about .040" (~1mm). Cups and pans can also be forged from solid. Starting with a large round bar (about 3/4") OR short round billet drive a punch nearly through (or to a suitable depth on long bar). Then drive a bigger punch in to thin the walls a little. Flare the opening and working over the corner of the anvil draw out the pan from the upper rim of the punched section. Then working over a mandrel in a vise or hardy hole draw down the side of the cup. If made on a long bar fuller behind the cup and cut off OR form a long stem. If made from a short billet then a small hole can be punched in the bottom of the cup to attach it by riveting. I prefer to rivet or rivet and braze pans and cups to a bar. When done on the end of a bar a very short tennon can be machined or filed. If only making a few you can saw and file the tennon. It only needs to be about as long as twice the thickness of the pan. I usualy use 3/16" or 1/4" (~5 to 6mm) diameter for common sized pans. The end is upset using a punch to reach inside the cup. This works fine as-is but if I am brazing a cup to the pan I occasionaly attach the pan to the bar and then braze (or silver solder) both joints. The riveted tennon helps hold things in place. Low temperature plumbiing solder works fine on brass and copper candle sticks. Just remember that the solder is going to darken. The new tin/silver plumbing solders do not darken as bad as the lead/tin solders but they will darken. So solder carefully or work the solder lines into the design. Clear lacquer will prevent the brass, copper and solder from tarnishing. |
| - guru - Monday, 12/09/02 17:39:20 GMT |
|
Russian Rose: I made a cup (calyx?) for mine out of 3/4" black pipe. Sawed triangles into the end of the pipe, hammered them out as leaves and then about 1/2" back I necked it down with a guillotine tool and slipped the Russian Rose into it - effect was very pleasing |
| adam - Monday, 12/09/02 17:42:41 GMT |
|
Kitty litter, I tried this and found it a nuisance. It would stick to fluxed metal. |
| adam - Monday, 12/09/02 17:45:30 GMT |
|
Spit; I've picked up a couple of wind up victrola actions at the fleamarket cheap cause they were not *in* a victrola just for building a camp "jack" One of the niceset I've seen was in Muiderslot a castle in the Netherlands. It was weight driven but you when you wound the rope around the barrel it trapped several springy wires. As the weight ran down the wires would be freed and start ringing a small bell telling you it was time to wind it back up again. On the anvil: turn it over and look at the bottom---we identified a Hay Budden that way saturday as the base has a distinctive shape (as does several other brands). Postman's "Anvils in America" can show you what to look for. Thomas |
| - Thomas Powers - Monday, 12/09/02 18:18:04 GMT |
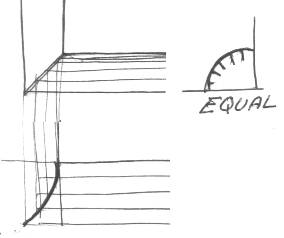 Miter Cope Layout: Tim, You will find this in most drafting books and sheet metal books.
IF the cross section of the curve is cylindrical then a 45° view is an ellipse.
Laid out flat it is a parabola (part of a sine curve).
If the curve is not cylindrical then the shape is not common mathermatical form.
The rough drawing at left shows the method of projecting the curve and approximate results.
Miter Cope Layout: Tim, You will find this in most drafting books and sheet metal books.
IF the cross section of the curve is cylindrical then a 45° view is an ellipse.
Laid out flat it is a parabola (part of a sine curve).
If the curve is not cylindrical then the shape is not common mathermatical form.
The rough drawing at left shows the method of projecting the curve and approximate results.Layout your plan view with a quarter circle next to it. The quarter circle is evenly divided into 8 or more segments. Below the plan view you draw a series of parallel lines spaced apart equaly the distance of the spaces on the quarter circle. Then lines are projected down off the 45° miter in the plan view to develop the curve. Luckily you only need to do this one time for all eight curved edges. I recommend you do the layout on a piece of sheet metal using compass, scribes and square. When done you can cut a durable template from the sheet metal. IF your cross section is not cylindrical you can use the same method but you have to divide the curve equaly with dividers not by angles. IF the end of the curve has a flat flange at the top (parallel to the bottom of the pan) then the lines should be at 45° angles (like a miter) but spaced apart from the curved section. The BEGINNING of the curve should be close to 90 degrees since it rises verticaly. |
| - guru - Monday, 12/09/02 18:26:23 GMT |
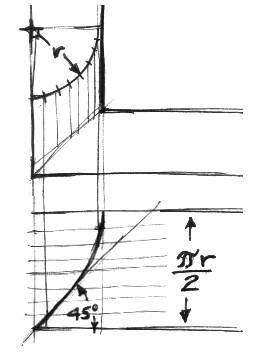 Errata: After posting the above layout I realized that the quarter circle could be laid out directly above the projection (90° from above) and would be much simpler. There would also be less loss in accuracy due to the double projection as shown above.
The resulting curve is also called a harmonic curve. Only the last bit of the curve is 45°. A very close rough layout can be made by hand using the rectangle produced by r and PI*r/2 and the starting and ending angles. |
| - guru - Monday, 12/09/02 18:56:34 GMT |
|
hey folks, looking for info on the story of the blacksmith and the king. (The feast of craftsmen, The king of craftsmen)NOT the children's book. Specifically original sources, prints etc.. any help is appreciated , thanks |
| - michaelm - Monday, 12/09/02 19:38:16 GMT |
|
Super Airset: My mistake, not JP Green. It was EJ Bartells. They have discontinued the Super Pyramid and are suggesting Super HiBond as a replacement - the salesman said its "very similar". However, the Salt Lake City branch still has 9 (actually 7 I just bought two) 55# boxes of Super Pyramid for $18/ea. Call Brandy at 1-800-324-4907 |
| adam - Monday, 12/09/02 19:43:23 GMT |
|
Michaelm, If you've already read it on the story page, all I can add to that is that it's an old English legend. I've got a buddy that lives in England, I'll contact him and see if he can find out anything more for us. |
| Paw Paw - Monday, 12/09/02 20:10:03 GMT |
|
michaelm: There was a book, a treatise of sorts, written called "The Blacksmith: Myth and Magic". I think that is what it was called, our Unversity Library had it. I can't find it on the web, so I would check your local library. It had a very good analysis of various myths and their meaning with blacksmithing and culture of the times. Well worth the read. |
| Escher - Monday, 12/09/02 23:05:34 GMT |
|
Thomas, Now that you mention it I remember being at Muiderslot and also seeing that. Too bad that was so long ago... ALmost 30 years ago. I wish I could jump back and go look at all the stuff again but this time with the eyes of a sorta blacksmith.... back then I was much more interested in other things..... |
| Ralph - Monday, 12/09/02 23:07:33 GMT |
|
need info on building a gas forge |
| bob davignon - Tuesday, 12/10/02 00:24:06 GMT |
|
Jock, I have a coal source to add to the coal scuttle. I went to that page and didn't see any information on who to contact or where to send the information. How do I go about this ? Harley. |
| Harley - Tuesday, 12/10/02 00:43:12 GMT |
|
heat treat cut off hardie....have a cut off hardie that i bought from kayne's, "german", that is all i know. when in use, the edge fractured. i "normalized" it, and dressed the edge. i then hardened it and missed the temper; now it deforms with use. give me a recipe to try...flame heat intil it looses its magnetic properties, quench in oil, draw temper, what should i do?? gurus, how would you approach this?? |
| - rugg - Tuesday, 12/10/02 01:12:49 GMT |
|
Michaelm, It's in "The Village Blacksmith" by Ronald Webber. It's a British book not to be confused with Aldred Watson's book of the same title. Plumb full of stories and lore, and it doesn't tell you how to make a dang thing. |
| Frank Turley - Tuesday, 12/10/02 01:24:12 GMT |
|
Rugg, reharden. Depending on the carbon level non-magnetic may not be hot enough. Steels below 60 point carbon need to 100° to 200°F above non-magnetic and so do steels above 85 point carbon. Check the hardness before tempering (slide a file across the edge. . should be slippery). The grind the edge flats and heat the shank. Let the heat rise from the shank, you want it soft anyway. As soon as a faint yellow starts across the sharpened part quench in oil to stop the tempering. THEN to make sure you got all the part tempered heat it in an oven to 350°F and let air cool. Then the shank will be soft and the edge as hard as it can get but it will be supported by material tempered softer. |
| - guru - Tuesday, 12/10/02 01:31:03 GMT |
|
The Coal Scuttle: Is maintained by Fred Holder of the Blacksmith's Gazette. www.fredholder.com. Click on the banner at the top of the Scuttle. Bob, I answered you by mail before I checked here. |
| - guru - Tuesday, 12/10/02 01:33:55 GMT |
|
A quick one this time, I promise. We put the big (700+lbs) slab anvil on it's stand this week. A MAJOR production that was, I'll be the first to tell you. But it was worth it. The big anvil is a MASSIVE improvement over the 55lb anvil we'd been using. Even without all the handy features of a full anvil, it's better. We're in the process of making a mandrel/bick/horn thing to mount beside it, and that will have a hardee and prichel hole in it for things we'd need that for. So the question is this.. how on earth do we quiet this huge lump of steel down!? The ring is high and sharp.. and peircing. After only 2 hours working on it, my ears are still ringing! I'd rather like to keep my hearing the way it is.. I've heard several ideas for deadening sound over the years, some of them even here.. but I don't remember them all. So I thought I'd toss it out to get an idea of what y'all think we should do to quiet the beast down. Budget is EXTREMELY limited.. and picking this thing up and moving it around, even with an engine hoist, isn't something we want to do any more than we have to.. so we want to do it right the first time. Heh. Thanks Guru for all your help.. knife will be done soon, and when it is I'll be looking to join CSI. Robert "Asgard" HPL Steele Be afraid. |
| - Robert "Asgard" - Tuesday, 12/10/02 02:16:58 GMT |
|
What type of wire screening would you suggest for a fireplace inset/screen? My husband is a metal fabricator blacksmith and I was wondering. Where can I get it? Thanks allot for your time. Leah McIsaac |
| Leah McIsaac - Tuesday, 12/10/02 02:20:33 GMT |
|
Frank Turley,,, just a note on the power repose post you made,, i stayed with Tom at that workshop,, Russ's demo was an animal head out of 1" solid bar,, done in one heat with power chisels... when we went home, Tom said he thought he could do the same with his hand tools,, so fired up the forge and sure enough from teeth to scales,, done in one heat,, his comment was "i think power tools run at such a high rpm,, they just make you think you are working faster!!!" Lol,,, epic adventures from the times of magic,myth, and legend....speaking of which,, i'm just about done with the log house,, another epic adventure,, been in the forge finally and tricking the ole lady out to the max... |
| anvil - Tuesday, 12/10/02 02:31:15 GMT |
|
Jim,, a late responce to your painting question... i use alcohol to clean my iron,, thus avoiding the film from mineral spirits. i like rustoleum, and apply it as you have said,, but do it this way. i mix red metal rust primer with the white light rust primer.. the first coat is a pink color,, the second coat is full red,,, then i can see any missed places. for the two coats of black i use rustoleum flat or matte black,, sometimes i use the gloss first,, and the final coat is flat or matte... i don't like a high gloss finish,, even tho it holds up better,, but the four coat process lasts very well here in colorado. |
| anvil - Tuesday, 12/10/02 02:43:47 GMT |
|
I've spent some time forging simple items such as screwdrivers, knife blades and the like. However, I have ventured as far as making a spanner wrench for my bicycle's steering, and frequently make my own "dental picks" (I can't imagine anyone actually using the horrible thick things I make on anyone but Osama). I have an odd question: If I were to try forging a simple, single-throw crankshaft, say, 1 1/2 feet overall length and 1 1/4 inches in diameter on bearing surfaces, what would be the best way to approach this, if at all? |
| Nick Rhodes - Tuesday, 12/10/02 02:54:04 GMT |
|
Guru You have answered a number of my gas forge building questions over the past few months. Finally this evening I fired up one burner of my first, and almost complete, four T-Rex burner forge. Kind of felt like I needed to open a bottle of beer or something to celebrate but I was alone in the shop so I put some iron in the fire and hammered away with delight. Thank you very much. Chris |
| chris smith - Tuesday, 12/10/02 03:04:00 GMT |
|
Chris Smith, Very appropriate name for a blacksmith. Chris from Chrstoper, Christbriner, and Smith. (grin) At the bottom of the page, click on the "CSI - anvilfire MEMBERS Group" link, and see if you think it's worth joinging. Less than the cost of a good cup of coffee a week, helps to keep anvilfire afloat. |
| Paw Paw - Tuesday, 12/10/02 05:28:03 GMT |
|
Christopher, not Chrstoper. I can't type tonight. |
| Paw Paw - Tuesday, 12/10/02 05:28:40 GMT |
|
I second the Fireplace screen question! I have spent about 4 hours looking at various screening on McMaster Carr, and have ended up so confused each time that I have yet to order any. I plan on using 302/304 stainless, but beyond that..... If anyone out there wanted to provide me with detailed specifications on what to use, I would be most pleased. I never knew there were so many type, sizes and grades of screen. Funny thing is, if I had a stack of screen here in front of me it would take about 2 mionutes to pick out the right one..... Ahhh, the joys of the internet. |
| -JIM - Tuesday, 12/10/02 09:28:36 GMT |
|
Gugu - Fireplace screen Looks like this is one for the FAQ |
| Paw Paw - Tuesday, 12/10/02 13:13:04 GMT |
|
guru, already. |
| Paw Paw - Tuesday, 12/10/02 13:13:38 GMT |
|
Paw Paw: Has a screaming sea weasel bitten off the tip of one of your fingers or nefarious forces stolen your monocle? I, of course, do not make ypographical terrors or speling mysteaks. |
| Bruce Blackistone (Atli) - Tuesday, 12/10/02 13:59:10 GMT |
|
Nefarious forces. (grin) |
| Paw Paw - Tuesday, 12/10/02 15:11:43 GMT |
|
Anvils Ring: Regardless of how successful you are in damping the ring, wear earplugs! There is a lot of energy in the sound of a hammer's blow and over the course of listening to many thousands of impacts your hearing will deteriorate. |
| adam - Tuesday, 12/10/02 15:24:34 GMT |
|
Reducing Ring Anchoring tightly to the stand helps. Some folks use silicon caulk. The caulk doesn't actually dampen the ring but it helps support the anvil evenly. The loudest ring from any bar of metal is produced when it is free to move. The worst case on most anvils is when it is setting on a high spot or two. Then the whole is alowed to vibrate freely until the energy is completely disapated as heat and noise. Restiing on three points helps but it depends on their positions. So clamping tightly helps the most. Many people put a speaker magnet on the side of their anvil. Large ones work but small ones don't seem to help. This relies on the internal elastomer (rubber) damper between the magnet and the base. Plain magnets do not do anything that I can tell except collect scale. A damper like a speaker magnet should help the high pitched ring, anchoring to the base helps dampen the low. You probably need both. A rubber pad under an anvil can make the ring worse if it allows the anvil to move freely. When a pad is used the anvil needs to be clamped tightly to it. Dense foam rubber is better than hard sheet like neoprene. Silicon rubber is high temperature resistant and will not make a burnt rubber smell every time a little scale falls on it. They make high density silicon rubber foam but you don't want to know the price. . . Soft plastics and foam rubbers filled with lead are used to absorb noise. The lead is high density and its softness keeps it from re-transmitting sound. In "Practical Blacksmithing" one smith suggested anchoring an anvil in lead to reduce the ring and make it solid. His method was to build a stand metal with a rim, support the anvil off the bottom (small piece of wood or lead) then pour melted lead under and around the anvil. Of course everyone it trying to get away from dealing with lead these days. . . But it would make a suitable anti-ring pad to clamp against. Lead is available in sheet. When nefarious screaming sea weasels approach just ring that gigantic block of steel. |
| - guru - Tuesday, 12/10/02 15:50:43 GMT |
|
Guru, I am studying your drawings and text on laying out the miter for curved sides of tray. Thank you very much. You mentioned a good drafting or sheet metal book would have this info. I, however, do not have a good either, can you recommend any? Again thanks, but why does my head hurt?> |
| Tim Pilcher - Tuesday, 12/10/02 15:51:08 GMT |
|
Leah. Ive said this before. I use 1/8" galvanized hardware cloth available from any building supply. Make sure the zinc hasn't filled some of the apertures. I spray paint flat black. When you could still dump-pick, I found a portion of fire screen that had very fine expanded metal for the screen, and it was smooth, without burrs. I have not followed up on where to get it, but it looked really nice. |
| Frank Turley - Tuesday, 12/10/02 15:58:25 GMT |
|
JG..One more comment about the sacrificial forge floor. I use screws to put it together so it can be taken apart if needed. On the bottom or the form I attatch a 1/4" thick X 3" X 10" strip of plywood. This creates a depression in the cast. Used as the top of the floor, it catches and prevents the flux/slag spilling over the sides. The kitty litter on the bottom will attatch itself to the flux if it eats through the floor before you change it, instead of bonding to the brick floor and causing damage to the origional floor. The first few I cast were difficult to remove from the form, so I used duck tape inside the form, which I spray with PAM. Works pretty well. Dr. Hrisoulas mentions using a kiln shelf in The Complete Bladesmith. I use a castable because it is cheaper and I have it on hand. Adam..I have had a small mess when I left the false floor in too long and flux ate its way to the kitty litter. It was tough getting a small glob out, but were it not for the litter it would have taken a chunk out of the brick. How did the kitty litter get on the steel (Im assuming you meant the steel you were working on.) Perhaps I misunderstood. |
| R Guess - Tuesday, 12/10/02 15:59:50 GMT |
|
Tim, I have a half dozen books on the subject of drafting, most are old out of print text books. They all pretty much cover the same subjects and there was little difference between a high school drafting text and a college text. The same books are used for different levels, I, II, III. . . I would try a used book store or any school book store. Sheet metal working books are also generaly text books and mine are very old out of print things. They are also relatively rare. The online book sellers would be your best bet but it is hard to tell what you are getting. . Well. . . We have ice and ice covered snow left over from last week in the yard, driveway, my paths to and from the office and house. . . It has gotten too slick to go out at night. Now they are predicting more frezing rain. . . So it is time I go risk my neck to haul sand and hopefully make it a little safer. . . I'm ready to move to a semi-tropical climate. |
| - guru - Tuesday, 12/10/02 16:01:42 GMT |
|
All, The anvil I asked about last week has been positivly IDed as a Hay Budden. Thanks to Thomas Powers for bringing his copy of Anvils in America to the SOFA meeting for me to use. It was interesting to compare the dimensions of this anvil to those given for other HB anvils. The HH on mine is 1 3/8, which you would normally find on an anvil in the 450 lb range, but mine is definitly not that big. According to Postman, early HB anvils were a cutom made item, rather than being stock sizes. Patrick |
| Anvil ID - Tuesday, 12/10/02 16:02:35 GMT |
|
Tim Pilcher; Try Lindsay Publications. 3dogs |
| 3dogs - Tuesday, 12/10/02 16:05:27 GMT |
|
Sand pass 1 completed safely . . Anvils shapes. Even late Hay-Buddens were custom made to order when wanted. These were usualy a special weight (most of the large RR-shop anvils were special orders) or a special height for the given weight so that it would replace an anvil on a stand without change. It is the special Hay-Buddens that are often not marked. They are rare but almost all the anvil the manufacturers made sawyer's anvils, knife makers anvils, chainmakers and European style double horn anvils. I've only seen one Euro style Hay-Budden and I would have loved to have owned it. Richard Postman recently told me about a fake Hay-Budden. The anvil appears to be a Peter-Wright, but Hay-Budden markings are carefully carved into the side. Engraved to LOOK stamped. But the markings were a bit too clear and too sharp. The lettering also did not follow the proportions used by Hay-Budden. There was nothing wrong with the anvil, but it wasn't a Hay-Budden. . . Truth is often stranger than fiction. |
| - guru - Tuesday, 12/10/02 16:29:33 GMT |
|
Jewlers Saw Question: How do I determine the right blade size for the material I am working with? blades seem to go from 8/0 to 5, but nowhere can I find a description of what these size mean, or what the best uses for them are. Thanks! -JIM |
| Jim - Tuesday, 12/10/02 18:08:30 GMT |
|
Hi guys, i placed this question a few weeks ago and i have not heard anything, did you guys just miss it or forget it? i coppied it from the archive and im pasting it in here. i appreciate the help. Hello Guys, Sorry i have not been in touch, being at school keeps me pretty busy. I am studying Arboriculture in Maine. In september and october i went to a blacksmiths roundup and then volunteered as a blacksmiths apprentice for living history days at the maine forest and logging museum. I am slowly returning to my forge for some tool needs. I would like to make a peavey and a pulphook. I would like some assistance on design and fabrication, preferably without arc welding, but i can weld if need be, im just more interested in traditional techniques. The hinge point and the cone/point fabrication is challenging my mind. Also the fabrication of the pulphook handle and attachement to the hook itself. Maybe someone would like to do a demonstration, or next fall when i figure out this stuff i could do one. Thanks for your help, hope all is well. |
| Robert Hogg(Smithin Scout) - Tuesday, 12/10/02 18:39:40 GMT |
|
Anvil Magnets: I use the base off of a magnetic indicator stand (standard machine shop variety) under the horn. It's easy to remove because it turns on & off, and easy to clean for the same reason. Turns the "ring" into a "tink" even with a BAD temporary anvil mounting (i.e. sheet-metal rolling chair) I've never really thought why it works. Perhaps because the magnet is held only by the flux field, it interrupts the traveling wave with it's added density? Or, maybe it's magic! BTW: It also repels the screaming sea weasels.... |
| Zero - Tuesday, 12/10/02 19:06:18 GMT |
|
Guru, Are nefarious screaming sea weasels any relation to the sneaky snow snakes that we often had to take oral (80 proof) medication for after hunting on bitter cold days? |
| Brian C - Tuesday, 12/10/02 19:15:54 GMT |
|
Guru re: semi-tropical climate..... Well the encyclopedias do say that this part of the PNW is a semi-tropical rain forest... (VBG) |
| Ralph - Tuesday, 12/10/02 19:17:10 GMT |
|
Semi tropical: A good friend has property in the Costa Rican highlands. Average temperature of 74°F Max of 84°F, min of 58°F. . . two seasons, wet and dry. Peavy with Cant hook: Scout, your Dragon Striker demo is still getting a lot of hits! Cones are a bit of a trick to make. See our 21st Century page under MATH, Cones01. That will show you how to layout a cone. You will need to add overlap for a forge weld. The welding and finishing are tricky. You will need to make a mandrel to work on. I also suspect that the point wants to be a solid piece welded in. I would make this part cylindrical with an upset to fit the cone. After welding cut off the extra bar and point it. The hook anchor is made from a piece of strap or flat bar. Both ends are bent at 90°. A short piece of flat bar is thined on both ends and welded to the inside of the ring on one end. When the part is put on the wood shank the shoulder bolt that the hook pivots on clamps it tight. There are several ways to make this part without arc welding but both parts usualy have forge welding. |
| - guru - Tuesday, 12/10/02 20:36:37 GMT |
|
Jewelers Saw Blades: Jim, this would take some digging. I used to buy them from Brookstone and their catalog gave number, width in thousandths of an inch and TPI. But they were not always listed. Last time I bought some I bought a BUNCH so I wouldn't have to keep reordering. I just checked the Brookstone web-site and they don't appear to handle anything REAL any more. . . I called them and they definitely don't carry them. . so I would have to find a 20 year old catalog. Anyone else got a size chart? |
| - guru - Tuesday, 12/10/02 20:52:54 GMT |
|
Hello Guru, I have a question regarding hte heat treated of 420 SS. We manfacture products that need to be heat for hardness. When this is done the parts stick together and ther are very difficult to seperate theses parts. They cannot be seperated by hand. Do you know why this might happen? And do you know a process that we can use to advoid this problem. Thank you Ray |
| RAY - Tuesday, 12/10/02 21:06:08 GMT |
|
Miters I about wore out the trig keys on my calculator with a problem similiar to Tim's before I had a revelation. This is probably immediately obvious to anyone but me, but so long as you cut both sides of the joint the same (actually as mirror images) and keep the curve within reasonable limits (no more than 45 degrees from straight for a 90 degree corner), you can form the sides so the joint closes. If I were Tim and didn't need a precise final profile, I would fold a piece of card stock at 45 degrees across one corner and cut the corner off in what looked like a reasonable curve. I would then flatten the card out, fold the sides up, and curl them so the cut curves came together at the corner. You probably wouldn't have to cut too many cards before you came up with a curve you were happy with, and then you could use the card as a template for the metal. |
| Mike B - Tuesday, 12/10/02 21:52:01 GMT |
|
I said "across one corner" when I probably should have said "through." You would want the corner cut in half by the fold so both sides of the joint would come out the same. |
| Mike B - Tuesday, 12/10/02 22:06:04 GMT |
|
SmithinScout, one of Roy Underhill's books (yes, woodworking books) has a section on blacksmithing. One of the projects is a peavey. Best I recall, it didn't require forge welding but the pivot was pinned through a mortise in the wood handle. Sheet metal layout - Try Gingery's sheet metal book. It's at lindsaybks.com, which 3dogs already recommended. There are several other sheet metal books there that look real good, but this is the only one I've read. Prices in the sub-$10 range. Like guru, my favorite drafting/layout book is an old high school text I pulled out of the dump...back when I was about high school age. It wasn't the same as the books I had in school, but it's all the same stuff. Jeweler's saw blades...www.woodcraft.com? Don't recall them having a size chart, but I think they sell the saws and blades. They use them in marquetry. Might be they list them for sale in size and number of teeth rather than some arbitrary numbering scheme. Steve |
| Steve A - Tuesday, 12/10/02 22:49:47 GMT |
|
Jeweler's saws: I've been using the things for over thirty years and have never really had a chart of what size was what. I can give some general guidelines though, that have worked for me all this time. Jeweler's saw blades are available in sizes from 8/0 to about #12, with 8/0 being the smallest. And they are SMALL! About the size of a coarse human hair. I am always amazed at how well they hold up. I only use 6/0 and 8/0 for cutting the very thinnest of stock, or where I need to cut a corner so tight you cna't tell it from a true right angle. For sheet metal in guages from 16 to 20, I use anything from a 2/0 to a #2, depending on how tight the cut has to be. As the stock gets thinner, the blade gets finer, and vice versa. Whenever you're cutting with jeweler's blades, it is important to have them tensioned very tightly. The slightest flex and they break very easily. Using a saw frame with as shallow a throat as feasible for the work at hand really helps here. Always lubricate the blade with some beeswax or paraffin when cutting brass, silver or steel. When cutting aluminum, I find that kerosene or diesel fuel is a better lubricant. The best aid for successful cutting with a jeweler's saw is a good solid bench pin. Take a look at the pictures of them in a catalogue and then make your own, but make it long enough to clamp at both the front and the back of your bench so it is really rigid. Keep the hole and the v-cut as small as possible to give the most support for small pieces. Hope this helps. |
| vicopper - Tuesday, 12/10/02 23:59:37 GMT |
|
hello the below is from several of my daughter's jewelery catalogs and books: 7/0 JEWELERS SAW BLADES 5in. Use with a #80 Drill Bit. Detailed Description Blade thickness: .0067" x .0130" 66 TPI 6/0 JEWELERS SAW BLADES 5in. Use with a #79 Drill Bit. Detailed Description Blade thickness: .0070" x .0140" 66 TPI 5/0 JEWELERS SAW BLADES 5in. Use with a #78 Drill Bit. Detailed Description Blade thickness: .0080" x .0157" 66 TPI 4/0 JEWELERS SAW BLADES 5in. Use with a #77 Drill Bit. Detailed Description Blade thickness: .0086" x .0175" 66 TPI 3/0 JEWELERS SAW BLADES 5in. Use with a #76 Drill Bit. Detailed Description Blade thickness: .0095" x .0190" 61 TPI 2/0 JEWELERS SAW BLADES 5in. Use with a #75 Drill Bit. Detailed Description Blade thickness: .0103" x .0204" 56 TPI 1/0 JEWELERS SAW BLADES 5in. Use with a #73 Drill Bit. Detailed Description Blade thickness: .0110" x .0220" 51 TPI 1 JEWELERS SAW BLADES 5in. Use with a #71 Drill Bit. Detailed Description Blade thickness: .0120" x .0240" 48 TPI 2 JEWELERS SAW BLADES 5in. Use with a #70 Drill Bit. Detailed Description Blade thickness: .0134" x .0276" 43 TPI 3 JEWELERS SAW BLADES 5in. Use with a #69 Drill Bit. Detailed Description Blade thickness: .0140" x .0290" 41 TPI 4 JEWELERS SAW BLADES 5in. Use with a #68 Drill Bit. Detailed Description Blade thickness: .0150" x .0307" 38 TPI 5 JEWELERS SAW BLADES 5in. Use with a #67 Drill Bit. Detailed Description Blade thickness: .0158" x .0331" 36 TPI terry l. ridder ><> |
| terry l. ridder - Wednesday, 12/11/02 01:00:42 GMT |
|
Does anyone use cutting fluid in their bandsaw ? I bought a gallon of cutting oil from Grizzly when I purchased my horizontal bandsaw, it's an oil type, set me back $30 and the gallon wasn't enough to fill the tank. This seemed expensive at the time, is there a cheaper solution ? Hydraulic oil, ATF, Oil of Olay ? Thanks - C |
| chris smith - Wednesday, 12/11/02 02:02:42 GMT |
|
Chris, I've used my el-cheapo taiwan vertical/horizontal metal cutting band saw both ways. I used the same high carbon blades for both procedures, Cutting the same type of mild steel stock, I didn't notice much difference in cutting speed or blade life. Cutting higher carbon steel, there was a definited difference, with wet cutting being both faster and with a longer blade life. I did not use a regular "cutting oil", I used Tap Magic, which I happened to have on hand. |
| Paw Paw - Wednesday, 12/11/02 02:56:55 GMT |
|
Thanks for all of the sawblade info! Anyone have a source they would recommend? Bandsaw cutting fluid: I have athe Tractor supply (Clake brand) bandsaw, and for mild steel I have had better luck cutting dry. Adding cutting fluid seems to make more of the metal dust sick, and carrys into the workings. I have had to replace one bearing because of this. -JIM |
| -JIM - Wednesday, 12/11/02 03:21:37 GMT |
|
Maybe I'm preachin' to the choir, here, but the first and foremost thing to remember about metal cutting saw blades of any kind, be they band, hack or jeweller's is that two teeth should not straddle the thickness of the work. Perhaps it seems like I'm having a DUH moment, here, but I'll bet we've ALL tried to get away with using too coarse a blade. Best regards, 3dogs |
| 3dogs - Wednesday, 12/11/02 07:23:29 GMT |
|
cutting oil: we use it usually blendet out with water, follow the receipe on the box, of course then it is no longer cuting oil but cutting fluid |
| Stefan - Wednesday, 12/11/02 07:23:45 GMT |
|
Looking for any information on an anvil made by ERNISDORFF & SONS CO.; Dubuque, IA. Looks like it is stamped 118 lbs. When did they make these and are they a good anvil? Thanks. |
| John - Wednesday, 12/11/02 09:04:59 GMT |
|
You might try http://www.bgartforms.com for blades. I bought "scroll saw" blades from him which fit my jewelers saw fine, when I was trying to do a lot of cutting of copper on my scroll saw. Still haven't quite managed to perfect that technique yet, and haven't done enough of it so that I can live through the chaos happening when a blade breaks in the middle of concentration on following the line, but I keep trying |
| Cap - Wednesday, 12/11/02 12:20:56 GMT |
|
For fire screens, I get a catalog from the people at www.mcnichols.com over in Houston. They have a free catalog, which is filled with info on measuring, specifying, etc. Bit pricey, but a good reference, and sometimes the job demands instant access. Of course you charge accordingly. A friend of mine got some perforated metal from them, two sheets, put them back to back in a frame and filled the perforations with marbles for a screen of stainless and glass. The listed size of the perforations and the precision of their manufacture allowed him to order exactly what he needed to fit marbles he had on hand.....Regards |
| Cap - Wednesday, 12/11/02 12:50:28 GMT |
|
hello; My daughter sent me this chart which is much better than what I put together from her catalogs and books. Jeweler Saw Blade Specifications terry l. ridder ><> |
| terry l. ridder - Wednesday, 12/11/02 13:26:13 GMT |
|
hello well that cut & paste sure did not work very well. ;-) terry l. ridder ><> |
| terry l. ridder - Wednesday, 12/11/02 13:28:03 GMT |
|
No information available at all (that I can find) about an anvil made by Ernisdorff & Sons. May be a Hay Budden that was made for a local seller. Take a picture of the bottom (underside of the anvil) and I'll be able to tell if it's a HB. Also, scrub the front of the foot, under the horn, with a scotch-brite pad and see if there is a serial number there. |
| Paw Paw - Wednesday, 12/11/02 14:56:51 GMT |
|
Terry, I'll rework in HTML and post on the FAQs page. Tabs do not translate to HTML. . . THANK YOU! |
| - guru - Wednesday, 12/11/02 15:10:41 GMT |
|
Sticking SS Parts: RAY, It sounds like you are welding them together. In the right environment with clean stock welding occurs at MUCH lower temperatures than you would imagine. Clean steels protected from air can be forge welded at around 2,300°F. In a vacuume parts can weld at even lower temperatures. Even if you are not getting a true weld, components of the alloy may be melting and creating a joint. There are several ways to prevent sticking. The first is to not stack the parts. If you must stack the parts to get more in the furnace then use a protective ceramic coating like ITC-213 or kiln furniture. Potters use little ceramic tripods to keep glazed parts from welding to the floor or kiln shelves. These are usualy a hard high temperature refractory and come in many sizes. They will add about 3/8" to the height of each part. The ITC-213 is used in various industries to protect metal parts. It is used to prevent oxidation of exotic metal billets while heat and during forging. It is also used in some heat treating applications. The advantage in heat treating is that it prevents surface oxidation. The disadvantage is that it must be removed like surface oxidation. However, in most cases it comes off easier than scale AND the part's surface has not been damages from oxidation. |
| - guru - Wednesday, 12/11/02 15:11:05 GMT |
|
Ernisdorff & Sons Anvil: There are dozens (maybe hundreds) of cast farriers anvils made by specialty houses for farriers schools and farriers suppliers. Today's crop includes Mankle, NC-TOOL and Texas Farrier Supply among others. Ten or twenty years from now it will be another group. I recently answered a similar question for a fellow by mail that sent me a photo of a farrier's anvil with an abreviated name and a tell tale map of Oklahoma under it. The name was OSFH (I think). The best that Richard Postman and I could come up with was Oklahoma School of/for Farriers and Horseshoers. . . Or something along that line. The anvil appeared to be about 50 years old. There is no keeping up with them all. |
| - guru - Wednesday, 12/11/02 15:20:37 GMT |
|
Cutting Fluids: Blades last longer if cooled. Even the little jeweler's saw blades we were talking about. I cool and lubricate mine with a little spit every couple strokes. Life of a dry band saw blade or reciproical saw blade is much lower than a cooled and lubricated one. The difference is something like 10:1 or greater. It is more important that the fluid COOL the blade than lubricate it. Most machine tools (and grinders) use water soluble oil (that milky white stuff). The oil is there more to prevent rusting the machine than to lubricate. It also wets parts that may have other oils on them. Plain water will run off and not get into the cut. The water based fluids are also non-flammable which makes them very safe compared to solvent types. The cooling that occurs is critical at the very cutting edge so thinner fluids work better than thick. Water works well because of its fuidity and high rate of heat transfer. But it must have a wetting agent. The premier taping fluid of the 1980's (now banned) was trichlorethelene dry cleaning solvent. You could hear it crackle as it evaporated from the cutting edge of a hand turned tap. The tric being a very thin fluid ran to the very edge of the cut and cooled by evaporation. It was great stuff and it increased the life of taps 12:1. The oil based replacements are not nearly as good and only increase tap life about 5:1 over dry. Pumped coolants also rinse offal and swarf from the cut and off the blade. Again, this is why cutting fluids are best when they are thin (non sticky) liquids. For my little band saw that doesn't have pumped coolant I use WD-40 as a cutting fluid (yes, even at the cost of WD-40 it is VERY cost effective). When I have a lot of work to cut I mix a little oil with kerosene and put it in an oil can to use for drilling and sawing. If offal carried on a blade damaged the bearings of a saw it is the fault of the manufacturer. Metal cutting saw bearings must be properly guarded and sealed to prevent failure. Chris, If your saw has a pumped system it is best to use water soluble oil. This costs about the same as the stuff you bought but it gets diluted in water about 4 or 5 to one . . I think . . (its been a while and it depends on the application). Most pumped systems retrieve the majority of the fluid and recirculate it. Some always runs off the ends of the machine and drips outside the drip pan so there is always a process of replacement. On good low loss systems like my surface grinder more is lost to evaporation than anything else. On it I just replace the water every so often unless it completely dries out (like now). But I ran it for about 5 years on one batch of coolant. . . If your saw does not have a retireval system then fabricating one is well worth while. Most of these have a multi-part tank that lets gravity seperate out the swarf. Where the swarf is very fine like a grinder a magnet is used to collect the fines. The magnet is housed in a plastic tube. To clean off the clinging metal powder the assemble is removed from the tank and the magnet slid out. The metal powder falls off and the magnet is replaced. Be sure your pump is designed for a recirculating system. |
| - guru - Wednesday, 12/11/02 15:57:40 GMT |
|
How much coal? I volunteer at a Canadian Historical National Site and this question has been brought to my attention a number of times. "How much coal would the blacksmith use?". This site hired approx 8 blacksmiths who worked on four forges. Bellows were used and the shop was running approx 12 hour per day. The coal was apparently coming from England. The smiths were forging axe heads, hinges, nails, farm items (forks, shovels, plows, etc..), some gold mining items such as pick axes, gold pans, and some horseshoes. Would anyone have any idea of how much coal would be needed per month, year, day???? Thank You Louis |
| Louis - Wednesday, 12/11/02 17:35:56 GMT |
|
Louis, We have 8 coal forges that get run for about 6 hours on class days. We go through about 100# of coal in that time. This is not a working shop environment though, this is a teaching environment. There is a lot of "figuring" time mixed in. I would guess that the situation you put forward would use about 100#-150# per day. This is only a guess based on what WE do! Larger Items require more fuel. More mass requires more heat volume ya know! You can keep a small fire for nails but you would need a much larger fire to sharpen a plow share. So the amount of coal needed per day would vary with the work load. I hope this helps some! |
| Wayne Parris - Wednesday, 12/11/02 19:48:06 GMT |
|
Louis, At an educated guess, approximately a bushel per day per smith. More if they were doing a lot of forge welding. |
| Paw Paw - Wednesday, 12/11/02 19:48:28 GMT |
|
Dave Masse, email me, please, I've lost your address. |
| Paw Paw - Wednesday, 12/11/02 19:49:11 GMT |
|
Coal Consumption: Louis, One thing you must be wary of is that in old journals charcoal is sometimes called "coal". We differenciate now but there was no need when everyone used charcoal. The amount of coal consumed could vary greatly depending on the size of the work being done. A smith working alone doing heavy work can use up as much as 100 pounds or more a day. But doing light or picky work the same smith may only use 20 pounds. A smith working with a striker (or power hammer) will use more fuel (easily double) than a smith working alone. So you can't just count "smiths". You also have to count the "jones" . . |
| - guru - Wednesday, 12/11/02 21:15:42 GMT |
|
does anybody can explain me where the clinker come from ? is it iron incrusted in coal ? i have a new batch of coal that i use now and it seem to make a lot of clinker,it melt together like a ball and harm the air flow. is there any tips to reduce clinker or it is in coal and nothing to do ? thanks !!!! |
| machefer - Wednesday, 12/11/02 21:19:11 GMT |
|
clinkers are dried dragon boogers. Seriously, clinker comes from the non volatile impurities in the coal - ie the stuff that doesnt burn and doesnt boil away. I think its mostly silica (like sand) which fuses together to make a glassy material. The amount of clinker depends on the coal and there isnt a whole lot to be done about it other than find a coal that doesnt make a lot of it. Low clinker is one of the things smiths look for when choosing coal |
| adam - Wednesday, 12/11/02 21:46:40 GMT |
|
Sticking Stainless Steel Parts: Stainless can be strage stuff to work with. To maintain its stainless quality, the chromium in the steel must be exposed to oxygen to create chromium oxide on the surface. It is this oxide layer that is inert and makes the steel corrosion resistant. Besides the scenario that Guru mentioned, two other possibilities may be occuring. If you stack the parts, the oxygen between the parts is quickly consumed. There may be a reducing atmosphere between the parts that breaks down the oxide coating and allows the steel to weld itself together. OR....there may be so much oxygen that the chromium oxide scale on opposing parts is growing together. I would guess that separating the parts to allow air to circulate between them and prevent them from touching would work better than coating them. If this is not practical, I would check out vacuum heat treating or an atmosphere furnace where the oxygen and carbon potential could be balanced for the alloy. |
| Quenchcrack - Wednesday, 12/11/02 22:33:44 GMT |
|
Please disregard all typos in the previous post. I borrowed Paw-Paws fingers to type it. |
| Quenchcrack - Wednesday, 12/11/02 22:34:42 GMT |
|
Clinker: As Adam said it is from impurities in the coal. All coal has some and there is good clinker and bad. In good coal with low impurities you want the clinker to coalese into lumps rather than making fine ash. These lumps can then be cleaned from the fire every so often. After a few hours I usualy get a doughnut shaped clinker in the fire which requires breaking up the fire somewhat to extract it. But most of the clinker comes out in one piece. IF you don't clean your forge out often enough, lots of coal ash collects in the forge and contributes to having excessive clinker even when you have good coal. Generally you need to clean the forge every day IF you work a full day. Even then you can tell from the clinker build up that the fuel is full of ash toward the end of the day. How much clinker you get is determined by the coal and how you maintain your fire. Learning to handle the clinker and ash buildup for your particular coal is all part of coal fire management. |
| - guru - Wednesday, 12/11/02 23:30:26 GMT |
|
michaelm I have a book [british] pub. in 1953 called ''the smith ..traditions and lore of an ancient craft'' by Frederic W. Robins , like Paw Paw sez it don't tell you how to make a thing, but its full o'stuff on myths [ merry smith myths!] and lore. try www.ABEBooks.com it's a listing of the contents of over 5,000 used bookstores around the world an excellent source for out of print blacksmithing books. very efficient [and very addictive] . |
| - lydia - Wednesday, 12/11/02 23:37:46 GMT |
|
While your talking about coal. I've been having a hard time lately with my coal fire. It seems to be burning out in the center. Why is this and what can I do to prevent it? I also have a hard time seeing the clinker when the fire is going. I know good fires and good fire management come with experience, but can you offer some good advise on how to maintain a good fire? I'm doing mostly smaller work - 1/4" rnd to 1/4x3/4 rect. |
| Ray - Wednesday, 12/11/02 23:56:15 GMT |
|
one more thing - what is a rounding hammer used for? |
| Ray - Thursday, 12/12/02 00:01:08 GMT |
|
Ray, Rounding the ends of a bar of steel that's being made into a horse shoe. It's a good hammer for a lot of other smithing applications, too. I don't shoe horses, but I use a rounding hammer frequently. |
| Paw Paw - Thursday, 12/12/02 00:13:49 GMT |
|
QC, that's right, put the blame on me! (grin) Me and Rodney Dangerfield, we don't get NO respect! (smile sadly) |
| Paw Paw - Thursday, 12/12/02 00:18:44 GMT |
|
Lydia, Do you have an ISBN number for that book? |
| Paw Paw - Thursday, 12/12/02 00:24:10 GMT |
|
Just got an email in. Ralph Zimmerman, Life Member of the NCABANA passed away today. Ralph was in his 90's, last of a line of six generations of blacksmiths. A find man and a good friend. He's gone, but he'll not be forgotten. The blacksmithing museum at the Dixie Classic Fairgrounds is named after him. I'll miss him. |
| Paw Paw - Thursday, 12/12/02 00:25:55 GMT |
|
PAW-PAW! That just ain't so! I respect Rodney! |
| - grant - Thursday, 12/12/02 00:38:21 GMT |
|
Grant, I love you too! (grin) |
| Paw Paw - Thursday, 12/12/02 01:08:36 GMT |
|
i am wondering about the types of high carbon steels used by blacksmiths for toolmaking hotcutters, coldcutters,ect; iwant to order some tool steel in different shapes and sizes ,can anyone tell me a good steel to use iam currently useing old rake tine teeth my research tells me its about a1080 carbon steel it works well for tongs and some punches ihave found it somewhat difficult to weld in a coal forge bt iam having more success as i use it any info on tol steels for blacksmith tools would be greatly appreceated |
| rickilo - Thursday, 12/12/02 05:09:03 GMT |
|
I was just wondering if you would be able to send me some information on how to harden metal? |
| Carli - Thursday, 12/12/02 05:22:18 GMT |
|
Carli, See our FAQs page under Heat Treating. |
| - guru - Thursday, 12/12/02 06:26:20 GMT |
|
Steels: Rickilo, Every smith has their favorite steels. It often depends on what is available to them and what they have worked the most of. Normally tongs are best made of low to medium carbon steel but not higher. The reason is they often get overheated and quenched. Higher carbon steels do not hold up well when mistreated that way. S-7 is a shock resistant alloy tool steel that a lot of smiths like for hammers, chisles and hot work tools. 5160 is a common tool and spring steel. It is used for prybars and bending wrenches and is suitable for almost anything except the hardest edge tools. W-1 is often available for machine shops and thus is commonly available. It is one of the less expensive of the high carbon tool steels. O-1 is more stable dimentionaly when hardened so its used for precision parts that need hardening. It is also commonly available because machine shops use it. It is more expensive than 0-1 A-2 is handy because it is an air hardening steel. It is commonly used for dies because there is not need for a quenchant. Being air-hardening it has a high temper range so it is a fair hot work steel. H-13 is a common hot work steel and H-27 is used for more extreame applications. H-13 is available in large slabs that have been heat treated to a hard but just barely machinable condition. It is often used for large dies (like for automotive body panels) that are "sunk" using EDM on the hardened steel. It can drilled and taped for mounting and since the whole is done after the steel is hardened there is no need to grind precision surfaces or to refinish after heat treating. The best rule to go by is to not use a steel of higher than needed carbon and hardness for the job. Tools that give a little last longer than those that break or chip because they are too hard for the application. |
| - guru - Thursday, 12/12/02 06:52:58 GMT |
|
Greetings, Guru and lieutenant guri; I'm looking for good info on backyard lost foam casting. The Ray-Vin website left me wanting for more. Best regards, 3dogs |
| 3dogs - Thursday, 12/12/02 09:08:18 GMT |
|
Guru Thanks for the info on cutting fluid, I'll track down some of the water based fluid and put the $30/gallon stuff back in the jug and find another use for it. This reminded me that my dad often used a cardboard wrapped stick of waxy material when drilling or tapping. I still have and use one he gave me. It looks like the wax melts under heat and might provide some lubrication and the chips seem to cling together. Do machinists use the wax for the same purpose as cutting fluid ? - C |
| chris smith - Thursday, 12/12/02 10:35:27 GMT |
|
Paw Paw, no such luck on a ISBN, the publisher is rider& company. from the fly leaf it looks like they are were, refference/self-help type publishers. The book was given to me by the late Charles Bunting , who was the master blacksmith at the big Stelco steel plant in Hamilton Ont [our Pittsburg] he was 93..... is blacksmithing the key to longevity or does it just make you feel a whole lot older? |
| - lydia - Thursday, 12/12/02 13:10:08 GMT |
|
Paw Paw . I just checked abebooks.com and they have 3 copies ...from $22-$56.. I searched under THE SMITH under author I just put ROBINS... |
| - lydia - Thursday, 12/12/02 13:19:21 GMT |
|
Lydia, > Is blacksmithing the key to logevity or does it just make you feel a whole lot older? Chuckle, some of both, I think! I'll check ABE, thanks for the tip! |
| Paw Paw - Thursday, 12/12/02 14:32:57 GMT |
|
Ray, All fires lose coal in the center, as a result of combustion. With coking grade coal, you should be developing a coke ring around the heart of the fire. Feed the fire with those pieces of coke from the inside out. As coke is fed to center, fill the resulting cavities with green coal. Keep "coning up" the fire. Clinker wants to "trickle" down and coagulate at the bottom of a standard firepot. The coke will usually hide it. Rounding Hammer. Horseshoers begin the making (turning) of a shoe by supporting a bit of the shoe stock over the anvil edge, tongs at the top of the bar, and hitting with the ball face towards the operator. You're hitting the central area of the bar on edge to get the "toe bend". If you used the other hammer face, you might get edge marks on the inside of the bend. The ball face is also used sometimes for concaving the foot surface of the shoe to relieve sole pressure. But I agree with PawPaw. We use it for all sorts of things in blacksmithery. If you're serious about the craft, you'll wind up whith an "arsenal" of hammers. |
| Frank Turley - Thursday, 12/12/02 15:11:51 GMT |
|
Ray: It is tricky to tell red hot clinker from glowing coal. Clinker has a wet glassy look when hot and it has a different feel and sound when you tap it with a poker |
| adam - Thursday, 12/12/02 15:22:23 GMT |
|
Chris Smith. I've used that stuff and haven't been real impressed. I seems like it tend to all stay at the top of a hole when you tap with it, and like you said, the chips tend to stick together, which make for a nasty situation if you are tapping or drilling a small hole. (This stuff is made for mostly tapping and drilling by the way.) It wouldn't work to well on a bandsaw because it wouldn't get down into the cut where the teeth are coming in contact with the metal. I'm not sure how expensive it is, but we used to use a concentrate called bio-cool in the shop, kind of a greenish water soluble substance that worked extremely well and was very "wet." |
| Bond-JamesBond - Thursday, 12/12/02 15:48:23 GMT |
|
Sorry about all the typos, I'm learning how to type with a cast on. |
| Bond-JamesBond - Thursday, 12/12/02 15:49:55 GMT |
|
Lost Foam Investment Casting: 3dogs, This is a dead simple process. Carve the shape, burry in sand, pour in hot metal. One of the largest and most sucessfull castings I made at Camp Fenby (Longship Co. Viking crafts weekend) was a lost foam casting. Atli carved a sword pommel from white packing foam (bad choice) then glued on a rough pouring sprue made of the same using some elmers glue. I burried the part in a pile of DRY sand-box sand (bad choice) we had dumped on the earth floor of his barn. Then I melted a full 3# crucible of brass consisting mostly of recycled keys. The metal was pourded down the center of the sprue which dissapears in front of the hot metal with a little puff of smoke and flame (not nearly as much as you would expect and less than other casting methods). The casting came out pretty good with one flaw where the metal had penetrated the sand. Better methods: The fine grained blue foam insulation they sell for use in construction is much better to carve and presents a smoother surface. This stuff saws great with a jig saw or band saw. You can use sand paper to round edges. Holes are best cut with a tubular punch or small saw. Sand should be what is known as "sharp" sand. The particles are actually sharp and not worn down. Sand-box "play" sand is often beach sand which is smooth and polished. It does not lock together as well as sharp sand. Often the river sand sold for masonry work is sharp sand. For parts with fine detail the dry sand may not reproduce quite as well as "green" sand. A thin coating of refractory clay on the foam investment will keep the sand from collapsing quite so easily and reduce penetration into the sand. It will also prevent the sand from sticking to the part. However, the surface texture of the foam is still there. In some comercial processes they use ITC-100 or ITC-296 on foam and wax investments. In mass production very complicated parts like auto intake manifolds are made by lost foam casting. The investments are made by injection molding the foam parts, then gluing them together to make shapes nearly impossible to cast. These are placed in a special cask where sand is poured in, shaken to be sure it fills all the hollow spaces, and THEN a vacuume is pulled on the flask locking the sand in place. The metal is poured (usualy aluminium, but bronze and cast iron/steel work too)) and allowed to cool. As soon as the part is solidified a trap door is open in the cask which is on a conveyor system and the part falls out. . . The process reproduces the surface so accurately that you can see the fine lines between foam beads in the investment. Complicated core boxes and cores are not needed thus cutting way down on production costs. Mold and die costs in this case are still high due to making metal molds to form the form. In 1984 I recommend this process to a foundry that was making a 12,000 pound one off casting for us. They thought I was crazy. We had to buy patterns and core boxes (as big as a pickup truck) that cost more than the finished machined casting. . . In 1990 we had a similar part made weighing 18,000 pounds. This time the foundry went to great lengths to explain to ME that all they used for large castings was lost foam. . . they said that 10 or more investments this size would cost less than wood patterns. . . I just smiled. The same rules for gating and risers apply to lost foam as for other castings. However, the design is different due to the different way the mold is produced. The important thing to remember is that most castings need nearly an equal amount of metal in the sprue and risers to feed the casting as it shrinks. Green (moist clay bonded) sand can be used in this process if higher mold strength is needed. However, vent holes should be poked in the sand with a piece of wire (coat hanger or welding rod) to help vent steam. In the pommel I cast for Atli we actually mounded the sand up around the investment and sprue like a small volcano. It took me back 40+ years to playing in sandboxes. . . However, the sand would have had better strength if it was deep enough to bury the part in leveled sand. This can also be done in a cask (wooden box, large tin can. . .) |
| - guru - Thursday, 12/12/02 15:54:15 GMT |
|
Atli, I was not able to stay at the demo on Wenesday night, but I wanted to thank you for an excellent demo. |
| Ralph - Thursday, 12/12/02 16:22:34 GMT |
|
Coal Use: depends a lot on the type of blower too! When I was using both electric and hand crank blowers, the electric forge was consuming at least twice as much as the hand crank. What time period too? Wrought iron is generally worked at a much higher temp than A36. And finally---if they were importing it from England---it wasn't charcoal which was an abundent natural resource of the Americas. I'd bet that Colonial Williamsburg has old account books of the buying of forge fuel that can be corrolated to active forges. If you can make the conversions from the units of the days you can get a good idea of coal use. Thomas |
| - Thomas Powers - Thursday, 12/12/02 17:02:06 GMT |
|
Hello, I am a student and I am trying to use nickel in a practical project. Unfortunately as it's Xmas, all my tutors are too busy to answer my questions about this. So i'm stuck :o( I am trying to anneal nickel. I heat it like i would copper until it is an even red-orange colour and cool it. But this isnt successful. What should i be looking out for to signal when it's ready? Help! i dont have a clue! Many Thanks, Lu x |
| Lu - Thursday, 12/12/02 17:11:36 GMT |
|
Ralph: You're welcome. Hope folks find it useful. |
| Bruce Blackistone (Atli) - Thursday, 12/12/02 17:15:10 GMT |
|
Guru's I have found an unlimited source for discarded bandsaw blades. 1.25" wide x .06"? thick. I want to start experimenting in the art of blade smithing. I have in mind to laminate two or three together to thicken the end product. Is it best to fold the stock lenghth wise or across the length? Or a combination of both? My consern is keeping that thin of material hot enough to weld without burning it up at the beginning. Any input would be greatly appreciated. Thanks -Dodge |
| Dodge - Thursday, 12/12/02 18:16:00 GMT |
|
How do you calculate tonage needed for ajob on a punch press? |
| Lonnie Leach - Thursday, 12/12/02 18:29:39 GMT |
|
Lu, first, are you sure it is pure nickel? It might be a nickel alloy. If it is a nickel alloy, you may have to quench it to get it dead soft. I know this is contrary to what we think about as a softening process but precipitation hardening alloys must be quenched to prevent the precipitation of a second phase that hardens the nickel. Generally, anneal at 1500-1700F for 5 minutes AT TEMPERATURE, quench in water. If you are using a gas furnace, the products of combustion can contaminate the nickel with carbon and nitrogen which can affect surface hardness. If you have more questions, I would be happy to try to answer them for you via e-mail at my place of work: nichols@lonestarsteel.com . |
| - Quenchcrack - Thursday, 12/12/02 18:31:39 GMT |
|
Annealing Nickel: Lu, Nickel is normaly in the form of some iron or copper alloy. Nickel is annealed at 705 and 1205°C (1301 and 2200°F). Higher temperatures are used for "dead soft" temper. But this increases grain growth which may not be good for certain mechanical applications. The low end of the range is for copper alloys like Monel and the high end for iron alloys. Some nickel alloys are air cooled after heating, some are quenched. If you have been quenching the metal try a slow air cool. For more details see Key to Metals, Heat Treating Nickel |
| - guru - Thursday, 12/12/02 18:40:09 GMT |
|
Dodge, try layering 1095 or 1084 with the bandsaw blade. Thatway you will get a discernable pattern...... I mean after all if you are going to go to the trouble of welding might as well get the pretty as well... |
| Ralph - Thursday, 12/12/02 18:46:43 GMT |
|
Lonnie Leach: To calculate blanking tonnage you multiply the length of the cut (perimeter) by the thickness of the stock by the shear strength of the material (in psi) then divide the sum by 2000 to get tons. (Tons=LTS/2000) |
| Zero - Thursday, 12/12/02 19:22:15 GMT |
|
Punch Press Job: Lonnie, It depends on the job. Punching holes and blanking is straight forward. Bending is a little tricky, forming is worse and coining requires critical analysis if it is anywhere near over 20% capacity of the press and generaly is not recommended in punch presses. For punching mild steel multiply the permiter of the hole in inches by the thickness of the metal in inches to get the area to be sheared. Then multiply by 30 tons. That is the force to do the work plus a small safety factor. THEN, if your die set is using stripper springs add the force to compress the springs. This is normaly about 30% to 50% of the punching force (to pull the punch out of the work). Stainless takes much more force and is hard on tooling (It dulls common punches on the first hole). Brass and aluminium take much less force but I design for steel so I can use the same for several materials. Die sets can be hard coupled to the press ram and pull the punch out with nearly the same force as it applied to do the job. This requires careful design of the dieset and is not usualy used in applications where the dieset is changed out often. However, you CAN gain a little advantage by not needing heavy stripper springs. Except in high production applications where lots of enginering is applied most jobs other than punching that are done in a punch press are done via overkill. When you KNOW you have 10 to 100 time the power needed to do a job then you don't sweat the details. This is sort of a trial and error seat of the pants method. Some folks with common sense can get away with it and others end up wrecking machinery. . . If you can notice ANY apparent strain or slowing of a punch press in operation you are probably much too close to overloading it. If the press pauses slightly when it hits the work you have DEFINITELY overloaded it and it will fail in short order (or is already damaged). These are the little things that folks without experiance with machinery overlook. . |
| - guru - Thursday, 12/12/02 19:26:28 GMT |
|
I work on restoring ald antique stoves. Typically these stoves are missing parts or pieces. Two of the pieces that are typically missing or damaged so badly they need to be replaced are a curved ring around the top portion of the stove and the fineal. Size ranges of the ring range from 14 to 18 diameter across the ring, about 1.5 to 2 inches width of the ring, and thickness cand vary from less than 1/16 of an inch. I would like to find someone who can make rings for stoves, and possibly the fineals. Do you have any suggestions. I live in Colorado, so close to there would be nice, but not a requirement. If you need more info, I haven't described what I want very well please e-mail me. Thank You |
| Rodney - Thursday, 12/12/02 20:55:01 GMT |
|
Punch Presses: My note above about slowing of a punch press is not entirely accurate. At full load the flywheel of a punch press slows about 15%. However, only the most astute observer of machinery can detect this slowing through about 90% of rotation. The motor usualy brings it back up to speed in the next rotation. All in less than a blink of an eye. . |
| - guru - Thursday, 12/12/02 23:10:11 GMT |
|
Trent and Miguel, your slack-tub registration mails bounced. Please register again. |
| - guru - Friday, 12/13/02 00:43:34 GMT |
|
I know that this was posted a while back, but I can't seem to find it. How do you apply bee's wax, and what finish does it leave. Thanks and sorry for the repeat question. ps. I just found a local steel place that will let me raid their scrap bin any time I want and haul it all away for FREE!! I'm giddy like a school boy. Tee Hee. |
| Bond-JamesBond - Friday, 12/13/02 03:08:50 GMT |
|
007 - Just keep on a truckin. . I'm sure Paw-Paw will help find a place to put it all! Hmmmm. . maybe I just put that heater core in my flat bed truck. . . I've got a couple tons of steel beam and plate in the yard but I KNOW I have used up at least that much over the years. . It disapears in a hurry when you start building stuff. Then there is always the problem of having JUST the right size piece. . . :) |
| - guru - Friday, 12/13/02 03:23:09 GMT |
|
Beeswax: I just heat the piece up a bit (black heat) or more accurately after the last heat I give something as I'm hammering it I let it cool down a bit, then rub the piece over the wax. I didn't know there WERE other ways to apply beeswax.. if there are I'm interested in hearing them! In my experience it keeps the grey/black color. And keeps it for a long while too.. at least until it's heated up agian and the wax melts off. I waxed a pair of tongs once when I was experementing.. left the tongs outside for several days and there was not a patch of rust to be seen. So it works! Just my 2 cents. Robert "Asgard" HPL Steel |
| - Robert "Asgard" - Friday, 12/13/02 04:19:34 GMT |
|
Forgot to mention: I'm told that if you rub the waxed metal with a rag after it cools it polishes up nice. Never tried this, and don't know how it would affect the rust-resistance that the wax seems to offer.. but it couldn't hurt to try! Robert "Asgard" |
| - Robert "Asgard" - Friday, 12/13/02 04:22:58 GMT |
|
Hello, I have a road grader blade that I've since cut up and forged heated to beat the pieces flat.(they were curved) I would like to use them on my Treadle Hammer as hammering plates. Should I reheat them to a red heat and submerge them completely in an oil quench? After that should I temper the face of them to a blue? or will the oil quenching be enough? So as to be usable as Hammering plates? |
| Will - Friday, 12/13/02 04:44:14 GMT |
|
Jock, I was reading thru your post about lost foam casting and was intrigued. The sand you use around the foam investment is just loose sand? No binder as in open mold (Not sure if thats the right term) casting? That process uses oil in the sand to hold it together correct? |
| Dodge - Friday, 12/13/02 07:50:34 GMT |
|
Guru; Thanks for the input and inspiration on the lost foam inquiry. I think I'll summon up some nerve and give it a try at the plant where I work. That bunch is easy to entertain. I have everything I need to set it up; parts for Reill burners, propane, kaowool, and an understanding but bewildered plant superintendent whose favorite question to me is "NOW WHAT?" (Y'know, I've even got a couple of crucibles that I pilfered from the testing lab stashed away.)Heh,heh. Thanks again, 3dogs |
| 3dogs - Friday, 12/13/02 08:02:30 GMT |
|
Wax Finish: 007 Robert explained the correct way of applying wax, oil is the same process. Expect a LOT of smoke and depending on what kind of oil or wax it is, it may smell like rotting flesh(old used motor oil) when burned. Also expect the smoke to erupt into flames, this will happen if the metal is hotter then the flash point of the wax or oil, this is best done outside. You have been warned. Different waxs and oils have a different finish/luster. Basicaly for a wax or a hardening oil(such as teek oil) the finish will have the same hardness and polish-ability that it would if rubbed on cold. As I understand it the black comes from the carbon deposits when the wax or oil is burnt on. About half a year ago I applied a wax finish(semi soft candle wax) to a hook that I made(the kind with a build in nail) and pounded it into a tree in the backyard. The only place that it has rusted is where the hammer had struck the metal to pound it into the tree. The realitively soft wax and carbon deposits were displaced by the hammer blows and exposed the bare metal. Although the hook is NOT frequently used to any viable extent, so there is not the wear that would normaly be present, thus the wax is not being disturbed. Eventualy the rust will sneek under the wax that is left and turn the whole hook into dust;} In conclusion, using a wax or oil to finish a piece is quick, dirty and often exciting BUT it's finish is short lived compared to the paints and other advanced technology's that we have availiable. Although there is a group studying a paint technology that I believe was used by the Mians and has survived a few thousand years abuse from the enviroment. . . |
| Caleb Ramsby - Friday, 12/13/02 08:11:19 GMT |
|
Sand For Lost Foam: Dodge, Yep, it is dry loose unbonded sand! But I expact there are size limits to unbonded sand and that is why in production processes they use a vacuum. The vacuum locks the sand together the force coming from the surround air pressure. But for backyard production a thin clay slip will hold the sand at bay. You just need to be sure to use a refractory clay. Regular white ceramic clay slip is much too low a temperature material and will actualy boil if gotten hot enough. BUT it WILL work with low temperature alloys like aluminium and zinc. Stoneware clay should work for brass. I NEED to do a demo on this but it takes having someone else taking the photos. . . You can't pour the metal and click away at the same time. I've got everything to do a foam casting demo including sheets of 2" thick blue foam to carve, brass and equipment. What small items do you folks want to see cast? Or would buy when I'm done ;) |
| - guru - Friday, 12/13/02 15:50:53 GMT |
|
Wax Finish One of the best wax finishes is hardening liquid floor wax. It is very durable and can be polished. I guess I will have to buy some to find the right brand to recommend. . The Kaynes sell several types of waxes. |
| - guru - Friday, 12/13/02 15:53:28 GMT |
|
Hmmm. Small brass items. Light switch/doorbell plates with smithing theme of course, CSI logo mounted on a nice piece of wood (can be displayed with pride in any shop), Biz card holder(with hammer, anvil etc..), small trivet, maybe a bell to be hung outside the shop. How small is small? |
| Gronk - Friday, 12/13/02 16:23:01 GMT |
|
Johnson's floor wax, both liquid and paste have a pretty good rep amongs blacksmiths. I use the paste in the wax mix that I use. |
| Paw Paw - Friday, 12/13/02 16:45:59 GMT |
|
Grader Blade Will, I believe this is an abrasion resistant steel and not a particularly hardenable steel. We have had posts from other folks on the subject that have used it an know more about it than I do. HOWEVER, as I have repeated often. . ALL scrap and recycled steels should always be treated as an unknown. No matter what anyone tells you, the piece YOU have could and probably IS different. The only folks that can absolutely say are the manufacturer of the original part. And generaly they will not tell. Manufacturers also change the steels they use any time they want and not all manufacturers use the same steel. SO, when using scrap steel YOU become the metallurgist. Or more appropriatly a metallurgical detective. All you know for sure at this point is that it is steel. Carbon content can be roughly judged by spark testing. Ocassionaly alloy content can also be determined by this method. To determine the proper heat treatment you use trial and error carefully keeping track of what you did. To test the resulting hardness without a tester you can use the file method and comparison test know items. Determining the heat used for tempering can be done by temper color. However, the standard colors are for plain carbon steels only. Use them as a reference for the specific steel but not as a judge of specific temperatures. Being a metal sleuth takes patience, logic, imagination and some knowledge of metals. If this is not your kind of thing then you either need to quit using scrape steels and purchase steels of known composition, OR just fumble your way along by the seat of your pants (as many of us do) and don't get too technical. For your specific application most folks use mild steel as rolled. If you do not harden the material then it is most likely OK. But as soon as you harden it then you need to do some testing to be sure you haven't over hardened the steel whicj could result in cracking and spalling. |
| - guru - Friday, 12/13/02 16:49:38 GMT |
|
Will, This will be a matter of experimentation. I searched and found a Dept. of Commerce site that states that grader blades (like for dozers) can be 1050, 1055, 1152, and 1552, and that the steels have trace amounts of boron. I would try heating to a good cherry red and quenching in oil to harden...oil to be on the safe side as opposed to water, and to prevent warping. Agitate. I would be tempted to temper to the "Ocean Green" color [about 700�F] which occurs after the pale blue. It is difficult to see. I would think that would be a relatively soft temper so that it holds up to concussive forces without cracking. |
| Frank Turley - Friday, 12/13/02 16:50:35 GMT |
|
Frank, Thanks for the research. I need to put that in a safe place. . grader blades keep coming up. Ideas for Lost Foam: All good ideas Gronk. But remember I have to carve these things as one-offs from foam. Casting bells is an art requiring the right alloys. . Might be fun. One great use for this process is making patterns for other molding processes. Often you want a durable pattern. Cast the pattern in aluminium from a quick and dirty foam original, THEN refinish the aluminium pattern. I'll look into a CSI logo in brass. The C and I would be small seperate castings. Three pounds is about the limit of my small casting setup. I haven't made crucible tongs for the bigger crucibles. I have both jointed and tweezer type for my small crucibles. Each size crucible needs their own. At least one backyard foundry guy is casting iron and steel using a propane fired crucible furnace. . . :) |
| - guru - Friday, 12/13/02 17:06:22 GMT |
|
Thanks all for the wax info. I just bought a small pack of bees wax at a little store in town, and thought I'd give it a try. Guru, I just bought a nifty new D-camera, and if this were demo were to take place at say a relatively neutral location, oh I don't know, say around Paw-Paw's neck of the woods, providing he approves of course, I would be happy to take the pictures. |
| Bond-JamesBond - Friday, 12/13/02 17:09:18 GMT |
|
Hi Jock, I have a couple questions that I am hop0ing you could answer. I am working on the spring for my power hammer (NC_JYH style) and I have run into a snag. How do I bend the leaf spring to fit? If I heat it, it will lose it's temper and I don't think that I could retemper it back to where I need it. What size leaf spring do you recommend? Can you give me some advice on how to bend it and maintain the required stiffness/springiness. What size shocks did you use on yours? They seem huge! Thanks Daniel Kretchmar www.irontreeworks.com |
| Daniel Kretchmar - Friday, 12/13/02 17:23:09 GMT |
|
Grader Blades: I had an edge from a city snow plow one time that I had tested. It was 1050. On another occsion, I had a section of grader blade with a carbide edge. This was not hardenable. I would try a spark test first and then try and oil quench a small piece. If it doesn't get hard, try water. Patrick |
| Patrick Nowak - Friday, 12/13/02 18:03:31 GMT |
|
Jock, Foam casting ideas. Belt Buckles!! Try to find a solid brass one in the stores! Most are brass plated zinc or potmetal. I've been saving some salvaged brass (mostly large nuts 3/4" found on the hatch covers of a barge that was being scrapped out) for a number of years hoping to someday find a simple method of casting. This coul be the answer. Now all I need is a crucible. :) -Dodge |
| Dodge - Friday, 12/13/02 18:58:36 GMT |
|
007, it was a little over one year ago that I was asking about wax and oil finishs on this site, the great thing about this place is that in another year you will most likely be answering someone elses question about wax! |
| Caleb Ramsby - Friday, 12/13/02 19:27:44 GMT |
|
dodge I would sigest layering the band saw with O1 it has about the same heat ranges as most bandsaw blades (mostly L6 or something like it) also if you use thicker O1 and stack 3 or 4 blades then o1 then 3 or 4 then o1 etc the thicker O1 will help to keep the blade from burning up if you want to fold the billet add the same # of blades betwine the folds to keep the pattern. castings ...what about a chess set one side polished the other blackened? MP |
| MP - Friday, 12/13/02 19:31:56 GMT |
|
A coffee creamer made from stainless (the thicker the better) will hold enough brass to cast a belt buckle from---especially if you have a thick bed of coke under it and a "Mt Fugi" fire around it. Post 1984 american pennies can be used to replace the zinc that boils/burns off in toxic fumes and y'all take *ALL* safety precautions---molten metal is much nastier than red hot steel as it will come right back at you if you mess up and sticks and burns to the bone rather than just rolling off. Thomas |
| - Thomas Powers - Friday, 12/13/02 22:04:18 GMT |
|
Wax....Just an observation from personal experience. Early on, I made a drive hook with a long spike to be used to hang a bird feeder on (a lot like the iForge demo). I forged it and applied bees wax. Put it into a tree in the back yard and it stayed there all summer. I am now seeing some rust develop but only where the hook has been bent back on itself. Science predicts that the most highly stressed part of a piece of metal will corrode first. So...normalize anything that will be exposed to the elements so that remaining stresses will be minimized. A little extra wax in tight bends would probably help, too. |
| - Quenchcrack - Friday, 12/13/02 22:40:15 GMT |
|
guru, one the question regarding the cut off hardie that i posted (harden/temper), do you see anything wrong with the plan: heat the piece in my gas forge to critical temp, quench the whole piece in oil, let it air cool from there until i can barely hold it, then throw it in the oven @450F for a couple of hours. this is assuming that it is medium carbon (very high likelyhood that it is). sound OK?? one more, i have read that the Rc of quenched 4140 is 56-57. for back up tools, bending forks, and drifts, i dont see any reason to temper. what do you think?? is it surprising to anyone that 4140 and tool steels in general are not in stock in steel distributors in las vegas, a metro area of more than 1.2 million population! thanks again.. |
| rugg - Saturday, 12/14/02 01:13:27 GMT |
|
Caleb, I know, I have caught myself doing it for people who ask how to get started. You are right, that is one of many great things about this site. |
| Bond-JamesBond - Saturday, 12/14/02 01:22:15 GMT |
|
Hardening and Tempering: In almost all cases no matter what the as-quenched hardness or the desired hardness all steels should be tempered. As-quenched even mild steel can be very brittle even though it is not tremondously hard. That means it will not hold and edge, it will not resist being dented with a hard too, BUT it will be so brittle that it will break under little strain. . . If a steel is not hard enough at the maximum tempered hardness then you are using the wrong steel. But note that tempering at the low recommended temperature on reduces the hardness two or three points Rockwell. When you get into alloy steels and very high carbon steels the rules on annealing or normalizing vary but it is almost universaly recommended to temper all. Even air quench steels need to be tempered to a minimum of around 450-550°F (after having cooled to a minimum of 150 to 200°F). |
| - guru - Saturday, 12/14/02 02:45:35 GMT |
|
Industrial Supplies: I'm not surprised at what you cannot find in Las Vegas. Consider the unusual things you CAN find there. It is not an industrial town. In the Washington DC area you can search far and wide for simple things like Jacobs chuck arbors and large drill bits. . . they are NOT there. The business of DC is government, not manufacturing. Sacremento, CA is the same way. In in DC you can drive a couple hours to Baltimore and find virtualy anything industrial (or military) and any material including exotic woods. Richmond, VA is a capital city but it was also a large industrial center so you can find a very wide range of things there. Having good industrial suppliers is often the luck of the draw and can make a big difference in your business. |
| - guru - Saturday, 12/14/02 02:52:53 GMT |
|
SPRINGS: Daniel, Springs are hardened and tempered medium to high carbon steel. See all the comments today on heat treating unknown steel and in the our Heat Treating FAQ. |
| - guru - Saturday, 12/14/02 02:56:18 GMT |
|
Rugg, Whaddya' got there, a trout or a bass? It's really not too good to assume. If it's a sure enuff medium carbon steel without other alloying, then all of its heat treatments are not necessarily going to be like those of 4140, the latter being a chromium-molybdenum steel. Anyway, I wouldn't harden/temper the whole tool, just the blade. That leaves the shank shoulder relatively soft [normalized or annealed] where it sits around the edge of the hardie hole. And that's good. Don't have hardened steel banging against hardened steel. I'm sure I have previously posted 4140 heat treatment specs, but I'll do it again if you need it. FORGE 2100-2200�F [lemon]; NORMALIZE 1600-1700�F [bright red, sometimes called salmon] air cool; ANNEAL 1450-1550�F [bright cherry red] slow cooling, preferably in a furnace; HARDEN 1525 to 1625�F [bright cherry going into salmon] quench in oil; TEMPER 400-1300�F. Different mechanical properties are imparted to the steel at the various tempering temperatures. |
| Frank Turley - Saturday, 12/14/02 04:03:47 GMT |
|
Scraper blade, at least the newer ones are often " Astralloy" which, as the Guru says is an abraision resistant steel that is tough. It can be hardened. I used it for the working faces on my treadle hammer. While it was hardened first, the deep welds used to fix the plates in place blew much of the temper they might have had. The softness on the hammer face is an advantage for me 'cause I use a lot of hand held tooling and sthe soft face is " stickier" and I can cheat the angles more. On the anvil end, the softness is less desirable, but the stuff is tough, so I take a polished rounding hammer and herd the displaced steel back into the divots from whence they came from time to time. It seems to be workhardening some as a result. Some places on it stayed hard. Beginning a big storm off the Pacific..long swells tear up the summer's kelp beds..we hattened down the batches |
| - Pete F - Saturday, 12/14/02 05:08:17 GMT |
|
Heat Treating 4140: The transformation to martensite in 4140 STARTS at around 600F and finishes at about 200F. If you interrupt the quench before it reaches the 200F range, it will not develop full hardness. Frank Turley's instructions on hardening are highly recommended since you won't find color vs temperature instructions in most heat treating books. Last of all, his admonition not to harden the entire tool also addresses the issue of a major section change between the hardy shank and the bit. This transition in thickness would be where it would crack. However, I might suggest that you put a big radius here, quench and temper the entire part, brighten the tip, and draw the temper from the shank end. File the radius down after tempering. The problem I fear is immersing the red-hot tool only partly into an oil quench. The oil will fume around the hot tool and may catch fire. |
| Quenchcrack - Saturday, 12/14/02 13:29:47 GMT |
|
Where are you at Pete? |
| Bond-JamesBond - Saturday, 12/14/02 13:48:56 GMT |
|
Quenchcrack, I was thinking of taking a hardening heat on the blade only as I do in a coal forge at the edge of the fire...quenching the entire tool, cutting edge down, to avoid flash and burnoff. There will be a fadeout into a black heat or thereabouts toward the thicker base of the blade. Then, a separate tempering heat, not a reserve heat thing. I've lucked out so far, without cracks. |
| Frank Turley - Saturday, 12/14/02 14:16:12 GMT |
|
Frank, that makes sense. I work with a gasser and heating only a portion of a short tool is difficult if not impossible. I worked in a plant that water quenched 4145 bars 30 feet long and up to 12" in diameter. When it worked, which was most of the time, we got tremendous properties. When it didn't...well, a 12" x 30' bar split full length like cordwood, is a lesson to be learned quickly...hence my nickname.... |
| Quenchcrack - Saturday, 12/14/02 14:26:30 GMT |
|
Does anyone have information or source material for hydrogen embrittlement as a result of electrolytic treatment of high carbon steel? I am specifically curious as to the why/how. Also, whether a prolonged period at a temp. above 100c. would drive off the unattached H, thus reversing or inhibitting the embrittlement. Come to think of can the hydrogen causing said embrittlement be driven off?? Always more questions than answers, thanks in advance. |
| michaelm - Saturday, 12/14/02 15:33:04 GMT |
|
Slow. . . Weekend. . . Everyone must be out Christmas Shopping. Out at one of many good movies that have opened in the past month. Daniel, The shock absorber linkage is easy to build but makes a lousy hammer. It works but does not hit as hard as spring and toggle systems. AND due to the fact that all modern shocks are now pressurized with nitrogen they extend like a spring. This means the hammer starts with closed dies every time you start it. Then at high speed the shocks stop acting like a link and the ram floats. A rather peculiar dynamic. |
| - guru - Saturday, 12/14/02 16:52:07 GMT |
|
Speaking of Movies, I saw Nemesis last night. GREAT MOVIE! I saw it with a friend who doesn't like Star Trek, and he followed it, and thought it was a good movie. Ok, back to smithing. I am having a heck of a time getting my radii even when making s-hooks. I that just practice, or is there a trick to it? |
| Bond-JamesBond - Saturday, 12/14/02 17:36:31 GMT |
|
I have seen horse bits advertised as being made of "sweet iron". Anyone know what that means? Neal |
| Neal Bullington - Saturday, 12/14/02 19:08:21 GMT |
|
Daniel, If you are looking to build a power hammer I built one of the junk yard hammers. It is the new inproved "rusty". My head weights in at 33 pounds. I can do one lick or several. I built it for less than $50.00's. The plans are $22.00's I think, but you can alter them to fit you needs. I'm very pleased with my hammer. It does every thing I need it to do. JGBHF |
| JG Bleeding Heart Forge - Saturday, 12/14/02 19:12:41 GMT |
|
Neal, You came to the right place. One of the Spanish words for the old low carbon wrought iron [the material] is "hierro dulce", translating literally as "iron sweet". Presently, mild steel [low carbon] is termed "acero dulce", or "steel sweet". The early-day Hispanic bitsmiths apparently passed this definition on to their Anglo apprentices and counterparts, and it stuck. I have given this a little thought, wondering why in Spanish, wrought iron would be called sweet. I can't come up with anything really concrete. On the other hand, why do we call low carbon steel "mild"? They all seem to be culinary terms, but they are as good as any, and we have inherited them. In terms of advertising, the bits are not really made of wrought iron anymore, but "sweet iron" sounds good to a lot of old buckaroos, the prospective buyers. I don't think the advertisers are fudging too much. After all, mild steel is technically an iron with only about 0.20% carbon. It gets semantic. |
| Frank Turley - Saturday, 12/14/02 20:02:17 GMT |
|
Hi, I've been looking for a used anvil( about 100 lbs.)for a while now. I don't want to spend too much because I'm just starting out. I noticed people selling new cast steel anvils online for much less than I have seen them other places($100).Would these be good enough for a beginner? Just thought you might have some insight for me. |
| Mike - Saturday, 12/14/02 20:17:54 GMT |
|
hello mike; harbour freight sells the * russian cast steel anvil for $89.00 usd online and $79.00 usd in the store. i purchased one several months ago and i am pleased with it. they do take a little bit of cleaning up but nothing major. * link to anvilfire product test report |
| terry l. ridder - Saturday, 12/14/02 21:04:10 GMT |
|
Sorry All, I did an elbow leaner on the keyboard while reaching for a book behind me...got a big gaposis. |
| Frank Turley - Saturday, 12/14/02 21:13:38 GMT |
|
Michaelm, electolitic processes, like cleaning, plating, etc, can create hydrogen ions at the surface of the steel. This hydogen, being very small, goes through the steel readily, collecting at non-metallic inclusions. As the nacent hydrogen becomes hydrogen gas, the pressure builds up and the inclusion becomes the starting point of a crack. Heating the steel to 250F and holding it for an hour or so will drive off the hydrogen, leaving the steel un-affected. A multitude of technical references are available, most of them totally incomprehensible to the average metallurgist. Just bake it. Mike, check out the review of the Harbor Freight 110# Russian anvil on this site. |
| Quenchcrack - Saturday, 12/14/02 22:55:41 GMT |
|
Frank You just made this senile Old B*gger's day! (anile to be more correct). I thought I was the only fellow that did things like that. (occasionally thank the Lord). Thanks. I owe you one. SLAG. |
| slag - Saturday, 12/14/02 23:41:05 GMT |
|
Hi All, I'm interested in forging some stainless steel for an outdoor piece. I've heard that if I forge stainless the same way I forge mild steel, it will rust and there's something that I can do to forged stainless to ensure that it won't. Do you know what I'm talking about? Karen |
| - Skippy - Saturday, 12/14/02 23:54:50 GMT |
|
Slag, Better to be a booger than a b*gger. |
| Frank Turley - Sunday, 12/15/02 00:55:22 GMT |
|
Wow Frank: I thought MY mind went blank! |
| Bruce Blackistone (Atli) - Sunday, 12/15/02 01:01:15 GMT |
|
Slag, I had no idea you were an imbecile, with old womanish qualities. . . well that IS what the 1913 "Websters New International Dictionary" defines anile as. smirk/grin Now I just need to look up what a young man with an insatiable apetite for unusual knowledge which he uses towards manic contrivences which most often create sceens of great levity and also has a tendancy to spill coffee ten times a day while glancing off of door jams and other such non obstructive objects. WHEW . . . I think I need a thesaurus and some more coffee. |
| Caleb Ramsby - Sunday, 12/15/02 01:45:52 GMT |
|
Caleb ya got me Senile is the term for mentally degenerating males And anile is the same term for women thus afflicted. O.K. I coc*ed up on the the gender. But honest: I can still tell the genitles apart: honest::: (I think), Regards, SLAG. |
| slag - Sunday, 12/15/02 02:51:35 GMT |
|
Slag, Have you run into some goys lately? I know, I know. Let's get back to metalwork. |
| Frank Turley - Sunday, 12/15/02 03:40:29 GMT |
|
Do you have the chemical ingredients or formula used for a bronze patina on copper? Thanks for your help. esr |
| Eugenia - Sunday, 12/15/02 04:20:49 GMT |
|
Eugenia, I can quote from Oppi Untracht,s book, "Metal Techniques for Craftsmen", Doubleday, 1968. "Bronzing Copper. Copper Sulphate 400 grains Water 2 ounces Use warm, immerse two or three times, scratch brushing between immersions. Depending on the purity of the copper, the color may be light brown, terra cotta, purplish, or dark brown." I haven't contacted Bryant Labs in Berkeley, CA, for some time, but they were [are?] specialists in patinating chemicals and their use. The last phone number I had for them was: 510-526-3141. |
| Frank Turley - Sunday, 12/15/02 04:49:40 GMT |
|
Ballpien hammer design: I am getting ready to make a few small ballpien hammers(and later some larger) and am having some difficulty rationalizing the usefullness of the mushroom shape of the ballpien and flat heads. Is there a specific reason for the swaging done behind the heads or is it just a old or new tradition that has been blindly perpetuated? I noticed in your(Jock's #93) demo about hammers that the old style of claw hammer did not have the swaging done behind the head. Looking at a ballpien it doesn't seem that it would inhibit the operation of the hammer if the o.d. of the pien head was the same as the stock behind it instead of the usual reduction. I believe that, to an extent, the stock behind the ballpien head could be larger than the head. Could the reduction just be to get the head away from the handle without making the hammer heavier? Or does the resulting grain flow from swaging produce a stronger member for a given head weight? Or is it just a way to have a larger(o.d.) head while using less weight? I am also wondering why it seems that all of the instructions that I have seen for the production of a hammer head facilitate the removal of stock for the handle hole. Would the head not be stonger and have a more central mass if the hole was just drifted and the displaced metal left pushed out, almost forming a round section around the handle? This will be by the way the first hammers that I shall make. For those who are wondering my forge project has taken a backseat to the cleansing/organizing/aranging/deconstructing/reconstructing of my work area. It was just getting TOO ineffecient of an enviroment to get any work done, but I don't want it TOO effecient or I won't have any time to think while I am attacking a project. grin |
| Caleb Ramsby - Sunday, 12/15/02 08:20:00 GMT |
|
Caleb, About ball peens [many spellings], it is all very traditional and I believe, very British. There may not be a comprehensive raison d'etre. Style rules. For a first effort, it is not the easiest hammer to make. Are you using the term "swage" to mean "fuller"? If you want to maintain the octagonal look either side of the cheeks, it helps to start with octagonal stock, which will continue to provide points of reference. The eye is usually punched first, undersized. You will get a frog eye [side swelling] whether you use a slit chisel or a hammer-eye punch. I believe the eye punch is used, because it is easier to align the drift with the hole. It is already the right shape. While maintaining the frog eye, do the necked fullering to demarcate the head and ball. Then drift, leave the drift in and flatten the cheeks while hot. If you don't get enough cheek for that nice round look, you need to drift and fuller them out edgewise with the drift in. And to maintain that rounded cheek, Lillico* recommends a special bolster when driving in the drift. It is a bottom swage with a vertical hammer eye hole all the way through the shank. I would think that the wide cheeks provide more lengthwise contact with the haft. After reducing the ball and shaping the head, anneal. After annealing, get out the trusty angle grinder/sander, and go to work. The head and peen are hardened separately. By definition, a peen is smaller than the corresponding head. For instance, on a farrier's rounding hammer, we call the rounding end a "ball face". Getting back to style, different countries and regions of countries developed their own aesthetic regarding hammer heads. Spanish hammers most often *will* maintain the side swelling around the eye, but they don't have the wide cheek. They like it that way. French hammers have an offset cross peen and a squarish face. I guess the British developed the ball peen way back there in time, and it is used primarily in English speaking countries and Scandinavia. Japanese hammers have a rectangular eye and a round face; the haft goes in the eye at a slight angle to the head length. Etc., etc. * J.W. Lillico, "Blacksmith's Manual Illustrated, Technical Press, London, 1960. 4th impression. |
| Frank Turley - Sunday, 12/15/02 13:50:22 GMT |
|
My wife was run over by another skier and the impact of the collision bent her ski pole. Question: should the pole be heated to be straightened, or should this be done cold like and aluminum arrow. I'm not sure of the material but there's a reference to "alloy 5086" on the pole. Any advice? |
| coondogger - Sunday, 12/15/02 13:56:30 GMT |
|
We have a retail store in Santa Fe called "Shibui". They specialise in antique Japanese furniture and wares. The owners are also authors. They have out a new book: "Japanese Cabinetry: The Art and Craft of Tansu". Lots of nice iron hardware is shown. www.shibui.com |
| Frank Turley - Sunday, 12/15/02 14:01:42 GMT |
|
DARN! I thought we were having a dead weekend. . had some caching bug on my system. . . Will fix Frank's elbow on keyboard glitch and then catch up. |
| - guru - Sunday, 12/15/02 15:10:34 GMT |
|
Ski-Pole: Coondogger, Many of these type things made of aluminium rely on the work hardening of the rolling, drawing and finishing process as well as heat treating. Heating it would screw that up. It is probably also anodized and you don't want to wreck the finish. I would recommend carefully straightening it using a wooden or rubber mallet. But if it has a kink that has reduced the cross section or displays any cracking (look VERY close), then destroy and discard the pole. This is a highly stressed device that you depend on and if it collapses or breaks it could be very dangerous. |
| - guru - Sunday, 12/15/02 15:35:38 GMT |
|
Russian Anvil test Report: Mike, If you didn't notice that I added a link to Terry's response please check this out. AND Beware of cheap anvils being sold on eBay. At least one repeat seller misrepresents cast iron products as steel. there are already cheaper Chinese clones of the Russian anvil on the market that are probably NOT cast steel but cheaper lower quality cast iron. AND after all that. . . for just a little more you can usualy find a REAL hardened steel faced anvil if you go to a few blacksmithing organization meetings. Check our ABANA-Chapter.com page for the closest group and GO! I get a little tired of folks saying they "can't find an anvil" when what they mean is "they can't find an anvil for no money". Anvils are tools made of hardened TOOL steel and can be expensive. But used ones are often a great bargain compared to new. If you go through our news pages we have published photo after photo of trucks and trailers loaded with DOZENS of used anvils (on each one). Generally you will pay about $2/pound for old anvils from a blacksmith/tailgater. This is a bargain since the same quality NEW anvils sell for $5 to $7 per pound. Buying cheap low quality tools is false economy. You will end up replacing them and having wasted the money originaly spent. False Economy: Back in the 1970's before radial tires became universal you could buy recaped bias ply tires for $18 each ($22 installed). The average life of these tires was 8,000 miles and there was a HIGH probility you would have a flat (and the associated expense) in that time on 3 out of 4 recaps. Cost per mile driven = .275 cents At this same time you could purchase Michlin radials of the same size for about $65. They were warrented for 40,000 miles and rarely did not last that long. Cost per mile driven = .16 cents. Operation costs of radials was almost HALF that of recaps. AND there was the added safety of the much superior tires plus the dependability and convienience. The amazing thing is that radial tires now last longer AND cost less. . . Buying cheap tools is the same but it is harder to quantify. Usualy the tool breaks in short order and you are out the original investment and must replace it. OR the tool does not perform properly and you waste a great deal of time fixing it to get marginal performance. In Robert's report on the Russian anvil to cost of worn out abrassive wheels is not taken into account nor the wear and tear on his grinder. Neither is his time. I'd bet that he lost track of time and the initial grind took more like an hour and that a couple more were spent on it later reshaping the horn. Add at LEAST $10 to the cost for abrasives and $25 for time. So now the cost is up to $115 and you still have a soft anvil that you can't get half your money out of. . . I would personaly take a beat to pieces 150 year old anvil with chisle marks on the horn, chiped edges and a swayed (but hard) face over a new junk anvil for the same money. . . |
| - guru - Sunday, 12/15/02 16:46:42 GMT |
|
Bending Radi: 007, It is a matter of practice. I did once see a demonstrator that had built a little bending jig for S-hooks but I thought it was a great waste of time (two short pieces of pipe welded to a flat bar. Pick a spot on the horn of your anvil and use that to shape each one. Part of the charm of hand made is that every piece in not perfectly the same. Although with practice many items reach the point where you cannot tell by eye that there is any difference. The Practice: Most of us end up making hundreds if not thousands of S-hooks while doing public demos. They are fast and easy and they sell. In typical 1/4" round stock the end is easy enough to bend hot that you could do so with your fingers if they were fire proof. . . only a couple gentle touches while it is on the place you have selected on the horn and they will be nearly perfect. |
| - guru - Sunday, 12/15/02 17:01:43 GMT |
|
1/4" square stock "S" hooks with a twist don't take much longer than round stock one, sell just as well, and sell for more. |
| Paw Paw - Sunday, 12/15/02 17:41:17 GMT |
|
Guru, Re: the Russian Anvil. Well, the time was a labor of.....curiosity? Love? And the grinding wheels were HF specials....had I used good American made wheels, I might have cut the time in half and used fewer wheels...part of a pattern there, eh? Couldn't agree more though on false economy...I would never go back into HF except they are only 2 blocks from me...BTW, they are advertising their cast iron ASO as "55 pounds of solid STEEL..." in my local store. I brought to their attention that it was not steel but to no avail. Buyer Beware! They also had a 4" sidewheel grinder for $10. Called them a special purchase. I cannot imagine the Chinese factory having seconds or rejects....the idea of not shipping EVERYTHING they make must stick in their craw. Question: Years ago a man gave be a big box of power hack saw blades, assuring me they were not welded blades. Well, they were mostly welded blades, 2-3 being all-hard. What is the steel used as backing to the welded-on alloy teeth? Is it good for anything? |
| Quenchcrack - Sunday, 12/15/02 17:45:09 GMT |
|
Just a note on anvils. After reading a book with a picture of a poor african blacksmith using a goatskin bag as a bellows and a flat rock as an anvil, I feel very humble. Be thankful for that railroad rail anvil or that cheap harbor freight anvil and for all the blessings we have in america. |
| - taylor - Sunday, 12/15/02 18:28:31 GMT |
|
A CROSS-POST I WANTED TO SHARE OVER HERE: While 40 carbon is safe to water quench in CARBON steel, alloys like 4140 and 4340 are generally considered to be unsafe to water quench and require oil quenching. Let me also say that you can often get away with water quenching these alloys in water IF they are properly annealed AND heated to EXACTLY the correct temperature for quenching AND the shape is simple. A SUCCESSFULLY water quenched 4140 part can be can give great results, just be aware that you are risking all the work you put into the tool. For those who don't understand what I mean by "unsafe" or "risking", these alloys often crack when water quenched. TRUCK axels seem to be 4140 in my experience, while CAR axels act more like 1040/1045. I believe many car axels are case hardened. This gives a very tough core and a stronger surface to resist twisting and wear at the spline. This would also explain an earlier comment that the writers hammers came out soft in the center of the face while hard at the edges. Forget steel supply wharehouses. More of you guys should try to find machine shops in your areas where you can scrounge odd bits of VIRGIN 1045 and 4140 and 4340 and such. They ALWAYS have such drops laying around the saw. Odd bits of tool steel aren't uncommon either. REALLY nice to know exactly what you're working with. Bring the owner a hook or dinner bell or any "gee-gaw" you made yourself and explain what you're doing, most will be fascinated and happy to help out. A simple trivet might net you a couple hundred pounds of neat alloy and medium carbon pieces. Make him a custom hammer and he'll treasure it forever and may be a friend for life. I've never known anyone in the matal trades who wasn't fiscinated by blacksmithing. |
| - grant - Sunday, 12/15/02 18:35:09 GMT |
|
Thanks guys, well back to work then. Practice, practice, practice.....How are you feeling PPW? |
| Bond-JamesBond - Sunday, 12/15/02 18:40:17 GMT |
|
Makeing it one day at a time. |
| Paw Paw - Sunday, 12/15/02 18:45:57 GMT |
|
Gee Quenchcrack, Maybe "I" can answer your question. Most lierature I've read from various suppliers siply says "spring steel back". In my experience it's 1080 - 1095. Having used hundreds of power hacksaw blade I can never understand why the solid high speed blades last so much longer than the weld-edge blades. Seems like only the steel in the teeth would matter. OBTW Quenchcrack, I've really enjoyed having someone with your knowledge and background around these forums. |
| - grant - Sunday, 12/15/02 18:46:24 GMT |
|
TRIVIA I GUESS Way back in the last century, I ran a lot of production out of a coal forge (30 odd years ago). One neat trick I learned was to put wood blocks on top of the fire to form a "cave". Makes a nice "roof" that chars and adds heat from that direction, more like a furnace actually. A little smokey for sure. As it burns and turns to charcoal you just shift it around and ultimately add it to the fire and put on another. Always had a pile of oak blocks maybe 8" - 10" long (some longer for big work) piled by the forge. You can run a pretty hollow fire this way with very little air as long as you just need a forging heat (not a welding heat). |
| - grant - Sunday, 12/15/02 19:06:55 GMT |
|
Grant, thanks, I can say the same about you... Well, now, if that stuff is 1080-95, it might just make a good little knife blade....a bit thin but servicable. Not much to do to forge the blade, though. Just a tang and a taper..... |
| Quenchcrack - Sunday, 12/15/02 20:21:48 GMT |
|
Frank, Yes I did mean swage to be fuller. I should have been sleeping when I was typing, or mabey I was. grin Well, thanks for clearing up many of my questions! I think that at first I will just make a plain ball peen hammer without fullering behind the heads or flattening the "frog eye". From there I shall attempt to develop my own style and see what I come up with. On the same boat, I have a bunch of suckers/shoots from an apple tree in my backyard that I cut this summer. I am wondering if this would be an aplicable material to utilize as a hammer handle. I know it is a hard and strong wood and since it is the suckers, the growth rings are large and this might impart a toughness to the wood that would be benificial, I am not sure. Any one have any experience with apple wood? |
| Caleb Ramsby - Sunday, 12/15/02 20:53:10 GMT |
|
007, my experience(whatever it is worth) with making hooks and other curves, has been not to use the horn at all. When I first started I had no access to a anvil with a horn so all of my scrolls and curves were done over the edge of the anvil(big chunk of steel). I highly suggest making some tight scrolls(such as electric burner elements on a stove, just with no gaps) , starting them over the edge of the anvil and then tightening them with the scroll up and the bottem of it on the face of the anvil. These are great to use as a little wall "shelf" if you make a spike on one end, a scroll on the other and a arm(short or long) with a twist or whatever in between. Then go to making a loose scroll, about 3-7 turns, leaving half an inch inbetween the scrolls, these will look almost identical to the electric burners. These work great to develop the control of a scroll since every wrap you add covers up the scroll under it and forces you to make it right or dismantle it using the vice and try again. One can use these to make a camp fire trivet if you add three, five or more legs about 1' long, with one end that has a loop that fits loosly around the scroll iron. Since I started using this technique, when I am using an anvil with a horn I almost never utilize it. Then again I know smiths that swear by bending forks and fabricated scroll forms. The world, much less it's occupents would not survive, much less thrive without variety. -Caleb Ramsby |
| Caleb Ramsby - Sunday, 12/15/02 21:13:05 GMT |
|
Calculating a cone or any other shape: There was a recent discussion here about calculating the mass of various shapes. When I was floating around the blacksmithing ring I stumbled(yes, it is possible to stumble when one is floating, grin) upon a site where a guy was talking about his technique. What he (sorry, I can't remember who it was, or where) did was use a clay(kids play-dough would work, taste great. . . but it is filling) to make the shape that he would be forging. Be it a cone, flat taper, ball, leaf, flower, fish tail or any such finial. He would often even use the same forging tools he would use to make the real deal out of metal, such as a relief chisel to make veins in a leaf. Then squish the final shape into a measurable shape, such as a cube, or square stock, measure it and calculate the amount of the mass. This would give one the amount of material that would be neaded for the given shape and there is only one very simple calculation involved. |
| Caleb Ramsby - Sunday, 12/15/02 21:26:16 GMT |
|
Caleb, seems like for simple shapes, just calculating it would be quicker. Even with my meager experience, I can guess pretty close most of the time. Of course, judicious choice of projects minimizes the degree to which an error becomes a disaster. My thanks to Bryan Black who, single-handedly, wired in my buzz box today. Now I'm really dangerous. Variety was good at first, now I need something different.... sorry Caleb, I've waited years to use that line... |
| Quenchcrack - Monday, 12/16/02 00:12:51 GMT |
|
Skippy and stainless steel- if you check the archives from last week, quenchcrack composed a piece on rusty stainless. Good timing, too, i am doing a run of brass spoons and ladles for xmas presents, i bought some 304 ss round, it's about 2/3 the price of 316 ss. i took a twisted, leaf end as forged handle this afternoonand stuck it in a jug of really salted water, then took it out to let air dry, back in, back out, etc. it's started to rust after three hours. so i just got done with the other 24 handles, heating to 'look out the dam's busting' yellow, quenching in water, as quenchcrack described ( i have no idea what 2100 degrees looks like in stainless). i guess i'll know if it rusts tomorrow morning, doing the saltwater test to the heated and quenched piece now. Question? if i would have used 316 ss for this project, would it still rust in an as forged state? I'm trying for dishwasher safe, won't rust utensils, making rivets from brazing rod. happy holidays, Mike |
| mike-hr - Monday, 12/16/02 01:03:26 GMT |
|
Dear Guru: I'm a newish metal artist and have been experimenting with finishes for milled rusted steel. I have been using bees wax, turpentine, johnsons wax, mineral oil, and linseed oil combo. I've tried dtm paint and clear coat. Are there any patinas or anything I can paint over rusted metal that is lasting? What works the best in your experience? |
| Tamera Mulanix - Monday, 12/16/02 02:41:46 GMT |
|
Patina: Tamera, On iron and steel flaky red rust or oiled and waxed tight rust ARE the patina. A patina is an oxide coating, usualy aged, on a piece of metal. On copper, brass and bronze the naturaly patina is a relatively durable green (dark green if sealed, light green and brown). Patinas on copper alloys can vary greatly in color depending on the oxidizing agent used. On iron/steel the natural patina is red rust. Blues can be created with harsh chemicals. But they too are oxide finishes and require sealing or constant oiling to prevent rust. The only durable long lasting finishes on steel start by sandblasting the steel. Then applying a multi layer paint system. The color and texture can be anything you want including textured rust red. The best is sand/grit blasting, metalic zinc primer, neutral lacquer primer and a top coat of your choice. |
| - guru - Monday, 12/16/02 05:01:12 GMT |
|
Rusting of Stainless: Mike, my experiance with stainless is that most of the rust is from contamination of the surface. Heating and quenching to produce the desired structure does nothing to remove contaminates OR fire scale. Testing forged parts with scale in salt water is just testing the surface contaminates from your hammer, anvil, vise and other tools. Using brass rivets with stainless parts is NOT the way to prevent corrosion. Bimetalic corrosion effects stainless just as it does any other metal. You are better off with carbon steel rivets. But if you want to do it right the rivets need to be the same alloy as the parts being joined. If you want to test for diswasher safe, then do it in a dishwasher. . If you are making a nice decorated hand made kitchen utensil then the owner should expect to take care of it. Have you ever seen what a dishwasher does to good bone or wood knife handles? Even glassware does not fair well in dishwashers. If the water has any minerals in it at all they end up welded to the surface of glass and ceramics alike. Do you know what dishwasher detergent does to brass??????? For SS handles with brass or copper spoon and ladle ends you should be using monel rivets. These have elements of both the SS and the copper alloys and the bi-metalic corrosion should be less. However, you are still joining an iron alloy and a copper alloy. Anyone that values your fine hand made gift will wash it by hand and even oil it lightly if needed. But throwing it in the dishwasher. . . . |
| - guru - Monday, 12/16/02 05:19:48 GMT |
|
Bond; At the edge of the Pacific 1/2 way between LA and SF ( I'm assuming you meant literally)...otherwise... http://www.peterfels.com/ Quenchcrack; ironically, Harbor fright 4"grinding wheels, unlike most of their other stuff do make sense. Those cheap, soft wheels wear away quickly, but, they cut faster as a consequence. Time is the most valuable element here and those long lasting, "good quality" wheels are,oddly, a false economy. Yeah, Bryan B is a good guy, helped me in my 3 phase confusion. If you find this website as valuable as the rest of us... JOIN THE CSI, AND HELP KEEP THIS BOAT AFLOAT! |
| - Pete F - Monday, 12/16/02 05:45:02 GMT |
|
im looking for a set of plans that used to be advertised in popular science magazine in the sixtys it was for a midget yard-dozer now called the magnatrac .they are not selling them anymore and i was wondering if anyone might have a set of these lying around? thanks .....eric |
| eric chilton - Monday, 12/16/02 06:28:45 GMT |
|
sorry i forgot to tell you im 38 years old welder from ky working at a ag spraying company thanks |
| eric chilton - Monday, 12/16/02 06:31:30 GMT |
|
Mike-hr, yes, 316 would also rust. 304 and 316 are almost the same chemically. 304 has more chromium and less nickel than 316 but 316 has about 2% molybdenum added. The same heat treatment should work on 316. Hope the heat treatments work for you. |
| - Quenchcrack - Monday, 12/16/02 13:06:18 GMT |
|
Guru, surface contamination of stainless parts is a common source of rust but the observation that the corrosion is just the result of embedded scale does not reflect what is happening metallurgically. When the stainless steel is heated to the forging temperature, the carbon combines with chromium to make chromium carbides. Since it is the chromium that forms a passive layer to protect the steel, any diminishing of the available chromium will reduce the corrosion resistance of the steel. Heating will dissolve the carbides and quenching prevents the carbides from reforming, leaving the chromium free to form passive surface oxides. If heat treating after forging is not practical, use 304L, a low-carbon version of 304. It has so little carbon that it requires no subsequent heat treating. As far as rivets go, I agree that one should absolutely not use a different material as it will create a galvanic cell. Since the stainless will not corrode, it becomes a giant cathode to the little anodic rivet and eats it a way in no time. A high polish will also help prevent crevice corrosion, another common problem with some stainless steels. Crevice corrosion happens in cracks and pits where the O2 becomes depleted and cannot re-form the passive chromium oxide coating. |
| - Quenchcrack - Monday, 12/16/02 13:21:23 GMT |
|
Hi, I'm new to blacksmithing and have been attempting to forge the spike axe off of the iforge page, however, I've been unable to bump the spike down to the suggested 3 inch length. What is the best method for doing this? My RR spike just bends in the middle. Thanks |
| Josh - Monday, 12/16/02 15:09:06 GMT |
|
Stainless corrosion: Quench, You know this stuff better, but I concur on the stainless chrome carbide issue and corrosion. I've also seen the contamination/rust from tools and abrasives used on steel. I've had much practical experience using stainless in some nasty environments including ones with little oxygen and the lack of ability to rebuild the chrome oxide. Do you know what the lower limit of oxygen requirement is for the chrome oxide to reform? Generally? I expect it will depend on a couple factors. A general number would suffice. Thanks! Wanna see some really nasty things happen to aluminum fasteners? Use them to hold stainless together in a wet environment. Grin. |
| - Tony - Monday, 12/16/02 15:53:28 GMT |
|
I like using clay for exploring processes but have never used it to help determine volume. Most of the examples given I would just forge a sample to get the streach-out. |
| - grant - Monday, 12/16/02 16:48:02 GMT |
|
Dozer Plans Eric, There WAS something similar on a page we used to trade links with. . . but the page is gone and I have not been able to contact the fellow that ran it. Sorry I can not be more helpful. |
| - guru - Monday, 12/16/02 18:00:20 GMT |
|
Upset with Upseting Josh, Upsetting is one of the more difficult blacksmithing tasks. A friend of mine calls upsetting and upsetting experiance. It requires more speed and hammer control than almost any other task. It looks easy but is not. First, it helpd to keep the part to be upset hot and the rest cool. This reduces the problem with bending. Keep the heat localized. Cool with some water if need be. Then, keeping the end of the work crowned so that when you strike the center the force is centered. This also helps reduce bending and increases the efficiency of the upsetting. As you work the end will flatten so you have to repeatedly roll the work knocking down the corners and radiusing the end. Support the work with the end just beyond the edge of the anvil and strike back towards yourself. If the work is well supported and you strike downward slightly this helps support the work and back it up at the same time. Light rapid blows work better than slow heavy blows when upsetting. AND nothing but a low of forge practice makes it easier. |
| - guru - Monday, 12/16/02 18:12:56 GMT |
|
Mike-hr, I forgot to mention, when you do your corrosion test, you need to do it AFTER you remove the scale. Also, abrasives used to clean it can become embedded in the surface and cause problems. This gets to be a real "sticky" problem and companies that weld SS pipe and tube often pickle it to clean it. SS is usually heat treated in a vacuum or an atmosphere furnace to prevent the scale from forming. Tony, I worked as a corrosion engineer for a few years early in my career and what I saw in some chemical plants would scare the daylights out of you. I trust things have improved significantly since then. In His infinite wisdom, God ordained that a galvanic cell can be created between any two conducting materials with only the slightest difference in chemistry, microstructure, hardness, temperature, or environment. It allows us to make wonderful things like storage batteries and costs us BILLIONS of dollars to mitigate, repair, and prevent. I don't have a number for O2 required for continual passivation but I will check some of my old Corrosion books to see if anything is mentioned. |
| - Quenchcrack - Monday, 12/16/02 18:49:50 GMT |
|
guru, thanks for the advise on the RR spike upsetting. I'll give it a try and see how it works out for me... |
| josh - Monday, 12/16/02 18:58:28 GMT |
|
Stainless and Galvanic Corrosion For sheer joy, there's nothing like the reaction you get between stainless steel hardware, silicon bronze bolts and aluminum spars on a sailboat in a tropical, salt water environment! Everything needs to have non-metalic inserts, beddings or pads, and even then you have to watch it like a hawk. (A seahawk, of course. ;-) Anybody interested in galvanic corrosion should check out the boating section in the library or some of the sailing and boating magazines. A wonderful electrolyte is warm salt water. (Another advantage of bronze fastening for modern longships. Even with good wrought iron, the Vikings had to replace rivets on a regular basis.) Josh: Welcome aboard. Wiser heads than mine are responding. Sunny, cool and breezy on the banks of the Potomac. I got boats to float, but help keep Jock's above the water. Visit your National Psrks: www.nps.gov Go viking: www.wam.umd.edu/~eowyn/Longship/ |
| Bruce Blackistone (Atli) - Monday, 12/16/02 18:59:36 GMT |
|
Hey all, I got an order for a couple of personlized horseshoes (just like the Iforge demo, thank you Guru...) and have been having a very tough time getting the letters to come out well. I have a good set of stamps ( I think) and upon recommendation from the Guru I have been stamping the steel cold. I usually end up with on part of the letter so shallow it can hardly be seen, and I have to restamp. About 1/2 the time this gives me a "double" and I grind down and restart. I must not be holding the stamp just right, but I am trying to be careful. I have had the best luck with one hard blow to get it started, and then slowly adjusting and lightly striking 10-15 more times. Takes forever, and I am not happy with the results. How do other smiths do this??? It is the most miserable thing I have done in the shop so far, and any advice to make it less painfull would be appreciated. -JIM |
| Jim - Monday, 12/16/02 19:57:17 GMT |
|
Jim. Something is awfully wrong...but you knew that. The steel may be too hard. You can anneal the shoes by heating to bright cherry and cooling slowly in lime or wood ashes. Or, at least normalize by air cooling from a heat. Don't quench! Hold the stamp vertically with a pool player's "bridge", the way the supporting hand holds a cue. One lick should do it. |
| Frank Turley - Monday, 12/16/02 20:22:09 GMT |
|
what effect dose heating and forging have on the grain structure and the machanical properties of mild steel when making something like a cold chisel? |
| - steve roberts - Monday, 12/16/02 22:18:57 GMT |
|
Jim: Try holding the stamp with tong or even vise-grip. If you were doing much of this I would reccomend a little fixture kinda like a guillotine tool or blacksmiths helper to hold the stamp upendicular. |
| - grant - Monday, 12/16/02 22:44:06 GMT |
|
steve roberts: ALL heating and forging DOES have an affect on the grain structure and mechanical properties. WHAT affect it has depends on YOU. It can be EITHER beneficial or detrimental. WHY are you making a cold chisel out of mild steel? |
| - grant - Monday, 12/16/02 22:49:03 GMT |
|
Stamps: Jim, As frank pointed out hard steel can be the problem. Even mild steel can be pretty darn hard if you quench it. I found that I had to be sure to let shoes air cool. Holding and stamping letter punches is an art. First, you do this on a good anvil. The surface the piece is supported on makes a huge difference and an anvil is the only way to get a deep impression. Then, it is very important to have the punch face setting flat on the surface. You have to carefully rock the punch back and forth until it feels flat. To SEE where you have the punch and that it is aligned and setting flat you have to have your face down level with the work. If using an anvil on a normal stand this means squatting of setting on a short stool. THEN you have to give is a hard wack with a fairly heavy hammer. A 3 to 4 pounder is best. One HARD wack. Now, this is a little scary as you have delicate fingers in the way AND if you misstrike the punch can be sent into you face like a bullet. WEAR SAFETY GLASSES or better yet, a face shield. I never had any luck on getting the punch back in the original impression. But the second attempt was a HARD single blow. It takes some practice. And as I mentioned, it is a bit scary. But then. . I've hit my left hand hundreds of times while driving nails. . . but never when stamping. . . Then again, there is a HUGE difference between a 16 or 24 ounce carpenter's hammer and a 3 pound smithing hammer. . . Some folks use holders like Grant mentioned but I found this to be too slow when doing different letters every time. I also recommend that you carefully keep your punches in alphabetical order. Otherwise they are very hard to find. |
| - guru - Tuesday, 12/17/02 00:31:39 GMT |
|
Mild Steel and Heat: Steve, as I just mentioned above you CAN harden mild steel but compared to tool steel it is nothing. A cold chisle made of mild steel will just barely harden well enough to cut soft non-ferrous metals (aluminium, copper . .). And then it will dull very rapidly. You need high carbon steel if you are making cutting tools. See our heat treating FAQ. |
| - guru - Tuesday, 12/17/02 00:36:31 GMT |
|
I am a female blacksmith of about 3 years+. I am getting ready to start a business with my blacksmithing teacher. He asked me to think about some selling item or niche to sell. I have done everything from flowers (irises,roses, orchides,etc) to dragonflys and candleholders. I have done a few tools too, such as my hammer , tongs, and a few punches. I am exsperiencing a mindblock, so to speak. Please Help.. Heather |
| Heather - Tuesday, 12/17/02 07:06:15 GMT |
|
heather: potracks, closeracks/closecrooks, tools for the fireplace, candelholders, gardengates, frieing pans, vases, with glass inserts or stainless, woodchisels, doorhandles, furniture hardwear, furniture....... whats your angle, what do you like to make, what sells around your place |
| Stefan - Tuesday, 12/17/02 09:58:16 GMT |
|
copper casting: recently in my metals class was looking through the book that i was given for this class, and i have been trying to figure out how to make the things that i need out of plaster of paris. i.e. the mold and the melting pot. if you have any suggestions on this topic please help |
| alex - Tuesday, 12/17/02 14:08:38 GMT |
|
Heather, With no intention of stereotyping HERE, many lady smiths seem to do extremely well with flowrers. I say here, because there is some stereotyping out in the worlds and flowers are a "girl" type of thing. That's horse crap, of course, and we all know it. But it's true, none the less. A second thought would be to cruise the small "novelty" stores in your area and ask them what they think would sell well. This would give you the opportunity to develop a contact list at the same time. |
| Paw Paw - Tuesday, 12/17/02 14:13:51 GMT |
|
Heather, Are you by chance the heather that is also a welder at a lightpole manufacturer?? |
| Dodge - Tuesday, 12/17/02 14:49:20 GMT |
|
Copper Casting: Alex we have several articles on mold making and casting on our iForge page (#98, 99 molds - #137 lost wax and equipment). There is also a link to the Casting Cowboy site on the lost wax demo. Copper alloys melt at a high enough temperature that you need to buy a graphite or silicon carbide crucible. You will also need tongs and a pouring shank to fit the crucible. I highly recommend the foundry books by C.W.Ammen. They are all good and you will eventualy want them all. The Foundryman's Bible covers the widest range of topics. In the near future we should have an article on building the little furnace featured in iForge demo #142. |
| - guru - Tuesday, 12/17/02 19:48:56 GMT |
|
What to Make?: Heather, this is always a problem. Design of original items is difficult when you have a mind block. There are practical considerations such as what sells or what will local shops carry. Some places may only want the cheapest traditional items but others may want high dollar original pieces. If you do sculptural work or jewelery and wearable items there are main stream outlets and then there are places where items with sexual conotations can be sold. It you sell direct through a web-site or store of your own you can carry whatever you like. Location as they say is everything. If you are in a tourist town the market is different than in an industrial town. Some folks can make a living localy while others may have to travel to their markets. It is difficult to judge. Generally the BEST thing to make is what you want to make and that you have practiced enough to be good at it. Quality work almost always has a market (though difficult to find somethimes). However, if you like doing unusual artistic work you may also have to make a lot of marketable more traditional work to pay the bills. One thing to remember is that the bulk of this market is folks in the upper middle class and beyond. You need to make things they like. Scale is also something to consider. IF you are good at small delicate work there is a market for dollhouse pieces and you can get almost as much for a set of 1-1/2" andirons as full size. . . AND fuel and materials is inconsequential. We have over a hundred items on our iForge page that may give you some ideas. |
| - guru - Tuesday, 12/17/02 20:07:09 GMT |
|
Steve, forging hot steel flattens the metal grains. When the piece reheated, the grain boundaries re-form to make smaller grains. This actually makes the steel tougher. If you over-heat the steel, the grains grow larger and the steel can get brittle. Every cycle of heating and forging will refine the grains. If you seriously over-heat the steel, you will burn it (this means the grain boundaries have melted) and the steel is ruined. If you allow the steel to cool very slowly, the grains can grow slightly larger and the carbon will form big carbides, making the steel soft. Cool it more rapidly, the carbon forms into many small carbides and the steel is slightly harder. Rapidly cool it in water or oil, and the carbon is trapped in the iron crystal latice and forms no carbides but the iron becomes very hard. |
| - Quenchcrack - Tuesday, 12/17/02 22:20:53 GMT |
|
|
|
|