| WELCOME to the anvilfire Guru's Den - V. 3.0 |
|
THIS is a forum for questions and answers about blacksmithing and general metalworking. Ask the Guru any reasonable question and he or one of his helpers will answer your question, find someone that can, OR research the question for you. This is an archive of posts from December 1 - 8, 2004 on the Guru's Den |
|
|
|
Hello there, I am trying to make a sheet of 20 gauge copper into a bowl... I can't figure out how to do it. I have an oxy-acetylene torch, and have been hammering it, but it still looks bad... Do I need to make a cast iron mold? Any advice would be greatly appreciated. thanks |
| coppersmith in training - Tuesday, 11/30/04 21:38:48 EST |
|
To the guru it may concern: I am a fiction writer who is researching the craft of blacksmithing for a novel. The main character of the story is a blacksmith, especially of blades. My specific question is how long would it take a skilled bladesmith to forge a typical one-handed sword? How many pieces (either tools or blades) could a skilled blacksmith turn out in a day for instance? On a less specific note, what is a blacksmith's day in general like? What kind of chores, prepwork, and daily problems does he face? How does this kind of work feel to do? Thank you for any response you are able to give me. --Garrett Bettencourt |
| Garrett Bettencourt - Tuesday, 11/30/04 21:52:49 EST |
|
copper bowl, 20 gauge is pretty thin for any method other than raising. If you try to do it by sinking, that is, stretching it into a depression in a block or form, you may thin the copper so much it splits. Raising, on the other hand, is a compressive technique that will either maintain the thickness of the stock, or actually thicken it as the rim is drawn in to a smaller diameter. Raising jis a technique that is difficult to illustrate with pjhotos or drawings, and is virtually impossible to convey with words alone. If you go to the drop down menu at the upper right of this screen, you'll see a heading called "Armoury". On that page is an article entitled "Raising a Norman Helmet" by Eric Thing. That will give you about as good an idea of how it is done as can be conveyed in this medium. To learn it thoroughly you need to work with a metalsmith one on one for a while and practice, practice, practice. Ooops, I'm late for a meeting! |
| vicopper - Tuesday, 11/30/04 22:38:21 EST |
|
I just received a 150# Hay-Budden from a friend who new I was a newbie to blacksmithing. He was not a blacksmith, and after scouring the archives on AnvilFire, I have determined he didn't know what he had. The serial number appears to be either 3025 or 3625. The second digit was damaged by mounting hardware. This must have been one of their early anvils. Any idea as to the year it was manufactured? Thanks, Rich |
| Rich Natale - Tuesday, 11/30/04 23:43:16 EST |
|
Rich, 1893, for either number. That's a good one! |
| Paw Paw - Wednesday, 12/01/04 00:05:54 EST |
|
Antique Brazier: It looks to me that the damage has already been done by the seller. Two parts have been scrubed with abrasive and cleaner as well as polishing. The item is a mixture of brass and copper or high copper red bronze. The only cleaning that sould be done is very carefully with mild soap and water. The couple green coroded spots are probably from an animal (probably a cat) marking the pot. Does terrible things to brass. Spot cleaning with soap and water and MAYBE a little piece of SOS pad to gently remove the green and nothing more! The kind of person that does resporation and repair on this kind of item usualy works in a museum. Also before putting a bunch of money or worry into something like this I would have it appraised and its true age accertained. Ebay is loaded with new "antiques" just off the ship and they all have a story. I have dealers from India, Pakistan and China spam me every day with offers of "aged" reproductions. At least you didn't pay too much for it and it is a nice looking piece in ANY case. |
| - guru - Wednesday, 12/01/04 00:25:15 EST |
|
Paw Paw, Thanks for the quick response! I haven't cleaned it up yet, but the top appears to be in good shape. However, the edges are rough. I am going to show it to some of the locals to get their opinion on its condition. Even if it is a little far gone, it is an interesting piece and the price was right! |
| Rich Natale - Wednesday, 12/01/04 00:32:46 EST |
|
Garrett, To begin with, the pulldown menu at the upper right will allow you to click on Armoury. Peruse the sword articles. I hope some others will respond to this. It is not my forte, but I could write a pamphlet about it, and not really touch on the subject. For example, what country, what period, elaborate or plain? Then there are other concerns besides forging a blank: hardening, tempernig, removing black oxide scale, grinding, filing, polishing, hilts, hand guards, pommels, rivets, assembly, scabbard making, etc. It seems so freakin' simple in the movies. |
| Frank Turley - Wednesday, 12/01/04 00:42:55 EST |
|
Fiction and Blade Smithing: Garrett, First, a sword was rarely made by ONE person. The smith would forge and heat treat the blade several days to a week). A cutler would spend days (up to a week) grinding the blade. An artificer or a hiltsmith would engrave and add the furniture which might be cast, forged or a mixture of the two. In any case, there would be days of filing and carving. In the end the merchant that contracted the various steps (and probably obtained the raw materials to start) would sell the finished product. The farther back you go the longer it took. As early as the 1300's (probably earlier) cutlers had water powered grind stones. There would be several on a heavy wood shaft. Each would have a plank for the cutler to lie on and rest his arms while he ground the blade on the slow turning wheel for hours and hours. These old soft white natural stones were nothing like modern abrasives. Before water powered grind stones they were hand powered and much slower. . . Lots of child labor was involved in powering such tools. Hand scraping (another slow process) was also used to shape and finish blades. The perverse thing about the history of technology is that a modern bladesmith is more likely to do the entire job than an ancient one would have. Specialists evolved VERY early in civilization and made good use. The difference today is that the maker generally cannot afford subcontractors and modern machinery reduce much of the labor once done by hand. The exception is engraving. Most top engravers do nothing but and the rest is done and paid for by someone else. And many bladesmiths that use modern alloys sub out the heat treating. If you REALLY want to write about smithing you should spend a few days in a smithy swinging a hammer and find out just how stubborn steel is. For a typical day, see my story on the our Story Page titled "A Day in the Life of a Blacksmiths Apprentice". Although you could say this was an unusual day it is common for every day to be unusual, doing something different in a blacksmith shop. Even specialists have days where they build equipment, test new procedures, make repairs. . . |
| - guru - Wednesday, 12/01/04 00:51:06 EST |
|
Garrett-- The estimable Guru is right: get thee to a smithy and observe a smith or two or three doing some actual smiting. California abounds in smiths, as does Oregon just up the way. Check the local chapter list of ABANA. There may be one near Siskiyous. Take copious notes. You'll pick up the kind of telling detail Cormac McCarthy employed in a description of a smith making a tool. It's the only way to bag those all-important objective correlatives. And Frank is right, too-- narrow the focus of your research down to a specific time and place for the regimen. Who knows, you may even abandon scriving and take up the hammer! A lot more fun! |
| Miles Undercut - Wednesday, 12/01/04 01:09:28 EST |
|
Raising: Ryan, Besides the armoury article we also have some photos of the process in our NEWS coverage of the West Virgina Armour-In (2 years), AND there is a brief bit of illustration from Decorative and Sculptural Ironwork in our book review. Tools required are relatively simple. For dishing a wood block with shallow depressions is best. For the raising you need a bent stake with a rounded end. These can be very simple or elaborate according to your budget. Some of the finest copper raising I have seen was done on a bent piece of truck axel stuck in a wood stump. I've used the handle on a large vise for a "mushroom" stake. . . It helps to layout concentric circles on the blank. The Armourers swear by "Sharpie" markers. Raising takes many controlled passes in orderly sucsession. It takes care and concentration. If you look at the Eric Thing article you will see that the work goes through a strange stage with high ridge and turned down edge. This is good controlled raising technique and what should always happen as you work from the center out. In 20 ga metal I would try something small (maybe 3" diameter) and then work up. Raising is an art that takes practice doing many pieces. It does not come all at once. AND as VIc pointed out it is very helpful to get lessons or pointers from someone that does a lot of raising. |
| - guru - Wednesday, 12/01/04 01:32:50 EST |
|
NC Forge Manual: DB, No such thing. They come with simple assembly and lighting instructions and that is IT. The case is just sheet metal and you can cut away. . . The two burner stoves come in a variety of configurations including a plain steel door, insulated door, back stock door and dual end ports. NC has cast port frames and doors but you could fabricate your own. NC might sell them to you as spare parts. You can see all the various NC-TOOL forge configurations on the Wallace Metal Work page (see our drop down menu). |
| - guru - Wednesday, 12/01/04 01:44:28 EST |
|
Guru & Vicopper, Thanks for your advice, I think I may have to work up to the raising and sinking techniques... Have you guys ever used a metal lathe, for "spinning" a bowl... Kind of like a birdbath? |
| coppersmith in training - Wednesday, 12/01/04 02:02:12 EST |
|
Spinning: Ryan, This is a relatively simple process but like all sheetmetal working it requires skill and practice. For metal spinning you create a wooden form called the "chuck" which usualy bolts to a face plate. The work is held against the chuck with a wood cylinder running in a ball bearing live center. Pressure from the tailstock drives the work (friction drive). The compound rest is replaced (or has attached to it) a tool bar that supports vertical pins that are used for leverage points while using the hand held spinning tools. I've done a little spinning a very long time ago. Too long ago to give pointers. Many metalworking books cover the process. |
| - guru - Wednesday, 12/01/04 13:17:40 EST |
|
Dear Guru, I am working on 2 small steam engines in school at the moment. The chassis is made of brass and the holes drilled into it serve as the bearing surface themselves. The reamer I am using is running out slightly so I had to float ream the bearing holes. I successfully reamed one hole but on the other, the reamer grabbed and reamed the hole way out of true. I was considering just filling the bad hole full of hard solder and redrilling/reaming it. Do you think that this would work? The engine is a low RPM design, so I figured a hard solder would be similiar to babbit and would make a good bearing surface. If I cant fill the hole in, im just gonna have to drill a big hole and put a brass plug in, but that would be a pain the the arse, and wouldn't look as nice. Please help me save my engine! Thanks |
| Thomas - Wednesday, 12/01/04 14:14:55 EST |
|
Ebay question - There's a 193 # "Fisher" anvil for sale, item 6133469180. Problem to me is that there's not nearly half the markings I'm accustomed to seeing on a Fisher Norris. For instance, no FISHER, only the bird. Also, the nose looks rather blunted compared to my fishers at the house, but I haven't got experience with large Fishers, so I don't know if the basic silloette was changed as the anvils got larger. Can anyone with Fisher-Norris experience (Oh, hi Vic) take a look and let me know what you think? Thanks. |
| Monica - Wednesday, 12/01/04 14:59:28 EST |
|
Solder vs. Babbit: Thomas, these are two different things. The "hard" solder may be considerably softer than babbit. In order to be sure the repair has a good hold and does not have thin spots I would drill it at least 1/4" oversize if there is room. This will result in 1/8" walls. I would saw a few grooves in the sides of the hole to help keep the babblit locked in place while reaming. In order for the solder/babit to stick the base will need to be preheated. Ocassionaly the surface is tinned with high tin solder to help the babbit stick. See babbiting instructions in an old Machinery's Handbook or machinists manual. One way I have seen holes repaired is for the hole to be drilled oversize, tapped, a threaded plug installed and then pined in place by drilling on the thread line and pinning with similar material. |
| - guru - Wednesday, 12/01/04 15:03:04 EST |
|
As Fisher's get bigger it is expected that they will be used for larger work with heavier hammers and so the "delicate" parts will be massed up quite a bit. You should see the horn on my 515#'r! The bird looks right to me and you can tell it's not a "fake cast iron ASO" due to the edge wear---looks like plate wear to me. It's not in the best of condition, I would like to see how much plate is there---has it ever been ground down?---but ther looks to be a lot of life left in it. I wouldn't pay $2 a pound but I would probably go over $1 a pound if I needed an anvil---given no hidden flaws, been through a fire, etc. Course I'm cheap. Thomas |
| Thomas P - Wednesday, 12/01/04 15:26:30 EST |
|
What I meant by hard solder was a high tin content. I have a machinery's handbook, but it is a 24th edition. I'll check it out for babbit/solder info. I also thought filling the hole with a brass brazing rod. What is your opinion on that? My teacher is afraid brazing may cause warpage. |
| Thomas - Wednesday, 12/01/04 15:29:35 EST |
|
Brazing welding the hole is likely to produce a lot of porosity and heavily distort the part. High tin solder is often quite soft. For tinning pure tin works best. Hardness in lin lead alloys is controlled largely by antimony content. Monica, Yep its a Fisher. |
| - guru - Wednesday, 12/01/04 16:01:40 EST |
|
My neighbor and friend bought an old gas fired hearth from a school. He is a retired art teacher and needs it for some proj. The device is complete except we don't know how to connect it up to a propane tank, as it only has a length of piping extending from the hearth. There must be a regulator and an orfice between the gas source and the hearth. From the existing gas pipe, the gas goes thru a globe or gate valve (control?) and then thru a on-off solenoid valve before it enters a centrifugal blower and on into a three port manifold with ports discharging into the hearth proper. The incoming pipe size is 1/2 in. and the hearth discharge ports are about 3/4 in. Do you have any ideas how we might proceed to get this thing into operation? Please forward your comments to me at the e-mail address. Many thanks. Pat Barton (12/1/04) |
| Patrick Barton - Wednesday, 12/01/04 16:15:59 EST |
|
Patrick, I suspect you have an old Johnson Gas Forge. They are still in business if you need setup and instalation information. Johnson gas Forges These forges were usualy run on natural gas but can be run on propane as low pressure. |
| - guru - Wednesday, 12/01/04 16:28:53 EST |
|
Well, given that I just found out that my dad's giving me a 150 Fisher for Christmas, it's an academic question anymore. Either way, the "Buyer arranges freight" part would have likely kept me from bidding. I would have needed a day or two to price the freight to take into consideration on the final, true price of the anvil. |
| Monica - Wednesday, 12/01/04 17:39:12 EST |
|
Merry Christmas Monica! Now all you need is some coal in your stocking! |
| - guru - Wednesday, 12/01/04 19:21:33 EST |
|
Why change teh orintation of the hardy? Just make new hardy tools with the shank such that the tool portion is where you want it? |
| Ralph - Wednesday, 12/01/04 19:44:28 EST |
|
Copper spinning: For all the apparent simplicity of spinning metals, it is more complex than one might think. The first complexity is the tooling. You need either a proper spinning lathe, or a metal working lathe with special modifications. Most, though not all, ordinary wood lathes won't have the power or rigid enough ways for spinning. (The torque loads are higher than you would think.) Then there is the matter of making the chucks themselves. You'll need a wood lathe, table saw and drill press for that. If you have a true spinning lathe, you can use it for the wood turning, but wood turning on a metal lathe isn't that much fun, believe me. Too much messing about to either convert the compound slide or manufacture a proper turning tool rest. Next comes the issue of spinning tools. It takes several to do the job, and they're all way bigger and heavier than regular turning chisels. You often need to apply so much force against the metal that the three foot handle is tucked under your arm and you lean your full weight against it. The burnishing heads must be highly polished medium to high carbon steel to hold up at all. Usually, you end up having to make your own, particularly when you get into making complex compound curve forms, steeped feet, rolled rims and the like. That brings us to the matter of annealing of the metal. After moving the metal by spinning a course or two, it will be too hard to work safely or satisfactorily and need to be annealed. For spinning, the annealing process must be absolutely uniform, or you end up with differentially annealed metal. In other words, some areas are softer than others. When you start spinning on that piece, those areas of differing hardness translate themselves into a piece that immediately goes out of balance and is collapsed by the burnisher. Or flies off the chuck and becomes a sort of demented metal frisbee caroming around the walls of your shop (or head). So you need an annealing oven or specialized torch/pan setup, which can get expensive and/or time consuming to come up with. If you want to try your hand at spinning, start small and very simple, using aluminum as stock. In gauges lighter than about 16 gauge, it can be spun on a fairly small simple lathe, even a homebuilt one. Annealing is much easier as well, as 3003 aluminum (for example) anneals at temperatures that you can achieve in a household oven. You can make quickie spinning burnishers using rebar ground to profile and crudely shafted as long as you're working small stock. Don't bother trying to forge or heat treat the rebar, just use it as delivered. It will be hard enough to do the job. You need to lubricate the metal while spinning it. Sheep tallow is traditional, if a bit unpleasant smelling. Some of the water-borne lubricants used for metal cutting and turning will work too, and smell somewhat better, depending on brand and preference. (grin) the single most important "trick" to learn is centering the disc and establishing the start. This is done by eyeballing it to center as you clamp it between the chuck and the tailpiece follower, then turning the headstock by hand as you use a wooden stick to detect if it is running off center and carefully bump it into true center. Then you spin it up just a bit and check it. Only when you have it PERFECTLY centered do you spin it up to speed. If you spin it up off center, you get that frisbee thing happening. Remember the scene in Goldfinger where Odd Job whacks the head off a statue with his metal bowler hat? You want to keep that scene in mind when you get tempted to take shortcuts on centering the stock. Once it is centered, you spin the first bit out from center, where you can work it down to the chuck on the first course. This gives you a sure fire place to return it to after you unchuck it for annealing. From there, you spin away, making mistakes and learning as you go. |
| vicopper - Wednesday, 12/01/04 22:27:50 EST |
|
Cripes that was verbose! I need to control myself. |
| vicopper - Wednesday, 12/01/04 22:28:20 EST |
|
Hello everybody. I have been reading alot about forges and have read that more and more people are using gas forges than coal. I have looked at some of the commercially available forges, ie forgemaster, NC,etc. I can't understand how they are useable for anything other than horseshoes, knifemaking and very small pieces. Is there something I am missing. I can't see how they are useable for anything larger. I am trying to decide what to get as I am a newbie and want to spend my money in the best way that I can. Any suggestions would be appreciated. Thanks |
| magi - Wednesday, 12/01/04 22:28:40 EST |
|
hi im wrighting a resherch paper on black smiting and i can find anything on the care of swords and armor and what metals make the best swords and armor any help u could give me would be appricated future blacksmith wyatt |
| wyatt whitham - Wednesday, 12/01/04 22:50:32 EST |
|
IRONWORKERS Thank you for feedback. I went to sites and looked. Went to Canadian distributer today. 55 ton of most interest. I was impressed. Measure scales at each station. Better angle iron shear system (minimize distortion). Backstop limit switch etc. same capacity/speed with 5 hp vs 10 hp Piranha. I won't have to upgrade my power supply. I would have liked to buy American however dollar for dollar here in Canada the Geka will suit me much better. It was great to have your President visit Canada the last 2 days. Regards |
| Thomas A. - Wednesday, 12/01/04 23:31:47 EST |
|
Magi: Part of the secret of using these forges is the back hatch for longer stock, and being able to use it with the door open or partly closed. My long-running project (far too long) is the Great Ironbound Chest. Much of the ironwork on this gift to the family is in the form of straps, corner braces, locks, hinges and such made of 1/8" X 2" (3mm X 51 mm) mild steel. I�ve done almost all the work using a single burner Whisper Baby forge (known to the family as the "Baby Balrog"). It's also useful for preparing other parts before using the coal forge. For instance, the ring handles were forged from old 5/8" (16 mm) round wrought iron fence pickets. I used the gas forge to cut them on the hardy, forge them square, scarf them and put a twist in them. I then used the coal forge to turn them, weld them, and round them up on the cone mandrel. On the straps it's a matter of sequencing- I started down the straps putting in decorative scallops in the sides and then worked my way to the end where I forged them into fleur-de-lis. Since the fleur-de-lis quickly become too wide to fit through the back hatch (or the front, for that matter) they�re the last things forged on that end. I certainly am in no hurry to give up my coal forge, but I have done a lot of work, of late, using the gas forge which tends to be neat and clean and (at least with one burner) cheap. On the other claw, I tend to work in a medieval context, so a lot of what I do isn�t on a very large scale. I suppose if I were doing fences and gates (instead of using them as raw material ;-) I�d be doing almost all of it on the coal forge or using a much larger gas forge. One I saw in Florida for this purpose (which I still need to write-up for the Anvilfire News) was about 4� long and 18� in diameter (1.22 m X 45 cm). For me the coal forge is more versatile (although I�m always running short of coal) while the gas forge is more convenient. I�d start with coal, and get a gas forge once I had the processes (and the size and scope of my requirements) down. Your reality, of course, may vary, and I�m sure others will have their experiences and views to add in here. Rainy, windy and then lovely on the banks of the lower Potomac. Took off the day for family errands and to look at a potential new/used truck to replace my �84 F-150. Visit your National Parks: www.nps.gov Go viking: www.longshipco.org |
| Bruce Blackistone (Atli) - Wednesday, 12/01/04 23:33:18 EST |
|
A note sent by the Rocky Mtn Smiths: Here is a link to very interesting article from Machine Design on powdered metal Damascus (pattern welded steel) by a Swedish manufacturer. Check it out! http://www.machinedesign.com/ ASP/viewSelectedArticle.asp?strArticleId=57611&strSite=MDSite&catId=0 |
| habu - Wednesday, 12/01/04 23:43:52 EST |
|
Wyatt: Start by going to the "NAVIGATE" pull-down menu and scroll down to the Armoury. Then read my article on the history of swords and the Guru's article on the reality of modern sword smithing. After that (and the suggested reading), ask away! :-) |
| Bruce Blackistone (Atli) - Wednesday, 12/01/04 23:55:32 EST |
|
Thomas-who-almost-tanked-his-engine. Give some thought to the relatively new lead free solder that is required for potable water piping (copper). It is somewhat harder than regular lead solder, and when properly fluxed and heated, is not difficult to use. I used it to repair an antique pewter porringer and got a good color match. The lady who owned it was using it for a spoon rest on her stove, and let the porringer get too close to the burner. DUH. It's just about as hard as babbit if memory serves me, and if kept lubricated, should hold up. |
| 3dogs - Thursday, 12/02/04 04:09:31 EST |
|
Any plans out there for an upsetting machine? |
| - chris in@earthlink.netgavin - Thursday, 12/02/04 07:06:54 EST |
|
Rich: Great post on spinning - thanks Monica: Global Tranz is a "freight forwarding company", 866 275 1407. I am having them ship a 200# lathe from ohio to nm for $160 door to door! Might be an option for your Fisher. Congrats by the way |
| adam - Thursday, 12/02/04 11:50:54 EST |
|
Magi, well what do you want to do? Then we can make good suggestions. However let me point out that much of smithing is rather planer and so a "slot" forge may actually work for fairly large items. Also you don't need to heat more than you can work at one time before it gets cold (a common complaint about gas forges is that they heat *too* *much* of the piece) If you get into smithing you will probably end up with multiple forges---they're not hard or expensive to build and there is no one forge that will do everything. I'v got 5 currently and still have dug a trench forge in the yard when I needed to box fold 3/8" stock along a 3' length. One of the handiest forges is a good propane burner and a stack of firebrick on a fireproof table---you just stack it to get the size/shape you need for the project at hand.---I've read about forgewelding ship components together and they mentioned just piling up coke on the factory "floor" with blowers going into it and the pieces being hung from chainfalls. I've done quite a bit of dishing with my propane "pipe" forge by stacking firebrick in front of the opening and slipping the piece between the forge and the stack---it actually gets more efficient as the piece curves and then sits "in" the forge more---I have a special set of tongs forged to grab hot fire brick that I find *very* handy!. Thomas |
| Thomas P - Thursday, 12/02/04 11:57:44 EST |
|
When I hear the words "hard solder," what is implied to me is one of the high-temperature silver solders that flow at temps from 1100 degrees F to 1700 degrees F. No lead or tin solder can be considered "hard" in comparison to one of the silver alloy solders, which are not to be confused with silver bearing solder for plumbing work. Not to dispute the good guru, but many soft solders are basically the same formula as some types of babbitt metal. Lead-free plumbing solder is almost identical to Nickelite brand babbitt, for instance, which (minus the 0.5% silver) is pretty darn close to Brittannia pewter. It's almost as bad as bronze alloys, eh? |
| Alan-L - Thursday, 12/02/04 11:59:47 EST |
|
how do you go about to make tavern puzzles, i have checked everywhere, but nobody list how to make them. i ccan buy , but know diagrams n making them! can you help me out? thank-you! lee |
| lee vincent - Thursday, 12/02/04 13:51:46 EST |
|
Thank you, gurus, for your excellent responses to my post. I really appreciate how helpful they were. I'll be sure to mention this site in the special thanks credits. |
| Garrett Bettencourt - Thursday, 12/02/04 14:22:50 EST |
|
Upsetting Machine: Chris, not that I know of. Even small upsetters are huge heavy machines built with very heavy castings. The clamping mechanisims are relatively mechanicaly complex. On the whole there is a lot of very critical engineering and like flypresses are not a DIY project. For small scale upsetting there have been power hammers with modified anvils that had a U shape cross section and adjustable back stops. This allows bar to be set verticaly and clamped OR passed through a heavy bolster plate. For creating the upset shoulder on jack hammer bits Sullivan and Ingersol Rand used high speed pneumatic hammers same as portable ones mounted horizontaly on their bit sharpening hammers. I had thought of building a horizontal air hammer upsetter. . . But will probably do something with a pieced anvil. |
| - guru - Thursday, 12/02/04 14:55:04 EST |
|
Forge Size: Even in large coal forges the usual smithing heat is only a few inches to a maximum less than a foot. When forging long pieces like swords it is done in short heats because a long heat would create a piece like handling a wet noodle. Long gentle bends like scrolls are done cold except for the ends. Gas forges come in many sizes from the little Whisper baby which is too small for even a horseshoe but is great for hooks and small work, up to car bottomed furnaces where a RR-car with a refractory deck is the bottom of the furnace. To be efficient in a blacksmith shop requires different sized gas forges. This is because a large forge takes nearly as much fuel to run empty as when full. If you look at NC-TOOL or Forgemaster forges they both make larger forges. But if you want bigger there are industrial makers like Johnson that make large forges. Then there are the DIY gas forges. One of the best I have seen was a modification of a Swan forge that had a C shape cross section with a door. This gave you a nice compact enclosure that you could move long irregularly shaped pieces in and out of. Another design is the trough type that I show in our "stupid" gas forge burner article. For small work this forge was a pain to use but it had the flexibility of a coal forge and would large irregular (on one axis) work. Coal forges have the advantage of being relatively efficient and flexible through a wide range. However, a blacksmiths forge is not an industrial furnace either. |
| - guru - Thursday, 12/02/04 15:20:56 EST |
|
Advangtages of Gas Forges: One of the biggest advantages of a gas forge is that you can put a stack of billets in and let them soak without worry of burning them up. In a coal forge you are lucky if you are VERY attentive to keep three pieces going at once without burning one up. A small gas forge will support a production operation like a power hammer easily. To do the same with a coal forge is nearly impossible OR takes a second person to what the forge. |
| - guru - Thursday, 12/02/04 15:24:26 EST |
|
Tavern Puzzles: Lee, We get a request for these once in a while. For MANY years there were only a couple designs or maybe only the ONE horseshoe and chain model. . . People who made it copied it from a sample or figured it out from seeing one. THEN the fellow that was making them for Cracker Barrel (I think) started coming up with a new puzzel every so often. Others copy the originals. This is probably him: www.tavernpuzzle.com He will even sell you the solutions! These kind of puzzels are like jokes and magic tricks, there are A VERY FEW creative people who invent all of these and I have always felt that is is fair to let the inventors have the credit AND the profits. There is no secret to these other than the specific dimensions and close tolerances that must be held. Besides having a creative mind to invent them you also need to know how to make the jigs and fixtures to make them. It is a business that you should invent your own. |
| - guru - Thursday, 12/02/04 15:53:54 EST |
|
TAVERN PUZZLES Lee Vincent. Look for books by Jerry Slocum about puzzles. You will find great historical information about the 'entanglement' puzzles and might get some ideas. As GURU said, you will not likely find any drawings or anything, You would need to figure them out yourself. |
| - Tom H - Thursday, 12/02/04 17:53:06 EST |
|
SWABA had a simple puzzle for the kids to play with at the State Fair, it was made from 2 16p nails and was bent cold using a jig. Lots of kids got something to take home. Thomas |
| Thomas P - Thursday, 12/02/04 19:59:05 EST |
|
Sharon, A correction. I just completed measuring some old bladed fans and fan cases, most of them having patent dates from around the turn of the 20th century. The overall outside diameters vary from 23cm to 35.5cm, the average being 30.5cm.The fan cases are radiused on the periphery so therefore, the fan blades are radiused on the end. I said there were 8 blades, but all that I looked at had 6 blades. The blades are sheet metal, riveted to a cast iron core. The core is centraly drilled to about 6cm and have a 3cm set screw to fix the fan to the spindle leading to the gears. The diameter of many of the fans is close to 25cm, especially if they are to fit inside of a 30.5cm cast iron case. Presently, I am using an electric squirrel cage blower with a 10.2cm wide by 25.2cm O.D. case. I necked down the air exit to 7.5cm to accommodate the stovepipe. |
| Frank Turley - Thursday, 12/02/04 21:09:34 EST |
|
Chris, what diameter of bar do you wish to upset? how far, and to what diameter? how many an hour? There are factory upsetters rated as small as 1". I would guess that an Ajax 1" upsetter might go 50,000# We have upsetters from 4" to 10". This referrs to the general size of the part after upsetting, but is not an exact sizing. Our 10" will upset a 5.5" bar out to a flange 22" x 3" thick on the end of that 5.5" bar. Takes 4 hits. Our new 9" coming this month will weigh 300,000# for the basic machine and sit on a 90 cubic yard foundation. So as the Guru points out, yes upsetting machines are available, but even a small one would require very large structures. Our 9" generates in the area of 1800 tons. Look on the surplus record for pictures etc. |
| ptree - Thursday, 12/02/04 21:10:05 EST |
|
Jock-- Remember that cardboard box of really quite handsome, quite old, hand-made bench vises-- little jobs they were, such as a jeweler or gunsmith might use-- that you ran a picture of in your admirable ABANA conference coverage? I can't find the picture in the archive. Do you happen to recall or might you guess approximately what they were going for? I think I know of one such and wonder what a fair (owner's a chum) opening bid might be. Many thanks! |
| Sebastian Chippinghammer - Thursday, 12/02/04 22:35:44 EST |
|
In the spirit of Christmas we're having a tong exchange amoung the SlackTubPub users. To get in on this send me your snail mail address via email jmg@sasktel.net by Dec 15th. I will draw names and let you know who to send your pair of tongs too. I will NOT let you know who your getting your tongs from so it will be a suprise. Getting too close to the Christmas rush so 3 Kings Day (Jan 6th)will be the day you have to have yours tongs mailed by. Merry Christmas Jim |
| JimG - Thursday, 12/02/04 22:59:18 EST |
|
Tavern puzzles. At one time, the Gilbert toy people put out a cardboard box full of such puzzles. Anybody remember the Gilbert Company? A.C. Gilbert invented the erector set way back there in time. |
| Frank Turley - Friday, 12/03/04 00:12:07 EST |
|
Boy I remember my erector set! My favorite. Several years ago my mother was at an auction and bought a super deluxe set that was originaly the carosel in the big steel box and someone had added the crane set! Our then teenage son had a great time with it! Today the sharp edges and little square nuts would all be considered dangerous and it couldn't be sold. . . |
| - guru - Friday, 12/03/04 00:26:01 EST |
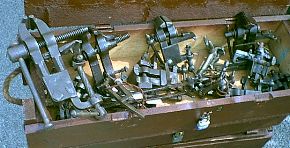 Vise photos: (click image for detail) Those were from the SOFA Quad-State Roundup (current news edition 35, p.15).
That collection was a small part of a pretty classy antique tool collection that included all kinds of tools. Vise photos: (click image for detail) Those were from the SOFA Quad-State Roundup (current news edition 35, p.15).
That collection was a small part of a pretty classy antique tool collection that included all kinds of tools.For the past couple years wagon vises have been selling for $125 to $145. But apparently there was a large cache of US army vises from WWI or WWII that hit the market and have set this (reasonable) price for what is usualy a rare item. The last small antique bench vise I saw in good condition went for $135 about 5 years ago. I bought one for a third of that price that is missing some parts. |
| - guru - Friday, 12/03/04 00:48:02 EST |
|
Guru-- Many thanks for finding that picture of the old vises for me! And for the estimate, which confirms my fears of what I ought to offer-- much to my wife's dismay. We just gave one of our grandsons a modern day Erector Set for his birthday and he loves it- they are still available, I am happy to report (check it out on google), teency little nuts and bolts and girders and all. I think they are essential to teaching kids how things go together--and to keep stuff in good order. Me, now, I recently got myself-- slow learner that I am-- not one but two of the earliest sets, fairly intact and replete with original wooden boxes. |
| Sebastian Chippinghammer - Friday, 12/03/04 01:02:39 EST |
|
I never had an Erector set, but I did have my older brothers Mechano sets. However they often gave me a good thumping after I used them cause if I couldn't find the shape I needed I would bend and twist the peices to what I wanted. Good thing I couldn't get them hot enough with Dads lighter......... |
| JimG - Friday, 12/03/04 01:09:29 EST |
|
Hey guys, I was wondering if you could help me identify a trenton anvil. The serial number is A1479x7 The x represents a number that is unreadable, but looks to be eitehr a 3 or another 9 The weight stamp is also a little unclear, with only the top half of the impression for the first digit, so it's either a 2 or a 3 hundreed pound anvil. The measurements are:Length=31 1/8 Height=12 1/4 Face plate=4 1/4 x 19 5/8 The horn is a little different, it apears to be a little larger than the normal profile, and the top of it is completely paralel with the face. I'm looking for a aproximate date of manufacture, just curious I suppose, and your guesses at the weight. I'm going to pick this anvil up in a few weeks. and so the weight question will be answered then, but hey, it's a new toy, and if I cant play with it, I'll think about it :) Thanks guys, Tony |
| youngsmith - Friday, 12/03/04 05:24:26 EST |
|
Frank T. ! thank You for your help (the blower stuff...)!! |
| Sharon - Friday, 12/03/04 08:44:06 EST |
|
Erector Sets: I once caught one of my fingers in the gears of the elctric motor that came with them in the late '50's. Split the nail, drew blood, and hurt a lot; and my shocked parents said: "Don't stick your finger in the gears!" I have followed said dictum to this day; a lesson cheaply, if painfully, learned! I think that over the years my parents gifted me with just about any basic or mid-level set made by Gilbert or Porter- chemistry, minerology, microscopes, physics, water/hydraulics, all sorts of neat stuff. Most of it got passed on to the kids, sometimes when they were in college. I think the Erector set (combined from mine and my elder brothers) got sold by my wif at a yard sale, though. We still play with the same stuff, just on a different scale. I never became a scientist, but I think my parents would still be pleased. Another sunny, lovely late autumn day on the banks of the Potomac. Vist your National Parks (Springfield Armory, where much of our mass production procedures were invented or perfected): www.nps.gov/spar/ Go viking: www.longshipco.org |
| Bruce Blackistone (Atli) - Friday, 12/03/04 09:53:05 EST |
|
Smoke stack material for side draft forge - I'm putting together the materials to assemble a side draft hood/chimney for a coal forge. I�m planning on using either (wood) stove pipe or the galvanized air ducting for the chimney. The galvanized would be cheaper, but I can�t remember if the coal smoke will corrode through the zinc layer or not. Snowing and �1 Cel. North of the Lake Ontario (maybe a white Christmas?) Don |
| Don Shears - Friday, 12/03/04 10:54:39 EST |
|
Anvil Weight: Youngsmith, My best guess is that is a 200 pound anvil from the dimensions you have given as it is very near the same as my 200 pound Hay-Budden. |
| - guru - Friday, 12/03/04 11:08:12 EST |
|
Stove Pipe: Don, the thin blued pipe will evaporate in less than a season if used with coal. The heavy galvanized pipe is better and stainless is best. The zinc is there to prevent corrosion of the steel. No part of the stack should get hot enough to melt or burn the zinc. Be sure to use as large a pipe as possible. 10" (254 mm) is recommended, 12" (305 mm) is best for a large coal forge. 8" (203 mm) is marginal and will result in a smokey shop in 90% of cases. Note that most suitable pipe for a forge is commercial size and rarely if ever found in hardware stores. |
| - guru - Friday, 12/03/04 12:10:13 EST |
|
I usually buy my daughters (15, 19) tools for christmas, the craftsman screwdriver set and a 3/8"VSR drill most recently. Since they are approaching the car(n)age it's time for wrenches. One thing we used to do is to drag items out of dumpsters and take them apart to see how they work---good fun! I always scroung muffin tins out of the trash as they make great holders for parts so you can keep track of what order they came off in. My wife still has problems when I ask her why she didn't fix something but waited for me and she say "cause I didn't know how to do it" and my reply is "I don't know how to do it either I expect to learn how while taking it apart..." The Central Ohio Science and Industry (COSI) museum has a section where kids can take apart donated computers, printers, etc and see how they work. Bought a big bin of stackable parts bins today at the fleamrket for about 10 cents a piece, now I will have no excuse not to sort the bolt, screw and nut cans... Thomas |
| Thomas P - Friday, 12/03/04 12:16:10 EST |
|
Sorting Hardware: This too can be a great learning experiance. One of my brothers and a friend got a job with a machine shop that was moving to sort all their fasteners. When they started they did not know a 1/2" from 5/16" much less thread pitches. But by the time they were finished they both could tell a #8-32 from a #10-24 by eye and knew the difference between a jam nut, regular nut and heavy hex nut as well as castle nuts and lock nuts and many other special fasteners. The average person does not know the difference between a nut and a bolt much less a socket head cap screw and a Torx™ bolt or how many sides a hex bolt has. I remember a cover illustration from a popular engineering magazine featuring an article on fasteners. The artist had beautifully and clearly illustrated large pentagonal and octagonal head bolts. . . . Now this was not so unusual but the EDITOR of this prestigious engineering magazine missed it! Remember the good old days when every American high school had a draftiing class? Drawing screws may seem like a simple minded excersize but it is an important learning experiance. I liked drawing the big acme threads and did one of the typical vise drawings with details. My instructor didn't catch it but my father caught the LEFT HAND thread. . . As a machine designer I would continue to draw many types of fasteners, usualy in more detail than is common today. Our shop drawing standard was "damn the new standards make clear understandable drawings". This often included shading shafts and bearings, drawing gear teeth AND fastener details. . . It was appreciated by everyone that used our drawings. Every citizen in a technological society should have SOME knowledge of the bits and pieces that make it work. To know that there are coarse threads and fine threads and that common fastener heads have six sides (less commonly, four) should be required knowledge to graduate from high school. |
| - guru - Friday, 12/03/04 13:06:08 EST |
|
I rember being amazed that some of the kids in 7th grade metal shop did not know one kind of screwdriver from another. That was in the late 1960s and shop (metal, then wood) was REQUIRED for all boys. I hate to think how many kids don't have a clue about things mechanical today. Of course I'm hopeless when it comes to vidieo games, but. . . |
| John Lowther - Friday, 12/03/04 13:36:41 EST |
|
I am an old bird but a novice in metal working. I have some old knives made by my grandfather from old sawblades. The wooden handle slabs appear to be fastened with babbitt rivets. I would like to duplicate his work but don't know where to find information about this technique. Can you help. Thanks, Jim Smith |
| Jim Smith - Friday, 12/03/04 12:49:15 EST |
|
Babbit or Lead Rivets: Jim, I have never heard of this technique. It sounds like your grandfather's idea. Are you sure they are not aluminium rivets? With age and exposure to dishwashing chemicals the aluminium may have turned dark. Knifemakers have used a variety of scale riveting techniques. One modern "primitive" method was to use two sizes of hollow brake lining rivets that were a force fit into each other. These had large flat heads that were countersunk into the slabs. Another was to use countersunk steel washers and plain brass or copper rivets. These plain rivets are simply cut from a piece of heavy copper wire or brazing rod. The brass brazing rod should be annealed by heating to nearly red in low light and then quenching. These rivets are headed very slightly in a counter sink in the washer or surface of the slab. Modern bladesmiths use special sex rivets that work like the brake lining rivets which are hard to find today. These are available from bladesmiths suppliers. Others use plain brass or stainless pins and rivet them upseting just enough to make a tight fit. These are usualy used in conjunction with epoxy glue which seals and holds the slabs to the tang. Head spinning is a simple process performed on a drill press which you will see examples of on many pocket knives. A small die with a rivet head impression is made in tool steel and hardened. This is then run at low speed and pressed against the end of the rivet with a little lubricant. The metal flows outward creating a small shallow head. The advantage of this method is that it avoids putting excessive force on the slabs. There are many good books on knifemaking. I would start there. See our book review page for just a few. |
| - guru - Friday, 12/03/04 13:26:05 EST |
|
Jock What is a SEX rivet? If its R-rated don't tell, I'm to young. Patrick |
| Patrick Nowak - Friday, 12/03/04 14:04:15 EST |
|
Tony, 1900 |
| Paw Paw - Friday, 12/03/04 14:26:28 EST |
|
Sex Bolts and Rivets: These have a head and the stem of one is solid and other hollow. Sex bolts or screws are threaded with male and female threads (thus the sex) and rivits are a press fit together. The most common use of sex screws are attaching removable belt buckles to leather belts. The belt is skived (thined), folds over the buckle bar and is then joined with pan head sex screews. These are low and flat like a rivet but can be removed. THEN there are blind rivets. These work in a number of ways. In soft materials the end can be split in a V and when it reaches the bottom of a short hole the edges flare out into the soft material. Another type are called "drive" rivits. These have a central pin that when driven flush cause the end of the rivet to expand and hold tight. |
| - guru - Friday, 12/03/04 14:53:32 EST |
|
hey coppersmith, if you are into woodturning then the process is relatively simple but you need a couple of special tools to do it. if you are serious about this and own a lathe , e-mail me and I'll describe the process |
| dale - Friday, 12/03/04 15:09:39 EST |
|
Can a "cold chisel" be used to cut hot metal? Do you need some kind of a "hot chisel" or can you just go to a hardware store and buy a "cold chisel" and use it to cut red hot metal? |
| Dana - Friday, 12/03/04 15:19:39 EST |
|
I am looking for information on color changes of 1008 material steel. I anneal these parts in a controlled enviorment(endothermic gas)at 1240f for 2 hours. The typical load size is 700 lbs in 36x22x48" baskets. The question would be what causes the outer edges(straw to blue and purple) to vary in color with the rest of the load(light blue to silver). Is this a surface condition that would hinder plating? |
| Andy Ashline - Friday, 12/03/04 15:24:44 EST |
|
Temper Colors: Andy, These are oxidation colors comonly called "temper colors". See our FAQs page, temper color chart. Being oxidation colors means that your oven was opened before the pieces cooled below 650 to 420°F. The variation in color indicates that the outer part of the load was at 490 to 590°F and the middle of the load hotter. This is a very fine layer of oxidation with fine gaps in lines that cause the color refraction. The effect is a little greater than slow oxidation at room temperature but much different than rust. I do not know how it would effect plating. |
| - guru - Friday, 12/03/04 15:44:15 EST |
|
Hot and Cold Chisels: A cold chisel can be used to do hot work but a hot chisel is too slender to do cold work. If the past the only difference was the weight of the body and the width of the edge. Good quality modern hot work chisels are made from hot work alloy steels while cold chisels are made from SAE 5160 and 1095 steels. Those thin hot slitting chisels sold by our advertisers cannot be beat for hot work and are well worth the price. |
| - guru - Friday, 12/03/04 15:50:52 EST |
|
More about Chisels: Blacksmiths handled cold chisels were often very heavy blunt tools. The body curved and met a taper that was not much lower than the grind of the 60° edge. The shape was that of a very old chisel that had been shaprened over and over until all the taper was gone. The shape of a blacksmith's hot chisel is not much different than a modern cold chisel with a long taper. A handled hot chisel is similar to an ax but slightly heavier, but not as heavy as a wood splitting maul. The new hot slitting chisels are very slender, only about 1/8" (3.2 mm) thick tapering to an edge close to 1/16" (1.6mm). These chisels work because of the very high carbon and high alloy content that allow them to keep most of their strength at a red heat. They are alos air hardening so that when over heated they cool hard. Many smiths go overboard and make all their tools from hot work steels. Some tools like hardies start life as a hot work tool and as they get shorter and fatter from repeated sharpening they evolve to cold work tools. Time to get another hot cut. |
| - guru - Friday, 12/03/04 16:46:19 EST |
|
I just wanted to thank you guys for answering to the best of your ability. I realize that no magical property is likely to be imbued into the blade but I was highly interested in this particular legend. I don't know the origin of it, as I said, i've only ever heard pieces. But again, thank you for trying to help. |
| Rae - Friday, 12/03/04 18:08:53 EST |
|
Andy, this layer of oxidation should not affect the plating process as the first several steps in most plating processes involve vigorous cleaning and "etching". Etching is dipping the part in a corrosive bath for a prescibed amount of time to take off any corrosion or scale on the part, then cleaned again and then plated by whatever process. So by the time it gets to the plating tank, the colors should be gone anyway. What type of plating is being done to the parts? If I know I can be a bit more specific (as long as I'm familiar with the plating process of cours). |
| MikeA - Friday, 12/03/04 18:11:42 EST |
|
youngsmith, I have a 250 pound Trenton with approximately the same dimensions as yours. The weight should be stamped on the base, under the horn. My Richard Postman book says your serial number would indicate the year, 1917. |
| Frank Turley - Friday, 12/03/04 19:51:52 EST |
|
Andy, if you are using an endothermic atmosphere, you should have NO OXIDATION, thus no temper colors. If you see temper colors, you have oxygen in your furnace. You might want to replace the seals....Or you could wait until the furnace blows up and just replace the whole thing. |
| quenchcrack - Friday, 12/03/04 20:17:32 EST |
|
Tony, Frank is right, I mis-read a number. 1917 is the correct age. The A is an inspector's mark (probably) and not part of the serial number. |
| Paw Paw - Friday, 12/03/04 20:30:12 EST |
|
Endothermic atmosphere. Had one, after we blew it up several times, and the insurance co. went nuts, we convinced our metalurgist to change to a inert atmosphere. But it was exciting on a regular basis. |
| ptree - Friday, 12/03/04 20:35:57 EST |
|
for those of you that have a propane burn forge i have a question. my question is about the brass piece that fits inside the tank and conects to the regulator. mine seems to be leaking no matter how tight it is with or without teflon tape on the treads.can someone out there help me with this problem before it blows up? many thanks from a nebie smith |
| - John S - Friday, 12/03/04 21:24:13 EST |
|
Paw Paw I just got back into town again,..I posted the photos of the Sullivan on the anvilfire Yahoo photo page, album "GGraham" |
| ggraham - Friday, 12/03/04 21:50:39 EST |
|
Do you have any information on how babbit metal was used in place of rivets to fasten handle scales on knives? |
| Jim Smith - Friday, 12/03/04 21:58:07 EST |
|
Jim Smith, Check the message immediately following your first question. The answer is there. |
| Paw Paw - Friday, 12/03/04 22:08:17 EST |
|
John S, There should be no reason for ANY type of sealant on the threads of that propane tank fitting. That should be a POL fitting, which is similar in function to a plumber's flare fitting. All the sealing happens at the cone-shaped nose of the fitting, where it butts up against the female part. The threads are there only to pull the two parts together tightly, not to actually form a seal themselves. Usually when a POL fitting leaks, it is because some foreign matter has gotten into the seat of the fitting and scored or gouged it, creating a surface than cannot seal. This may have happened on either the male or the female piece or both. The fittings are inexpensive enough that there is no good reason to try to re-fit them, you simply replace them. If the male fitting on the regulator is damaged, you can get a new one at the welding supply and have them install it on the regulator for you. If the female fitting on the tank is damaged, then you need to take it to your propane supplier to have the tank purged and the fiting replaced. MOst gas suppliers are so concerned about product liability that they are happy to perform the change at only the cost of the parts, just to be sure that it is done correctly and safely. |
| vicopper - Friday, 12/03/04 23:09:20 EST |
|
Just to add (slightly) to what ViCopper said, some of the newer POL fitting have an "O" ring at the tip of the male end. I think the new OPD cylinder valves may have some kind of resilient seal as well. The solution's still the same -- replace the bad part, but don't be confused if you see something other than brass at the mating surface. |
| Mike B - Saturday, 12/04/04 08:18:34 EST |
|
Jim Smith, do you mean the kind of handle where the scales are held in place by babbitt (more often just plain lead) was cast into a precarved groove or grooves in the scales? That was pretty common on cheap wood and bone handled French table cutlery from the 1870s-1890s. The basic idea is to carve out the channels for the metal, inlcuding holes in the blade tang, in such a way as to make the casting alloy lock the scales in place. The pouring forms are just cardboard. Once you have everything in position and the cardboard securely taped in place, melt your babbit in a ladle and pour. The paper will smoke a bit. Let cool, remove the paper, and file/sand to the desired final contour. DO NOT hold it in your hand when you pour! Don't ask how I know (grin!) |
| Alan-L - Saturday, 12/04/04 11:28:47 EST |
|
Leaking POL Fitting: Actually, the older type have a curved surface on the male part on the hose/regulator and a flat angled surface on the cylinder. The most common cause of leakage is damage to the easily damaged male part. Over tightening, droping on any surface but especialy something like concrete, anything that causes a flat, scratch or rough surface (including corrosion) will cause them to leak. As VIc said, the only solution in this case is to replace this part. Your welding supplier or propane supplier should have replacement nipples. |
| - guru - Saturday, 12/04/04 11:35:00 EST |
|
Ggraham, Gawd, what a beautiful area! I think You'd have to disassemble the hammer to recover it, and that would be one heckuva job. Worth the work, though. At least it would be to me. |
| Paw Paw - Saturday, 12/04/04 12:10:13 EST |
|
Paw Paw, and Frank Turley, Thanks for the info. I was guessing mid-teens, but had nothing, other than a hunch to go by. Frank, The weight is stamped. but the first digit is unreadable (I only have a slightly out of focus photot to go by) and only the top part of the first digit of the weight is clear, it's either a 2 or a 3 followed by 0 0 It seems the weight could go either way, as I've seen 200 pound anvils near the same dimensions, and my 325 pound peter wright is very close to those dimensions as well.... Oh well, Thanks again guys, Tony |
| youngsmith - Saturday, 12/04/04 12:34:07 EST |
|
Anvil Weights by Dimensions: These are difficult to determine from general dimensions. Many heavy anvils have much of the weight in the waist. A rough face width measurement or +/- 1/8" can easily miss 5 or 10 pounds. Add an inch to the waist width and you can be off 20 to 40 pounds. Different brands have different proportions and add weight in different ways. The heaviest Peddinghaus has the same dimensions as the next down except for the addition of the upsetting block AND the base is 1" thicker making the anvil 1" taller. It is a 55 pound difference. Early anvils are much more compact and can be surprisingly heavy. Consider a simple 9" cube of steel that weighs 206 pounds! |
| - guru - Saturday, 12/04/04 13:12:39 EST |
|
Jim Smith: Could it be pewter pins on that knife? Pewter bolsters with integral pins aren't uncommon historically, and just making pins with the same method doesn't seem like a far stretch for some makers to have done. |
| AwP - Saturday, 12/04/04 17:03:09 EST |
|
Hello I am just starting Blacksmithing I bought a 110 pound anvil at harbor freight cast steel made In china for 90 dollars Was it worth it? Thank you |
| Michael - Sunday, 12/05/04 01:19:20 EST |
|
Michael, If it was the 110 lb. Russian anvil reviewed here (use the navigate toolbar, go to 21st Century and scroll down to product reviews to read the whole story) then yes, it was worth it. The Russian is a decent starter anvil after a bit of polishing, although the hardy is an odd size. The uncertainty lies in Harbor Freight selling some anvils as cast steel, when they are, in fact, cast iron. If it is cast iron, then not such a good deal. :-( Tap it with a hammer. Does it ring? If so, it's a safe bet you have the steel variety. If not, try to take it back for a refund. Good luck in your smithing ventures. Eric |
| eander4 - Sunday, 12/05/04 02:47:05 EST |
|
Hello Jock, how are you..I'm back smithing after a long hiatus with tendonitis and have a quick question for you. I'm doing a base for an indoor table out of mild steel, and wanted to slide some hammered copper tubing on the legs in spots...is there going to be any problems with electrolysis? Will shooting the finished piece with a clear coat help. Does indoor copper items tarnish...blah blah blah (sorry, not such a quick question i guess) Your thoughts would be appreciated...thanks and have a happy holidays. Gator |
| Gator - Sunday, 12/05/04 14:32:21 EST |
|
Gator, For indoor use, electrolysis shouldn't be a significant problem. Unless of course, by indoor you mean in the shower. :-) Clearcoating will keep out most of the moisture, which helps retard electrolysis, and it will help to keep the copper from tarnishing for a while. For a while. The copper WILL tarnish, sooner or later, as it is a very active metal. I would probably leave the copper raw and figure on it tarnishing or polishing it every couple of weeks. |
| vicopper - Sunday, 12/05/04 18:53:09 EST |
|
Guru, what is the meaning of the "J2" suffic in the designation of Type 420 J2 Stainless Steel? How does this added identification modify the characteristics of Tpye 420 Stainless Steel? In a response you provided in Nov."99, you stated heat treatment was crucial in the final properties of a product. Could the advantages of Type 420 be diminished by poor craftsmanship? If so, how much? Any help would be greatly appreciated. Thanks. Ron Garland |
| Ron Garland - Sunday, 12/05/04 20:08:56 EST |
|
Vicopper, thanks for the help...I appreciate it. Have a safe holiday. Gator |
| Gator - Sunday, 12/05/04 20:38:54 EST |
|
Anvil Identification: I've already checked in Postman's Anvils in America; but I thought I'd run this one by the assembled guruship. For some time I've been looking for a "smaller" anvil for demonstrations so I could leave my 70# (31.75 k) Mankel sitting fat, dumb and happy on its customary stump. Several months ago I came upon a small Colonial period anvil at the local flea market in excellent condition, given its 300+ years. A little swayback, but on the whole perfectly useable as-is. After some pinching of pennies over the last months and some bargaining I went ahead and purchased it at what turned out to be about $2 a pound. Now, I had an historic, small, lighter anvil to haul off to demonstrations, which illusion persisted until I went to load it in the car trunk (the truck being out of commission). Small, but heavy; especially for a skinny whimp like me! Very compact, this tool. I got it back to the forge and had to stand IN the trunk to lift it up, then eased it onto the skateboard and out into the late afternoon sunlight for further examination. It's pretty much a textbook case of a Colonial anvil: welded-on horn, no table, porter-bar holes fore, aft and below, no pritchel hole, small (3/4"; 19mm) hardy hole, compact feet and a lot of mass under the face with a very short projecting heel. Turning it at angles to the low sun enabled me to read the inscriptions rather easily. First of all, the weight was marked at 1*0*20 with the numerals terminated/outlined with dots; the first "0" was oversize and slighly irregular, and the last "0" had an intentional slash (/) through it. So, despite it's small size, the puppy weighed 132# (59.87 K) or about twice as much as I was anticipating! On the other side it is marked with a capital "R" with a serif under the vertical stave. Then, directly below that, it is marked "H||T" the two verticle lines being shorter and the cross line at the top of the "T" being about half as long as usual. Outside of those markings, there's no trace of anything, and the remaining marks are pretty prominent, with no "fade-off" from wear. I've diligently searched through Postman, and can find no inscription that these marks could be part of, especially on an anvil this early. I suspect the letters may have been applied by a later owner, but I thought I'd run it by y'all, since some of you may have come across something similar. So, I guess I'm all set if I want to portray someone from Paw Paw's "Revolutionary Blacksmith"! Another lovely day on the banks of the lower Potomac. Visit your National Parks: www.nos.gov Go viking: www.longshipco.org |
| Bruce Blackistone (Atli) - Sunday, 12/05/04 23:56:37 EST |
|
Gator, What did you do for your tendonitis? I guess it's an eventuality in smithing as is sinus trouble to a diver...I take lots of asprin and wrap with an ace bandage to get by but eventualy something will have to be done. Is yours cured? Ron C |
| Ron Childers - Monday, 12/06/04 08:54:30 EST |
|
420 J2: Stainless: People who have to work with Stainless Steels must get very frustrated at the whimsical and caprecious numbering system employed. 420 is a strange martensitic stainless that has no nickel, only high chromium and 1% silicon. The specs say it has a minimum of .15%Carbon, which is not enough for a good knife blade. Now the task gets harder, what does the J2 stand for? I could not find a reference that listed 420 J2, perhaps you could tell us where you found it. Regardless, many foreign steel mills modify US Grades (and vice-versa) and tack on an alpha-numeric prefix or suffix. Other domestic mills modify AISI or ASTM grades and do likewise. The lack of order in this numbering system is an embarassment to the steel industry. |
| quenchcrack - Monday, 12/06/04 09:55:16 EST |
|
I have a spec. that calls for heat treating material at 40C....does this cross over to a specific Rockwell Hardness? Thank you! |
| Pam Gaulin - Monday, 12/06/04 10:00:34 EST |
|
420 J2: I googled for 420 J2 and found a lot of pages listing fantasy blades made from 420 J2. I found one who actually said this was a JAPANESE SPEC and looked under JIS conversions and found there is no US equal to this material. As near as I can tell, it is 420 SS with about .40% Carbon. This is on the low side of what makes a good edge but it would be extremely tough, explaining why so many repro SOOORDS are made from this stuff. I would not personally recommend this carbon range for good edge retention. Pam, 40C as in Centegrade or 40C as in Rockwell 40C ? |
| quenchcrack - Monday, 12/06/04 11:20:43 EST |
|
40C: Pam, There are three Rockwell hardness scales used for different purposes, A, B, C. Normally they are expressed as ##Rc ##Rb ##Ra. 40 only exists in the C scale. So if they meant Rockwell hardness then it is 40Rc. See our hardness comparison chart. |
| - guru - Monday, 12/06/04 12:26:23 EST |
|
Hey Ron, I got it so bad in my hammer arm, I almost sold all my stuff. I pretty much took a few months off and let it heal up real good, I wear one of those elbow wraps that have a tension strap over your forearm...that helps alot. I also don't push it any more...if it starts feeling bad, I move on to a non-pounding phase of the project. I'm planning on building an air-hammer to take care of more of the pounding as well. Take care...Gator |
| Gator - Monday, 12/06/04 12:37:53 EST |
|
tendonitis I have minor tendonitis in both arms, the PT gave me some velcro/foam rubber bands, that I put on when ever I do lifting etc. His comment was put them on when ever it's going to hurt. |
| - Hudson - Monday, 12/06/04 12:41:41 EST |
|
420 SS is commonly used to build plastic injection molds where corrosion is an issue (like molding PVC). We would buy it in blocks around 45 Rc and machine it using EDM. It is not considered a high hardness steel but is better than some of the softer grades. |
| - HWooldridge - Monday, 12/06/04 13:19:06 EST |
|
Made In russia Actualy By central forge Sorry about the mistake |
| Michael - Monday, 12/06/04 14:08:38 EST |
|
"Central Forge" This is a Harbor Freight branding and has nothing to do with the actual place of manufacture. This branding is applied to items from China, Korea, Taiwan, Eastern Europe, and probably Pakistan. |
| - guru - Monday, 12/06/04 14:24:37 EST |
|
Gator, At our meeting last month there was a youngster that stood in rapt attention during two demos. Both he and his mother asked lots of questions which indicated they had read up on the subject. The kid then asked me to show him how to do something- how could I refuse? Especially since his pretty mama was with him. Anyway, there went the "rest period" for my elbow. I showed him how and he did his own project, or it would have been really bad. Are you one of those Gainsville Gators? |
| Ron Childers - Monday, 12/06/04 14:29:35 EST |
|
Ron, I had a very similar experiance this weekend at Paw-Paw's demo. A bright teenager and his mother. The young fellow had been studying and knew quite a bit of metalworking terminology. It was a night demo so we could not do much. He got to pump the belows, stike hot iron while I held it. He had a great steady rhythm so I could turn the work and he could see how it should be done. He also got to make a bunch of twists. Brian Cornish sent photos of his son Tyler brazing as he learns to use a torch. Lots of bright kids coming up in the ranks. The next generation of smiths is really going to be something. Lets hope we can hold the economy together for them. . . |
| - guru - Monday, 12/06/04 15:08:57 EST |
|
Old Anvil Markings: Bruce, It sounds like an owner's initials. This was fairly common to do in the 1700's. One hint is the serifs. The punches used by most manufactures of the time did not have serifs as they took more force and were prone to wear. Hand engraving often had serifs. The size/weight issue is a common surprise on these early anvils. That compact mass is really deceptive when one is used to looking at modern anvils. |
| - guru - Monday, 12/06/04 15:21:22 EST |
|
Dear anvilfire Guru, I am interested in being able to make simple square or rectangular metal hinges for myself. Is this something that I can get into easily using a few tools and some sheet metal or is it more involved than that? If it is relatively easy, can you please point me in the direction of some tool suppliers (online or in SE Pennsylvania)? Thank you. Christopher Josten |
| Christopher Josten - Monday, 12/06/04 15:49:11 EST |
|
quenchcrack, thanks for the information on 420 J2. I suspected the J2 indicated a Japanese variant. I have collected knives for years, mainly for their apearance, and have noticed an increased reference to this designation. I attempted knife making some time ago, by the reduction method, but gave it up after all the hard work. The attempt did help me appreciate the craftsmanship of the products I see or buy. In an earlier response to a post on "Sword Making", the amount of expertise and work involved in the process was pointed out very well. The metal forming process is critical, though sometimes hidden in the end product, whereas the craftsmanship is readily apparent. So, the bottom line is, we have to take the manufacturers word that a product contains a given material. But it sure helps to understand what they are trying to say. The other reference I see alot is "Solingen Steel." The knives I have that have "Solingen" etched on them seem to be of better quality. Again, thanks for the help. It is appreciated. Ron Garland |
| Ron Garland - Monday, 12/06/04 15:53:51 EST |
|
Guru, And the bright ones will learn faster than we did- If they listen,we have made all the mistakes for them and we have the best of the crop of youngsters. Juvenile delinquents don't care about stuff like blacksmithing. The late Bob Berryhill said "The anvil is a symbol of honesty".But that is a whole 'nother story. You are going to Madison in 05 aren't you? |
| Ron Childers - Monday, 12/06/04 16:01:18 EST |
|
Hinge Making: Christopher, Most hinge making is done with tools made by the maker, not purchased. Hinges are usualy heavier than sheet metal and are made of plate or bar. The most difficult part of the task is simply cutting the stock to size. If dealing with 1/8" or less material you can use a hacksaw and a file to make the blanks. Heavy shears like a Beverly shear, press or ironworker are also used. There are a variety of ways to make the hinge eye. Blacksmiths often just forge them rolling the eye by hand and hammer sometimes over a pin. Others bend the eye on a dending jig. It is also done in small shops the same way as in factory production by using a press. See our iForge demos #24, 90 and 91. See also #162 on press tooling. |
| - guru - Monday, 12/06/04 16:13:06 EST |
|
SERBC '05, Madison: Yep, probably will as that is not too expensive for me and I have a road worthy vehical now. I would also like to go to CanIron in Nova Scotia next September but that will be an expensive trip. |
| - guru - Monday, 12/06/04 16:25:16 EST |
|
Hinges: Chris when you say this to a blacksmith he immediately thinks of hanging the castle gates. Light hinges for cabinet work can be made with 1/16" brass sheet, some silver solder, a jewelers saw and a propane torch. Fine Woodworking printed an article on this in one of their books - dont recall which one. |
| adam - Monday, 12/06/04 16:48:19 EST |
|
Polite kids, Pretty Mamas Hard to pass on that! My 13 year old loves the shop, he's a big help...hard to keep him from doing too much, too soon. But it keeps him from wanting a Playstation...that stuff is just electronic reefer. (my opinion, no disrespect intended to people who like it). Ron, I'm a Plano, Illinois, gator. Figure that one out! Take care of your arm partner.... Gator |
| Gator - Monday, 12/06/04 16:52:39 EST |
|
Guru, thanks for the reply. (I'm a beginner in case you couldn't tell.) I looked at the demos and learned from them. It seems as though I will have to learn some things about welding first so that I can make my own die in which to form the hinge eyes. Perhaps not though - The first hinges that I would like to make are 2.5 inch square hinges made from stock that is less than 1/16 inch thick. Are there shearing/punching templates available for cutting the hinge leafs (and attached knuckles) from stock with accuracy? |
| Christopher Josten - Monday, 12/06/04 16:54:36 EST |
|
Guru! I have two questions. My little propane forging furnace (Whisper Baby) is about 7 yrs old and no longer heats hotter than an orange heat Any ideas/suggestions? Also. I was drawing out a 1/4" bar of 440C over a bottom fuller at orange heat when the bar cracked along the fuller dent. What's the problem? How can I avoid this in the future? Thanks, Nick |
| nick - Monday, 12/06/04 18:53:27 EST |
|
Christopher J.: For that size stock you really don't NEED dies. They are handy, but you can roll the eyes cold around a pin using a small hammer. The way to figure out how much stock to leave for the knuckles involves good old geometry. Given that you want a round eye for the pin, and thus are trying to roll a circle, you want to leave enough stock to roll a circle of the same diameter as your pin, plus a half hair for room to play. Since circumference = pi x diameter, multiply your pin size by 3.1415927 etc, and there's your length of flat stock to leave. As for how to get it to look pretty once you have the measurement, that depends on your skills with a ruler and a scribe, plus how you cut out the knuckles. On small hinges I have been known to drill out the waste, chisel the outside corners, and then file to the scribed line. You can use a jeweler's saw if you have one, or a hacksaw, but getting that inside bottom flat part can be a tough one. A small cold chisel on a block of hardwood end grain can really speed things along there. |
| Alan-L - Monday, 12/06/04 19:31:36 EST |
|
420 J2 stainless. I saw some knives today that were marked 420HC in a big box. Having worked with the 400 series alot, this one puzzled me as I knew 420 was low carbon. I guess that the big name American knife maker had copied 420 J2. Now 440C is a good knife material. We use lots of 1" bar, and many guys were making blades by milling to a flat stoke. This was prior to my having a forge. We scrapped alot of the stuff as bar ends. Wish I had some now. |
| ptree - Monday, 12/06/04 20:37:08 EST |
|
Christopher, For small hinges like you've described, you can readily make them with simple tools. For the barrel of the hinge, you want to allow a bit more stock length than Alan said, though. Use pi times the outside diameter of the hinge barrel, plus a smidgen for play. That will be pi times the diameter of the sum of the pin diameter plus twice the thickness of the stock. You can roll the barrels on the two leaves as full length and then cut the segments out with a jeweler's saw afterwards, or you can cut the segment first and then roll them. For small stocksuch as 1/16", I would roll the whole barrel then cut, but you may find it easier to roll shorter segments. If you choose to do that, you need to do a careful layout. If you're making more than one or two hinges, start by making a template for each hinge leaf out of thin brass or steel. Coat the surface of the template stock with a black Magic Marker and then carefully measure and scribe the layout lines using a machinist's square and steel rule or (better) dividers. Then saw/file the barrel segments until the two hinge leaf templates will mate together perfectly. Now you can use them to mark as many pieces of steel as you want, using the same method as you did to make the templates. When you roll the barrels, be sure to get a nice clean roll right at the end of the metal. If you don't start out that way, you won't be able to tighten up the barrel later on. If you want the barrels to close up with a hairline meet at the join, then you need to angle the end of the barrel stock enough to match the arc tangent. Brass is a good material to learn on, as it is somewhat easier to form. You can make a "drift" to open up any little tight spots in the barrels by tapering the ends of a piece of rod the same diameter as your hinge pin, and long enough to drive through the barrel and out the other end. If the drift has a cylindrical center section at least as long as the hinge barrel, you can hammer the barrels some with the drift in place to open them up. If any of the taper of the drift is inside the hinge barrel when you hammer it though, you may swage down the barrel enough that the drift won't ever come back out. Some jewelry making textbooks have decent instructions for making hinges like you're thinking of, check your local library. |
| vicopper - Monday, 12/06/04 20:39:08 EST |
|
i want to replace the tention spring on my power hammer,can you give me all the specs i need,my hammer is called the canadian giant 25lbs,i believe was made by the jardine co. thank you |
| paul - Monday, 12/06/04 21:21:00 EST |
|
Paul, You might check with Sid Suedmeier of Nebraska City, Nebraska. Ph402-873-6603. He rebuilds hammers and has a spare parts list. Very knowlegeable. |
| Frank Turley - Monday, 12/06/04 21:33:55 EST |
|
Old Anvil Markings: Thanks, Jock. It very well could be an engraved initial over a name. I'll take another, closer look; who knows, it could be a local name, since it's not unusual for families to lurk about for 300-400 years. I promise; I'll take good care of it! |
| Bruce Blackistone (Atli) - Monday, 12/06/04 21:45:05 EST |
|
I meant "...lurk about in one place for 200 to 300+ years." I wouldn't want to exagerate! ;-) |
| Bruce Blackistone (Atli) - Monday, 12/06/04 22:13:43 EST |
|
Elbow tendonitis: "Band-It" makes a good plastic and velcro wrap for tendonitis that still sllows good blood flow. A great exercise to help the healing and prevent it from coming back - pinch all fingers and thumb together. Put a rubber band around them (I find the purple bands from brocolli bunches works great) and open and close your hand. This works the flexors muscles which rarely see any action and thus an imbalance forms. I got rid of me tendonitis this way. I keep some rubber bands in my truck and work out my hands while I drive. |
| dief - Monday, 12/06/04 23:08:40 EST |
|
Where can I purchase a large piece of the type of insulation found in Forgemaster gas forge doors and what is it called? |
| mike - Monday, 12/06/04 23:27:48 EST |
|
am restoring what i believe to be an old champion forge assembly. it has the blower mounted underneaath and is operated by a wood handle. it has 150 embossed on the blower and the bottom of the forge (the only markings found so far). i have a few questions. what is the approx. age of the forge ass'y? what grade/type of babbit are that blower bearing? how do i replace them since they are what appears to be poured bearings? any help will be greatly appreciated. thanx, kirt |
| - kirt - Monday, 12/06/04 23:42:16 EST |
|
Springs for a Jardine. Paul, Dave Manzer told me he's never seen two springs for a Jardine that are the same, and that the ones from the LG don't work. Your going to have to get a springshop to make you one. If you have your old one and it is the correct one you have the wire size and number of coils needed. Block up your ram and adjust the toggles till they are exactly the same length and are perfectly horizontal. Then measure how long the spring needs to be. Take that measurement and the old spring to a springshop. Also if you don't already have it get Dave's video on how to cure the tap miss bang blues availible in the anvilfirestore, or direct from Dave if your in Canada. I hope this helps. |
| JimG - Tuesday, 12/07/04 00:12:20 EST |
|
Paul this is the size of the spring on my 25# Jardine O.D. is 2 1/2", I.D. is 1 1/2" and length is 4 1/2", Wire Dia. 1/2" number of coils 6 1/2 closed and ground. Our group ordered 10 of these from City Spring in Edmonton and they mainly went on 25# Jardine hammers, but also fit a couple of 25# LG's. The last time I had my hammer apart I noticed the spring was 4 3/8". Your mileage may vary. |
| - Daryl - Tuesday, 12/07/04 01:55:39 EST |
|
CHRISTOPHER;I've made brass hinges for small wooden boxes out of brass sheet and 1/8" bore tubing. The tubing was silver brazed to the edges of the sheet pieces. Do the brazing on a good, flat firebrick to assure a flat bottom surface. A piece of 1/8 bronze brazing rod with a head peened on one end served good 'nuff for the hinge pin. Before heading the pin, you might want to chuck the rod up in your drill motor and let it spin in a piece of fine emery paper to ease the fit into the tubing. To keep from having blobs of silver braze alloy around the joints, I hammered the alloy wire down flat and thin and cut it in little tiny squares, to be placed along the joints along with a few drops of green Banter's flux. If your joint edges are clean and the fitup is tight, the alloy should flow nicely. If you're buying standard 55% silver alloy wire be sure you get "cadmium free" especially if the hinges are going to go on food containers. If you get jeweler's sheet solder, cadmium is not an issue. |
| 3dogs - Tuesday, 12/07/04 04:14:31 EST |
|
3dogs, vicopper, and Alan L. - thanks for your help! |
| Christopher Josten - Tuesday, 12/07/04 12:12:53 EST |
|
Hi, You have a very informative site here, very impressed. I was wondering if you had ever heard of I.R. and F. Co., Anniston, AL. My Dad picked up an anvil with that name on it but can find no reference to the company in his library. Just wondering if you might know when made or even if it is an import with an american name to fool us. |
| Fred - Tuesday, 12/07/04 13:24:15 EST |
|
Forge Door Insulation: Mike, If the Forgemaster uses blanket type material like NC-TOOL does then it is Kaowool. We sell it by the foot, 10 foot and 25 foot case in the anvilfire store. Most forge door insulation is 1-1/2" or 2" material. Due to cost all we carry is 1" as this is the most common thickness. For building forges and furnaces it is doubled to get 2". It can be glued with ITC-100 for forge doors. For kiln walls that are often 6" thick the 1" is accordianed and sewn together using stainless or inconel wire. |
| - guru - Tuesday, 12/07/04 13:25:32 EST |
|
I.R. and F. Co.,Anniston, AL Fred, I have no information on this one and neither does Richard Postman the author of Anvils in America. There is lots of industry in Anniston and several foundries. Without more information (size, image) it is impossible to tell. Many places make cast advertising anvil paperweights of various sizes and almost every small foundry in the country has made small bench anvils at one time or the other. Neither are serious tools. There are also many low production anvils made for farrier schools as well as individuals making anvils. |
| - guru - Tuesday, 12/07/04 15:08:18 EST |
|
Replacing Poured Bearings: Kirt, The manufacturer of this equipment has been out of business for quite a while. It could be over 100 years old but most likely around 80. Many models of these forges were made well after improved replacements were listed in the catalogs. There is no information available as to alloy grades. Poured bearings are replaced just as they were originaly made. The old babbit is melted out, the shaft OR a dummy mandrel is aligned in the bore, damming compound and shim stock used to close off the bottom, the whole preheated and babbit poured. Most babbiting was done around a sooted shaft the soot creating clearance for oil. Oil holes were drilled and oil grooves carved by hand after pouring the bearings. Many babbit bearings were also poured undersized and reamed to a finished fit. Many old books on machine work have details on babbiting and there are also some reprints available from Lindsey Publications. |
| - guru - Tuesday, 12/07/04 15:29:37 EST |
|
More about Hinges: I used to do repairs for a local antique dealer that specialized in 18th century antiques. One of the jobs she brought me was a small jewelery box with broken hinges. The hinges were made from about 1/32" material and were forge welded! I repaired them by careful torch welding and filing. . . A surprizing number of very small items were forge welded. Often this small work was relagated to women as cottage work. As part of the British or European cottage industry they made everything from tacks, chain, small hinges and files. In England all chain below a certain size was made by women. However, there were also women that worked in the chain factories producing large chain. |
| - guru - Tuesday, 12/07/04 15:38:40 EST |
|
Could you please inform me on regular cost/prices of forge work? How much would the time consumed cost? If it is piece work, what is the cost difference from a horseshoe to a chain mail suit? Also, if I could get a rough estimate of how long it takes to make items, it would be a great help. Thank you. |
| Thomas Pascal - Tuesday, 12/07/04 18:07:53 EST |
|
Guru, don't forget the superficial Rockwell scales, R15N, R30N and R45N, plus Vickers and Knoop microhardness. The number in the N scales refers to the load in kilograms. Microhardness scales may use anywhere from a few grams to one kilogram. This is why is it critical to list the hardness WITH the scale used. |
| quenchcrack - Tuesday, 12/07/04 20:25:50 EST |
|
I am sorry if this inquiry seems a little out of place, but I can find no info elsewhere. I have a sterling silver spoon that is stamped, "PAT 1913 STERLING LL PEDDINGHAUS". I found it with a lot of valuable estate flatware. The only products I can find anywhere relating to Peddinghaus are smithing items. Can you tell me why this name might be on a silver spoon? Thank you so much for your consideration. ~Ellie. |
| Ellie - Tuesday, 12/07/04 21:12:36 EST |
|
Today we poured the foundation for the new 9" upsetter at work, a solid block of 100 cubic yards. With the clutch pit etc this is a 140 cubic yard total! Embedded 2" x 4" bearing rails. Maybe half a ton of rebar. I did talk to our resident upsetter expert, and for those wanting their own little upsetter, he said the 1" and 1 1/2" is a plug and play set-up. Takes a 25,000# forktruck to move but wire up the 20 Hp motor, load the dies and start banging! |
| ptree - Tuesday, 12/07/04 21:34:27 EST |
|
Vic, I DID say to leave a half-hair to play with! |
| Alan-L - Tuesday, 12/07/04 21:48:19 EST |
|
Thomas, Is this cost-estimating a trick question? Or is it for homework? Whole books have been written about the subject. There are many methods. Years ago, I ordered a British book, "Business Methods". A brief outline of their suggestions would be to: Add YOUR TRUE COST of labor, materials, and overhead. Then take 30% to 100% of that sum, and add it back on the original sum for profit. The most difficult one is probably Labor, because if you're a beginner and/or a little unskilled, you cannot charge for learning time. You must guesstimate the man-hours as though you were a skilled worker. You can have a clue as what to charge for labor by checking what a skilled welder or unionized ornamental ironworker gets IN YOUR LOCALE. Steel material cost is the REPLACEMENT COST of whatever you pay per pound or foot-length for that material. An average of 7% material wastage is charged to the customer. Overhead cannot be calculated until you have been in business for at least one year. You can add up overhead from the previous year and calculate an hourly rate. Don't forget to increase your Labor and Overhead a few percentage points each year because of galloping inflation. Having said all that, even an experienced hand will occasionally lose his or her buns by miscaculating, usually because of excessive labor and/or Murphy's Law. If you bill yourself as an artist, you can charge whatever the traffic will bear. |
| Frank Turley - Tuesday, 12/07/04 21:50:09 EST |
|
Christopher; The old way of cutting out hinges is with a hammer and chisel, hot is easier than cold of course. That requires a sacrifice plate to cut against but needs the least amount of equiptment. If you roll your hinge barrels hot around the same size stock as the hinge pins, then you can file to finished dimensions. You can probably fake the templates by taking a pattern off existing hinges. A small addendum to the tendonitis discussion.... Always lift palm up with the affected arm, never palm down...and Rotate your hammer handle grip so that your palm is toward the bottom side of the handle. Wear one of the pressure bands below your elbow that redistribute the load across the whole tendon cluster. Keep the hurt parts in motion, moving to the edge of discomfort and back, don't let them freeze up. Do reverse forearm curls as the injury heals with slowly increasing weight. It isn't necessary to be extra careful when you blow your nose.....usually. It is necessary to join the Cybersmiths and support Anvilfire. |
| - Pete F - Tuesday, 12/07/04 23:10:02 EST |
|
Ellie-- google tonight says Ebay lists, or has listed, a souvenir spoon for sale with the name LL Peddinghaus on it. Perhaps the same name might have been on the spoon you have because a company by that name might have made it. |
| Sebastian Chippinghammer - Wednesday, 12/08/04 00:48:21 EST |
|
Peddinghaus: This is a large and popular industrial name in Germany and Europe. In blacksmithing there are "Three Houses of Peddinghaus." Peddinghaus the hand tools reseller Ridgid Peddinghaus anvils has no business relation to the hand tool reseller. Then there is the Peddinghaus machinery manufacturer, again, no relationship to the others. They produce the ironworkers and other metal working machinery. There are probably many more but I am not familiar with them. |
| - guru - Wednesday, 12/08/04 11:29:13 EST |
|
How hot does metal usually have to get before it can be worked into a shape? |
| - Jak - Wednesday, 12/08/04 12:15:01 EST |
|
Guru- What type of metal would you recommend for modern sword and knife forging? I'm just starting blacksmithing, and I'm having trouble deciding what to use. |
| - Silver Fox - Wednesday, 12/08/04 12:19:50 EST |
|
Pricing Ironwork: Thomas P, As Frank pointed out this is a difficult question. Ironwork is one or all; art, craft or industry. As an art the creative aspect may be priceless and is only limited by what the customer can afford OR what the artist is willing to take (often at a loss). As a craft the price should be based on the quality of the work as it varies greatly. As an industrial process the price is determined by cost plus a profit. The cost including everything from the daily market prices to energy, labor and insurance costs. Artists and craftsfolk SHOULD use industrial accounting methods to determine the MINIMUM they should change and then add a profit over their labor. However most do not have a clue to their real costs more often than not charge less than they should. I recommend to small shop owners that are fairly well mechanized (competitivly) that they need to charge $100/hour in order to make a middle class living in the United States. This soulds like a lot but is rapidly chewed up by the low productive time of the self employed (50% max), costs of operation, taxes. . . And THERE is the crux of the problem. Your expected living standard. The worker in North America that expects to have a decent small truck, live in a warm comforatable home, have a TV, computer or other non-essentials, take weekends off. . MUST charge a great deal more than the Asian worker that walks everywhere, lives in an unheated hut without electricity and works in a "shop" sitting on a dirt floor using the minimum of tools. When your suit of maile was an essential item it was made by a cottage worker filling in durring the winter when they did not work the fields. The standard of living was low as well as labor costs. The suit of maile may have taken months to complete but required little skill or education. But the cost of materials were quite high. Today, when a suit of maile is a non-essential they are often made by hobbiests that put a low value on their time The cost of making a horseshoe is very little and it only takes a few minutes. However, there is a higher level of education required to install that shoe AND in the case of thoroughbreds and race horses that are VERY highly valued there is an element of risk that must be considered by the farrier. In this case it is not the value of the services as much as what the worker does NOT do. What is it worth NOT to maim a million dollar race horse? Depending on the class of work things like railings are estimated at $150 to $400 per running foot. If the rail is to be 100% hand forged and very artful it may cost more. In the matter of pricing hand made goods there are no easy answers. |
| - guru - Wednesday, 12/08/04 12:56:52 EST |
|
Jak, YOur question is difficult to answer because it is so broad. There are many type sof metals, all having different working characteristics. All the way from antimony to zinc, with working temperatures anywhere from below zero to above 3000�F. Mercury, for example, is liquid at room temperatur. If you want it to hold a shape, it will have to be below its freezing point, or lower than -38�F. Tungsten, on the other hand, remains a solid up to more than 6,000�F. The metals commonly worked by blacksmiths are usually worked in the range between about 900�F and 2100�F. Copper alloys are hot-worked between about 850�F and 1350�F, depending on the alloy. Common mild or low-carbon steel is worked between 900�F and about 2200�F. It is not very workable until it reaches a heat of about 1550�F, though. Higher-carbon steels, and special alloy steels have narrower working ranges, and are specific to the alloy. You can find out more information by doing research in ASME and other technical texts. The simple answer to your question is, it must get hot enough to become sufficiently plastic to be worked by the methods available. |
| vicopper - Wednesday, 12/08/04 13:04:31 EST |
|
How Hot? Jak, It depends on the metal. Precious metals like gold and silver and soft metals like copper and tin are predominatly worked cold. But they are also melted and cast into molds. Melting Points: Gold 1945°F (1063 °C) Silver 1761°F ( 961°C) Lead 621°F (327°C) Tin 449°F (232°C) Copper 1981°F (1083°C) Brass 1616 - 1823°F (880-995 °C) Bronze 1841°F (1005°C) Aluminium 1220°F (660 °C) Iron 1990 - 2750°F (1093-1510°C) Metals like iron, brass, bronze and aluminum are commonly hot forged. The forging temperature varies for each and even steel is forged at different temperaturs as noted by VIc above. Brass, bronze and aluminium are all forged at some temperature a few hundred degrees below their melting points. In normal light these temperatures are too low to see a red glow. Steel is forged at a temperature that is red to yellow in all but the brightest light. |
| - guru - Wednesday, 12/08/04 13:22:00 EST |
|
Bill Gichner We just received word that Bill Gichner passed away during the night. He lived 91 fruitful years, and will be greatly missed. A funeral is being planned for a synagogue in DC sometime Friday. I will let you know when I know more. Please pass this information on. Judy Boone |
| - guru - Wednesday, 12/08/04 13:23:42 EST |
|
Bill Gichner: For those of you that do not know him Bill was one of the first dealers of used blacksmithing tools and machines in the modern era. He was a finder and a wheeler dealer. He has often been known as Wild Bill Gichner but perhaps better as the notorious Bill Gichner for his high prices. His shop in Rehoboth Beach, Delaware was a meca for smiths all along the East Coast. For a number of years the Bill held a January hammer-in there with the Mid-Atlantic Smiths. In recent years the Bill Gichner hammer-in was held on a farm where there was more space. In the 1970's he traveled in a large van buying and selling anywhere he could. He knew the value of tools and would rarely take less than his asking price. At the 1998 ABANA conference Bill had marked "See Bill Gichner for price" on dozens of antique tools that others were selling! When asked for a price, he charged a fee for for the appraisal! At the 2004 ABANA conference Bill spent the entire evening at the Uri Hofi invitational demo. Dozens of smiths launched their careers with equipment bought from Bill and as such he was one of the resources that helped make the resurgence of blacksmithing in the US possible. We shall all miss him. |
| - guru - Wednesday, 12/08/04 14:05:19 EST |
|
Bill Gichner Service: Service will be held on Friday at 1 p.m. at the Addis Isreal Synagogue in Washington, D.C. The Synagogue is located at Conn. & Porter St. N. W. Washington. If you need more information about the service or how to get there please call the Synagogue. Bill Gichner passed away December 8, 2004 at about 10 a.m. He went into a peaceful sleep with Bob Swenson beside him and a few minutes later breathed his last breath. |
| - guru - Wednesday, 12/08/04 14:50:05 EST |
|
Bill Gichner has passed away. Say a prayer for a fine man that supported blacksmithing from its revival days. |
| - HWooldridge - Wednesday, 12/08/04 14:48:26 EST |
|
Thanks Guru, and Vicopper. Your answers have proved to be invaluable. If I were working with metal to try and make any type of blade, though, what would I use? I think the most practical answer would be steel,wouldn't it? Say I was making a blade, most likely a sword. What tempurature would you recommend heating steel to make a sword of excellent craftsmanship? |
| - Jak - Wednesday, 12/08/04 17:30:04 EST |
|
Perhaps you can answer Silver Fox and my question in just one go-round. |
| - Jak - Wednesday, 12/08/04 17:43:58 EST |
|
Jak, Steel is not a final answer. There are thousands of different alloys, many good for knife making. Each has a slightly different heat range. Worked too cold, and some can fracture. Working too hot, on some alloys, and you have problems too. Others don't care. Try doing ASME research, but remember that no all mills use the same system for identification. Take a look at the FAQ page for more information on blade making. It is not a beginners project. |
| Monica - Wednesday, 12/08/04 17:44:16 EST |
|
I'm sure those of us who knew Bill have plenty of stories about him . Maybe later. He WILL be missed. |
| Dan tull - Wednesday, 12/08/04 18:18:31 EST |
|
Jak, I don't think Monica was trying to slight you by saying it's not a beginner's project. I've been pounding steel for a number of years now and still don't have the smithing skills to make a blade of excellent craftsmanship, so in that respect, I too am a beginner. True craftsmanship in the world of bladesmithing requires extensive knowledge of both the structural properties and behavior of the metals being worked because as Monica said, each alloy has it's own peculiar personality. Also, different bladesmiths have different ideas about what alloy makes the best blade, although I think most would agree that a high carbon content is important. The best thing I can recommend is reading some of the books given in the swordmaking section of our FAQ's. Eric |
| eander4 - Wednesday, 12/08/04 18:44:01 EST |
|
Jak and Silver Fox, When I demonstrate knife forging, I usually use water hardening drill rod which is a high carbon steel of about 1% carbon content. It comes in bars of round section and it comes scale free in three foot lengths. I begin forging it at an orange heat and stop at a low cherry red. It is available by mail from McMaster-Carr, MSC, Travers Tool, and places like that. Even though it is water hardening, you're supposed to use oil when hardening thin sections, as it helps to prevent warping. |
| Frank Turley - Wednesday, 12/08/04 19:44:43 EST |
|
I had the honor of knowing Bill Gichner for nearly 35 years as much more than just a merchant tool dealer. I've known his son-in-law Bob, a master woodworker, since 1964. Bill's image as a flinty trader (see above) masked a kind and generous, vastly knowledgeable master blacksmith with a teaching forge in his shop, and who always had time to answer a question or find a needed tool, or book for me and my family. He indeed charged full freight-- because he knew what his tools were worth. He had used them in his family's famous ironworks for decades before opening Iron Age Antiques in Ocean View, Delaware. Requiescat in pacem. |
| John Neary - Thursday, 12/09/04 01:19:53 EST |
|
In memory of Bill Gichner, I submit one of his sayings. "The holding hand does as much as the hitting hand". |
| Frank Turley - Thursday, 12/09/04 09:30:45 EST |
|
Bill Gichner: Dan Tull mentioned stories about Bill Gichner. If you have one e-mail it to me and I will put a collection together for the next news. |
| - guru - Thursday, 12/09/04 11:20:14 EST |
|
|
|
|