| WELCOME to the anvilfire Guru's Den - V. 3.0 |
|
THIS is a forum for questions and answers about blacksmithing and general metalworking. Ask the Guru any reasonable question and he or one of his helpers will answer your question, find someone that can, OR research the question for you. This is an archive of posts from December 16 - 24, 2006 on the Guru's Den |
|
|
|
Fighting with weapons: Paul, When you fight with deadly weapons the object is to kill your opponent. When you put on a stage show (professional, amateur, historical, for fun or otherwise) the point is to NOT kill your opponent and NOT injure yourself, your opponent or innocent bystanders. There is a big difference in the tools for each job. Properties of steel are very subtle. Hard enough to hold an edge and cut through a variety of substances is harder than where the steel is its toughest. As soon as a sword stops being a sharp edged killing tool then toughness is more critical to its durability and safety than hardness. AND YES, the proper temper is more appropriate to that of a wrecking bar. |
| - guru - Friday, 12/15/06 23:58:03 EST |
|
Paint on Barrel Hoop: Bill, Carb cleaner will dissolve a lot of things but generally not paint, at leat not very well. Paint stores sell paint removers and that would be best. Paint remover will also cause a lot of corrosion on steel which might help match the rust. |
| - guru - Saturday, 12/16/06 00:02:31 EST |
|
Shelf Life: Khan, in OEM packaging these things have a virtually infinite life (longer than the packaging). Pure titanium is rarely used. It is almost always an alloy and in many cases plated. This is the wrong place to ask about implant life but the SS when properly heat treated and passivated should last many times longer than a human life. Corrosion is the least of the problems with any implant. Every part of the human body is flexible and changes with time. Metal parts do not. The body also does not like foreign objects and tends to push them out. However, there are platings that flesh does like to adhere to that reduces this problem. I am sure there are much better places to get a second opinion on this subject. |
| - guru - Saturday, 12/16/06 00:14:51 EST |
|
Swords for Differing Missions: No reply necessary, but just to reiterate- An actual war sword is designed to kill people and the materials and constructions all lend themselves to that purpose, even at the cost of some strength to the blade. The ideal war sword, of course, is a combination of sharp and tough, but the compromise is aimed at creating a deadly weapon. Not all of these blades will "break eventually" but a good proportion of them may, and you don't want to be in the neighborhood when they do. (Don't even mention the unfortunate floor of Union Station; probably why the Norwegian Embassy has not invited us back. 8-P ) Swords for movies, stagecraft and reenactments are meant NOT to kill people; they are meant to prevent dangerous breakage, so toughness is the greatest virtue, and looks the next consideration. Sharpness should not enter into the equation at all. Some folks will undoubtedly dispute this. You can usually tell them by their scars and/or missing digits. Cool and clear on the banks of the lower Potomac. Silt fence going in at the house lot. Visit your National Parks: www.nps.gov Go viking: www.longshipco.org |
| Bruce Blackistone (Atli) - Saturday, 12/16/06 00:27:55 EST |
|
Dang, I did it again! Must... learn...to...refresh...! |
| Bruce Blackistone (Atli) - Saturday, 12/16/06 00:30:31 EST |
|
Thanks again guys, you're an invaluable resource. Just a by note, that explains why the stage combat swords I've worked with(starfire is the brand) have a "dull"(probably not the correct jargon) finish, like an old steel hammer I have. I guess that is due to the constant oiling on both the hammer and the sword. The steel gets darker and darker with every oiling? A bit like an old pan I suppose, except that a pan is cast iron right? I hate to keep asking questions, but I was wondering something... I have a huge cast iron tub, the porcelain kind, that I took from a bathroom I remodelled(I pick up lots of metal and odds and ends in my business), and I'm wondering if it is good for anything besides taking to the scrap yard to shred. All the online resources I'm reading say that cast iron is useless pretty much. But I thought that there might be some use a beginner in metal work could put it to. |
| Paul Martens - Saturday, 12/16/06 00:57:09 EST |
|
Barrel Hoop: For removing paint I use red devil lye mix it with a little water apply to paint and within a couple minutes the paint can be hosed right off. but lye is hard to get these days as stores took it off the shelves for same reason as cold medicine apparently they use this stuff to cook drugs. but any way you can still get it on line just have to sign a waiver form. it is the best paint remover I have found.and a great degreaser also. |
| - Sharp - Saturday, 12/16/06 00:59:19 EST |
|
Cast Iron Tub: You can float down a river in one if You are carefull, if it is the "Crow Foot" type. Some people refinish them and might pay better than scrap price for one. |
| Dave Boyer - Saturday, 12/16/06 03:06:40 EST |
|
Cast iron tub: You could use it for a water quench tank, when the water gets too nasty just pull the plug in the drain and refill it. |
| AwP - Saturday, 12/16/06 04:08:16 EST |
|
Cast Iron: Cast has an amazing number of uses but is just not malleable so it is not very useful to the smith. Cast iron is formed primarily by its given name CASTing. Melt is and pour it into molds. Of course this is easier said than done. The secondary method of working cast iron is by machining or chip making. While we consider most chip making as a machine process today there was a period of about 100 years when cast iron was used for many machine parts and worked by hand with saw, chisel and file. Craftsmen made dovetails, sliding surfaces and the precision gauge blocks to make them flat by hand. In this process they produced the machines that eventually replaced the Iron Chipper and gave us the machine tools we have today. There are many applications where cast iron's lack of flexibility and vibrational dampening are valued. Today you can buy continuous cast iron bar, sawed plate and slabs for working in the machine shop. Today this is a cheap alternative to one off castings. |
| - guru - Saturday, 12/16/06 08:50:10 EST |
|
Frank, Racoons are native to North America, so if the Japanese used racoon fur in the bellows, it must have been after the 1850's (when they started trading with the US). |
| Mike B - Saturday, 12/16/06 08:54:09 EST |
|
Jock, there IS a certain amount of degredation that implant materials go through while in the body compared to outside. Of course the percentage of material loss is extremely low, but the human body is a hostile environment for anything. The softer plastics degrade way faster, I've seen PTFE literally melt in oral piercings, which is why I hold a staunch opposition to it's use in my shops. 316, 316L and 316LVM in my consideration are all fine for the body, I wear an example of each in my body every day. Too many companies tout their stuff as "implant grade" without even checking to see if the ASTM refers to it as such. I had a whole batch of piercing needles mislabelled as 316L, just to make the buyer feel "safe" with the product. I proved my point (pardon the pun) when I brought a heavy magnet to the needle packs and watched them jump off the counter to stick to the magnet. ALL hypo type needles are 440, hands down. Ti is overstated. |
| - Nippulini - Saturday, 12/16/06 08:54:10 EST |
|
Magnetism and SS. Nip, While 300 series stainlesses are supposed to be non-magnetic they often become so via work hardening. Cold drawn wire is a perfect case for this. |
| - guru - Saturday, 12/16/06 09:04:34 EST |
|
Materials Performance, Weapons and Musical Instruments: There are a great variety of high performance applications for materials. In these applications the materials are stressed to their maximum in order to get the most out of them. In racing and weapons it is to make them lighter weight. In musical instuments it is for greater volume of sound. In most of these cases it is common for the item to fail when pushed just a LITTLE too far. Acoustical stringed instruments create sound by the vibration of a string of limited mass. This mass must transmit its vibration to the greater mass of the sound board which by its large surface area transits an amplified sound. Violins, guitars and harps commonly self destruct from the tension of the strings on their very light weight sound boards. This is a very high performance application of wood and glue and they are built at the very limit of what the materials can stand. If made the slightest bit heavier for greater durability the sound would be weak and dull. Grams of mass make the difference between a fine instrument and an amateur attempt. Their construction is a gamble which for the value of their art we accept. In race cars everything is pushed to the limit. So much power is squeezed out of a given size engine that its life is usually one race of a few hours rather than years. Bodies are relieved of attachment panels and gussets so that with the slightest contact they rip off in ways that would be entirely unacceptable in family transportation. Weapons of hand combat are similar. Light weight, highly stressed for speed and agility. Light weight in order to increase the carrier's endurance as well as speed. Hardness to cut through opponent's armor at the cost of durability of the weapon. It is a gamble in a kill or be killed situation. It is a risk accepted by those that expect to survive by skill rather than hiding behind heavy immovable armour or fortifications. In steel it can be either very hard or very tough but not both at the same time. Every application is a compromise. But as frustrating as it is, steel is the strongest general purpose material we have. In any material when designing for high performance the weight of the object is one of the most critical aspects. Light weight you use as little material as possible. Less material almost always means less strength. |
| - guru - Saturday, 12/16/06 10:10:55 EST |
|
Cast Iron Tub, I went to a Lakota (Sioux) powwow in South Dakota, and they had a tub over a fire where they cooked a big meat stew to feed the entire camp. Mike B., You may well be correct about your dates and the racoons. I got that information from Yoshihara & Kapp's book.* On the other hand, sometimes the translations of Japanese words are difficult and/or erroneous. One example. I have heard that the sledge hammer hafts are made of Japanese "Cow Killer wood". The forging charcoal is of a Japanese "pine" or "red pine", doubtless a different red pine than we have in the States. For the tatara iron furnace, "pine and oak" charcoal is used. Without defining the taxa, genera, and family, using the international system, I would not be sure of how to identify the referenced woods. Re Jock's comments about weight, hardness, and toughness, the Japanese bladesmiths did the best that they could with the material at hand. The carbon content of their blades was not all that wonderfully high, probably not more than 0.60%, but by their hardening technique, they got a martensitic cutting edge, yet with a tougher, more yielding remainder of the blade, going into the back. Tai chi chuan swordplay is interesting to watch, if you've never seen it. An adept, a master, can make contact with his opponent's sword and "stick to it" by following the opponent's chi and body language. There is lots of bodily movement and swordplay, but the swords remain touching each other. If an adept senses an imbalance in his opponent, he can then separate and cut. * "The Craft of the Japanese Sword" |
| Frank Turley - Saturday, 12/16/06 11:54:49 EST |
|
Actually, the Panda (Ailuropoda melanoleucais) related to the raccoon,(Procyon lotor) not the bear. There is a related critter in northeast Asia, with reddish fur and a ringed tail known as the "lesser Panda"(Ailurus fulgens)The foregoing probably being more than most folks really wanted to know about 'coons. |
| - CHINESE 'COONS - Saturday, 12/16/06 12:09:15 EST |
|
OOPS (misplaced subject line) |
| - 3dogs - Saturday, 12/16/06 12:12:06 EST |
|
Mistranslation is quite possible, especially if the Japanese borrowed a word for something else when they first encountered raccoons. Even without that, translation's tough. I'm still not sure my wife understands the difference between "rat" and "mouse"; apparently the same word covers both in Chinese. |
| Mike B - Saturday, 12/16/06 12:26:41 EST |
|
Trees and Translations. In England what we in the US call a Sycamore is called a Maple. Big difference. I think Oak and pine are pretty well defined world wide but there ARE significant differences in varieties. But when you get into the rain forests of Central and South America there are trees most of the locals cannot identify. AND they have local names that mean nothing elsewhere, even in the same country. I tried to do a search on animals in Japan and only found those listed as rare. However, they have a variety of furry small animals who's fur could make a seal. These include the Snow Monkey and the Otter (now VERY rare or extinct). I doubt it matters what kind of fur was used. In many cases the treatment of furs is more critical than the type. |
| - guru - Saturday, 12/16/06 12:50:22 EST |
|
Metal folklore? I was reading a welding magazine recently, and read about a fabricator who built a stainless steel, life size giraffe. He claimed you could only heat and anneal stainless 3 times, before some unspecified bad thing would happen. I would like to clarify my own understanding of 300 series stainless. Would the metallurgically enlightened among us, Quenchcrack, Gavain, Ptree and Patrick, care to weigh in on this, and elucidate? I am of the understanding that two different heat related things happen when one forges stainless. Is it true that the entire piece of say, 304, will have a transformation between austentic and martensic states, caused by heating above a certain temperature, which can be reversed by quenching in water? I know that when I forge stainless, up to say orange heat, then quench in water, it anneals the metal. This makes it noticeably softer and easier to bend than mill finish cold rolled work hardened stainless bar. I can take two pieces of the same bar, and heat and quench one, and it will bend much easier than the as purchased material. The second thing I understand happens to stainless is at the surface of the material, when heated. As I understand it, to be stainless, and shiny, we want chromium oxide. When heated, the chromium instead combines with carbon in the steel, and makes chromium carbides. This seems to only happen at the outside of the metal, where it is in contact with the atmosphere. This is the blackening we see on heavily forged stainless. This black, carbide layer, can be removed either mechanically by grinding and sanding, or chemically by electropolishing, to expose a layer where the chromimum will bond with oxygen in the atmoshphere and make chromium oxide? I have done forgings where I start with a relatively massive piece of stainless, say a piece of 1 1/4" round 5" long, and draw it down to a 3/4" to 1/2" taper over 16", and then flatten the other end out into a 3" x 5" x 1/8" flat, to make a salad serving spoon, where I may take 20 or 30 heats to do so. In working it, I will quench it relatively often, just for ease of workholding. I have noticed no ill effects from repeated heating and quenching. I do end up with a heavily blackened surface, from all the forging, which, when I have the piece electropolished, comes out bright and shiny. So where does this rule of no more than 3 annealings come in? Is there any real change to stainless caused by repeated heats? Repeated annealings? Or do I only have to worry about the final surface, and if I electropolish that, is the body of the stainless still basically the same alloy and composition it started out as? |
| - ries - Saturday, 12/16/06 14:06:20 EST |
|
Racoosn are not native to Japan. Theydo have a creature whose name is translated "Racoon Dog." This critter has a tail that is ringed like a racoon's but his frtont looks doglike. I don't know the zoological classification of this critter. When a youn Japanese friend was visiting she saw a 'coon for the first time on my back porch. I saw a "racoon dog" for the first time at the kitchen door of her Japanese farm house in Northern Japan. There is a smithy in the Hachiman Shrine in her town, Tono. The box bellows does have some sort of fur on the piston. This shop is just as it was left when the wearing (and making) of swords was banned in Emperor Meiji's time. |
| - John Odom - Saturday, 12/16/06 14:44:05 EST |
|
I recently came upon an old barn-like structure downtown in a small city that I would like to make into a shop. It has wood framing covered by galvanized sheeting. I will need to get a use permit and satisfy the planning dept. that there will not be too much noise and fire hazard. The site is close by the highway running through town so there is a fair amount of automotive noise already, so it is not as though I would be a sonic earsore. I wonder how much noise level in decibels I should say will be thrown off into the neighborhood from inside a 50 by 100 foot shop when somebody runs a grinder or a power hammer? |
| brian kennedy - Saturday, 12/16/06 15:06:12 EST |
|
I have 3 shop buildings that are metal sheeting over a wood frame- and all three of them were easy to insulate and either sheetrock the inside of, or I put up OSB- strandboard. Insulation and interior walls will cut down on the sound by quite a lot, and its really hard to catch a wall on fire in a normal shop- I suppose if you were practicing your juggling of flaming torches, and you werent very good at it, it might be a problem. I did used to have my shop in a steel framed, galvanized skin building, with no insulation and no interior walls, and it was indeed quite a bit noisier, inside. But if the door was closed, it cut down on sound transmission too. Grinders are probably worse than power hammers, and compressors are worse than grinders- maybe we can get Grant to tell the story of the Great South Park Compressor War, of which he is a survivor- some people get awful grumpy about loud compressors, is all I know. Anyway, I recommend some insulation and walls- it will make it cooler in the summer, and warmer in the winter, and quieter to boot. |
| - ries - Saturday, 12/16/06 16:11:38 EST |
|
Brian, An angle grinder is like a skill saw and the noise is loud, piercing and travels a long distance. Stationary grinders are almost silent at a distance. The power hammer is hard to quantify. A tight hammer on a proper foundation makes very little noise. A loose hammer (100 to pound hammer) on a concrete floor may be heard and felt 100 yards away. Air hammers also have exhaust noise but this can be muffled. Can't say in decibels. You might want to visit someone elses shop with a meter. |
| - guru - Saturday, 12/16/06 16:18:17 EST |
|
Reis, I am not a metalurgist, and I am sure that the guys with the degrees will be well able to explain why, but to my knowledge there is no limit to the number of times 300 SS can be annealed. We typically used 316, and starting in about the late 80's, 316L. We hot forged the parts, and electropolished off the scale and color. We had strong reason to do so, as the black surface would allow "intergranular stress corrosion cracking to start and propogate in many of the chemical services our product went into. That was also the main reason for switching to 316L, as it allowed an easier weld from a properties after the weld. Much of our product went into the oil fields were the valves were specified for "sour gas" service, meaning hydrogen sulfide was in the oil/natural gas. Due to the strict specifications we had to meet, we were very careful about how we worked the SS after electropolish. Grinding with a wheel that had been used on carbon, or wirebrushing off a stick weld with a carbon wirewheel would cause the SS to rust, and we often had to scrap in that case. We also did solution anneal on a lot of the valves, and parts. I am not aware of any reason, or specification we had prohibiting number of anneals. We aimed for a grain structure, hardness and surface condition. As some of the specifications called for nothing harder than Rb-22, trying to get a valve stem or bonnet bolts to work was a trick. Truth to tell, I suspect that when torqued the soft solution annealed bolts would stretch until work hardening would allow the clamp stress needed to make the joint tight. I also suspect the bolts were also above Rb-22 at that point. |
| ptree - Saturday, 12/16/06 18:12:18 EST |
|
again about japanese blacksmthing and bladesmithing. i know the traditional forge of the smith was adobe, my question is... if i use refractory cement instead of adobe, will the forge be more efficient? thanks y'all Andrew B. P.S. i'm planning to build a japanese smithing site (next to my other site) in the near future and i'll send picture when i have it build |
| Andrew B. - Saturday, 12/16/06 18:33:08 EST |
|
Forge efficiency: Andrew, Forges and refractories are efficient in different ways. Refractory brick and cement is NOT particularly a good insulator. It DOES resist high temperature, abrasion and chemical attack. However it is dense and conducts heat well. If you need mass to absorb heat and hold it this is the way to go. Light weight insulating refractories such as foamed brick and Kaowool are high efficiency temperature insulation and do not conduct heat well and their low mass does not hold and radiate heat. However, they are prone to mechanical and chemical attack. Adobe, is roughly inbetween. It insulates fairly well but is not as delicate as insulating refractories. The Japanese were also experts in clays and used high temperature porceline (kaolin) clays as surface coatings for forges, furnaces and in their heat treating. |
| - guru - Saturday, 12/16/06 19:09:06 EST |
|
ries, I have not heard of the 3 annealing limit. I suppose the metallurgy police will be showing up to yank my PE license pretty soon. Heating an AUSTENITIC stainless to about 1800F-2200F will put the chromium carbides into solution and quenching it will prevent them from precipitating again. Chromium carbides rob the structure of the ability to form Chromium Oxide on the surface which protects the surface from corrosion. When chromium oxides are formed from forging, they need to be removed to allow the surface to be polished to the shiney surface we associate with stainless steel. They can be removed by grinding and polishing or by dissolution in acid. I see no metallurgical problems from repeated heating and quenching. Once you remove the gross oxides formed on the surface from forging, it re-oxidizes to create the passive surface typical of stainless steel. |
| quenchcrack - Saturday, 12/16/06 19:26:29 EST |
|
I have made dozens of pieces of jewelry from 316 and 316L. I usually work with stock 1/4" up to 1/2" and I notice that quenching hardens my work, which is a desired effect. Removal of scale is a pain, grinding, sanding, all that. I do not use SS only worktools, so theoretically my work would rust but it doesn't. My final polishing work is done by hand on a high speed buffer with white rouge, I do this at least 3 to 4 times in all directions before muslin wheel finishing. I get mirror polish results and have never had a rust problem. By the way, the original post that started this discussion involved "pure titanium", which is NOT used in ASTM implant material. I forget the designation, but it is an alloy of Ti and Al with something else. The only pure metal I've heard of and used in the past is Niobium (an old favorite for the nipps). I had 4 gauge Niobium rings made that cost me $70 back in the early nineties. |
| - Nippulini - Saturday, 12/16/06 22:05:45 EST |
|
Ries: In adition to what the others posted: Carbon in the alloy can form chrome carbides anywhere in the alloy if it is held at temperature long enough for them to form. If You are starting with low carbon alloys, then the problem likely comes fron added carbon, and would be of limited depth. I never heard of the 3 time limit, but it MAY have merrit in that continued careless heating in a carbon environment might add more carbon and add it to a greater depth. Some welding filler metals use other elements that join with carbon more readily than chrome does, this tends to keep whatever carbon that is present from forming chrome carbides. |
| Dave Boyer - Saturday, 12/16/06 23:50:25 EST |
|
Nippulini, 6AL-4V ELI Titanium, ASTM-F136-98e1 is a common one for implants. Ti, Al, and Vanadium. CP2 is also sometimes used. The ELI is for low inclusions. Guru mentioned plating for better biocompatibility and tissue adhesion- I don't know about plating, but surface finish makes a huge difference. There's some good recent research showing that different types of tissue will adhere better to different surface finishes. It seems like most people use electropolishing and / or an acid etch to get the surface they want for the job. Are you passivating your 316l forgings? That should reduce your worries about rust (and contamination by rouge). Citric acid from your local cannery supply store or citrisurf is easy to work with and can be diluted and put down the drain. Last time I contacted Citrisurf they offered to send me a free sample- I bet a sample packet would last for a bunch of piercing jewelery. |
| - dave32768 - Sunday, 12/17/06 00:29:52 EST |
|
Zinc Safety - I would like to forge a number of ceiling hooks from large wood screws. So far I haven't been able to find anything that isn't galvanized or zinc-coated. Does anyone know a source for non-plated hardware, or a good technique for safely removing the plating prior to forging? Thank you! - John (aka Lord Maolcolm mac Donnachaidh) |
| Maolcolm - Sunday, 12/17/06 09:23:14 EST |
|
Maolcolm: Can you put your forge outside, when there is a fair breeze blowing and then stay completely downwind? |
| Ken Scharabok - Sunday, 12/17/06 10:14:27 EST |
|
Nippulini, The carbon from work tools issue is a surface effect and sanding, and polishing should remove most or all. The bigist issue we had was when a hot stick weld was wire wheeled . The still hot and soft weld zone was attacked with a super heavy duty pnuematic grinder with a 6 to 8" knotted wire wheel. The harder carbon wires would dig deeper and leave residue that showed up later, say days to weeks, often in the customers warehouse or work site. A definete no no to have a SS vale rust at the bonnet seal weld. |
| ptree - Sunday, 12/17/06 10:24:54 EST |
|
TGN, I cannot explain your ability to harden 316 since is is an austenitic stainless. The high Ni content will stabilize the austenite and inhibit the formation of ferrite and martensite. Repeated coldworking and reheating may have caused some ferrite grains to form, creating a duplex type structure that will form martensite when quenched. Or it might just be pure freaking magic! |
| quenchcrack - Sunday, 12/17/06 10:50:20 EST |
|
I can't explain it other than the possibility that small thin pieces do not react the same as larger solid workpieces. Although David Blaine was tooling around in my basement last week, so who knows? |
| - Nippulini - Sunday, 12/17/06 12:22:57 EST |
|
Ken, Guess you meant upwind? (grin). |
| Mike B - Sunday, 12/17/06 12:46:38 EST |
|
Maolcom: Vinegat will remove the electroplated zinc on hardware. Hot-dip coatings may require muratic acid (HCl). Muratic is nasty stuff and must be used with appropriate cautions. You can't leave the items in the acid or the steel will be eaten up too. Neutralize with Baking soda and thoroughly wash. Dilute the muratic 1:1, and it works better than straight as purchased at the hardware store. |
| - John Odom - Sunday, 12/17/06 13:47:48 EST |
|
Having trouble accessing store on laptop (shuts down internet explorer) On desktop when I try to buy, nothing happens? Thanks, Ray |
| Ray - Sunday, 12/17/06 18:24:34 EST |
|
Does anyone know where a set of prints can be obtained/purchased for a trip hammer? Thought about trying to build one. Any help will be greatly appreciated. Kirt |
| kirt - Sunday, 12/17/06 21:41:04 EST |
|
Kirt, You can get a seto f plans for a Kinyon-type simple air hammer from ABANA, for about ten bucks. Go to the abana.org website. |
| vicopper - Sunday, 12/17/06 22:31:35 EST |
|
Ray, Certain security settings on IE prevent our store from working. Under normal conditions it works with all browsers. You can call orders in if you like. Tomorrow is pretty much the deadline for deliveries by Christmas. |
| - guru - Sunday, 12/17/06 23:03:59 EST |
|
GURU do you have plans to make a coal forge ? what can i use as the blower? how do i prevent ash falling down on the blower? Thank you |
| markj - Monday, 12/18/06 06:06:26 EST |
|
markj, check it the plan file (you can get to it from the scroll menu at the top of this page) it has some plans. and to keep the ash from falling on the blower, i don't quite understand what you mean becasue normaly blowers are positioned about the same hight or above the leval of the forge and off to the side. conserning what kind of blower to use,i know some peopel that have made thier own great bellows and celtic wine skin bellows and jananese box bellows, (out of those three my opinion and my vote lie on the great bellows) most people i know use a standard hand blower(avaliable brand new at centaurforge.com) or with some patience you can find them used at flea markets and garage sales,or make your own bwllows or blower (just a bow with fan blades and a place for the air to come out) another great place to get old tools and such, is from people you know and people that your friends know. just put the blower/bellows on a pedestal, that is the right hight for you, (it's all personal, if your not comfortable in the shop then my guess is you propable won't be spending much time there.) After you have the forge and blower/bellows set up get some of that flexible tin tubing and connect them toether. As for ash/coke falling into the tubing, there is a thing called a tuyere (to-weer) it's basicaly a "T" pipe connected to the botom of the forge so that the tin tubing going to the blower/bellows is coming off the side. On the bottom opening in the "T" pipe you put a weighted covering so that when you need to you can open it and let the ash/coke fall through, but there has to be a covering on it or you won't get alot of air. hope that helped Andrew B. |
| Andrew B. - Monday, 12/18/06 09:44:58 EST |
|
Markj, There is a discussion of forge types and blowers from early last week. Just look UP. |
| - guru - Monday, 12/18/06 10:55:31 EST |
|
Guru if you were making some (PA) barn hinges that were about six or seven feet long would you use 5/16" stock or 3/8". the doors are cypress and not very heavy compared to oak say. and then how wide of stock 2 1/2" or 3". Somehow i think either would work. i think it may be more asthetics and have seen hinges of both sizes. |
| coolhand - Monday, 12/18/06 20:20:21 EST |
|
coohand, 6-7 foot hinges, I have made long barn hinges from 3/8"X3" steel before, and it seemed to by alittel weak, my doors were oak though, so that will probably workquite well for cypress. I'm asumming you nkpow how to weld. Make sure you complelty weld the ends of the hinges, where the 2 pieces meet. and not leave them butted together. And you should have yourself some strong study HEAVY hinges. hope it helps Andrew B. |
| Andrew B. - Monday, 12/18/06 21:35:20 EST |
|
Coolhand, The size you give should work. Normally these taper in both width and thickness. You can start out with a heavier hinge and rapidly drop the width after the first foot or so with a step or a scroll, then use a long gentle taper. Often on large doors three hinges are used. The only problem when using three hinges is getting all the pintles perfectly in line. If they are not then the door must flex and there is great load on the center hinge causing undue wear. |
| - guru - Monday, 12/18/06 23:54:43 EST |
|
Just a suggestion if you do use three hinges. When putting them on a door ot jam run a long length of the same size stock as your hinge pins through all three to align them. Then use those to set the other size. |
| Ken Scharabok - Tuesday, 12/19/06 05:52:34 EST |
|
will a piece of s-7 plate 1/4 thick make a good knife blade////? |
| - joe harrison - Tuesday, 12/19/06 09:19:12 EST |
|
joe, 1/4" is PRETTY DARN heavy for a knife blade unless it's either like a hatchet or a massive bowie knife, i normaly use 1/8" or thinner, i made a large hatchet from 3/16" and it works like a dream, as for the metal s7 is good for blades, not the best, but good non the less. Andrew B. |
| Andrew B. - Tuesday, 12/19/06 09:48:42 EST |
|
Long strap hinge. If using pintles, I have found that for "insurance", a long bolt or all-thread arc-welded or gas-welded to the pin-boss is more secure than a drive pintle. I forge weld the pin & boss first. I installed some last year where the �" bolts went through 10" thick door posts. Not to forget the use of flat washers. I made sure that I was far enough in from the edge of the door post (jamb) that I wouldn't get tear-out. If a drive pintle with barbs is used, it helps to reinforce the pilot hole join with builder's epoxy. I've been accused of "cheating" in using contemporary materials and techniques, usually by people who don't know a dang thing about blacksmithing. I quote my Arizona blacksmith friend, "I may be a blacksmith, but I'm not a stupid blacksmith!" |
| Frank Turley - Tuesday, 12/19/06 10:36:08 EST |
|
Joe, that sized piece could be cut, then forged into a thinner and more appropriate shape. Unless you plan on doing a LOT of stock removal. As far as the type of steel, I have no idea. I make my knives from scrap steels that I feel have a nice enough carbon content (Junkyard Rules apply). |
| - Nippulini - Tuesday, 12/19/06 13:10:34 EST |
|
Heavy Door Pintles: If you have access I prefer a threaded rod with nuts. I also prefer a top cap that anchors the top of the pintle pin as well as a reinforcing base plate. Then nothing can rotate and sag the top cap keeps water out of the hinge. |
| - guru - Tuesday, 12/19/06 14:11:40 EST |
|
I would like to repair a knife that has a broken tang. Would a brazed joint be sufficient? The blade is 5160. |
| - Donnie - Tuesday, 12/19/06 14:17:33 EST |
|
Donnie: yes, no and maybe depending on the details you didn't provide... Thomas |
| Thomas P - Tuesday, 12/19/06 16:40:08 EST |
|
Blades and TangsLots of unanswered questions in that post. Such as what type of tang, where is the break, how did it get broken and how do you know it is 5150? Most tang breaks occur where the tang starts. This is almost always due to too small a tang and sharp corners. These are design and manufacturing flaws which cannot be corrected and will probably not stay repaired with a braze joint. Most sketches of tanged blades show a small tang with a sharp corner and many people have made them this way. This is almost always going to break under high load. 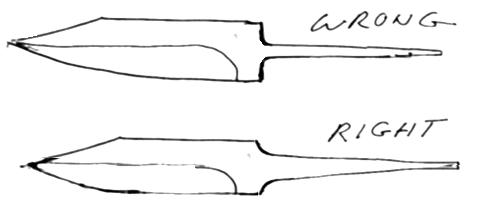 The thing about a small sharp or slightly radiused cornered tang is that it is easy to fit a guard over. A large radius is more difficult to make and requires matching the hole in the guard to the radius OR having a rectangular ricasso and a short notch for the guard almost as big as the blade. This works very well with silver soldered guards as the tang then blends out of both the shoulder of the blade and the guard. When a blade has a tang like the first example above they almost always break at the shoulder. Since a braze joint in steel is not nearly as strong as the base metal a repair at this point would be very weak. To repair this properly means taking a radius out of the knife as in the second drawing by grinding. Then the break will be some distance from the high stress area and can be welded or brazed. The guard would also have to be refit as well. Want to see the perfect tang? Look at most files. |
| - guru - Tuesday, 12/19/06 18:49:28 EST |
|
Wouldn't most welding techniques do well? |
| - Nippulini - Tuesday, 12/19/06 19:23:06 EST |
|
The blade was forged from 5160 barstock. The tang design was exactly like Guru's example of the wrong way to do it. I thought about making a notch about 1/4" into blade for tang to fit into, and then weld. I think I will weld instead of braze. Any thoughts on this would be appreciated. I think I will stick to blacksmithing after this is done! |
| - Donnie - Tuesday, 12/19/06 19:32:44 EST |
|
Welding: preheat, weld, postheat---repeat heat treat of blade, repeat cleanup of blade, repeat hilting of blade. Usually not worth the effort vs just starting over Thomas |
| Thomas P - Tuesday, 12/19/06 20:02:25 EST |
|
Pintle and strap hinges: I make pintles that are designed to go into either masonry or wood, using a tapered, square drive-in shank. The boss is made by stepping down the 5/8" square shank stock to 5/16" thick, wrapping and fitting to the pin. The pin usually, though not always, has a spade, leaf or ha'penny-end dropped tail with a screw hole. The pin is driven through the boss, aligned and forge welded. For wood, the shank is barbed; for masonry, I use a slower taper and lightly chamfer the corners. That fits a 3/4" hole just about right, and a bit of epoxy in the hole before driving in the shank ensures permanence. The dropped tail on the pin prevents any twisting of the pin and resists withdrawal if there is any problem with the shank. For wood jambs, I recommend step-drilling the holes or using a tapered reamer to approximate the taper of the shank. Done that way, there is very little chance of splitting the wood, and you get a more positive retention. This general design has been in use in the Caribbean for around three hundred years and seems to hold up well. So far, anyway. When making very long strap hinges, taper in both dimensions and be sure you have a fastener within six inches of the hinge barrel. For stock over 1/4" thick, there is no real need to weld the barrels, but I like to taper the stock end and forge weld it to the face of the strap. It looks nicer that way, but it pretty much rules out using my Streeter-type barrel roller to make the barrels. If you examine the forces at work on the barrels, you can see that welding is really unnecessary if the stock is sized appropriately. For any door leaf over three feet wide, you should really use three hinges. Proper manufacturing of the hinges and proper installation techniques will keep everything in line just fine. Use a string line and snap a chalk line parallel to the door edge and set the pintles to it. Then wedge the door into the opening with wooden shims until you have the appropriate reveal all around. (Allow a bit more reveal at the bottom to allow for drop under load.) Once the door is set, you drop the straps over the pintles, square them up and mark/drill your bolt holes in the door. Bolt it all up, knock out the shims and enjoy a job well done! Don't forget to put a dab of stiff grease4 on the pintle pins before you drop the hinge straps over them; it's much easier if you don't have to lift the door. (grin) |
| vicopper - Tuesday, 12/19/06 20:26:21 EST |
|
VICopper: In another 200 years people are going to wonder why there is old forged ironwork on St. Croix and and on all the other Virgin Islands there is none left. |
| Dave Boyer - Tuesday, 12/19/06 22:22:00 EST |
|
Not a chance, Dave. The old stuff is real wrought and mine is mild steel. You know which will last longer. (grin) But I surely do enjoy making nice stuff for the old buildings around here. I'm trying to talk one of the local churches into popping for some new main doors; local Mahogany, all custom ironwork with fancy hinges, locks, straps, grillwork on a Judas window, the works. I doubt if they'll be willing to spring for that expensive a job, but it sure would be fun to do! |
| vicopper - Tuesday, 12/19/06 22:48:50 EST |
|
Blade Repair Again: The method I roughly described does not effect the blade temper or finish (if it was finished) but DOES shorten it somewhat. Notching into the blade makes a visible repair that at welding heat would probably leave a significant heat affected zone. The weld filler metal will also not match the blade color and always be visible even if done perfectly. My method while shortening the blade hides the weld and puts it inside the grip in a hidden protected place. It also allows changing the tang design from a bad one to a good one with the weld at a point that is at least half the width of the blade. With an epoxy bedded grip the weld should see little flexing. In Damascus work it is common to have a very short tang with a piece of mild steel welded to it. This save the very expensive hand made metal and provides a soft durable tang. These are often forge welded on so that there is a long overlap of the two metals so that there is not a sudden change in material. When welding using other processes the high carbon steel wants to be reduced in hardness as much as possible to reduce the stress at the weld as much as possible. As mentioned, repairs of this type are hardly worth it. You might consider regrinding the blade into an entirely different smaller blade much as one would just keep chipping at a flint knife until the shape was right regardless of the size. |
| - guru - Wednesday, 12/20/06 10:15:16 EST |
|
Guru; while it's common for the manufactured pattternwelded knives to get a tang welded on; it is not nearly so common with custom made ones---there is usually plenty of billet for a tang---if you are making the billet! It is interesting to note that welded on wrought iron tangs were used in medieval weapons at times as the weld can be clearly seen in some of the museum pieces---an not the "cheap low status" ones either. The cost of steel was a lot higher than the cost of iron back then---even as recent as the American Civil War steel could be 5 times the cost of iron! Thomas |
| Thomas P - Wednesday, 12/20/06 12:33:46 EST |
|
RICH; I'd wager that The Good Rev would be happy to "let" you donate the work, though. Whatcha could do though is sit up the road a piece on Sunday A.M. with a radar unit and offer the speeding parishoners and/or tourists the option of 3 days in the Graybar Hotel, or a generous donation to The Door Fund. |
| 3dogs - Wednesday, 12/20/06 15:05:15 EST |
|
One thing I do is to purchase old handled hot cuts and then cut off the tip. A plate is welded on what remains of the head to become a flatter. A shank is welded on to the tip to become a hot cut hardy. Problem is cutting off the tip. I've tried annealing in the forge overnight but they still dull a bandsaw blade and will trip out the chopsaw a couple of times getting through. Have tried heating them as hot as possible in the forge and then chop sawing them that way, but isn't much better than cold and more than a little bit dangerous. Any low tech solutions? For example, is there a special chop saw blade designed for cutting tool steel? |
| Ken Scharabok - Wednesday, 12/20/06 18:27:57 EST |
|
Ken I've seen that done with old small sledgehammer heads---just pull the temper on the striking end---which can be done as part of the preheat for welding and no cutting needed. Thomas |
| Thomas P - Wednesday, 12/20/06 19:11:26 EST |
|
Abrasive Cutting: As with all wheels you want a coarse friable wheel for cutting hard materials. The softer and more friable the wheel the faster it cuts but the faster it wears out. If a wheel glazes and burns then it is too hard. The chop saw tripping out may be a machine with and undersized motor. Note that for heavy repeat use these should be water cooled. I looked up a few wheels and did not find satisfactory information about them. Search the various abrasive manufacturers until you find the full information before buying. What often happens with various resinoid wheels is folks complain about them wearing out too fast and dealers then stock harder long lasting wheels. Give me a SOFT fast cutting wheel any day! You go through them faster but TIME is much more costly than wheel life. |
| - guru - Wednesday, 12/20/06 19:53:13 EST |
|
Annealing tool steel will try anyone's patience. The alloys, especially the air hardening varieties, are designed to transform to martensite in heavy sections that naturally cool slowly. You might have better luck tempering the material as hot as possible for as long as possible. Stay under 1300F to prevent any austenite from forming. Any austenite formed when annealing will just make more martensite when it cools. |
| quenchcrack - Wednesday, 12/20/06 19:53:20 EST |
|
There's an unusual post vise on ebay, Item# 280061560059, the spring configuration is quite unique. Anyone know who made it? |
| Thumper - Wednesday, 12/20/06 21:14:48 EST |
|
Forgive my ignorance,,I dont understand whats so unique about this visespring. The bench mounting tab appears to be a home-made, But thats about all unusual I can see. |
| - Sven - Wednesday, 12/20/06 22:02:57 EST |
|
Well, OK The spring is sort of upside-down than the usual set-up, But that may be accounted for by the improvised mounting tab... |
| - Sven - Wednesday, 12/20/06 22:05:46 EST |
|
Thumper, The vise looks like an Iron City that had lost its original mounting plate, U-shackle, and wedge. Somebody jury rigged that upside-down spring and plate. The spring pressure should be near the pivot beam, because in that way, there is less throw (movement) to open the movable leg/jaw. |
| Frank Turley - Wednesday, 12/20/06 22:25:24 EST |
|
Thanks all, I just didn't know if this was a factory setup by some company I wasn't aware of or what. Since it was just a repair, seems like someone could have saved a whole bunch of work by following the original layout. |
| Thumper - Wednesday, 12/20/06 23:04:06 EST |
|
Ken - If You ever have a chance to get a high powered belt driven industrial abrasive saw GET IT. The portable saws are not powerfull or rigid enough to cut heavy sections of anything, let alone hard steel. |
| Dave Boyer - Wednesday, 12/20/06 23:08:42 EST |
|
Thumper: On obtaining a leg/post vise with a missing spring and bench mounting parts the devil in the detail is the latter. Replacement springs are easy to make. The replacement mounting parts needs to fit snuggly around the rear post, with ample area to secure down to bench top, plus some way to provide additional tightening between the bench mount and rear post. To do it properly it is really more of a machine shop job than DIY. On replacement springs I do them out of mild steel. I've found 1/4" by either 1" , 1/4" or 1 1/2" works for up to say 6" of jaws. Lengths are 10", 11" or 12", correspondingly. On H-D 6" jaws or higher 3/8" x 1 1/2" x 12" is more suited. After shaping heat to a dull red and quench. On cutting the handled hot cut heads, I do have a 220 volt, 12" table saw. Will try to figure out how to make a jib which will allow cutting a pass at a time. (And I am aware of the danger of mixing hot sparks and sawdust. Really just a matter of cleaning the saw before a different usage.) |
| Ken Scharabok - Thursday, 12/21/06 07:16:05 EST |
|
Vise Springs: On one of mine (for my own good, arbitrary, and capricious reasons) I forged the spring into an "S" so that the top end of the S bears against the moveable leg and the bottom is held by the bench clamp. It's stiff, which is a good thing for holding the jaws in position against the weight of the handle. At any rate, it works for me. On my tripod mounted post vise, a previous owner had welded (!) a coil spring (like a stretched garage door spring) to the base jaw, around the screw. This is weak and barely workable, and I had to add a leaf spring to get it to hold open more than a couple of inches. The upside-down mounting on the vise in question doesn't make a lot of sense; perhaps the seller had it in pieces and just reassembled it that way because the clamp had slid down to the bottom of the base leg? It does rather nicely illustrate why a standard spring mounting is �the standard.� :-) Cool and cloudy on the banks of the Potomac. I might do a museum crawl this afternoon, bibles from before A.D. 1000: www.asia.si.edu/exhibitions/current/IntheBeginning.htm (I'll try not to steal any to hold for ransom. ;-) Visit your natiomnal Parks: www.nps.gov Go viking: www.longshipco.org |
| Bruce Blackistone (Atli) - Thursday, 12/21/06 09:36:09 EST |
|
Leg vise mount. FYI, the currently offered eBay vise 230067516329 has the typical IRON CITY configuration. The wraparound portion and the splayed feet are of one piece. |
| Frank Turley - Thursday, 12/21/06 11:14:18 EST |
|
The reversed spring was common on some later vices. In fact the "traditional" spring mounting is just a parts and materials savings technique as the spring is held by the bench bracket and being long and low travel does not need to be made of good spring steel. On a stiff vise they often do not work well. The change was an "improvement" that could be used as a sales ploy on something that had not changed in hundreds of years. . |
| - guru - Thursday, 12/21/06 11:45:27 EST |
|
Abrasive cutting on the table saw: I strongly recommend against it! Table saws weren't made to have cutting swarf and abrasive dust run through their motors. Unless your particular saw has a TEFC (totally-enclosed, fan-cooled) motor, you're courting disaster. Most table saws have bearings and trunnion tracks that won't like that abrasive swarf, either. Check out Hougen Trak-Star�� abrasive blades for your chop saw. They're made for cutting railroad rail, a fairly tough material. Keep in mind, if you're buying metal-cutting abrasive blades, they all use aluminum oxide for the abrasive. The difference is in the particular form of the Al2O3. SOme form break down to smaller grains easily, some with more difficulty. Also, the fibreglas/resin substrate may be either hard or soft. As the guru said, soft, friable abrasives make for faster cutting. They also make for less loading/glazing. If you wan ta real frustration, try using a masonry blade for cutting steel. They use silicon carbide as the cutting medium, but they tend to glaze immediately when used on steel. |
| vicopper - Thursday, 12/21/06 15:55:57 EST |
|
Abrasives on a table saw: DON"T. For the reasons stated above, they ruin a tablesaw in a hurry! Merry Christmas, Happy Chanuka, Happy Holidays and or enjoy the winter solstice! |
| - John Odom - Thursday, 12/21/06 17:39:18 EST |
|
The big abrasive chop saws I have seen used for cutting tool steel were mostly Everit's and one thing is that a 20" will typically have at least a 5Hp 3 phase drive motor, with a long feed lever so that the feed pressure can be maintained. One drawback to coolant is that many of the tool steels will quench at the end from the coolant and get harder than woodpecker lips. We bought a cold saw for the tool room for just this reason. |
| ptree - Thursday, 12/21/06 19:06:42 EST |
|
Tried table saw and it didn't cut cold any better than chop saw. Tried chop saw on really hot heads and it worked much better. Apparently I just wasn't getting them hot enough. I suspect I wasn't leaving them in the forge long enough for the heat to saturate to the middle. |
| Ken Scharabok - Thursday, 12/21/06 19:30:21 EST |
|
Hi Ken. That's pretty funny, cutting a big red hot piece of tool steel on the chop saw. I guess, if it works, it's fine. Recently, I learned in the metalshop class how those wheels worked. They use a glass matrix, and when the abrasive grain dulls, it melts the glass and flies free. Cutting a big piece of hot steel like that might change the wear mechanism of the wheel. Talking about using abrasive cutting wheels to cut tool steel, I have had good luck with the expensive (4X consumer grade price) ones from our local blacksmith-owned welding store. They have a money-back guarantee, and I have never had to take one back. They are more than 4X better than the Home Depot variety. Maybe more than 40X better. Of course, for ordinary mild steel, you may as well use the cheap ones. I make tools out of dead 1" + twist drills and milling cutters, and it just zips right through them. Note that I have had poor luck (results, it's not really a matter of luck, that's just a figure of speech) annealing this kind of steel. It takes too long, and I am too cheap to pay the power bill. Ordinary low tech carbon steel seems to respond fine to annealing in ashes. I build a fire out of cheap wood or charcoal briquettes. The good lump charcoal is too valuable to use for this purpose. Keep poking around and looking at the color. When the metal has been hot for a good long time, but not too hot, shovel dirt and ashes over it. It will continue to burn for a few hours under the dirt. A piece of sheet metal can be placed over the top, but be aware that this metal will be sizzling hot for hours. Eventually, the fire will burn out, and you can poke around to see when things are cool. This will anneal most steels, but not HSS. To effectively work with HSS, you need two furnaces: a high temp one and a low temp (usually electric) one. The ramp up cost is enough to buy a lot of new H-13 or S-7, or as one production smith told me: OCS. It has some mediocre hot work properties. |
| EricC - Thursday, 12/21/06 21:20:32 EST |
|
Ken, My first thought was to cut a hot cut with a hot cut. You're probably working by yourself, and a welded-up guillotine with hot cut blades, top & bottom, would work. Might put a hardie shank on it. A friend visited a blacksmith in Turkey years ago, and the Turk had a hand operated metal shear for cutting hot stock. That is something to consider, although I personally have had no experience with shearing hot metal. |
| Frank Turley - Thursday, 12/21/06 21:54:00 EST |
|
Ken Go with what Eric said. Put money in the good abrasive wheels from a weld shop not home depot. Makes all the difference in the world. I am wondering why you want to reinvent the wheel? You can buy quality new flatters and hardies in the 30-35 dollar range. If your cheap why not just use some 4140 and forge news ones from scratch instead of making a low grade welded up tool. If someone uses a welded up mongrel in your shop and gets a shard you will be footing the bills all the way to your cardboard future home. don't even think of selling that stuff if you do. You can't write off liability. |
| - Ironman - Thursday, 12/21/06 22:19:57 EST |
|
Any good method for removing those microscopic steel splinters that bug the crap outta ya? |
| - Nippulini - Thursday, 12/21/06 23:03:53 EST |
|
NIp, If, and only if, they're iron or steel splinters and not SS or non-ferrous, I use one of those super powerful neodymium magnets. The kind that wipes out your hard drive if you get within a foot of it. Oneof those will cause that little buger to stand up and either slip out or raise its head enough to snatch it with some pointy tweezers. For the ones under the skin and unreachable even by magnetism or magic, I soak the offending areae in a bit of vinegar or very diluted phosphoric acid. That usually dissolves the litle ones pretty quick. I would think, for a guy that pokes great gaping holes in himself and dangles scrap iron from his sensitive spots, you'd just grab a grapefruit knife and whittle the offending meat away until the teeny little bit fell out. (grin) |
| vicopper - Thursday, 12/21/06 23:26:20 EST |
|
Abrasive saw: The masonry wheels are the ones to use if You ever need to cut or grind cast iron. The hard bonded 14" chop saw wheels are intended for metal studs, garage door track and conduit. This is the stuff construction contractors cut, and the wheels at the home depot or lumber yard reflect that. ERIC C: What brand or at least designation are the ones You are using? I have had pretty good results with Forny chop saw wheels [pretty cheap on sale], ACE hardware has them, but I don't usually cut heavy sections. I have a small tablesaw that I use for abrasive cutting, I use the unreinforced 1/16 thick RADIAC wheels on it. As mentioned by others, this is not something You do with Your GOOD tablesaw. I allso have an old radial arm saw resurected from junk that is modified for abrasive cutting. I built it for 1 job and havn't used it since. |
| Dave Boyer - Thursday, 12/21/06 23:26:38 EST |
|
Hot Shearing: This works great on thin sections and with the proper shear probably on thick as well. You just want to work fast. The late Dave Manzer demonstrates using a Beverly shear to hot trim feathers he was forging in his Tooling and Techniques video. Grinding: Most of my experience is either operating a surface grinder or an angle grinder. On the surface grinder the hard wheels uses for soft steel and cast iron will just burn and discolor hardened alloy steel even while water cooled. The super soft ones cut just fine. Any time the type of work changes so does the wheel. Dressing with a diamond is also a critical step. With angle grinders you can spend hours doing a jod that will take minutes with the right wheel. As mentioned above the normal wheels sold for these are fairly hard and are for long life. They make softer ones that are faster cutting. When you have a job to do and a heavy grinder to wield those fast cut wheels are the way to go. With the right wheel I have seen chop saws zip through large diameter drill bits like they were butter. They also sell super thin wheels used for this purpose on stationary grinders. The thin curf does not take much pressure and the fast cut transfers little heat to the work. These are commonly used to trim ends off severely chipped or broken drill bits prior to resharpening. |
| - guru - Friday, 12/22/06 01:41:38 EST |
|
Eric C: Yes, please provide brand name and specifications. Does your welding shop mail out with a phone purchase? Once I got the heads hot enough I could cut through about 1" or so in perhaps ten seconds. Man, talk about sparks. I have a 5-gallon metal bucket positioned behind the chop saw to catch them. I need the cut to be flat (and relatively straight). Using even a guillotine fuller would V the cut. On doing these, it is a matter of ROI. I can usually buy them for $5-7. Flatters sell for $20 or so and hot cut hardys (from tip) for $15-20 with a shank welded on. Thus, $35-40 for a initial $5-7 investment (plus a couple of more bucks in added material) is a nice return on time Bear in mind I nitch market to beginning or hobby blacksmiths or bladesmiths. How often does one need to use a flatter? Here it is the plate which needs to be hard, not the entire head (much like a Fisher anvil). It is the edge on the hardy hot cut which is the working aspect. Shank merely holds it in the hardy hole. Cheapest Centaur Forge flatter is $75. Cheapest C-F hot cut hardy is $35. Only quality problems I have had with flatters is when I was trying to weld plates onto China import small sledge hammer heads. Weld joint on heads would fracture with a sand appearance. |
| Ken Scharabok - Friday, 12/22/06 06:07:42 EST |
|
Ken, the fracture appearance suggests high sulfur content, not uncommon in Chinese-made steel. |
| quenchcrack - Friday, 12/22/06 09:34:22 EST |
|
I do not have a super powerful MRI style magnet, but alas the splinters fell out today after a nice steaming hot shower. I never said they hurt.. just annoy. Besides, I use large meat cutting kitchen knives for splinter removal. I hold on to the grapefruit knife for removing corns and calluses from the feet. |
| - Nippulini - Friday, 12/22/06 10:51:26 EST |
|
I see |
| - Ironman - Friday, 12/22/06 11:08:31 EST |
|
Swarf splinters and more. I think I dropped something on my left "metatarsal head" where the big toe phalanx joins the first metatarsaal bone. I ignored it; shame on me. It swelled and excited some friction between bony area and shoe. After a few days of intermittent pain, I recently went to the chain store, "Foot Solutions". I am now fit with two pairs of shoes for work and dress, the shoes having a big boxy toe area, EE width. When I was a kid, I wore a C width. Some custom made orthotics will be arriving any day now. It seems a little pricey at first blush, but I want to keep on truckin'. I chastise myself, because I've been doing tai chi for a number of years, and I'm suppsed to be more body aware. |
| Frank Turley - Friday, 12/22/06 12:44:24 EST |
|
Hi Dave and Ken. The wheels are made by Walter. They are made in Italy. They cost about $4 each for 4.5" angle grinder variety. Their performance on hard steel is much better than the Norton ones from Home Depot, which are between 1 and 2 dollars. But, the friendly fellow at the counter of the welding store told me that he got a lot of complaints about the price. So, if it's the first time you are buying them, he gives you one free, so no complaints. Worked on me, I came back to buy them as "stocking stuffers" for buddies. If you are grinding zinc off galvanized pipe for junk welds, the cheap wheels are fine. I never use the really cheap ones, since I have heard too many stories about what happens when they fail. |
| EricC - Friday, 12/22/06 13:00:19 EST |
|
Handy Abrasives: Once in a while you see something you have never seen before. For me it was abrasive coated cord that the sewing machine repairman had in his kit. When the needle plate on a sewing machine is needle cut or rough this is the stuff to fix it with. Will also work on small holes and in very tight spots. As this is used mostly in the specialty service industry it is not easy to find. It took some research to find the stuff and I bought two grades, coarse aluminium oxide and crocus in a size a bit smaller than 1/16". However, they had it much finer. Abrasive and polishing cord is manufactured by E. C. Mitchell Co. Middleton, MA and sold by Small Parts Inc. Part of the trouble I had searching for it was using the term "thread" which is used everywhere on the net for everything except thread. Same with string. So be sure to call it "cord". |
| - guru - Friday, 12/22/06 13:17:11 EST |
|
Is there anything I should do to prepare galvanized in order for it to be chromed? |
| - Nippulini - Friday, 12/22/06 14:52:05 EST |
|
Eric C: Thank you. I was under the impression you were talking about 14" blades for a chop saw. Trying to cut tool steel with a palm grinder isn't something I'm interested in trying. |
| Ken Scharabok - Friday, 12/22/06 15:05:04 EST |
|
Abrasive cord: Manufactured abrasive cord may be a fairly new item, but the concept has bee around for millenia. Since very early on in the metalsmithing game, jewelers and sculptors have been using a cord charged with abrasive for getting into tight spots. It is called a "trumming cord", and is prepared by charging a braided linen or cotton cord first with beeswax and then with the abrasive of your choice. I have always preferred old-fasioned braided linen fishing line, known as "Cuttyhunk Line". For larger trumming cords, I have used braided boot laces and even sahs cord. The sticky stuff can be beeswax, rosin, or even spray glue. You can buy loose abrasive grains form MSC, McMaster, etc in grits from less than a micron up to chunks the size of carbide saw blade teeth. The trumming cord can be used held inyour fingers or you can rig up a frame similar to a jeweler's saw or hacksaw frame for work that needs it. In fact, you can make a large frame such as for a buck saw, and string it with a strong cord charged with diamond grit and cut through hardened steel barstock with it. The same cord can be be run on a motor and a couple of pulleys, creating a bandsaw suitable for sawing glass. Lots of possibilities for using this centuries-old technology. |
| vicopper - Friday, 12/22/06 15:42:18 EST |
|
Nip, Yes. You should remove ALl the galvanizing. Doesn't matter much how you get it off, but you have to get it all off. It should be theoretically possible to plate copper over the zinc, then nickel over the copper and then chrome over the nickel, but there's one catch. Zinc is soft, and chrome is brittle. Particularly on hot-diopped galvanizing, the zinc layer may be quite thick in places. Any chrome put over this soft place is going to be very prone to lifting due to the soft substrate. There may be some chemical consideratons as well, but the mechanical ones alone are enough to make me recommend against it. |
| vicopper - Friday, 12/22/06 15:46:08 EST |
|
Chrome plating: There is also two ways to plate with chrome, for a hard surface and for rust proofing. For rust proofing you must copper flash, nickel plate then chrome. The reason for the nickel is that chrome is porous and rust will occur through chrome. The nickel is a tight rust preventing plate. Ask your plater if he is using 3 stage chroming or is doing simple "hard chrome" plating. A VIc noted you need to remove all the zinc. Then you also need to remember that the plated finish will be no better than the base metal. So the underlying metal must be nearly as perfect as possible before plating. On small lots and one offs it is much better to use stainless. Note that you can also plate over stainless. This creates a hard non-galling finish and is often used on top grade stainless fasteners. |
| - guru - Friday, 12/22/06 20:01:14 EST |
|
Abrasive cords. I recieved a sample card of abrasive cords perhaps 15 years ago, I think from Mitchel. I eventually used the samples, but not enought to buy any. Splinters. I have used tweezers witha builtin magnifier for years. They have needle sharp jaws and they only cost a couple of bucks. A strong task light, angled from the side to sorta parrellel the skin surface will often highlight the splinter. I got lots of practice at splinter removal at the valve shop. We had a couple of processes that made tiny, splinters. The worst were the SS splinters. The carbon steel will rust up in a couple of days and you can see them. The SS ones won't change color and have to be dug out, or fester out. I probably got a hundred splinters a year, and the guys on the shop floor maybe one a day! |
| ptree - Friday, 12/22/06 20:36:09 EST |
|
I guess I'll just keep the galvanized the way it is. There are two 1-1/4" pipe about 3 feet long each being used as rakes for the front end of a lowrider chopper style bicycle I'm making. The rest of the bike is actually made from the parts of about 4 different bicyclces I salvaged. I plan on naming it "FrankenBike". Pics will be posted upon completion. |
| - Nippulini - Friday, 12/22/06 21:43:06 EST |
|
Trumming cord: I used this polishing process in my finish work for fine jewelry for many years. For finish work, I would suggest not coating the cord with anything to make it sticky, this only binds the material you're removing to the compound doing the removing and ends up pretty messy (especially wax). Instead, run the cord over what ever abrasive or polish stick you prefer (several times) to impregnate the string and replenish it as you go. White diamond bobbing compound removes metal fast and also provides a passable polish as it deteriorates on the cord. Another cool method of polishing in a tight spot is to put a round tooth pick in a dremel or flex shaft tool, groove it up and down it's length on two sides, spin it over the polishing compound to get some on it, then polish, it's like having a tiny wood lap. |
| Thumper - Friday, 12/22/06 22:01:01 EST |
|
Abrasive cord: There were some rolls of it at one shop I worked in, they looked pretty old 20some years ago. I guess the manufactured cord goes back pretty far, as it is used a lot in textile machinery manufacturing and maintainance as Guru mentined. |
| Dave Boyer - Friday, 12/22/06 23:30:08 EST |
|
Walter Abrasives: I have used some of their products, top quality but over the top price. Sometimes it may be worth it. They offer a chopsaw wheel designed for portable chopsaws, Chopcut II. I havn't tried them. |
| Dave Boyer - Friday, 12/22/06 23:34:22 EST |
|
wire rope (steel cable) steel? i got a lot of wire rope the other day from a local industrial surplus place, it is in about 150 foot lengths 3/4" ans 1/2" diameter with steel weights (cylinders that the rope terminates in) they came from caterpillar, ive tested and they are magnetic and are not galvanized, is there any other tests i can do to narrow down what alloy they are? thanks again Mike |
| mike kruzan - Saturday, 12/23/06 01:06:01 EST |
|
You can heat the end until it's non-magnetic, then quench it in water. If the strands break instead of bent, then you have a decient amount of carbon. Most (not all) high strength cables are a pretty basic alloy, usually pretty close a 10xx. |
| AwP - Saturday, 12/23/06 04:38:54 EST |
|
thanks for the tip AWP, i guess that gives me another question, when you speak of non magnetic what kind of magnets are you using to test for magnetivity (sp? real word?) i know that a lot of magnets loose thier strength as they get hotter, thanks again Mike |
| mike kruzan - Saturday, 12/23/06 04:40:54 EST |
|
Abrasive cords,, There is at least one instance of convicts sawing through steel bars using dental floss, I dont know what was used as the abrasive, Probably a mixture of toothpaste and concrete dust. Wirerope can be used to cut off burning oilwell pipe. There is a seris of valve devices that can be remotely clamped onto a damaged oilwell head, But the pipe to clamp onto needs to be reasonably true, So any old or damaged stuff needs to be cut off and whilst the whole thing is alight the only way to get near it is a wirerope set up like a giant bandsaw using bulldozers to carry the pulleys |
| - Mike - Saturday, 12/23/06 08:42:52 EST |
|
Hey gang, I was at the scrap yard yesterday picking up some copper for ladels. I was talking to the older man that I always deal with and he mentioned that they were moving some stuff out of the old warehouse. They found a big anvil in there and wanted to know if I was interested. I went and took a look at it. It is a bridge anvil, he used the fork lift to put it on the scales and it came to 895 pounds. They let me have it for $200.00 (I know, stuff like this never happens to me, so I must have been good this year). Anyway we got it on the truck and I cant find a name or makers mark. Were bridge anvils marked in a specific place? It appears to have 2 layers of paint, one red and one a grey. I am guessing that it came out of one of the local railroad yards or from the coast at the shipyards (Mississippi). It does look like it was made in 3 pieces, 2 legs and the face, and the legs and face are dovetailed together, then welded. The hardy hole is approx. 2 X 2. It does have a horn, but the horn is not pointed, more like a cylindrical shape. Any help identifying it would be appreciated. Vance Moore Whynot Forge Meridian, Mississippi southpilo2@aol.com |
| vance - Saturday, 12/23/06 08:48:03 EST |
|
Mike Kruzan, Wire rope in normally supplied in alloys that are identified as "Plow Steel", "Improved Plow Steel". and "Super Improved Plow Steel" I do not have my wire rope reference manual at home, But these alloys make a nice knife material if forge welded. The terminals swaged on the ends are typical for use of wire rope on a drum. The terminal is swaged on, and the terminal is inserted into the start point on the drum. The drum is rotated to wrap the rope, with the rope wraps giving most of the grip. Big rope of this size would be typical for use on the old winch operated pans. These earth moving pans were pulled by a big Cat, say a D-7, and the Cat had a winch mounted on the rear. The rope from the winch went back to the pan, and was used to raise/lower the pan, and to empty the pan. Often rope of this size and use has a hemp core, impregnated with a graphite grease to lubricate the rope from the inside out. If you cut the rope, look for this core. If you wish to forge this stuff to knife material, in a forge, these are the general steps. 1. Cut a short lenght, say 12" of rope. 2. remove any hemp core. This is done by carefully starting the rope to unravel, then slipping the core out between the strands and then reraveling the rope. 3. Place the rope in a parts cleaner to remove grease and oil if you have one. Air dry overnight. If not go to step 4. 4. Place on top of a good fire and standclear of the smoke. The rope will bubble out grease. 5. when the rope is done buning, remove and aircool. 6. weld on a handle of 1/2" square (or Equiv) Arc weld works well) 7. Heat to dull red, and spoon on borax to the rope. Heat to yellow and spoon on more borax. Take a welding heat on the end of the rope, and gently strike to weld, rotating the rope a little between blows in a manner to tighten the rope as you weld. Reflux between every heat. Continue up the pore till you have welded the entire lenght. Then at welding heat, forge to square. 8. forge to blade shape. This all sounds hard, but cable is the easiest pattern welding material I have experience with. Once the blade is made and roughed, heat to nonmagnetic and oil quench. Temper as desired. finish the blade, and grind thru polish. Ferric chloride for Radio SHack, dilute 50:50 make a good etch. |
| ptree - Saturday, 12/23/06 09:47:15 EST |
|
Vance, I photographed one of these at SOFA a couple years ago. No markings. |
| - guru - Saturday, 12/23/06 09:49:54 EST |
|
I might add to Ptree's comments, Dont be afraid to experiment with twisting the rope tighter while its at a good red, but before welding it. This will change the finished pattern. Also it increases the bulk of material, Its surprising how much dimension of the rope is reduced as its consolidated to a welded mass. Also unless one has a supply of lefthand rope to weld up, (I say lefthand, because 99% of all rope is righthand) try un-twisting one piece of rope until it twists up in its opposite direction, then weld a piece of righthand alongside a piece of lefthand, It finishes up as a great chevron pattern. |
| - H�kan - Saturday, 12/23/06 12:26:43 EST |
|
Hello, I am 15 years old and have been making knives and daggers for about 3 and a half years. I know i am very young, but i have some experience in smithing. I know how to smith basic blades and some other stuff, mostly small to medium daggers. I want to start moving toward swords and larger weapons. I just wanted to ask if the basic prosses is retained on a larger basis or if it changes completely? |
| Defender - Saturday, 12/23/06 15:35:18 EST |
|
Where the heck is my post? |
| Defender - Saturday, 12/23/06 15:38:08 EST |
|
Defender, Basically the processes are exactly the same except for size which presents some new problems. When forging you work in short sections so you do not need to heat the entire blade. But when heat treating you need to be able to heat, support and transport the blade making sure to heat and quench evenly. Many long blades are hung vertically in a gas forge to avoid bending and warping. |
| - guru - Saturday, 12/23/06 16:11:11 EST |
|
mike kruzan: You don't leave the magnet on, you just check it for a second whe nyou think it might be hot enough, if it's not hot enough you put the cable (without the magnet) back in until it's hotter and test again. Do NOT leave the magnet in the heat. |
| AwP - Saturday, 12/23/06 16:46:17 EST |
|
Authentic Finish: I'm working on a project of replacing hardware on a chuck wagon and the gent wants it aged and authentic as possible. I'm thinking that if I take the pieces out of the forge, leaving the discoloration on, then spraying clorox to get some rust started would be proper. Anybody got any better ideas or will mine work? |
| Thumper - Saturday, 12/23/06 17:16:29 EST |
|
Thumper: what he wants is an UNAUTHENTIC finish. Parts were *not* supplied artificially aged when that wagon was built or repaired in it's original use life. What he wants is to match the new stuff with the old; an OK endevor though I would stamp the new parts with the year on the side that will be covered by the wood in case a museum ever gets it. If he is not willing to have the date stamped in a hidden area I would re-evaluate my relationship with this guy. Is it old enough to be real wrought iron? Real wrought iron will often get different age patina patterns than mild steel does. If it's real WI you really need to make the replacements of the same to be authentic and to get the same aging patterns. To get the pitting from rust, coarse salt ceystals in a moist box will help; or the old favorite of burying in a moist manure pile for an appropriate time. Thomas |
| Thomas Powers - Saturday, 12/23/06 21:10:29 EST |
|
Can anyone recommend a easy-to-find oil to coat cold-rolled steel sheets with, so rusting will be retarded in storage? Normally, the old film the CR plate comes with from the warehouse keeps it fairly clean for a year or more here in Arizona, but (just my luck) I was hauling some sheet in my pickup when we got a totally unpredicted storm. I wiped down the sheet when I got home, and it seems fairly clean, but some of the oil came off, and I'd like to freshen up the coating. Would just a light mineral oil do? I've heard that automotive oil is loaded with additives that make it lousy as a rust preventative. What do they use in the steel industry to coat CR plate? The stuff is transparent, and seems to cling for years. Eric T |
| Eric T. - Saturday, 12/23/06 21:29:26 EST |
|
AWP, Hakan Thanks for all the info.. plan on tearing into this stuff tomorrow afternoon i love this place! |
| mike kruzan - Saturday, 12/23/06 21:48:43 EST |
|
I have a bunch of cheap H.F. triangle welding magnets all over the place. When I work my steel, I just wave it around a nearby magnet. If i feel it pull, I know it hasn't reached that point yet. Plus, I've gotten a little bit of the hang of telling by color. |
| - Nippulini - Saturday, 12/23/06 22:57:27 EST |
|
Thomas, The gent helps move cows twice a year for several ranchers and likes being the "cooky", he's also thinking about doing a "City Slicker", thing off season. We're not going for perfect or musem quality, just useable "period correct". Mostly, we're repairing or replacing metal that was added over the years that doesn't match what was originally provided (including rivets and nuts and bolts). Soooo, basically I'm looking to find a color matching recipe. Eric, a friend of mine that ran a junk yard for a number of years told me that I could store my steel out in the open and spray it a couple of times a year with desil fuel and that would inhibit the rust....haven't tried it yet, so far all my metal still fit's in my shop. |
| Thumper - Saturday, 12/23/06 23:35:59 EST |
|
I Have Just Started With Metal Working, And I Was Wondering If There Are Any Resources For Patterns To Help Me Out Starting Off. I'd Like To Make A Sheetmetal Rose, But I Am Having Problems With The Shape, Any Help Would Be Great!!! |
| Matthew - Saturday, 12/23/06 23:54:18 EST |
|
In the recent posts theres been a lot of talk about magnetism. Does hot rolled lose its magnetism during heat treating temperatures or at forging temps? Also, im kinda curious, could somebody give me scientific reason why steel loses its magnetism? Thanks |
| - Sebastian B. - Sunday, 12/24/06 04:44:05 EST |
|
happy holiday to you all, and hopes for a few bags of prime coal and great amounts of steel/iron in stocking. |
| OErjan - Sunday, 12/24/06 05:50:27 EST |
|
Magnetic materials have atoms with unpaired electrons. In most substances with UPEs they are randomly oriented and cancel each other out. In Iron they can arrange themselves in domains that reeinforce each other. these substances are called "feromagnetic." In a permanent magnet all the domains line up. When you heat a bar the atoms begin to move, and at some given temperature the domains come unravelled, and the atoms act as individuals and the magnetisim seems to be gone. Substances that have UPEs that do NOT arrange in domains are paramagnetic, which is thousands of times less that ferromagnetic. Oxygen is paramagnetic and some oxugen meters use the paramagnetism to measure the oxygen cvontent of gasses. substances with no UPEs are non-magnetic. |
| - John Odom - Sunday, 12/24/06 08:51:22 EST |
|
Harbor Freight magnets-- FYI: those clever devils at HF's magnet supplier have thoughtfully made these cheesey magnets, or the framing thereof, out of some flammable mystery material. So while they do hold the pieces of your work in position (at least while they have any magnetism left, which is not for long), they also melt nicely, too. Peeeyewey! And wowee, do they ever cause arc blow. |
| Miles Undercut - Sunday, 12/24/06 09:06:02 EST |
|
Matthews: First a request. Please do not capitalize the first letter of each word. Makes it hard for us old fogies to read. We were programmed in Old English - which is pre-cellphone texing and such. I would recommend you use the NAGIVATE anvilfire box in upper right to go down to ADVERTISERS. Click on BlacksmithsDepot and then look through their listings for rose forms which come precut (Rose Kit #667). You can buy one and use it for a template. However, at their prices it would be difficult to make them yourself without a plasma cutter or such. |
| Ken Scharabok - Sunday, 12/24/06 09:11:04 EST |
|
Roses: Check our iForge page. There are several including how to use the kits. Some of the kits are a bit thin as is much of the architectural leaves sold by various suppliers. For outdoor work and or to match most forged work you want to use fairly heavy sheet. I use 16ga as a minimum and heavier for outdoor work. At 1/8" you are talking about plate, not "sheet" metal. One design I like is to start with equilateral triangles, notch the flats to within about a 3/4" circle in the center, round each outside corner of the notches. Then you have a three peddled "leaf". Using a ball pien hammer dish each pedal, then roll the points outward. Then dish the center and the whole will close up around the hammer. A little bending and you have the beginnings of a flower. Make two of these, one about 20% larger than the other and you have a pretty nice flower. To make it rose like you need to heavily round the points and use a set of petals made from a square Or round piece for the outside. If you are not sure of the process try making the same from thin cardboard. Note however that the cardboard will not stretch three dimensionally like metal will. |
| - guru - Sunday, 12/24/06 09:47:15 EST |
|
Eric T. There are a large number of anti-rust oils. The ones for long term storage of steel, that will wipe off usually contain Sulfonate. A very helpfull plave for preserveative oils, and forge lubes is J & M LABS. www.jmlaboratories.com |
| ptree - Sunday, 12/24/06 09:48:22 EST |
|
Magnets and Magnetism: There is a difference between being magnetic and being magnetized. Hard steel and steel nickel (and other iron) alloys can be permanently magnetized but soft iron or very low carbon steel cannot. They will magnetize but only for a short time. Generally the harder the material the stronger and longer lasting the magnet. Thus the difference between cheap magnets that used to be found in many children's games and science kits and high quality magnets. This is also why solenoid cores and transformer plates are made of special very low carbon or nearly pure iron. It can become magnetic and then lose that magnetism as soon as the electricity is turned off. In transformers where the polarity is rapidly changing this lets the magnetic direction change with little resistance. When iron or steel is heated above a low red the crystal structure changes and the metal stops being magnetic. It will not react to a magnet and IF it was magnetized it will no longer be. In GENERAL this is close to the transformation point of steel and is used to test is the metal is ready to harden. However, this is not true for all steels so you you check before assuming this is the hardening point. I usually tell people it is about 200°F hotter. So, you cannot make a magnet out of pure iron and you can wreck a good magnet by overheating it. Iron and steel stop attracting a magnet above a red heat (more or less). Arc Blow: You will get this from any magnet, temporarily magnetic material or strong DC circuit. TIG cables are particularly bad and will magnetize the work if carelessly wrapped or draped around the work. |
| - guru - Sunday, 12/24/06 10:11:12 EST |
|
John Odom: are you trying to destroy our belief in the Magnetism Fairies? Pu-leeze sir, have some courtesy, this is a family site! :-) |
| quenchcrack - Sunday, 12/24/06 10:54:52 EST |
|
Dear Friends: Happy holidays to you all. I've been a smith for about a year now and am trying to sort out something that has stumped my teachers in the Southern CA CBA chapters. Generally, I've learned that normalization of steel that has been forged is accomplished by heating to critical temperature and then letting it air cool. A blacksmith colleague of ours is from Europe and is in the metallurgy business, so he seems pretty knowledgeable. But a few of his recent points stumped our best teachers and I figured I'd ask you folks to corroborate or refute my friend's claims about normalization of steel. He has told us that normalizing is different than annealing, and that to normalize steel, bring to critical temperature and then dunk in water briefly to bring it to just around a black heat temperature. He said that the normalization process is best accomplished during quick temperature changes, rather than slow ones. So, he has suggested normalizing a piece about two to three times successively, reheating to critical and then cooling quickly each time, and then letting the last one cool in the water all the way to room temp, thereby doubling as my quench as well. From what you know, is this true, or is he mistaken? If he is mistaken, then that might explain a few of the cracks that appeared on a really nice blade that I forged recently (using this process of normalization when the forging was done). If he is not wrong, then the cracks must be due to some other mistake I made. So, thanks in advance. Happy Holidays. Sincerely, Arik Greenberg |
| Arik Greenberg - Sunday, 12/24/06 13:12:30 EST |
|
Normalazation is a word used with a great deal af latatude in the rest of the world from my experience in the valve trade. In Forged steel valves and fittings, normalazation is often a desirable trait for the finished product. In The US, this is accomplished with a controlled furnace heat treatment. A specific grain size is specified as denoting normalazation. A fine grain size is the desired outcome. In the rest of the world many forgings have the added "N" on the material designation, and is justified by using insulated totes to catch the forgings. The thought is that the forgings cool slow enough to yeild a normalized state. From metalulurgical examination of literally hundreds of forgings, THE only process that yeilded the specified grain size consistantly was furnace normalazation with a controlled heat treatment process. And I do not know of any normalazation process that uses a quench for a carbon steel material. |
| ptree - Sunday, 12/24/06 14:24:27 EST |
|
Normalizing is defined as heating to about 100 degrees above the upper crtical temperature, and cooling in still air. Slow cooling may allow grains to get somewhat larger. Slow cooling through the two-phase region of the phase diagram (between A1 and A3) may result in a funky structure called Widmanstatten Ferrite that is very brittle and should be avoided. Quenching from the normalizing temperature will create martensite rather than the ferrite/pearlite structure typical of normalizing. Controlled slow cooling is more of an annealing process but, as ptree stated, can be used to create the precise grain size needed. |
| quenchcrack - Sunday, 12/24/06 15:04:28 EST |
|
Normalization: The reason your friend has good results with multiple quenchings as "normalization" is twofold. Quenching results in martinsite (as quenchcrack mentioned) which when brought up to critical, goes into solution faster then pearlite. He needs to do it multiple times because his quick heat method doesn't disolve all the carbides in one go (though being martinsite from the previous go helps), so multiple heats are required to fully disolve them. Basically, he uses a method that allows him to get comparable results in a low tech way that you can get by using a temp controled furnace soaking at the correct heat for the correct time for all the carbides to go into solution. His way isn't better, but it's a different way to get equal results, with less equipment. |
| AwP - Sunday, 12/24/06 16:08:37 EST |
|
Merry CHRISTmas to all my metal mashin' friends. |
| 3dogs - Sunday, 12/24/06 18:14:16 EST |
|
Arik Greenberg: Any part with severe changes in sectional thickness are at a great risk if quenched in water. The thin parts will cool quickly and shrink while the heavy sections will still be hot and at their expanded size. In a hardenable material the thinner parts will have hardened when quenched. This is asking for crack problems. In tool work when parts of variable section are to be hardened, they are often made of air hardening material to avoid the stresses from rapid cooling. Air or oil hardening materials should NEVER be water quenched. I feel that if Your friend gets satisfactory results with the method You described, that is fine FOR HIM. I am a firm beliver in following the steel manufacturers methods, and where I came up through the tool and die trade those were the methods of Carpenter Steel or "Car Tech" |
| Dave Boyer - Sunday, 12/24/06 18:50:13 EST |
|
Eric T, The best readily-available rust preventative that I have used is plain old Vaseline petroleum jelly. You can think it down with mineral spririts or kerosene to amke it sprayable, if you want. Vaseline is pretty much the same stuff as Cosmoline (of military fame), just in a more aesthetically pleasing form. It will last almost indefinitely. The cheap generic stuff is just as good as the brand name, by the way. |
| vicopper - Sunday, 12/24/06 23:27:23 EST |
|
Merry Christmas to ALL! |
| - guru - Monday, 12/25/06 09:29:40 EST |
|
|
|
|