|
|
| |
| |
|
|
|
|
|
|
|
|
| |
| |
| |
| |
| |
| |
| |
| |
| |
| |
|


| |
| |
|
Tell them you found it on anvilfire.com!
|
|
|
BENDERS 3
Special Benders
BENDERS 1
BENDERS 2
Picket Bender
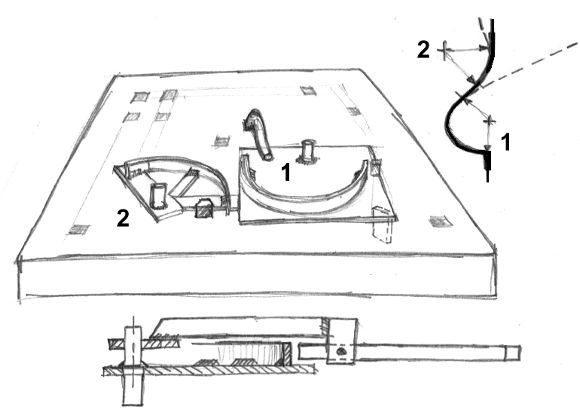
The drawing above is for a double bending setup to be used on a weld platen.
It is for bending the pickets commonly used on balcony rails in Italian and Spanish style ironwork.
The bending is done in two stages. The first stage is the large radius bottom bend.
It is done without the second stage bender in place as it would interfer with the sweep of the bar.
The corner bend is forged first, then the part placed in the bender against the starting post.
The lift off bending handle is placed over the center post and the first bend is made.
The end position is shown by the dotted line in the drawing to the right.
A certain amount of "over bend" will be required due to spring back.
After the first bend is complete the bending handle is removed and the second stage bending jig installed.
This should have some tabs or short bars on the base so that it just drops into place on the weld platen.
The bending handle is put in place and the second bend is made.
The end position (for spring back) is shown by the dotted line in the drawing to the right.
Note that I have shown a flat between the two bends. This may or may not be needed according to your design.
Once the jigs are tested the bending can be done in batches, one stage at a time.
However, it might be benificial to clamp the bar in place with a C-clamp after the first bend.
In this case the second stage bender is removed and installed for each part.
This is why the weld platten is recommended for setting up this type bender.
To constuct the bender guide surface the bending arm should be used to assure a smooth fit.
I prebend the flatbar, weld the starting end, adjust the bending arm against the flat and then work around the arc with handle tack welding the part in place.
This assures a smooth radius with the center pin exactly centered.
You can make seperate bending arms for the two different radii OR make the handle adjustable.
It is actualy easier to make seperate handles if you have the materials.
The rotating bearing may want to be longer or have two plates rather than what is shown above.
See bender below for adjustment ideas.
U-Bolt bender
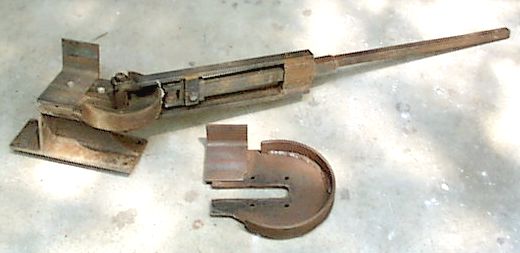
This is a custom made bender I built to make several sizes of large U-bolt.
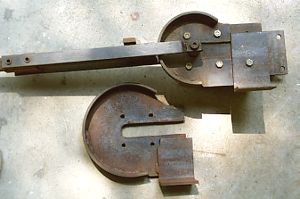
It has two interchangable dies and an adjustable bending arm.
A pre-threaded bar with a nut on the starting end is positioned against the inside vertical surface of the angle iron bracket.
The poistioning of the nut assured that the legs of the U-bolt came out exactly the same length.
In this case that was when the nut was flush to the end of the rod.
|
 U-bolt bender top and side views.
|
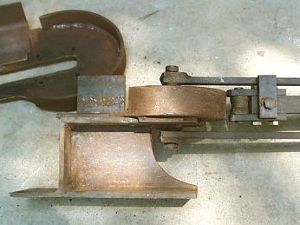
The bending handle pivots on two hard steel shoulder bolts.
It slips inside a piece of square tubing and is held in place by two set crews.

The roller nose is made of mild steel.
It had a low "V" groove but bending pressure made it fit the round bar being bent perfectly.
Benders can also have a plain "nose" but they need to be hardened and polished tool steel.
The vertical tab bolted on behind the roller reacts against the bending arms to reduce flex.
This special bender was built for a production job that was quoted in the thousands of parts but only a dozen were ordered.
The cost of the bender which took about 12 hours to build was built into the quote.
This was done by pricing the parts on a curve where ONE equaled the cost of the bender plus the minimum stock order and single job costs (setup, purchase materials, delivery).
Ten were priced at the bender cost plus actual estimated labor, then the same for 100 and 1000, each with single job costs.
If I had bid on the perceived cost of one part I would have lost my shirt on the job.
The result was I made money and had a nice bender left over. Anyone need some 1/2" dia. x 6 or 8 inch U-bolts?
Copyright© 2002 Jock Dempsey
Aug 13, 2002


|
|
|
|

BENDERS 3
Special Benders
BENDERS 1 BENDERS 2Picket Bender
The drawing above is for a double bending setup to be used on a weld platen. It is for bending the pickets commonly used on balcony rails in Italian and Spanish style ironwork.The bending is done in two stages. The first stage is the large radius bottom bend. It is done without the second stage bender in place as it would interfer with the sweep of the bar. The corner bend is forged first, then the part placed in the bender against the starting post. The lift off bending handle is placed over the center post and the first bend is made. The end position is shown by the dotted line in the drawing to the right. A certain amount of "over bend" will be required due to spring back.
After the first bend is complete the bending handle is removed and the second stage bending jig installed. This should have some tabs or short bars on the base so that it just drops into place on the weld platen. The bending handle is put in place and the second bend is made. The end position (for spring back) is shown by the dotted line in the drawing to the right.
Note that I have shown a flat between the two bends. This may or may not be needed according to your design.
Once the jigs are tested the bending can be done in batches, one stage at a time. However, it might be benificial to clamp the bar in place with a C-clamp after the first bend. In this case the second stage bender is removed and installed for each part. This is why the weld platten is recommended for setting up this type bender.
To constuct the bender guide surface the bending arm should be used to assure a smooth fit. I prebend the flatbar, weld the starting end, adjust the bending arm against the flat and then work around the arc with handle tack welding the part in place. This assures a smooth radius with the center pin exactly centered.
You can make seperate bending arms for the two different radii OR make the handle adjustable. It is actualy easier to make seperate handles if you have the materials. The rotating bearing may want to be longer or have two plates rather than what is shown above. See bender below for adjustment ideas.
U-Bolt bender
This is a custom made bender I built to make several sizes of large U-bolt. It has two interchangable dies and an adjustable bending arm.A pre-threaded bar with a nut on the starting end is positioned against the inside vertical surface of the angle iron bracket. The poistioning of the nut assured that the legs of the U-bolt came out exactly the same length. In this case that was when the nut was flush to the end of the rod.
The roller nose is made of mild steel. It had a low "V" groove but bending pressure made it fit the round bar being bent perfectly. Benders can also have a plain "nose" but they need to be hardened and polished tool steel.
The vertical tab bolted on behind the roller reacts against the bending arms to reduce flex.
This special bender was built for a production job that was quoted in the thousands of parts but only a dozen were ordered. The cost of the bender which took about 12 hours to build was built into the quote. This was done by pricing the parts on a curve where ONE equaled the cost of the bender plus the minimum stock order and single job costs (setup, purchase materials, delivery). Ten were priced at the bender cost plus actual estimated labor, then the same for 100 and 1000, each with single job costs. If I had bid on the perceived cost of one part I would have lost my shirt on the job. The result was I made money and had a nice bender left over. Anyone need some 1/2" dia. x 6 or 8 inch U-bolts?
Aug 13, 2002