| |
 |
|
|
|
-GURU
|
|
Tonight's demo is another project designed to meet the requirements of the Boy Scout Metalworking merit badge. This one looks easier than the other but it actualy takes a little more skill manipulating the work and judging the shape by eye.
|
|
|
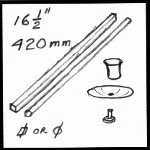
Figure 1 |
Materials required are:
1) 16-1/2" (420mm) 1/4" square or 3/8" round bar.
2) Candle cup
3) Candle drip pan
4) 3/16" x 1/2" round head rivet
Optionaly you can make the rivet from a piece of plain bar or forge one on the end of a piece of the 3/8" round.
|
|
|
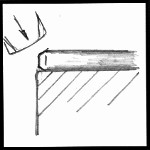
Figure 2 |
The first step is to chamfer and round one end of the bar. This is easiest to do near the far corner of the anvil
|
|
|
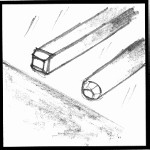
Figure 3 |
A blunt chamfer will do as shown but slightly more rounded is better. Chamfer first, then knock the corners of the chamfer off.
|
|
|

Figure 4 |
Flatten the end of the bar with a taper. The rounded corners will result in making a nice round end.
|
|
|

Figure 5 |
On the middle of the anvil's horn flatten the middle of the taper as shown to make an a flat section about 1/16" (1.6mm) thick.
|
|
|
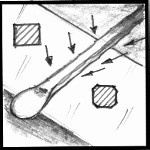
Figure 6 |
Now chamfer the corners of the bar if you are using square stock. This can be done hot or cold. Cold gives you better control if you have some practice and can use a heavy hammer (900 - 1200 grams).
You may chamfer evenly or leave high points for a "rustic" look.
|
|
|
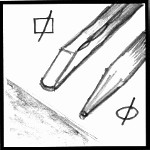
Figure 7 |
Taper the opposite end. On square stock a wedge as shown will work fine. You will need to narrow it after the first couple tapering blows.
On round stock make a tapered point. Make a square point first, then knock off the corners to make an octagon. After that you can knock of the obvious corners but it is often round enough as an octagon.
|
|
|
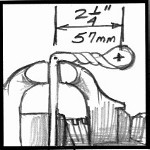
Figure 9 |
Now, I made the twist in the wrong order. Before twisting, make a right angle bend as shown.
Make a center punch mark in the center of the round end (equal distant from the sides and end), then measure as shown and make a light center punch mark to align to when the stock is hot.
Take your heat, clamp at the center punch mark and bend. Give is a light tap with the hammer to square it up.
This also applies to round stock.
|
|
|
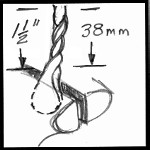
Figure 8 |
SQUARE STOCK ONLY:
Take another heat, clamp on the edge of the square as shown and make a full turn. Having made the bend first provides a handle with leverage to do the twist.
|
|
|
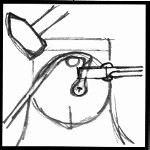
Figure 10 |
Now is where it gets tricky and every smith has to fiddle to get things right.
take a heat at and just beyond the corner. Start your curve over the horn. Remember to tap lightly and beyond where the metal is supported on the horn.
|
|
|
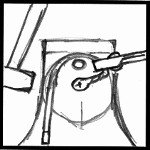
Figure 11 |
Get a second grip on the work (it may be the next heat). Continue to work around the horn.
|
|
|
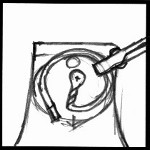
Figure 12 |
As the circle closes up the bent section will get in the way and you will need to work near the tip of the horn.
With a good long heat you might be able to do this in one heat. But that takes both luck and practice. It you make a half dozen of these the last few will be made in 1/4 the heats of your first.
|
|
|
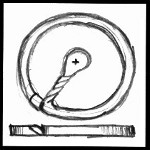
Figure 13 |
When this stage is finished the part should look like this and the center part flat.
At this point it may take some adjusting cold to get a smooth circle.
|
|
|
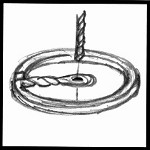
Figure 14 |
From here on the steps are almost the same as our previous candle holder.
You can either drill or punch the hole for the rivet.
|
|
|
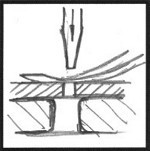
Figure 15 |
To punch the hole you will need a punching plate to place over the hardy or pritchel hole. The hole should be a size bigger than the punch.
|
|
|
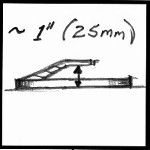
Figure 16 |
After making the hole take a heat and bend as shown. Using a piece of 1' (25mm) stock or a big hex nut for a spacer to set on the anvil will make it much easier.
|
|
|
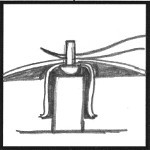
Figure 17 |
Punch or drill the candle cup and drip pan as necessary to fit. Then assemble as shown.
A short piece of stock is needed to back up the rivet. It can be flat and doesn't need a depression. A cylindrical end of a small ball pien hammer will also work if it fits in the candle cup.
|
|
|
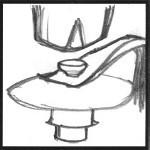
Figure 18 |
This small rivet is headed cold. The first blow should be a heavy straight blow and upset the rivet as shown. Light taps will work harden the rivet and it will split.
|
|
|
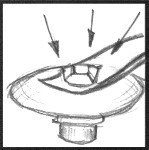
Figure 19 |
Now give the rivet 4 angular blows to make a pyramid out of it. If needed give it a fifth flat blow to tighten the rivet.
|
|
-GURU
|
|
A pair of these candle stands will meet the forging requirements for the BSA Metalworking merit badge.
|
|
-GURU
|
|
NOTE that other forging excersizes are required for the merit badge. Forging S-hooks and tent stakes can cover these excersizes.
The Scouts are also required to make drawings of their "tasteful" projects. But design in a media you do not fully understand is very difficult. I would have the Scouts make multi view drawings of what they expect THEIR project to look like.
As a counsler you should check these drawings to be sure they are not too advanced or impossible to make.
|
|
-GURU
|
|
Questions? Comments?
|
|
mike-hr
|
|
thanks, Guru
|
|
Milt
|
|
Neat project. Would a pair be needed for the badge, or could one of these and something else be accepted?
|
|
-GURU
|
|
Yes, It can be any two projects. However, the requirements call for forging, bending and a riveted joint in both.
|
|
-GURU
|
|
NOTE: Glenn Conner made one of our sconces from last week's demo and we now have photographs on that demo.
|
|
Ntech
|
|
Nice project. A scout could use those on the dinner table also.
|
|
-GURU
|
|
Our use them as mother's day gifts, Christmas. . .
|
|
Brogan
|
|
Nice Demo. Thanks Guru!
|
|
PPW
|
|
Jock, wouldn't a heading tool that fit in the anvil work better than a flat surface, or do you want the head to flatten out a little bit so it doesn't stick so far up into the cup?
|
|
-GURU
|
|
Since the rivet head is where you can't see it I don't think it matters. Flattening it helps tighten the joint.
|
|


Demonstration by Jock Dempsey
May 29, 2002
Figure 1
1) 16-1/2" (420mm) 1/4" square or 3/8" round bar.
2) Candle cup
3) Candle drip pan
4) 3/16" x 1/2" round head rivet
Optionaly you can make the rivet from a piece of plain bar or forge one on the end of a piece of the 3/8" round.
Figure 2
Figure 3
Figure 4
Figure 5
Figure 6
You may chamfer evenly or leave high points for a "rustic" look.
Figure 7
On round stock make a tapered point. Make a square point first, then knock off the corners to make an octagon. After that you can knock of the obvious corners but it is often round enough as an octagon.
Figure 9
Make a center punch mark in the center of the round end (equal distant from the sides and end), then measure as shown and make a light center punch mark to align to when the stock is hot.
Take your heat, clamp at the center punch mark and bend. Give is a light tap with the hammer to square it up.
This also applies to round stock.
Figure 8
Take another heat, clamp on the edge of the square as shown and make a full turn. Having made the bend first provides a handle with leverage to do the twist.
Figure 10
take a heat at and just beyond the corner. Start your curve over the horn. Remember to tap lightly and beyond where the metal is supported on the horn.
Figure 11
Figure 12
With a good long heat you might be able to do this in one heat. But that takes both luck and practice. It you make a half dozen of these the last few will be made in 1/4 the heats of your first.
Figure 13
At this point it may take some adjusting cold to get a smooth circle.
Figure 14
You can either drill or punch the hole for the rivet.
Figure 15
Figure 16
Figure 17
A short piece of stock is needed to back up the rivet. It can be flat and doesn't need a depression. A cylindrical end of a small ball pien hammer will also work if it fits in the candle cup.
Figure 18
Figure 19
The Scouts are also required to make drawings of their "tasteful" projects. But design in a media you do not fully understand is very difficult. I would have the Scouts make multi view drawings of what they expect THEIR project to look like.
As a counsler you should check these drawings to be sure they are not too advanced or impossible to make.