| |
 |
|
|
|
-GURU
|
|
The term "fuller" comes from the cloth making industry where round ended beaters are used on cloth to loosen thread fibers.
This made the cloth softer and "fuller". The process probably predates metal working by thousands of years.
In smithing a fuller is a tool with a round or parabolic "nose" that is driven into the hot metal.
Photo above courtesy Kayne and Son.
|
|
|
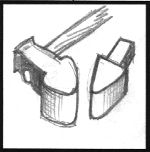
Figure 1 |
Fullers come in different types and styles. These are handled (upper) and shanked to fit the hardy hole (lower).
Earlier Bill Epps did one on the type that mounts on your anvil and has a pivot to support the upper of an upper/lower pair. Tonight we are looking at plain fullers.
|
|
|
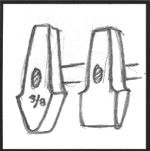
Figure 2 |
Handled fullers can be made straight and cross (the handle). The only difference is which way the handle hole is punched.
|
|
|
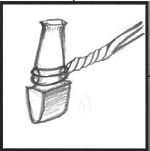
Figure 3 |
And then there is the old "wythe" or wihte style that originally were held with thin green branches (wythes) and latter by wrapped bar stock.
For more details see Rough, Loose and Withe Handles.
|
|
|
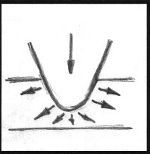
Figure 4 |
Fullers move stock faster than the hammer due to the narrow round face. They also move the metal on one axis, perpendicular to the face. This is often very handy.
|
|
|
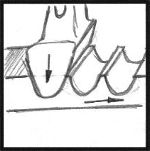
Figure 5 |
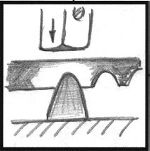
Figure 7 |
|
|
-GURU
|
|
When doing heavy drawing the fuller is repeatedly driven into the metal as shown OR the metal into the fuller.
Please note that the illustrations are exagerated.
Sinking the fuller too deep will result in cold shuts or folds when flattening.
|
|
|
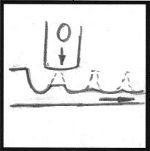
Figure 6 |
After fullering the high spots are driven down with a hammer and if a smooth finish is desired a flatter.
Please note that the illustrations are exagerated.
Sinking the fuller too deep will result in cold shuts or folds when flattening.
|
|
|
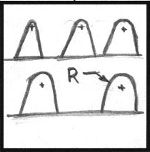
Figure 8 |
Fullers come in different sizes.
The size is usually indicated by the radius (half the diameter) of the nose.
On work where a specific radius is needed the matching fuller is used to dress the corner.
|
|
|
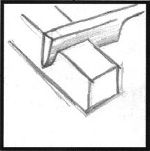
Figure 9 |
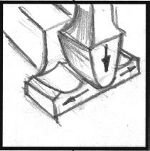
Figure 10 |

Figure 11 |
|
-GURU
|
|
Above is a classic series demonstrating the isolation of stock and then the fullering of the stock perpendicular to the long axis. Fullers gives you control that you cannot get with hammer alone.
|
|
|
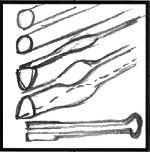
Figure 12 |
And our last illustration is of a type of spring fuller that is easy to make and can be very simple (just plain round bar) or more sophisticated with shaped ends. A friend of mine calls these his "fingers"
|
|
-GURU
|
|
Questions, Comments?
|
|
dunchadh
|
|
can you explain the spring fuller illustration a little better?
|
|
Sean
|
|
Fullers are made of tool steel right? not just thick mild steel?
|
|
PAW-PAW
|
|
Sean, I've got two sets of spring fullers, 1/4" and 1/2" made from mild steel. Quenched them in Super quench, been using them for years.
|
|
rocker
|
|
Thanks Jock, nice demo!
|
|
-GURU
|
|
These are just made from a piece of round mild or spring steel about 30" inches long and sized as needed.
Most fullers are made of tool steel but they don't have to be if you need one in a hurry. I often just pick up a piece of round bar.
|
|
JOCK D
|
|
This is a continuation of the above. We will look at some details as well as some suggestions from Hugh McDonald.
|
|
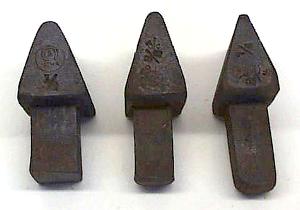
Figure 14 |
These are commercial bottom fullers. They are marked by diameter, not radius. These are 1/2", 3/8" and 1/4". And although they all came from the same shop they all have different shank sizes.
|
|
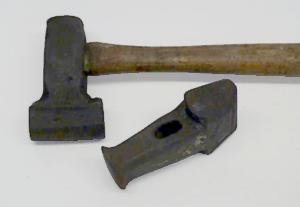
Figure 15 |
These are top fullers. The handled one is hand made and the other is a commercial fuller. The hand made one is actually a better design, having a very thick section around the eye so it will not swell the eye when struck.
|
|
|
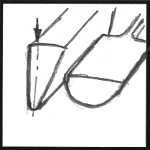
Figure 17 |
These are typical power hammer fullers. The narrow wedge is used for isolating stock. The half round is used both as a fuller and turned upside down, as a flatter. The large half rounds are common in power hammer work but take too much force to be hand struck.
|
|
|
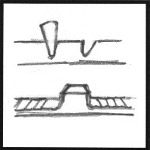
Figure 18 |
The wedge fuller is used to isolate stock and leave a surface perpendicular to the flat. the back is radiused just enough that it can be used as a right or left hand tool.
|
|
|
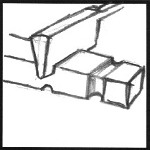
Figure 19 |
The wedge is often used alone on all sides of a bar but it can only be used for shallow depressions or it will push stock into the groove on the far side. For heavier double sided fullering you need top and bottom fullers.
|
|
HUGH M
|
|
ONE MAN FULLERS or SPRING FULLERS
Hugh McDonald
|
|
|
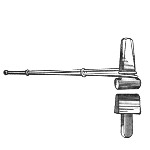
Figure 16
Image from 1908 Webster's Dictionary |
The anvil hold down we looked at recently is a good example of a tool to help the blacksmith working alone.
Top and bottom fullers are used together at the start of so many forging processes and when the smith had a striker and an apprentice it went like magic.
The lone smith however, holding the metal between his legs while doing the same job can really make his eyes water.
Calling his spouse, child or neighbor to, "hang onto that while I hit it," is often not helpful either.
|
|
|
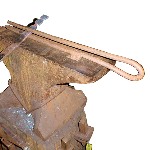
Figure 22
Click For detail |
Take two or three feet of 1/2" dia. bar and bend it in the middle like a hairpin with the legs parallel and about 3/4" apart. In use it lies on edge along the anvil with the heated steel slipped at right angles between the legs.
Hammer the top one down for even grooves on both sides of the work.
The deluxe model (mine) has a short piece of heavy walled square tube that fits the hardie hole and is arc welded to the bottom leg so it sits there ready for use.
|
|
|
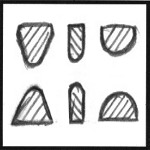
Figure 20 |
Make whole families of round and square ones of various sizes as you fancy.
I have used the 1/2" one in the photograph for many years but can not remember where the idea came from.
|
|
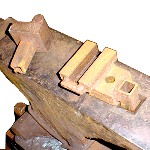
Figure 24
Click For detail |
Square, heavy wall tubing, called RHS here (in Australia), of the appropriate size is great for hardie tools.
It is easily tapered hot, quickly cut off and arc welded to the tool and is a lot less likely to damage your anvil than solid steel when driven hot into the hardie hole for a good fit. Many anvils have been broken this way.
Hugh McDonald
|
|
|
|
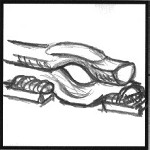
Figure 21 |
For fullering large round stock or pipe it helps to have a curve in the fuller to help push the metal toward the center. Here the bar has been bent and the bottom has supporting spacers welded on to it.
JOCK D
|
|
|
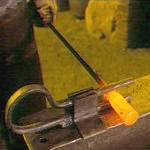
Figure 23
Click for Detail |
And this is a nice photo of a spring fuller in use on pipe that I found on
Laughing Crow Forge (web site abandoned).
Note the side guides.
These are not necessary but they help keep the top bar centered over the bottom for picky work.
The guides are made of pieces of angle iron and give this spring fuller a nice base as well as having a hardie hole tang.
Also note the flattening of the loop. If the spring is to stiff you can flatten the stock.
|
|
JOCK D
|
|
See also iForge Demo #41 Anvil Fuller Tool by Bill Epps.
Updated with new photos.
AND See the new iForge Demo #159 Easy Fuller Fingers
Questions? Comments?
|
|
notjustone
|
|
In figure 21 is the bend needed in the top bar and if so do you ever have problems with it straightening out?
|
|
PF
|
|
Thanks Guru, our knowledge of smithing is a bit fuller now
|
|
JOCK D
|
|
If made of mild steel they tend to lose shape but are easy to put in the forge and adjust. In tool or spring steel they will take YEARS of constant use without losing shape.
|
|
PF
|
|
Guru, if of tool steel, is there a problem with die wear over time?
|
|
mike-hr
|
|
I saw a cool trick recently, a guy welded a six inch piece of whatever to the top of the hairpin on the spring fuller, he could open it with his elbow , hot iron and hammer in hand..
|
|
brooks111
|
|
Is spring steel just like car shocks?
|
|
JOCK D
|
|
Pete, not unless you are using it on a lot of tool steel or stainless. Fullers tend to wear "in" not out so much. .
|
|
JOCK D
|
|
Mike, there is always a new "kink"
Brooks, shock rods are something hard possibly case hardened as well as chrome plated. Never made anything out of one. .
|
|
PF
|
|
Brooks, more like the springs
|
|
notjustone
|
|
Would shims on the top and a hammering surface to make the top basically supported like the bottom be beneficial?
|
|
Rich Waugh
|
|
More great and useful info. Thanks, Jock!
|
|
PF
|
|
I like those side guides
|
|
JOCK D
|
|
Notjustone, Not unless you are using a HUGE hammer. I've seen a lot unsupported on the bottom but I make them with spacers.
|
|
Leo M
|
|
Nice demo thanks Jock
|
|
notjustone
|
|
Thanks jock worry huge hammers don't fit my hands
|
|
b eyes
|
|
'tis my first visit to a demo. Thanks for letting me in.
|
|
Sleepingbear
|
|
Great demo.
|
|
JOCK D
|
|
Thank Hugh McDonald for the bulk of the new stuff!
|
|
|
|
Links:
|
|
|
|


Demonstration by Jock Dempsey
February 21, 2001
Addendum with material from
Hugh McDonald
April 3, 2002
In smithing a fuller is a tool with a round or parabolic "nose" that is driven into the hot metal.
Photo above courtesy Kayne and Son.
Figure 1
Earlier Bill Epps did one on the type that mounts on your anvil and has a pivot to support the upper of an upper/lower pair. Tonight we are looking at plain fullers.
Figure 2
Figure 3
For more details see Rough, Loose and Withe Handles.
Figure 4
Figure 5
Figure 7
Please note that the illustrations are exagerated. Sinking the fuller too deep will result in cold shuts or folds when flattening.
Figure 6
Please note that the illustrations are exagerated. Sinking the fuller too deep will result in cold shuts or folds when flattening.
Figure 8
Figure 9
Figure 10
Figure 11
Figure 12
Most fullers are made of tool steel but they don't have to be if you need one in a hurry. I often just pick up a piece of round bar.
Demonstration by Jock Dempsey
With material from Hugh McDonald
April 3, 2002
Figure 14
Figure 15
Figure 17
Figure 18
Figure 19
Hugh McDonald
Figure 16
Image from 1908 Webster's Dictionary
Figure 22
Click For detail
Figure 20
Figure 24
Click For detail
Hugh McDonald
Figure 21
JOCK D
Figure 23
Click for Detail
Laughing Crow Forge (web site abandoned).
Note the side guides. These are not necessary but they help keep the top bar centered over the bottom for picky work. The guides are made of pieces of angle iron and give this spring fuller a nice base as well as having a hardie hole tang.
Also note the flattening of the loop. If the spring is to stiff you can flatten the stock.
AND See the new iForge Demo #159 Easy Fuller Fingers
Questions? Comments?
Brooks, shock rods are something hard possibly case hardened as well as chrome plated. Never made anything out of one. .
iForge is an Andrew Hooper Production
HTML Copyright © 2000 Jock Dempsey, www.anvilfire.com
Webmaster email: webmaster at anvilfire.com