| |
 |
|
|
|
-GURU
ANVILFIRE
|
|
Tonights demo will be a continuation of last week's.
Last week we discussed punching holes and slitting. Tonight we are going to look at how far to slit and what we can do with it.
|
|
|

Figure 15 |
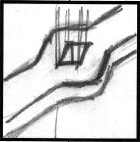
Figure 13 |
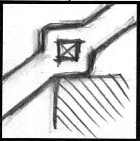
Figure 14 |
|
-GURU
ANVILFIRE
|
|
A little logic will tell you how long to slit for a punched hole. For a square it is the length of two sides minus about 5% to allow for drifting a snug fit.
|
|
|
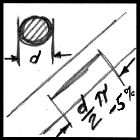
Figure 16 |
For round holes it is a little tricker.
|
|
|
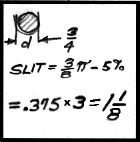
Figure 17 |
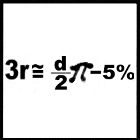
Figure 18 |
|
|
-GURU
ANVILFIRE
|
|
The minus 5% lets you round PI to an even 3 (whoops) and the adjusted length of the slit is 3 time the radius.
|
|
|
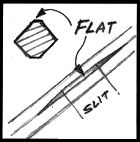
Figure 19 |
For punching square bar on edge you need to start by forging a narrow flat to set the chisel on. After making the flats mark the length of the slit on the flat.
|
|
|
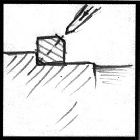
Figure 20 |
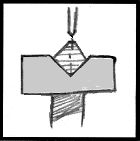
Figure 21 |
|
|
-GURU
ANVILFIRE
|
|
There are several ways to support the work to split it on edge. Supported on the anvil shelf, in a set tool (shown) or on a swage block.
|
|
|
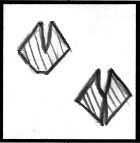
Figure 22 |
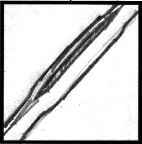
Figure 23 |
|
|
-GURU
ANVILFIRE
|
|
Split the work about to center and then turn it over and finish from the other side. When done close up the split and square the stock back up.
|
|
|

Figure 24 |
Now to make something. Above we have split the bar several inches (about 5-6 in 5/8 bar).
We can open this up to make this pleasing shape made of triangular bar. . .
|
|
|
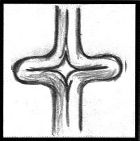
Figure 25 |
The open oval shape can be used on its own or we can continue to mash it down like this.
|
|
|
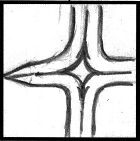
Figure 26 |
Then it can be flatten and the ends pointed as shown. For the mass of these corners to work out you need to bring the side points up to a welding heat and reweld just a little back into a square when you point it.
|
|
|
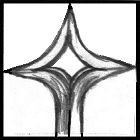
Figure 27 |
This one has had the bar cut off and pointed on the end too. This gives us two different shapes. A four pointed star and a mid bar element.
|
|
|
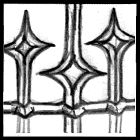
Figure 28 |
Using these two elements and more square bar split on the corner you can produce this VERY distinctive piece. All using the same techniques.
|
|
-GURU
ANVILFIRE
|
|
Very stout. Makes an ugly looking weapon too. . .
|
|
RALPH
|
|
Jock, didn't some of Francis' work on display at Flag have that detail?
|
|
-GURU
ANVILFIRE
|
|
It may have. The first time I saw this was at the Ripley, WV conference in 1984. Josh Greenwood made one at an open forge just showing off!
|
|
-GURU
ANVILFIRE
|
|
PUNCHING PART I Punching Holes
Making Matrix and specialty Punches Touchmark, character and eye punches.
|
|


Demonstration by Jock Dempsey
guru at anvilfire.com!
August 9, 2000
ANVILFIRE
Last week we discussed punching holes and slitting. Tonight we are going to look at how far to slit and what we can do with it.
Figure 15
Figure 13
Figure 14
ANVILFIRE
Figure 16
Figure 17
Figure 18
ANVILFIRE
Figure 19
Figure 20
Figure 21
ANVILFIRE
Figure 22
Figure 23
ANVILFIRE
Figure 24
We can open this up to make this pleasing shape made of triangular bar. . .
Figure 25
Figure 26
Figure 27
Figure 28
ANVILFIRE
ANVILFIRE
ANVILFIRE
Making Matrix and specialty Punches Touchmark, character and eye punches.
iForge is an Andrew Hooper Production
HTML Copyright © 2000 Jock Dempsey, www.anvilfire.com
Webmaster email: webmaster at anvilfire.com