| |
 |
|
|
|
ALAN
LONGMIRE
|
|
Okay, this is a candlestick I make based on one I saw Elmer Rousch at J. C. Campbell make. Francis Whitaker made a similar one, it's in one of his books.
|
|
ALAN
LONGMIRE
|
|
This is a fairly basic forging job that uses a few tools you've seen here before, like the guillotine fuller and maybe a leaf tool if you want. It's made from 5/16 inch round rod and 3/4" black iron pipe, but seamless tube works as well.
|
|
ALAN
LONGMIRE
|
|
Most candles are 5/8 to 3/4" at the base, so we want to use pipe that's about the right size. 3/4" O.D. schedule 40 is just about perfect. We'll start with the basic pipe cup operation.
|
|
ALAN
LONGMIRE
|
|
Remember when forging pipe, always block the open end in your hand with something like wadded up paper, or when you lower the hot end your arm will suddenly lose all its hair..
|
|
|
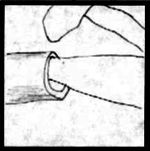
Figure 1 |
Step one is to heat the end of the pipe to a fairly high heat and put a taper on the thickness. I do this over the tip of the horn, but some folks use a bick iron. The drawing is supposed to show this being done with a cross pein.
|
|
|
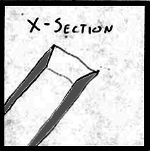
Figure 3 |
Be careful when you do this not to spread out the end of the pipe. The taper is to provide room to roll the end back later. An axial cross section is pictured at left. I mislabeled it as fig. 3, oops!
|
|
|
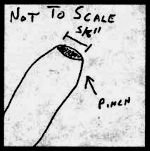
Figure 2 |
After you thin out the wall at the end of the pipe, it's time to taper the outside diameter in a bit. You want the Inside dimater at the start of the taper to be about 5/8 inch so it will hold a candle (no pun intended) when you roll the rim later. The drawing shows this taper to a greatly exaggerated degree.
|
|
|
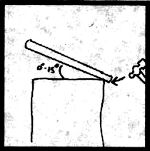
Figure 4 |
Now hang just the wall-tapered section over the edge of the anvil and flare out the rim. I use either a 32-oz. ball pein or the cross pien if I'm in a hurry. The thin rim should flatten out, then start to roll back upon itself.
|
|
ALAN
LONGMIRE
|
|
Hit on the inside only, and you don't have to have the pipe at an angle all the time. Practice this one. It's tough to keep the rim even and level.
|
|
|
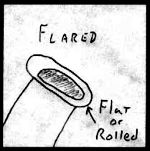
Figure 5 |
|
|
|
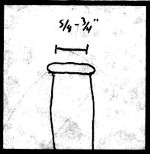
Figure 6 |
When the rim is rolled, it should look like the drawing to the left.
|
|
|
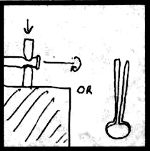
Figure 7 |
Now for the fun part: use either a guillotine fuller or a spring fuller to neck down the pipe. Do this about an inch from the end, as pictured below.
|
|
|
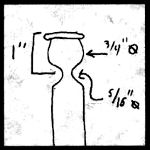
Figure 8 |
|
|
|
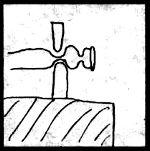
Figure 9 |
You could stop here, cut it off, and thread the small end 1/4-20, bolt it to something, but this demo has a ball finial. So, neck it down one more time, this time until the walls of the pipe touch.
|
|
|
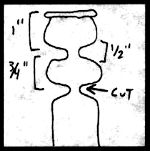
Figure 10 |
|
|
|

Figure 11 |
Now then, after you cut this off with a hacksaw, since a hot cutter would mess it up, you need to hammer the end into itself. This is kind of like Bill's "forging a ball" demo.
|
|
|
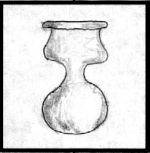
Figure 12 |
The finished product will look something like this.
|
|
|

Figure 13 |
Now then, we need the handle part. Take about 12 to 14 inches of 5/16 inch round stock and forge a little scroll on one end. Don't forget to taper! When you make this little scroll-doodle, bend it 90 degrees flatways to the rod. If you look at it from the top it will look like the little thing in the drawing.
|
|
|
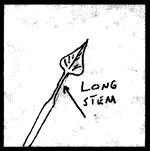
Figure 14 |
Now, on the other end of the rod make a leaf. There's a demo here for that, too.
|
|
|
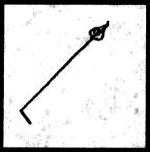
Figure 15 |
It should look like this from above.
|
|
ALAN
LONGMIRE
|
|
Now comes the hard part: scrolling the rod. It should be a flat scroll with the last few inches slowly raised up so it'll sit flat with the leaf end off the table. You can do this on the horn, or in the vise. I usually start it on the horn and then tweak it in the vise with a torch, then set it on the anvil and smack it 'til it's level .
|
|
|
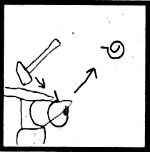
Figure 16 |
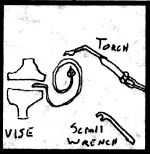
Figure 17 |
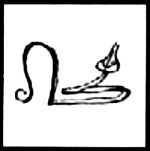
Figure 18 |
|
|
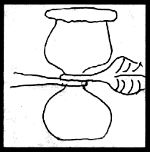
Figure 19 |
Then, the finish: wrap the thin part of the leaf stem around the neck of the pipe cup. A torch will be handy for tweaking here, since the cup needs to sit level and be up off the tabletop.
|
|
|
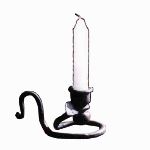
Figure A |
This will give you the following product. Use one of those 6 inch emergency candles, they're just the right size.
|
|
|
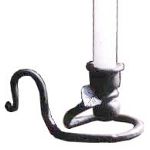
Figure 20 Detail |
Oh, wait! You absolutely HAVE to get the wrap tight or the cup will wobble amazingly.
|
|
ALAN
LONGMIRE
|
|
Other things can be done with the rod ends. I've put leaves on both ends, or put a tight scroll on the cup, faceted the ball, and so forth.
|
|
Pete F
|
|
excellent demo Alan!, nice piece.
|
|
ALAN
LONGMIRE
|
|
Okay, I guess that's it. Questions?
|
|
jj2k
|
|
Neat demo. How much do these sell for?
|
|
ALAN
LONGMIRE
|
|
Thanks, Pete!
|
|
Jim C.
|
|
Alan, good demo. Thanks for the time to share this one with us.
|
|
Ntech
|
|
Nice piece and good demo! I like the two piece design.
|
|
|
|
what if you dont have a torch????
|
|
dimag
|
|
Good demo Alan,very saleable item.Consider this idea stolen :)
|
|
ALAN
LONGMIRE
|
|
I sell them for $28 - $30.
|
|
JOCK D
|
|
I thought the ball hanging down was an intresting detail. It could be made into other things too. A hot pepper comes to mind for some reason.
|
|
Dave L
|
|
Thanks Alan well done I'll try one tonite
|
|
clive
|
|
very good
|
|
ALAN
LONGMIRE
|
|
If you don't have a torch, you'll get very good with tong manipulation! I've done it, it just takes longer.
|
|
ALAN
LONGMIRE
|
|
I got the idea with permission from Elmer Rousch, he got it from St. Francis, and HE got it from a student of his from alaska!
|
|
the wind
|
|
on figure 5 alan, are you rolling it down on itself i take it?
|
|
BRYAN
|
|
Very nice, Alan!
|
|
Milt
|
|
Thanksfor the demo. Looks neat, but many steps for some of us just starting. Looks like one to keep for when I know one end of the hammer from the other!
|
|
ALAN
LONGMIRE
|
|
Yep, the dangly bit can be in many shapes. And wind, yes I'm rolling it down on itself like a banana peel.
|
|
Bill
|
|
good demo
|
|
ALAN
LONGMIRE
|
|
Also, the basic pipe cup technique can be used as a starting point for various flowers.
|
|
ALAN
LONGMIRE
|
|
Any more questions? If not I'm going back to the pub, and then to bed! gotta go to work at 6 AM :-(
|
|
the wind
|
|
thanks alan... nice
|
|