| |
 |
|
|
|
-GURU
|
|
Tonights demo is by Bruce Blackistone our resident historian and expert on medieval things is a full time
Marklander Viking
and master of the Longship Fyrdraca. He works for the National Park Service.
|
|
ATLI
|
|
"The multiplicity of methods of skinning a cat is of little comfort to the feline involved."
Uncle Atli’s Very Thin Book of Wisdom
The idea behind this demonstration is to forge a spearhead in such a fashion as would be practical for the original Anglo-Saxon smith, using simple tools and materials.
(In part II we will demonstrate several “quick and dirty” methods for forging generic spearheads, and there are many methods besides those.)
This session is devoted to how it MIGHT have been done a thousand or more years ago.
Since there is always a lot of enthusiasm from novice blacksmiths and reenactors for this sort of thing we will start from the beginning.
|
|
|
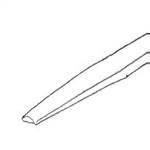
Figure 1
Click for Detail |
1) Using a 1/2" (12.7 mm) bar of lower medium carbon steel (40 pts. would be ideal) taper and scarf about 4" (10.16 cm) of one end for faggot welding.
|
|
|
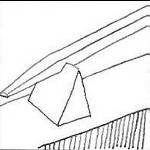
Figure 2
Click for Detail |
2) Cut about 2/3 through on the underside of the bar on the hardy.
|
|
|
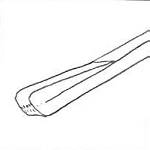
Figure 3
Click for Detail |
3) Fold over and faggot weld back on itself. This is for the socket.
|
|
|

Figure 4
Click for Detail |
4) With a cross or straight peen hammer, start spreading the socket in a flair.
An occasional work-over with a ball peen will help to thin the metal.
|
|
|
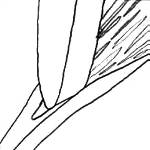
Figure 5
Click for Detail |
5) Use a narrow fuller up near the "pointy" end to thin and create a pocket. (You can also clamp a thin fuller in a vise and hammer the stock down on it.)
|
|
|

Figure 6
Click for Detail |
6) The socket should start to take a fan shape. You may want to make a paper template (either spindle fitted, wrapping paper around the proposed shaft or use Jock's formula for cones on the Anvilfire 21st Century Blacksmith page HERE ) and draw the pattern on your anvil or a piece of plate or sheet metal. Anglo-Saxon spear shafts are thin, almost always under 1" ( 25.4 mm) and down to ˝" (12.7 mm). I usually aim for ľ" (19 mm), which, times pi, gives a base measurement for the bottom of the spread socket of a bit less than 2 Ľ" (5.7 cm) but you may want to leave some leeway. This is also a good time to profile the socket, since some edges may be a little rough. These may be evened up by forging, filing or grinding.
|
|
|
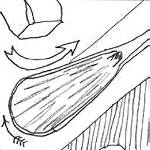
Figure 7
Click for Detail |
7) Start rounding-in the socket on the anvil, forcing it closed. If you have a swage block, this can be handy, but you can also lightly crimp the middle of the socket on the anvil step to get it started.
|
|
|
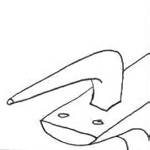
Figure 8
Click for Detail |
8) The only tool you might have to custom-make is a socket bick. Mine was formed from an alignment tool, picked up at the flea market. I forged the back end to fit the hardy hole and then bent it to a right angle using a long pipe sized to near the point of the bend. (Useful wrenches, pipes.)
|
|
|
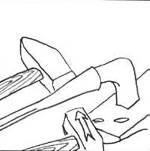
Figure 9
Click for Detail |
9) Buck the socket with a heavy hammer and close it up with another hammer. When shy a helper, I've braced the cold end against my chest on the leather apron. (Useful folks, helpers.) The socket bick is also useful for opening the socket if you've rounded-in too tight.
|
|
|
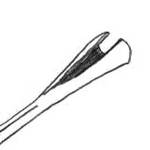
Figure 10
Click for Detail |
10) The socket should look something like this. So much for the hard part.
|
|
|
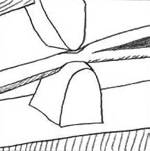
Figure 11
Click for Detail |
11) Fuller down the corners ahead of the socket to a nice round or octagonal. DON'T OVERDO IT!
|
|
|
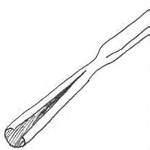
Figure 12
Click for Detail |
12) Ready to work on the "pointy" end.
|
|
|
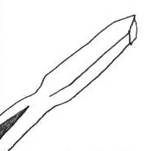
Figure 13
Click for Detail |
13) Proceed 4-5" (10-12.7 cm) beyond the neck and cut off on the hardy from both sides to start forming a point. Note that the socket slit should be at a right angle to the plane of the blade.
|
|
|
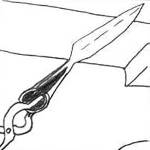
Figure 14
Click for Detail |
14) Draw out and flatten the blade according to taste. A leaf-shaped profile seems to come naturally. If you're somewhat inexperienced "forge thick and grind thin", using files (slow but sure) or grinders (fast but tricky, especially grinding wheels) for shaping. Remember- you can forge too thin.
|
|
|
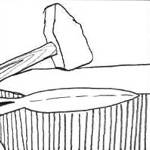
Figure 15
Click for Detail |
15) One method for drawing down the sides into an edge is to hammer with one side of the blade off the anvil. (The Russian pattern anvils, with the cut-away heel, are useful for this.)
|
|
|
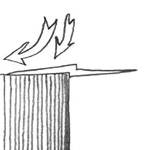
Figure 16
Click for Detail |
16) This shows a cross section to be aimed for. Interestingly enough, African tanged spears use this same form, as shown in a recent edition of ABANA's "Hammer's Blow".
|
|
|
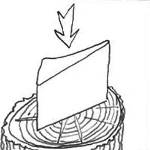
Figure 17
Click for Detail |
17) One method to make a "strickened" or indented profile seen on some spearheads is to prepare a special fuller and hammer each "wing" of the spearhead down over it. A good blow with a heavy sledge may do the trick, especially to get it established. The bigger the profile of the fuller, the more force that will be required. These shops didn't run without a large labor pool, so hammer men would have been available for some extra persuasion.
|
|
|
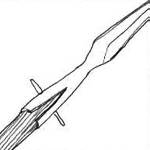
Figure 18
Click for Detail |
18) The head was attached to the shaft (ash preferred, but they also used hazel, willow, and a variety of whatever-was-handy) by a metal pin or rivet.
I prefer a pin, since it can be pulled out to simplify the changing of the shaft when the spear was broken, and it seems to be what is depicted in numerous contemporary manuscripts. Be sure that the holes are aligned through the middle of the socket and at right angles to the socket slit and the axis of the blade and shaft.
|
|
ATLI
|
|
In the 21st century I just insert the carved-down spear shaft, put it in a wooden V-block under the drill press, and run a pilot hole, one size smaller than the pin, through socket walls and shaft.
Then I drill the holes of the socket walls to pin size, giving a tight fit to the pin through the wood.
The pin can also be bent fore or aft to provide grip, and this, too, seems to be shown on some manuscripts.
|
|
|

Bruce "Atli" Blackistone
Click for Detail |
"Atli" explaining the forging of an Saxon spear at Military Through the Ages, Jamestown, VA, March 15, 2003.
At Military Through the Ages the Longship Company
(normally Vikings), of which Atli is a member, portrayed a group of Saxons invading England in 553 AD.
See anvilfire NEWS for more details.
|
|
ATLI
|
|
Questions?
|
|
GURU
|
|
Wonderful drawings and instructions Bruce!
Bucking the socket bick is a great piece of advice for perventing damage to the anvil.
|
|
Brogan
|
|
Cool demo... I will be making a few of them. Thanks!
|
|
terry l. ridder
|
|
I am a bit confused as to the purpose of the special fuller in fig 17.
Would you be able to expand on it's purpose?
|
|
ATLI
|
|
The fuller indents the blade "wings", one on each side. You smack down the "wing" on top of the fuller to form a slight hollow. Then rotate the blade on it's axis and fuller the other wing.
|
|
ATLI
|
|
The fuller addds stiffness and lightnes (relative to the size).
|
|
Ntech
|
|
Good demo. great subject. Thanks for showing me how.
|
|
Cameron Stoker
|
|
Ahh, so the 'stricken' spear is actually stronger than the 'un-stricken' one.
|
|
ATLI
|
|
Cameron- Fullers are magic. Corrugated roofs and cardboard are the same principal, and far superior to flat sheets.
|
|
Cameron Stoker
|
|
Somewhat related, is ash a common wood in the usa?
|
|
GURU
|
|
ASH, Yes Cameron. IF the name is the same where you are. Many common tree names are different worldwide. American ash is what baseball bats used to be made of. It is a very hard strong light colored wood. Denser grain than oak but not as closed as maple.
|
|
ATLI
|
|
If you look around, a lot of the stock sold for broom and rake handles is ash!
It's a very light color. Baseball bats are made of ash. Good sources up in the Appalachians and Ozarks.
|
|
Cameron Stoker
|
|
I suppose it is not so common in the southwest (NM) - We don't even really have oak (of a speakable size) here.
|
|
ATLI
|
|
One conflict between literature and archeology is the poets always talk about "ash" shafts and "linden" shields. Archeologists find all sorts of wood being used.
|
|
Cameron
|
|
Were A-S spears also done with a welded socket? Seems like it would be hard work to thin out the socket compared to working a wrought iron socket and welding the 'pointy' on seperate?
|
|
ATLI
|
|
Cameron: Yes, they could be done that way (and I've done it) but considering you'd still have to beat a bar into a sheet- this just seems easier in the context of the time. (No hammer mills yet w/ water power.)
|
|
Cameron
|
|
One last question: How long do you spend on this forging? Thanks for a good demo
|
|
ATLI
|
|
Cameron: Since I keep doing it in stages for demonstrations and experiments, I've never actually done the job in one session. I think I could pound it out in no more than two hours, one on a good day and a helper handy.
|
|
ATLI
|
|
Okay; y'all be careful out there. I don't want anyone putting an eye out!
To bear arms is to take responsibility. Always make sure you know where the pointy end is and be sure nobody walks into it. (The basis of some of the earliest English common law!)
Continued in Spearheads Part II
|
|