Bit
Demonstration by Bill Epps.
http://www.besmithy.com
Febuary 9, 2000
Bit
Demonstration by Bill Epps.
http://www.besmithy.com
Febuary 9, 2000
Bill-Epps : |
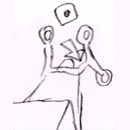
Tonights demo is a "One piece horse Bit" | |||||
Bill-Epps : |
|
|
|
|||
Bill-Epps : |
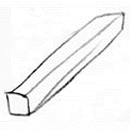
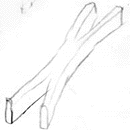
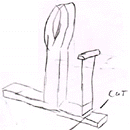
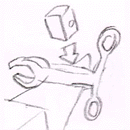
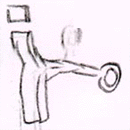
We are going to start with a piece of 3/4" Square stock, 7" long. This is going to make a 5" two-to-one bit. | |||||
Bill-Epps : |
Layout and mark each end two inches back with a center, and mark w/center punch. I make a line down the center with a cold chisel, something that I can see when the steel is hot. | |||||
Bill-Epps : |
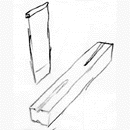
Get it good and hot and with a hot cutter follow your line. Go 1/2 through on one side, and 1/2 through on the other and do this on both ends. | |||||
Bill-Epps : |
|
|
|
|||
Bill-Epps : |
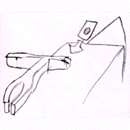
After I get it pretty well split, keeping it centered, be sure about this, I go to the vice and finish opening it up to the depth of 2". | |||||
Bill-Epps : |
|
|
|
|||
Bill-Epps : |
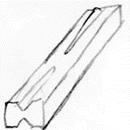
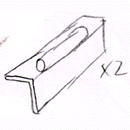
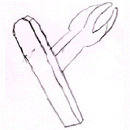
I grab the piece in the vice and use a blunt nose punch on the bottom of the split to put a radius at the bottom of the split on all sides. Then I put it in the vice jaws with a 1/2" rod welded to the edges and hammer it down to a "T". The reason for this is to put a radius on the bottom of what will become the "Shank" to avoid a cold shunt. | |||||
Bill-Epps : |
|
|
|
|||
Bill-Epps : |
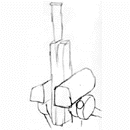
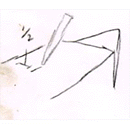
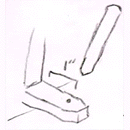
After I do this on both ends, I close one end back up to get it out of the way so that I can work on the other end. I make a mark with my soap stone on the face of the anvil, and trim 1/2" off one arm, only. This is going to be the top | |||||
Bill-Epps : |
This is going to be the top Eye/loop of the bit. The corners I drive back into theirself at a 45 deg. angle and flatten back out. This will give a radius on the end and get rid of the corner that could make a cold shunt in the ring/eye. | |||||
Bill-Epps : |
|
|
|
|||
Bill-Epps : |
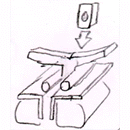
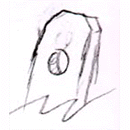
After the end is well rounded I mark 1" back from the end, and hot punch a hole a little over 1/4" in diameter. | |||||
Bill-Epps : |
|
|
|
|||
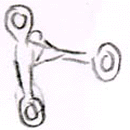
Bill-Epps : |
Using the horn of the anvil, The metal above the hole is what I am going to work out into the ring. The punched hole is going to end up being the bottom of my ring. On the top side I like to make this ring over 1" closer to 1 1/4" in diameter. This is where the bridle has to hook in and also the curb strap. The bottom eye of the ring only has the reign attached and doesn't have to be quite as big. | |||||
Bill-Epps : |
|
|
|
|||
Bill-Epps : |
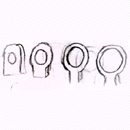
When working the eye, keep it the same thickness as the eye grows. On the bottom shank, round the corners up and punch the hole. This hole only needs to be 3/4" back from the end. | |||||
Bill-Epps : |
Now at this point, I use a rounding hammer and start working the top shank down until it is about 2 1/2" long. | |||||
Bill-Epps : |
|
|
||||
Bill-Epps : |
Now we take the bottom shank as in the top and start working the eye up. After we get it open to a little under 1", we will start working the shanks. | |||||
Bill-Epps : |
|
|
|
|||
Bill-Epps : |
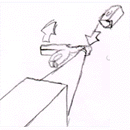
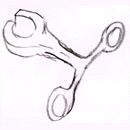
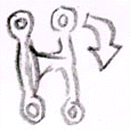
Now I use a rounding hammer to start working the bottom shank and draw it to about 4 1/2" to 5" long. Start working the mouthpiece down, leaving a good radius in the corner. After I get it worked out, I take a good heat grab it in the vice, and I twist the "Finished part" 90 degrees. This is to get it out of the way so you can work on the other side. | |||||
Bill-Epps : |
|
|||||
Bill-Epps : |
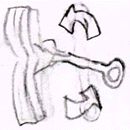
Go back to your mark on your anvil face and trim off the end of the other side and "Repeat" all of the previous steps. | |||||
Bill-Epps : |
|
|||||
Bill-Epps : |
After you get the second side about the same as the first side, heat the Center and untwist the first side to be straight in line with the second. | |||||
Bill-Epps : |
|
|
|
|||
Bill-Epps : |
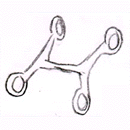
Now that the two shanks are lined back up, finish working out the mouth piece, it should come out to about 6" in length, leaving a good full radius in the corners. | |||||
Bill-Epps : |
|
|
|
|||
Bill-Epps : |
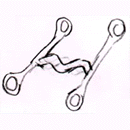
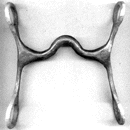
Now I come and put a port in the center to get my width right on the bit, and I let the two top shanks angle outward as to give good clearance on the side of the horses mouth so that the curb chain or bridle won't pinch his mouth. The reasons for the radius in the corners of the mouthpiece is not to pinch his mouth when the bit is pulled back and the curb chain comes forward. | |||||
Bill-Epps : |
|
|||||
Bill-Epps : |
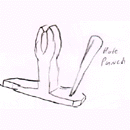
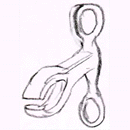
It should look something like this. | |||||
Bill-Epps : |
Questions?? |
|||||
Steve-E : |
Bill how long do you estimate your forge time for this bit? | |||||
Bill-Epps : |
Steve-E: 3 to 4 hours. | |||||
Jock-D : |
An expensive piece of hardware. | |||||
Bill-Epps : |
Expensive is right even before you hang the chrome on it. | |||||
Jock-D : |
Chrome? Looks like a good piece for stainless. . . | |||||
Tom-Stovall : |
No chorme on sweet iron. Horse slobber won't rust. | |||||
Bill-Epps : |
This is a good forging exercise even if you aren't a horseman. Someone you will meet someday will be, and they should know the difference between a "Hand Forged Bit" and a store bought one. | |||||
Ten-Hammers : |
And what did the old dogs do be4 chrome? | |||||
Bill-Epps : |
If you are gonna make bits, learn what their purpose is, and how they work. There's a lot of "Mis Information and Old Wives Tales" about bits. | |||||
Tom-Stovall : |
Wrought iron. | |||||
Bill-Epps : |
Ten: Chrome = engraving, or mounted silver or silver inlay, NOT Chrome plating. | |||||
vince-herod : |
Could you tell us a few? | |||||
Bill-Epps : |
If a bit is used, it will not rust. However, if it lays up and is not used, then it should be wire brushed, but you don't oil it or put poly finishes on them. | |||||
Bill-Epps : |
#1: Bit does not stop a horse. (horse has to be trained to stop). #2 the Bit is just your line of communications between a trained horse and a trained rider. The horse holds the bit in his mouth and responds to the movement of the reigns. #3 The bit doesn't matter, it is the hands and the training. A lot of folks want to buy training rather than spend time working with horse and developing equestrian skills. | |||||
Tom-Stovall : |
Pay careful attention to the radius Bill incorporated at the junction of shank and mouthpiece. Lots of store bought bits make too sharp a transition here and will pinch the heck out of a horse. | |||||
Ten-Hammers : |
A lot of folks want to know where I get my knives chromed. I polish them, I say, They've never seen a plow come out of the ground | |||||
Ten-Hammers : |
Do you use a rag buffer to polish Bill? | |||||
Bill-Epps : |
The advantage to a handmade bit is that you can make it to fit the particular horse you want to make it for. | |||||
Tom-Stovall : |
Bill, it ain't just a forging exercise, the bit you built ended up being "right" in that it's a horseman's bit from the git go. Excellent work! | |||||
Bill-Epps : |
After I get through forging a bit I forgot to say, it should be sanded and polished smooth. | |||||
Bill-Epps : |
Yes, I do use a rag buffer to polish the bit | |||||
Bill-Epps : |
Heck, I use die grinders, rag buffers and what ever it takes to get it clean and smooth.:) | |||||
Ten-Hammers : |
I've got a small line shaft with 6 buffers, and then on to the High speed one. I don't buff much anymore though. | |||||
Rich-Hale : |
For those without a buffer,,,you can tak a pice of emery about two feet long and 1/2" wide and buff it like shineing a shoe.....go from 100 grit down to 400 or so and it will look great..... | |||||
Ten-Hammers : |
Yeah, Then on to crocus. Real labor, but fine results. | |||||
iForge
is an Andrew Hooper Production
Copyright © 1999 Bill Epps
HTML Copyright ©
1999 Jock Dempsey, www.anvilfire.com
Webmaster email: webmaster@anvilfire.com