 |
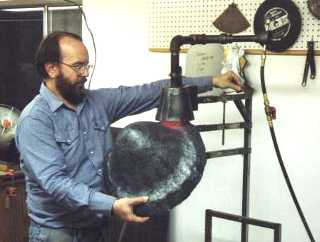
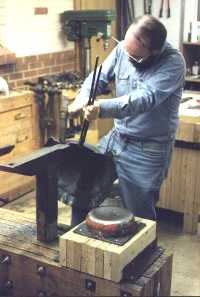
13) Eric adjusts the forge for the work. He will go through about two more raisings before the profile is satisfactory. The small fan in the background is required to break up and circulate the super-heated air above the forge. (A ceiling fire can ruin your day!) Eric comments: "What you don't see here is the evaporative cooler (a usual house fixture in the Southwest) blowing several hundred cubic ft/min of fresh air into the shop while the forge is running. Ventilation is essential when burning fuel in a closed space; plus, it keeps the shop from getting to 120+ F when I do this in July! The helmet in progress is a bascinet, 12-gauge. The piece weighs about 9 lbs. at this point, I think." |
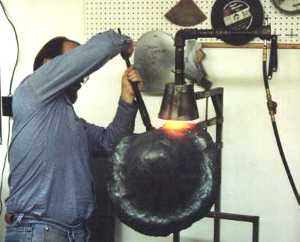 |
14) Hot stuff! When the metal reaches a yellow and starts to scale, it's ready. Metal templates for an Italian barbute and other pieces hang on the peg-board in back. |
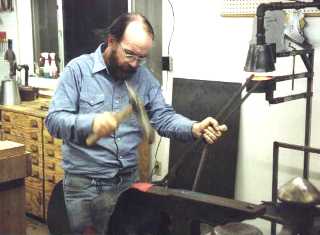 |
15) Over to the T stake for raising. |
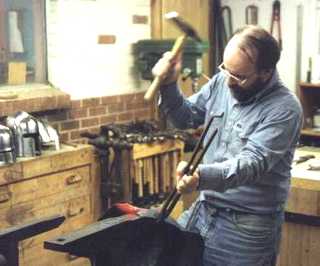 |
16) .smiting with skill. |
 |
17) .until the heat fades to a dull red. Eric says, "Now you can see the need for that leather pad on the thigh. I just naturally push my left leg up to support the work from below, and the heat and shock were punishing my left quad something awful. I've been asked why I use a T-stake, like a silversmith, when the few old illustrations from period sources show mushroom or ball-stakes being used for helmets. No great reason; I just learned on my T-stake, and after hundreds of hours on it, I'm used to it. I've tried a ball stake a couple of times, and nearly killed myself; it's a very different approach. I may try it again someday." |
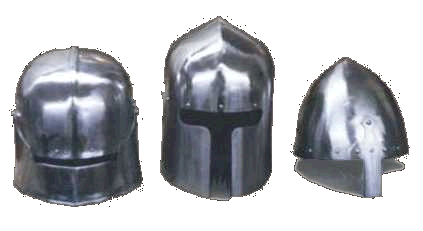
Skipping ahead, through all of those boring intermediate steps, we have an Italian style 15th century barbute, a German style 15th century sallet, and an 11th century Norman style helm. |
|
 |
A close-up of the sallet. Note neatly squared median crest raised along the top of the helm. |
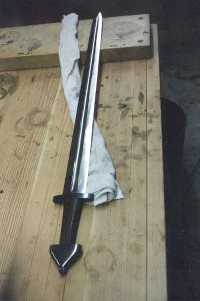 |
20) When Eric isn't forging wondrous helms, he sometimes dabbles in a Viking style sword or two. Eric comments: "The sword is not pattern-welded, by the way; that is a skill that I will probably never learn. (The skill level of some bladesmiths is a constant source of amazement to me -- I hesitated to let Bruce take a photo of this piece; it is a simple kitchen knife, compared to some work I've seen.) The blade was forged and ground from 5160 alloy bar stock. The rock maple block screwed to the end of the bench has different size hollows for dishing cold work." |
| What cannot be shown here are the hours of work and the degree of talent and skill that Eric brings to these projects. However, just looking at his tools and techniques answered a number of questions that I'd had. For armory on a low-talent/simple-tool basis, see "Atli and Tadgh Make a Helm" in a later feature of Anvilfire. Eric adds: "A couple of extra notes: a) The propane tank for the forge is always kept OUTSIDE the shop, the hose runs in through an open door. I use about 12 ft of hose. b) The Mk 4 forge chamber shown in item 10 is now up and running. Some observers may scratch their heads over the complex-looking burner pipe shown here on the operating forge. This is a burner designed by Ron Kinyon of the Arizona Artists Blacksmiths Association. The two 90-degree elbows are intentional; the design was originally for a cheap, easy-to-build "multi-positional" burner, and the elbows also slowed and mixed the gas-air stream a bit, preventing flame separation and blowout. I have since tried Ron Reil's flare-mouth style of burner, on the Mk 4, and I have adopted it. It is stable over a wide pressure range, meaning you can idle it at low consumption (2-3 lbs pressure) or turn it up to very high heat (10-15+ lbs, no problem). It's also very easy to build. I urge anyone who has not looked up Ron's website yet to take a look; you can find it off the Blacksmith's Ring from the Anvilfire site. (Look for Forge and Burner Designs.) He has lots of drawings, photos, and hints for forge builders, and was very courteous and helpful to me when I sent inquiries. (Please only email him if you have specific questions for him to answer personally; he has to handle a lot of traffic on his site!)" | |
|
Copyright © 2000 Bruce Blackistone Copyright © 2000 Jock Dempsey, All Rights Reserved |

anvilfire.com home |
Related article Atli and Tadgh Make a Helm |