Building an 18th-Century Forge
at The Presidio de San Agustin del Tucson
By Eric G. Thing
|
In the spring of 2010, Rick Collins, a member of a Spanish Colonial military re-enactment unit in Tucson, Arizona, approached me with an idea: How about making a period forge, circa 1770, for the Presidio museum in downtown Tucson?
I jumped at the chance.
I love making and operating forges, and I really wanted to help support the Tucson Presidio Trust. (For information about the Presidio site, visit the Trust's website at
www.tucsonpresidiotrust.org.)
|
Background: The Spanish-American Colonial Forge
|
Before I built one, I had to know what to build. I have a copy of Marc Simmons' and Frank Turley's
Southwest Colonial Ironwork, a handy reference for reconstructing 18th century Spanish-American forge equipment. To quote pages 46-47:
"The forge of colonial blacksmiths was a simple platform of earth, adobe, or stone, constructed to accommodate the height and particular needs of the worker...
"Principal parts of the colonial forge were the foundation, hearth, fire pot, tuyere, and fire wall. The foundation, either square or rectangular in form, was made by laying up a masonry wall to a height of two feet or more. The enclosure was then filled in solidly with adobe, rock, or tamped earth to a point approximately six inches below the top of the retaining wall. Finally, the remaining space received a fill of either floor cinders, ashes, or carbonilla, a mixture composed of equal parts of ground charcoal and moistened earth."
The authors then describe the fire pot as a simple depression in the carbonilla hearth, with the tuyere coming in on one side. "Iron tuyeres (alcribs) are reported for three of the San Antonio missions in the late 1770s." (p. 47) This is bang on the period of the Tucson Presidio, which is a good thing, since I really wanted to try an iron tuyere.
What about air supply? Simmons and Turley, page 47: "These were the distinctive double bellows, often termed concertina bellows, used by Spaniards until late in the 19th century." Oh, dear. This really worried me. Plans and how-tos exist for making Anglo-French "great bellows", the double-chamber type, but I knew of no plans for the classic Spanish two-bagger. It turned out that I needn't have worried. Bill Ganoe, the current demonstrator blacksmith at the Presidio, had constructed such bellows, and was only awaiting a period forge to use them on!
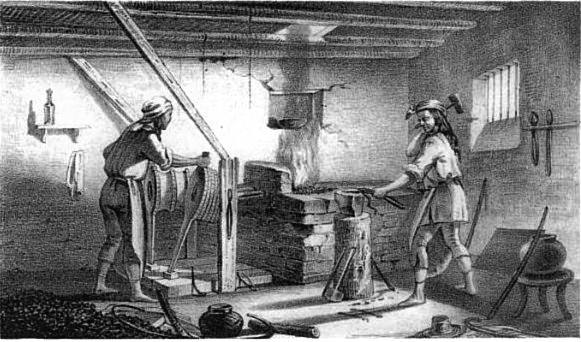
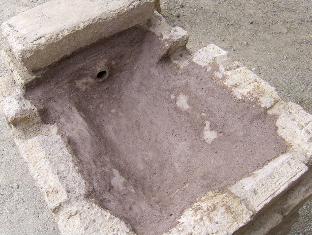
Below is a picture of a Zuni smithy, circa 1854, reproduced in the Simmons and Turley book. This is exactly the type of forge I wanted to build, though I was constrained to a smaller scale: about 3'x3' maximum footprint for the forge body.
|
|
So, I could build an adobe forge body, with a depression in the top for a refractory hearth. An iron tuyere would be permissible. Concertina bellows required, and those already built and ready to hook up.
Consulting with Bill, who would, after all, be doing most of the smithing on the finished forge, I decided on a height of 28 to 30 inches. Since 8"x16" is a fairly common adobe brick size, I picked a six-unit rectangular layout for each course of bricks. This gave a nominal footprint of 24"x32"; small, but very practical for what Bill was called on to make at his forge. Depending on brick thickness, 7 to 9 layers would be needed to achieve the target height, so about 60 bricks would be used in the body. I decided that I would just go with all bricks on each layer, rather than a rectangular wall with tamped earth fill. Adobe bricks are really cheap.
One change from period practice: Instead of a tamped carbonilla hearth, I decided to go with a layer of fireclay mortar, laid directly on the topmost adobe deck. I've had success with fireclay mixes in test side-blast forges I've built in the past. (If the old ways are better, we will find out; if the fireclay hearth can't take a season of use, what the heck -- we'll just tear it out, and fill in some carbonilla.)
|
The Site: The Tucson Presidio Reconstruction
|
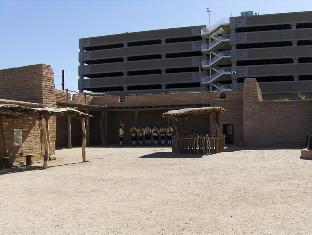
Here's a view of the Presidio courtyard. Really nice adobe walls (adobe supplied locally -- now, as then, Tucson has got some great clay soil in the Santa Cruz river environs), and a barracks in the back. That's the Presidio unit drilling in the background. During the hot months (I am writing this in July 2010) the living history folks don't do demos for the public; it's just too bloody hot. In the fall and winter, though, things can get lively. The unit shown here even has a sweet little 3-pounder field piece that they fire saluting charges from, once a month.
The forge will be located the end of the little ramada on the left.
|
 |
|
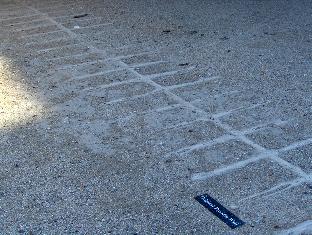
The courtyard actually stands on a corner of the original fort; the modern builders left the discovered remains of the period foundation in place.
|
 |
|
Going a little deeper, they found traces of a Native American pit house. (The Tucson valley has had humans living in it for a good while.) The city fenced off the site, and left it in place as an exhibit.
|
 |
|
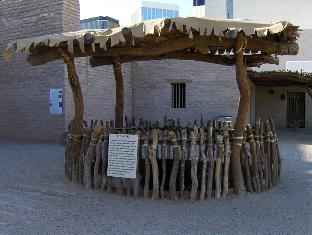
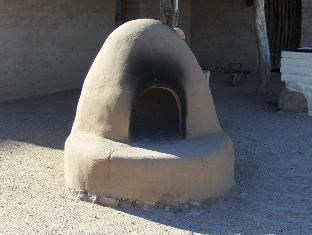
What settlement would be complete without an oven? The staff built a big old horno (earth oven) that works really well. During tourist season (Fall and Winter) bread and sundries are cooked in the oven and available for sampling.
|
 |
Materials
|
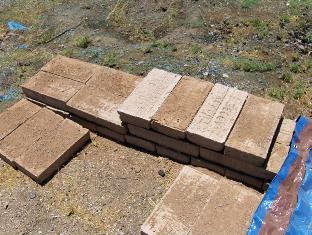
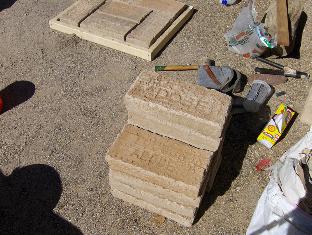
To start with, we need adobe. We need bricks for the body, and loose adobe mix to make mortar for gluing the bricks together. Here are the bricks, supplied by Tucson Adobe West, a company in Avra Valley, about 20 miles northwest of Tucson. (My thanks to John Acton, owner of Tucson Adobe West, for both his materials and advice.) These are 8" x 16" nominal (close to 7" x 15" exact) bricks, weighing about 20-24 lbs apiece. The bricks are about 3.5" high, so I figure eight courses will reach about 28" tall, nearly the height Bill prefers for a forge. Each course will require six bricks, laid out in a 22" x 34" rectangular pattern, so there should be 48 bricks in the body of the forge. Add a few more to build up the sides and the tuyere end, plus some inevitable spoilage, 60 bricks seemed adequate. (I purchased a pallet of about 80 bricks. I always overdo.)
Mr. Acton's bricks are about 45% soil, 45% sand, and 10% Portland cement. Apparently many of the adobe makers in Arizona have switched to cement from the older asphalt emulsion for weather stabilization.
|
 |
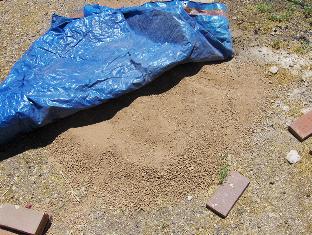 |
The adobe soil, for the mortar. Mr Acton gave me about 300 lbs of his soil component when I bought the bricks. I stored it in my back yard under a tarp. He screens it to 3/8", which is great for bricks and large mortar joints, but I'm going to be using pretty thin joints in the forge, so I decided to screen it to 1/8". The stuff you see here is not yet screened.
|
The other mortar ingredients, sand and mortar cement, I just bought in the regulation bags at a big-box store. No romance there. But there are two more materials needed for this forge: the clay and the granular "extender", both needed for the forge hearth mix. Clay provides the sticky, moldable component; the extender provides body, and cuts shrinkage during drying.
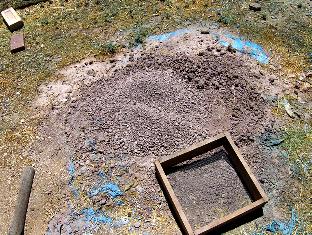
For the clay, I went native. The township of Vail, about 15 miles east of Tucson, has some very good material. An old brick plant, shut down for many years, got a new life as a paintball field, and the owner (Mr. Randy Yeager) let me chop at an outcropping with a pick and shovel. I got a few hundred pounds of a very handsome light red-brown clay, mixed with a lot of rocks. Here is the clay as dumped in my back yard. Also shown is the 1/8" wire screen I made to filter both adobe and clay.
|
|
|
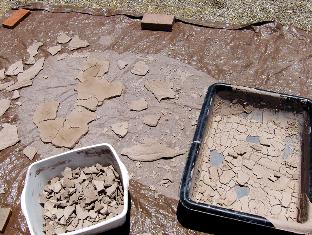
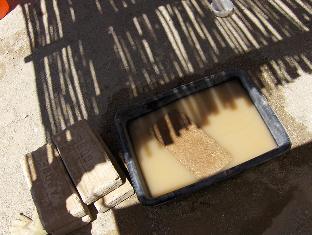
So, how to screen these iron-hard chunks of clay? First I tried pounding the clay with a hammer and screening the resultant powder and rock mixture. This was tiring work, and raised a lot of dust, which is unhealthy to breathe -- clay can contain free silica in very fine particles. Then I tried a "slip" method: dump about 30 lbs of clay in a bucket, cover with water. Let soak overnight, then stir it around with a stick to finish breaking it up. You get a thick clay slip, with pebbles and rock chips mixed in, like loose chunky peanut butter. Strain it though the 1/8" mesh -- a really messy procedure, but dust-free -- into a big plastic tub. Let it dry in the tub over a few days. Or, if you are impatient, pour the slip from the tub onto an old tarp spread on the ground. In the summer heat (105 degrees F when this picture was taken) the slip dries in 4-5 hours, shrinking and cracking into peelable chunks. Break chunks in fingers, toss into bucket.
|
For the "extender", or solid component of the forge pan mix, I decided on grog, which (to a potter) means crushed fired clay. I've made experimental clay forge pans from 50/50 mixtures of clay and grog, and they have worked pretty well, with minimal cracking. For bread ovens, and other relatively low-temperature applications, a clay-sand mixture is fine, but sand does not behave well up in the 2000-plus F range. It vitrifies too easily, and the quartz crystals in it go through crystalline volume changes, causing clay-sand mixes to crack and spall too readily. I figured that grog would have similar thermal characteristics to clay, since it is clay, after all. So, I bought a 50-lb bag of grog at a local ceramics supply house.
|
Building the Forge
|
|
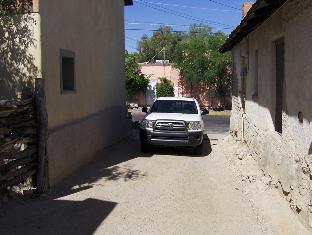
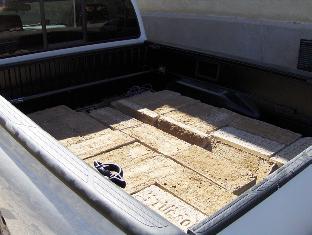
Weekend #1 (7/24/10). Parked in the Presidio main service ramp. You can probably see exposed adobe in the flanking structures here. It's the real deal; the Presidio is surrounded by 19th century buildings from Arizona Territorial days, and many of them were adobe-built before other materials became cheap and available. I'm transporting about 45 bricks in this load, nearly 1000 lbs. Adobe is heavy!
|
|
|
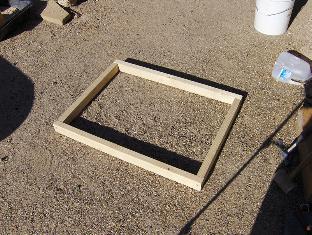
Starting the foundation. The city regulations require us to make this a non-permanent structure; it has to be capable of disassembly and "no-trace" removal within a day. No concrete footer or excavation of any kind is permissible. But we need a bottom treatment of some sort, because the Presidio courtyard (hard-packed soil and gravel) is nowhere close to level. We'll just make a mud pad. I pre-made a simple rectangular form of scrap 2x3 lumber, a couple of inches bigger than the forge footprint, to make laying the pad easier.
|
|
Dry ingredients for a batch of our mortar mix: 6 liters of adobe soil, 6 liters of sand, and 1.5 liters of mortar cement. This makes a 4:4:1 mixture that John Acton recommended for adobe mortar. (What you don't see here: I decided to modify the foundation pad mix by substituting 2 liters of gravel for 2 liters of adobe, tossed in after the photo. I thought this aggregate would strengthen the mortar a bit, making a more stable foundation. Time will tell.) We add water, start stirring. We are making the pad mortar pretty stiff, with the barest glisten of moisture when squeezed in the hand.
|
|
|
We dump almost the whole barrow of mix into the form, and push it around with our hands until it looks kind of level. We lay the bricks in, check for level, then shove mortar around and re-fit until the first course of bricks is fairly true. We then pack the joints with gobs of left-over mortar. (Buttering the ends of the bricks before fitting is a bit over my skill level, and joint-packing works fine.)
|
|
We let the foundation course dry in the morning sun for about half an hour while doing some material prep. Our puddled adobe bricks have slightly raised edges and corners on the top side, and I want them smoothed to make laying the courses easier. Some of the soldados pitch in to knock off the edges of several dozen bricks with a mason's hammer. Prepped bricks are stacked for laying up.
|
|
|
Second and third courses are nearly done. Each course is six bricks, and it turns out that my 6:6:1.5 liter mortar batch is just enough to lay 10 bricks -- not quite two courses -- with a few gobs left over for joint packing.
|
|
Typical bricklaying sequence: We start by dipping each brick in a water tub for a few seconds, pull it out and stand it on end to drain. (I hear the collective gasp. But it doesn't hurt cement-stablized adobe, and having the outer few millimeters of each brick damp really extends the working time on mortar joints. Out here in Arizona, the bricks get absolutely parched, and will suck the moisture right out of freshly-laid mortar.)
|
|
We throw down a gob of mortar, spread and squish out sort of flat with a trowel (just about any spreading tool will do; I used a tile thin-set trowel). This mortar, unlike the foundation pad stuff, we mix really wet and loose, so it's very easy to spread. We lay down a damp brick, check for level quickly; then slap down a bit more mortar on the low end, or rake off excess mortar from the high end, whichever seems appropriate. We lay down the brick again, press down hard. We scrape away mortar oozing from joints, and use it for packing other joints.
|
|
|
About every other course, we pause to check the sides of the forge body for plumb. As in all measurements for this project, precision is not necessary, but we want to make sure we don't build in an overall pronounced lean to either side or end. Here Bill is tapping out a freshly-laid brick to meet a carpenter's level, held plumb.
|

|
|
Mid-way through course #7. Note the increased area of shade; the Presidio unit has rigged an awning, using some canvas, ropes, and a couple of lances. It's a blessed relief. It's now about noon, and the temperature is approaching 100 degrees. The 50-60% humidity (July is in our rainy season) is actually a help; it makes us pretty miserable, but keeps the mortar from drying too fast.
|
|
|
Eight courses done; height about 26 inches. This is the final "base" course; the next one has to allow for the geometry of the hearth, which will be built next week. We take a bit more care in leveling this course, and pack all the joints well with spare mortar.
|
|
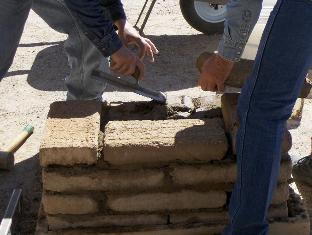
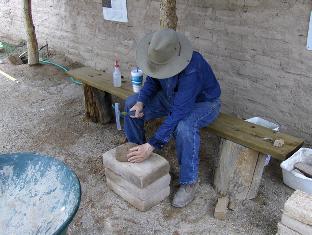
The ninth course starts with a dry run of bricks that are beveled by chipping their inner top edges back about two inches. This accomodates the slope of the future hearth. The tuyere is put in position, and two bricks are cut to fit it on either side.
|
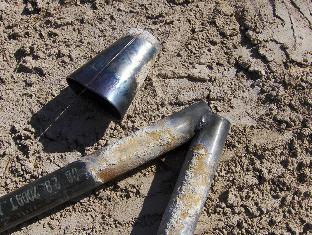
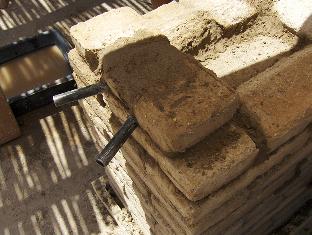
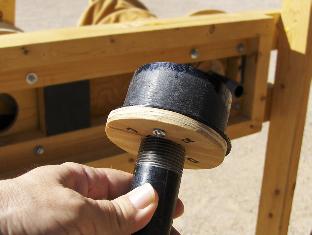
A close look at the tuyere, before it is buried in the forge body. I used 3/4" black pipe. The design is drop-dead simple: hacksaw off a section of one end of each pipe, so they meet at an angle, forming an oval mouth. Guess by eye, and grind a bit after sawing, so the pipes meet well at about a 40-degree angle. Tack the pipes together with a very short weld on either side. Weld on a piece of strap on one side to strengthen the joint, if deemed necessary. Then cut and roll a cone out of 12 gauge steel so that, when flattened a bit, the cone comfortably shrouds the joint.
The merged joint, I thought, would make a sort of air-valve, where the air stream running through one pipe would flow across the end of the other, creating a mild venturi effect and stifling back flow. (Thanks to Bruce Blackistone, Jock Dempsey, and other folks on Anvilfire, for advice on alternating-blast tuyere physics.) I added the conical nozzle so that it would actually be closest to the forge fire; the V-pipe would be shielded from the worst heat, and the angled air blast would be a bit buffered and straightened before going into the pan.
|
|
|
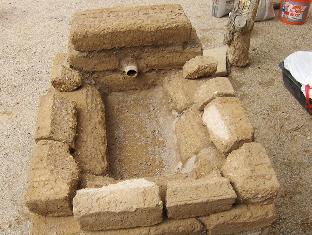
Ninth course laid, with all joints and inner corners well-packed with mortar. This course has no center brick; the space will be filled with the hearth layer of clay/grog mix.
|
|
|
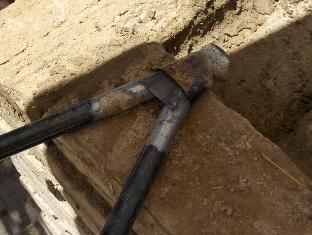
Mortaring in the tuyere. It's set so that about 1 inch of the nozzle will be exposed.
|
|
|
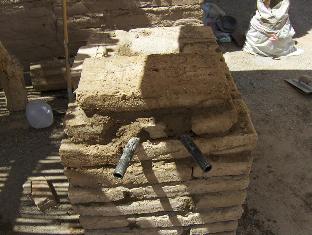
Tuyere fully buried, ready for the cap brick to ensure it stays that way.
|
|
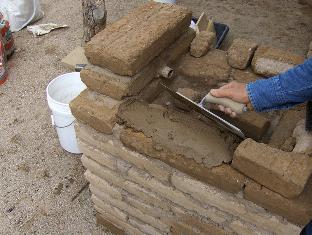
Cap brick now laid atop the tuyere wall, and everyone stuffing leftover mortar into hungry joints around the forge body.
|
|
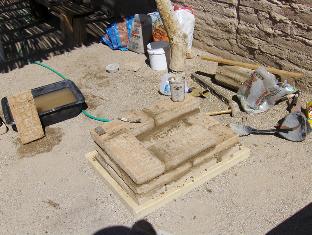
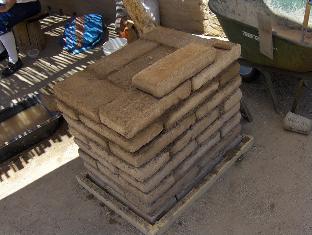
End of build for the day. Two views of the forge body. There still remains some adobe work to do: a rim of brick fragments to continue the slope of the hearth cavity up three more inches. One prospective chunk of the rim is resting on the forge in the photo. I want to give the hearth a bit more depth than just one thickness of brick. But finishing the forge will have to wait for next weekend.
|
|
Weekend #2 (7/31/10). Today we will finish the adobe work, making the top rim. This morning (about 9 AM), we are blessed by overcast and mid-eighties temperature. Humidity is very high, so the mortar will stay workable a long time.
|
|
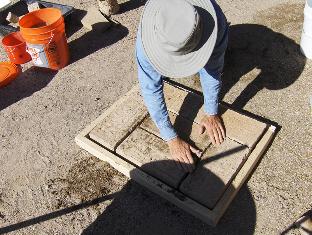
We start by splitting several bricks into quarters and eighths, and chopping bevels on their inner edges.
|
|
|
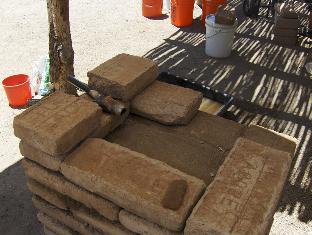
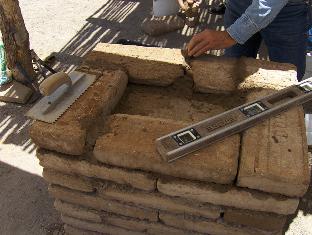
Dry run for the rim. Some of the brick splits have broken corners; its hard to be precise on small pieces of adobe, but it's no big deal. Note that we are leaving a 3" wide gap on both sides of the rim, to allow long work to lay across the hearth.
The forge, by the way, has endured a couple of rainy days without a tarp, which is why some of the brick is damp all over. Note the split on the right side with the creamy center; it was cut from a dry brick soaked for 2-3 minutes. This shows the depth of moisture penetration in these stabilized bricks after a short soak.
|
|
We make about about 2 gallons of 4:4:1 mix, and lay the splits in a good thick mortar bed.
|
The rim is laid in, all joints well-stuffed. (Note the shadows: the Sun peeped out very briefly!) We had a lot of leftover mortar, so we used it filling incomplete joints around the body from the last weekend's build. A light wirebrushing of the forge body smoothed the joint surfaces out pretty well. We decided to let the rim dry out thoroughly, and clay the hearth next weekend.
|
|
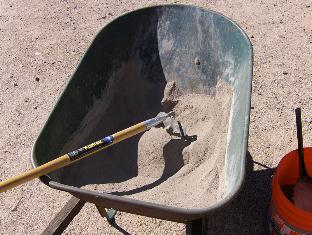
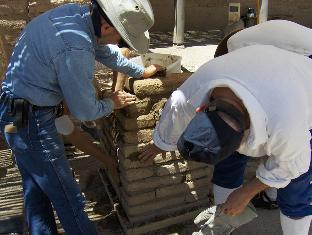
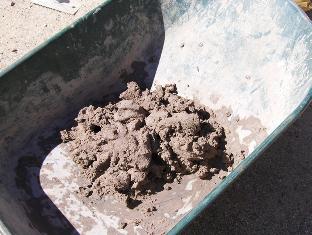
Weekend #3 (8/7/10). Today we clay the hearth. I estimate that about 8 liters of clay mix will do the job, so I start by dumping 4 liters each of screened Vail clay and coarse grog (the white stuff) into my wheelbarrow. I mix the ingredients dry, then mix water in by hand. Clay mixes are very sticky, and a hoe does not work very well for wet mixing. After a few minutes of kneading, we have a nice, heavy-bodied mixture. I make it fairly stiff, with almost no moisture shine.
|

|
|
With a spray bottle, we dampen the adobe pan, figuring just a touch of moisture will help the clay adhere a bit better.
|
|
|
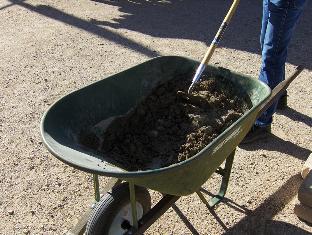
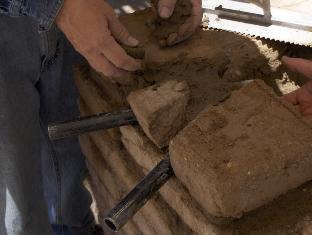
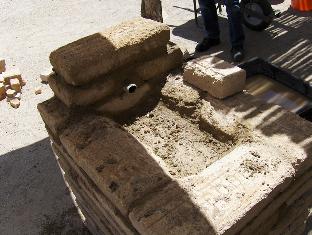
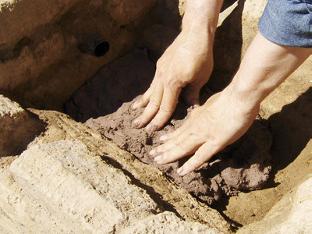
In goes the clay! We lay down a thick (about 1.5") bed on the hearth bottom.
|
|
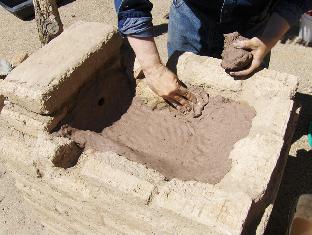
|
Then we build up the sides, up to, but not onto, the rim bricks. We're very careful around the tuyere nozzle, making sure it's completely shrouded in clay, but protruding out a bit from the finished clay "wall". We "pat" the clay into place, moistening it a bit from time to time with the spray bottle if we think it's getting stiff too fast (the day is pretty warm). This Vail clay, by the way, worked great. This is the first time I've used it in a project; I used commercial fireclay in earlier test forges, and although it worked OK, and was a great refractory, it was sort of slimy when wet, and did not adhere well to a subsurface. This clay was very malleable and sticky, and grabbed well. (I sure hope it resists heat and cracking! After all, they did make bricks out of the stuff...)
|
|
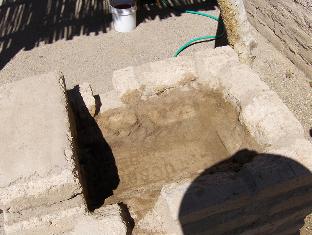
The claying is done. We left the pan shallow; the fuel may be built right up to the top of the rim bricks, but we left them uncoated. I believe that the rim of the forge will not experience great heat; the fire should sort of "hang in space" in the center of the fuel mass just in front of the tuyere. In a couple of test forges, I found bits of unburned starter newspaper just inches away from the fire volume. (Coke is a great insulator.) Of course, one of the great virtues of a forge like this is that you can slap in more stuff if you have to. If we need more clay, we'll add it later.
|
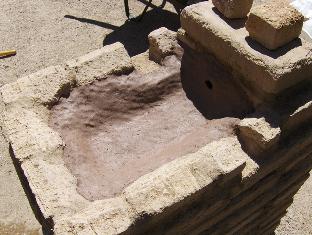
|
|
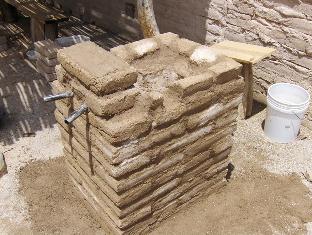
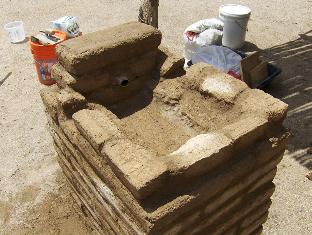
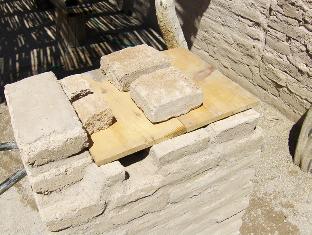
The forge is essentially completed. Next step is to fire it up, after the clay dries for a few days. Bill will bring his concertina bellows next weekend, and some coal, and we'll try it out. In place of the truly ugly plastic tarp we were using, I just placed some pine boards and bricks over the wet hearth; this makeshift cover doesn't look too out of place in the Presidio courtyard. We will build a nicer forge cover in time for the tourist season.
|
|
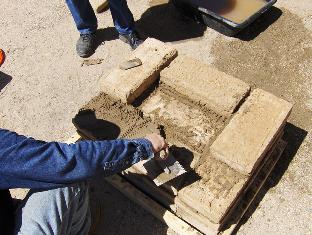
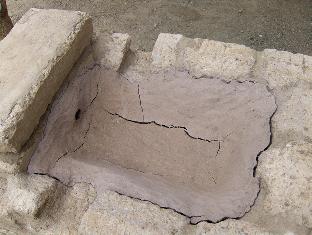
Weekend #4 (8/21/10). Whoops! Had to skip a week due to some personal business. As can be seen, during the two-week hiatus, the clay hearth shrank and cracked, but this was expected. We just take it easy this session, and fill up the big cracks with fresh mix. We'll let it dry, and fire up next weekend.
|
|
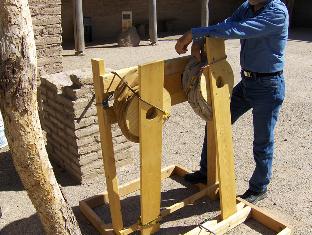
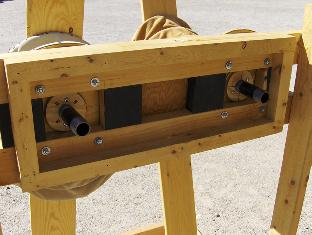
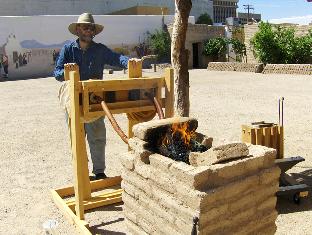
Weekend #5 (8/28/10). Baptism day for the forge, and Bill has just unpacked and partially assembled his concertina-type bellows. They're constructed of dimensional pine lumber, with two 11" diameter lungs, each with six internal plywood-cutout rings secured to the leather bag with tacks. In each lung, two of the rings form the ends, and they have small (about 3" dia) holes; the input end has an internal leather flap valve. The four internal "stiffening" rings are basically hoops, just to hold the leather roughly into shape. Below are two views: input end (still with the transport bungees on), and side view, with one lung extended, the other compressed.
|
|
|
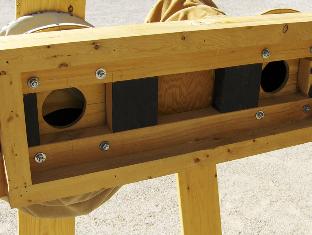
Output side of the bellows. We want a temporary, easily disassembled way of piping air from 3" holes to 1" iron pipe, so...
|
|
|
Simple adapter, consisting of a plastic drain cap, a plywood disk with a 1.25" hole in the center, and an iron pipe nipple screwed into the disk. Ugly, but fast and cheap. I'll make some better-looking versions next year.
|
|
|
Adapters push-fit into the output holes.
|
|
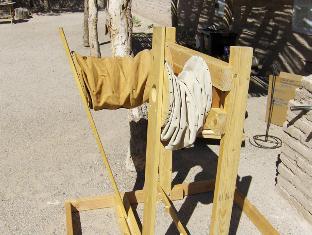
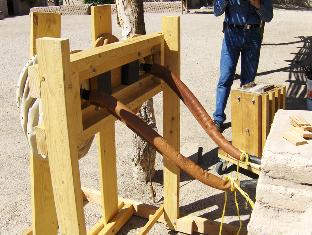
Leather air-hoses in place. I stitched up two 20" hoses from some old 4-5 oz leather I had lying about, and stiffened them internally with 16 ga galvanized wire coils I wound around a piece of electrial conduit. They fit inside the hoses nicely, and flexed well, keeping the hoses from kinking. (Excuse the yellow nylon twine holding the hoses tight on the tuyere pipes; dang it, forgot the iron tie wire!)
|
|
Lighting up, with newspaper and twigs. The tuyere fanned this starting fire pretty well, blowing "on" it, rather than "through" it.
|
|
|
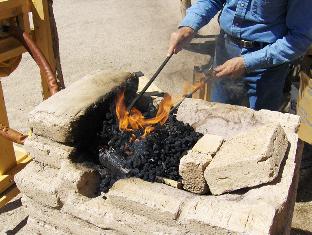
After sprinkling on a little green coal, and getting it to catch, Bill put on a few shovelfuls and raked it carefully up over the fire. You have to re-orient your thinking 90 degrees when using a side-blast; you bank fuel up against the tuyere wall, instead of filling a fire pot from the top.
|
|
Me, getting into the bellows-monkey zone. With practice, you build up a rhythm that Bruce Blackistone described to me: start compressing lung B just a fraction of a second before lung A is fully compressed, and vice versa. You can get a fairly constant air blast. The fire is going well, and we have piled in a few adobe chunks in the hearth to allow us to keep the total fuel mass small. During the demo season, the hearth may be filled up with a big mass of coal; it will only burn at the tuyere end. (This picture shows the big mural on the south Presidio wall. It's meant to give an idea of the full size of the fort in its heyday.)
|
|
|
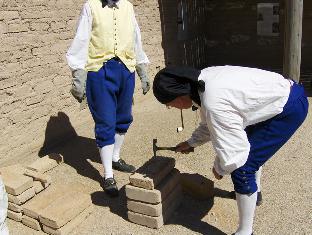
First project: Bill starts heating 1/4" square stock for nails.
|
|
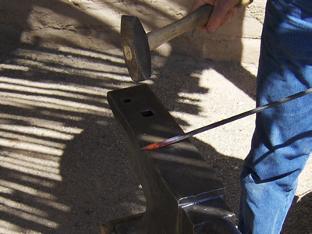
Bill begins a nail. (Yes, we need an 18th-century frontier anvil, and one is in the works! I hope to have it ready by December of this year.)
|
|
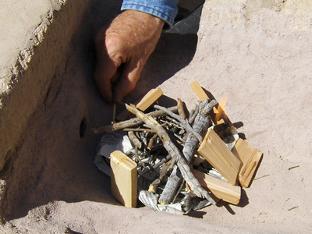
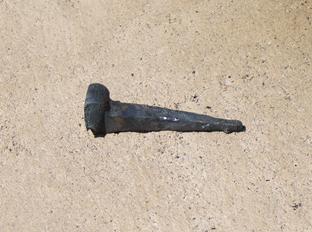
Our first artifact. Kind of made me choke up.
|
|
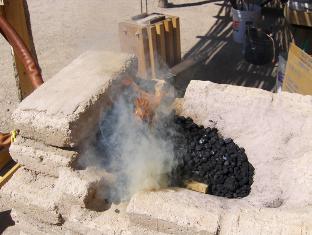
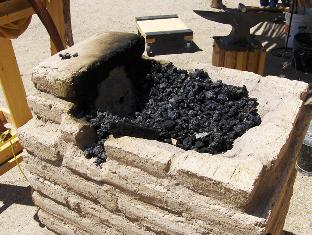
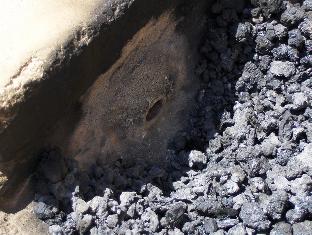
After operating the forge for about an hour, we tore the fire down. The clay hearth was a success, so far. On the right, close up, you can see the mound surrounding the tuyere where the clay actually fired; it's rock hard, with virtually no cracking. (The soot ring is rather marked.)
|
|
One property of this forge that I forgot to plan for: a masonry forge takes a long time to cool down! No problem in a closed shop, but in open air, with daily threat of downpour, you have to wait over an hour for the hearth to cool enough to put a wooden cover on it. During demo season, after four-plus hours of operation, we may have to let the forge cool overnight and take chances with evening showers, or devise a sheet metal cover that does not look too out of place in an 18th-century settlement.
My thanks to Bill Ganoe, Rick Collins, Jeff Coleman, Mike Starace, and the rest of the Presidio Unit who helped us complete this project.
At this point, we don't plan to fire up the forge again until demo season begins, in late October. By next year, we hope to have a period anvil (and perhaps a bickern), and maybe even a Mark II version of the bellows, with bigger lungs, and virtually no modern-looking lumber or hardware. We plan to post updates as extensions to this article on the Anvilfire site. Till then!
|