BASIC TOOLS: The Center Punch
Tools that built our world
- Center Punch
- A hard steel hand tool sharpened to a 110 to 60 degree point used for marking drilling and reference locations in metal work.
A Story: The Lost Center Punch
On several occasions I have been asked to work in a friend's shop to help him out of a time crunch or manpower pinch.
My place in the shop is usually doing design on the fly, layout for myself and others, making things fit together and drilling lots of holes.
The most important tool in all this is also one of the smallest.
The center punch. You need one to do layout, to locate holes, use as a scribe in a pinch. . .
The thing is, my friend's shop is THE black hole of small tools.
Not only is it a cluttered mess, it and everything in it is literally black from coal, coal smoke and scale. It is also poorly lit.
On the brightest days visibility is low and on overcast days and at both ends of the work day in is just plain impossible to see well.
The lights in the shop are recycled sodium street lights that result in an orange monochrome cast that reduces depth perception and makes everything look the same. . .
Yes, my friend IS cheep. . . and working in his shop is like working in a cave.
The first time I was in this situation I spent a full frustrating day looking for a center punch.
Yes, this is utter stupidity and not cost effective.
But I was told repeatedly, YES, there is a center punch here, keep looking for it. . .
The next morning I took a half inch Allen wrench out of a collected box full of random large hex keys, torched off the bent end and ground it to a center punch shape.
Not the best center punch but it served for the couple weeks I was there.
And YES, still not cost effective.
I left the tool in the box of miscellaneous drill bits.
The next time I was working there the routine started out the same.
However, this time I gave up the search before noon, walked down to the local hardware store and charged a $4 center punch to the shop.
There was grumbled complaints about unnecessary purchases. . .
I kept this punch in my Carharts pencil pocket until it was time to leave then handed it to the other worker and said, guard this with your life.
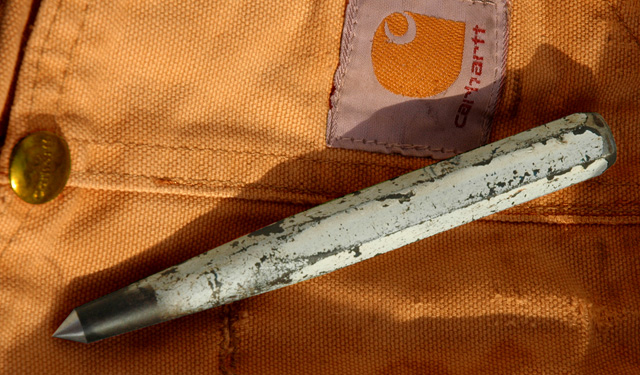
The last time I worked for my friend I arrived bearing a nice sharp new center punch painted white to identify it as mine.
Even though I was there mostly in a design and management capacity I still did most of the layout and kept that center punch in my pocket.
Months later when the job was over I came home with that center punch.
I still have it and have been using it for several days for decorative punch work in sheet metal.
The moral of this story is that organization (IE tool chests or bins for small tool storage) equals efficiency and pays for itself rapidly.
About Center Punches
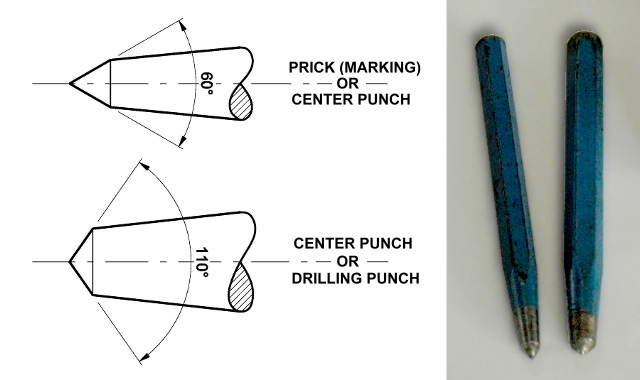
Center punches are used in two different point angles.
A sharp 50 to 60 degree layout and marking punch often called a prick punch, and a 90-120 degree drill starting punch that is used after the marking punch.
I bought a pair like this a decade ago but the same source now only carries one unspecified point angle but in many sizes. . .
More industrial decline. . . But you can grind your own. Prick punches are usually more slender than center punches.
Center Punch Use
When doing precision layout use your scriber to make a very small divot by pushing it into the work by hand.
This will make a microscopic mark but it should be enough for your center punch to locate in.
Once you have the center punch located DO NOT double strike.
A double strike is light tap to align the hammer then the hard blow to make the mark.
The problem is that the first tap almost always knocks the punch off its mark.
Double striking is a habit learned from less critical work. Try to avoid it as much as possible.
An automatic center punch (spring loaded with internal trigger) does both the above in one move.
Keep your center punch sharp. In some materials you may need to sharpen your center punch every couple uses or so.
Dress the struck end any time it looks mushroomed.
A long heavy chamfer is good as this forces the hammer blow to be centered.
This is applicable to almost all hand held struck tools.
The struck surface should be slightly crowned (rounded).
For a diagram see Making Repousse Tools
The Starrett Book for Machinists Apprentices


BASIC TOOLS: The Center Punch
Tools that built our world
A Story: The Lost Center Punch
On several occasions I have been asked to work in a friend's shop to help him out of a time crunch or manpower pinch.My place in the shop is usually doing design on the fly, layout for myself and others, making things fit together and drilling lots of holes. The most important tool in all this is also one of the smallest. The center punch. You need one to do layout, to locate holes, use as a scribe in a pinch. . .
The thing is, my friend's shop is THE black hole of small tools. Not only is it a cluttered mess, it and everything in it is literally black from coal, coal smoke and scale. It is also poorly lit. On the brightest days visibility is low and on overcast days and at both ends of the work day in is just plain impossible to see well. The lights in the shop are recycled sodium street lights that result in an orange monochrome cast that reduces depth perception and makes everything look the same. . . Yes, my friend IS cheep. . . and working in his shop is like working in a cave.
The first time I was in this situation I spent a full frustrating day looking for a center punch. Yes, this is utter stupidity and not cost effective. But I was told repeatedly, YES, there is a center punch here, keep looking for it. . . The next morning I took a half inch Allen wrench out of a collected box full of random large hex keys, torched off the bent end and ground it to a center punch shape. Not the best center punch but it served for the couple weeks I was there. And YES, still not cost effective. I left the tool in the box of miscellaneous drill bits.
The next time I was working there the routine started out the same. However, this time I gave up the search before noon, walked down to the local hardware store and charged a $4 center punch to the shop. There was grumbled complaints about unnecessary purchases. . . I kept this punch in my Carharts pencil pocket until it was time to leave then handed it to the other worker and said, guard this with your life.
The last time I worked for my friend I arrived bearing a nice sharp new center punch painted white to identify it as mine. Even though I was there mostly in a design and management capacity I still did most of the layout and kept that center punch in my pocket. Months later when the job was over I came home with that center punch. I still have it and have been using it for several days for decorative punch work in sheet metal.
The moral of this story is that organization (IE tool chests or bins for small tool storage) equals efficiency and pays for itself rapidly.
About Center Punches
Center punches are used in two different point angles. A sharp 50 to 60 degree layout and marking punch often called a prick punch, and a 90-120 degree drill starting punch that is used after the marking punch. I bought a pair like this a decade ago but the same source now only carries one unspecified point angle but in many sizes. . . More industrial decline. . . But you can grind your own. Prick punches are usually more slender than center punches.Center Punch Use
When doing precision layout use your scriber to make a very small divot by pushing it into the work by hand. This will make a microscopic mark but it should be enough for your center punch to locate in.
Once you have the center punch located DO NOT double strike. A double strike is light tap to align the hammer then the hard blow to make the mark. The problem is that the first tap almost always knocks the punch off its mark. Double striking is a habit learned from less critical work. Try to avoid it as much as possible.
An automatic center punch (spring loaded with internal trigger) does both the above in one move.
Keep your center punch sharp. In some materials you may need to sharpen your center punch every couple uses or so.
Dress the struck end any time it looks mushroomed. A long heavy chamfer is good as this forces the hammer blow to be centered. This is applicable to almost all hand held struck tools. The struck surface should be slightly crowned (rounded). For a diagram see Making Repousse Tools
The Starrett Book for Machinists Apprentices