Lighting Clay Forge: I do not hear the sound of slowly rushing air. . . If the clay is still damp the tinder (paper, wood scraps) will dampen, not burn hot and often will not do well. Good dry real wood charcoal should just about light with a match. But at least one full sheet of news print is needed if dry, two if humidity is high and it will not due at all if the paper is actually damp.
1) Light starter paper (1 sheet), insert lit end over or into tuyeer.
2) Apply small amount of kindling for coal.
3) Give gentle blast of air to make kindling fire roar.
4) Pile on a small amount of fuel to cover paper/kindling.
5) Increase air but not to the point it is cooling the fire (blowing it out).
6) Add more fuel if the first is burning. If not start over again and pay closer attention to the amount of air applied.
Often if you do not apply air soon enough the kindling will smother itself with smoke and CO2. OR if you apply too much air the kindling will burn up or blow out before adding fuel.
|
|
- guru
- Thursday, 05/24/07 02:27:30 EDT
|
Degign Programs: Cooper, currently the best are designed as plug ins or library systems for AutoCAD and will work with AutoCAD Lite.
THIS is IF you are going to be using standard components from various manufacturers. AutoCAD is pretty much the standard.
IF you are going to be designing every part from scratch and have time for the long learning curve of an advanced drawing program then folks I know recommend FormZ. Note that AutoCAD has any equally long learning curve, there are just more aftermarket tools to use with it.
Do not expect ANY CAD program to make an artist out of you. If you cannot draw a 3D object manually then you are going to have a difficult time using a CAD program as they are much less intuitive than a pencil. To be an "artist blacksmith" you must have the training of the artist. At a minimum you need to be able to handle isometric drawing well. Idealy you should also be able to draw in perspective.
Learning to draw PROPERLY with CAD is a discipline that requires patience. Accurate CAD drawings are created by inputing every point of a drawing as mathematical coordinates and connecting them together with lines and curves. Any instructions that start and end with a mouse click are WRONG.
One advantage of CAD and vector graphics tools is that many let you put a photograph behind the drawing. This means you can draw a gate, then overlay it onto a photo of your client's home, garden or building.
Another advantage is clean printing. When you buy a CAD package remember that you are going to need a large format (11x17 min) LASER printer or a good plotter to take advantage of the CAD program.
AND you can re-use drawings.
Other options for using computer graphics is to hand draw components, scan them, then use any graphics program to cut and paste to create a complex work with repeated elements. This can then be distorted to create a perspective drawing. This can be fast, efficient and produce a nice hand crafted looking drawing.
|
|
- guru
- Thursday, 05/24/07 02:52:46 EDT
|
Anybody know what this was intended for? Note that it appears to be hollow with some strange design around the back, where the horn should be.
http://tinyurl.com/2u39ly
|
|
andrew
- Thursday, 05/24/07 05:08:42 EDT
|
DESIGN PROGRAMS: My Two Cents..I have been using TurboCad for many years; significantly less expensive than AutoCAD but does everything I want it to and will read AutoCad files and libraries. It took years for me to become really competent using the program, but is absolutely indespensible to me now in laying out my work. I got an older HP plotter off of eBay for $200; clients LOVE to see thing printed out full size, and I also use it to print out full size working drawings that I work directly on top of. Generally scorched/burned/full of brown holes by halfway through the project. Anyone know of any heat-resistant plotter paper?
|
|
Charlie Spademan
- Thursday, 05/24/07 07:34:20 EDT
|
Sketching software. Google bought a product called Sketchup for 3D drawing. I've heard it was fairly good, an free. Unfortunately, I use Linux and Sketchup is only working on Windoze and MacOSX right now.
|
|
- Marc
- Thursday, 05/24/07 08:17:37 EDT
|
Odd Tool: Andrew, That is just he back side of an old combination tool that was primarily a vise (vice). It is not a true anvil as it is mostly hollow. Typical of these tools the vise is missing. What would make it REALLY rare and valuable is to be the complete tool with the vise jaw and screw.
These were popular in the late 19th century and early in the 20th century. Some combination tools included drill, vise, anvil and even a forge blower. They came in many styles and arrangements. Like a large multi-blade knife with too many widgets they were not very good for any of their purposes. Their popularity ended fairly abruptly and now they are strictly a collector's item.
About the only vestige of the multi-function anvil/vice left is the occasional machined flat on the body and short horn on some small vices. This was a standard vise pattern for many years but because it invited hammering on parts of a vise that really are not suitable for that purpose they have mostly disappeared.
|
|
- guru
- Thursday, 05/24/07 08:27:20 EDT
|
Andrew: In addition to what Guru noted above this one is also a bit different then what shows up in flea markets, etc. in the U.S. in that it still has all four lug areas. My observation is these usually had a crown on the bottom in the middle. That is, set on a flat surface it would rock side to side slightly. When all four lugs were bolted down it put stress pressure at the lug areas, so one or more were frequently broken off in use.
Being cast iron and hollow, when used they would have given off a thunk, thunk, thunk sound.
In the U.S. that one might go for about $10-20 USD.
As Guru also noted complete ones in excellent condition are scarce, especially for those which had a number of accessories.
Anvils in America has examples of several styles under the Miscelleneous Anvils section.
|
|
Ken Scharabok (Poor Boy)
- Thursday, 05/24/07 08:40:49 EDT
|
Cooper,
I have a drawing pad for the computer, too. Mine is in a drawer somewhere, as I have no use for it. I've found that it really isn't all that compatible with CAD work, because, as Jock points out, CAD is primarily inputted by point plot and vectors, not by WYSIWYG stylus work.
For CAD work, I use TotalCad 2D from IMSI. It is dirt cheap and works like the old DesignCad from American Small Busiines Systems that I learned back in the DOS days. It will allow me to use photos, AutoCad files, etc. I think I paid ten bucks for the program.
There are design programs o ut there that are designed for drawing pad input, but most of them are either jokey little things for play or very high-end stuff like Adobe Illustrator at around a grand. The learning curve for Illustrator is horrific, and it is a program for professional graphics work, not CAD. I haven't found one that is simple, yet effective for using the graphics tablet to do sketching and then turn that into a working drawing. If you find one, I'd love to hear about it.
|
|
vicopper
- Thursday, 05/24/07 09:34:28 EDT
|
CAD Programs: While almost all CAD programs will import and export ACAD DXF files and some will directly read ACAD files this is a constantly moving target. There is almost always some loss or glitches in these conversions. Historically the programs OTHER than AutoCAD wrote better working DFX files than AutoCAD and it is Aut
The problem with the non-mainstoream programs is getting orphaned. TurboCAD and DesignCAD are now both owned by IMSI who is now "Broadcaster Inc." and who knows who it will be next week.
I started using DesignCAD when it was ProdesignII and still owned by the original authors. It was written 100% in assembler and very fast. Its claim to fame was support for dot matrix printers which it did better than anyone. The name was changed and ownership changed some 6 times. The last verison I HAD claimed be able to import every known major CAD file of the time. What it DID NOT properly read was the previous version of its own file format.
At the time I had invested thousands of hours into DesignCAD files. I had created my own libraries of components that were much superior to off the shelf files which are notoriously bad. My libraries also included some very complicated heraldry devices and crests. I had everything from fine art, family trees, shop layouts, machine designs and operating manual illustrations in DesignCAD DOS files. .
The problem with losing the availability to use these files is that you often need them MANY years later. I started using ProDesign back in 1982? When DesignCAD came out it read all the previous files just fine. But when the Windirt version came out (new programming team) the files were no longer properly readable. You would think that as long as you have the old software you can open the old files. This is only PARTIALY true. Many DOS programs, particularly those that used extended memory cannot be installed under Windows. And now with Vista many Windirt programs will no longer be supported as well. So having archival software is not a solution either. You MAY need archival hardware. I am currently looking at rebuilding my old DOS machine so that I can open a bunch of archived files. . .
The other problem is hardware. If your program is not constantly updated OR has backwards compatible drivers then you lose the capability to output files. My last DOS version of DesignCAD was a GREAT program. It was stable, supported a programming language and would do everything I asked it to do. BUT the loss of support meant that I could not get drivers for new printers. . . like the very expensive large format laser printer I purchased for use with my CAD system.
SO, if you are new in the CAD business and expect to be in business for many years then the stability of the company producing the tools you are using is of utmost concern. But also be forwarned that you need to update with EVERY major update AND load and re-save every file you have created in the system's new file format with every update. THEN hope the product stays in production.
Sound like bad luck on my part? Yep. I have a repeat job coming up from a previous job done in 1993. . . ALL the work was stored digitally. There are CAD files and WordIMperfect files that are going no longer viable and may all need to be recreated AND there are files of types that I have no idea WHAT they are. . except that I created them. The amazing thing is that I still have the files and the disks are still readable.
|
|
- guru
- Thursday, 05/24/07 09:47:56 EDT
|
Hey thanks everyone for there thoughts. I have found nothing really either , I guess Ill continue to draw.
|
|
Cooper
- Thursday, 05/24/07 09:49:04 EDT
|
Hey Folks,
First, I need to make 10 rings out of 1" X 1/4", 14" outside Dia. mild steel, bent the hard way, curving the 1" and keeping the 1/4" flat.
Thus the inside of the ring will be 12" dia.
I made a test piece by heating in the forge and bending around a bending fork in the vice.
Is there a faster way? Would a Hossfeld type bender be helpful?
For CAD program I use Graphite by Ashlar-Vellum, it works well, I know the program, but it is expensive.
Thanks
Bart
|
|
blackbart
- Thursday, 05/24/07 11:30:49 EDT
|
Bends the hard way: Blackbart, Hossfeld WILL make this bend cold but the process is like using a press to bend short sections by pumping dies in and out. It is not as fast as using a roll or rotation bender. To make 10 of these will not pay for the bender and the dies (over $1000 with one die set) compared to making a common bender with side guides to hold the work flat (about $100 shop cost) and doing them hot which would be very fast.
An alternative would be to make a short tubular bending mandrel and then progressively hot bend a coil of rings from a long bar then saw them apart. This would make clean rings with nice square matching ends.
IF you invest in the various dies that a Hossfeld needs and learn to use them it can be a very productive tool. However, without the dies which are sold separately the device is not very useful. Many are bought and then parked never to be used again. YOU will have to be the judge of whether you would use it again in the future.
Note that Hossfelds and other benders of their type take a lot of room to use and to leave setup. IF you have a weld platen it will make a very good anchor to attach one of these to. By using dogs on a base to fit the holes in your platen you can quickly install and remove it from the platen. DO the same with a bench vise and you keep your platen open for large jobs but get the advantage of a heavy bench to attach a vise.
|
|
- guru
- Thursday, 05/24/07 13:33:23 EDT
|
I am working on putting a hood and flue on my �portable� forged. The forge uses a 125-150cfm blower as its air supply and I have a cut away 55 gallon steel drum acting as the hood. Being the tall fellow I am the drum isn�t high enough to vent the gas away past my head so I need to install a section of flue pipe. I tried a 4� diameter pipe because I forgot about back pressure and well most of the smoke and heat ended up right in my face. So what diameter of flue pipe would I need to avoid back pressure and getting smoke in my face for a 125-150cfm of air flow (max, I rarely use it that high).
|
|
Mike Gora
- Thursday, 05/24/07 14:07:00 EDT
|
Guru
Thanks for the response.
Are there plans for a "Common Bender with side dies", this seems like the way to go.
I keep looking for an inexpensive Hossfeld bender, and assume that I could make the dies as I have access to both a mill and a lathe.
Thanks
Bart
|
|
blackbart
- Thursday, 05/24/07 14:08:03 EDT
|
Graphics Tablets: These are used a lot by artists working for digital media. Some of the web cartoonists act about like they broke their arm when their Wacom tablet goes out.
Digital Media: To date, there has been no more reliable archival material invented than acid-free paper bound into books. A while back I asked an archivist about maintaining records from the computer. He said "Print them out. Even if your media is still readable, after twenty years there won't be hardware which runs the software to make your media useful."
DOS: One of the big problems with DOS was that it let every program have direct access to the hardware, and therefore every program needed to have its own printer drivers, display drivers, etc. Some programs wouldn't work if you had a high-end (for the time) SCSI disk, 'cause they were set up to access the standard MFM and IDE disk controllers directly, rather using the DOS interface.
As I understand it, there are programs which can emulate the hardware environment of a ISA machine under Linux or Windows, which will enable DOS programs which were made to reach out and touch the hardware to get the responses they are expecting, while never leaving protected mode. I haven't tried it, but "bochs" looks promising. Since it goes all the way to down to emulating the processor, it will be slow compared to modern systems, but DOS applications are not all that demanding when it comes to processor anyway. . . Nonetheless I think I'd try it before building a new DOS system.
|
|
John Lowther
- Thursday, 05/24/07 14:41:41 EDT
|
Forge Flue: Mike, the minimum forge flue should be 10" but 8" will work with a hot clean fire. 12" is best for indoor forges. An issue with forge hoods is the amount of air they TRY to move. If you have a common funnel type hood it tries to suck up ALL the air at its opening including cold air. The cold air dilutes the warm as well as increasing the amount trying to go up the stack thus reducing its effectiveness. The reason side draft type hoods work well is their small intake which just about limits the flow to the hot forge exhaust. If you have used a drum as an enclosure reducing the opening to the outside world (and cold air) will improve its performance.
Note that if you cannot find large stove pipe you can use two pieces to make larger diameter IF they use the same joint and are the same thickness pipe.
6" + 8" = 14" diameter
6" + 6" = 12" diameter
4" + 6" = 10" diameter
|
|
- guru
- Thursday, 05/24/07 14:51:11 EDT
|
Benders: Blackbart, The very first drawing is what I call a simple bender. To add side guides you would need to bend some 3/4" x 1/4" to fit and then weld on with some extra side clearance (about 0.010" to 0.015"). The 3/4" material is so the sides are shorter than the work being bent.
Hossfeld has a very good manual for their benders and it is mostly on-line as their catalog. Most of their dies are cast but you could make your own by fabrication. With the machine tools you have it should be no problem.
|
|
- guru
- Thursday, 05/24/07 15:08:20 EDT
|
John,
this may be a little late but borax is available from Boots, the last load I bought came in white boxes straight off of the shelf with two sealed bags in each box.Price then was about £1.50 a box
|
|
- Wayne
- Thursday, 05/24/07 15:09:16 EDT
|
Well my forge is mostly an outdoor forge, as a work from a storage space and haul the forge outside to use it. Would a side draft still work in semi windy conditions? The main reason I want a flue system is to deal with the changing wind where I work. Thank you for your previous help guru.
|
|
Mike Gora
- Thursday, 05/24/07 15:13:00 EDT
|
Graphics Tablets in CAD: For large input jobs they use an equivalent in the form of a graphics board or table. They are made as large as a full size drawing board. Points are set at corners using a magnifying cross haired mechanical cursor "pen". Lines are not traced but corner and reference points are set similar to numerical input. However, instead of a CAD drawing where every dimension is accurate down to the last decimal place the points are only as accurate as the operator can visually place them AND how accurate the drawing being "traced" is. The results must be heavily corrected in order to use automatic dimensioning.
DOS - I still have my old 486-66 DOS machine. The problem is a bad mother board from a failed CMOS battery. I was thinking about putting in an old Pentium II board I have but I am not sure the DOS or how much of the system would work.
I DID pickup an old 5.25" drive from home yesterday that I am going to put into the current (up to date) machine I am repairing. That will give it a 3.5 DOS, a 5.25 DOS, 100/200 ZIP, CDRW-ROM and a DVD as well as the HDD.
|
|
- guru
- Thursday, 05/24/07 15:43:13 EDT
|
Side draft Outdoors: Mike, They still work better than a regular hood even with a cross wind. You may want a side shield on the far side.
You can convert your overhead drum hood to "side draft" with an internal baffle plate at a steep angle. I needs to be a big oval (true ellipse) but I'm sure you can figure it out.
|
|
- guru
- Thursday, 05/24/07 15:53:14 EDT
|
im making a coal forge, but what about a clinker breaker what does it do, do i need one, where does it go can i make one? Thanks.
|
|
- Matthew Maiers
- Thursday, 05/24/07 18:21:13 EDT
|
Matthew, A clinker breaker is not an absolute necessity. In coal forges it does not actually break up clinkers but it does help clear clinker and ash from the air entrance between the firepot and tuyeer.
About the only type currently in use is called a "ball" type clinker breaker. This is a piece of cast iron or steel that fits into the throat of the tuyeer at the bottom of the fire pot. It is the shape of the opening when looking down on it and triangular with rounded corners when looking from the side. There is a hole through the triangular side that a 1/2" rod passes through. This extends out to a convenience distance and has a bent handle. The "ball" is turned around and around to clear the opening.
Where the ball is left determines how the fire burns. If the point on the triangle is UP the fire is centralized and burns very hot. If the flat is up the fire is spread to the sides to make a larger fire.
If the opening into the forge is square or rectangular then the "ball" would be less ball shaped. While the shape can be forged it is not easy to make. They can also be flame cut by someone good with a torch.
Other forges have just a simple bar grate with large openings and it is cleared with a pointed poker. I prefer a loose grate that can be removed if necessary.
Some forges have a grate with holes in it but these clog rapidly when used with coal and require tearing down the fire and rebuilding it often. These types only work well with charcoal or for short lived fires.
|
|
- guru
- Thursday, 05/24/07 19:14:16 EDT
|
Hi,
Is there any info on smiths building and using rolls for stock reduction and texturing.
Horspower requirements, rolling temp. steel selection for rolls are they cooled and how.
Regards
|
|
guido58
- Thursday, 05/24/07 19:16:00 EDT
|
Andrew of South Aus:
I tried clicking on your name to send you an email (re: blacksmith's association in Sydney), but the email bounced.
If you send an email to craig.williams@wattyl.com.au , then I can just repy.
|
|
Craig
- Thursday, 05/24/07 19:16:36 EDT
|
So what type of tuyere do you use with a clinker breaker
and you said that just grates with holes plug easily,
so what type doesnt, can i make it?
do you basically make a tuyere like poorboys with bars instead of holes?
im looking at a guys plans for making a pot out of 5/8s a36
but he doesnt really go into detail about the clinker breaker or the tuyere. and by the way, the a&h anvil deal didnt work out, the guy decided he would keep it.
so im thinking im going to get a 335lb euroanvil
|
|
- Matthew maiers
- Thursday, 05/24/07 19:33:39 EDT
|
Mike Gora, My demo trailer has a stack, and is a side draft. There is a fair wind shield. The stack is 8" od and about 8' tall. I have only cut a semicircle out of the bottom of the stack on the side towards the fire. When starting a fire it captures about 80% of the smoke and when the fire is hot it captures about 95%. The 8' is above the forge so the smoke blows over my head and the heads of most spectators. I would not use this forge without the stack as I hate eating smoke. Jock may have photos from the CSI hammerin when he posts the news.
|
|
ptree
- Thursday, 05/24/07 20:48:56 EDT
|
Mike G: My side draft is much like Ptree's, except that I used a section from a 30# propane tank with a 10" wide x 10" high round topped cutout. 12" stovepipe [crimped end] fits in the cilinder cut from the tank.
|
|
- Dave Boyer
- Thursday, 05/24/07 21:28:45 EDT
|
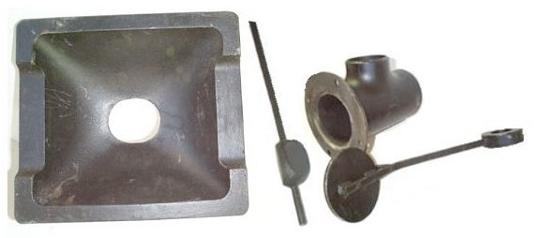
Firepot image from Blacksmiths Depot.
Fire Pots, Tuyeers and Clinker Breakers: These are usually part of an overall design. If you want to mix and match parts then plan on making your own or designing your own parts.
To use a rotating clinker breaker there must be a slot in one part or the other to create a hole for the operating rod. This makes for the best maintainability. However, some designs had a drilled hole and you threaded the parts together and then pinned on the clinker breaker.
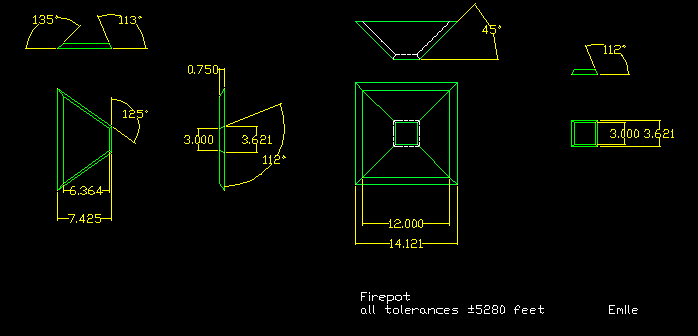
Grates tend to burn out. Drilled holes clog and thin plates with drilled holes also burn out. So grates need to be replaceable. I use loose ones. A friend of mine uses a single bar with bent ends to fet the slope of the firepot. This is not perfect and does not always stay put but there is no difficulty replacing it.
Forges rust like crazy from the acids, alkalies and salts in ash. Bolts tend to get so corroded that they must be torched out. Using taped holes is a disaster in this case. So you want to use through bolts. Stainless is best and you want to use never-seize on them.
For the Tuyeer and ash dump most coal forges are almost identical to the one shown in our brake drum forge plans below.
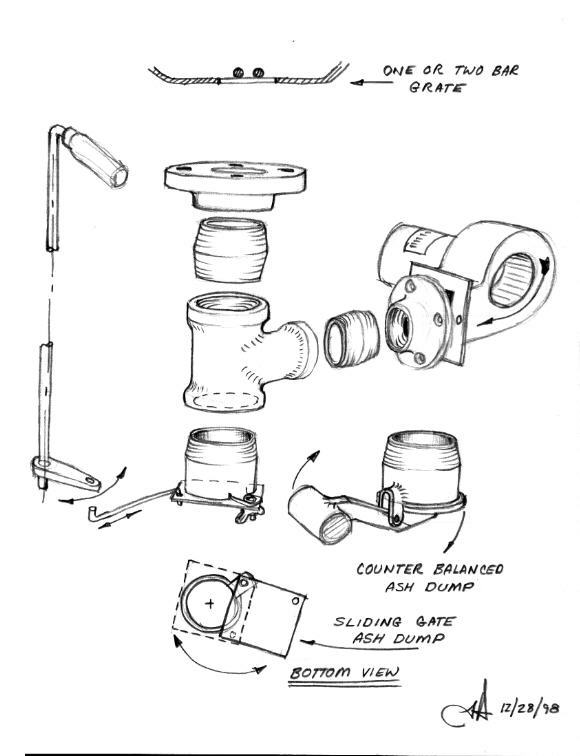
The only problem with making tuyeers this way is that the threads rust like crazy. The commercial one at the top uses a weld T instead of a threaded T. However, both will rust and they get hot enough that all paint burns off in use. For long term storage clean and paint with HT Barbecue Black.
|
|
- guru
- Friday, 05/25/07 00:02:01 EDT
|
how can I tell if the body of an anvil is wroght? I will soon see a 275# in person that pictures of show a steel plate- and it's old. Can they be easily indenified from those that have a cast iron body? It is pretty wellmarked up. what might i expect to pay?
|
|
idfrgr
- Friday, 05/25/07 00:55:55 EDT
|
idfrgr:
The manufacturer and approximate date of anvil can be used to determine the likelihood of all or part of the body being wrought iron. Sometimes anvils say SOLID WROUGHT or WARRANTED.
Those with solid cast iron bodies will not ring, for example Fisher, Vulcan and a couple of others. Fisher is said to have taken out, then put back in a ring in their anvils, but it is not as distinct of a ring as a soft-bodied anvil with a steel plate.
|
|
Ken Scharabok (Poor Boy)
- Friday, 05/25/07 01:19:24 EDT
|
I have a beginner's question/concern in selecting an anvil; it is to be my first. (Having read the FAQ and anvil selection essay, I am still compelled to ask this, due to the particularity of my case - do forgive my beginner's incompetence.)
The situation:
I have an opportunity to obtain an old, used Vulcan, 252 lbs (stamped 25 on base, for the record). Top is solid, edges are sharp.
On a practical note, I'm a 5'6"/140 lb gal operating from her backyard, with hardly anyone in the area big enough to lend a hand with moving the anvil around - which means that it would have to stay outside in my yard all the time, and as far as I know, that isn't good for anvils. Am I right to think so? (A crude solid roofing is to be built over it and it will be covered when not in use, but is that enough protection?)
My concerns with this prospective anvil acquisition are as follows:
-Size. At the moment I am a complete novice, but my goal is to eventually move towards forging knife blades and some decorative metalwork - more on the hobby scale, not big professional projects. I have heard that a common recommendation is to get the biggest anvil one can afford- but is it really worth chasing after the biggest one I can find? If the anvil was any smaller, I could put it away in my garage when not in use, to protect it from the elements and rust.
-Shape and quality. I have read in several references that blacksmithing (as opposed to farrier work) requires a more stouter anvil with more weight towards the center - how strictly do I need to abide by that specification? In other words, is Vulcan (with its stout shape) more "suitable" for forging than, say, a comparatively more sleek Hay Budden?
Vulcan also has a shorter, smaller horn - are there any disadvantages to it being shorter, or is the length of it insignificant?
I have also read above that it does not ring - is there a practical functional difference between anvils that "ring" and ones that don't, or is it simply a matter of personal taste?
In summary... Based on the work I plan on doing on my anvil, is it worth to rush out and get this 252-lb Vulcan just because it is a Vulcan, thus sacrificing all portability and leaving it out in the yard, or wait for something a bit smaller to come up, with weight in the range of, say, 170 lbs to 200 lbs, which would be easier to move to a safe dry place when not in use?
Thank you for your time.
|
|
Miriam M.
- Friday, 05/25/07 03:16:42 EDT
|
Miriam,
My thoughts , for what they are worth, are certainly you don't need anything any bigger. If you get a really big anvil it can be more like walking round a snooker table than forging when you are working on it. If the anvil is good I would get it if the price is good. You can always trade it later. If you read the posts above you will see that if you "wait for a smaller anvil to come along" you might be waiting a very long time.
If you have to leave your anvil in an open environment then paint it and grease the face. It will be fine. I have done that in some fairly wet places and it has always worked ok.
On a final (and I hope not patronising note) remember a 140lb woman is NOT as strong as a 140lb man so don't hurt yourself! If it needs to be moved get brother/ neighbour/ father or a combination thereof to help you. A lower back injury could be with you for the rest of your life. It is never worth it!
I hope guru (who will correct all my mistakes) will concur that it is a pleasant novelty to come across somebody who has the common sense to read up on the subject before jumping in with both feet.
|
|
philip in china
- Friday, 05/25/07 06:52:56 EDT
|
Miriam,
If I remember correctly,in Donna Meilach's book Decorative ans sculptural ironwork there is a photo of an anvil kept out of doors where the owner has built a dog house on wheels to slide over it when not in use.
Philip in china, I used to live at Retford..its a small world is it not?
|
|
- Wayne
- Friday, 05/25/07 07:58:57 EDT
|
Wrought vs. Cast: If markings stand OUT from the surface they are cast. If markings are thin and stamped INTO the surface they are wrought. One exception is Kohlswa who scratched their markings into the pattern and they look similar to stamped. But most cast anvils have either no markings or very obviously cast logos or letters that stand out from the surface.
|
|
- guru
- Friday, 05/25/07 09:27:14 EDT
|
item 270122983584
Vulcan 252lb – 250$ US – one bid, four days to go. For Price reference.
|
|
Leppo
- Friday, 05/25/07 09:42:54 EDT
|
Cooper/3D modeling -
I have been using google Sketch-up for a bunch of projects. The interface is more like a child's toy than a rendering program yet you can get some professional results (quickly). The basic version is free and quite powerful. You can download it and run through a tutorial in no time.
|
|
Jamie
- Friday, 05/25/07 10:06:21 EDT
|
Vulcan Anvils, the Size for You, and moving anvils: First, these were not top of the line anvils do not pay too much for it. But if the price is right then it is hard to refuse.
The big difference in the shape of the cast iron Vulcan and
Hay-Budden is that the cast iron is quite weak and long overhangs are bad design. So cast iron bodied as well as some cast steel anvils have short horns and thick quickly sloping heels. This DOES make a stouter anvil for the weight than the more slender Hay-Budden. However, the slender horn on the wrought anvils is much easier to use on a variety scrolls and curlicues. Many smiths find the thinner heel more useful but that is a matter of what you are used to.
For stoutness the best anvils were the very old ones that started with a rectangular block and had a horn added. Many of the old English anvils had a body that was 20% wider than the face the long way and a very slight waist. Horns were short on these because they were an add-on and the weld fairly weak. When they started making the entire upper body from one long piece of wrought with the grain all going the long way then horns could be longer and not break off.
For the average hobbiest a 100 to 130 pound anvil is just FINE. This is a VERY common size in old anvils due to being just heavy enough for average work and still being portable. Bigger is more satisafactory to work on BUT as a woman you do not have the "mine is bigger than yours" syndrome of the male of the species.
I had anvils outdoors for all the time I was a full time smith. However, they were partially sheltered and I WAS working full time which helps keep the rust at bay by wear and tear. Of more concern than the weather is theft. Wood stands also rot and I had to replace mine about every 10 years.
Depending on your work space and storage space you can easily move an anvil on its stand with a hand truck. This saves the back and moves two pieces at one time. Note that some stands do not move well due to having legs or open bottoms. My box stands do move OK on most hand trucks. If not I would add a two by four piece of wood in the hollow bottom so it could.
On smooth surfaces you can also tilt the anvil and stand and walk the assembly from one place to another. A hand truck is faster but you may not have one. Again, those three legged stands do not walk well either.
I think the dog house covering was a Ron Reil invention. Paint a good ferocious dog name over the opening and you get a little security along with keeping the anvil out of the rain.
SO, Once an anvil is on the right type of stand you can move it and the stand and not have to lift all that weight. For two average people in good shape a 200 pound anvil can be put on a stand if they are careful and lift with their legs. If you make a lifting rig as described above a couple days ago you can use four people to move an anvil.
I USED to lift my 200 pound anvil off a pickup truck tailgate and put it onto a stand and the reverse as well. However, today I have a tough time getting a 100 pound anvil off the floor. I easily walk my 300 pound anvil around on its stand but most often it gets hopped from one end of the shop to the other with a hoist.
Also remember that once you HAVE an anvil others will become more common (its the perversity of life) and you can trade up or down as needed.
|
|
- guru
- Friday, 05/25/07 10:08:13 EDT
|
PLEASE DO NOT post long URLS. For ebay the item number is sufficient.
|
|
- guru
- Friday, 05/25/07 10:13:45 EDT
|
On archival drawings. I know this is a bit late, but to get archival drawings paper is a bad choice in most cases, as it is good for perhaps 20 years in real world use. Mylars made in the 80's had yellowed and gotten brittle when I tried to use them in 2004 at the axle shop. At both the axle shop and the boiler shop, there were many old drawings of the buildings and tooling etc, still in perfect usable condition that dated to 1880 and before. Ink on muslin. The muslin is a heavily starched linen. Demensionaly stable, and a delight to handle as it is not flimsy. Makes excellent prints and resists handleing damage as well. To prove a point one of the draftsmen at VOGT made a quick sketch, of ink on muslin. Took it home and ran it through the washer. Still usable, although the blueish color of the sheet had become pretty much white. We were using boiler door casting drawings made in 1860, not redrawn from 1860, but drawn in 1860 to have castings made in 1995. As far as I know they are still in use.
At the boiler shop We first went to CADAM, and when we split off the valve and fitting shop we went to PRO-E. Top dollar systems, at $40,000 a seat in the late 90's, but ohhh what it would do.
I learned to draw with pencil and pen and ink in the 70's and used that technology up to the 90's, only upgrading to Rapidographs instead of the ruling pens. With pencil on paper or muslin, I could outdraw any guy in the koint speed wise for one offs. But when you have families of parts made from a casting, the PRO-E ate me up every day.
I no longer draw mechanically for work in my present job, but use the skills in the shop.
|
|
Ptree
- Friday, 05/25/07 18:16:20 EDT
|
I want to make a Hall Tree that looks like a tree. What are your thoughts for getting the texturing on the pipe. Thanks for you input.
|
|
- boneman
- Friday, 05/25/07 20:12:15 EDT
|
Boneman,
I just had a job that needed treebark on gate handles. There are texture tools for power hammer use, and you might be able to do pipe. I would expect that for pipe however the daylight opening may need to be bigger than the std tool. I made my texture tool. First I put a radius across a pair of chunks of 1/2" by 2" flat bar. I then ran cold, raggedy looking beads along the radius to give a texture. I put a spring handle on the pair and bingo. I did my hammer work with a hand hammer on stainless and i made 5 gate handles that were pretty big. The texture surface in the tool looks fine, and the customer loved the look.
|
|
ptree
- Friday, 05/25/07 21:00:28 EDT
|
Archival Drawings: I have paper velum drawings made in 1962 that are in first class shape. I also have a tracing paper drawing made in the 1930's that is perfect and have handled tracing paper drawings from the 1890's that were not too delicate to print. However, they need to be stored properly.
I always used K&E grid mylar. The drawings I made on it in 1980 are perfect, no yellowing or embrittlement. They have been stored in cardboard storage boxes that are not the best for archival purposes. We occasionally used other brands of mylar and they have darkened and embrittled considerably.
BUT. . I also have diazo process blue prints from the 1960's. This is a terrible process designed for temporary use but if kept away from sunlight and moisture they hold up much better than one would think. However, sunlight will bleach them in just a few days to were they are not readable.
On good paper a LASER print is very durable due to the plastic "ink" that is colored with carbon black. Both are very stable. However, the laser toner reacts with vinyl and will weld to vinyl report covers.
I much preferred working on mylar because erasures did not show and the grid made it very easy to work without taping down drawings. Most modern drafting tape does not hold well and alignment is a problem. Drawings were very fast and printed sharply.
The advantage of CAD is that every "print" can be an original and updates can be perfect. Once you learn to use layers to store separate parts so you can create individual details from the parts of an assembly drawing AND you work to absolute dimensions then some of the slowness of CAD is replaced by efficiency.
But the CAD learning curve is long and slow. . .
|
|
- guru
- Friday, 05/25/07 22:27:43 EDT
|
Boneman, Try running varying length and approx. parallel welding beads that are discontinuous and spaced randomly but close. Run these at a cold heat(stringy), so they are raised for depth contrast, and then flatten with a flap disc. Play around with a scrap piece and you'll see.
|
|
- Plato
- Saturday, 05/26/07 00:37:19 EDT
|
Miriam, My anvil is outside. It is chaulked and bolted to a steel stand which is partially buried. I made a long bar that sits in the pritchel hole and arches over the horn. The bar holds a big bag off the face, protecting it from the rain. The same bar is also awesome at killing the ring. I also spray a light coat of RP7 when I'm done forging.
|
|
andrew
- Saturday, 05/26/07 02:09:15 EDT
|
The local County Ag Extension Office and Chamber of Commerce are putting on a Family Fun Day today at Jr. High School. As much as an end of the school year party as anything else. I was asked to set up an anvil and (propane) forge and do a bit of hot metal bending. I encourage others to also do this type of thing. Adults tend to say, "I didn't think anyone still did that this type of thing anymore". Kids tend to say something like "wow".
Question often asked is if you shoe horses. My reply is to say yes I do. I walk up to them and go shoooo. Kids love that line.
|
|
Ken Scharabok (Poor Boy)
- Saturday, 05/26/07 09:46:25 EDT
|
I recently purchased a 4� x 8� x 1� steel plate for a welding table. Once I had it mounted on the stand I realized it had a slight bow in it, about 3/8� over 8 feet, parallel to the long axis. It is now sitting on the base (not attached) with the concave side down. Any suggestions about how to flatten this plate short of high explosives?
|
|
sig
- Saturday, 05/26/07 17:45:32 EDT
|
Sig, although it is art, some careful stringer beads will draw the arch out. Weld on the inside of the curve.
I have also seen big rosebuds and buckets of water used. Otherwise a 1000 ton straightening press is also quite nice.
|
|
ptree
- Saturday, 05/26/07 18:41:12 EDT
|
Sig,
Stringer beads will do the job, as ptree says. However, they need to be one side that you WANT to pull. Welds shrink when they cool, and will pull the sheet with them.
I had the same situation with a slightly smaller (3' x 7' x 3/4") weld table top made from some salvaged steel from a large water tank. I managed to pull all but 1/16" of the arch out of them simply by welding a framework of sturdy channel iron to the bottom.
You might consider welding a truss arrangement to the bottom of the plate. Start the truss out with a slight opposing arch, using stringer beads to pull the long truss cord to concave, then weld it to the plate using stitch welds. Work from the ends to the center and it should pull the plate down. More of an art than a science, I'm afraid, at least when I do it. Might be an engineer out there who can give you some good guesses as to member sizes and amount of compensating arch.
Or, prop the two ends on some 2" bar and drive a loaded cement truck over the center. Should about do it. (grin)
|
|
vicopper
- Saturday, 05/26/07 21:25:06 EDT
|
Sig: Rather than weld the sturdy channel directly to the plate like vicopper did You might use a method of bolts and shims or bolts and nuts so You can ajust the table relative to the channels and pull it flat.
|
|
- Dave Boyer
- Saturday, 05/26/07 22:18:51 EDT
|
Hi guru.I have to weld a tank on the inside that has been used as a industrial container.The metal has been permeated with all sorts of chemicals.Problem is ,when I start to weld,the faceplate flares up with a greenm flash and makes it hard to see.Any amount of grinding doesnt seem to have any effect. Any suggestions?
|
|
william duckett
- Saturday, 05/26/07 22:44:40 EDT
|
William, Not enough information other than it sounds like it is something you should not be doing.
That said, If you mean your welding faceplate then try more ambient light. If you light up your workspace like daylight then you can see through a #12 shade before striking the arc and afterward the contrast is not nearly so severe.
What ever is burning off may be in the alloy of the steel if it was some special container. Be sure to use plenty of ventilation such as a local exhaust fan AND wear a good fume and vapor filter under your hood.
If you do not know what the chemical burning off AND OR your employer doesn't know either than take the absolute most caution. A thin coating of cadmium used for corrosion protection could make the job lethal if you breathe the fumes.
|
|
- guru
- Saturday, 05/26/07 22:56:39 EDT
|
Sig, Relatively short weld bears will REALLY distort a plate. Take your time and wait for the plate temperature to equalize between beads. Since this one needs to be welded on the side you now have UP, I would cut it loose from the table and work from the other side.
When I built my weld bench with a 1" plate top I was lucky that the plate was close to flat. I drilled and tapped 5/8" NC holes in the plate and bolted it down at about one foot increments. The bolts were installed from underneath and then ground flush on the top. They are still removable (as long as nobody welds on them). The holes are such that I can turn the plate over if need be.
|
|
- guru
- Saturday, 05/26/07 23:10:13 EDT
|
William-- green flash sounds like galvanized to me. Whatever it is, your lungs were not intended to breathe it. So, the answer is simple: don't. I get up coughing and hack all day from welding and cutting junk like that. No job is worth it.
|
|
Miles Undercut
- Sunday, 05/27/07 00:25:24 EDT
|
Thanks everyone for taking the time and effort to offer such wonderful suggestions! This is a great resource to draw from. Unfortunately, I am rather new to REAL blacksmithing (recovering farrier of 30 years), so some of these terms are new to me (stringer beads? weld bears?). I do have a relatively large TIG/MIG welder, so I should be able to accomplish these terrific ideas. Thanks again!
|
|
sig
- Sunday, 05/27/07 06:40:23 EDT
|
Thanks guys I knew I could get an honest bit of advice here .Always a pleasure,keep the faith Shortguy
|
|
william duckett
- Sunday, 05/27/07 07:48:15 EDT
|
Whoops. . "short weld beads" (not bears)
Stringer beads are long straight welds. Parallel stringer beads are used to built up surfaces and fill large joints and fillets.
A stitch weld is a short bead of maybe 1", a gap of 1 or 2" and another 1" weld. These are commonly specified to reduce welding and given in weld length and gap (1" - 1", 1" - 1.5" and so on).
A heavy weld pass will actually bend the plate in the middle (with the bead on the inside of the bend). Fairly light beads (or stitch welds) will pull less. I would try one down the middle and then one in the middle of each space created by the first (IF needed), then four more if necessary. In the end you may have a relatively flat surface with gentle humps in it but that is better than that big curve.
|
|
- guru
- Sunday, 05/27/07 08:53:44 EDT
|
William Duckett, and any one else who welds inside stuff,
As an industrial safety guy, who has worked in boiler shops, may I offer several bits or advice?
1. "Inside a tank" means a confined space. To weld inside a confined space, means that it is a "Permit required confined space" in OSHA terms. This means that a checklist of items, all intended to keep you alive and healthy need to be completed BEFORE you go inside. Things like a test of the air for enough oxygen, but not too much oxygen. Looking for carbon monoxide, hydrogen sulfide, and an explosive atmosphere. Testing for remians of any toxic chemicals that may remain from the use of the vessel. It means a plan for how to get you out of the space if something happens and you can not come out on your own. Usually a harness with a rope or a tripod with winch if a verticle entry. An attendant to watch you to see that you are ok.
2. In a confined space, welding requires a local exhaust. This is a fan extractor that removes the weld fume(smoke). also a supply of fresh air from outside.
3. Never ever weld on tanks that held chemicals unless you know what they held, and the materials. Many chemicals leave behind residue that changes in the heat of the weld and many are toxic.
For those who don't know, oSHA has been working hard at getting the word out on confined spaces for years. Hard regulations that are not BS. after perhaps 15 years of hard enforcement and fines etc, the yearly death toll from confined spaces has dropped way down. It is now only about 200 deaths per year. Think about that, that is on average 1 person per working day DIES somewhere in the US in a confined space. Often however it is several at once. Someone goes in, and passes out, and then someone rushes in to rescue them. and they go down. I have seen reports of as manny as 5 in a row. that is the reason for the planning and equipment to rescue from outside. Permit required confined spaces are very serious business. Please take care when entering anything like this.
For clarity, a confined space is anyplace that is not designed for normal occupation. If it does not have normal egress, like a door, stairs etc, and normal lighting and ventalation it is a confined space. As soon as you add almost any risks such as engulfment such as in a grain bin or coal chute, or the structure has sloping floors like a cone bottom tank, or you have uncontrollable atmosphere risks, of fire, or welding etc you have a permit required space. Every state OSHA has training phamplets, and will also send you the actual reg for FREE. While many often Pooh pooh OSHA, the book is written in blood. They wrote this thing from the experiences past. there are also many helpfull items, for the fabricator like railing rules that will help if you have to fab up an OSHA compliant rail.
Remember, "Life is too short to spend any of it dead, injuried or in jail, and any combination of the three really sucks"
END OF RANT
|
|
ptree
- Sunday, 05/27/07 10:30:03 EDT
|
Confined Spaces: On a job we had several years ago there was a confined space that consisted of a very small room (8 feet by 18" by 7 feet tall plus obstructions and a gently sloping floor). Several men could work in it but they had to get there through a small tunnel on their hands and knees. It was under a water conduit against a dam and difficult to get to much less hear someone cry for help. We had everything from welding to heavy mechanical and electrical work going on inside these rooms (there were two).
Any time anyone was in it we had a forced ventilation fan that had to be hooked up to a special oversize conduit. We also had a safety man that sat outside the tunnel listening to the men inside and checking on them (by voice) every few minutes. His orders were to GET HELP, DO NOT GO IN if something happened AND he was NOT a runner for getting tools or parts. I repeated this order to him EVERY DAY lest he decide to be a hero. He was allowed to check on the fan and extension cords close by but that was all.
Our employers, the money men, constantly complained about the job of the safety man (a minimum wage employee). I repeatedly told them that this was a necessary requirement for people to work in this hazardous space. I reminded them of the liability and they responded that they had insurance for that. . .
The day I left that job they also fired all the "extra" workers. For months after that a lone worker often worked in those spaces. Luckily nothing ever happened. But the slightest incident could have meant death to a worker in a space like this. Even a simple fall.
Today that plant is closed due to bad judgment of those "money men". The next time someone goes in those spaces it will be from the top with a cutting torch.
|
|
- guru
- Sunday, 05/27/07 11:01:21 EDT
|
Guru, The act of working in that confined space is illegal without the proper safety system, including your safety man. Congress is working on putting teeth in the OSH act as we speak. Criminal penalties for willful violations that result in death
|
|
ptree
- Sunday, 05/27/07 18:56:37 EDT
|
have any of you guys tried the dayton blowers at centaur?
There like $70 Heres a link http://centaurforge.com/prodinfo.asp?number=115VBLOWER
|
|
- Matthew Maiers
- Sunday, 05/27/07 20:09:28 EDT
|
have any of you guys tried the dayton blowers at centaur?
There like $70 Heres a link http://centaurforge.com/prodinfo.asp?number=115VBLOWER
|
|
- Matthew Maiers
- Sunday, 05/27/07 20:09:35 EDT
|
Please help me, I work at a guest ranch and my wrangler just asked me to get him some info on the Pro-forge, like temp. it gets to, how long it will last, general stuff to tell the guests durring our blacksmith demo. tonight. Any and all help will be much appriciated.
Kim
|
|
Kim
- Sunday, 05/27/07 21:02:21 EDT
|
Does anyone have information about Nydqvist & Holm powerhammers? They were made in Sweden. Any technical information would be greatly appreciated. Thank you.
|
|
Paul
- Sunday, 05/27/07 21:43:28 EDT
|
Kim, Is that a brand or a type? A propane gas forge will reach 2400 to 2600°F (1320 to 1430°C) depending on type. The fuel tank (propane bottle) will last anywhere from a few hours to a week depending on the size of the forge and the tank. Some shop forges will use as much fuel as there is in a typical 20 pound bottle in less than an hour. Little hobbiest forges can run 4 to 6 hours a day for weeks on the same fuel.
|
|
- guru
- Sunday, 05/27/07 22:29:03 EDT
|
Dayton Blower: Matthew, Dayton makes a considerable range of blowers. Their smallest is great for a big gas forge OR a very small coal forge. Tell Centaur they need to publish some specs on that blower and which one it is. They SHOULD have almost everything that is on the Dayton literature on the web site.
Note that these are light duty little blowers. They work great for what they were designed for. I use the ones with a flange that can be bolted to a 2" floor flange.
When locating them be sure to keep them far enough away from the forge that they do not get over heated. A heat shield between the forge and the blower is recommended.
|
|
- guru
- Sunday, 05/27/07 22:36:23 EDT
|
Swedish Power Hammer: Paul, This is another orphan machine like many others. That means that if anything goes wrong then you are the engineer and millwright.
The vast majority of machines of this type built in the first part of the 20th Century had very sparse if any operating instructions. They expected BLACKSMITHS, men with real mechanical skills to be buying and operating their machines. OR men who went to trade schools and learned about machinery. If there were any pamphlets on these they were in Swedish as it was very rare for them to be exported. I'm not sure about this one but most of the Swedish power hammers were spring helves. These were popular in Sweden but not anywhere else.
Today being an orphan machine also means that like any old machine you walk up to it, study the pieces and parts, turn a crank, adjust a slide, run it slow, study it and figure out how it works. Generally anyone that STUDIES the machine can figure out more than the last owner.
|
|
- guru
- Sunday, 05/27/07 22:45:30 EDT
|
i think i have a large dayton blower that was in our old oil furnace, is there a such thing as to much air force.
and if there is could you change the speed to slow it down.
|
|
- Matthew Maiers
- Sunday, 05/27/07 22:48:50 EDT
|
Hi Jock your site is a credit to you and the whole worlds blacksmithing community , I say, hats of to you, and the crew , from down under,,, keep on hammering away. [bang bang] best regards, Glenn Moon,Industral Blacksmith
pobox327 Braidwood,N,S,W 2622, Australia [IronVil Park]
|
|
glenn moon
- Sunday, 05/27/07 23:28:25 EDT
|
as to the oil furnace having to much air yes you can but if you have an air control on your oil burner you can regulate the air , it is all ways best to have a bit to much air than to less air supply ,i use high presure blowers 8inches of water tube gauge mesurment with good needle valve control on the oilburner
|
|
glenn moon
- Sunday, 05/27/07 23:38:16 EDT
|
Forge Blowers: Matthew, Yes you can have too much air. However, it is simple to put an air gate in the air pipe and adjust with that. Some folks put electric controls on forge fans but they are hard to keep the motor running very slow and the motors tend to stall (and burn up) if run too slow. This works best on small blowers that are sized just right for the forge so that the lowest it needs to run is about 50%. Many folks use both an air gate and electric control, but all you need is the air gate.
With too much air you can blow the flaming fuel OUT of the forge. My first forge could do that if you wanted some excitement . . . With high speed blowers like vacuum cleaner fans you get too much air AND a lot of noise as well. So large low speed blowers are best.
|
|
- guru
- Sunday, 05/27/07 23:42:50 EDT
|
Glenn, Thanks!
|
|
- guru
- Sunday, 05/27/07 23:43:39 EDT
|
Thanks, Guru, for responding to my post about the Swedish Pneumatic hammer. I'll keep fiddling with it to obtain optimum performance.
|
|
Paul
- Monday, 05/28/07 00:35:41 EDT
|
as to you swedish hammer if you can sent me some photos of the hammer and how it looks , i might be able to help i have pulled a fair few hammers apart, so i might be able to help , my email in springandhammer@hotmail.com name here is glenn moon master blacksmith
|
|
glenn moon
- Monday, 05/28/07 04:26:53 EDT
|
G'day Glenn (master Blacksmith) - John at Massey in manchester here ! - you still heading over here for the conference in July ?
To all others - have a look at glenns website for what you can do with an open die hammer and a bit of hard work!
|
|
- John N
- Monday, 05/28/07 05:17:56 EDT
|
Glenn, There was a guy near you who had sourced some super heavy rail that would make nice little anvils here a week or so back, if you scroll up a bit you will find the details, a few taps under the 7 cwt would put a nice horn on them .... you could solve NSW's anvil shortage in a jiffy!
|
|
- John N
- Monday, 05/28/07 05:58:33 EDT
|
Glenn & John N: Sold an item to someone in NSW who noted the only AU group he could locate was the one in Western AU, which was quite a distance away. Have you thought of forming something like the NSW Blacksmiths to get recognized an an ABANA affilitate. At least it would give a point of contact for others in your area. The ABANA Secretary can likely provide information on becoming an affiliate.
In the U.S. what the Alabama folks do is to have an umbrella group which covers the entire state and then area sub-groups, which they call councils or forges.
|
|
Ken Scharabok (Poor Boy)
- Monday, 05/28/07 06:34:58 EDT
|
I like your thinking Ken but I am probably about 10,000 miles to far north to be a member of a NSW blacksmiths group (Manchester UK :)
The BABA in the UK is a very active group, if youve not seen the quarterly magazine its well worth a look - very high quality 'glossy' - worth the subs alone. (Ken - Jock, if you havent seen it I can stick a few back issues in the post for your general information - mail me if interested and it will go on the 'to do' list, you might see them by christmas! )
|
|
John N
- Monday, 05/28/07 06:53:01 EDT
|
John
I tried to email your company but the link didn't want to work. I am thinking about getting an an yang hammer but want to play with one first. I would buy direct from An Yang here, of course, but hoped I might be able to look at one at your place and ask you any relevant questions. I shall be in UK in 3 weeks time.
|
|
philip in china
- Monday, 05/28/07 07:48:04 EDT
|
Phillip, John's web site is list on the power hammer page list of manufacturers.
John, Thanks for the offer. I have a stack of the BABA magazine I am supposed to do a review on. . .
|
|
- guru
- Monday, 05/28/07 09:34:39 EDT
|
John
Just tried again but my mails will not go through to you at your address at Massey. Maybe you could mail me some time so we can talk power hammers. From the specs on the An YAng hammers they seem to be made for people about 3 feet tall. Is this a feature? Should I mount mine on a concrete plinth?
|
|
philip in china
- Monday, 05/28/07 09:45:50 EDT
|
Forge Blowers, mine's big, about 14 inches across and connected the the forge piping by automotive pre heater hose. I used to have a sheet of plastic that leaned against the intake side of the blower to vary the amount of air, but I ended up just crushing the pre heater hose by hand till I had the blast I wanted. Its in two pieces so when I over did it, I pulled the connection apart and opened it up a bit.
|
|
Michael
- Monday, 05/28/07 10:21:08 EDT
|
Short Chinese Hammers: Phillip, The very small Chinese copies of Western hammers are just scaled down, not redesigned as light capacity machines. So they are like scale models. For the Asian worker that still works sitting on the ground (there are a lot) this is not a problem. However, for those of us from the West that work standing up it IS a problem.
My recommendation to importers seven years ago was to have heavy cast iron bases manufactured by the Chinese as it SHOULD have been cheaper to have them make them rather than fabricate a base here. At that time I was told it would be too expensive (the Chinese wanted the importers to pay for the pattern cost). Some are now finally being made but I do not know who is making them.
If you fabricate a steel base it will need to be filled with sand or concrete to deaden the ringing noise.
A concrete riser can be made. It should be steel reinforced with steel anchors to bolt to. I would build a steel box larger at the bottom than the top. Criss cross it with welded in rebar then fill with concrete. A new control treadle will need to be made and fixed to the box. Note that shrinkage of the concrete WILL occur in time.
|
|
- guru
- Monday, 05/28/07 11:51:19 EDT
|
i just bought a power hammer it is a murry. i was wondering if it was connected to mayer little gaints couse it looks just like those. i was wondering if any body had any infermation about the company so i can find out when it was made the serieal number is 18 thanks jake
|
|
jakeg
- Monday, 05/28/07 16:12:09 EDT
|
Murry was the rebirth of the Moloch which was designed by the Mayer Bros. Later it was bought out by Little Giant.
While the design is very similar they are different hammers, parts do not interchange.
|
|
- guru
- Monday, 05/28/07 17:27:55 EDT
|
More. . Jake, "Pounding Out the Profits" has a brief history of the machine. Otherwise see my post above about Swedish power hammers and orphan machines.
That said, the Dave Manzer Little Giant tune up and techniques videos both apply to this hammer. Dave's videos which we sell are the ONLY accurate information on Little Giant adjustment and tune up. They include years worth of experiance and study of these quirky machines.
|
|
- guru
- Monday, 05/28/07 18:19:59 EDT
|
Where can I buy a leg vice?
|
|
Victoria Moore
- Monday, 05/28/07 20:02:18 EDT
|
Blacksmith's Leg Vice: Victoria, Currently in the US blacksmiths leg vices are available from Blacksmiths Depot. They carry a quite nice new one.
For used blacksmith vices you could try farm auctions or better yet a blacksmith's organization meeting. There are blacksmith's groups all over the world and you will find that among them there is almost always a dealer of used tools or two. See ABANA-Chapter.com for a group near you.
|
|
- guru
- Monday, 05/28/07 20:54:05 EDT
|
Has anyone seen Ron Kinyon's new design for his air hammer and has he put together plans for the new method of attaching the ram. I couldnt tell from the one picture I saw how he was triggering the change in stroke direction.
Thanks
|
|
Steven Bronstein
- Monday, 05/28/07 21:06:05 EDT
|
Victoria; since you don't mention a location and not even a country or what continent you are on I will have to assume you live in Central New Mexico USA just like me and say that the Tumbleweed Equipment Auction, Lemitar NM USA, each spring and fall usually has a post vise in it.
However any good blacksmith's conference will usually have a dozen or two and I have counted over 70 for sale at one Quad-State Blacksmith's Round-Up held in Troy OH in September. I would bet there will be a number of them at the IBA Conference in Indiana in early June as well.
When buying a used post vise I feel the most important thing to look at is the condition of the screw because all the other parts are fairly easy to repair. If the screw is heavily worn I would not take a vise for 1/4 the price of one with a good screw---unless I already had a spare one that would fit.
Back from 6 days of camping and forging---used 3.5 bottles of propane for 4 days of pretty constant use between 9am and 7pm; no forge welding though.
Thomas
|
|
Thomas P
- Monday, 05/28/07 21:59:11 EDT
|
Matthew Meiers and others:
Ifyou're lanning to choke down an oversized blower, I srongly suggest that youput the air gate on the INTAKE side of the blower, and NOT THE EXHAUST SIDE. When yo restrict the intake, you decrease the number of air molecules that the blower is trying to move, makingot work less hard. When ou restrict the exhaust, you take the full number of molecules of air and expec the blower to compress them. What then happens is that you get a very high velocity air stream from the choked down exit, and the motor is working hard to compress the remaining molecules of air. This is hard on the motor and gives you a bad air stream. Rig a sliding gate on the intake side.
|
|
vicopper
- Monday, 05/28/07 23:45:22 EDT
|
Philip in china - PM sent
|
|
John N
- Tuesday, 05/29/07 05:18:38 EDT
|
I believe I have two of the finest examples of aluminum repousse and chasing artistry. As an aluminum industry guy, I've never seen anything done with the depth and skill as shown on these two pieces, each worked from 1100 alloy .040" thick sheets into panels. Each panel measures about 15" x 30" with up to 3" relief, including separation and reforming without adding metal to the piece. Truly magnificent work.
My question... is there a forum where these pieces can be displayed so that others can see this amazing artistry in metal?
Please review and advise... and thanks for having such a good website. Regards, Bill Anderson
|
|
Bill Anderson
- Tuesday, 05/29/07 08:47:19 EDT
|
Bill, We publish such things in our NEWS on occasion if provided with good photos. We are also looking for work to illustrate Repousse'Tools.com
|
|
- guru
- Tuesday, 05/29/07 09:26:38 EDT
|
Is it possible for mild steel to rot away and appear to be wrought? I was fishing in my creek yesterday and found a 12" piece of metal under the water. I pulled it out, hammered away all the rust and theres a woodgrain look to the material. I bent a bit of it off til it snapped and you can still see the grain. I spark tested it and it seems like mild steel. I tried to forge a bit of it into a square and it started to flake a little. Here's some shots.
http://greatnippulini.com/maybewrought.jpg
http://greatnippulini.com/wroughtend.jpg
What can I do with this?
|
|
- Nippulini
- Tuesday, 05/29/07 12:35:03 EDT
|
Here's another shot showing more grain.
http://greatnippulini.com/maybewrought2.jpg
|
|
- Nippulini
- Tuesday, 05/29/07 12:54:05 EDT
|
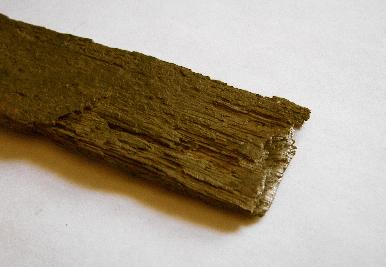
Nipp, that is definitely wrought. The problem is that when rusted long enough, particularly under water all the slag that holds it together corrodes out. So what you have is a bundle of rusted iron fibers. It is impossible to forge and very difficult to repair. You would need to derust with an acid, soak in flux and weld it back together. . .
|
|
- guru
- Tuesday, 05/29/07 13:53:44 EDT
|
Neat! So basically I could use it for decorative purposes, not really good for forging. I live in a historic town (Hulmeville PA), founded by John Hulme in the 1700's. The Neshaminy creek backs up to my yard and I always find really old artifacts, usually porcelain, whiskey jug pieces and other findings. I'm sure if I troll the creek some more I could find the rest of whatever it is the piece is from. Thanks for the help!
|
|
- Nippulini
- Tuesday, 05/29/07 14:10:17 EDT
|
Nipp, Your sample above was good enough that I used it with another I had on the Wrought Iron FAQ.
Often what you see is just surface corrosion. If it is perfectly straight and even it MIGHT be roll marks that have corroded differently. But if they wander and have definite changes you can just about be sure it is wrought. Note that Old steel can also have grain. However, it is much less distinct than in wrought and shows up mostly as coloring rather than texture.
|
|
- guru
- Tuesday, 05/29/07 14:36:12 EDT
|
if i made a firepot out of stainless would it still corrode? and has any of you guys had experience with euro anvils? thanks.
|
|
- Matt maiers
- Tuesday, 05/29/07 17:03:41 EDT
|
SS Firepot: Matt, it will not rust but it may get burned from the intense heat. However, this is true of all firepots. If you over do, then the pot can be melted and burned up.
One thing to note is that SS has a high thermal coefficient of expansion. It will expand more than surrounding steel parts. So you need to use oversize bolt holes to attach it.
The parts that corrode the fastest and need replacing most often are stacks and hoods followed by sheet metal forge pans (if it is a small type). Water also tends to leach the chemicals from the ash and end up in the ash dump. I've had 1/4" thick ash dump plates corrode to the point that they were so rough that about half the air going to the tuyeer leaked out.
|
|
- guru
- Tuesday, 05/29/07 17:21:29 EDT
|
EuroAnvils USA are good folks to do business with. The agents in Europe have not been so good to do business with.
Euroanvils are a medium quality cast steel anvil typical of those cast in the Czech Republic. You get what you pay for. There are a lot worse.
|
|
- guru
- Tuesday, 05/29/07 17:29:07 EDT
|
when was this company established D.J. Murray Mfg. Co., Wausau, wis and when did they start manufacting power hammers my has a seiral number of 18
|
|
jakeg
- Tuesday, 05/29/07 19:27:15 EDT
|
In 1939 the bankrupt Moloch company was purchased by D.J. Murray who had been in the manufacturing business for over 50 years. Murray made hammers until the business faded in the late 1950's. It sold the hammer line to Little Giant in the mid 1960's. If you want the whole story gt a copy of Pounding Out the Profits. See our book review page for details.
|
|
- guru
- Tuesday, 05/29/07 20:00:55 EDT
|
Does anyone have experience repairing Miller Thunderbolt AC/DC arc welders?
This model changes the amperage via a crank handle on top. One area of the screw threads is stipped on mine to where it goes up so far and then free spins. I have the replacement parts can am not 100% sure how to get to the collar at the bottom in order to change it out.
I'm thinking I am going to have to guide off two welds to pretty well take the transformer & shunt apart to get at it. Just would like some verification. I have parts manual which shows blow-apart of parts I can e-mail.
|
|
Ken Scharabok (Poor Boy)
- Tuesday, 05/29/07 22:07:12 EDT
|
Oops, mean to say I may have to grind off two welds.
|
|
Ken Scharabok (Poor Boy)
- Tuesday, 05/29/07 22:09:11 EDT
|
thanks for all the info, also ive got an atha 1 1/4lb
straight peen hammer are these worth anything? and how do you over do a fire, to much air? ive got 3/16" ss i think im going make the parts for two pots then weld all the plates together making somthing like 1/2". and also ive heard its better to just not fasten the pot to the table because of the expansion and retraction.
|
|
- matt maiers
- Tuesday, 05/29/07 23:18:25 EDT
|
so, why is the euroanvil less quality than say a vaughn or a refflinghaus i know that that the czeck anvils dont have a polished horn, big whoop. are the steels less quality?
are they less hard, i saw uri hofi and habermans son using one?
|
|
- matt maiers
- Tuesday, 05/29/07 23:26:42 EDT
|
Matt
The cast steel they are made from is only a mediuym carbon steel. Yes they are soft. 40-44 rockwell. The Vaughn is not a high quality anvil either. They are made in India. They typically are missing the horn tip, flash in the hardie holes and they crack. The edges are very soft and center is much too hard. I had one with a crack new all the way across the face.
They all are certainly fine anvils to use. You get what you pay for. Why not buy a Nimba, Rat Hole or a TFS anvil? For the cost of a Vaughn you could get two. Pretty much the best made anvils. I have a Nimba. I will tell you they are second too no other anvil made today.
Probably seeing Uri Hofi using a euroanvil was for marketing at a demo by the supplier whom provided it. I have also seen these czech anvils with dips in the faces new and upon removing the protective coating body fill around the base to hide inclusions. Basically as you say it is a big Whoop. YOU GET WHAT YOU PAY!!
|
|
- Burnt Forge
- Tuesday, 05/29/07 23:53:51 EDT
|
Ken-- Miller tech support has always been extremely helpful to me. Try calling them. They got me through a reincarnation of a 1972 DialArc I bought from a junkyard and sent parts, schematics, answered questions, never once said take it to a dealer, or suggested I buy a new one.
|
|
Miles Undercut
- Wednesday, 05/30/07 00:38:46 EDT
|
Vaughn and Vaughan. Vaughan anvils are made in UK by Lye Forge Ltd. (WWW.anvils.co.uk). They are hardened to a guaranteed 60 Rockwell and are a very pleasant unit to work with. Don't confuse them with the Indian made Vaughn anvils which I have never seen or used but seem to be a very different proposition!
|
|
philip in china
- Wednesday, 05/30/07 04:47:03 EDT
|
From VAUGHNs web site:
Safety Bulletin
We are increasingly receiving specification documents within international tenders which use the term "Cast Iron Anvil" as a general description.
Whether in an educational, vocational training or industrial environment there are significant health and safety hazards in using a cast iron anvil.
Although the intention in use is not to strike the anvil directly with a hand hammer, inevitably this happens regularly- especially in a training environment.
If accidental striking of a cast iron anvil occurs there is a high risk that the anvil will chip and/or shatter. The resultant personal injuries to user(s) are not difficult to imagine due to small pieces of metal flying about!
Vaughans' anvils are cast in steel to a long tried and tested blend. The working face is heat treated to 60-65 Rockwell and a narrow strip around the perimeter of the working face is left untreated to absorb the impact of any hammer blow, which accidentally glances off a workpiece during use.
|
|
Ken Scharabok (Poor Boy)
- Wednesday, 05/30/07 07:01:45 EDT
|
Thankyou Philip from China, its so pleasant to here when a customer is happy, and supportive of its supplier. I would just like to add that all the range of anvils we produce are 110% English and proud we are too........
|
|
CEO - VAUGHANS!!!
- Wednesday, 05/30/07 07:19:36 EDT
|
Atha Hammer: Matt, That is a little light for forging unless you are very small and doing small work. Atha tools are collectors items that you should set aside or trade for something not so collectible and more usable.
Too much air causes a fire to be oxidizing (more scale on the steel). At some point the amount of air starts cooling the fire and the result is much like blowing out a candle. Too much air can also blow pieces of fuel out of the fire.
Anvil quality varies greatly from manufacturer to manufacturer. Cast iron anvils are always junkers. Cast steel comes in a wide range of grades and its quality is also determined by the casting process and heat treatment. Forged steel anvils have always been the best but the last maker, Peddinghaus, has reduced their production to where they are difficult to get and may stop production (nobody is sure). This has also caused the value of old forged anvils to skyrocket in recent years.
Low grade cast steel is difficult to tell from high grade cast iron and some unscrupulous dealers (many on ebay) claim "professional quality heat treated steel" when what they have are cast iron of a grade unknown to the dealer or importer.
The best high grade cast steel closely approaches a forging except for one aspect, inclusions. Large castings are typically made in sand molds. Parts of these molds often collapse and end up in the metal. Inclusions can also be slag and debris from the pouring crucible. If an inclusion in in a non-critical place it does not matter. If it is in a critical place then the casting can fail. Forgings on the other hand start as much better steel and then are proven in the forging process. Generally if the metal can survive forging there are no major faults in the metal.
Demonstrators use the tools and machines provided for them other than what they can carry on an airplane.
|
|
- guru
- Wednesday, 05/30/07 08:49:49 EDT
|
Vaughan Brooks Anvils
The two I hade were English. I know because I purchased them new. They were marked Brooks on the side. The above mentioned problems were with those anvils. Obviously I was not happy with with.
To be fair to Matt in the UK. I will say: They are very nice folks and do sell some really great tools. I persoanlly wasn;t happy with the anvils. Doesn't mean you will not be. I also am aware of everything Ken posted as well. I know they leave the edges softer. I didn't like if you tunked it with a light blow by accident you would get a pretty good ding in it. The cracked face from no hammer blows kinda ticked me off. It was cracked upon removing the paint before use. I couldn't stomach horn tips missing and flash in the hardie hole. They may have fixed the patterns by now.
I feel I am entitled to post this opinion as it it just that.
|
|
- Burnt Forge
- Wednesday, 05/30/07 09:01:57 EDT
|
Matt: I don't think a stainless firepot is going to help unless you keep it cool. Ferritic stainless is used in exhaust applications because it is heat tolerant but if you get it red hot, it will scale up and corrode like a carbon steel. Besides, where would you get a ferritic stainless pot?
|
|
quenchcrack
- Wednesday, 05/30/07 09:24:36 EDT
|
The good thing about buying from a reputable company is the Sale of Goods act (here in the UK anyway) - If goods are not fit for purpose they must be replaced or refunded, no question.
Did you complain ? - I would be very supprised if a vendor in this industry ( where a happy customer tells ten others, and an unhappy one tells 100 ! ) did not resolve any quality issues.
|
|
John N
- Wednesday, 05/30/07 09:30:35 EDT
|
Scaling Down:
I have noted in a nautical context just what complications ensue in scaling-down a vessel (see: A Matter of Scale at http://longshipco.org/lesson.html ), and some of it applies to mechanical devises as well; your dealing with squares and cubes and square roots and cube roots, and, if you don�t know what you�re doing the results are frequently disappointing.
This also comes into play with old-fashioned artillery, where a 2� bore falconet threw a 1 pound ball* and weighed 500 pounds; a 4� bore demiculverin fired an 8 pound ball and weighed 3,400 pounds; and a full cannon, with an 8� bore weighed 6,000 pounds and fired a 60 pound ball. (see: http://www.cr.nps.gov/history/online_books/source/is3/is3c.htm for further oddities of design, and volumes, and geometry; not to mention Muller�s Treatise on Artillery) Anyway, artillery leads us to�
Stainless Steel Expansion:
When they were casting our bronze falconet as part of the batch for the Half Moon, the original plan was for a stainless steel liner. The expansion of the stainless steel, however, made this unworkable, so we ended up with a slightly thicker mild steel liner for the bore.
Wrought Iron Ship Salvage:
There�s a WW-II era wooden barge aground and slowly crumbling near where we berth the S� Hrafn. When we wander by, if the tide is right, we can worry some of the wrought iron ship spikes loose. How workable they are depends a lot on where they are located relative to the tide lines and the quality of the original spike. You get a lot of variation from spikes under similar conditions. They�re fun to experiment with, but until you �prove� them in the forge, you can�t count on them for any specific project. It is also very important to keep them �square� to the hammer as you draw them down or work them to keep them from fraying.
Sunny and warm on the banks of the Potomac; more work than I can shake a stick at, so back to shaking pens and pencils and computer keys.
Visit your National Parks: www.nps.gov
Go viking: www.longshipco.org
* Frequently the ball for the falconet was charted at 1.25 pounds, but then I discovered that they were sometimes made of lead, which accounted for the extra � pound.
|
|
Bruce Blackistone (Atli)
- Wednesday, 05/30/07 09:42:37 EDT
|
Unfinished Horns: It used to be that all anvils came with the horn finished. This included little small hobby anvils all the way through heavy industrial anvils. Some makers still finish their anvil horns, particularly in the U.S.
Anvils also used to come with finished sides (near the top) and German side slope anvils had this surface finished as well. I have copies of British anvil drawings that called for machining the sides of cast anvils for 2 to 3" from the top edge AND specific radii for the edges and hardie hole.
In the machine industry it is common to have a "machining" allowance of about 1/4" on any finished surface of a casting. This is to assure that there is clean metal when you get the final dimension. Anvil horns are a little different as they are commonly finished by hand grinding. But the theory is the same. Left unfinished you do not know if there are surface inclusions or pits too deep to finish out. This makes unfinished horns a gamble for the buyer.
The major complaint I have against unfinished horns in on the German style anvils with the conical shaped horns. Unlike the organic shaped horns these straight sided horns were designed to be machine finished. A couple revolutions on a fixture designed for the purpose and you are done and the finish is perfect.
Hand finishing an anvil horn requires tools than not everyone has PLUS it requires some skill as well as time. In the factory this is as much as an hour of hard work by a skilled worker. I have finished several new anvil horns and it is not as easy as you might think. I used two grinders and a belt sander. At least one belt was used up. Total time was over an hour on each. Achieving a smooth even surface requires a good eye and skill with the tools. It is much easier to make the surface worse than to make it better.
In the end it is a matter of cost vs. pride in workmanship and the product sold.
|
|
- guru
- Wednesday, 05/30/07 09:44:09 EDT
|
Do you have instructions for building an anvil made from what appeared to be 6"X6" square stock 24" or so long? It was standing on end supported in a frame which allowed the anvil height to be adjusted. It had no horn, just a flat square top.
|
|
Thad
- Wednesday, 05/30/07 10:42:21 EDT
|
quenchcrack I worked where there was a heat treating facility and they used stainless part baskets and racks to support the parts in the furnaces. Why stainless for this application? Is it just because they would not corrode, and be around longer (since the heat would flash off any protective oil)?
|
|
Dave Leppo
- Wednesday, 05/30/07 11:04:34 EDT
|
Anvil Plan: Thad, No. That is a bladesmiths anvil designed for a school where it needed to be adjustable. It is much more solid and simple to determine your ideal anvil height (usually knuckle height with arms relaxed to sides OR an inch taller) and just go to the floor.
These are also commonly made from round stock anywhere from 4" to 6" in diameter according to what is available. Often SAE 1050 stock is available in these sizes as scrap or drops.
I prefer wood stands. For an adjustable stand to fit a long square or round my wood stand shown on our iForge page STANDS article. For a long block a snug hole would be cut in the top and a cross piece made for it to rest on at the bottom. The bottom cross piece would also need blocks to hold the anvil base from shifting.
To adjust this type stand I made one a little shorter than usual. Then I made several wood pads that fit into the hollow base and raise the stand and anvil. It only takes a few seconds to change the pad and raise the anvil several inches.
|
|
- guru
- Wednesday, 05/30/07 11:08:10 EDT
|
If anyone needs a reminder of why caution with acetylene is necessary, glim this batch of pix of the devastation in England Saturday that killed the driver when some bottles in his van went boom:
hobartwelders.com photos
|
|
Miles Undercut
- Wednesday, 05/30/07 11:31:44 EDT
|
Dave Leppo - certain grades of stainless are used as fixtures in heat treating and reheat furnaces because of their strength at higher temperatures and resisitance to oxidation at higher temperatures. Often it's a trade-off between initial cost & fixture life for stainless vs. the initial cost and life for more robust alloys that are either nickel based, or contain higher amounts of alloying elements.
Grades 309 & 310 stainless are used in a lot of furnace applications, 309 is about 23 % Cr, 12.5 % Ni while 310 is about 25/26 % Cr & 20 % Ni (The analysis of a couple standards we use to set up our spectrometer.)
At higher temperatures, the Cr and Ni give increased strength and resistance to creep versus that of a plain carbon steel.
|
|
- Gavainh
- Wednesday, 05/30/07 12:27:22 EDT
|
Matthew at vaughns - which foundary do you use to get the anvils cast ? - Ive been a bit short of decent steel foundaries since Thos Clarkes turned into a supermarket a few years ago :(
I am thinking of getting a few cast with my company name etc 'just for fun' (not resale so not stepping on any toes !) - it would be nice to deal with someone whos cast them before, ive been getting some pretty rough steel castings lately, even with good patterns..
|
|
John N
- Wednesday, 05/30/07 14:28:50 EDT
|
Burnt Forge:
I'm wondering if there might not be two, possibly three, companies here. According to Anvils in America Brooks became Brooks/Vaughn (note spelling), then Vaughan. Is it possible Vaughan is connected to Brooks/Vaughn only through similarity of names?
|
|
Ken Scharabok (Poor Boy)
- Wednesday, 05/30/07 16:05:01 EDT
|
Dave Leppo, It has been my experience that high nickel/chrome alloys are used in heat treating to have the high strenght at elevated temp, and oxidation resistance as well as high creep resistance. Even with the chrome and nickel, the baskets and so forth are very high maintenance as it is. They soon are very mishapen and start to crack etc. Carbon steel at these temps often won't make it thru a cycle if a basket that is lifted by a hook. I found that a vendor had switched from a very expensive alloy to plain steel to finish a order, and the basket literally fell to pieces when lifted to place in the quench. Exciting! And as a Safety Guy I really hate exciting.
|
|
Jeff Reinhardt
- Wednesday, 05/30/07 18:23:04 EDT
|
so the euroanvils are gonna be soft sorta like that russian anvil like 40-45 rockwell? plus what do you think of a refflinghaus? all i was saying about the polished horn is i have all the time in the world to finish one.
and i plan on welding a fire pot together like on the shady grove forge site.
|
|
- matt maiers
- Wednesday, 05/30/07 18:30:56 EDT
|
Matt, the Euroanvils are a lot better than the Russian/Chinese (who knows? and the importers don't say, or know the alloy).
Stainless and firepots: In this application stainless will hold up much better than the alternatives (cast iron or mild steel) IF it is the same thickness. Firepots rarely reach scaling temperatures but when they do they are on the short track to burning out. Thickness of the material helps this because the heat is conducted away from the local hot spots. Cast iron pots often end up with holes melted in them due to the lower melting point of CI.
Where the problem comes in making a stainless firepot for heavy duty use is that you would need up to 1/2" thick plate. 1/4" would work but does not have high burn out resistance. The problem? Cost and cutting. You cannot easily flame cut stainless plate. You have to use a plasma torch. AND unless you get a great deal on some some scrap the cost will be exorbitant.
With heavy use you will get some scaling at the bottom of the pot but unless this is repeated over and over it will not be a problem. The rest of the firepot and tuyeer (if stainless) will last forever. As I noted above the relatively thin carbon steel pipe T's and ash dumps are the parts that corrode first and must often be replaced. I would be more likely to make these of stainless because I have had to replace them most often.
Coal ash corrosion does some strange things. You get a covering of soot and under it rust forms in huge sheets that flake off. You also get open area rust without the soot that does a similar thin. Depending on your climate and forge use this can be an annual or semi-annual event taking a LOT of metal with it. Thin sheet metal hoods and smoke screens last just a few years before they have great gaping holes. On my portable forge I finally replaced the hood with copper and it held up very well. Stainless would have been a good option as well if it was available. Thin copper held up very well except for bi-metallic corrosion where it was attached by rivets to a steel frame.
|
|
- guru
- Wednesday, 05/30/07 20:08:54 EDT
|
Hi Guru,
I have an old post vise that is lacking a spring and a collar. Do you have any advice on how to make those pieces? Not having a full vise around as an example I'm finding it difficult to make them. I'm a proficient smith so the technical element is not a problem it's just a matter of design - can you point me to any drawings or other resources? I've had difficulty finding anything detailed enough on the web. Thanks!
|
|
Copper Heron Forge
- Wednesday, 05/30/07 20:12:37 EDT
|
we got a 65 ton shear that ot to do the trick, and im getting the ss for free. as i said in the earlier post the ss is 3/16" then ill weld the plates together to make 1/2"
or close enough.
im kinda interested in buying a vaughan are there any U.S
dealers? where can i find a price list?
euroanvils my main question is WILL THEY DENT easily
an how hard are they.
|
|
- matt maiers
- Wednesday, 05/30/07 20:25:36 EDT
|
where can you buy ss piping?
|
|
- matt maiers
- Wednesday, 05/30/07 20:30:26 EDT
|
Matt Maiers,
Stainless piping will be easy to find in 304 and 316SS. Look for the nearest Mcjunkin, or Ferguson piping supply house and they will probably have what you need in stock, assuming you have a piping house in your vicinety. Mcmaster Carr also sells SS fittings. Expect to pay big$$$, and be double sure to lube the pipe threads if using threaded joints with a good neversize. Otherwise you may not get it fully threaded together before it galls, and then you may not get it apart, ever.
|
|
Jeff Reinhardt
- Wednesday, 05/30/07 21:03:35 EDT
|
I have an old engine lathe of my grandfathers that i'd like to sell. It has a 14in chuck 5ft 6in turning bed plus extra 16in chuck. there are many more parts and accessories that go with it along with toolingtips ect. . It is in great working order however of course does not apply to osha standards of today. I live in northeast pa. Do you know if there is anyone interested? I have pics for anyone interested. Any info you can provide would be greately appreciated.
|
|
steve-s
- Wednesday, 05/30/07 21:15:24 EDT
|
Matt M: Don't weld the plates together, as this will tend to make the hot spots hotter. You won't get heat transfer from the inside plate to the outside plate. Just use the 3/16 material and make 2 while You are at it. They will last for a while.
|
|
- Dave Boyer
- Wednesday, 05/30/07 21:21:18 EDT
|
Hi Ken
Good Question. I do know it is one in the same company. Their mark has changed on the patterns over the years.
Gary from Vaughan/Hope Works explained it to me once. I honestly can not remember. Maybe company changed hands or was consolidated from Baker to Hope Works. Not really sure. I think at one time Baker was the foundry and now they subcontract the foundry work out. My memory is not what it use to be.
|
|
- Burnt Forge
- Wednesday, 05/30/07 21:36:47 EDT
|
Matt
Vaughan anvils are sold by: www.centaurforge.com
They are great people. Pick up a small 7 lb burnt forge swage block while your there as well.
The euroanvils are a bit soft and do dent. Of coarse you should not hit one directly anyway. It will help you learn hammer control. Miss blows do happen though.
It is all in what you want a London pattern or double horn continental.
|
|
- Burnt Forge
- Wednesday, 05/30/07 21:42:34 EDT
|
are you sure those are vaughans or vaughns if ya read the posts above theres quite a difference.
|
|
- matt maiers
- Wednesday, 05/30/07 22:29:11 EDT
|
Stainless piping: jeff i know not of these stores you speak of, do they have a web site?
|
|
- matt maiers
- Wednesday, 05/30/07 22:34:00 EDT
|
SS Piping: For tube many autos (notably Dodge mini-vans) have SS exhaust systems. One reason I like them.
|
|
- guru
- Thursday, 05/31/07 00:05:50 EDT
|
Leg Vise Parts: Copper Heron, See our VISE/VICE FAQ for some photos.
Springs are as wide as the frame at the top and 1/4" to 5/16" thick. They curve gently forward and push at the bottom of the outer jaw. The nicer springs are an S curve with a very slight recurve at the bottom. The originals tapered in width to about 75% and then had a fish tail that was bent to fit around the sides of the jaw to keep it centered. Later vises had crude simple arced springs.
Because of the very low travel on these springs they can be made of mild steel. If you make one from an other leaf spring just normalize it, do not harden and temper. These soft springs are easy to adjust their arc as needed.
As you can see from the FAQ there are two type of traditional brackets on English and American Vices. One is the collar type and the other is a mortise and tenon that goes through the spring and is pinned. These were an old method and not very strong. But they are easy to make. The later type has a bracket with a big rectangular slot. This uses a keeper and a wedge to pull back on the collar. This is a stronger system byt it is difficult to make. French vices had a simple angle bracket on the bench with two bolts which pulled back on a cross bar. Late vices replaces this with a U-bolt and a bracket, often just a piece of angle iron. See the vice photos on the BlacksmithsDepot.com site. In all three cases the bracket that held the vice to the bench also held the spring.
The tenon design had a number of problems. The first is that it is a weak connection for a vice. The second is that it required a matching hole in the spring weakening it. The spring also needed a slight arc at the hole to hold the pin in place so it did not vibrate out. Besides the arc I filed a slight groove in mine to help keep the pin in place. And finally, the tenon did not allow for any vertical adjustment of the bench bracket. The bench to floor support distance was determined by the vice.
The wrap around bracket allowed for some variation in bench height. However, a few vices had a step that prevented sliding the bracket downward. . . Dumb thing to do. Otherwise there was several inches of adjustment and the spring would still work.
The old hand forged bench brackets were beautiful things. They came in a variety of styles that could probably be used to identify the makers. Even the early strap type were hand forged. One type was diamond shaped with a flattened round bean end or sometimes three flat bean ends. Another type had two rams head scrolls that ended on bean ends OR leaf shapes. The tenon type often made a heart shape with two scrolls with bean ends.
Do you know why so many vices are missing their bracket and spring?
Blacksmiths bolted them SOLID to their bench which often anchored to the wall and part of the building. The bolts were often tightened then peened over to keep the nuts from working loose. When the vice was sold at auction the buyer couldn't easily get the bracket off the bench (which did not come with the vice) so they tapped out the wedges or pins and abandoned the bracket. They probably took the spring with them but shortly lost it. . .
|
|
- guru
- Thursday, 05/31/07 00:10:41 EDT
|
Anvils, Will they dent? The BEST and hardest old Mouseholes, Hay-Buddens and others could still be dented by hitting them with the corner of a poorly dressed hammer, especially one harder than the anvil. They could also be cut by chisels. I've seen anvil faces positively CHEWED up by folks cutting chain on their face over and over and over again. . .
Old Kohlswa's were probably one of the hardest of the cast steel anvils. They chipped badly because of their hardness but they too could be dented. I had an apprentice prove this to me by NOT working on the edge to draw a point as instructed.
You can strike a full hard blow to a good anvil's face with a properly crowned hammer, have it come back whizzing past your head (missing if you are lucky) and not leave a mark on most good anvils. But you can also use a ball peen, straight peen of the unrounded corner of any hammer and make dents with a lot less than hard blows.
THEN there is anvil size. Due to cooling rates little 100 pound and smaller anvils are often very hard. Up to about 200 pounds the quench rate did not change much but above that anvils tend to be softer and softer. You will never find a really hard anvil over 300 pounds including old high quality anvils like Hay-Buddens. That is one reason Euroanvil has a reputation for soft anvils. Most of theirs sold have been the 300 and 500 pound anvils.
Large anvils being soft is a GOOD thing. They are more commonly used with heavy sledges and the corners accidentally struck. When steel chips the shrapnel that comes off is hot, VERY sharp and moving at bullet speeds near your crotch and arteries that if cut can result in your death in a short time. Many smiths have been injured by spalling anvil edges. This is ALSO why anvil edges should be dressed to as round as one can stand (or much more than you THINK).
You want a really hard anvil? But an old classic. Most modern manufactures will just not harden them as hard as they used to. They would rather have them dent than chip.
|
|
- guru
- Thursday, 05/31/07 00:31:37 EDT
|
so is it a good idea to buy a euroanvil? im looking at getting the 334lb. or the 264lb.
you make a very good point guru, because i plan on making
damascus steel and will be using a sledge
i guess ill just have to be careful where i place the hammer.
also, maybe it would be a decent idea to soften the hammer just a tad, because id rather have a dented up hammer than a dented up anvil.
|
|
- Matt maiers
- Thursday, 05/31/07 00:46:13 EDT
|
are there going to be any blacksmithing events on the west coast any time soon?
like a convention, that would be a lot of fun.
|
|
- Matt maiers
- Thursday, 05/31/07 00:51:05 EDT
|
if you want to forge weld stainless steel pattern welded bar, put your sections of stainless all very clean [polished ]in side a peice of mild steel square tubeing very tight , and electric weld ends on the tube all weld tight them heat to welding temp and forge them down 40% then take of the out side mild steel, and you have all welded stainlees pattern bar
|
|
moony
- Thursday, 05/31/07 04:31:39 EDT
|
hi john n yes i will be at iron bridge
|
|
moony
- Thursday, 05/31/07 04:36:23 EDT
|
I received the following from Vaughan in England. Apparently any Vaughn or Vaughan being cast in India is just a rumor as they have confirmed all Vaughans are cast in England.
Vaughans acquired all existing patterns of the "Brooks" anvil range in the early 1980's and we are now the sole manufacturer in England.
The anvils do not have consistent markings which suggests that several products were amalgamated into the range some time before we acquired it.
We have two dealers in the USA - their contact details are:
1.Centaur Forge Ltd
117 N. Spring Street
Burlington
Wisconsin
WI 53105
Tel: 262 763 9175
Fax: 8350
Contact: Mr Ernie Litynski
2. Milwaukee Tool and Equipment Company
2773S. 29th Street
Milwaukee
WI 53201-2039
Tel: 414 645 0200
Fax: 2892
Contact: Dick Gutenkunst
|
|
Ken Scharabok (Poor Boy)
- Thursday, 05/31/07 06:24:02 EDT
|
Matt, You are over thinking getting into blacksmithing. Step one is to get an anvil and a forge and try it. One reason for simple forges is to test the fuel and your desire. OR rather than spending a lot of money on tools you may never use, take a blacksmithing course at a school or even a day workshop at a hammer-in. A couple hours working at the anvil will change your outlook on a lot of things. Using a sledge is a two man operation in most cases. Otherwise think power hammer.
You mention the West Coast. In much of California you will find coal difficult to find and burning it can upset your neighbors as well as the authorities. Think charcoal or propane.
On the anvil quality as many have noted you get what you pay for. Generally the place to start is with a used anvil unless money is no object. However, location makes a difference in availability. The rust belt is rich with old tools and the farther away from it you get the fewer and more expensive they get. However, I know people in countries with very little history of blacksmithing who have had no trouble finding anvils once they seriously started looking.
Events: You didn't say WHERE on the West Coast? Checking our calendar there is a four day workshop (class) at Old West Forge, White Salmon, Washington, Cost: $425 starting TOMARROW. If you are in Northern California or North you might make it by ground if you leave now.
Also See CanIron. If you don't have a Passport you MIGHT have time to get one if you apply TODAY. The expected time to get a US passport is officially 8 to 10 weeks. However, if your application is perfect and you apply at the right time of year I (and family members) have gotten them in two weeks without paying for the expidited service. But this was back before the new laws and the official schedule was 6 weeks. Note that the application PDF can be filled out and printed rather than writing by hand.
For association events see your local via ABANA-Chapter.com.
|
|
- guru
- Thursday, 05/31/07 06:39:37 EDT
|
Travel to CANADA: According to the State Department website you can still travel to Canada from the US without a passport IF you are traveling by ground.
SO any of you that want to go to CanIron can still go without a passport IF you do NOT fly OR you fly to the Northwest US and drive into Canada.
|
|
- guru
- Thursday, 05/31/07 09:08:03 EDT
|
I seem to recall going into Canada you still need some proof of U.S. citizenship, such as a birth certificate. Don't know if driver's license alone would be sufficient. You might double check with the Canadian Embassy in Washington, DC.
|
|
Ken Scharabok (Poor Boy)
- Thursday, 05/31/07 10:25:08 EDT
|
You need a government issued photo ID such as a driver's license and an original copy of your birth certificate to enter Canada without a passport. A passport is easier if you have one. AND the birth cert is a primary document for getting your passport. Unless you hustle you can spend as long getting it as the passport.
Compared to the U.S. and other major countries most of the world is broken up into to small places and it is common for folks to need a passport. Folks from many parts of the world think it is strange that so few U.S. citizens have passports. Then for others that have difficulties getting passports, preventing them from traveling freely, it would seem unbelievable how easy it is for a U.S. citizen to get a passport. You simply fill out the paperwork, have your photo taken and pay the modest fees, then wait for the mail. They return your original copy of your birth certificate. Easy, and its your right at a U.S. citizen.
|
|
- guru
- Thursday, 05/31/07 10:56:59 EDT
|
The renewal of my daughter's passport has taken over 3 months now and she has missed her graduation trip to Europe with her Grandmother.
They are so backlogged they will not talk to you unless your leave date is within 2 weeks over a week ago they told us her passport was done and was in printing and would be overnighted to us. Still not here.
If you live in a city with a State Department passport office I would advise going in in person for the 1 day service if you can afford it.
Thomas
|
|
Thomas P
- Thursday, 05/31/07 11:11:01 EDT
|
Ken
Great. Thanks for the info. I am glad they wrote back to you.
Hope works didn't write back to me. I have only purchased two anvils and several other tools from them. Hmmmm... Maybe I won't in the future.
|
|
- Burnt Forge
- Thursday, 05/31/07 11:35:48 EDT
|
Stainless automotive exhaust systems - most of them are made of 400 series stainless steels - 410 and 409 were common. Not as corrosion resistant as the 300 series, such as 304 & 316. When I worked for Armco/AK Steel we were supplying flat rolled 400 series stainlesses to the big three as well as Toyota and Nissan for production of automotive exhaust components.
|
|
- Gavainh
- Thursday, 05/31/07 11:56:23 EDT
|
410-409 SS pipe. Regardless, I've had 18 year old Dodge vans with the OEM exhaust. If you figure that a normal carbon steel exhaust system would need to be replaced at 5 years then probably every 3 years thereafter. That saved 4 expensive exhaust replacements and all the aggravation that goes with them. As a clean cold air feed pipe on a forge it should last forever.
|
|
- guru
- Thursday, 05/31/07 12:30:09 EDT
|
Passports: Thomas, That may be why the date for requiring all crossings into Canada and Mexico by ground transportation are set for "as early as" January next year. It could meant the date will slip or is expected to.
Destruction of the New Orleans passport processing center put a real kink in the system just at the same time as the requirements were tightened and millions applied for passports.
|
|
- guru
- Thursday, 05/31/07 12:41:54 EDT
|
Canada:
We took a bus trip last year into Canada and we had to have both a drivers license and a birth certificate.
|
|
- Marc
- Thursday, 05/31/07 12:48:47 EDT
|
The State Dept. offices in major cities are like going into Fort Knox. I went to the Philly office a year or so ago, and let me tell you, if you plan on going to one, remove all metal from your pockets, even change! The armed guards are no joke. Pretend like you're going to the airport during an orange alert.
|
|
- Nippulini
- Thursday, 05/31/07 12:50:42 EDT
|
i need a detailed description on how to build a forge
|
|
james
- Thursday, 05/31/07 13:03:59 EDT
|
Burnt Forge: Contact gary.cattell@anvils.co.uk. I am sure he can help you with your Vaughan questions.
|
|
Ken Scharabok (Poor Boy)
- Thursday, 05/31/07 13:22:13 EDT
|
James; dig a hole in the ground, place a 1" id piece of blackpipe so that one end is at the bottom of the hole and the other is outside of it. Duct tape a blow dryer to the pipe. You now have a forge!
Of course if you wanted details on a propane forge or a very large free standing forge or a very small forge or a..., I'm sure you would have given *us* enough details to answer your question.
Example: what you want to do with the forge: forging 30" diameter stock requires a different forge than one to make nails. What fuel you want to use: charcoal, coal, coke, propane, natural gas. What tools/skills you have: a forge that takes extensive welding is no good if you don't have access to a welder!
Grumpy Thomas
|
|
Thomas P
- Thursday, 05/31/07 13:54:30 EDT
|
Birth certificates: If you were born in Kansas since about 1920, you can go to the Office of Vital Statistics in Topeka and they will print up your birth certificate while you wait. Seems like they charge a couple bucks extra for the service.
I've heard rumors that it isn't that easy in most states.
|
|
John Lowther
- Thursday, 05/31/07 14:30:43 EDT
|
Thanks Ken
Gary is a very nice person.
|
|
- Burnt Forge
- Thursday, 05/31/07 14:42:35 EDT
|
Birth Certificate: Most states are quite good and the fees are very low. We have had a week turn around for NY, KY and VA and even had to get a replacement for an ORIGINAL Territory of Alaska (issued by the U.S. territorial government) and it only took about two weeks. I think we sent our request via priority mail and they returned by regular or confirmed delivery mail. So there was at LEAST 10 days in the mail. But if you are applying for something else that needs that certified original then you have that initial delay.
|
|
- guru
- Thursday, 05/31/07 15:01:20 EDT
|
James,
Being that I'm not one of the gurus here, perhaps it's not my place to make this point -- but I can't help myself. Jock will tell me if I'm out of line.
Are you the guy who posted the exact same question about forge design on the PaleoPlanet metalworking forum a couple days ago, and got exactly the same answer that Thomas just gave -- plus multiple links to specific sets of instructions?
Regardless, if you can't bother to take two minutes to explain exactly what you're trying to do, why should the good folks here waste their valuable time spoon-feeding you designs for a dozen different forges? And if you don't know exactly what you want to do, maybe that's a sign that you should do a little more research. It's a big Internet out there, and there's lot of smithing information for anyone who's interested enough to look -- including tons right on this site.
There may not be any stupid questions, but there sure are lazy ones.
|
|
Matt
- Thursday, 05/31/07 15:10:56 EDT
|
Matt, Thanks. I appreciate knowing when someone is trolling for answers all over the net and fails to go back and check the answers given. Then there are those that do not like the answers given (too difficult, too honest) and try to find something else.
Its like the folks that come on and say they "cannot find an anvil" when what they mean is that they cannot find a FREE anvil or at the local garden supply for twenty cents a pound. They really don't want to know that $400 is closer to what they are going to spend without serious searching.
|
|
- guru
- Thursday, 05/31/07 15:50:33 EDT
|
If I can find a darn good, 196# (89kg) anvil for less than fifty-five CENTS a pound here in the VIrgin Islands, (whichI most assuredly did), then I won't listen to any excuses from anyone from anywhere. You have to LOOK,not just ask and hope. LOOKING means doing all the detective work, all the legwork and all the schmoozing necessary. If you're not willing to do that, then you probably don't have the determination to spend the time and energy to learn to be a real smith. Noneof us can do it for you, even if we were willing to which, I can assure you, I am not.
Learning is not something you can be spoonfed. You have to seek it, demand it, beg for it, strive for it, work hard for it, and gobble it up when you do find it. Not willing to do all that? Stick with video games and be a couchwart; you're well suited to it.
|
|
vicopper
- Thursday, 05/31/07 16:09:44 EDT
|
I am going to be returning to the states for about 6 weeks (I will arive in Atlanta Ga on the 24th of June. I will be seeing family and friends in GA, Chattanooga, SC, and WV. I was wondering if there are any events in these areas or if there were some blacksmiths in these areas who would be willing to give me some pointers on all the things I am doing wrong. I have done a lot of reading, and I have learned a lot by just going out and lighting the fire and hitting the steel on our very poor cast iron anvils. While I consider this valuable education, I also know that blacksmithing is an art, and it would be very helpful to watch, listen and learn from somebody who knows what they are doing. I think I remember seeing a post about a forge in Chattanooga? Any help would be greatly Appriciated.
|
|
Sean in China
- Thursday, 05/31/07 16:44:31 EDT
|
just to clear the air there ar two matts on this forum, i always post my last name along with my first.
well guru ive got money ive saved up for quite a while to get into smithing. ive used improvised tools and have realized you will save your self a lot of cus words and frustration by just waiting, and getting the right tools.
so no, money isnt a huge problem, that doesnt mean i can buy a 400 pound refflinghaus and a new coal forge
but i will spend the right amount of money to get the right tools.
i want to get a good anvil, and i have the enough tools and materials to build a forge. im planning on finishing out around $1200-
but please take my words sofly, i dont mean to upset anybody, and am sorry if i have.
|
|
- Matt maiers
- Thursday, 05/31/07 17:04:18 EDT
|
On a less grumpy note than my last post, I have a question about tongs. My first set of mild steel "Dempsey Twist" tongs (mystery steel, likely A36) didn't hold up very well. I thought this was because I didn't get the jaws hot enough before twisting them, and that may in fact have been part or all of the problem. But another smith recently told me that he's made several pairs from mild steel, and all eventually failed.
I'm wondering if I might not do better with a better steel, so I'm looking for suggestions. (One approach might be to keep using A36 and just make heavier tongs -- but my tongs are already pretty clunky.) I gather low to medium carbon is best, to avoid possible brittleness. I saw a recommendation somewhere for 4140 (maybe here?), and I'm sure that I once saw an enthusiastic recommendation here for 8260, but I can't find it now. Would either or both of those be particularly good for tongs? Any other suggestions? Anyone know what steels commercial makers use?
|
|
Matt
- Thursday, 05/31/07 17:23:33 EDT
|
Good point, Matt. I'll try to remember to use my last initial from now on, to help avoid any confusion.
|
|
Matt B
- Thursday, 05/31/07 17:25:04 EDT
|
Sean, We are on the border of NC/VA a short 15 minute drive from the major N/S Interstate 77. If you have time plan on stopping. We normally have an open guest room but it may be in use then. But there is also a couch. . . You have my address if it fits in your schedule.
This is not my regular shop but we have anvils, forges and basic tools.
The Alex Bealer Blacksmith Association is having a meeting July 27. http://alexbealer.org/
I couldn't much else going on in the deeep South. Too hot in July!
|
|
- guru
- Thursday, 05/31/07 17:34:23 EDT
|
I've had a 175# Euroanvil for over a year now. So far, now dents. I guess that may be because of the (relatively) small size, as Guru suggests. It *certainly* isn't because of my hammer control (grin).
IIRC, Off Center tongs are 1040 or 1045. If you get away from A-36, it's probably best to stick with a plain carbon steel -- less chance of hardening them accidentally.
|
|
Mike BR
- Thursday, 05/31/07 17:57:01 EDT
|
That should be "no" dents.
|
|
Mike BR
- Thursday, 05/31/07 18:07:34 EDT
|
Matt, Tongs have been made of wrought iron, mild steel, H13 and titanium. . . Tools steels are way overkill and difficult to forge. Thomas
I have maybe a half dozen wrought tongs and they are all a little weak and regularly need adjusting. Some are quite antique so I have stopped using them.
The vast majority of tongs made in the 20th Century were most likely from mild steel and nothing higher carbon than SAE 1040. Design and forging technique makes a big difference.
|
|
- guru
- Thursday, 05/31/07 18:42:29 EDT
|
OK, Jock. Thanks. In that case I'll try just cutting off the offending jaws, grinding out the cracks, and welding 'em back onto the reins. It's easier than making a whole new set.
|
|
Matt B
- Thursday, 05/31/07 21:30:46 EDT
|
You have to keep things proportional with tongs. Small ones have short 12 to 14" reins, heavier ones 16" and on up to about 22" for most hand held tongs. As the size and length go up the thickness of the joint and smallest connecting part also go up. Tongs that break often have too long of reins for the jaws and are being used on too heavy of work.
|
|
- guru
- Thursday, 05/31/07 21:40:00 EDT
|
I need to relace a missing handle on a vise and this poses a welding question.
I've found and purchased some mild steel balls (from "Pacific Steel", in various sizes, if anyones looking) and intend to weld them onto the handle ends instead of upsetting and shaping. For a secure weld I figure to grind down the end of the bar to a blunt point, but I'm not sure how to prep the balls. Will overlapping the welds to get back to the bar thickness be strong enough contact on the ball surface?
|
|
Thumper
- Thursday, 05/31/07 23:20:28 EDT
|
Thumper:
This is a vise handle, not a pry bar. Even a decent tack weld would do...if you aren't in the habit of slamming the handle against the screw head. Which you shouldn't be, as you'll quickly learn the very first time you do it with the web of your thumb in between the handle knob and the screw head. In fact, I like to put a hose washer on each end of a handle before I weld or upset the last end, so thereis a cushion against slamming. On handles that are already installed, I use a couple layers of heat-shrink tubing. Saves both the hand and the hole in the screw.
|
|
vicopper
- Friday, 06/01/07 00:56:14 EDT
|
Vice handles- weld the balls to the shaft and don't worry about it unless the handle is spring steel. I used ball bearings on a jack handle but annealed the bearings and ends; welded 'em and dressed off- looks good & works fine
|
|
- Ron Childers
- Friday, 06/01/07 10:11:14 EDT
|
Vise Handles:
Love the rubber grommet idea, no, I've never caught the web of my hand, but I do have the habit of releasing the handle on the last turn when verticle (SLAM). Guru, I like your method but since I already made the 60mi round trip to P.S. for supplies, discovered & picked up the balls, I think I'll use them instead. For the record, I love the brainstorming on this sight, as a horseman I've found that if you ask 5 horse-people one question, you get about 12 different useable and good answers, this place makes me feel right at home!
|
|
Thumper
- Friday, 06/01/07 11:14:05 EDT
|
|
|
[
CSI - anvilfire MEMBERS Group |
Getting Started in Blacksmithing ]
|
