| WELCOME to the anvilfire Guru's Den - V. 3.0 |
|
THIS is a forum for questions and answers about blacksmithing and general metalworking. Ask the Guru any reasonable question and he or one of his helpers will answer your question, find someone that can, OR research the question for you. This is an archive of posts from May 1 - 8, 2004 on the Guru's Den |
|
|
|
Stan and the crack:-) Or just snap it there and scarf the two ends and forge weld it back together. Does give the knife a bit more character;-) I don't want to talk about how often I have had to use that little trick:-) Get to talking with someone at a hammer-in or demo working with an unfamiliar forge, or with a helper at the blower/bellows Pull out a sparking mess where a really nice knife USED to be:-) Wire brush it, pack it, lap and weld it. And generally it is a patternwelded piece that get it too:-( Otherwise Ralph is right pitch it into the learning experience pile (also know as potatoes in some shops:-) and make a new one, being a little more carefull of how you treat your steel... Stan what are you making this knife out of? IF it is a good steel of know qualities: you got it too hot or are letting it soak at temp and getting aweful grain growth, and/or you worked it down too cold. If it is a junkyard steel: You may have worked it wrong, and/or you may have just exposed a fault that was in the scrap all a long... Solution: use good steel of know qualities, that you know and understand! Work in the correct temperature range for the steel. So don't let 1095 get into the cottage cheeze range (ie too hot, which if I remeber right is just getting into the yellow:-) And don't try and move the steel after it has gotten below the forging range, you can pack the edge slightly in that range, but no bending or working on the bevel! Normalize often while forging to reduce grain growth. Triple normalize before hardening to keep the grain growth down. |
| Fionnbharr - Tuesday, 06/01/04 01:09:12 EDT |
|
Thanks Ralph and Fionnbharr. I`m using leaf springs from a 1955 ford truck a mechanic at work gave me.I believe it`s 5160 steel. I made a nice one out of this steel before. I got the steel a few hundred degrees over non magnetic before I did a counter bend. It may have had the small crack in it prior to forging. I had hope I could of used borax and welding heat to pound it flat-out , but I see now this is "wishful thinking". I might give it a wack on the anvil and see if it breaks off anf try welding the halfs together. It would be a first attempt at welding and I can`t loose. Thanks Gentlemen ! |
| Stan - Tuesday, 06/01/04 01:54:55 EDT |
|
Gentlemen, here's a "general metalworking" question: My wife is a great cook, it's like her art form. She recently purchased two used pressure cookers, made of aluminun, apparently. The problem is that the smaller one is a little "wavy" on the bottom, she says it doesn't heat right because of that. I know there are probably 50 different alloys of aluminum, but is it at all possible that I could flatten this back out? I have basic metal working equipment, forge, anvil, torch, buzzbox, etc. Being under pressure, this could be a hazard, I don't know. I love that term: "I learned something pile". |
| Jim Donahue - Tuesday, 06/01/04 03:34:02 EDT |
|
Thank you good Guru. Yes, after rebuilding many of the gear teeth with bronze rod, followed by hours with small chisels and files, I'll use a gentle hand when abusing this already pre-abused machine. On the other hand, after thinking about the hand crank question.......The poor thing is going to be a bit surprised when I bolt the gear-head motor on. Any further machine empathy you or fellow CSI members wish to express to the sliprolls will be forwarded just before I plug it in. Speaking of that, do you have any recommendations as to how to set up the 3 way switch (ebay) for maximum safety? I have nasty visions of getting sucked into the rolls, as the switch handle gets to be a longer and longer stretch. Boby; It may well be that if you put your dirty coal in water and sorta wash it, that the heavy dirt and gravel will settle out on the bottom . Jim D; You are correct that any pressure vessel is risky to work on...especially one used by one's wife with hot liquids under pressure. Being a fool myself, I might gently flatten the bottom with a wooden mallet and some support, very carefully inspect the result for strain or cracking...and then take it out in the back yard, add water, put on a hot fire out there and put the pressure cap in place with some extra weight ...Then take it to the max and watch with binoculars. But then, I'm a fool, and cheap besides. SUPPORTING ANVILFIRE (via the CSI) MAY HAULT AGING!!! It's worth the chance! |
| - Pete F - Tuesday, 06/01/04 04:42:20 EDT |
|
For the second time in my lifetime I've come across an aluminum cylinder head that won't hold torque. I bolt it on the engine, torque the bolts, set the valve clearance and take it for a test drive. When I get back, the engine is running rough and it takes an additional 1/6 to 1/3 turn on the head bolts to get back to torque. The reason for running rough is that the head has become 0.010" thinner, and I no longer have the required valve clearance. The first time it happened I kept torquing it till I ran out of adjustment on the rocker arms then replaced the head. This time I am trying to understand what is going on. I can see impressions of the rocker arm assembly pressed into the top of the head where it contacts, and the holes for the head bolts are no longer round. The new head is not as strong as usual. My pet theory is that somehow in the process of being overheated, the aluminum has become annealed. If I remember right that is a matter of heating then cooling it quickly. So... what is the proper process for annealing cast aluminum, and could it happen to an overheated cylinder head? |
| rwidmer - Tuesday, 06/01/04 07:23:29 EDT |
|
Gang I need some help with a vise. I traded some work to a guy for two blowers and a vise. The vise resembles a post vise but the jaws are more elongated and wider. It has a small anvil (with a horn) that sits behind the jaws and the screw runs under/through the middle of the anvil. I can not find anywhere on it that has bolt holes or a plate for mounting it to a bench. It has a leg, like a post vise, but it is much heavier and round at the top then squares off at the bottom. I grew up on a farm and the leg to me resembles a "dirt packer" that we used to pack dirt back around a fence post. It says on it COLE TOOL COMPANY CHICAGO HEIGHTS ILLIN. Any advise on age? What was it used for (besides the obvious?) I was told that it may be as old as the civil war but it does not have that old a look to me. Thanks. Vance Moore Whynot Forge Meridian, Mississippi |
| vance - Tuesday, 06/01/04 09:29:51 EDT |
|
The boys at Rocky Mountain Smiths call a I learned somthing pile their Humble Pile. The anual Hammer-in will be held This Thursday thrugh Sunday in Loveland Colorado. E-Mail for directions. |
| habu - Tuesday, 06/01/04 09:50:52 EDT |
|
anual=annual thrugh=through ptp |
| habu - Tuesday, 06/01/04 09:58:22 EDT |
|
Slip roll: How about a foot switch, as you are sucked into the machine your foot should be pulled off the switch. Pressure Cooker: I think the wavy bottomed cooker has been overheated, it might be time to think about converting it to a flowerpot. Pressure cookers can bite! |
| - hudson - Tuesday, 06/01/04 10:50:42 EDT |
|
Cole Vise: Vance, I am fairly sure that is a sawyers vise (for holding saw blades). I THINK the company is still in business. Try Thomas Register. |
| - guru - Tuesday, 06/01/04 11:32:29 EDT |
|
Tree way switch: Pete, I believe you are talking about a drum reversing switch. A three way switch is one of those light switches where you can control the lights from more than one place. To use a reversing switch with a safety switch as Hudson recomended you need a motor contactor (relay) in the primary power circuit. The reason is that you do not want a cord with 240 VAC lying on the floor as a controller. Cranes and certain other operating switches need to run on lower voltage (30 VAC is best). This requires a little transformer (like a door bell transformer) to make the low voltage and for the coil in the contactor to be rated at that voltage. Contactors can usualy have the coil changed out for anything from 12 to 480 volts. Note that when you get your rolls running slow enough that a very small amount of HP will produce tremondous torque. 1 HP will probably be enough at the approximately 25 RPM or less you want to run at. |
| - guru - Tuesday, 06/01/04 11:45:06 EDT |
|
Cracked Blade: You bent it at MUCH too low a temperature. In this era of cheap materials I would toss it and start again. If the material was REALLY valuable the best thing to do would be to make two SMALL blades from the pieces. See other suggestions above. When I cleaned shop a number of years ago my "humble pile" was a full 55 gal drum of scrap. As they say __IT happens. Don't whine or curse about it, just TOSS it and start again. I had an apprentice that when he screwed up he would get upset and moody and stomp off. Instead of learning from the mistake and starting over he brooded about every mistake and learned nothing. In some areas attitude and temperment are everything. In a busy production shop or a job shop it is VERY important not to scrap pieces. But in a small home shop where you are learning from your errors it is not unusual to have 50% or greater scrap. As you learn you get better OR learn to be flexible. . . |
| - guru - Tuesday, 06/01/04 11:57:44 EDT |
|
Old Bement Hammer: Michael, the fits of the control valves are very picky and are usualy just a few thousandths or less slip fit. The snugger the more efficient the hammer. The most common repair is spray metalizing then precision grinding. I believe the hole in the control valve may be a port but I am not sure. I know there are holes in the sleave. Without dissasembling a good valve it is hard to tell. I called a friend who had his apart a few months ago and he could not remember. I personaly believe in making drawings of such parts when I can so that memory is not an issue. I would probably hone the cylinder. But honing is an art and you can screw things up as well as improve them. If the rings have been rotated from their old position then it would be best to hone the cylinder as well as dress the rings. Honing should start and end with a cross hatch pattern. Repairing old machinery is an art. It takes time, patience and research. |
| - guru - Tuesday, 06/01/04 13:00:36 EDT |
|
There is an estate sale going on this weekend and they will be selling an old forge. How much should we expect to pay for something like that? |
| John - Tuesday, 06/01/04 13:11:06 EDT |
|
John, that's like saying "there's a car for sale, how much is it worth?" Condition is everything. Last time I went to an auction that advertised a "champion forge", I found when I got there that it was just the cover off a Champion 400 blower. Value? none to me. Somebody paid $145 for it. Find out more about what they have, and report back. |
| Alan-L - Tuesday, 06/01/04 13:22:57 EDT |
|
John, Alan is right. You also need to consider that there are no parts available (all the old manufacturers have been out of business for a LONG time). Corrosion from coal and charcoal ash is devastating. Many of these things are not worth bringing home. On the other hand, a full size forge (not a little rivet forge) in perfect condition may be worht a good bit. Building a forge can cost you $400-$500 in parts and new ones cost around $800-$1,000. These things came in hundreds of models from a dozen manufacturers. In the end it will cost whatever someone is willing to pay for it. But its value MAY be much less or much more. |
| - guru - Tuesday, 06/01/04 14:31:30 EDT |
|
I wanted to know how i could drill holes in hughe cylinder (about 3m in OD and 1 m ID) such that all the holes (throughout the cylinder surface) look at the center of the cylinder |
| amit - Tuesday, 06/01/04 23:20:50 EDT |
|
basically i am a student trying to design this cylinder for my project..si i cannot use heavy machinery which is available only in industries...so i wanted only a few ideas of how we could drill these holes without making the cylinder too weak in design thanks |
| amit - Tuesday, 06/01/04 23:43:29 EDT |
|
HI, I have been having problems getting my chimney/hood to draw the smoke from my coal forge in my studio. I have a side draft forge hood based on an article in ABANAs hammer's blow. The article is by Brian Gilbert and based on one in Loonie Farmer's shop. I draw air from out side the building to provide the blast for the fire. I dont really want to put a fan in the chimney or hood. The building is not air tight and also at the base of a hill. I could make it air tight but i dont know if that will make much difference. I was hoping you guys would have some good ideas. Thanks for your time, |
| Hayes - Wednesday, 06/02/04 00:03:30 EDT |
|
I have a question regarding cooling steel. I know many people have different ways of cooling their steel, but is there one way that produces the "hardest" steel? Thank you! |
| Joe - Wednesday, 06/02/04 00:07:32 EDT |
|
Further thoughts on the "I Learned Something" pile: If I may take the liberty of quoting myself from the sword article in the Anvilfire Armoury- "Modern Japanese swordsmiths, with their emphasis on perfection, reject one half to one third of all their blades as failures." The price of perfection, or even competence, is to be able to reject the inferior and the outright failure. Sometimes you can salvage it for something else (that's what scrap piles are good for) and sometimes all you retain is the learning experience. I have an antique froe on the farm, loaned by my friends, with a crack 2/3 across the blade from when I was reforging out the much-abused back where someone had obviously beat it with some metal object. On the advice of the Great Guru we're just using it to split wood until it fails, then we'll try to reweld it. (My father�s-in-law secret to being known as a great photographer: �Throw out all the bad ones; just let folks see only the good stuff.�) Cool and humid on the banks of the lower Potomac. Visit your National Parks: www.nps.gov Go viking: www.longshipco.org |
| Bruce Blackistone (Atli) - Wednesday, 06/02/04 00:07:51 EDT |
|
Just found a copy of a Chambersburg proposal to supply a 8000 lbs steam hammer to a railroad in 1942, a catalog was included, talk about hammer lust! One note was that the RR wanted to run the hammer on 160 psi steam, Chambersburg replied that the hammer only needed 100 psi steam. Also delivery was 4-6 months. |
| - Hudson - Wednesday, 06/02/04 00:30:30 EDT |
|
Hudson, Lust no more. I have a contact that can line you up with numerous hammers in this size range. Most for scrap price or less. All you need is a place to put them. Serious inquires only. |
| - guru - Wednesday, 06/02/04 01:21:38 EDT |
|
Noooo... I think that the Steam Hammer Lust will stay just that for quite a while. Even at scrap prices that is an aweful lot of steel, and then there are the moving cost, set up costs, building a new building to go over the lovely, A honkin big gas forge to supply hot projects for said lovely hammer, not to mention the massive compressor, or steam boiler to throw the hammer. But it would be fun to be able to forge anvils and post vices in your shop:-)!!! Plus steam hammers need a driver as well as a blacksmith and some helpers to do most of the really fun stuff:-) Steam Hammer Lust! I seriously considered the 250# N-B-P, but was daunted by the expense to move, repair, set up, and power (I would want ATLEAST a 100CFM compressor:-) If I hit it big, I might go for it still:-) |
| Fionnbharr - Wednesday, 06/02/04 01:45:24 EDT |
|
Cylinder Hole drilling problem: Amit, you will need to describe your problem better or send me a sketch. When using primitive hole drilling equipment you can use drill jigs to keep hand held or similar equipment aligned. See our iForge demos #118 and #121 on drill press furniture for how drill jigs work. Relatively precision drilling fixtures can be built using angle iron or structurals for V-blocks and mild steel drill or brass for drill bushings. Hard steel are best and relatively inexpensive to buy. I have drilled 3/4" holes in steel using a brace and bit. This is one of the few times step drilling is recommended. However, DO NOT use too small of steps. Even when drills are hand powered the load on the corners can break them if the step is to little. Hand drilling holes this way is SERIOUS WORK but it CAN be done. An old fasioned beam drill (a long lever holding and pushing the brace and bit) is an amazingly simple tool and VERY efficient when modern bearings and drill bits are used. Use some sort of ball thrust bearing if building a beam drill. Be sure to let the pivot float some so that the drill angle does not change. Drilling presure starts at hundreds of pounds and ranges up to tons. However when step drilling the pressure is much less. For this kind of rig I would make my own brace so that it had about double the crank distance of a carpenters brace. This is needed for the high torque of drilling steel, especially large diameters. THE Nifty tool from heaven is a "magnetic base drill press". These weigh 80 to 120 pounds (36 - 54 kg) and have heavy duty drill motors and chucks. Magnetic hold down on thick plate is usualy 1,000 to 1,500 pounds. This is enough to drill 1" holes AND hole the drill press on a horizontal or overhead surface. When used where they can fall they MUST be chained to prevent dropping. If you can borrow one of these you can do AMAZING work. Often you need to weld up a fixture from junk to clamp to the work and support the drill. But it is well worth it. many things that cannot be put on a drill press of any size can have the mag-base drill taken to them. At the up comming Camp Fenby I will be taking our HD Mag base drill to use on the Ren-Faire JYH project. On this wood frame machine we will need pieces of thick steel plate to clamp the drill but it will work there too. It can also be used on a heavy steel table as a drill press for regular work. I will try to take pictures for another iForge drilling article. HOWEVER, you can see this tool in use in our FIRST news article on the EC-JYH. See the "EC-JYH Supplement page 4" |
| - guru - Wednesday, 06/02/04 01:53:48 EDT |
|
Side Draft Hood Problem: Hayes, You cannot assume that we have specific back issues of the Hammer's Blow or know the details of anyone else's plans. Here are some guesses. Your stack is too small. 10" is recommended. 8" works SOMETIMES but is NOT recommended. 12" will generally suck up the entire shop. If your air is coming from outside AND the shop is tight then you do not have enough fresh air for the 80% cold air sucked up the stack. Having air for the fire only is NOT enough. If your stack is not high enough above the roof line OR you are in a wind pocket (surrounded by large buildings, trees, hills) it may not matter HOW big or fancy a stack you have. Two feet above the nearest roof within five feet (I think) is the rule. That may be ten feet. The BEST practice is to have it higher than the peak of the roof no matter how far away that is. Stack caps can screw up the works. Thinking cap types MUST have a minimum of one diameter clear height under them AND work MUCH better with an inner cone pointed downward to reduce turbulance. The best high efficiency caps are the turbine type but I worry about their life exposed to coal ash. The next best is the low-loss type posted here by Tony and with a drawing I've burried somewhere. . . and need to post where I can find it. . . 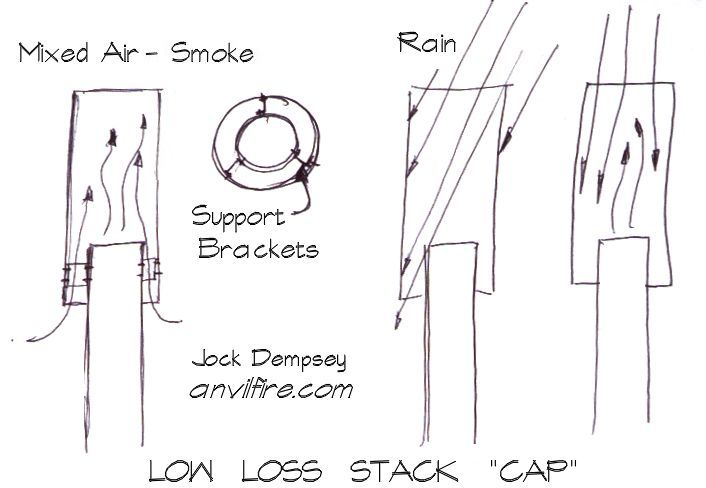 Click to enlarge Send that $90 to Dempsey's Forge, 4714 Granite Trail, Boonville, NC 27011 . |
| - guru - Wednesday, 06/02/04 02:21:21 EDT |
|
Steam Hammer lust. A 250 Niles is a WONDERFUL size hammer. Total weight is only about 5,000 pounds with the anvil. I've run a 500 Chambersburg and a 750 Niles and really wish I had time to work on my 350 NBP. It will probably not get setup until I'm ensconced in Costa Rica and can afford to have some local labor help me with it. |
| - guru - Wednesday, 06/02/04 02:28:15 EDT |
|
Cooling Steel to be Hardest: Joe, There is no simple answer to this question. Every steel has a "best" way that is different. Water quench steels are quenched in warm water or brine. Oil quench steels in oil, air or water depending on the section thickness. Air quench steels are cooled in moving room temperature air or in warm oil if very thick sections. Note the qualifier "warm". For most purposes quenching in cold quenchant can shock the steel and produce warping or cracks. The quench wants to be only as fast as is needed and no faster. Once the steel is quenched and below about 300°F it is best to temper it immediately. Often pieces are cooled to room temperature before tempering. This is OK but not the best. Ocassionaly frigid brine quenches are used on very large parts. But this too is steel dependent. For every rule there is an exception. Metalurgicaly you must reduce the temperature at a rate faster than the formation of austenite (I think). If you must know the best way you must first know the steel. Then you can look up the processing in a heat treating reference or MACHINERY'S HANDBOOK (see our reviews on the Bookshelf). OR you can play metalurgist and run trial and error tests until you find the best method. Besides our book reviews, see our FAQs on Heat Treating, Quenchants and Junkyard Steels. |
| - guru - Wednesday, 06/02/04 02:50:13 EDT |
|
i am building a new work shop, an all steel building ( no wood to set on fire ) and have been looking for plans to build a masonary forge, open on all sides, with a suspended hood. i am not sure the size i need yet,but any plans i can adapt to my needs. what i really need is an idea for the fire pot, ash dump, and blower pipe. what i should use to build it, as in.. a masonary pot, casting, or stainless steel??? and what about the hood, how should i make it. also would like to put in some kind of damper, so i dont loose all my heat in the winter when it is not in use. any ideas would be helpfull. this project is under way now.....thanks,...........jeff |
| jp1 - Wednesday, 06/02/04 03:26:51 EDT |
|
Thank You Guru, yet another time. Yes reversing drum switch is what i have and a 3/4 hp gear head motor to a small motorcycle chain sprocket ( home made conversion) to a large chain sprocket ( awkwardly modified) to fit a built up and turned roller gear drive shaft. Another layer cake of cobbled together junkyard fodder that just might work. Hudson; Glenn C suggested the foot switch solution too...if it set it up with a spring to return to the off position and a rocker pedal for either side it oughta do..thanks...and yes, I concur that the pressure cooker is cooked. Vance, I also have a Cole vise, it was army colored when i got it and has taken a lot of abuse just fine. When the thread stripped, i was able to modify a big square nut and slide it right into place, easy restoration. RE cracked blade; If you are not making mistakes, you are not doing much new. If the size of one's humble pile is a measure of creativity..I win. |
| - Pete F - Wednesday, 06/02/04 05:03:28 EDT |
|
jp1, You need a copy of THE BLACKSMITH, Ironworker & Farrier by Aldren A. Watson. The ISBN IS 0-393-32057-x I got my copy from Barnes & Noble for less than $20. There is a complete set of plans, including dimensions, in Chapter 10. A bonus is that it also has a complete set of plans, including dimensions of how to build a double chamber, great bellows, in Chapter 11. |
| Paw Paw - Wednesday, 06/02/04 11:09:25 EDT |
|
Building Shop and Hoods: jp1, Steel buildings have their problems too. They collapse sooner than wood frame buildings in a fire. Timber frame have the highest fire rating. Large overhead forge hoods are picturesque but do not work well except under the following conditions, 1) They have a HUGE stack (say 24" dia). 2) They have a large exhust fan. Otherwise they are very inefficient and don't work due to needing to suck up all the air at their opening which is 98% cold air. If you look in Diderots they had huge masonry hoods over their forges but the stack was as big as the forge. HUGE. A good friend of mine spent a fortune in time and materials building huge funnel hoods over his forges with large 12" stacks. One WITH a blower, one without. Both left the shop smokey. See the side draft hoods on our plans page and the new FAQ titled Low Loss Stacks. Brick forges with metal firepots are a hybrid. You start with a firepot and tuyeer and build around them. Plan on being able to replace all the metal parts in a few years. "All masonry" forges were usualy side blown and side draft with no metal parts. The side draft "hood" was an opening about a foot above the fire. The blast came in from the back at the bottom of the fire under the flue opening. Darn simple. They have 3-4 like this at Williamsburg, VA and they all work. The flue opening is about a foot square and slopes up at about 45 degrees to the bottom of a pyramidal smoke chamber which feeds into a large flue (14x14" or 16x16"). No "hood" is required although they have a little flap of sheet metal about a foot square to help guide the smoke on one of the forges. Although they were all made basicaly alike apparently one does not draw as well as the others. . . The other brick "hood" is one configured like the "super sucker" on the plans page. This style works well too. Note that all these require a 10" or 12" stack. 12" or larger is better. Full size shop forges REALLY need 14". Old forges with hoods and a small stack were designed to use out doors OR be hooked to a larger stack that had a greater draw than the small connector stack. Buffalo Forge sold a LOT of forges with smallish hoods. They also sold huge blower systems to hook them to as well as "down draft" forges (no overhead hood or stack). |
| - guru - Wednesday, 06/02/04 11:47:21 EDT |
|
Humble or Mistake Pile: When I was an artist doing a lot of paintings I just painted over the rejects. After several layers the painting develops character. . . One gaudy painting of an imaginary blonde with a sky blue background had a house painted over it leaving the blue sky as background AND as reflected sky in the windows. Folks don't believe me until I point out the curl of blond hair and a corner of one eye in one of the windows. . . When I was big into film photography I took mostly slides. easy to sort through each box and toss the bad ones. I still have thousands that should be culled to a few hundred. . . Digital photography is even better. No film or processing costs to waste. Just a click of the delete button. Digital photography also alows for more second chances. Bad photos that MIGHT have been able to be printed at great expense by an expert in the darkroom can now be rescued in a digital editor in a few minutes. Even color balance can be adjusted and I have even added depth of field as well as fixing bad spots in images. . . In carpentry and wood working most of the screwups ended up in the kindling. But in metalwork our mistakes tend to have long lives. We hate to haul them away as scrap so they just mock us forever or until someone else cleans out the scrap pile. |
| - guru - Wednesday, 06/02/04 12:02:37 EDT |
|
Pete, Sounds like you have a plan. 3/4 HP is reasonable. Now if you want a REAL set of rolls a friend is selling a set that will do big pieces of 1/2" plate. . . Can we say Alexander Calder sized public works? |
| - guru - Wednesday, 06/02/04 12:04:51 EDT |
|
Humble pile?, most stuff I mess up bad enough that it ccan be refribbed into something else goes outside the door of the shop and the alley pickers cart it off like it *NEVER* existed...we have a deal, they can take *anything* in front of the shop door to the alley and *nothing* else... Thomas |
| - Thomas Powers - Wednesday, 06/02/04 12:32:24 EDT |
|
Hi Guru, Thanks for taking my question...I am a rain gutter guy who has experience cold forming sheet metal, bending, cutting, etc., but I want to get into making ornamentals out of copper. My question is, where do I find out about coppersmithing? I know how to solder and braze already. Mike |
| Mike - Wednesday, 06/02/04 13:31:29 EDT |
|
Woohoo! All the talk of hoods inspires me to share, I just finished putting up the new forge chimney. It's side draft, a length of 14" round inside a 16x18" outside piece. All recycled from heavy old galvanized ductwork, with scrap stainless for where the smoke goes in and out. Can't wait to start the fire now and see how it works. Gotta get started on the new humble pile... |
| - mstu - Wednesday, 06/02/04 14:21:24 EDT |
|
Coppersmithing: Mike, you are already there depending on the style of work you want to do. The same tools are used for forming copper as other sheet metal. All you need is patterns or to come up with your own. You will find that copper is dead soft compared to steel and not very strong. For most things you need to think about reinforcing. Wired edges are common. I would use bare brazing rod to avoid severe bi-metalic corrosion and for stiffness. Copper can be soldered or brazed. Soldering is the least invasive and requires MUCH less clean up but turns black eventually. You can copper flash the bright solder with copper sulphate solution to help reduce the discoloration. Common tools for a coppersmith that does not do beaten work is a bar fold (edge brake), small rolls, edging tools or machines, box and pan break, crimpers, hammers. Wood blocks are common used for bending surfaces like an anvil. A coppersmith that does beaten work uses the same tools as an armourer or silversmith. This includes repousse' tools and techniques and raising tools and techniques. For copper and silver it is common to use a sand bag for dishing and initial shaping. Then there are many types of stakes. You can buy art stakes from Pieh Tool and Centaur Forge among others. Kayne and Son stock a line of raising hammers. In copper you can work a long ways while raising or doing repousse' work before re-annealing. Wood dishing blocks work well as do sand bags. Various ball and mushroom stakes are used for raising. However, I have seen BEAUTIFUL Mexican copper work turned out on nothing more than a bent piece of old truck axle stuck in a stump. Raising is a skill that takes lots of practice. We have a how-to article for heavy plate on our armoury page that would apply to most raising. There is also a nice short section on it in Dona Meilach's Decorative and Sculptural Ironwork (see our book review page). We also have a short Repousse' FAQ with links. |
| - guru - Wednesday, 06/02/04 14:59:38 EDT |
|
This is a question I'm hoping Paw Paw can answer. What was the touchmark for Thaddeus Stevens' Caledonia Forge near Gettysburg, PA? Is there an existant picture? Thanks, Pam |
| Pam - Wednesday, 06/02/04 16:27:25 EDT |
|
I have recently acquired a Champion Blower & Forge Co. Trip hammer and was wondering if anyone has any information on, or experience with such a hammer. The head seams to be comparable in size to a 25 lb. Little Giant. The dies are turned in-line with the bow spring so that you stand in front of the hammer when using it. The left side of the frame is marked �CHAMPION BLOWER & FORGE CO. LANCASTER, PA. U.S.A. NO 0 PATD JULY 1 02� The right side is the same except it is labeled �NO 1.� This seems unusual unless perhaps Champion used a universal frame for two sizes of hammers. Any information on this hammer�s history, age, etc. will be appreciated. Thanks, Jason A. Lonon |
| Jason A. Lonon - Wednesday, 06/02/04 16:32:53 EDT |
|
Thanks for all the info, i will look into building it the ways you suggested. i have outgrown my curent forge and location, and am looking to build something bigger, for the request i am getting. |
| jp1 - Wednesday, 06/02/04 16:52:20 EDT |
|
I was looking at a forge called "Wisper Mama" made by NC Tool, there was a mention that Anvilfire evaluated this forge. Do you have a link where I could read what you guys had to say?? |
| Lee - Wednesday, 06/02/04 17:55:24 EDT |
|
Lee, 21st Century Page, scroll down to Product Reviews. |
| Paw Paw - Wednesday, 06/02/04 18:09:27 EDT |
|
Pam, Sorry, but I have no idea on either question. If you find anything out elsewhere, I'd be interested in knowing. |
| Paw Paw - Wednesday, 06/02/04 18:11:20 EDT |
|
Re: VERY EARLY FLY PRESS --- I picked up a small very early fly press that has brass parts on it, the detail of which has to be seen to be believed. It has a brass tag that says Becker and below that Paris with patient dates of 1851 and 1855 ! It has a 2" throat and weighs about 75 pounds and is fully functional. I would like to swap it for some vintage auto body tools. I'm looking for Porter Ferguson auto body spoons and pneumatic fender hammers by Watervliet, Rams-head, Chicago Pneumatic and Milwaukee but any vintage out of production auto body or coach work tools might catch my fancy. I will probably eBay the press in a few weeks if no one has anything to swap. I am not a regular member here (pounding sheet metal cold is my passion) but you can see me and my Pettingell hammer on the power hammer pages. If you want to see photos of the fly press contact me at jbhammer@optonline.net but use the words "FLY PRESS" in the heading otherwise i may delete you with the rest of the spam. Better yet can i forward the photos to ?? for display on the anvilfire site so everyone can see them. Thanks ~ John Buchtenkirch |
| John Buchtenkirch - Wednesday, 06/02/04 19:13:30 EDT |
|
Viruses: ONE or more of you out there are eaten up with computer viruses! I am getting TONS of virus mail with forged email addresses from: Ron Reil Centaur Forge Bill Epps ferrouspublishing.com admin@anvilfire.com (a completely phoney address) webmaster@nazel.com (me again) Please check your systems for viruses. . . I am getting hundreds of these a day (on top of all the SPAM). |
| - guru - Wednesday, 06/02/04 19:57:16 EDT |
|
Old Flypress: John, sent mail. Would love to see. |
| - guru - Wednesday, 06/02/04 19:58:04 EDT |
|
Thanks for the info on side draft hood / chimney problems. I can have a sliding door that i can control air flow into the shop with and the chimney is well above the roof ( but in a wind pocket with trees and a hill nearby ). I have tried pre heating the hood and chimney with a tiger torch and that seems to help and experimented with a flap in front of the hood to catch smoke, and that also helped. I think the main solution has to do with the cap. Im thinking about a low loss stack cap like you suggested but i was wondering about the "inner cone pointed downward to reduce turbulence" could you please explain how that works/ what you mean. And also what is a "thinking cap" and a "turbine cap". Thanks a lot your help is greatly appericiated. |
| Hayes - Wednesday, 06/02/04 21:33:55 EDT |
|
Thanks for the info on the shears.I am looking for 3c collects for milling machine...new or used. |
| Gary Dishaw - Wednesday, 06/02/04 21:55:40 EDT |
|
hi guys! Ihave a problem with weight of a power-hammer: it is an "hercules" Samuel Platt LP 160lbs wedesbury..... (you can see pictures on bladeforum: http://www.bladeforums.com/forums/showthread.php?t=301219 Imust find a truck for move it, that's why I need a approximately weight of this hammer....... thanks for your help guys!!! Fabien |
| Fabien Chapaveire - Thursday, 06/03/04 04:54:04 EDT |
|
John 1850's is *NOT* very early for a fly press; now if you had said 1550's then it would be an early one. They were fairly common in the renaissance mints. Thomas |
| - Thomas P - Thursday, 06/03/04 11:41:08 EDT |
|
Fabien, We will have to do the same as those on bladeforums and guess. This looks like a heavier hammer than a Little Giant and is probably in the Bradley Class. Bradley 200 Compact = 5,700# (2586 kg) Little Giant 250 = 5,500# (2495 kg) with motor Fairbanks 200 = 5,600# (2540 kg) So, in the range of 5,000 to 6,000 pounds (2300 to 2700 kg) would be our best estimate. Too heavy for a small pickup truck. You probably need a flat bed farm truck with dual wheels. |
| - guru - Thursday, 06/03/04 11:47:17 EDT |
|
Stack Problems: Hayes, The wind pocket problem should not trouble you on calm days. However, on gusty days you can have more air coming DOWN the stack than up. Building orientation can do the same. Large doors facing down wind can cause a suction on the building that draws air down the stack. Wind and drafts at the forge can also be problematic. Thinking Cap = Coolie Hat = Conical Cap. The distance from the end of the pipe to the edge of the cap MUST be 1 pipe diameter or more. A downward pointing cone in the cap about the diameter of the pipe smooths the flow. Turbine caps are turbine caps. Those round rotating caps you see on thousands of barns, resturants and other buildings. . . These are helpful in that wind turns them and helps pump the air out of the pipe. They also turn on their own from rising gases. The problem is that coal ash is very corrosive and these things have a lot of little parts (usualy aluminium). The acid in the coal ash eats aluminium just as fast or faster than steel. Distance to the fire is also a factor with side draft hoods. The front of the hood is usualy only about a foot from the center of the fire. If your forge is larger then it helps to raise the hood. Do not leave a space between the hood and the forge. This allows cold air to enter and dilute the draft.  Doug Merkle at AFC 1998 - Side draft hood at the Alabama Forge Council Pavilion at Tannehill Park, AL. When they work they work right. |
| - guru - Thursday, 06/03/04 12:46:55 EDT |
|
thanks Thomas ! mmmm, I need a new truck......... |
| Fabien Chapaveire - Thursday, 06/03/04 14:03:23 EDT |
|
Fabien, I missed the second image. This hammer is definitely at the heavier end of the range noted above. About a ton more than other estimates. |
| - guru - Thursday, 06/03/04 14:03:59 EDT |
|
Guru...Just renewed my membership in CSI for another year. For $1 a week, I have access to the largest volume of information, knowledge and experience that I know of, concearning all things metal. There is new information and answers to questions posted daily by helpers here who are experts in their crafts. The i-forge alone is worth the price of a membership. Just want everyone to know how much I appreciate this site as I lurk around the pages. So come on folks...join CSI, help support Anvilfire and be a part of something great. PS. check out my new web site at http://www.rguessknives.com |
| R Guess - Thursday, 06/03/04 17:26:48 EDT |
|
Stainless steel turbine vent caps are available from HVAC outfits who specialize in restaurant work. Pricey, but they definitely work. |
| vicopper - Thursday, 06/03/04 23:18:38 EDT |
|
Thanks a lot guru. That stack info is pretty useful. Keep up the good work! |
| Hayes - Friday, 06/04/04 02:10:56 EDT |
|
Hayes and others: For the Guru to be able to 'Keep up the good work!' Anvilfire.com needs your support. Join CSI and save a valuable resource. Besides, all the cool kids are doing it. |
| Nomad - Friday, 06/04/04 11:02:44 EDT |
|
thank you Guru ! |
| Fabien Chapaveire - Friday, 06/04/04 17:32:44 EDT |
|
How much heat can granite take before it cracks or breaks ? |
| DHousman - Friday, 06/04/04 22:01:15 EDT |
|
Jock et al, I just bought a #3 Rousselle Punch Press but am lacking all tooling. It came from a working shop and appears to be in great shape. I will have to get a single phase 2HP 184T for it but the tooling is what has me stymied. I've never run one before and don't want metal shooting through my chest at mach 3 so I'd like to know if the die sets are interchangable between makers and if there are any better than others. I had a link of yours last PM but I'll be darned if I can find it tonight. Brian, Odin Forge. com |
| Brian Rognholt - Friday, 06/04/04 22:35:11 EDT |
|
Used punch presses are cheap because in much of industry, they are obsolete, with cnc turret punches replacing them. A 50 tool cnc punch can duplicate many patterns that used to require a $10,000 custom die, and take an hour to change dies. The CNC punch will change dies in seconds. Punch Press tooling is interchangeable, as long as you can bolt it down to your press, and the tonnage required by the tooling is within the capacity of your press. Most punch press tooling is custom made, and most times they calculate the tonnage required by looking in reference books. Machinery's handbook may have some info on this, but i would look for a copy of the ASM metals handbook-desktop edition- you can often find a used copy of this for a reasonable price- I paid 20 bucks for mine. Another thing to look for at used bookstores is the Bliss Power Press Handbook, published by the Bliss company, which made punch presses. I have also seen used technical books about punch press tooling design pretty often, usually for under 20 bucks. Auctions are going to be your best bet for tooling. But much of what you find is going to be designed to make one oddball part. Look for Unipunch tooling- this is really flexible C frames that can be configured like an erector set, and used on everything from a hydraulic press to a press brake to a punch press. Real commercial tooling is made for Millions of uses, so it is high carbon steel, very precise, and heat treated to precise hardnesses. And expensive, of course. |
| ries - Friday, 06/04/04 23:16:45 EDT |
|
Hardening Steel: Joe, as Guru said, every steel has it's own best method. However, it is the amount of carbon that controls hardness up to about .6%C. Beyond .6%C and hardness does not increase but abrasion resistance does due to the formation of carbides. Iron must be heated to a temperature that will dissolve all the carbon into the austenite. It also takes some time to dissolve large carbides. Failure to heat to the proper temperature or to allow the carbides to completely dissolve will result in poor hardening regardless of the speed of the quench. Martensite, the phase of iron that is hardest, starts to form about 700F but you must get to 700F as fast as the steel will tolerate. The martensite is finished forming anywhere from 300F down to -200F depending on the chemistry. There is an article on metallurgy and heat treating at www.iforgeiron.com in addition to the extensive information in the FAQ section here. |
| quenchcrack - Saturday, 06/05/04 08:42:21 EDT |
|
quenchcrack: I had thought that the stopping of additional hardness and the begining of carbide formation was at the euctide(sp?) point, around .8%? Am I misunderstanding, or is the euctide point something slightly different? |
| AwP - Saturday, 06/05/04 10:54:10 EDT |
|
Thanks Ries. Everyone that's looked at the machine says it's going to be a blast to work with. I plan on using it for 0.5" round in fence rails. It'll save quite a few hours of drilling and probably a few drill presses :-) Brian |
| Brian Rognholt - Saturday, 06/05/04 11:16:35 EDT |
|
Brian, here's the Unipunch web site ries was refering to. www.unipunch.com |
| Nomad - Saturday, 06/05/04 11:25:33 EDT |
|
Punch Press Tooling: Brian, See my iForge demo #163 on commercial tooling for flypresses and punch presses. It is a rudimentary article but covers some of the basics. See also the introduction to presses iForge demo #161. The big reason punch presses are cheap right now that Ries missed is that the mechanical clutch type are impossible to make OSHA compliant. OSHA and the insurance industry is forcing manufacturers to dump these old machines. Any bought at over scrap price are overpriced. The big danger of these machines is the clutches are finicky and have a tendancey to double stroke and even engage without warning. The older and more worn the machine the bigger the danger. As these machines are commonly hand fed the danger of accidental engagement is a very serious problem. Both of the punch presses I have are typical. I use them with the understanding that they may engage on their own at any time. There is no way I could have an employee or helper use these machines. They will run perfectly for thousands of parts then suddenly double stroke. There have been more serious punch press injuries in industry than from any other machine. Injuries almost always involve loss of digits, hands, limbs. . . The practical problem with using punch presses it that the tooling MUST be engineered. If calculating cross sectional areas and shearing forces is not your thing then forget it or hire a tooling engineer. A punch press is not a power hammer or flypress that can stop at any height. Punch presses MUST travel their full stroke or they fail catastrophicaly. DO NOT confuse tooling that will work under a flypress with tooling you can use under a punch press. Tooling CAN be made by hand but to get the real advantage of a punch press you need a lathe, milling machine and surface grinder to make tooling OR make detailed drawings and have someone else do the work. You can see from my iForge articles that I have do it both ways. Sadly I do not have photos of my best die set as I sold it with a job. It was made from all new components and had precision machined dies one of which I had to pay a more skillful machinist to make. Yes, you CAN buy used tooling. But it MUST be RE-engineered for your machine and your application. Most old dies sets are so specialized that they are difficult to recycle. The parts are usualy so drilled full of holes they make Swiss cheese look solid. Universal tooling (die holder and dieset pairs) are the most useful to the small shop but they too MUST have the engineering calcs done. As Ries pointed out there are many books on the subject. Often die set manufacturers catalogs have a lot of what you need to know. |
| - guru - Saturday, 06/05/04 14:59:46 EDT |
|
Hwooldridge, Guru, Vicopeer and all others who gave me advise on welding up the 1 3/4 inch pipe with the 2" galvanized fittings: I used the 6011 as I liked the concept of being able to weld over the slag and not worry about inclusions on this type of a weld (non-critical) and it worked great. Used 1/8" rod, tried DC and AC, found the AC actually filled a little better than the DC (at least for me), 90A was a perfect current for it. Thanks guys! |
| Ellen - Saturday, 06/05/04 15:14:43 EDT |
|
AwP, you mean the eutectoid point. That is the point on the phase diagram where ferrite will instantaneously transform to austenite (and vise-versa). All other carbon-contents will transform over a range of temperatures starting at about 1333F. The eutectoid point occurs at .83% carbon and 1333F. Beyond the eutectoid carbon of .83%, the slow cooled microstructure will be pearlite and cementite, below the .83C it will be ferrite and pearlite. The hardness of water quenched .6% carbon steel and .83% carbon steel is the same, Rc 65 or so. |
| quenchcrack - Saturday, 06/05/04 16:45:41 EDT |
|
Hello all, I am in the process of planning a new shop building. I've asked a few questions before, and appreciate the great answers recieved. Today I am looking for a source for an overhead monorail. I assume I can buy the rail at my local steel supplier, but I have no idea where to buy the actual hoist. What brands should I be looking for, or avoiding? I have seen one available at Harbor Freight, but I would really like a more reliable unit. Any suggestions would be greatly appreciated. |
| FredlyFX - Saturday, 06/05/04 17:01:30 EDT |
|
quenchcrack: Ok, thanks. I read somewhere about how you need to be careful to make sure to soak steels that are past the eutectoid point to let the extra carbon disolve out of the carbides before quenching, I must have got it confused since it relates to similer things. |
| AwP - Saturday, 06/05/04 18:37:56 EDT |
|
Flue pipe: I know I should use galvanized flue pipe, but is there any difference in thickness that I should look for when ordering my pipe? Not being a heating and cooling guy, I want to get the right stuff so it lasts as long as possible. Last time I just used standard 8" galv, and didn't expect it to last too long anyway. Now that I've got a pole barn, I want to set this up to last as long as possible. I was figuring 10", but will check prices for 12" as well. Any guessses as to what type of place would offer the best price? HVAC supply houses? Just talking to some people, it looks like I will probably have to have it ordered in anyway. Bob |
| Bob H - Saturday, 06/05/04 19:03:53 EDT |
|
Awp, you need to soak most steels that have enough carbon to harden them. Simply getting them up to temperature will not allow time for the carbides to dissolve and you will not get maximum hardness when you quench. Normalizing before you harden will help since the normalizing will result in a smaller, more evenly distributed carbide which will dissolve faster. Annealing will result in large carbides and is not recommended prior to hardening. |
| quenchcrack - Saturday, 06/05/04 19:15:55 EDT |
|
Hello, i was thinking of purchasing a Peddinghaus 600G, 800G, or 1000G corss pein hammer and i want to buy two of them but i am not sure which to i should buy. If anyone can give me a suggestion of the two i would use more i would greatly appreciate it. Thank you. PLZ EMIAL ME HERE: maj273@hotmail.com |
| John - Saturday, 06/05/04 20:45:57 EDT |
|
I have about 100 1 foot lengths of annealed steel wire that I cut off a spool. I want to get it as straight as possible. I was thinking of drilling a hole that is slightly larger in diameter than the wire through a 2-3 inch thick piece of steel and pulling the wire through it. That should straighten it. Is there a better way of doing it? Thanks in advance! |
| David - Saturday, 06/05/04 21:52:05 EDT |
|
Straightening wire: David, if you want the wire really straight, it is best to straighten it before you cut it, by pulling it just enough to stretch it slightly. Since it is already cut, you'll need to use an alternate method. Pulling the wire pieces through an oversize hole will not straighten it appreciably, unfortunately. All steel is "springy" to some extent, and to straighten it you need to move the bends past the yield point of the steel. A loose-fitting hole simply won't do it. What you need to do at this point is to pull the wire through a "drawing" die. This is a piece of steel plate with a tapered hole that is slightly smaller in diameter than the wire, so the wire is drawn down smaller in diameter and becomes proportionately longer. Moving the molecules of the steel this way will straighten it and slightly work harden it. You didn't say what diameter wire you're working with, but the following method will work with any size from about 22 gauge to 8 gauge. You just adjust the numbers accordingly. You can make a drawing die for 18 gauge wire (.040") by drilling a #63 drill hole through a piece of annealed 1/4" medium carbon steel plate and reaming the hole with a .030 to .050 tapered broach. The small end of the hole should end up being .038" and the large end about .044". Slightly countersink the large end with a 60� countersinking bit. The smoother the hole is, the easier it will draw the wire, by the way. To draw the wire, hold the draw plate in a vise attached to a heavy bench or stationary object. The end of the wire is pointed a bit with a file and put through the hole from the large side. Grab the protruding end with a pair of drawing tongs or visegrips and pull it smoothly through the plate in a perpendicular path. The resulting wire will be .038" diameter and about 5% longer than you started out with. You should lube the drawplate hole with some tallow or paraffin before drawing. The necessary drills and broaches (reamers) are available through places such as W.W. Grainger, MSI and McMaster-Carr. All of them have online catalogues, so Google 'em up and check them out. |
| vicopper - Saturday, 06/05/04 22:48:05 EDT |
|
John, You didn't say what you plan on doing with the hammers, so it is hard to advise you which to get. For me, the one kilogram hammer (2.2 lb) would be a medium light forging hammer. Anything lighter would be for very small work or non-ferrous metals. For blacksmithing, I would buy two of the 1000 g. hammers and finish the faces slightly differently for different drawing forces, but I wouldn't buy the lighter ones as I already have a few dozen silversmithing hammers. Your mileage may vary. :-) |
| vicopper - Saturday, 06/05/04 22:54:44 EDT |
|
Ellen, I'm not surprised that the 6011 rod worked better on AC. 6011 is basically just 6010 with an arc stabilizer added to allow it to run on AC. Running it on AC is easier because it runs hotter that way,and the arc stabilizer also makes it a bit slower chilling as well. I still prefer the 7014 on DC straight polarity for penetration and 6013 0r 7018 on DC reverse polarity for buildup. Glad to hear that it worked out for you on your project! |
| vicopper - Saturday, 06/05/04 23:11:28 EDT |
|
vicopper, The wire is 0.08" in diameter. I've got plenty of wire left on the spool. Would I just stretch the wire by about 5%, i.e. the same amount as it would strecth by pulling it through the die? Thanks for the advice. |
| David - Saturday, 06/05/04 23:12:30 EDT |
|
David, With .080" wire you should be able to pull it straight, but it isn't going to be real easy. Clamp one end in a vise that is affixed to a heavy bench (preferrably bolted to a wall) and take a couple of wraps around a short piece of 1/2" pipe with the other end of the wire. Then get a friend or two to help you pull until you FEEL the wire stretch. The amount it stretches isn't really important. As soon as you feel it stretch noticeably, it will have re-arranged itself internally and be about as straight as you're going to get it. If you pull so hard that the wire snaps, the sudden release of stress will make it snap back and introduce new bends, so just stretch it until it moves, then stop. Now handle it carefully so as not to bend it while cutting and you should be all set. PLEASE NOTE: As with any operation that stresses metal, it is crucial that you wear appropriate safety equipment. Gloves, face shield, goggles, etc. Should you snap a stressed wire, it could suddenly whip back and hit you. A piece of wire traveling near the speed of sound will pluck your eyeball out quicker than a cat. Glass eyes come in several pretty colors, but you can't see out of them worth a darn. Wear protection! |
| vicopper - Sunday, 06/06/04 02:20:46 EDT |
|
Bob H: Coal forge flues need to be more corrosion resistant than regular flues. Stainless is ideal, heavy galv steel is next best followed by heavy steel. Regular stovepipe should be easily replacable if it is to be used...unless you want to swab it out at the end of each workday. |
| - Pete F - Sunday, 06/06/04 03:39:19 EDT |
|
Bob H , I have gotten 10" and 12" stove from two different sources. I have found that the least expensive was to go to the local Vocational Tech school and have the metal shop students make it. The school I went to made it for the cost of material. Harley |
| Harley - Sunday, 06/06/04 05:41:50 EDT |
|
Vicopper- "Glass eyes come in several pretty colors, but you can't see out of them worth a darn. Wear protection!" Well said! |
| Brian C - Sunday, 06/06/04 08:23:08 EDT |
|
VIC, What Brian said! Very good image, that folks will remember for a long time. |
| Paw Paw - Sunday, 06/06/04 08:44:24 EDT |
|
Thanks for the info Jock. 163 and 161 were the iForge numbers I was looking at but had lost. It's easy to see by looking at the machine why OSHA and NIOSH don't like them very much. I'll see what I can dig up for a die set and go from there- after adding a few high velocity sheilds. Thanks. Brian |
| Brian Rognholt - Sunday, 06/06/04 09:59:09 EDT |
|
Can you recommend a Ferrier School for horse shoeing in Oregon or No. California? Do you know the hr. wages for people who shoe horses? Thankyou |
| Phil Lantz - Sunday, 06/06/04 11:36:17 EDT |
|
Hammer Weights: John, This is a personal decision based on your strength, experiance and the type of work you are doing. I use hammers from less than a 1/4 pound (100g) to as much as 8 pounds (3630g) largely dependent on what I am doing. I use different size (and shape) hammers for forging than for marking, riveting, sheet metal work and other tasks. For general forging the range of hammers you list (600 to 1000g) is fairly average. A 600 gram (1.3 pound) hammer is a good training weight for a teenager, young lady or someone of very slight build (100 pounds or less). An 800 gram (1.76 pound) hammer is a very good starting hammer for someone without a lot of hammer experiance and a good everyday hammer for someone slight of build. It is a good size for learning hammer control. A 1000 gram (2.2 pound) hammer is a good size for someone with experiance and control. It is a good everyday hammer but a little light for some smiths. A 1360 gram (3 pound) hammer is a good size for someone with experiance, control and well developed muculature. It is a good everyday hammer for heavy forging but a little too heavy for some smiths and a little light for others. Using too heavy a hammer can result in tendonitius, elbow and shoulder problems. It is better to swing a small hammer fast than a big hammer slow. The extra movement is better for you than the slow heavy movements. An 1800 gram (4 pound) hammer is a heavy hammer and will tire all but the strongest smith. It it a weight that should be used for heavy work only. Heavier hand hammers are ocassionaly used for short periods. |
| - guru - Sunday, 06/06/04 11:56:57 EDT |
|
Straightening Wire, bar, sheet: David, commercialy these items are straightened in straightening rolls. Straightening rolls are a series of rollers situated on either side of an axis in alternating sets. They are closer and closer together to the point of deflecting the work in both directions just short of bending it. Flat stock from coils only needs upper and lowers while square and round stock need sets on two axiis 90° from each other. For round stock the rolls may have round or V grooves. Great quantities of metal are shipped in coils (rolls). The coiling bends the stock. Since most stock need to be flat to work the material taken from a coil is run through straightening rolls then sheared. For wire a small set of straightening rolls could be made using cam rollers. Minimum sets are three rollers. Their positioning is dependent on the temper of the metal. Very soft material wants almost no defletion at the end but hard material wants as much as possible without bending the metal. |
| - guru - Sunday, 06/06/04 12:12:05 EDT |
|
In Weygers' "Complete Modern Blacksmith", which I trust you have, harrumph, there's plans for a wire-straghtening jig that looks pretty simple and will take the size you have. Basically it's a set of three plates with holes 60 degrees out of phase from each other stuck in a piece of pipe. Get reading! |
| Alan-L - Sunday, 06/06/04 12:22:17 EDT |
|
Wages: Phil, Farriers, like blacksmiths are generally self employed and as such an hourly wage cannot describe their income. For most self employed costs eat up as much 75% of the gross. So what is charged per hour is a LOT more than what the individual makes. Then there is the matter of business skill. Two self employed people in exactly the same business may make completely different incomes. Location, clientel, salesmanship, controlling costs and how hard each works can make as much as a 5 to 1 difference. Generally the self employed work double the hours of others. Folks that think they can be self employed and work regular hours generally don't make it. In general farriers make a good living. However, it is a kind of work that is a lot like being a professional athelete, at some point the body gives up and you have to find other work. Farriers need to have a very early retirement plan or be prepared to sequay into another occupation. Consider this. If you make 25K/yr for fourty years you have made one million dollars. Today most folks need to make 40 to 50K and family incomes are commonly 80-90K or more. That means two to four million dollars in a lifetime. But if your working carreer is short then you need to make BIG bucks. Athletes that MAY only work for a couple years may need to make millions per year to come out having made regular wages. . . Makes those outregeous contracts look a little different. . . A farrier may only have a 10 or 20 year working carreer. So to retire when they are worn out they need to make two to four times what average folks make. OR plan on a second occupation. Long term financial planning is something few of us do today. But it is good to look at and figure out where you are going to be when you are 65 or 70. . . |
| - guru - Sunday, 06/06/04 12:40:45 EDT |
|
Dose anyone know of the Golden Rule of pa portion's ? I would like to make a set of pa portion calipter's I lost the formula on how to set them up dose anyone know how to ? or have formula ? E-Mail me thanks |
| IronWolf - Sunday, 06/06/04 13:07:03 EDT |
|
Do you mean the golden rectangle? From January 1 - 7, 2001 on the Guru's Den Golden Rectangle or Mean: Take a square, divide the base in half, strike an arc from the center of the base to the an opposite corner and set the far corner of the rectangle. Ratio 1:1.61803398874989484820458683436564 A lot of folks force spirals to fit in a sequence of golden rectangles. The key word if FORCED. Its hype and wishful thinking trying to make everything fit this so called "magic" rectangle. But don't believe me. LOOK at their examples. If it worked you could do it mathematicaly. See our iForge demo about sprirals on how true spirals are developed. |
| - guru - Sunday, 06/06/04 14:21:22 EDT |
|
Alternately using the Pythagorean Theorem (simple geometry): reduced 1 : SQRT(1¼) + 1/2 ^ = power, ^2 = squared. |
| - guru - Sunday, 06/06/04 14:39:17 EDT |
|
Jock, Alt 0178 gives you the Squared (�) sign. Alt 0179 gives you the Cubed (�) sign. Alt 0185 gives you the power of 1 (�) sign. |
| Paw Paw - Sunday, 06/06/04 17:37:00 EDT |
|
More on punch presses- Brian, dont try out a hydraulic ironworker for punching your half inch holes for fence pickets. Because if you do, you will be spoiled by how much better it is than anything you can cobble together with a punch press. Punch presses were designed for mass production, not the give and take of an iron shop. An ironworker is a much superior tool for everything you want to do- shearing round, square, flat bar and angle to length, and punching holes in all kinds of things. Once you have been corrupted by the ease which with a hydraulic ironworker punches a 3/4" diameter hole thru 1/2" steel plate, or shears a piece of 1/2" x 6" flat bar, there is no going back. And they are relatively quiet, compact,reliable and much safer. Of course, the big drawback is expense- unlike old punch presses, ironworkers are so desirable that no one gives em away. But if you really are punching enough holes to justify a punch press, you probably should start trying to talk your money manager (wife) into an ironworker. It took me many years to convince mine, but it is one of the single most grin producing tools I have ever bought, and it pays for itself every year in my shop- especially like last week, when we had to shear 200 pieces of 3/8" stainless round bar- put em in, cut em, take em out. We are punching a lot of 3/4" holes this week in stainless angle- probably take a half hour to do 2 dozen of em. do a web search on mubea, geka, scotchman, and piranna. |
| ries - Sunday, 06/06/04 18:07:23 EDT |
|
Straight wire Thanks for all the info. What I finally did was drill a 0.081" hole in a ~2 in thick piece of steel. I then used a bandsaw to cut a kerf into the block so that I could use a clamp to control the diameter of the hole. Pulling the wire through the hole made the wire straight enough for my purposes. It got out the sharper bends but left a slight bow to the wire. Which I don't mind. |
| David - Sunday, 06/06/04 19:50:13 EDT |
|
Okay, I need some bar stock, flat and round too. Various sizes. Where can I go to purchase small lots in Eastern Massachusetts without being forced to get a truckload of each? Single lengths if necessary? |
| Bill Pond - Sunday, 06/06/04 20:09:14 EDT |
|
Well, dang, Bill, don't you have a phone book? Look up "steel" in the yellow pages and chances are pretty good you can find a service center that will sell you a small quantity. It is normal for them to impose a minimum order but it is usually in the $20 range. |
| quenchcrack - Sunday, 06/06/04 20:15:04 EDT |
|
I've tried but they keep trying to punch up my order, I'm not thin skinned but who needs the hassle! |
| Bill Pond - Sunday, 06/06/04 20:22:14 EDT |
|
I just got another anvil. It came from my brother's farm in Penn. There is no hardy hole. It is stouter in proportion of base to table. It is all iron, not steel. I can tell by sparks. No marks or printing anywhere on casting. All edges are rounded by wear. The casting itself if rough as if the founders lacked good sand or technique. Any ideas as to age or origin? Please advise. I am a metal worker by trade. Journeyman machine and fixture builder. I dabble in forging as well as damascus steel. |
| - John Funke - Sunday, 06/06/04 21:03:53 EDT |
|
John, Sounds like a Colonial style. Take some pictures and send them to me by email and I'll try to help you with it. |
| Paw Paw - Sunday, 06/06/04 22:11:23 EDT |
|
Experience: Been welding and fabricating for over thirty years. Novice at heating with a coal fire. Question: I need to make square headed bolts. Generally 3/4 inch and fairly long. Can you point me in the right direction? Thanks |
| Dave Sellars - Monday, 06/07/04 00:50:01 EDT |
|
Hey, I am a 12 year old kid who is intecsted in medievil reinactment and blacksmithing. I have read your intro to black smithing but am still a bit lost at to what i will need and also is the furnace etc. big. My parents might no be to happy with a huge smith taking up the back yard!! Thanks Rob |
| - Rob - Monday, 06/07/04 04:48:17 EDT |
|
Square headed bolts: If you just need a few, you can always thread the end just enough to screw a nut on flush and arc weld the nut on, little grinding and it looks like a bolt. If you want to forge then, you are looking at upsetting the end, and then forgeing the square end, a fair amount for work for each bolt, I suppose you could try forging a hex head head to square, but the resulting head would be undersized. |
| - Hudson - Monday, 06/07/04 06:09:24 EDT |
|
Rob: If you're interested in doing small scale smithing on a medieval reenactment basis (tools, knives, cooking gear, chest hinges, etc. as opposed to swords and siege machines) then the equipment does not need to be big, heavy or expensive. For reenactment purposes double bellows with a tuyere stone/bellows shield, some simple hammers and tongs; a small ~10 pound (4.5k) block anvil and separate hardy and bick, mounted into the same stump; and some punches, chisels, and files can get you started. I think the most expensive part of mine was the pig skin for the bellows. However, the traditional medieval layout requires more than one person to operate efficiently. A single person cannot pump the bellows, tend the charcoal fire, and forge the metal with any degree of efficacy. It�s a team effort, which means you need a reliable crew if you�re going to do this on a regular basis. For non-reenactment purposes, a small �farmer�s forge� for coal, or a single-burner gas forge, and a moderate size anvil will suffice to get you started. As the Great Guru points out, you can always do smaller work on a larger setup, but you can�t really do large work on smaller equipment. However, if you wish to keep the scale small and personal, this will suffice, at least until you grow more experienced and ambitious. There are some pictures of a small Viking style forge in the Anvilfire News at: http://www.anvilfire.com/news1/news1011.htm. My early medieval setup may be shown on one or more segments of the History Channel�s �Toolbox� series this summer. You�ll find lots of appropriate projects in the iForge section, and further information in the Anvilfire Armoury. Take your time, look around Anvilfire; there�s a wealth of information to be discovered, much of it relevant to your interests. Thomas Powers is also quite experienced in early medieval technology (to the point of smelting the ore), so he�ll probably add to what I�ve posted. Heading for the low 80s on the banks of the Potomac. Steamed, bent, clamped, screwed and riveted a new quarter rail (to replace the dry-rotted one) under the gun�l on Saturday. The 5� (127 mm) silicon bronze rivets that I made worked fine, thank you. Visit your National Parks: www.nps.gov Go viking: www.longshipco.org (Oars, not ores!) Camp Fenby; a laid-back medieval arts and crafts weekend, June 25, 26 and 27. For those with access to yahoo groups: http://groups.yahoo.com/group/CampFenby/ (in draft) |
| Bruce Blackistone (Atli) - Monday, 06/07/04 08:56:21 EDT |
|
Bill, did you try Turner steel in West Bridgewater? They've always been good to deal with. You said you want small lots... did you see the link to On-line Metals in the Store page here? Don't know how much you're looking for. |
| Gronk - Monday, 06/07/04 09:22:21 EDT |
|
Embeded Characters: Paw-Paw, ASCII key codes embedded in HTML documents often blow up the HTML and are in the least not universally displayed on different systems and will produce a different character. There are special codes for these characters in HTML. Using the carrot character for powers is standard programming notation. |
| - guru - Monday, 06/07/04 11:06:37 EDT |
|
Buying Steel: Almost all suppliers that have a decent selection of affordable steel are commercial warehouses or "steel service centers". Most of these folks require either a MINIMUM ($25 or $50), OR for you to open an account. If you open an account with them they will usualy sell you ANY amount from one stick to a truck load AND cut it for you (for a fee). Most places if you need steel cut they will want you to pay for it first (when you get there) and THEN they will cut it. This makes perfect sense to me as I can't sell specail odd cut lengths of material either. . . Warehouses carry steel in 20 foot (6 meter) and 12 foot (3.7 meter) lengths. Unless you have a truck for that truck load you will have to ask to have your steel cut. So plan to open an account or wait. In either case cutting is not cheap. I have steel cut into 12's and 8's instead of half. This gives me long pieces if I need them (unless I need a 10's). You can usualy haul 12' lengths in a full size pickup, or on a stock rack or luggage rack. Do not expect tight tolerances on warehouse cut steel. If you need exact lengths they WILL cut it but at a higher cost. Cutting to make haulable is different and is usally +/- 1" or so. If you need a tighter tolerance then specify it. The warehouse folks sell affordable steel. Now if you are not a business and just want some steel to play with and do not need to be competitive you can order mild steel in three foot lengths (maybe 6') from McMaster-Carr. You can also buy steel at many construction supply places like Lowes. However, the hardware store and construction supply stuff is almost always galvanized. You can also often talk a small machine or welding shop into selling you steel. However, they paid the warehouse their price PLUS delivery and deserve to get this back plus a profit for handling and trouble dealing with an amature. AND remember, these folks are doing you a favor. They keep inventory on hand for when THEY need it, not you. So don't be a needy customer. If they seem happy to sell to you then fine but if they are hesitant then they probably don't want the nusciance business. |
| - guru - Monday, 06/07/04 11:34:36 EDT |
|
Guru, how do you make a good sturdy anvil. Im not 100% sure about the hole process they go through to get made. Thanks |
| - Mike - Monday, 06/07/04 11:59:14 EDT |
|
John---was that *cast* iron or *wrought* iron? Both have been used for anvils. Back in OH I was getting more steel than I could use for free from an ornamental iron shop. When the price of sttel was way down the scrapyard started charging them for hauling their scrap in and so they were happy to have a smith stop by every now and then and take a couple of hundred pounds of it. You can be surprised what a commercial shop considers "scrap" too! Don't know if that deal would still work with the current price on scrap though. Also there are price breaks depending on how much stuff you norder so sometimes a small shop will be *happy* to include your order if it will get the end price down for them or keep their account active, start talking to people! Thomas |
| - Thomas P - Monday, 06/07/04 12:16:50 EDT |
|
Steel in Eastern MA: Bill, look in the book for Haverhill Steel. They have no minimums and even have used steel in a small assortment of sizes. Cutting is pretty reasonable. If it's small enough, I usually bring bolt cutters or my cordless recipro-saw to cut to fit. 12' is about the biggest that'll fit in my van. If you're willing to travel, Mill Metals in Manchester, NH and Cohen Steel, in Concord, NH, also sell with no minimums. |
| - MarcG - Monday, 06/07/04 12:21:02 EDT |
|
Primitive Forging: Rob, to add to what Atli had to say. . FIRST: Knowledge is your most important tool. There are many good books on blacksmithing. Find them and study them. We list several in our Getting Started article and have book reviews of more on our "bookshelf" page. We also have many articles on the subject here on anvilfire. You mention medieval reinactment. Maybe you have seen blacksmiths at work. If not watching others can be a great deal of help. A few minutes watching a smith can answer hundreds of questions. SECOND: As Atli pointed out you can get by with just a few tools. See my post a few above yours about "Hammer Weights". Trying to use too big a hammer can be very discouraging. Your most important (non-mental) tool that is the most difficult to come by is an anvil. Early anvils were not the classic shape we think of today. A square block of steel will do. This needs to be as heavy as possible. But compactness is more important than total weight. A 25 pound cube or rectangle of steel may make as good an anvil as a larger 100 pound piece of steel beem. Many folks use a short piece of old rail road rail, however this is not very good as it is quite springy. See our iForge article on using Rail Road Rail for tools. There are brief scenes of sword smiths in the movie "The Last Samuri". These are the only accurate forging scenes I have seen in a movie (ever). The little block anvil in use is typical of ancient anvils and is still used by modern Japanses sword smiths. Hammers can be bought at hardware stores as well as from specialty suppliers such as our advertisers. These have not changed much in thousands of years. Tongs can ocassionaly be bought at hardware stores than sell farriers (horse shoer's) tools. For getting started (until you make your own) Channel locks work as do Vise-grips. You can also buy tongs from our advertisers. THE FORGE can be as simple as a shallow hole in the ground with a tunnel for a source of blown air. OR two rows of bricks to make a trough. Primitive smiths worked at ground level and even today that is the norm in primitve smithies throughout the Middle East, SouthEast Asia and Japan. Western smiths and most modern smiths prefer standing at a forge and anvil raised of the ground. See my story on the story page titled "Blacksmith of 1776" for a description of a primitive mud and wattle portable forge. The source of air for the forge is largest variable. Even though a modern coal forge is all made of metal the fire pot is still the same shape as a shallow hole in the ground. Air have been provided to forges by human breath (not recommended), wine skins or a hide over a pit, wood and leather bellows of various designs, the wind and water pumped air, metal fans that were hand cranked and turned by electric motor and even air compressors powered by steam or electric power. We even had a fellow write in about haow he had made a bellows from a 5 gal plastic mud bucket and some plastic sheeting. As Atli pointed out, a small portable bellows needs to have a helper to power it. For working alone an electric blower is the handiest. You can always use the electric at home and while learning and the bellows when you put on a show. Larger bellows (as big as you) can be convieniently used to blow a coal forge used by one person. The large bellows take less effort than a little one and provides a steady steam of air for brief period after the smith stops pumping. Of course everything is a matter of scale. You can heat small bits of wire and nails to a welding heat with a very small bellows and a charcoal fire. Bigger pieces require a bigger bellows. Note that when smiths speak of charcoal they are not talking about charcoal briquettes (like Kingsford). We are talking about REAL 100% wood charcoal. Briquettes have a small amount of charcoal, a lot of sawdust (for flavor) and a small amount of soft mineral coal held together by glue. They can be used in a forge but are not very good for this purpose. They burn up quickly while leaving an inordinate amount of ash. You can buy real charcoal from restuarant suppliers or make your own (see our FAQs page). SO, scroung or buy a small anvil, hammer and tongs. Build that forge and go to work! Note that parental guidence is recommended any time a minor is dealing with fire and hot metal. Yep, this is a PG rating hobby. Rob, this means YOU! Good luck and feel free to come back and ask more questions! |
| - guru - Monday, 06/07/04 12:33:43 EDT |
|
Hey I�m just starting out and was wondering if anyone knows here I can get some coal around where I live (Plymouth WI) and if you know how much it would cost and how much you get thank you |
| rossy - Monday, 06/07/04 13:17:34 EDT |
|
Jock, I didn't realize that the ASCII key codes sometimes caused problems. No problem, although I do occasionally use them in forums, and frequently in email, I've never run into the problem before. |
| Paw Paw - Monday, 06/07/04 13:17:39 EDT |
|
Making an Anvil: Mike, Making a good anvil is not an easy task. To start with they are a much more sophisticated than tool than they appear to be. AND they are by necessity HEAVY. The best anvils are made with a hardened tool steel face. Most modern anvils are cast from all tool steel. The most expensive are forged. Several 20th Century anvils as well as the modern Peddiinghaus are made with a forged tool steel upper body and a mild steel base welded together at the waist. The best 19th Century anvils were forged from wrought iron and had tool steel plates forge welded to the face. NO, you cannot just weld a plate on around the edges. All are hardened and ground at great expense. Anvil shapes vary a great deal. Primitive anvils are not difficult to make (a great cube or slightly rectangular bar). The "stake" anvil with a shank to fit in wood stump was also popular. However, modern smiths prefer the shapes that took centuries to develop. These include a round tapered horn, a thin heel OR a tapered quare horn, a square "hardie" hole for holding tools and a round punching hole. The overhanging horns are usualy supported by an extended base or "feet". The best anvil designs have the hardy hole close to the body so that tools are well supported for heavy use. However, due to the expense and difficulty of making a deep square hole most anvil makers compromised and moved the hardie hole out away from the body where the anvil was thinner. This results in springy too support and a weakness in the anvil that ocassionaly fails resulting in a broken anvil. Yes, there is some engineering consideration in these tools that most just consider a lump of iron. Good anvil design is an art that many makers do not understand. To make any decent anvil you need to plan on hardening the face. When you are talking about heat treating a 100 pound or greater lump of steel it is not an easy task. Can YOU pickup a red hot 100+ pound mass and move it? Some do-it-yourself makers use hard facing rod to weld on a hard face. This avoids general heat treating but is actually more expensive than hireing a professional heat treater. Hard facing rod is usualy laid over a substrate of alloy buildup rod or stainless rod. Several passes are required and ALL slag inclusions and pits mut be ground out betwen passes. When finished the face is hand ground and new pits welded up and reground. In this process the rods are expensive, the abrasives are expensive AND many folks overlook the the possibly several hundred dollar electric bill to burn all those rods. . . To make the square hardy hole all early anvils were punched. This means heating the anvil to a yellow heat and using sledges to punch a 3/4" or 1" square hole through 3" or more of iron and steel. The best modern anvils are drilled and broached. Cheaper anvils have the hardie hole cast in. Cast holes are usualy not sized very well and are often misshapened. They do not need to be this way but it is often the case. Do-it-your-selfers often build the anvil around a piece of square tubing or torch a big hole, put the tubing in and buildup around it. This is a VERY messy way to make a square hole. The best way is to machine a slot 1" by 1" deep in the heel or horn of the anvil and then weld it on with a full penetration weld. It is possible to do this using alloy steel pieces and only have a narrow seam to weld across the face or each side of the hardie hole. The best do-it-yourself anvil construction is to start with a single piece of very heavy medium carbon steel plate (4"-5" by 30" by 12") which weighs about 400 to 500 pounds and whittle away an anvil shape with a cutting torch and grinder. You will lose about 40% of the mass in this process. The hardy hole will need to be drilled and machined square (see our iForge demo on square holes). Feet (possibly made from scraps) will need to welded on. Then the face hardened. Optionally you could have the profile of the anvil machine flame cut. In thick plate this would probably save you money in grinding wheels and final quality. The corners will still need to be knocked off the horn by hand before grinding. Another way to go it to use the two part process and weld the tool steel upper body to a mild steel base at the waist. No matter how an anvil is made it is a LOT of work and expense. I have tried to come up with production process that could make a better all steel anvil than the Peddinghaus and could not do it for less even if we ignored labor. . . Even at $4 or more a pound new anvils are a good deal. We have even looked at making a sqaure lump starter anvils and had difficulty approaching the big manufacturers prices. See our FAQ's on Selecting an Anvil and our anvil series. |
| - guru - Monday, 06/07/04 13:29:23 EDT |
|
Thanks Ries. I figured a $10k Machine would kick booty over a $52 unit. I'm afraid I don't have 10 g's laying around. Brian |
| Brian Rognholt - Monday, 06/07/04 13:29:40 EDT |
|
hi! I have an other problem! any advices for install my power hammer????? http://www.bladeforums.com/forums/showthread.php?t=301219 an heavy concrete floor ???? Fabien |
| Fabien Chapaveire - Monday, 06/07/04 13:33:48 EDT |
|
Hammer Foundation: Fabien, Small power hammers are often just run on a good concrete floor. However, there are some disadvantages to this. One is shock and vibration. Shock is transmitted through the floor and will shake tools of benches and materials off shelves. Shock also contributes to operator fatigue. Your 160# hammer is not a small hammer when it comes to concrete floors. Unless you have a very heavy floor (a foot thick or more and reinforced), then it should have a seperate foundation. For this size hammer the manufacturer would have recommended a a foundation about 6" (150mm) larger than the base of the hammer in all directions and about three feet or a meter deep. Anchor bolts are cast into the concrete with tubes around them so they can be aligned to fit the hammer. The foundation should also be steel reinforced. The depth ofen varries according to the soil type. If the soil is sandy and loos you need to keep digging deeper. Where to soil is heavy compact clay you can go shallower. This type of foundation should be isolated from the surrounding floor with a cushion or gasketing. When I poured my hammer foundations I used 12 layers of roofing felt (tar paper or shingle underlayment) on the sides of the hole. Between the foundation and the hammer there should be a layer of wood or heavy belting. There are two reasons for this. First to absorb shock and second to compensate for the out of flatness of the base of the machine and the concrete. High places at this joint can damage the machine or the foundation. So a cushion is used. Since many hammers had low anvils and dies many modern users like to use a thick wood cushion to raise the hammer to a more convienient height. |
| - guru - Monday, 06/07/04 15:22:25 EDT |
|
DC blowers. I'm making a portable forge powered by a 12V heating blower from an old vehicle. Where can I find a wiring diagram that shows how to make a variable speed controler? Does anybody have a spreadsheet that draws spirals/scrolls? many thanks Bob |
| Bob G - Monday, 06/07/04 18:34:56 EDT |
|
Bob G, why not just make an air gate? or use the switch that came woth the blower? it should have at least 2 perhaps 3 speeds on it already. Can not remember but it would seem as if a variable resistor in line with the motor would work too..... |
| Ralph - Monday, 06/07/04 19:44:48 EDT |
|
Bob, For many motors, a regular fan switch would work. That's what I would try first. |
| Paw Paw - Monday, 06/07/04 20:12:01 EDT |
|
Bob, Most old DC motors were just run on a variable resistor. Some were resistor wire coils others were composit resistor material with a slide. Computer Math To draw and layout scrolls see my iForge demos on same. The math for creating a spiral is simple if you use polar cordinates: k = angular steps the lower the closer the points on the curve. increment or i = rate of spiral per angular step. Note that this is THE perfect spiral found in nature. There are no rectangles involved. However, there may be a ratio that makes a nice fit to the golden rectangle if you believe all that. . . To draw this on the computer screen is more complicated because you must convert to cartesan coordinates. The math is pretty easy but getting the programming flow to work in all quadrants and multiple turns may take a few special cases of logic dependant on your programming language and graphics module. Starting with the above routine d = the hypotenuse of a right triangle. Then y = d � sin A Remember that if you use angles in degrees you must convert to radians in computerese. For the purpose of this program it would be better to ignore degrees and stick with the metric system standard radians where 1 turn = 2PI. You also need to set a center point that is a positive X and Y value and add the calculated values to them or the spiral goes off-screen. In this example you might have to keep track of which quadrant you are in and compensate. . however I THINK the angles greater than 90° (PI/2) result in the negative values needed. The last time I did this math in BASIC it was to draw a clock on the computer screen. Each hand was calculated and drawn seperately including the sweep hand, erased and then redrawn as they moved. It worked just like the old Win3.1 desktop clock. The program was an excersize in basic programming for 8th grade students in 1992 (on Trash 1000's). The lesson taught both loops and computer geometry. I also wrote a little radar graphic program with a sweeping beam and the old fashioned phosphor tube fade behind the beam using the same basic routines. . . This was written in QuickBASIC. The trick on this one was that the view of the screen was slightly angular so that all the round dials and the radar screen were elipses. It was a demo program to show that game programs COULD be written in BASIC. All the graphics were rendered mathematicaly so that it was VERY fast and efficient compared to the bulky bitmap oriented programming of today. I worked on making an on-line spiral program but it takes a bunch of Php graphics programming that I am not up to speed on. For me it was always easier to just make the scroll instead of worrying about the mathematics. If it is pleasing to the eye it is right. IF it is not pleasing to the eye then it is wrong. Try drawing spirals free hand. After drawing a hundred or a thousand then you should be able to forge them without a jig or drawing OR at least forge them to match a chalk drawing. If you want to be an artist-blacksmith learn the ART. |
| - guru - Monday, 06/07/04 20:29:53 EDT |
|
Spreadsheets I've done a lot of math in spread sheets but all my experiance was in a Lotus 1a clone (still the ONLY universal spreadsheet format). It did no graphics. My brother who is a wiz at Excel could probably whip up a scroll program. But he makes his living programming for a government contractor and gets paid for this kind of thing. . . I'll ask him but since I do not use ANY virus spreading MS office products I could not test and comment on its efficiacy. |
| - guru - Monday, 06/07/04 20:37:15 EDT |
|
Guru,Do you know anything about a german mechanical power hammer company named Hellwegen and Holtzhausen? I just bought one ,it appears quite old but runs very well, in fact it behaves more like an air hammer than a mechanical. At rest with no pressure on the treadle it cycles almost imperceptibly up and down, then with increasing pressure it statrs to take longer and harder strokes. on the riveted tag it says type 0/45nbf. any ideas as to where to find more info? ironbasher |
| Kinzea L Thompson - Monday, 06/07/04 20:39:50 EDT |
|
Kinzea, I never heard of this one but I am sure that like the old Ameican manufacturers that there was dozens during the hey-day of mechanical hammers. Needs someone to write a European version of Pounding out the Profits. From the way it operates is sure SOUNDS like a pneumatic hammer. Are you sure it is not a self contained hammer? (motor and compressor linked to cylinder). |
| - guru - Monday, 06/07/04 20:51:43 EDT |
|
OBTW - All the geometry you need to know to convert polar coordinates to cartesan (rectangular) coordinates is in Machinery's Handbook. |
| - guru - Monday, 06/07/04 20:57:15 EDT |
|
I'm looking for a magnetic base drill and was wondering if anyone has advice on buying this tool. It's one of those tools I don't need often but when I do there's no substitute. My welding gas supplier is carrying a British made one for $500 that includes a Jacobs chuck and a few annular cutters. Seems like a pretty good deal but I never heard of the brand ( HITECH, evolutionpowertools.com ). Thanks Chris |
| Chris S - Monday, 06/07/04 22:02:55 EDT |
|
Bob G, Years ago I used to make protable forges that used heater blowers from old Ford pickups. I used the blower switch that came in the truck, which was a 3-speed rotary switch that was nothing more than a series of resistors. I found that the three speeds Ford chose never seemed to be the right speeds, so I put an air gate on the blower intake. That made the blower completely adjustable down to the finest increment. When using an airgate on a blower, always put the airgate on the INTAKE side, not the exhaust side. When it is on the intake, it decreases the load on the blower motor, but when it is on the output side, it increases the load on the motor. This is because the output gate causes the blower to try to compress the air against a resistance. On the intake, it simply reduces the amount of air the blower is working against, and actually decreases the motor load. If you want a ready-made variable speed control, look for one intended for a variable speed 12v or 18v drill motor. Or check replacement fan controls for RV applicatrions that use 12 volts. An AC fan control generally won't work since it is designed for an induction motor. |
| vicopper - Monday, 06/07/04 22:37:52 EDT |
|
Mag drills- you may not use it much, but when you do use it, you use it hard. I find mine sits on the shelf for months, but then it gets thrown in the back of a truck, bounced to a job site, set down in dirt, concrete dust, and metal shavings, gets rained on, drill lube dripped all over it, gets dropped once or twice, gets every scrap of metal on the site magnetized to it, and then back in the bed of the truck late in the day when we are to tired to baby it. So you need one that is easy to get parts for if it breaks. I have used big milwaukee mag drills a lot, and they are built very tough. But they are also really heavy, and I am not as strong as I used to be, so when it came time to buy the last one, I bought a Jancy JM101- It is much smaller and lighter, only 28lbs, (and that is important when you are bench pressing it on top of a ladder) and will only run bits up to 1 3/8" in diameter, but that covers 95% of what I need, and I can always rent a giant one for a day if I really need more capacity. Havent had to in the 4 years Ive had this one, though. Jancy is sold in every city I have ever worked in- and it hasnt needed fixing yet, except for a broken nylon slide on the dovetail- a ten dollar part that my welding supply had in stock. I would recommend both a jacobs chuck and annular cutters- the annulars do 75% of our jobs, but it sure is handy to be able to drill a whole bunch of no. 7 holes for tapping 1/4x20 when you need to. |
| ries - Tuesday, 06/08/04 00:19:25 EDT |
|
Folks, I had a problem with my email system this evening and in the process of solving the problem, several messages got deleted. If you have sent me a message in the last couple of days and haven't received a reply, would you please re-send the message? |
| Paw Paw - Tuesday, 06/08/04 01:25:34 EDT |
|
Welder Question: Currently I'm once more in the position of needing a welder. Does anyone have anything to testify for/against Campbell-Hausfeld? If they're OK I want to buy one of their cheaper MIG deals until I can get a good Miller like the machine that I learned to weld on. If no, I'll just have to wait (and do any necessary joining in the interim by brazing). Rust removal question: I remember a while back there was a discussion about various scale removal techniques, including an electropolishing technique. Will electric methods (or one in particular) work for removing rust as well? Sunny and warm in Kaneohe, Hawaii. (Earlier, that is.) |
| T. Gold - Tuesday, 06/08/04 04:28:22 EDT |
|
WHAT DOES OO7 SIGNIFY INJAMESBOND007? |
| ANGITR - Tuesday, 06/08/04 08:05:34 EDT |
|
Spreadsheets - Guru, have you looked into OpenOffice? It's a free answer to Micro$loth Office and can read Word and Excel files (among a whole bunch of other things). I haven't done graphing with it, but I haven't heard any complaints in that area. I use it on Linux, but it's also available for the EasyVirus operating systems from Redmond, WA. If you've got Linux, Gnumerics is an Excel reader and is much faster than OpenOffice. --Marc |
| - MarcG - Tuesday, 06/08/04 08:55:15 EDT |
|
Mag Base Drills: We have several, the big one is a Gamag with a heavy Milwaukee 2 speed drill motor. It weighs 98 pounds. The lighter one is a hole-saw brand that I can not remember. . . weighs about 40 pounds. We have also sold Milwaukee brand mag base drills as part of equipment sets. Part of the weight of mag base drills is the magnet. The bigger the magnet the bigger the hole you can drill. The big Gamag has a 2000-2300 pound magnet and will drill 3/4" and 1" holes if you pilot drill with a 3/16". The lighter the magnet the smaller the hole that can be drilled. AND also the more likelyhood of shifting the machine. As Ries pointed out, when you use these things they normally get used HEAVY. Anything heavy enough to clamp the magnet to is usualy big enough that it needs serious holes drilled in it. Note that the magnet needs THICK steel to clamp to. Often the webs and flanges of structurals are not thick enough to make good use of a mag base drill. Plate over 1/2" is needed and 1" is best. The big Gamag drill has a double adjustable base which LOOKED like a good idea but is not really necessary as the drill can be slid around to align it (even when overhead). It was an expensve machine costing over $4,000 in the early 1980's. Part of the cost was the heavy duty 2 speed (geared) drill motor. The lighter Milwaukee units we sold cost around $1500 and were quite durable. They had a heavy magnet and a variable speed gear motor. I do not recommend electrical variable speed for heavy duty use. The hole-saw unit was about the same cost but came with a set of cutters and a coolant feed system (probably misplaced by now). It was much lighter and did not have the reach or power of the others. Like all tools it depends on what you need it for. If we had purchased a lighter unit than the Gamag HD we would have been sorely dissapointed in what we could do. It takes two people to setup most of the time but it is doing a job that could be done no other way. I have drilled and taped hundreds of 3/4" and 1" holes with it. . . Good tools are not cheap. |
| - guru - Tuesday, 06/08/04 12:53:01 EDT |
|
Please do not send me to pages with long Flash intros. . . |
| - guru - Tuesday, 06/08/04 12:56:18 EDT |
|
Chris, I saw no Jacobs chucks. They do mention an extra attachement (extra cost) but I could not find info on it. This drill looks like our hole-saw. These are short on flexibility of use due to vertical height and stroke as well as horizontal clearance. Regular drills are fairly long plus the chuck and eat up available stroke. I would want to see the unit setup with a chuck and regular jobber length bits before I bought it. |
| - guru - Tuesday, 06/08/04 13:10:27 EDT |
|
More viruses. . . NOW there is a screwed up virus that takes a LONG list of names and sends them all to the same server address WITH a return addess at the same server. . . multiple endless loops fouling up the mail servers. . . Even if I quit using my address this junk will be clogging the server. If the US Federal government does not realize in a HURRY that spammers and virus writers are the REAL terrorists then the Internet is rapidly going to lose its value, commercial and otherwise. . . |
| - guru - Tuesday, 06/08/04 13:22:32 EDT |
|
thanks again Guru ! |
| Fabien Chapaveire - Tuesday, 06/08/04 14:18:16 EDT |
|
what qualifications do blacksmiths need? thanks!! |
| chris howe - Tuesday, 06/08/04 14:32:09 EDT |
|
Using the standard metals nomenclature the 007 would indicate a very low carbon content for Mister Bond, though the first digit seems to be missing which would indicate the basic type of steel he was. Since he was a very straight forward type of guy I would venture a guess that it was a "1" Chris what type of blacksmith? Someone doing production hook work needs patience and resistance to repetitive stress injuries. A top custom knifemaker would profit from a through understanding of ferrous metallurgy. A good ornamental iron smith would make good use of freehand drawing and art skills. Saying "blacksmith" is sort of like saying "Dr" there's lots of different types and they have different skillsets! Thomas |
| - Thomas P - Tuesday, 06/08/04 15:23:06 EDT |
|
007 = license to kill#7 |
| ptree - Tuesday, 06/08/04 16:41:37 EDT |
|
why would he want to kill the #7? Was it because 7 ate nine? |
| Patrick - Tuesday, 06/08/04 16:48:57 EDT |
|
Chris Howe, basic qualifications for a blacksmith would be patience, a willingness ( even an enthusiasm) to learn. Able to often figure things out on thier own or with minimal clues. Ablity to really listen, THEN ask questions. Some mechanical aptitude is helpful. |
| Ralph - Tuesday, 06/08/04 16:49:35 EDT |
|
Adding to Ralph's list, MUST BE A SELF STARTER. Modern blacksmithing is primarily the occupation of the self employed. If you need someone to tell you to get up in the morning and light a fire in the shop OR to clean up the shop when there is nothing else to do then you are not going to be a blacksmith (or any other self employed occupation). Ever hear the phrase "on their toes". I can usualy watch someone working for a few seconds and tell if they have got it. Folks that stand flat footed not paying attention to their surroundings won't cut it. Folks that are "on their toes" will be successful at almost anything they want. They move differently when they work and always have something going on. AND Those that want to be "artist-blacksmiths" need to have some artistic skills. The ability to draw so that you can explain ideas to a customer is critical. You can't be an artist-blacksmith without being an artist first. . . I knew I should have deleted that stupid 007 question. . . |
| - guru - Tuesday, 06/08/04 18:12:09 EDT |
|
DC inverters: Is there any advantage in buying a DC welder (over AC) if I don't intend to use it as a TIG welder? |
| Bob G - Tuesday, 06/08/04 19:26:48 EDT |
|
Bob, There are a lot of applications where DC is required. Where deep penetration is required in structural joints DC is almost always used. Been too long since I studied welding to comment further. Other may have more to say. A lot depends on what you want to use your welder for. If it is just for doing things for yourself, building jigs and fixtures and so on then an AC only welder is very economical. However, if it is to be used in business and for any commercial welding then you should have an AC-DC welder. |
| - guru - Tuesday, 06/08/04 19:39:06 EDT |
|
Guru thanks for the quick reply . I am pretty sure my newly aquired hammer is a mechanical for the following reasons; there is no air cylinder attached to the hammerhead , but rather a 30 inch long or so leaf spring set up connected to a pivot then an adjustable link going down the back of the hammer to where the motor and flywheel are.there is however a 20 inch or so cast drum that i suppose a small cylinder and compressor could reside in as with the linkage you would not need that long of a stroke for an air cylinder to produce the 10 to 12 inches of travel that i have between the hammer head and anvil block . Thanks again Ironbasher |
| Kinzea L Thompson - Tuesday, 06/08/04 21:05:07 EDT |
|
Welders: Tyler and Bob If you're going to get a welder for general purpose shop welding and can only aford one welder, then get an AC/DC stick welder. That machine will do a far, far greater range of work than any but the most expensive MIG machine, and will cause far fewer headaches, too. DC is necessary for several reasons. As Jock pointed out, DC will allow the use of rods that have very high penetration, although some AC rods will come close. BUT, the AC rods that have high penetration also have pretty ugly looking beads and lots of spatter, compared to DC. DC rods such as 7014 will provide high penetration, smooth bead and good fill, while 6013 and 7018 are fast-fill, slow freexe rods that do beautiful beads and fast fill, but with less penetration. Being able to change the polarity on a DC welder offers some advantages over AC as well. DC straight polarity (DCSP) has the electrode negative and the work positive. Since the electrons flow from negative to positive, the concentration of heat is in the work, not the electrode. This gives more penetration while keeping the rod cooler, and it facilitates welding in uncomfortable positions like vertical and overhead. DCRP heats the rod more, causing it to melt sooner, which gives faster fill and less penetration. The lower heat to the work means you can weld thinner stock without burning through. With 3/32" 6013 rod and DCRP I can comfortably weld 14 gauge tubing with nice fillets and no burn-through. Conversely, with 5/32" 7014 rod running on DCSP, I can weld 3/4" plate very easily. All this with a cheapo Century brand 225/140 amp AC/DC welder I bought for $200 at Home Depot twenty years ago. (A similar machine by Campbell Hausfeld would probably be similar in performance, Tyler). A MIG machine that would cover that range of stock would cost well over a grand. Plus using up more consumables such as gas cups, nozzles, feed rollers, guide sleeves, gas, etc. The new inverter-type stick welders sold by Lincoln, Miller and Esab are pretty impressive, as they weigh only a quarter of what a comparable transformer-type welder weighed a few years ago. Many of them don't even care what voltage you feed them, accepting anything from 120 volts to 440, without changing anything. And adding a TIG torch to one of them doesn't require buying a high-frequency unit, either. MIG is best suited to production work where the variables of stock type and thickness are very controlled. A MIG machine must be set correctly for the metal, thickness and other conditions in order to produce a strong and attractive weld. For all-around shop use, I feel that a stick welder is more versatile. The only caveat that I will add to the above is that I am not a certified weldor, nor do I profess to be an expert on welding. I've been welding for about forty years, though, everything from gas to stick to MIG, TIG, plasma-arc and carbon rod. Having used all that varied equipment, on a wide range of work, I recommend an AC/DC stick welder of 225 to 275 amp capacity for all-around work. The big three brand names are the best, and your local welding supply is THE place to buy, since they're the ones you'll be going to for consumables and advice. |
| vicopper - Tuesday, 06/08/04 21:48:48 EDT |
|
ANGITR-- Somewhere in the thriller-dillers that begat the clicks, novelist Ian Fleming explained that the 00 prefix indicated that superspy James Bond was authorized to kill by the fictitious British intelligence agency he worked for. The 7 indicated he was the seventh such agent. Unknow the others. Not sure they were ever mentioned. |
| Sebastian Chippinghammer - Tuesday, 06/08/04 23:15:58 EDT |
|
TYPO-- should be flicks, not clicks, in the preceding. Sorry. |
| Sebastian Chippinghammer - Tuesday, 06/08/04 23:18:37 EDT |
|
Vicopper: I've heard you talk about using 7014 rods quite a bit. How would these compare to a 7024? I've used them quite a few times, and they run a BEAUTIFUL bead, as long as it's flat or horizontal. Not much use otherwise, unless you like eating hot slag. |
| HavokTD - Wednesday, 06/09/04 00:06:08 EDT |
|
Do you know were on web.Or from a company that I can buy or get plans for mining equipment ,Jaw Crusher, Ball mill ,or roller mill maybe even a consentrating tables. Thank you Bill Ellis |
| Bill L ELLis - Wednesday, 06/09/04 00:44:42 EDT |
|
Name 3 forgeing operations and describe how the grain structure is affected in each case. |
| Elia - Wednesday, 06/09/04 06:50:45 EDT |
|
Name 3 forgeing operations and describe how the grain structure is affected in each case. |
| Elia - Wednesday, 06/09/04 07:03:11 EDT |
|
ELIA: If I do, do I get my metallurgy degree? |
| 3dogs - Wednesday, 06/09/04 07:49:29 EDT |
|
|
|
|