Just another question on power hammer/treadle. How would a hydraulic press fit in? I realise it may not be as versatile, but it seems like a quieter option compared to the JYH - especially in the suburbs. Obviously cost of hydraulics would increase costs somewhat.
|
|
andrew
- Thursday, 06/07/07 22:06:26 EDT
|
Have you ever heard a hydraulic power supply running? Kind of like a lower note hi-decibel skill saw running constantly. GNNNNNNNNNNNNNNNNNNNN. . . . Much noisier than the thunk thunk thunk of a small power hammer and carries quite far. Hydraulics necessary to do reasonable work is also quite expensive compared to other machines.
About the only quiet forging machine is a small roller mill like the McDonald Mill (see our reviews page). They make less noise than the roaring of a forge fire and much less than a gas forge.
|
|
- guru
- Friday, 06/08/07 00:48:32 EDT
|
What makes a quiet forging machine is cast iron. While fabricated steel machines are probably the future good solid cast iron machines are much quieter. However, it takes thick solid mass to achieve lower noise. Newer machines that have been lightened considerably have hollow spaces that resonate.
The ultimate in quiet is a new Ingersol Rand electric rotary compressor. You can stand right next to one and not hear hardly a hum from the compressor. Power an old solid steam hammer with one of these and it is scary quiet. A friend has several large old hammers and the compressor pumps up a huge 1,000 gallon air receiver. When the compressor stops and you run the hammer it is only the hardest blows that are significantly noisy. As long as you keep hot steel between the dies it is a gentle thud thud thud and the deep breathing sounds of the exhaust. The feel of the ground vibrating surprises you when there is so little noise to create it.
Then there is the rotary screw press (a powered fly press). These are also very quiet but they are quite rare. If you want quiet forging power with little or no vibration this is the way to go.
|
|
- guru
- Friday, 06/08/07 01:06:32 EDT
|
Well, I live just near Chapel Hill, NC (mid-state), and as such there seems to be a pretty healthy community of anvil using folks about 3 hours west.
Anyone have anything to say about euroanvils? -Drew
|
|
Drew
- Friday, 06/08/07 06:47:31 EDT
|
Brings up one other question. Starting out, first real nice anvil purchase... I know it's always said to buy the heaviest, nicest anvil you can afford... but which to preference? The same money (about the upper end of my budget) could get a 120 lb Nimba OR a 286 lb euroanvil on my door step. Better to buy a fine tool and bolt it down to something immobile, or to go for sheer mass and sacrifice some finish and quality? Seems like the Nimba would hold its value better if I wanted to sell it, and it would be nice to have a portable anvil even if down the road I have a 500 lb. monster. For now I don't have a permanent shop, so I need to be able to move it with another person.
What would be better? Anvils don't seem like a good place to scrimp, but money is always an issue and I wonder where it's best to put it if you can't just buy a Gladiator right to start with. -Drew
|
|
drew
- Friday, 06/08/07 09:55:27 EDT
|
So no on the slate, and maybe on the sandstone (I guess this is the same as what happens to concrete). Would building a wood fire with and letting it burn down to mostly coals be hot enough to test the rock? Speaking of which, how hot would you say you could get a wood fire to be? I think I have heard the number of about 1600 degrees F, but I dont recall the source. It also seems like I remember reading in Bealer's book that some smiths in North Carolina(?) used chunks of green chestnut in their forge rather than using charcoal or coal.
|
|
- Hollon
- Friday, 06/08/07 10:13:01 EDT
|
Drew, You are surrounded by smiths of various sorts. The Power Hammer School is in Mooresville and the Foothill smiths meet there once a month. The BigBLU is manufactured at Oakhill Ironworks up in Morganton, I am up in Boonville near Mt.Airy, Dave-B is over in N.Wilksboro, ptpiddler is near Charlotte. . . . Those are just the ones I can remember where they live.
Euroanvils is a good inexpensive anvil. Per pound it is the best you can get for the money. Folks often pay as much or more for cast iron junkers in ebay. They are a little soft but some of this is due to their size (large anvils do not harden as well NOR should be as hard a small anvils). Sometimes their castings are rougher than they should be. But you get what you pay for. If you want better there are some very nice anvils for considerably more money.
|
|
- guru
- Friday, 06/08/07 10:19:46 EDT
|
Wood Fire Temperatures: As wood burns it converts from wood to charcoal. A charcoal fire can run 3,000°F (1648°C). The story IS, that the fellow that invented the Fisher-Norris anvil welding process found a piece of cast iron melted and welded to a piece of steel after a building fire.
The problem with burning wood is that much of the non-carbon material gases off and does not burn 100%. Where it DOES burn is high above the fuel bed. So you have an overall cooling effect that requires heat to produces gases and water vapor that together largely make up smoke. The wetter the wood the cooler the fire. Then certain woods have more products that gas off than others. The gassing off process makes charcoal.
So, theoretically you can burn wood and get a very high temperature fire. The problem is that the fire is cooling itself AND producing copious smoke. Where very high temperatures occur in building fires and bonfires is when about 1/3 to 1/2 the fuel has been burnt converting the rest to charcoal. THEN things get very hot and there is much less smoke. However, anyone that has been at bonfires or campfires can tell you that there is almost always smoke until very near the end. If there is smoke then the fire is not at 100% efficiency.
Making charcoal (as a separate process) throughly cooks all the volatiles and things that contribute to making smoke and lowering the fire temperature. Doing it as a controlled process retains most of the high energy carbon. SO when you burn good charcoal you get a clean high temperature heat.
|
|
- guru
- Friday, 06/08/07 10:37:06 EDT
|
Man, you must have all had fantastic scrap yards back in the day. I'll be paying 25 cents per pound after adding in cutting costs and I think i'm getting a hell of a deal, but I still expect to spend around 600$ in parts for each a treadle hammer and a power hammer (most likely building a helve / rusty style hammer, as it's a simpler design , though since i'm just buying anvil posts right now, i could change my mind later)
All this talk of 50 and 100$ junk yard power hammers has me sighing to myself >_<
|
|
jmercier
- Friday, 06/08/07 11:04:16 EDT
|
Hello,
I'm a francophone from Montr�al, Canada, so excuse me for my english. I am also an occupationnal therapist. One of my client is a blacksmith, independant worker in a small shop. He is doing manufacture custom made iron work. He's having a tendinitis at his right elbow. I'm triyng to find equipment for him to reduce risk factor for injuries. So, I'm looking to find a power hammer and a ram scroll bender hydraulic, pneumatic or electric. I have difficulties to find a good model and also a distributor. Can you help me? Do you know model of power hammer and bender that you would recommand and where to find them?
Thank you very much for your time.
V�ronique Landry
|
|
V�ronique Landry
- Friday, 06/08/07 11:31:51 EDT
|
Scrap WAS much cheaper 20 years ago. In fact you couldn't hardly sell it. So what happened is a LOT got given away.
The huge 2" thick base under the EC-JYH was a screwed up part from our shop. Someone had flame cut heavy chamfers on the wrong side of the plate. I got it for free. The two 4" thick 12" diameter rounds that made up the anvil were also freeby drops. You GOTTA be in the right place at the right time. But now I don't get these deals any longer so the steel is more dear.
It is not all that easy. I have several 10' lengths of over 6 and 7 inchs diameter steel shafting waiting to be converted to hammer anvils. I paid a dealer about $800 for it and HE bought it from another dealer. However, the guy *I* bought if from (Chuck King of Petersburg, VA) did all the leg work AND delivered the steel to me.
I have a piece of 140# RR-rail about 10 feet long as well. I bought it OR traded it from a friend. I also have a number of short lengths of lighter rail that I bought from a scrap outfit that grinds up RR-rail to make Wheelabrator abrasive from. The price was pretty cheap but I had to drive 50 miles and the stuff was covered with black greasy dirt. Probably came out of a coal mine or yard.
My best hit was back in the 70's. A bunch of buildings had been torn down and the lots cleaned up with the exception of the pile of steel scrap. This consisted of everything from some 24"x75# I beam down to 2" angle. The stuff sat there a LONG time. When I asked about it I was told it had been given away TWICE. I told the man if you want it gone, it will be gone by Monday, DON'T give it away again! Three of us with two pickup trucks hauled the entire 5 to 8 tons away in a weekend. We had to torch up a lot of it into pieces we could handle and fit in our trucks. Beams that took 3 of us to pick up one end, I had to unload alone by tying to a tree and taking off FAST. . . The key was I ASKED. But I also had a full size torch outfit AND a HD pickup truck. I am STILL making things with material from that one "hit" and I only got half.
TODAY, Just the gasoline to haul all that steel away would cost $200 for the two trucks for the weekend. Add $65 for the oxy-acetylene and $25 for the lunch I bought. That still only adds up to about 2.5 cents a pound not including labor.
|
|
- guru
- Friday, 06/08/07 11:48:03 EDT
|
Machinery: Veronique Landry, Dealers for this equipment are pretty sparse so you are probably going to need to buy from U.S. dealers.
Our advertisers that sell Power Hammers are:
Anyang (see our power hammer page for distributors).
Big BLU Hammers
Centaur Forge
Striker Tool Company
Phoenix Hammers
Centaur Forge sells Hossfeld benders. These are a manual bender but that make an add-on hydraulic system. For more sophisticated (and more expensive) benders you will need to check with NOMMA.org and Fabricator Magazine. Among the machines sold by their advertisers is a number of universal high production machines such as the German made Hebo.
|
|
- guru
- Friday, 06/08/07 11:57:00 EDT
|
What scrap yard?----Lets see I was able to buy the anvil stock at scrap rate the yard buys at through a friend who's job would let him buy at the same rate as the scrapyard. I bought 4 pieces and sold two of them for twice as much as I had paid and so had "free" metal. I gave away one of them to a friend. Never can remember if they were 4140 or 4349 though...
The base plate was a piece of 1" thick steel about 30x48" that was thrown on top of a bunch of welding class scrap at the tech auction. I bought it off the fellow who won the bid for $40 as he didn't want to mess with lifting it into his truck.
The heavy I beam pieces for the back upright were free, had been used as weights for farm implements and when a friend cleaned up an old farmyard he dumped them over at my place.
A lot of steel is around as little bits may cost more in labour to take to recycling than you get for it for a business. It's 100 miles to a scrapyard from where I live so we tend to recycle everything ourselves...
*ALWAYS* *ASK* and be ready to jump on a find. Be safe, having a hard hat, steel toed boots and leather gloves, can go a lot towards making someone think that they are not risking much letting you help clean a site.
If someone else is cleaning a site a friendly word and a cold sixpack may get you the piece you want/need!
And finally *CONSTANT VIGILANCE* it's out there; you just need to keep your eyes and ears open for it---and not be in a hurry...
Thomas
|
|
Thomas P
- Friday, 06/08/07 13:35:15 EDT
|
Power scroll benders-
The most basic, and cheapest ones available are the RAM, sold thru www.classicirononline.com
Then, you step up to the german and other european models.
These would include the hybrid 3 roll models from www.eaglebendingmachines.com
and the dedicated scroll benders from the germans
www.usahebo.com
www.glaser.de
There is now a chinese company that is copying the germans, and they are starting to get some limited US distribution.
I believe that a miami company, www.yacmachinery.com will be importing the chinese machines, although they are not shown on the website yet.
They did take a big ad out in this months Nomma magazine, showing a full range of chinese machines.
|
|
- Ries
- Friday, 06/08/07 13:41:30 EDT
|
*CONSTANT VIGILANCE* and Carry-Iron Thomas says, Constant Vigilance . . But also follow up on leads and take advantage of the moment.
I am not a follower of the following but HAVE done it with Paw-Paw when he was alive. He had an eagle eye for what he called "carry-iron" (carrion) on the highway. He would stop anywhere, city streets, the Interstate, and pick up stuff that had fallen off vehicles. On a single trip from North Carolina to Georgia (about 700 miles) we picked up TWO, TWO! brand new heavy truck brake drums in different states AND a perfectly good 5 gallon insulated water container WITH lid. He would STOP and backup in the highway, turn around, park in the road. . . All very dangerous things and I am NOT recommending them. But Paw-Paw brought back lots of stuff from the road side.
I read another article from someone that spent a lot of time on the road and literally brought back tons of iron over a period of years. Pieces of chain and rigging were common along the roads he traveled. In my collection I have a hook , swivel and 5 foot length of chain that I found in the road. I opened the door of my low riding sports car and just scooped it up without getting out.
Iron is not the only element on the roads. I picked up two large contractor road signs from the landfill where they apparently had been in the bottom of the truck when the contractor dumped a load of debris. Four foot square 1/8" thick aluminium plate! And last year I ran over a 12 foot section of an extension ladder in the Interstate. It had rotated at an angle as the car in front of me clipped a corner of it and I could do nothing except run over it. The semi behind me also ran over it flipping it into the air about 30 feet. I did not see more. . . But it WOULD have been a good section of aluminum ladder.
I made a U-turn to go back and pick up a very nice pair of commercial wheel chocks on a rope a few years ago. The car behind me got there first. . .
And as Thomas also noted, you want to be the direct buyer, NOT the guy that buys AFTER the scrap yard has it.
|
|
- guru
- Friday, 06/08/07 14:29:43 EDT
|
Drew
I have a Nimba. Finish and quality can't be beat. Worth the money.
|
|
- Burnt Forge
- Friday, 06/08/07 14:37:47 EDT
|
Veronique,
Check out www.soluquip.com they are in P.Q. and would be closer to you. (sorry Jock, I have mentioned advertising on anvilfire to them and got a polite pfo letter in return saying they were busy enough without advertising)
|
|
JimG
- Friday, 06/08/07 14:57:09 EDT
|
Jim, Thanks for the note. On the other hand I have gotten that response for folks that end up advertising in other places. . .
"P.Q." We just changed that to QC on the Kaynes cart. I told them that was the normal abbreviation in French and everyone understood it, especially in Canada! I'm glad I was not too wrong.
|
|
- guru
- Friday, 06/08/07 15:34:48 EDT
|
Went to my steel dealer/scrap yard earlier this week. In one hopper they had four aluminum beer kegs. Three about 30" tall and one about 24" tall. $1.00 pound, but they do make great quench tubs. Passed them by though as I didn't need one myself and I couldn't justify buying a couple for possible resale on eBay.
At scrapyards it is pretty well targets of opportunity as the three in my area I know of ship it out about as fast as it comes in.
On Fisher & Norris, way I heard story is foundries had tried making steel plate topped cast iron anvils prior to F&N; however, the bond was very inconsistent. One time it would bond fine, next plate would pop off. Mark Fisher must have known about this problem and when he saw the molten cast iron bonded to the steel beam he must have figured out the problem was they weren't getting the top plate up to essentially forge welding temperature before they poured the cast iron into the mold.
Way out of my area here so I am speculating what they did was to bring a plate up to forge welding temperature, place it down on something, set a two-part mold over it, throw in a shovel full of flux and then poured in the cast iron. I suspect process might have taken 30-seconds, if that with an experienced crew.
I would be interested in knowing the total number of anvils produced by F&N and Peter Wright. Both may have have sold more anvils in the U.S. then all other competitors combined (besides each other).
|
|
Ken Scharabok (Poor Boy)
- Friday, 06/08/07 16:18:13 EDT
|
Burnt Forge... what size Nimba are you using? I hear that their design gives a better rebound per pound, kinda like a post anvil. I wonder though if the 120 is still gonna be too small for what I do... mostly tool-smithing and pretty light blacksmithing. Also, I have a 6" diameter, 5 foot long mild steel post set into the ground I've been using for heavy stock squashing, so whatever anvil I use will never be seeing a sledge or a hammer bigger than four pounds. If that little titan is gonna be big enough I may do it, but otherwise I'm probably thinking of getting a 175 lb. euro for now... later when it's time to get a permanent shop anvil I'll be thinking hard about nimbas. But then... they last forever... such a hard thing to decide. Maybe the money spent on a euro will be wasted if I decide I HAVE to have a centurion later... I'm prone to silliness like that. If you all had to do it over again, would you buy the last anvil you'd want first?
|
|
drew
- Friday, 06/08/07 16:33:06 EDT
|
New Anvils, Used Anvils. Most are a fair investment and you can get most of your money out of a used new anvil if you try. However, the longer you keep it the greater the likelihood of getting or NOT getting your investment out. Anvil prices like steel have been climbing in recent years so used anvils sell for their original price because new is much higher. . .
It partly depends on if you have improved it or put wear and tear on it. I've had new anvils that we worth more when they left than when they arrived because they had finished horns and edges, hardy holes radiused, burrs removed and a nice repaint after the dressing. A day's labor can add value to the tool. However, one with significant signs of wear and tear is going to sell at used prices.
Either anvil you are discussing will do the job. Anything over 100 pounds is not bad. The difference is how heavy of work you are doing and how much. Those that work at the anvil for long days need every advantage they can get to reduce fatigue and stress.
|
|
- guru
- Friday, 06/08/07 17:16:38 EDT
|
Anvil Life: Actually anvils DO NOT last forever and they CAN BE worn out.
When used in heavy service where several smiths work in the same shop and striking is often done on a regular basis and anvils see a LOT of wear from missed blows. In fact this is the primary way most old anvils with heavily chipped edges got that way. But they also become generally dented all over in some cases.
Heavy blows also causes sagging in old wrought anvils including sagging horns. If you look at good old wrought anvils they started life with the tip of the horn about the same height as the face. This was a feature of English anvils to compensate for future sagging of the horn. After much use the horn would be straight out from the anvil and still look in good condition. After that the horn starts to look droopy. While it has no effect on usability it has the same visual effect of an aging woman's breasts.
Anvils also wear from abrasion. Anvils used for general purpose usually develop a slight depression in the center of the face that is lower than the surrounding edges. This is more from wear due to scale than sag. On anvils used for specialty production work such as shoeing or making hardware it is not unusual to see shallow grooves worn in the face of an anvil. I've seen numerous anvils with grooves worn in the horn, face and heel depending on what the smith did primarily.
It is rare but anvils also break. This was common when wrought anvils had the horn and heel welded to a blocky body. It also occurs when castings have serious flaws or inclusions.
THEN there is outright abuse. Anvils used for a flame cutting table often get notched and anvils used for a welding bench often get arc burned. Anvils also get used for cold chisel cutting chain and bar resulting in hundreds of chisel cuts.
Combine all these together and the results can be a pretty sad worn out anvil, and there are MANY in this condition. They are still usable, but have long passed their prime.
|
|
- guru
- Friday, 06/08/07 17:48:35 EDT
|
I saw a bridge anvil at the last Swaba meeting that had been used as an arc welding table---the *entire* face was built up weld bloblets. It's new owner knocked them down a bit and plans to use it for texturing hot steel.
Thomas
|
|
Thomas P
- Friday, 06/08/07 17:57:08 EDT
|
Vicopper, To quote the smartest man I ever met, " Son, you will make mistakes in life, and in building machines. If you make a mistake, go back and make it as right as you can. And ALWAYS strive to make new and original mistakes"
He told me that when I started building tools, fixtures and machines for the production shops at the valve shop, about 1984. Sadly, he only lived another two years. But I have taken that quote to heart and have tried to remember that every time I start to design. I have never built two machine that were identical. I have had designs that were built, prototyped, modified and then set to be produced for sale. Kinda was hard to not want to improve every one that was shipped. I have only had one machine that was built in large quantity, the ice blocker, and they are still building them after 15+ years. The solid ice beer mug maker may still be in limited production but I am not sure. I almost got a patent on that one, and was really wanting the wall plaque from the patent on the "ultimate frosty mug" :)
|
|
ptree
- Friday, 06/08/07 18:19:41 EDT
|
Scrap yard? Never have bought much from a yard. I have been blessed(cursed?) to have spent my life working in large factories. The stuff that is scrapped is unbelievable. At VOGT, we were scrapping a million# a month when I started. Great selection, and we could buy anything not SS or exotic for $0.06/#. Including machines! I know cause I did. At the axle shop, a more limited selection but plenty of volume.
The anvil for my JYH is an enertia bar from a vibratory feeder. it was 4" x 4" by 8'. cut in half and welded up the seam made a good start. The base plate from the feeder was a 1" x 6"x12'. scabbed to three sides made a nicer anvil. The center column was a drop of 6" x 6" x 1/4" square tube. The base plate some VERY heavy channel, legs up, that was a scrap from a boiler side frame. i filled the column with scrap steel shot. The only noise my hammer makes is the noise as the dies hit the iron. The shot makes the frame a 650# noise deadener. Did I mention that all that scrap was free for the hauling? By the time I needed the stuff, scrap was so slow, that they gave it to me to not have to break it up to put it into the scrap hopper.
As Thomasp and the Guru note scrap is out there, and if you ask nicely, with a small gift to hand, be it a cold one, a small knife(really popular) or something else, be polite. be ready to take it then and do NOT make a mess. That way the next time you come not only will they not chace you off, the may have saved you goodies! I got all the siding and roofing for my shop by that exact method.
|
|
ptree
- Friday, 06/08/07 18:29:48 EDT
|
thanks for the info idont plan on buying an oxen though theres lots of leather shops around as for the brick after 2 days of study i think i should just buy them at first (allready ordered) the diging a whole idea is apealing the loss of limbs and body parts is not the books you talk about are in my folder if i can get them through the BookPlace i will but i never buy anything with a credit card but gas and food its safer that way thank again
|
|
- elbert
- Friday, 06/08/07 20:51:03 EDT
|
Doint it from the beginning:
Elbert,
There are quit a few small operations that make brick by hand then fire them with wood. It is an art and the smallest number made is huge because the "furnace" is built from the bricks being fired. The large number also reduces the per-brick fuel cost.
There are back to the landers as well as a few good ol' country folk that raise their own food, slaughter their own cattle, make hams, bacon, sausage, jerky AND tan their own leather. A full size bellows requires one ox hide or two normal cow hides.
In the iron business there is currently a resurgence in making iron and steel in small quantities from the ore using small charcoal furnaces. This too is an art and it helps to have four or five friends that are as crazy as you are to help operate the furnace for the long 12 to 24 hour smelt. Much of this is research finding out about technical methods that have been lost as recently as 150 years ago. But it also requires mining your own ore, crushing it and roasting it before you start. . .
In wood working there are many (including myself) who have cut trees, split out boards with a froe, hand dressed the lumber, let it dry, dressed it again with hand tools and made things of it. There is also a school of working green wood which I have also practiced many years ago.
There are folks that hand make paper, print with old fashioned manual letter presses and do book binding starting with raw materials. Most of these folks DO have enough sense to buy leather from professionals. It is an art form and there is a market for such labor intensive books. I do book binding for myself but on a less obsessive level.
Quite a few folks in blacksmithing and on this forum are these kind of "renaissance" people that are multi-talented, well educated and obsessive about doing many things the hard way from scratch, just for the satisfaction of doing so. So when YOU say YOU want do it all from the beginning without modern technology WE take your question seriously.
Many of these crafts that SEEM very simple and were done by primitive peoples require a surprising amount of knowledge. Primitive peoples MAY have had a low level of technology but they were NOT dumb. They were just as intelligent as humans have ever been. TRY knapping flint using bone tools, OR even finding and identifying GOOD flint. Even stone age man had technology that required education and practice.
The EASIEST cheapest way of gaining much of this knowledge is to read a book. Today you are lucky, there are good detail books on almost ALL the crafts mentioned above and more. This was not always so. See our book review page for many of the ones on blacksmithing.
Your most important tool is the one between your ears.
|
|
- guru
- Friday, 06/08/07 23:43:30 EDT
|
Wasn't there a situation a while back where a woman wrote in saying she'd bought a slew of I hesitate to name the brand anvils because am unsure I recall correctly for her school and they ALL arrived badly flawed. Did she ever get that worked out? Anybody recall the brand? Also, a friend got a medium sized NIMBA several years ago, uses it hard daily, and loves it. Just loves it.
|
|
Miles Undercut
- Friday, 06/08/07 23:15:59 EDT
|
Miles, Those were Euroanvils purchased in Europe from the agent in Europe that handles the manufacturing of the anvils in the Czech Republic. He sold bad anvils (one literally fell in two) and then would not stand behind them. I do not know the outcome.
John Elliot (the current owner of Euroanvil in the U.S.) and the previous owner (Steve Finestien) both had numerous problems with their manufacture and the Czech agent. However, when they recieved bad product they either returned to the factory in the Czech Republic (at their cost) OR sold the rejects AS rejects at considerably reduced prices. Both Steve and John have stood behind the anvils they sell. If there are problems they have taken care of it. However, neither has had any control of their Czech agent.
SO, like many products it makes a huge difference who you buy from. If you buy a "Rolex" watch from a street corner vender for $25 do you expect a REAL Rolex (which start at about $10,000) AND a guarantee?
There are hundreds of Euroanvils in use in commercial shops in the US where they see as hard a use as any. They are not the best. But they are very good for the money.
|
|
- guru
- Saturday, 06/09/07 00:05:46 EDT
|
I have a Nimba Gladiator that I absolutely love. It is a near-perfect Italian-inifluenced design by the late Russell Jacqua and the quality and finish is magnificent. The 450# mass, most of which is centered under the face, is tremendously effective as a forging tool, far more so than any other anvil I've used.
I've also used Josh Smith's 500# Euroanvil, and it is a very decent forging tool, though not the quality of the Nimba. In fact, it was using Josh's big euroanvil that conovinced me of the value of a really heavy anvil. The price difference between the Euroanvil and the Nimba would have led me to get the Euroanvil, had I not lucked into a deal on my Gladiator that allowed me to get it for about the cost of a Euroanvil. I couldn't pass that up, and I love the Nimba.
|
|
vicopper
- Saturday, 06/09/07 07:41:56 EDT
|
Well, I hope it was apparent that when I say they last forever I mean only comparatively. I'm trying to figure what the appropriate way to think of their purchase is.
Clothes, for example. They wear out quick, don't re-sell for much... so money saved at a thrift store is money earned and smart. On the other hand, anvils seem to be pretty well lifetime investments if you're good to them... even saying that is probably to under-estimate their longevity. So in that context, they're maybe a bit more like a musical instrument or a nice pair of boots... the marginal difference in cost (which is big anyway) isn't worth the difference in getting what you want and making do for YEARS.
Or maybe I'm thinking of this wrong. I don't truly know. It's an interesting test case for a larger understanding of how you think of material, your time, money, and most importantly VALUE. What's worth it?
|
|
drew
- Saturday, 06/09/07 08:33:28 EDT
|
Oh, and I really appreciate everyone's input. Seriously.
|
|
drew
- Saturday, 06/09/07 08:35:21 EDT
|
Anvils: Mass Folks never appreciate the mass of a big anvil until they actually work on one. MY friend Josh Greenwood had a big 350 pound heavy pattern Hay-Budden that he used much of his career and dearly loved. But later he found a beautiful 450 pound German double horn anvil in Germany and brought it home. He says he can feel the difference at the end of the day after working on that anvil. He says that you do not notice blow per blow but that at the end of the day he is not as tired as he normally would be.
Although it is a pain to move I would not give up my 300# Kohlswa. If I ever have a heavier anvil it will be one of my own design.
I made detailed dimensioned CAD drawings of both of Josh's anvils. The anvilfire logo is from the drawing of Josh's Hay-Budden. And the Euroanvil was influenced by the drawing of Josh's German anvil that I sent the Steve Finestien and a rasterized version is posted with our German anvil article. A photo I took of my Kohlswa is on the Kohlswa.com page. The poorly copied Czech made "Austrian" pattern anvil is based on those in book by Otto Schmirler, Werk und Werkzeug des Kunstschmieds.
Thus the world goes round and round. . .
|
|
- guru
- Saturday, 06/09/07 08:46:02 EDT
|
Drew, You are right that you can live with what you purchase in an anvil for a lifetime. Many anvils have outlived their original owners by a half dozen generations or more.
Fine quality tools have intrinsic value that many do not appreciate. The best often do not work that much better but they LOOK much better, the quality of workmanship is better and in the end will be worth much more generations from now.
Look at the cheap cast iron anvils folks waste their money on. They wear out quickly and they have almost ZERO value as a used tool. They start ugly and end ugly. Millions have been made but they are VERY VERY rare on the used market. . because they are junk that has been scraped.
Many anvils sold in the early 19th through early 20th century are selling for more today adjusted for inflation than they sold for new. Some of this is due to collectors in the marketplace, but it is also due to the appreciation of fine made tools that will never be made this well again.
On the other hand you do not have to live with your first anvil forever. It is not like buying a house and much less expensive than a car. You can always trade up at a later date.
|
|
- guru
- Saturday, 06/09/07 08:57:29 EDT
|
Thinking re: purchases-- if you want it and can afford it, grab it on the spot, because when you go back for it, it may well not be there any more. Companies do not stay in business forever,especially in some line of trade as nutty as making anvils and swage blocks, and even if they do, they may discontinue the product you want. Buy the absolute best tools you can afford. Do not lend them. To anybody. Not even blood kin. Do not let your brother-in-law do concrete work for you. Keep a positive mental attitude. Etc., etc., zzzzzzz.....
|
|
Miles Undercut
- Saturday, 06/09/07 09:42:38 EDT
|
Actually, I paid more for the Nimba than I did for my wife's car. And the NImba has only MADE me money, while that car has COST me lots more than I paid for it. There is value and there is real value. A first-class anvil is real value, and doesn't have a 30% depreciation the minute you buy it, like a car does. Nor will it be obsolete before you buy it, the way a new computer would. Hard to find a better value in a tool than a good anvil. Just keep the welding and gas-cutting operations out of reach of the anvil, and it will stay in fine shape.
The number of smiths who "trade up" on anvils is pretty low, I'd imagine. Most of the smiths I know who started with a small (but decent) anvil, still keep it when they get the bigger one. The excuses for doing so are legion; I need a travel anvil, demo anvil, detail anvil, taller anvil, shorter anvil, thinner horn, smaller hardy hole, etc. The reality is probably more on the order of, "I can't bear to part with an anvil, even if it sits under the bench and collects dust." (GRIN)
|
|
vicopper
- Saturday, 06/09/07 09:42:50 EDT
|
Hello! I like it resurce! Welcome to my portal about russian kovka - http://yugsp.ru
|
|
- User
- Saturday, 06/09/07 10:04:02 EDT
|
On anvils, my philosophy is one size (or whatever) doesn't fit all. It really depends on what the intended use will be.
For someone just starting out, and blacksmithing will never be more than a part-time hobby, the Russian imports aren't that bad. They are cheap and readily available. However, I certainly agree with Jock with some mold redesign they would be much better.
If you intend to make money from forging then certainly a large and high quality anvil is justified.
Most will fall somewhere in between those.
For what do I am extremely happy with my 160-lb Fisher.
|
|
Ken Scharabok (Poor Boy)
- Saturday, 06/09/07 10:14:15 EDT
|
Guru (and company),
I am interested in the heat treatment process, and specifically, in methods for the prevention of decarburization, especially during the annealing process. Everyone talks about it, and evidently understands it, but many aspects of it seem to be taken for granted. For example: does carbon steel LOOK different (to the naked eye) before and after it has been decarbed? What is the temperature threshold for decarb? Is it constant with all steels? How quickly (and voluminously) does carbon migrate out of steel at a given temperature? (Some seem to think it a matter of little consequence, while others believe a careless match will strip all carbon out of your steel, plus all metal objects in the surrounding area) By what means can carbon be cajoled into remaining friends with steel despite increasing temperatures? Does carbon prefer to be friends with some steels more than others? (I'm working with 5160) Can recommended annealing temperatures be fudged towards the low side and still effect the same result? Can they in fact be ignored, and the steel softened sufficiently to be workable using temperatures below the decarb threshold? (I'm clearly not forging here, so I need the steel soft enough to work cold before the final heat-treatment) In short, how can this metallurgical hobgoblin be kept to a minimum?
I have access to a good kiln with temp controls, but (alas) it has no magically inert atmosphere to go with it. I have heard of wrapping with SS foil, and the use of isolating paints. But the SS stuff is difficult to find, and expensive besides, and I don't even know what an isolating paint is. I've heard of ceramic-based paints that are used in very high temperature environments like ovens and exhaust manifolds. Would something like this work?
I know this is rather removed from forging questions, but reckoned you would either know, or be able to point me in the right direction. This all started as a simple cold-working project but has unfortunately mutated into a full-blown research topic.
Thank much.
|
|
Prof Newbie
- Saturday, 06/09/07 10:59:56 EDT
|
I'm a smith, not a metallurgist. I don't think you have a hobgoblin problem. In normal practice, decarburization is a thin surface phenomenon measured in the thousanths of an inch.
You cannot fudge on the annealing temperature. You must reach the transformation (critical) range. For annealing, 5160 takes 1450 - 1500ºF, a good, cherry red incandescent color and very slow cooling. It can also be normalized by air cooling from 1600 -1700ºF.
|
|
Frank Turley
- Saturday, 06/09/07 11:34:36 EDT
|
I have actually met a fellow who traded *down* on an anvil. He had a 407# Trenton that had a beautiful face---except where the air arc crew had done the nasty on it at a copper mine in AZ
Anyway he was tired of moving it and not having an anvil he could take to demo's so I traded him a 125# PW, a screw and screwbox from a postvise and US$100 for it---my cost slightly over 50 cents a pound. What is nice is that it has the same hardy size as my main anvil and so I can share tooling and have something in it while doing other work on the main anvil.
Course I wouldn't be amiss at trading up...
Thomas
|
|
Thomas P
- Saturday, 06/09/07 11:37:11 EDT
|
Lord... thanks ya'll.
One other reality I've spent the day thinking about is that... really... It would be hard for me to buy my lifetime anvil now, never you mind the money, because I'm still too new to this to know WHAT IT IS! Might be a post anvil, might be that gladiator. For right now, honestly, anything is going to be better than the mild steel post anvil I've been using exclusively. So here's a vote... narrowing myself to what I can both afford (Comfortably) and also go and pick up, it's down to a TFS delta 100 lb. double horn or a 175 euroanvil. They're about the same price and face size. So, back to the beginning, quick vote! Put the money into top quality or sheer mass?
|
|
drew
- Saturday, 06/09/07 12:38:42 EDT
|
User, Um.....your site is all in Russian. I am betting very few of us speak or read Russian. Could be a great site but who the heck knows? Spasiba and dos vidania!
|
|
quenchcrack
- Saturday, 06/09/07 12:50:14 EDT
|
Prof. Newbie, carbon diffuses in carbon steel at about .007" per hour at about 1750F. It moves faster at higher temperatures, slower at lower temperatures. Unless you are making knife blades forged to finished size, I would not worry about it. On the other hand, the more times you heat, the more you will decarb and if you take a yellow heat every time, you can decarb the surface considerably. If you work hot, work fast. Working in a neutral atmosphere would be a blessing but it makes the smith rather short of breath. I have tried putting a black iron pipe in the forge with charcoal granules filling part of the pipe. I put the iron on the charcoal inside the pipe. The pipe radiates heat to the workpiece and the charcoal keeps the atmosphere around it charged with CO and CO2. This tends to minimize the loss of carbon at the surface. Also, you do not really need a fully inert atmosphere, you can use nitrogen but this presents other safety problems (it displaces air) and can form nitrides on the surface that are very hard and may crack. Finally remember that in heat treating, time and temperature are inversely proportional: Long time at low heat = short time at high heat.
|
|
quenchcrack
- Saturday, 06/09/07 13:02:41 EDT
|
Need Help with Fly Press
Hey, today I picked up an old fly press. It was made by J.D. Randall Co. Besides some minor honest rust, it's essentially new. The threads are pristine. The only thing about it is, it doesn't have a fly wheel on it. I'm going to make a fly wheel for it and need some input on how big and heavy the wheel should be.
Here a few specs:
Dia of screw 1-1/2"
Stroke 10"
Any other specs you need to determine what size wheel it needs?
Here are some pictures.
http://i83.photobucket.com/albums/j291/T-Murch/tt021-13.jpg
http://i83.photobucket.com/albums/j291/T-Murch/tt022-8.jpg
Thanks in advance.
|
|
Tyler Murch
- Saturday, 06/09/07 13:04:10 EDT
|
Tyler, Sorry to disappoint you but this is NOT a flypress. It is some kind of vertical machine vise. How do I know?
1) The screw threads are single lead (too slow even for coining)
2) The frame is much too light
3) There is no heavy thrust bearing.
4) The bar guides are for loose motion only, not heavy pressure.
5) It never had a flywheel as it was turned by a box wrench.
It is a beautiful tool, but it is not a flypress.
|
|
- guru
- Saturday, 06/09/07 13:57:57 EDT
|
Oh heck, anybody want to buy it? Seriously. email me.
|
|
Tyler Murch
- Saturday, 06/09/07 14:00:31 EDT
|
Tyler how much? Looks like it would be a great vise to modify for handwork on swords...
(I don't have my browser hooked up to my e-mail at work)
Thomas
|
|
Thomas P
- Saturday, 06/09/07 14:07:45 EDT
|
Thomas, how about $500. ? We can negotiate too.
Here is another picture that shows the frame better. It's solid.
http://i83.photobucket.com/albums/j291/T-Murch/tt021-14.jpg
|
|
Tyler Murch
- Saturday, 06/09/07 14:11:44 EDT
|
Decarburization: Prof. Newbie, Listen to QC, he is metallurgist. Where decarburization really becomes a problem is in repeated forge welding. You are working at maximum temperatures with fluxes (that also absorb carbon). Where in heat treating the problem is only a thin surface problem in repeated forge welding it can be fractions of an inch (1/16).
Smiths use this to advantage in some cases. In cable Damascus the difference creates the patterns when etched. In Japanese style direct process steel making it reduces steel that is too high of carbon OR includes some in the cast iron range. Repeated forging and welding makes the steel more homogeneous as well as reducing the carbon to reasonable levels.
In working wrought iron this is not a problem. The repeated heats act to refine the metal further than originally manufactured and helps make carbon free iron form iron that may have SOME trace of carbon.
You can purchase stainless foil from McMaster-Carr. A ten foot by foot wide roll cost $22 plus shipping. You can also get bags specifically for heat treating.
We sell ITC-213 which is used to protect metals from oxidation at elevated temperatures. It is about $53 a pint. It will last longer than the equivalent cost in stainless foil. However, the use is slightly different. In industry it is often used to protect exotic alloys like titanium from oxidation for forging.
|
|
- guru
- Saturday, 06/09/07 14:22:09 EDT
|
Tyler, While the frame is heavier than it looks from the front the platen is still too light and its still a vise. Beautiful tool if you need it.
|
|
- guru
- Saturday, 06/09/07 14:24:21 EDT
|
Drew,
Like when it comes to engines, you can't beat cubic inches when it comes to anvils you can't beat mass (ok actually you do beat mass...) (well you know what I mean even if I don't!)
|
|
JimG
- Saturday, 06/09/07 14:32:26 EDT
|
Guru, regarding the vertical vise platen. The platen and frame are cast as one. From the frame out it tapers out thinner. There is more meat behind it that you can't see.
Thanks for the info. I am still pleased with it.
|
|
Tyler Murch
- Saturday, 06/09/07 14:36:11 EDT
|
This picture shows what I'm talking about with the platen.
http://i83.photobucket.com/albums/j291/T-Murch/tt021-15.jpg
Here's a picture of the name
http://i83.photobucket.com/albums/j291/T-Murch/tt022-9.jpg
Threads
http://i83.photobucket.com/albums/j291/T-Murch/tt023-2.jpg
Thanks again for the info. At least now I don't have to get out in this heat and make a wheel : )
|
|
Tyler Murch
- Saturday, 06/09/07 14:51:54 EDT
|
After the initial review I was going to buy and dress a HF Central Forge made in Russia anvil, until I noticed that they have the diagnal Hardy hole. They wear the Central forge sticker and it even states that it is cast steel made in Runssia, but has the diagnal hole. Now, since I would be making many of my own tools, couldn't I just make the stakes offset so the tools would be in traditional manner? I am a wannabe, but plan on attending a blacksmithing class in Omaha Nebraska when money allows, and my 55# cast iron anvil that was made in england ain't so hot.
|
|
HF anvils again!
- Saturday, 06/09/07 16:16:16 EDT
|
After the initial review I was going to buy and dress a HF Central Forge made in Russia anvil, until I noticed that they have the diagnal Hardy hole. They wear the Central forge sticker and it even states that it is cast steel made in Russia, but has the diagnal hole. Now, since I would be making many of my own tools, couldn't I just make the stakes offset so the tools would be in traditional manner? I am a wannabe, but plan on attending a blacksmithing class in Omaha Nebraska when money allows, and my 55# cast iron anvil that was made in england ain't so hot.
|
|
Bob
- Saturday, 06/09/07 16:28:19 EDT
|
Again, thanks to everyone for answering my questions. I've got one more and then I'll try to be content. None of the anvils I'm considering for now are, in their own right, massive enough to just sit on something and be immobile. I've never quite understood how this works.
If a 100 lb. anvil was forge welded to the top of of a mass of steel of INFINITE mass (just heavy), would it behave like a heavier anvil or will it always rebound like a 100 pounder? How about if it's only electrically welded around the edge. How about bolted to a log set far into the ground so tight that the anvil winces?
If the anvil is made absolutely immobile, how much does that help a given anvils rebound? How much of the necessity for mass is simply that a heavy anvil will move less with the same fastening method to the same stand?
|
|
drew
- Saturday, 06/09/07 17:55:51 EDT
|
HF anvils again!
For many hardy tools it simply won't make a difference, such as on hot cut chisels. It will on hardys which traditionally run the length of the anvil face, such as spring fullers.
Yes, if you make your own you can simply put on the hardy diagonally.
|
|
Ken Scharabok (Poor Boy)
- Saturday, 06/09/07 18:24:31 EDT
|
Drew
I have a Titan. Sorry I am now just reviewing your response on anvilfire. Like vicopper said the mass is under the hammering surface. I think you would be well pleased with one. I have owned every shape and weight (600 lb) anvil. I am happy with my nimba.
|
|
- Burnt Forge
- Saturday, 06/09/07 18:46:47 EDT
|
HF anvils:
1) NEVER buy them off ebay, you can get them cheaper directly from HF. I have NEVER seen a description from HF stating the material or a warantee. The many ebay dealers selling them make up the entire line of BS used to sell them.
2) IF you buy from ebay those selling them are generally not good on handling returns and ALL the shipping (both ways) is on you.
3) They absolute worst condition OLD ANTIQUE broken down sad looking beater of a REAL ANVIL is still a much better tool. You can pick these up for $50 or less. Decent (having all their parts) but sad looking anvils sell for $100 to $150.
|
|
- guru
- Saturday, 06/09/07 19:29:48 EDT
|
Bob,
If I woke up tomorrow morning and found my anvil missing, I'd probably get in the car and drive to Harbor Freight. I'd plunk down the $90 to keep me forging until I found a true replacement anvil.
The problem with the diagonal hardy hole is that it's a bad design that concentrates stress at the corners. In theory, this could cause the heel to break off. I'd bet, though, that the chances of this actually happening in normal use aren't that great.
On the other hand, the anvil has a odd-size hardy hole (IIRC). Aside from maybe being at 45 degrees, tools you make for it quite likely won't fit your next anvil. But then, by the time you're ready for a real anvil, you may be ready and able to make some better hardy tools anyway. You could always pass the anvil with the tools on to another beginner.
If you have the money and a little time, you can't go wrong buying a decent anvil. A nice chunk of scrap steel is an option too, if you can find one. But, especially if you live near a HF, their anvil is a quick and cheap way to get started. My only caveat is that I'm assuming their "cast steel" anvils still are. I'm not sure that's been confirmed.
|
|
Mike BR
- Saturday, 06/09/07 19:36:52 EDT
|
Burnt forge... what type work are you doing with the thing?
|
|
drew
- Saturday, 06/09/07 20:27:49 EDT
|
The sticker on the side does say made in Russia and that it is steel. I appreciate your replies, I did research before posting here, but the talk stopped at the 45* hardy hole.
|
|
Bob
- Saturday, 06/09/07 21:11:56 EDT
|
Steel? What kind? How hard? How good? Steel can be pure iron that has ANY quantity of carbon, even an insignificant trace. This is less than mild steel and cannot for practical purposes be heat treated. It can also have nearly as much carbon as cast iron and be so poorly heat treated that it will crumble or spall under the slightest hammer blow. There are an enormous number of cast iron anvils being sold as "steel" because it is the right buzz word.
So what is the quality of the casting and heat treating? Foundry work can be very sloppy and a huge amount of (cheap) sand end up in the metal. Castings can also be poured from the foamy dregs of the melt that are normally discarded or recycled. Often low quality products that require no specific alloy are made of the dregs. . . In both cases you get trashy metal that breaks easily no matter what kind. So you need to know your foundry's reputation OR have a good warantee. On anvils this should include shipping at the seller's expense.
Heat treating is one of the expensive steps in making an anvil. Many cheap cast anvils are not heat treated in any way. Neither stress relieved, hardened or tempered.
Good steel is difficult and expensive to cast. Good foundries have laboratories and test every melt. They use good clean sand (it gets very dirty AND wears out) and good foundry practice. Sloppy foundries use high quantities of scrap which produces poor quality metal and often do not know WHAT the final alloy is. They use their sand until it will not bond any more even after adding fresh bonding agents or a little fresh sand to the mix. They often do not care anything about quality control and expect the company that orders the casting to be the quality control by sending back the rejects. If all the seller wants is a cheap product they just slap a label on the product and sell it.
THAT is what you get when you buy a bottom of the line anvil. Mystery metal from a source that DOES NOT CARE.
|
|
- guru
- Saturday, 06/09/07 21:52:53 EDT
|
OBTW - "Central Forge" means NOTHING. It is the Harbor Freight "house brand", Like Sears "Kenmore" (used to be Kenwood). Tools with this label are made all over the world and often the source is not identified or misidentified.
|
|
- guru
- Saturday, 06/09/07 21:56:32 EDT
|
Guru,
People keep asking about anvil size vs. worthiness for use. I was wondering if there was a formula to use for mass of anvil necessary for the size of iron to be forged, (like the one for hammer weight appropriate for anvil size). I have a old 160lb A&H, on a wood base and it "seems" to work well for forging on everything up to 3/4 inch stock (with a 3.25lb hammer), but I have no basis for comparison with what the pro's use.
|
|
Thumper
- Saturday, 06/09/07 22:14:56 EDT
|
Drew,
The rebound of an anvil is a function of the hardness of the face more than the mass. If you get even a small anvil face hard enough, it will rebound a hammer very well, assuming that the hammer isn't so heavy it significantly moves the anvil with eery blow. Likewise, even a huge anvil with a soft face will have little rebound.
The issue of rebound is only a reference point for determining the hardness of the face. When forging, you have relatively soft hot steel between the hammer and the anvil, so rebound ain't gonna happen, right?
As for mounting method/materials increasinng the effective mass of an anvil, the answer is yes. If you make a small anvil a contiguous and continuous part of a larger mass, it will have much more effective forging mass. But...the mass you stick it to has to be consistent with the material of the anvil. Wood isn't going to do it, sand won't do it, and a ton of feathers won't do it, either. You need to paste it on a large mass of steel with roughly the same resistance to deformation and resilience as the anvil itself, to get the increase in effective mass. Now, a heavy cast iron base will do the trick, or Fisher anvils would be worthless, which they most assuredly are not; they're wonderful anvils, because that cast iron is resilient, dense and doesn't ring, which I happen to like. Next to my Nimba Gladiator, my 250# Fisher is my favorite anvil.
|
|
vicopper
- Saturday, 06/09/07 23:02:39 EDT
|
Guru,
I found a 100lb Fisher&Norris Eagle anvil hidden in my garage. It was the last model made as it has most of the paper label still on it. (Date of the newspaper it was sittin on was 1968). I saw on one of the pages an old anvil cleaned up. The one I have is in excellent condition, hardly used. How would I clean/restore the exterior of the anvil.
Thanks,
Rich.
|
|
Rich
- Sunday, 06/10/07 02:18:29 EDT
|
Frank, QC, and Guru, I thank you all.
It sounds as though I've been a little too cautious/paranoid. Perhaps. I'm a woodworker and am trying my hand at making some tools. So almost certainly the same criteria for a good knife would be of concern here. And I like to do the best job that I can. I know a guy who makes knives and will do final heat treatment for me, and who is also willing to anneal so that I can do my own shaping, but he uses an oven with neither atmosphere nor foils/paints or anything else to protect the metal. He uses a triple heat/quench method and, based on what I've read, this could potentially draw out even more carbon.
Now admittedly, he stays in the annealing ranges you've mentioned, Frank (1450-1500~), so likely the 1750F diffusion rate described by QC is not even a remote issue. That, at least, is comforting. I just want to be sure.
My smith understands curiosity, and won't be offended if I anneal it myself (though I'll have to use another friend's kiln).
So in short, I want to be in on as much of the process as I can, I want to turn out a good piece, which means I'm concerned about even the slightest loss of carbon, and now I'm just plain interested in the problem itself.
My thanks again, gentlemen, for your time and help. If I'm being silly, please just let me know, so that I can send the thing off to my betters and save sweat for matters of real importance. Otherwise, well, what was the name of that paint again? :)
Regards,
Prof Newbie
|
|
Prof Newbie
- Sunday, 06/10/07 03:57:53 EDT
|
To append to the last message: In case it wasn't made more clear amidst all that rambling, the only heat this piece of steel would ever see is at annealing and final heat treatment. No forging.
Thanks again,
Prof Newbie
|
|
Prof Newbie
- Sunday, 06/10/07 04:03:29 EDT
|
Rich: I'll have to ask Richard Postman next time we speak but I believe your anvil was not made by Fisher & Norris, but by Crossley, even though the decal may say Eagle Anvil Works.
About 1960 the City of Trenton wanted to put a new highway through the property where the F&N foundry was located, forcing Mrs. Andrew (then owner) to sell. In 1961 she did so (apparently including all rights and patents) to Crossley Machine Company, also in Trenton. They were mainly in the business of making clay working machinery for the ceramic industry. Crossley continued to make Eagle brand anvils until the 1970s. They went out of business in the 1990s and their plant has also been demolished.
In an 1957 article Mrs. Andrew came off as being very proud of the Eagle logo on their anvils and I doubt they would have dropped it off in favor of a decal. Therefore, must have been Crossley's decision.
Unless your anvil says FISHER on it, removing the decal will make it just another no-name anvil.
On anvil manufacturer's identification I have noticed those who put on their logo/brand name tend to be very good anvils. Those without identification tend to be the junkers - as if they company wasn't willing to have the product associated with them.
Rather like those HF 110-lb ones with the small decal.
However, there is a possibility even Fisher & Norris did the same by producing a low-quality anvil with a six-pointed star, but without putting FISHER on it.
|
|
Ken Scharabok (Poor Boy)
- Sunday, 06/10/07 07:24:21 EDT
|
Thanks again! My plan had been to bust the piece of mild steel I'm using as a post anvil (3" x 12" x 24") out of its concrete base, saw it in half and make it the top of an anvil stand. Basically lay the two 3 x 12" square pieces on their side and glue and weld them together. Now originally I had wanted to weld bolts/threaded rod to the top and bolt the anvil down to it, giving me the option of removing it to take it with me. Glue would work better, eh?
Or better yet... I could trade my mild steel post for your gladiator and call it a day. Come to think of it, I'll bake you a cake to sweeten the deal. -Drew
|
|
drew
- Sunday, 06/10/07 08:00:16 EDT
|
Prof Newbie,
You might mean triple tempering, as ol' Bill Moran, the knifemaker, used to do.
Hang in there.
|
|
Frank Turley
- Sunday, 06/10/07 08:39:17 EDT
|
Later fisher with Label: See our anvil article on Fisher Norris Anvils

If you are cleaning one of these up you DO NOT want to damage the paper label. That adds considerable collector value to this anvil. While many of these were made, they are rarely found with the paper label. In fact you do not want to do anything to this anvil other than wipe off the dust and put a light film of oil on the face beig careful not to get any on the label.
THEN, you may want to test the waters to find out how much it is worth with the label. You can probably get at least as much as a NEW anvil and if not then wait a couple years and you will. Collecting of rare specimens of anvils has become pretty hot at this time. An antique anvil recently sold for $7,500 on ebay. It was quite rare and from a well known collection. However, prices over $1,000 have been quite common for collectible anvils in recent years.
|
|
- guru
- Sunday, 06/10/07 08:42:00 EDT
|
Drew,
Your piece of steel weighs (in this case, masses) about 250#, so it would certainly make a good base. If I were going to put a small (100#) anvil on that sort of base, I'd cut it in three pieces, each 3x8x12. Then I'd weld those three pieces together to make a piece 8"x9"x12", with the weld seams running vertically. Now you have a 8x9 base area to fasten your anvil to. That should be a decently big surface for the foot of a small anvil. If you need it bigger, just add a piece of 1" plate to the top, being sure to plug weld the center of the plate in a few places, as well as welding around the edges.
Mount your anvil to the base using whatever method you like to ensure it makes as complete contact with the base as possible. If it is not necessary for the anvil to be portable, and the anivl is cast steel, I might go ahead and weld the feet to the base. A clamping arrangement with large bolts and holddown plates would work nearly as well, and the anvil could later be removed. Either way, you'll end up with a small anvil that works like a MUCH bigger anvil, at least on the main area of the face. The horn and heel will still be small and not directly over the mass of the base, so you can't expect to work 2" stock on them. They'll darn sure sit still, though, instead of hopping around with every blow, but don't let that lull you into thinking you can use a sledge on them; you don't want to exceed their strength and break them.
Gluing, when I'm talking about steel, refers to welding, really. The only glue I use in setting an anvil is a 100& silicone construction adhesive such as Geocel that I put between a heavy anvil and the stand to keep the anvil from ringing. That glue, however, means the stand adds NO effective mass to the anvil, it just means you have to move both pieces as one. It's worth it to me, even on the Gladiator which is already heavy, because without that silicone, the Gladiator rings so loudly you need hearing protection. With the silicone, the Gladiator is almost as quiet as my Fisher.
To keep your anvil/base combo from ringing too loudly, you can put a strong magnet under the heel and horn. If you use neodymium magnets, this works prertty well. Or you can mount the combo on a wooden base using the silicone, which should work fine. With a 9 or 10 inch tall anvil, plus a 12 tall base, you won't need much of a stand to be at a comfortable height. You will want some sort of outrigger-type feet on the base to stabilize it, though. Or weld it to a piece of 3/4" plate about 24" square and you can stand on it to add resistance to movement.
With all that cutting and welding, you're going to have a significant investment in this project. Personally, I'd spend my money on a bigger anvil like the 175# Euroanvil, or a good used Fisher of around 200#, and start working to make the money to buy a Gladiator down the road. Did I happen to mention that I love my Gladiator? (grin)
|
|
vicopper
- Sunday, 06/10/07 09:29:28 EDT
|
Drew
Tools and decorative iron work. The Titan has enough mass under the working surface to function as a much heavier anvil. Much more than many heavier anvils unless you are talking in the hundreds of pounds. I never bought into having to have a huge anvil theory. Some do and if it pleases them that is great too.
It comes down to will the anvil you buy do what you want it to do. Will you be happy with it. I think any of the anvils you have mentioned would do both. Some good folks have given you good direction too. Sort out all the info and see what you will like. If you buy a Nima tell Willene Brande referred you.
|
|
- Burnt Forge
- Sunday, 06/10/07 10:24:01 EDT
|
Heavy Anvil Bases: While these have come and gone in popularity they just make the anvil more difficult to move (which can be a good thing or a bad thing).
If you forge welded or used a high percentage weld to attach an anvil to a steel base then the base becomes part of the anvil. So yes the effective mass has gone up. However, it depends on the shape of the mass. Mass directly under the anvil body is working mass. Mass spread out in the legs of a stand does very little, even if welded on. It helps make the anvil immovable but does not help in forging effectiveness.
I have been a fan of wooden stands and benches (shop use not welding or blacksmith) but I have been looking at a move out of the country and ANY wood (even in furniture) can lead to problems.
|
|
- guru
- Sunday, 06/10/07 11:55:10 EDT
|
Frank,
You may be right, though I could have sworn he used the term "triple quench." I don't know enough about it (or I wouldn't be asking all these goofy questions), but I'll ask him.
So, is decarb not really a problem in this case?
And come to think of it, should I gather that triple heating in any respect is not really orthodox practice? It made no sense to me when he first mentioned it, but then, what do I know?
Thanks again.
|
|
Prof Newbie
- Sunday, 06/10/07 15:39:07 EDT
|
There actually is triple quenching as well as triple normalizing as well as triple tempering. Evidently multiple quenching puts the grainsize and carbon in a better state for subsequent quenches---FOR SOME ALLOYS---for others it will possibly degrade the steel by more grain growth an decarb.
You may want to visit some of the knife/sword specific forums if you want to get into mind boggling discussions of heat treat voodoo...
Last time I looked at anvils at harbour freight the store personel didn't know the difference between cast iron and cast steel---sort of like a used car dealer not knowing the difference between a Yugo and a Porsche.
I have actually bought a 55# cast iron anvil, we drilled it out and plumbed it for propane to make a camp stove out of it for the MOB at Quad-State. It was *very* soft and graphite rich cast iron---drilled like butter except for 1 hard spot we ran into during several feet of drilling!
Mass and inertia and conservation of momentum/energy are all involved in hammering hot metal on an anvil. You want a large, hard anvil without a lot of mass in projections that tend to "flop" around during impact---of course you need good instrumentation to see them flop but flop they do!
Thomas
|
|
- Thomas Powers
- Sunday, 06/10/07 17:16:28 EDT
|
Sorry Tyler I get US$20 a week to spend on all my hobbies and that's 10 times more than I paid for my large flypress. I'll continue using my flypress for the odd clamping job with a bungy applying pressure to the wheel to keep it tight.
Thomas
|
|
- Thomas Powers
- Sunday, 06/10/07 17:30:50 EDT
|
When I paint exterior steel work I try to avoid using red paint. This is because, in my experience, red paint has a much greater propensity to go dull and degrade than any other colour. What is the reason for this? Is there anything I can do to prevent it?
|
|
philip in china
- Sunday, 06/10/07 22:09:20 EDT
|
Prof Newbie: If You are going to put Your heart & soul not to mention a good bit of time into making some really good tools I suggest You buy some tool steel to make them from, and have them professionally heat treated by a commercial heat treater.The tool steel comes as ground flat stock, it is fully anealed right out of the package, and the commercial heat treater can properly heat treat it to it's full potential. I have read a lot of these knifemakers heat treating methods, and they are pretty far off from what We did in the tool & die industry. We folowed the tool steel manufacturer's methods PERIOD. They hire real metalurgists to figure this stuff out and test it, why go with what some ill equipped amature thinks works best. My feelings on this topic are a lot like what Jock thinks about homebrew finishes V/S paint.
|
|
- Dave Boyer
- Sunday, 06/10/07 22:12:29 EDT
|
Philip,
Red is at the wrong end of he color spectrum, soit absorbs more UV than other colors. UV breaks down the binders in the paint. Also, for years the pigments for red were composedof cadmium salts, which tend to be less stable than the lead salts used for the blues and greens, or the carbon black used for, you guessed it, blacks.
Cadmium in not used in paints much anymore, I don't think, and the more recent automotive reds seem to hold up much better than the old ones. That is, IF they are a single-process paint, rather than a base coat/clear coat system. Clear coats are notoriously susceptible to UV degradation, exposing the underlying substrate to the elements.
|
|
vicopper
- Sunday, 06/10/07 22:51:04 EDT
|
Philip,
Sorry, I forgot to answer the second part of your question in my previous post.
To get a stable red finish, use the very best automotive acrylic enamel you can buy, and use the type that accepts the addition of a urethane hardener additive. My personal preference was Ditzler Delstar with DXR-80 urethane additive, when I was doing a lot of painting for outdoor work. It will hold up for ten years on a car, so it will do it on properly prepared and primed steel. NOTE: Cars get waxed, and good waxes contain UV inhibitors. Wax your painted work, and have your clients keep them waxed periodically. Best if you supply them the wax when you deliver the work, so you know they have the good stuff.
For small work that will be hand painted with a brush, get some One Shot brand lettering enamels from a sign painters' supply. It is somewhat expensive, but it covers well and holds up in the weather, if properly applied, waxed, etc.
|
|
vicopper
- Sunday, 06/10/07 23:00:19 EDT
|
Dave,
Your words are well-taken. You actually have voiced a lot of my own doubts in this. A lot of the problem in all of this is money. Bar stock is not cheap, at least as I've found it. I'm guessing here, but commercial heat treaters usually don't deal with Joe Schmo, and if they do, they probably charge a fortune.
Plus there is something romantic about taking something old and making it into something new, be it craft or materials. This is, of course, in large part the purpose of this website, no? So there has to be someone on planet earth a) who knows their craft, b) who doesn't have their nose in the air, and c) who isn't a highway robber. If you know anyone who fits that bill, by all means, let me know, and I'll be happy to talk with them.
I shall now end my short rant.
But I thank you again for your candid assessment.
Yours,
Prof Newbie
|
|
Prof Newbie
- Sunday, 06/10/07 23:19:36 EDT
|
It's not the size of the stock, but how you use it that counts.
The recommended MINIMUM size of anvil is 10X the weight of hammer used. Thus, a 10-pound sledge would need an anvil of at least 100 pounds.
This may not necessarily be optimum, however. My power hammer has an anvil-to-hammer ratio of about 13:1. You will likely notice greater efficiency, if you had a heavier anvil (face hardnesses being equal). Some folks compensate by wrapping chain around the waist of the anvil. This deadens the noise a little and creates a bit more mass (it is also a handy place to put the chisel / punch you are using).
The Nimba anvils are quite good, by the way.
|
|
Paul
- Sunday, 06/10/07 23:52:04 EDT
|
Is there a movie on this flight? Zzzzzz....
|
|
Miles Undercut
- Monday, 06/11/07 00:09:29 EDT
|
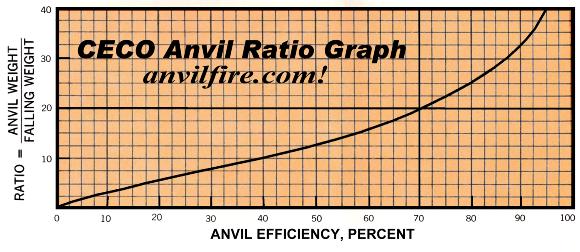
10:1 is for powerhammers, not hand hammers, and 15:1 is preferred.
With a 10# sledge you would very soon destroy a 100# anvil. Try a ratio of more like 50:1 if you want to be realistic. A 100# anvil is aboutright for a 2# hand hammer.
Those big anvils in railroad shops were big for a reason; those guys were striking with 8 to 16 pound sledges and needed the inertia of a big anvil.
|
|
vicopper
- Monday, 06/11/07 00:48:13 EDT
|
i am a french farriers and i forge sometimes !and i want to know if they have opportunity to work in your country? ihave few experiences like a farriers 14years speak english spanish portugues
|
|
- frederic
- Monday, 06/11/07 05:54:43 EDT
|
Frederic: Try contacting Anvil Magazine. It is probably one of the leading farrier publications. (anvil@anvilmag.com)
|
|
Ken Scharabok (Poor Boy)
- Monday, 06/11/07 07:00:14 EDT
|
Could you explain the reason for the 40:1 anvil to hammer mass ratio? Why does it matter if I use a smaller mass hammer? Why is the 40:1 considered ideal? Have just had an email from Vaughans in UK that my 300lb anvil is ready for shipping with my leg vice. Hope I am back from vacation before they arrive.
|
|
philip in china
- Monday, 06/11/07 08:17:59 EDT
|
Philiip,
You can certainly use a smaller mass hammer with a large anvil, but the ratio becomes important when you try to use too big a hammer.
If you drop much below about 50:1 for hand hammering, the anvil simply doesn't have the mass to resist the energy of the hammer and thus the hammer moves the anvil, diminishing the amount of work that is transferred to the work piece.
The energy of the hammer is a function of both its mass and its velocity, so it has more available enrgy than its mass alone might indicate. The anvil just sits there, so you are dependent upon its mass alone to resist the enery of the hammer.
Your 300# Vaughns anvil should allow you to work well with a hammer up to 6#, and you could stretch that a bit if needed. A 3# hand hammer, which is more nearly what you will be using, I suspect, will achieve about optimum efficiency with an anvil that size.
|
|
vicopper
- Monday, 06/11/07 08:37:42 EDT
|
Cost of Bar Stock: Even high priced tools steels are cheaper than labor processing scrap. Mild steel bar stock is FAR cheaper than labor (even in non-commercial hobby applications). AND both are infinitely cheaper than something that you may work days on then quench and have it shatter in a million pieces because you did not knoe what it was.
When you buy NEW tool steel you get the following:
A known alloy. See our Junkyard Steel FAQ if you believe this has no value.
Anealing. This is difficult to do in many tool steels and far beyound the capacity of amateurs. The steel is also in a "ready to go" condition that can be heat treated without further conditioning. Used steel and steel processed in the forge may be FAR FAR from the optimum condition.
Clean straight stock that is unstressed or distorted.
Instructions on correct heat treatment.
W1 tool steel is fairly inexpensive the world over.
|
|
- guru
- Monday, 06/11/07 08:58:29 EDT
|
Anvil Efficiencies:
VIc covered it pretty well but there is more. The ratio has to do with work efficiency. Anvils must be looked at as a mass floating in space. If the anvil has a mass equal to the hammer then the energy transfered to the anvil would send it off into space at the same velocity as the hammer WAS moving and the hammer stops. This is like billiard balls striking each other. One stops and the other flies off at very nearly the exact same speed at the one that struck it.
When a hammer with half the mass of the anvil strikes the anvil then theoretically the anvil would move away at the square root of the velocity of the hammer however, the hammer rebounds some and the movement is less. As the anvil mass increases it moves less and less until the hammer has very little effect on the anvil. Anything placed between this anvil and hammer will see most of the energy of the hammer. However if we go back to that one to one ratio the piece in between sees only a very small amount of energy depending on its hardness.
The chart above was designed to show the anvil efficiency of power hammers.
In this case economics is quite important because of the sizes involved.
Chambersburg engineers decided that 20:1 was the point of diminishing returns for a MACHINE at an efficiency of 70%.
However, machines do not tire and they do not feel the pain of fatigue that a living thing does.
We also assume that the machine's energy is of much less value than the human's. So the organic worker needs a higher level of efficiency. At 50:1 the efficiency is about 96%. But at 100:1 the efficiency may only be 97%. So there is no point to ever increasing the hammer to anvil ratio above 50:1 but very good reasons to have it as high as 50:1.
Now. . . from thousands of years of working at the anvil blacksmiths found that they needed an anvil in the range of 100 pounds to 600 pounds. The 100 pound anvil is VERY efficient for the worker doing light work and the farrier shoeing horses. For portability they use a 125 pound anvil and a 2 to 2.5 pound hammer. A very good match. In the commercial shop where heavy hand forging is done the heaviest practical hand hammer is 4 to 5 pounds. Smiths found from daily use that they needed a 200 to 300 pound anvil for this work. THUS the standard weight for a shop anvil became about 250 pounds. Shops that used strikers could use 8 to 10 pound sledges with a reduced efficiency on occasion and still get the job done. But in shops where machine forging was done and striking was commonly done using sledges over 10 pounds it was found that much heavier anvils were needed. 500 to 600 pounds was the common rail road shop anvil.
The undefined 50:1 ratio was determined from daily hands on use over hundreds of years (after the cost of steel was not a serious concern) and without the mathematics that Chambersburg quantified above (also using a lot of field testing).
In the modern shop where we have small power hammers that do most of the work that would have been done with 4 pound hand hammers and 10 pound sledges we tend to use smaller hammers in the 3 pound range and occasionally an 8 or 10 pound sledge. Thus a 150 to 200 pound anvil is a very nice size. For hobbiests that rarely use a hammer over 3 pounds and commonly use a 2.5 lb (1000 to 1200 grams) a 100 to 150 pound anvil is fine.
A ratio can also be applied to the size of the work being done but this is a bit more complicated. However, you will clearly find that you need a heavy hammer or a sledge and striker to work 1" square. This puts you in the 200-500 pound range again. You can work 1/4" square stock using a 1 pound hammer thus you could work on a 50 pound anvil if you did nothing larger. However, it is much easier to work 1/4" stock using a 3 pound hammer. . .
Note also that a mentioned above (Thomas I think) that the shape of an anvil makes a lot of difference. Long thin farriers anvils are quite springy and flexible. They are designed to provide as much work surface as possible with the least mass for portability. When forging on the center of the anvil the horn and heel actually hold still as the body moves downward from the blow. The more mass that is directly under the hammer or in a cone shaped zone under the hammer the more efficient the anvil.
Anvils must also resist sideways blows out on the horn and heel. These places have the advantage of leverage over the mass in the center. In normal use these blows are nothing like heavy forging blows but they are not infrequent. The anvil mass, base and attachment to the base needs to resist this twisting motion largely by friction.
So there is also more to anvils than just mass and hardness.
|
|
- guru
- Monday, 06/11/07 10:26:00 EDT
|
That one needs to be filed as a FAQ, Jock.
I definitely have noticed a difference in efficiency with my 450# Gladiator, compared to my 250# Fisher when, as you noted, I am working on the side of the anvil or out on the heel or horn. That extra mass and brute force solidity makes a very noticeable difference, even on relatively small stock such as 1/2". As an example, the other night I was forging a handful of hooks for my powerhammer tool rack. I was using 1/4" round, and working very quickly to knock out a dozen hooks before supper. I noticed that, workingon the Nimba, I could start a point taper at a red heat and have it reach yellow from the hammer work. Yes, I was whaling away, but I can't usually impart energy to heat stock like that on a smaller anvil. It made the work kind of fun, trying to see how far I could chase the heat up the stock. I've done that lots on a powerhammer, but never before so consistently with a hand hammer. Have I mentioned that I love my Nimba? (grin)
|
|
vicopper
- Monday, 06/11/07 11:43:19 EDT
|
I just got the notice that my CSI membership had expired a few days ago. I think I was one of the first charter members and gladly renew my membership. Anvilfire provides the most comprehensive forum for learning and exchanging ideas anywhere on the internet. Although I don't post often I have been lurking here in the shodows since around 1993. The membership is well worth the $52. I stand and applaude Guru, the elected CSI board that work to keep things running and The Guru's helpers that answer questions and pass along the knowledge to keep blacksmithing alive and well. Thank you everyone!
|
|
R Guess
- Monday, 06/11/07 12:10:21 EDT
|
Prof. N:
New bar stock really isn't that expensive unless you're buying high alloy steels, which a guy in your position probably isn't equipped to handle anyway. (I'm not.) Twenty feet of 1 1/4"x1/4" 5160 (hot rolled) will cost you $54.12 from Admiral Steel, plus shipping. With a piece of stock that size you could make more chisels (just for example) than you'd likely use in a lifetime of woodworking. Admiral also sells shorter lengths of simpler steels (like 1095) for about the same cost per foot. It really is a small price to pay for certainty, especially when you factor in the labor involved in hunting down junkyard steels, and the time wasted in making tools that fail because they had hidden flaws from years of service as leaf springs (or whatever), or because you were only able to guess at how to heat treat them properly.
|
|
Matt B
- Monday, 06/11/07 12:24:13 EDT
|
RGuess,
On behalf of the CSI Board of Directors, let me thank you for your continued support. It is people like you who help to keep Anvilfire alive and well.
As our first Chairman, Jim "PawPaw" Wilson used to say, where else can you get this kind of information for less than the cost of a cup of coffee a week? There simply is no other resource that does what Anvilfire does, and we all need to work and contribute to keep it going. Thank you for your contribution, Sir!
Rich Waugh,
Chairman, CSI, Inc.
|
|
vicopper
- Monday, 06/11/07 12:34:30 EDT
|
Thanks for all the info on how/why hammer to anvil ratio works. My wife will be happy ot find out that a larger anvil is no longer on my ,must have, tool list since most of my forging stays at 5/8 and below. It would have been hard to sneak it into the shop without her noticing a big hole in the check book anyway.
|
|
Thumper
- Monday, 06/11/07 13:28:43 EDT
|
Rguess, I too would like to personally say "Thank you" for your support. I would also like to encourage all that make use of this wonderful resource to become a member and make sure that we don't become a just another memory.
Thank you
Dave Baker
Treasurer, CSI, Inc.
|
|
daveb
- Monday, 06/11/07 13:59:46 EDT
|
In the early 1970s, I was looking for an anvil, and not finding any right away I found Eagle anvils were still being made by (IIRC) the "Fisher & Norris Division of the Crosley Machine Works." They sent me a brochure and price sheet. The Eagle logo was quite prominent on the flier. While the prices were quite modest by today's standards (@$3/lb. IIRC) they were out of my college student budget. I'll look around and see if I can find the notebook I had that in. I know I threw out the old Milwaukee tool and Centaur forge catalogs that were in there, but I may have kept the anvil flyer.
IIRC Joshua Kravits (SP?), who posts occasionally over on Forgemagic owns most of the surviving papers and many of the patterns from Fisher. He has been working on a museum to celebrate Fisher & Norris.
My surmise on the way they were made was similar to Ken's, but apparently the trick to making the cast iron to steel weld work was in the gating of the mold, making the molten iron flow across the underside of the top plate as the mold was filled. Now, it has been a long while since this was discussed (It was back in the Keenjunk days) and it may have been Joshua K. who explained this. Now, this is all from memory, so a pinch of salt may be in order.
|
|
John Lowther
- Monday, 06/11/07 16:49:14 EDT
|
John, I know their patent made a lot about the gating but I have not read it closely. I suspect you are right that the hot metal was used to heat the plate in the mold.
I just gave Dave-B a little Eagle clone that was quite old. It might have weighed 30 pounds. The steel face was only 3/16 to 1/4" thick and as brittle as the underlying cast iron. So the edges were chipped heavily. The pattern showed a line or slight offset that was supposed to make the plate LOOK 5/8" thick. . .
I had a "Star" brand anvil about the same size that I also gave away. It also had a very thin plate of 3/16 to 1/4". It may have gotten hot enough to weld but it didn't stay welded. This one had pieces of the top plate missing and much of the rest loose.
While Fisher did a good job a lot of others that made anvils using this technique after the patent ran out did not.
|
|
- guru
- Monday, 06/11/07 17:08:05 EDT
|
Re Fisher anvils. As is the case in many special technologies, often the patent does not tell all. The shop practices that are developed after the patent is issued to make the thing consistantly and fora reasonable price were certanly then, and often still developed in the shop, not on the drafting board. In many cases, the tricks that make or break a product are know only to the shop guys, and if they leave and the company did not have others train with the knowledable person the tricks are lost.
It actually is a good bit of defending your product from ionfringement to have tricks that hide in plain site, that prevent those who don't know make your product. This of course has to be balenced against not patenting a crucial bit.
Any patent is only as good as you ability to defend it in court. ($)
My Dad patented a number of items in the 50's, and his small company did not have the resources to defend them. He vowed to never patent again. He simply hide the tricks in plain site, and his last was the "magic corner" on extruded aluminum picture frames. I drafted for him on Christmas break from college, and noticed something on the print. I asked him if that was the magic corner. He replied that indeed it was. He even tried to explain it to his national sales MGR, hwho's head it sailed over. To my knowledge, beside his draftsman, and I that trick went to his grave. They are still cranking those frame extrusions from three factories, and everyone elses frames have bad mitre corners :)
|
|
ptree
- Monday, 06/11/07 18:09:44 EDT
|
Flux somehow had to be part of F&N's 'secret'. This is from a 1957 newspaper article based on an interview with Mrs. Andrew:
"The welding process was a closely guarded secret and no visitors were permitted in the foundry. The big secret lay in the flux used to join the two metals and remained a company secret right down to World War II. Only one man was allowed to mix the flux made with large quantities of borax at high temperatures. It was a dangerous process.
"When the last mixer left suddenly during the war, a commercial flux was substituted and it was found to work just as well."
|
|
Ken Scharabok (Poor Boy)
- Monday, 06/11/07 18:33:32 EDT
|
Well, well, gentlemen,
Your arguments are convincing. I shall, without further ado, look into new bar stock. (And yes, unless I intend to make that nifty new Dragonslayer XP5000 twenty-foot sword, that much stock would last me more than a lifetime).
And now: Where to heat treat?
My thanks,
Prof Newbie
|
|
Prof Newbie
- Monday, 06/11/07 18:51:58 EDT
|
Prof Newbie,
You can find directions to several knowledgeable heat treating facilities on the knife forums, I'm sure. Several knife makers of renown use commercial heat treaters for their knives. Try Don Fogg's forum, or Swordforum for some referrals. Also, I have seen advertisements indicating that at least a few of the knife makers' suppliers are offering heat treating, particularly those who sell steel or blade blanks for stock-removal knife making. A Google search, (always my first resort), should find what you seek.
|
|
vicopper
- Monday, 06/11/07 19:27:52 EDT
|
Prof Newbie: Depending on what You are making, good woodworking tools can be ground from worn out but good quality files. The trick being not to overheat the cutting edges. Most grinding wheels make too much heat, but the resin bonded wheels from Belsaw cut cool. Wet belt grinders are the best, but if You are carefull a dry one will get You there. SAE or tool steel that come in the hot rolled condition need 1/16" removed from all the rolled surfaces to remove the decarburized layer. Tool steels will give more consistant results than the SAE steels due to tighter tolerances in alloying, that is some of what You are paying for. In tool steels W1 & O1 are good general purpose inexpensive tool steels. A2 is a quite a bit more wear resistant and D2 is much more wear resistant HOWEVER wear resistance makes sharpening difficult unless You are using diamond or other superabrasives [Borezon,etc.] In Your earlier posts You were asking about decarborization, As the others pointed out this SHOULD only be a thin layer [asuming You have already removed the "bar bark" from a hot rolled product] and is generally ground off as a finishing operation after heat treating.
|
|
- Dave Boyer
- Monday, 06/11/07 21:53:10 EDT
|
Dave,
Thank you. So much info. One of my earlier questions had to do with being able to visually identify decarbed steel, with my hunch being the spotting of just such a "barky" layer. Would this be correct?
Thanks much,
Prof Newbie
|
|
Prof Newbie
- Monday, 06/11/07 22:45:37 EDT
|
Nope, Scaled steel looks like scaled steel. But descaled it can still be decarburized. As stated earlier, it is time and temperature (as well as atmosphere).
|
|
- guru
- Tuesday, 06/12/07 00:16:55 EDT
|
Prof Newbie: I don't think there is any way of visually detecting the decarbed material, the 1/16" is what the tool steel manufacturers recommended. Most of the tool steel We used was supplied "DCF" or de-carb free, this is premachined and about .030" over nominal size. While this might sound expensive, in a tool and die shop it saves a lot of time and is well worth it. Ground flat stock is a premium price material too, but by being ready to use it generally is worth it. By the way, don't get the wrong impression, I am not saying You should never use junkyard steels and homeshop heat treatment. Just understand that there are a lot of variables, and in as much that You will usually end up with results that are usable, they will seldom be optimum. Tools You will only use once, experimental tools, things You aren't sure if You can even make, etc. may not warrant the expense of good tool steel and professional heat treating. With known alloys You can get pretty good results heat treating Yourself if You follow the specifications. Having worked in 1 shop that did heat treat in house with marginal equiptment, I can say the results were often OK and ocasionally disastrous, but never perfect.
|
|
- Dave Boyer
- Tuesday, 06/12/07 00:17:28 EDT
|
From what you said I am happy with the theory of casting an anvil. Would forging be a great deal more difficult?
|
|
- philip in china
- Tuesday, 06/12/07 02:50:50 EDT
|
Hello, mrKlein here,
I am a late beginner blacksmith who has been requested to make a sword for my sister�s birthday. Before I get the �Oh No! Not another one� response (not that I don�t deserve it); I would like to say I did not become a blacksmith to make swords, knives daggers, and such. But now that I�ve been asked to make a sword, read Generation X Sword Making, and done a bit of bargaining I am making a dagger.
Now for the actual questions: Should the central ridge be forged almost completely straight or may it be made using a grinder or file? And how should I attached it to a display board, permanently would be best.
Thank you for putting up with yet another weapon question.
mrKlein
|
|
mrKlein
- Tuesday, 06/12/07 04:32:13 EDT
|
Hello all, i'm a 3d animator working on a personal piece set in fantasy medieval times.
Now i'm trying to keep costumes/arms as real as possible, and that means creation based on functionality, not just sticking pieces together that are held there by glue. If a piece is bound by thin strips of cloth I put them in, etc etc.
Anyways, i'm working on a two hand maul for my main character's weapon, and after 2 days of sketching and brainstorming I just dont know how I could actually build a functional weapon. My design specs are a large stone headpiece at least a foot long, maybe six or so inches high, and maybe 4-5 inches deep. I want it to fit the handle in the middle, with the handle being roughly 4 - 4 1/2 feet long (total including that which is in the headpiece). The handle is wood, maybe with some leather wrappings for grip, and ending with a small simple jeweled, metal, and/or stone pommel-like thing that is mainly ornamental.
Is something like that even possible to construct (while i'd be doing it digitally, if its not physically possible i dont want to do it)? If so, how?
If not with the stone head, would it be possible using metal instead (would greatly prefer the stone but metal is still acceptable)?
Thanks for your time.
-Alex
|
|
Alex S.
- Tuesday, 06/12/07 04:32:28 EDT
|
Hi guys. I'm trying to forge weld stainless steel. I was advised to use feldspar as a flux but am unable to locate any to purchase. I've googled it, I've been to ceramic supply stores... does anyone know where to get this stuff? Thanks for your time.
Joe.
|
|
Rodriguez
- Tuesday, 06/12/07 07:16:06 EDT
|
Aggressive Flux Rodriquez, You were given bad advice. The correct mineral is Fluorspar or fluorite and it must be about 98% CaF2 to be flux grade.
The Fluorine in calcium fluoride is what makes this a very aggressive flus that will dissolve chrome and nickel oxides. It is commonly used in making and casting steel and is the ingredient that is different in stainless welding rod flux coating. It is also the mineral that is used to fluoridate water to harden teeth.
It is available in powder from ceramic suppliers such as KICKWHEEL POTTERY SUPPLY, INC. (see our links page). You mix only 5 or 10% with your borax flux.
Note that fluorine and many of its compounds are quite toxic and it should be used in a well ventilated area.
|
|
- guru
- Tuesday, 06/12/07 07:30:29 EDT
|
Alex, I do not quite understand what you mean by "in the middle" but here is what I envision without ends.
The wood shank is split and opened, the stone forced in then rawhide wraps used to prevent the split from going farther. More leather wraps are used to firmly afix the stone.
Where I am confused is putting the stone in the middle of handle, are you sure you do not mean centered at the end?
I would think something this primitive would not be jewel encrusted. However a round flat guard would be possible. Many stone net and loom weights were smooth flat round rocks with a hole bored in the. It would be like a stone age tsuba. I this case you would want it to match the stone of the maul which I suggested pink speckled black granite.
Use of metal is your decision as its your fantasy world.
|
|
- guru
- Tuesday, 06/12/07 08:05:59 EDT
|
Ancient Art and Technology: When you think of this type tool or weapon you must put yourself in the technology of the era. Primitive peoples were expert in using natural materials such as animal sinews, bones, hides, internal organs, feathers, green woods, inner barks. They made glues from animal hooves and worked wood green in order to bend and shape it. They knew and used snake skins, aligator hide leather, shark skin and ray skin.
This last is a favorite used by the Japanese for sword hand;le covering and other decorative purposes but exists all over the world in warm waters. Rays have a wonderfully textured skin with little round protrusions that start low and small and built up as much as 1/4". It is a fabulous texture and very durable (the skins are cleaned and treated like rawhide).
Never forget that stone age peoples were just as intelligent as anyone today and just as artistic. They were closer to and knew much more about the natural environment than people today. They were as vain as people today and even fur clothing had style and decoration. They had sewing, weaving, carving and a range of natural pigment paints. Besides knapping stone they also carved stone with stone tools. . .
|
|
- guru
- Tuesday, 06/12/07 08:27:39 EDT
|
Guru, I would like a TIG welder or a plasma cutter for my birthday (6/16). Please make sure the appropriate people get this message.
|
|
- Nippulini
- Tuesday, 06/12/07 08:33:54 EDT
|
Nip,
You can't be that general, old son. You gotta be specific; I want a Miller Synchrowave 250 with a water-cooled torch, foot pedal and a new Jackson NexGen automatic helmet.
Also, I think you have your icons confused. Yes, Jock is of ample stature, with a beard and all that, but he wears Carhartt bibs and drives a minivan, not a red suit and sleigh. Try www.santaclaus.com for a better chance at success. (grin)
Happy Birthday!
|
|
vicopper
- Tuesday, 06/12/07 09:16:35 EDT
|
Well. . . my beard is getting whiter at a shocking rate and I just became a grandfather last Thursday. . . but I have no magic bag of tricks.
|
|
- guru
- Tuesday, 06/12/07 11:01:02 EDT
|
Maul; speaking as someone who has spent some time in museums looking at actual weapons I would have to say your maul is way too heavy to make a decent weapon. Most warhammers are really quite light as it is the speed that they are swung that puts the energy into the impact and as E=1/2MV^2 making something you can up the speed on gets you more than making it heavy.
Look at the aboriginal stone weapons---the Maori of New Zeeland have some nice ones IIRC. They are much smaller and often beautifully worked.
BTAIM, it's your fantasy, I'm just talking about what *works* in real life. I feel that fantasies that hold true to basic natural laws feel more true to people in general. (An example of this is that swords tended to weigh about 1kg for nearly 1000 years in Europe when people bet their lives on them; not some heavy crowbar that many people expect they were. It is amusing too to find that a good katana also weighs about 1kg so there seems to be agreement that that's a good weight for a sword.)
May I suggest a nice carved jade for the head as it is very tough---and was used for stone weapons!
Thomas
|
|
Thomas P
- Tuesday, 06/12/07 11:31:18 EDT
|
Mr Klein; a lot of your question boils down to what's best for *YOU*; something we can't answer. So many people expect that there is *one* right way to do things; however in blacksmithing there can be a large number of good ways to do things and the one that is best for you is the one that is easiest/fastest/cheapest/etc for *you*.
If your hammer control is good forging the shape of the blade makes finishing much faster and easier---we used to say that 15 minutes in the forge saved 1 hour at the grinder.
If you hammer control is iffy and you have a heavy duty belt grinder then grinding the basic shape might be better for you.
If it is strictly display then using a mild steel would make things easier as you would not need to run the risks of heat treat (warping, cracking, etc)
For a permanent display I would work into the pommel and guard places where screws into a display board could be run to keep it from being removed without a screwdriver.
Thomas
|
|
Thomas P
- Tuesday, 06/12/07 11:41:36 EDT
|
Guru , a while back there was a flurry of interest in a home built self contained air hammer by Mark Krause . I'd like to get his book / info but am unable to find a contact for him . You have a lead ?
|
|
Art
- Tuesday, 06/12/07 12:13:33 EDT
|
Alex, in addition to the way the guru showed I remember seeing pictures of American Indian stone weapons where the handle had been attached by making a split in a living tree, inserting the stone weapon head and then letting the tree grow round the stone head until it was firmly embedded in the "handle". The handle was then removed from the tree. Such an attachment method might be a plus for a fantasy world.
|
|
- Gavainh
- Tuesday, 06/12/07 12:22:19 EDT
|
Thanks for the replies guru, I can see where my comment of "in the middle" was vaguely placed. What i meant was the stone head would have a hole bored through it for the shaft to go through, similar to what hammers are like today (think sledgehammers). But naturally thats where I came to not know how it would be put together, as stone cant be expanded to then fit around the wood handle, as is my assumption of what happens when making metal hammers (which i'm probably mistaken in).
The setting i was going for has forged metal swords and such, but I wanted the stone maul as a simple weapon for simple fighting ("me smash!") style.
Thanks for the imput Thomas, I did indeed also lookup warhammers and know that the smaller one hand variety were more common place, but the character the weapon is for is stronger than a human would be, so the weight differences i figured wouldnt be that unbelievable and fit towards the style of weapon the character would be suited for. I started off thinking sledgehammer only bigger, longer, and a bit stylized. But yes, that is why i posted here, because i wanted to know what worked in real life from those that have first hand experience with this sort of thing (even if not direct first hand with the exact type i'm looking for), as I dont want the piece to feel out of place and that it would be possible to somehow see that character walk down the street the next day and it wouldnt seem like a cartoon.
|
|
Alex S.
- Tuesday, 06/12/07 12:39:21 EDT
|
What does IIRC stand for?
|
|
Ken Scharabok (Poor Boy)
- Tuesday, 06/12/07 12:54:39 EDT
|
I have just found an anvil that weighs about 90-110 pounds that has a very short back and a lower front nose. I do not see any markings. I found it in a salvage yard. I can take a pic tonight, is there anyone that could help identify, is there a classifieds section.
|
|
tony
- Tuesday, 06/12/07 13:07:52 EDT
|
Alex, You need to study some real tools.
Hafted hammers with holes in the heads are wedged on. The wood is expanded in the hole. In modern hammers both a wood and steel wedge are used. A slot is sawed in the handle, it is fitted to the hammer, then a wood wedge driven into the slot. THEN a second steel wedge is often driven in at 90 degrees to the first.
Stone tools rarely had long holes in them. There ARE examples but the type I drew is far more common. Those with holes were often flat rounds (oblate) with the hole going through the short direction. They looked like larger versions of net weights.
Note Thomas's comments about weights and do some calculations before going too far. I don't have oblate spheriods on my on-line calculator so you would have to guess at a close average shape of the same volume. And this one does not have a long list of minerals but concrete is close to most stone for this purpose. See Mass3j on our drop down menu.
On reason we mention this is that one of the fantasy swords folks come here with often asking questions about would weigh over 800 pounds in steel. . . We actually had a fellow send us a CAD drawing of what he wanted to make!
There is fantasy and then there is insanity.
|
|
- guru
- Tuesday, 06/12/07 13:12:14 EDT
|
Tony, You can send me the photo. Sounds possibly like an antique. Does it look something like this?
|
|
- guru
- Tuesday, 06/12/07 13:16:42 EDT
|
Forging an Anvil: Phillip, While it is not a technologically difficult task it is logistically difficult. How many pounds can you support at the end of a pair of tongs?
Large size forgings have some unique problems. Just the radiant heat from a large surface makes working near it difficult. Handling heavy weights require a crane, hoist or other mechanical means. If the forging is large you need an equally large forging machine. While you CAN use strikers there is a limit to how much a team of strikers can do.
To get a feel for the problems try forging the shape from a small piece of steel (say a 1" cube).
|
|
- guru
- Tuesday, 06/12/07 13:23:54 EDT
|
Prof. N.,
You can get some leads on heat treating services here: http://tinyurl.com/yu66cr
Some (many?) of them might not have worked with woodworking tools before, but I'm sure most would be happy to work with you. Your money's green, right?
|
|
Matt B
- Tuesday, 06/12/07 14:30:07 EDT
|
Ken:
IIRC If I Recall Correctly
BTAIM Be That As It May
Thomas
|
|
Thomas P
- Tuesday, 06/12/07 14:57:52 EDT
|
Tony got a great deal. He bought an early "Colonial" without pritchell hole from a scrap dealer. . . Similar to the above but with the horn lower.
|
|
- guru
- Tuesday, 06/12/07 15:16:31 EDT
|
I have no use for it as I am trying to gather machinist type tooling and sheetmetal machines. should I attend an event to sell or try the ebay thing?
|
|
tony
- Tuesday, 06/12/07 15:34:19 EDT
|
Tony: You really have more of a collector's than user's anvil. Likely you will get more active bidding on eBay. However, it may fit in with historical sites as a user.
|
|
Ken Scharabok (Poor Boy)
- Tuesday, 06/12/07 17:14:07 EDT
|
Am making progress on the Hossfeld #2 bender. After a couple of e-mails and a telephone call to Hossfeld I can make reasonably round eyes on the end of 3/8" rod.
I just have it mounted on one of my not very secure shop tables. Have bent up to 1/2" square with it so far without putting much stress on the table. However, if I put some heat into the end of the 1/2" bar it works much like 3/8" round.
There is, of course, more stock in the square than round of the same size (e.g., both 1/2") and you can really tell the difference in trying to bend them cold.
Major problem (even which Hossfeld acknowledged) is their instruction manual is rather challenging for a newbie - think of the instructions which come with a child's swing set. I suggested photographs taken from above would be more helpful than those taken at about 60 degrees as in the manual.
I also suggested they send a representative to Quad-State to demo their bender, but I doubt anything will become of that.
|
|
Ken Scharabok (Poor Boy)
- Tuesday, 06/12/07 17:25:45 EDT
|
Ken, I have an early Lock Down Securities bender, and the from above is how they show setups in their manual. Very helpfull.
|
|
ptree
- Tuesday, 06/12/07 19:34:33 EDT
|
I have a question about the connection between the propane tank and the and burner. With the brass connections, can you use teflon tape on the threads, or do you need something else to provide a good seal? My dad had said he had heard somewhere that you couldn't use teflon tape on connections that had propane going through them.
|
|
- Hollon
- Tuesday, 06/12/07 19:56:21 EDT
|
Hollon,
You didn't give enough specifics to answer your whole question, really, but I'll take a shot at what I can.
There is nothing wrong with Teflon tape for gas pipe fittings, providing they are threaded fittings using NPT threads that are designed for sealant. Teflon tape will NOT make a non-tapered fitting into a gas-tight fitting, so don't try it.
Propane cylinders generally use a POL fitting that is a type of flare fitting that requires no sealant. Likewise, flare fittings on copper tubing require no sealant, and none should be used. If the flare fitting does not seal, you replace it with one that does. Period. Take no chances.
Teflon tape, while a good thread lubricant/sealant, has one potential issue when used around small-orifice burners. Tiny bits of the tape can get pulled loose and find their way to the orifice, blocking it. Take care when using Teflon tape that you don't wrap it over the end of the pipe at all, or it will cut bits loose as you thread the joint together.
Don't use compression fittings on propane or any compressed gas. They're okay for your toilet, but lousy for real pressure. They're also a one-use-only fitting, although most people don't realize this.
The right way to test your gas piping before you run gas through it is to do a leak-down test. You put a pressure gauge in the system, pump the system up to more than the anticipated use pressure, but lower than maxiimum safe pressure, and close the system. Wait several hours. If you get a drop on the pressure gauge, you've got a leak and must locate and fix it. Just doing the old soapy water test and trusting it is not, in my opinion, sufficient when you're dealing with flammable gasses. Do a leak-down test and be sure your system is truly gas tight.
|
|
vicopper
- Tuesday, 06/12/07 20:37:26 EDT
|
That E=1/2Mv^2 business had me going for a few minutes. Let's say you have a 2# hammer on a 2' handle and and a 1# hammer on a 4' handle. Seems like you could swing the 1# hammer to twice the velocity and get twice the energy. But you can't.
F=M*A You can exert 1/2 the force at the end of a 4' handle as at the end of a 2' handle, so both hammer heads would accelerate at the *same* rate. This means that in the same time it took to swing the 2# weight through 90 degrees of arc, you could only swing the 1# weight through 45 degrees!
You could, of course, continue swinging the 1# weight through 90 degrees, and this would take the same amount of work as swinging the 2# weight through the same arc. But the 1# weight would end up with about 1.4 times the velocity as the 2#, and the same kinetic energy. Energy in equals energy out.
Accelerating both hammers to the same energy level would take the same amount of work. I suspect you could actually accelerate the heavier hammer more efficiently, since you'd be applying the force over a shorter time (but over the same distance). If you held a 10# weight at the end of your arm for an hour, you'd no no work, but it sure wouldn't feel that way! Lifting the same weight from the floor to the table would be much easier, but would do much more work (in the physics sense).
Of course, that doesn't say which hammer would be the better weapon. You could do a lot of work and build up a lot of energy by pushing a pickup truck. But even if your enemy was too dumb to step aside, the truck would probably just push him out of the way.
|
|
Mike BR
- Tuesday, 06/12/07 20:55:56 EDT
|
Ken, and others, IIRC stands for : "If I Recolect Correctly."
Ken, I am still enjoying the vise I got from you!
John Odom
|
|
- John Odom
- Tuesday, 06/12/07 21:11:16 EDT
|
Ok vicopper, sorry about my vagueness I'll see if I can clear things up. There is the POL valve that runs into the regulator, it has some tape on the threads. (Firstly I should tell you the gas store I got this from, was nice enough to put it together for me). Then from the regulator there is a fitting that goes to the hose, no tape there (These are all brass, and it wouldn't surprise me if I'm using the word "fitting" incorrectly). Another fitting goes from the other end of the hose to bushing (? once again) that goes onto a ball on/off valve. This is the second and only joint to have tape. After the on/off valve is another fitting that goes into the end of the actual burner.
Thanks to everyone that has helped me with my questions on building a forge (I guess it should be fairly obvious by now that I knew very little about this when I started)
-Hollon
|
|
- Hollon
- Tuesday, 06/12/07 21:16:03 EDT
|
Hollon,
I don't think anyone can give you a specific answer without more information. If the fitting has tapered male threads that seal by jamming into the female threads, you can/should use tape or other sealant. These are the NPT threads vixcopper referred to. They are the same threads as on ordinary galvanized or black pipe.
If there's a flat or beveled surface at the end of the male fitting, and a matching one inside the female one, and the threads just pull the two surfaces together to make the seal, don't use tape. These are flare fittings (or something similiar).
|
|
Mike BR
- Tuesday, 06/12/07 21:57:40 EDT
|
there is a creek near my home with alot of iron ore in it.how can i tell if it is worth making into something
|
|
randy
- Tuesday, 06/12/07 21:59:21 EDT
|
Ken, you guys pay my way and I will demonstrate a hossfeld eight ways to sunday at quad state- of course, I would also require some lubrication, in the form of Cruzan Rum.
I have been using a hossfeld almost daily since about 1979, and can do most setups from memory, but even I refer to the instruction manual from time to time.
One problem with 3/8" round I have found is that most of it is sorta hybrid these days- its not REALLY hot rolled. Almost every piece of 3/8" round I have bought in the last 15 years or so has been a lot closer to cold rolled, often with diagonal roll marks on em, and very seldom if ever with nice thick gray scale, like true hot rolled.
1/2" and bigger is still always real hot rolled.
But since the 3/8" is shinier, its usually harder to bend, just like real cold rolled.
Did you get a variety of 1" center pins with your hossfeld, with a variety of turned down diameter ends? This sometimes helps in making the right size eye on the end of bars. Hossfeld makes em with 3/8", 1/2", 3/4" and 1" ends, so you can vary the size of the eye.
With 1/2" square, if you try for too tight of a bend, you might need to do it hot.
And it sure helps to bolt the whole thing down to the floor. Especially when you are using both extension handles, at 8 feet of leverage. I usually only do this on really big stuff, 2" schedule 40 pipe, or 1/2" thick flat bar.
|
|
- Ries
- Tuesday, 06/12/07 22:12:24 EDT
|
Iron Ore: Randy, While a number of folks make their own iron in small quantities it is not a profitable venture but for the satisfaction and experience. Much of it is done as research and a few bladesmiths do it to make collector's blades where they can say they smelted the iron through making the final product.
If you are not already involved in blacksmithing you need to start there, learn to forge and build some of your own equipment. Then if you still have the urge to make iron then study up on the various methods and go to it.
|
|
- guru
- Tuesday, 06/12/07 23:20:21 EDT
|
bad 3/8" Round: Ries, I suspect this is like the 3/16 x 2 "hot roll" flat bar I bought many years ago. It was sheared from plate then had the rough sheared edges dressed by cold rolling. The process leaves rough work hardened areas. This stock was substituted in a order where I had built bending jigs based on real hot roll which was much softer and a lot cleaner. I had to wait a month to get the real product. . .
Some bar stock is made in slitting mills much like the earliest type where you put plate in and dozens of noodle like pieces come out the far side. The stock is then run through straightening rolls and edging rolls. In 3/8" it would not take too much effort to make it round. . . but it would be REALLY lousy stock.
|
|
- guru
- Tuesday, 06/12/07 23:26:49 EDT
|
Teflon Tape: While it is commonly used in all kinds of plumbing systems it can create havoc down line. It tends to get stretched across the opening of the pipe and then blown into valves, orifices, regulators and gages often causing them to fail.
I have used a LOT of teflon tape and do a very neat job wrapping it on threads. However, I have found that in the process of tightening fittings that the teflon extrudes out and get pulled across the pipe end even when you were very careful NOT to let it do so.
For that reason many people recommend that you never use teflon tape on critical assemblies such as in low pressure gas systems.
For gas the plumbing code calls for a paste type pipe dope that makes an absolute seal. But it also makes it difficult to disassemble. In home built non code installations the choice is yours. Be aware however that when gages do not work, there is whistling and snappy/flapping sounds in burners and various clogs that it is probably the teflon tape you used. The only savings grace there is in this case is that the parts come apart easily. . .
I still use it like many folks that understand the downside and the symptoms of a loose piece of teflon tape fluttering downstream from a valve or orifice.
As noted above there are all kinds of fittings. Tapered pipe are the most common. But there are also non-tapered pipe threads such as used in electrical conduit which are disasterous if mixed with plumbing parts. No amount of tightening will make them seal. Then there are flared tube end fittings (recommended for gas) and compression fittings (not recommended for gas) and patent compression fittings like Swage Loc brand and flat face pressure fittings. . . Most of these will screw together in one way or the other an NOT work with non-matching parts. Then there are adaptors from all the non-pipe types to tapered pipe fittings. All of this and we are not even talking the new plastic pipe fittings and snap locks.
|
|
- guru
- Tuesday, 06/12/07 23:47:24 EDT
|
Reality TV Interuptus: Ok, so I'm watching "Mythbusters" tonight and get called away before the finale. The deal is to see if two hammers smashed together will send chips flying. NO GO on off the shelf stuff, so they propose to "case harden" the hammers by bringing them up to red heat and then quench in motor oil. The assumption is that the carbon in the oil will harden the hammers to a crystaline structure. A, Case hardening takes hours: B, It's only skin deep when successful: C, The quench pan was only as deep as the hammer heads!! I'm thinking they actually softened the hammers if anything (unless they chilled the motor oil). Did anyone see how this BS finished out??
|
|
Thumper
- Tuesday, 06/12/07 23:47:53 EDT
|
I've had Teflon tape clog up the Venturis on gas forges and cause them not to reach full burn. And recall hearing and reading (but cannot now find the source) some years back that Teflon degraded amid propane and emitted toxic fumes. How much, etc., I dunno. Suggest a hard check before use.
|
|
Miles Undercut
- Wednesday, 06/13/07 00:49:32 EDT
|
Common white Teflon tape is not recommended for gas[propane ,natural gas].There is a yellow Teflon tape that is approved,more expensive and harder to work with because it doesn't stretch like the white stuff.Teflon also doesn't work well if there is strain on the connections.As Vicopper pointed out,a pressure test of the system is truly the best way to go.
|
|
dimag
- Wednesday, 06/13/07 06:21:18 EDT
|
Ries:
From what I can tell the used Hossfeld #2 came with the original assessory package plus additional dies. Also seem to be some made by previous owner(s) as they don't show up in their parts catalog.
It took me a while to figure out how to use the two sizes of 17B pins for eyes under 1". Finally figured out that U of 1/4" x 1" under the bender had to be moved to the side a bit to allow the pin to drop down lower so the smaller ends could be used.
When I spoke with the tech rep at Hossfeld he indicated they knew they needed to improve their instruction manual. You might contact them about doing a comprehensive VCR or disk for them on a contract basis. Their introductory VCR is a poor audio quality talk over while someone quickly makes the bend with the equipment already set up. Likely made a long time ago. Perhaps something like the tape following the instruction manual, just in a lot more detail about set up and tips and techniques you have learned. If you know someone locally with the taping equipment might be done in your shop.
Or you could perhaps do it on your own and sell the tape yourself (or perhaps through me on a royalty basis). I don't see where copyright would come into question. Personally I prefer VCR to disk as you can pause and fast forward and reverse.
On hot rolled. My steel supplier doesn't carry 7/16" square but special ordered it from his supplier. It is more like 7/16" x 15/32 - enough difference out of square to be noticeable by eye.
|
|
Ken Scharabok (Poor Boy)
- Wednesday, 06/13/07 06:29:58 EDT
|
Thumper, Mythbusters failed miserably in that episode and screwed up on the technology. The only way they got hammers to shatter was by soaking them in liquid nitrogen. . . You can do the same with a bannana, much less hard steel.
|
|
- guru
- Wednesday, 06/13/07 08:19:33 EDT
|
Pause, FF, Rev, Slow, Step at a time: Ken, you can do that on all DVD disks with the remote control. The only place I have seen where you could not was where the coding prevents bypassing the copyright message on commercial disks.
The HUGE advantage to DVD is IF they have a chapter menu you can go straight to the chapter or process step.
Hossfeld: Once you get used to how the Hossfeld works you will be much less frustrated. However, much of you frustration may be that the device is not nearly as flexible as you want it to be. That is why there is a die for every bend and different dies for different radii. The big disappointment for many is the relatively high cost of dies.
Hot Rolled: I would have to look up the standard mill tolerance but that may be out. Best tolerance I could find was within 2.5% of area or weight. . . and your material is within that tolerance.
The sad fact is we have had this poor quality steel dumped on us for years and it is only going to get worse.
|
|
- guru
- Wednesday, 06/13/07 09:07:02 EDT
|
Please send me if you can the JYH"plans Book" i am a HERRERO from Argentina and y want to make that machine .Thank you for your atenttion and sorry to my very bad english
|
|
carloslomazzi
- Wednesday, 06/13/07 09:10:59 EDT
|
AISI Tolerance for Hot Rolled Bar:
Over 5/16 to 7/16 +/-.006 difference in dims .009" max.
Over 7/16 to 5/8 +/-.007 and .010 max. difference
Over 5/8 to 7/8 +/-.008 and .012 max.
Over 7/8 to 1 +/-.009 and .013 max.
Over 1 to 1-1/8 +/-.010 and .015 max.
Machinery's Handbook 18th Edition.
SO if your bar is out 1/64 (.015) it would be way out of tolerance. At 1/32" you are buying reject scrap and the price should reflect it. The fact that nobody rolls 7/16" except as a special order should be a hint. I had some rolled one time and ended up buying over a thousand feet.
|
|
- guru
- Wednesday, 06/13/07 09:31:18 EDT
|
Mythbusters
I get so hot and bothered when they start dealing with metallurgy. There have been several episodes dealing with it.
|
|
- Tyler Murch
- Wednesday, 06/13/07 09:39:36 EDT
|
I am sorry to say that the booklet was never written. However, there are photos of many hammers at:
Catalog of Junk Yard Hammers
The best is:
NC-JYH
I have another built in Costa Rica that I will try to post today.
|
|
- guru
- Wednesday, 06/13/07 09:51:06 EDT
|
to tony with the colonial anvil; i am interested. post on the hammer in forum if you still want to sell it.
|
|
- morph
- Wednesday, 06/13/07 10:58:27 EDT
|
Mike BR now do the math with the hammers on the SAME size handles---putting in different length handles is cheating---exp: you can't even swing a 2# hammer with a 100' handle so of course you get more using the 1# hammer with a 4' hammer! Basic scientific method: control of variables! Changing 2 variables at the same time makes it hard to say which once caused the change in output. Something they don't seem to cover in school anymore judging from the Science Fair Projects I have judged.
Randy; it takes only a couple %Fe to make a pretty red rock; but you need more like 50% and greater to be an ore, the older and simpler the process the higher the Fe content you usually need as it has to be greater than that of the slag that gets produced, (one reason to flux with Ca; Ca replaces some of the Fe in the slag)
If you are really interested in smelting some iron from ore do a google search on "bloomery" and discard stuff dealing with flowers.
I've been part of a Y1K smelting crew for about 10 years; but moved away so I have to run my own now---been thinking about doing it at Quad-State some year.
Thomas
|
|
Thomas P
- Wednesday, 06/13/07 11:01:29 EDT
|
Maybe its a West Coast thing, but I have been consistently getting this 3/8" that is "almost" cold rolled since about 1990 in California and Washington, bought from several different suppliers, and it has always been the same. I have bought hundreds of 20 foot lengths over that time, and have never, in the last 15 years, gotten a piece of 3/8" round that was ordinary hot rolled.
My guess is that we get our supplies out here from one of the Western mills, and thats just the way they do it.
|
|
- Ries
- Wednesday, 06/13/07 12:24:58 EDT
|
FWIW, I decided to analyze an old broken foil blade - a Prieur brand from the late 1970's or early 1980's. (Yeah, I'm a packrat.) I ran 3 hardness checks on the blade - got a 52, a 53, and a 54 Rockwell C, I'd call it a 53.
For chemical analysis, my results were: carbon of 0.55 %, sulfur of 0.031 %, manganese of 0.67 %, phosphorous of 0.015%, silicon of 2.15 %, chrome of 0.10 %. All other elements such as nickel, vanadium, molybdenum, copper, cobalt, tungsten, etc. came in at residual element level - most at 0.01% , with nickel at 0.02%. Closest US grade I can come up with is 9255 - my manganese check is a little low as 9255 calls for .70 to .95 manganese, but the rest of the elements fit right in. Could be a different European grade too, where manganese is lower, though the closest one I found was an Italian grade identified as 55Si8, and it wasn't an identical match for that either - no close matches to a French grade. Differences could also be attributed to time passed, change in instruments etc.
|
|
- Gavainh
- Wednesday, 06/13/07 12:56:27 EDT
|
Cut and pasted from the ABANA forums:
--------------------------------------------------------------------------------
POSITION: Research Associate
The University of Louisiana at Lafayette's College of the Arts invites applications for a full-time, twelve-month position as Lab Assistant beginning August 1, 2007 pending approval at appointment. This person will oversee the College of the Arts’ metal shop facilities. The successful candidate will demonstrate strong managerial skills, significant technical experience and a willingness to serve the needs of students, faculty and the departments within the College.
RESPONSIBILITIES: Includes the installation, care and maintaining of equipment, implementation of new safety policies, and daily operations of the shop. The metal shop services the academic schools and departments within the College of the Arts, which consists of the Department of Visual Arts, Department of Performing Arts, School of Architecture and Design, and the School of Music.
QUALIFICATIONS: 3-5 years of experience in a metal shop environment is strongly desired. BA or BS required in one of the disciplines that the College represents. MFA or MA in Sculpture, Furniture Making, Metal Working, or Industrial Design is preferred; equivalent professional experience considered.
UNIVERSITY OF LOUISIANA AT LAFAYETTE: UL Lafayette is a Doctoral/Research-Intensive University and one of eight publicly supported universities in the University of Louisiana System. Our University consists of nine degree-granting colleges and the Graduate School. The University's enrollment is now 16,500, and the size of the continuing faculty is 550. UL Lafayette offers 77 undergraduate degrees, 28 master's degrees, and 8 doctorates.
RANK AND SALARY: Commensurate with experience.
APPLICATION PACKET: Applications accepted beginning June 15 and will continue until the position is filled. Include letter of application; philosophy of education; a CV; 20 images of personal work or examples of research; names, phone numbers and addresses of three references; SASE. Send to H. Gordon Brooks II, Dean, College of the Arts, University of Louisiana at Lafayette, P.O. Box 43850, Lafayette, LA 70504. AA/EOE/WMA.
|
|
Ken Scharabok (Poor Boy)
- Wednesday, 06/13/07 13:52:42 EDT
|
Greetings again experts,
Once again thanks to all for the various advice given on various topics I have asked, and I am here to request some more :)
I've recently been playing with fire welding and have had some success. while my attempts at welding 2 pieces of stock together have been at about 50%, I decided to go bold and attempted to fire weld steel cable. I wrapped 8 or so pieces of cable (maybe 1/4" each) with wire, and started hitting it. did one end, then the other, then twisted, etc... anyway, it looks like it all worked. I still need to go through another welding, twisting session to make sure I got it all, but I'm fairly confident it's half decent. this is a noobie attempt at making cable damascus. To continue, if all works out well, I plan on using the piece to make a knife. This will be my second knife, as I recently made one out of a ball bearing case (high carbon, quenched in oil), and had very good results, although there was minor blade warping to one side during quenching. came out a decent working knife. (First knife ever!)
Anyway, my question is, should I be successful in the final welding of the piece, and finish forming the knife, what quenching/hardening/tempering technique should I use (water,oil,time, heat, etc)? Please note this knife is intended to be a thrower (cuz I'm wierd like that), so it should be not too hard, but have good edge retention. maybe different process on the core on edge ?
this was made out of ordinary steel cable I found at the bazaar, it's of unknown quality, and I don't want to mess it up after I formed the knife.
Also, should this prove to be the so called cable damascus, as it's supposed to, as guru said, it's the decarburization that makes the pattern. Can anyone offer any advice on etching, I'm about to look up some techniques on the internet, but advice as always appreciated as I have not done this before.
Thanks much,
-bruno
|
|
bruno
- Wednesday, 06/13/07 14:51:44 EDT
|
Bruno; I too have an unknown piece of steel can you tell me how to heat treat it?
When working with scrap/unknown steel you will have to experiment to find the best heat treat for it so *ALWAYS* leave a piece for this experimentation.
In general you would first try heating to slightly above magnetic and quenching in warm oil. remove any decarb layer and check with a file---hard enough---ok it's oil hardening; too soft repeat with a water/brine quench. If it cracked/shattered in oil try an air quench instead.
If it doesn't harden then you are out of luck---good idea to try testing it *BEFORE* you do the work to make a blade from it!
Once Hardened you can try tempering the piece at different temperatures until you find one that suits yourself.
There is also a more involved quench test involving heating identical pieces to different temperatures and quenching them and breaking them to find which gives the finest grain size too that can be run after you know what it should be quenched in.
And if it's some weird alloy you can probably never find out what the best heat treat is without having it analyzed and looking it up.
Now do you see why we advise new people to go with something they know?
Thomas
|
|
Thomas P
- Wednesday, 06/13/07 16:16:01 EDT
|
Bruno, See our Junk Yard Steels FAQ.
|
|
- guru
- Wednesday, 06/13/07 16:42:42 EDT
|
Thomas,
Which variable do you want to pick? I was holding moment of inertia constant, you would hold handle length constant. Change the mass and one or the other's gotta change.
Here goes, though: swing 1/2 weight on the same handle (with the same force) and you will get twice the acceleration. *But* the final velocity from swinging through the same arc will still be 1.4 times that of the heavier weight, and the kinetic energy will still be the same. One way to look at is that, because the lighter weight swings through the arc in less time, it doesn't accelerate for as long.
Of course, if you want to change another variable (O.K. -- change a different variable) you could swing the lighter weight through twice as long an arc in the same time, and get twice the energy. You'd be still be doing twice as much work, since you'd be applying the same force over twice the distance. I'll admit, though, that this might be more efficient, since the amount of time over which you apply a force affects how tired you get. On the other hand, you can only apply force efficiently through a certain range of postures, and doubling the arc might take you outside of that range.
|
|
Mike BR
- Wednesday, 06/13/07 16:58:32 EDT
|
Well, I *thought* I was holding angular inertia constant the first time. Actually, the handle for the 1# weight should have been 2.8'. This would have given the same angular acceleration as with the 2# weight and 2' handle, 1.4 times the ultimate velocity, and the same energy.
Assuming the same acceleration with twice the handle was why I was coming up with a free lunch when I started thinking about this.
|
|
Mike BR
- Wednesday, 06/13/07 17:27:50 EDT
|
Bruno, if the wire rope (the correct term) is made for lifting and such, and is not guy wire rope, and it is American made, the three grades are know as "plow Steel", improved Plow steel" and "Super improved plow steel". All are somewhat close to 1085/1090 carbon steel. Oil quenching has worked on those I have made,(a few) and then temper to a light straw. I have no idea of the hardness as I did not test then. The several I have made were mostly lookers, and were etched in Radio Shack printed circuit board etchant. I believe this is Ferric chloride. If the rope is made outside the US, see the Junk yard steel FAQ. If the rope is not lifting rope see the FAQ. If you want to learn some good info see the FAQ. OBTW, you need to polish down to about 400 grit minimum to see any etch effects in my experience and finer is better. See Wayne Goddard's "$50 dollar knife shop" for a good discussion on cable knifes and etching.
|
|
ptree
- Wednesday, 06/13/07 18:24:59 EDT
|
Bruno: Ptree mentioned tempering to a straw color, which is good for a normally used knife, but I think for a throwing knife You should probably draw to a full blue. This sacrifices wear resistance a bit but gives a much tougher knife.
|
|
- Dave Boyer
- Wednesday, 06/13/07 21:52:37 EDT
|
i need a construction bid form online i can print on my printer asampler
|
|
jay
- Thursday, 06/14/07 01:37:04 EDT
|
this is a 1200 sq ft house that im turning in to a office for a customer
|
|
jay
- Thursday, 06/14/07 01:39:01 EDT
|
please send to e-mail address thank you
|
|
jay
- Thursday, 06/14/07 01:40:18 EDT
|
Hammer Hardness Preferences
In the past few months, I've made about seven hand hammers ranging in size from 1 to 3.5 pounds for my own use in my own shop.
I was wondering what people's preference are on the hardness of their hammers.
Do you prefer a hammer that is softer than the face of your anvil, or a hammer that is rather hard?
|
|
Tyler Murch
- Thursday, 06/14/07 02:13:18 EDT
|
Tyler,
With prolonged use, a hammer face may hollow in the center, especially if tempered softer than an anvil face. I temper my hammer faces to a dark straw, which is on the harder end of the heat rainbow. For conducting tempering heat, I use a brightly heated, turned eye on the end of a 7/8" or 1" square bar. This is dropped over the vise-held hammer head. The cross peen is used less and you don't have the hollowing problem, so I take it to a purple color, using the oxy torch. The eye is not hardened.
|
|
Frank Turley
- Thursday, 06/14/07 07:17:16 EDT
|
Frank,
I don't understand your explanation of how you temper them.
What steel are you using?
|
|
Tyler Murch
- Thursday, 06/14/07 08:18:33 EDT
|
Tyler, Frank is using latent heat and running the colors. This is where you quench the end and let the heat from the middle reheat the quenched area to temper. This results in a soft core and hard ends. If you assume a high carbon tool steel the results are fairly close using any of them.
The selective hardening and tempering produces a result generally not available in common tools.
These are standard blacksmithing methods that are applied to a wide variety of steels and while you DO get differences the results are generally "good enough". If you want exact results or to squeeze the highest performance from a piece of steel then you get out the expensive temperature measurement equipment and temperature controlled furnace AND apply hand heat treating methods. . . .
|
|
- guru
- Thursday, 06/14/07 08:50:37 EDT
|
Hammer Hardness: Many blacksmiths prefer their hammers on the soft side to prevent damage to the anvil. Soft is also less likely to chip and works FINE as long as most of what you are striking is hot steel. If you use a soft hammer it is best if you used a different hammer for striking hardened tools like punches, chisles and stamps.
I have two forging hammers that I have worn out and need to dress. . which I loath doing to tools that have grown with me. However, the small hammer is soft and the face has slumped to one side and is mushrooming slightly on that side. Apparently this is due to the angle I strike the work. My large hammer is pretty hard and has not worn very much. However, the center of the crown is slowly becoming flat. I suspect this is due to wear from scale, not deformation of the steel. You see this wear in anvils, why not hammers?
In my career I had never marked an anvil that I could remember. Maybe once from a misstrike. . . So I always assumed that the anvil could take care of itself. THEN I had an apprentice make dozens of marks on the face of my best anvil. He was using a hard German hammer which we had radiused the edges back quite a bit. But he refused to work points at the edge of the anvil. . .
Then there are other fields or types of work that need harder hammers. Tools used to strike cold steel need to be harder and tools used to strike harden tools need to be even harder than that. I generally use ball peen hammers for those tasks. Planishing hammers used on steel need to have hard faces but those used on precious metals do not need to be so hard.
|
|
- guru
- Thursday, 06/14/07 09:15:49 EDT
|
Physics: Mike BR, Your model still has some flaws. You ignored the acceleration of gravity which is helping the hammer to accelerate through a great part of its arc. While (or because) that is constant it is a higher percentage of the energy available per pound of the larger hammer than the small. In the small hammer your effort does proportionately more than the difference in weight would indicate. . . Your model is only true in a gravityless environment where you are accelerating mass without the help or hindrance of gravity.
|
|
- guru
- Thursday, 06/14/07 09:18:05 EDT
|
I may have been misunderstood. To harden, I heat and rotate the face at the edge of a coke fire not allowing the red color to reach the eye. I quench in water face down, no reserve heat, and then I abrade the scale from the face. I put the head in the vise face up and put my heated turned eye, a separate mild steel tool, on the head to transfer the tempering heat. When the dark straw is reached, I pour a can of water on it to "hold the temper." I'm using two separate heats, not a reserve or latent heat coming from the center of the head. I use old 18-wheeler truck axles.
The theory behind using the turned eye is that the center of the face will be dark straw while the outside edges of the face will be a softer temper, say purple, to help prevent spalling. This has been called a "rim temper". Well, it doesn't always work that well in real life. It's nevertheless, a good way to temper a hammer face.
|
|
Frank Turley
- Thursday, 06/14/07 09:27:52 EDT
|
Frank, Sorry for interjecting above.
Interesting method. So you can look "through the eye" and watch the temper colors progress to the center.
I expect that the fit of the eye, where it contacts, makes some difference in how evenly it works.
|
|
- guru
- Thursday, 06/14/07 10:08:15 EDT
|
Frank
Your method is also how I learned to temper a hammer. I believe it may be mentioned in Richardson's book. I have heard it referred to as "ring temper".
|
|
Bernard Tappel
- Thursday, 06/14/07 10:40:01 EDT
|
Frank, what do you mean turned eye? Turned as in turned on a lathe? Is it a bar that fits inside of the eye?
|
|
Tyler Murch
- Thursday, 06/14/07 11:11:42 EDT
|
Tyler, just a loop (eye) formed in the end of a round bar. About 3/4" round would be right. The straight part is the handle and is not heated.
|
|
- guru
- Thursday, 06/14/07 12:04:18 EDT
|
Hmm, that's a good idea. I will try that.
I've been using 1050 that I get in the form of hydraulic push rods and then forge square. It's so shallow hardening though. I think I'll order some 4140 from mcmaster.
|
|
Tyler Murch
- Thursday, 06/14/07 12:33:12 EDT
|
I know that every new blacksmith should take a welding course. But we are a bit limited in China. Phillip and I have a stick welder but our attempts at welding have been fairly poor. Any tips or suggestions for welding?
|
|
Sean in China
- Thursday, 06/14/07 13:35:27 EDT
|
Thanks Sean
|
|
Sean in China
- Thursday, 06/14/07 13:36:51 EDT
|
Guru,
It turns out that my boss's first job out of college was working for Kropp Forge in Cicero, IL. He's told me more than once that they had both a 50,000 pound and a 40,000 pound steam hammer. (Last night I checked the Kropp Forge website, and they still have a 50K and a 40K -- and a bunch of smaller hammers. The two biggest are likely the same hammers they were using 30 years ago, when my boss worked there.) But I'm having a little trouble getting a mental picture of these hammers. What do the weights refer to to? The total weights of the hammers? The weights of the stock they can work? Or the weights of their rams? I have trouble imagining that last possibility, but then again I recently saw a 1904 video of some men at the Westinghouse Works forging a piece of stock that, by my conservative estimate, probably weighed 20,000 pounds. So as far as I'm concerned anything's possible.
|
|
Matt B
- Thursday, 06/14/07 13:41:31 EDT
|
Matt, All drop, steam and air, hammers are rated by their ram weight. In air and steam hammers this includes the dies, drive rod and the piston. The same applies to modern power hammers. The only machines that do not use this system are hydraulic and screw presses.
YES, That big rectangular mass weighs 20 and 25 TONS on the hammers you are looking at.
|
|
- guru
- Thursday, 06/14/07 14:03:13 EDT
|
Thanks, Guru. That's probably about the size of the hammer in the video I referred to. Incredible.
|
|
Matt B
- Thursday, 06/14/07 14:09:57 EDT
|
Self Taught Stick Welding: Sean, It REALLY helps to watch someone else that is skillful at arc welding and even better to have THEM watch you and prompt you as to what you are doing wrong. BOTH parties should have welding helemts with the proper shades (#10 to #12).
Some hints. When you are doing it RIGHT the sound of the arc is like bacon frying. Old damp rods do not work well but they can be dried in an oven or with a torch.
More. .
Get comfortable and be sure you can move from the starting position about 8" while compensating for the rod being consumed.
Work in bright ambient light. In good sunlight you can actually SEE through that #10 shade well enough to read. DO NOT have back lighting as that reflects off the filter lens and makes it hard to see.
Grin and bear it! You WILL get lots of LITTLE sputter ball burns. To be successful at arc welding you must ignore the little burns and keep working uninterrupted.
PRACTICE PRACTICE PRACTICE! It is a skill that takes time. I usually tell folks that they need to use up a 100 pound box of rods before they will weld decently. Most do not believe it until they have done so. . .
The type of rod makes a big difference in what the puddle and flux cover looks like. The most common rod and one of the easiest to make smooth welds with is an E6013.
When you strike the arc it is a bit like striking a match. You immediately tend to pull back too much and lose the arc or keep the arc too long. For a 1/8" E6013 the arc should be between 1/8" and 3/16" and the rod sloped 20 to 30 degrees from vertical in the direction of travel.
To keep the arc correct you need to LOOK CLOSE! Get in a position where you can SEE into the puddle and control that arc length visually. Note that the flux will flow over the puddle and reduce your vision AND the apparent arc length so you MUST LOOK CLOSE!
Yes, I am raising my voice. The biggest error in learning welding is to not look into the puddle and see the details of what is going on. THAT is what that dark shade is for. Ambient light helps you see without the arc so it is easier to strike the arc and get to the work position.
Initial practice is just to make beads on a flat surface. Don't try to put something together until you can use up an entire rod smoothly. Your first beads should be just flat lines on a horizontal surface. Then chip off the weld scale (flux) and run welds along the edge of other welds centering your bead in the line of the edge of the first. These are parallel stinger beads. They are what you use in large V grooves and for buildup.
After you can make decent parallel stringer beads with some confidence then you try to weld two flat pieces of bar edge to edge. After you can weld reliably on the flat then you setup a right angled corner and run fillet welds. Do those until you have some confidence. Then set a piece of tube or round bar on a flat plate and weld around it.
It is a progression. As a teacher I am sure you understand mastering the easy then the more difficult PLUS practice.
Try to use at least 1/8" stock for practice. 1/4" is easier as 1/8" rods work well with a clean 1/4" thick joint.
Running beads and how the steel pulls and must be setup and tacked is something you normally learn in a gas welding class. Then you apply the slow speed process to what is done much faster with the arc.
|
|
- guru
- Thursday, 06/14/07 15:26:35 EDT
|
Hello,
I'm from Belgium, i've build my own Bech� (jyh) airhammer, ram weight 15 kg 180hits/min.
If you are interested? I'll send you a picture or a little movie.
So you can see what an wonderful machine it is.
Greetz
Patrick,
|
|
Patrick
- Thursday, 06/14/07 15:37:39 EDT
|
Partick, I will send you mail. We would love to see it.
|
|
- guru
- Thursday, 06/14/07 15:47:24 EDT
|
More Arc Welding: When I took arc welding I started with a piece of steel about 4x6" and 3/4" thick. At the end of the 6 weeks it was about 2" thick. We did a lot of other welding but all I could say that I could do it strike an arc and run a so-so bead. I did not learn to really LOOK into the weld. They had films that close but I did not (nor was told to) look as close as in the films.
Most of the arc welding I did after that was on automotive exhausts and frames (trailer hitches). Welding the thin and rusty metal and thick to thin was a real challenge but it did not improve my welding skills.
The first welding job I had other than for myself was making two large gun storage boxes. They were from 1/4" plate with 1/4" x 2" angle iron corners all welded 100% inside and out. That was about 100 feet of weld bead per box. I used up that 100 pounds of rod and could weld pretty when I was done. Prior to that I may have used up 50 pounds of rod over a period of several years. This job was all done in one work week.
Professional welders work like this constantly.
One thing about it. Once you DO get good it is a little like riding a bicycle, you never forget how and are back in form with a little practice.
|
|
- guru
- Thursday, 06/14/07 15:47:32 EDT
|
I noticed that the guru said that 6013 was one of the easiest rods to use for arc welding. Im am by no means at all an expert on this, but I have used 7018 and 7024, and to me (and this may be a personal preference) seem to be easier to use. I only had a problem with 7024's making more slag inclusions, but that was fixed by changing the angle at which I was welding.
|
|
- Hollon
- Thursday, 06/14/07 16:02:50 EDT
|
I have what I think is an old Army forge. It is Army green, has removable legs, a hand crank blower. It is marked with a diamond with a GL in the middle. In the forge pan is an inked in caution that states the hearth must be lined with fire brick before use. It does not appear to have ever been used. Is anyone familiar with these? What year this may have been produced. I have tried finding one on the internet, but have not been able to find any information. Thank you.
|
|
JJ
- Thursday, 06/14/07 16:15:50 EDT
|
Cavalry Forge: JJ, These were in use by the U.S. Army from WWI through Korea. Maybe a little earlier, maybe later. There was a variety of manufacturers.
I've got a fair collection of old catalogs and none show these forges. However, I have seen a number of them and owned one once.
In use most had sand or clay soil packed into them while in use then it was dumped out when the forge was broken down. I never saw one that said use firebricks but many said "clay before using" both statements are hogwash as these were designed to be a portable lightweight forge. Firebrick is heavy and clay too fragile.
Except for the legs the whole kit (blower and pipes plus a few tools would fit in the box.
|
|
- guru
- Thursday, 06/14/07 16:42:27 EDT
|
Hollon, the 7024 does a nice job but it is a flat position rod only. Its fluidity makes it easy to use, but it is a single position rod.
While 7018 is a popular rod and used extensively in the construction industry it is a "drag rod". You drag the flux coating across the surface you are welding. I have never been fond of this method and felt it taught bad welding habits. To get the benefits of the "low hydrogen" aspect of this rod you must keep them perfectly dry in storage and in use.
A lot depends on which rod you have used the most.
|
|
- guru
- Thursday, 06/14/07 17:00:31 EDT
|
E6013, Note that these are rated as having less penetration than a 7018 and that they are for "sheet metal" use. I've used 6013 for a little bit of everything but have not done any code welding.
|
|
- guru
- Thursday, 06/14/07 17:08:56 EDT
|
What is the secret in forging good efficient fire strikers? (Flint & steel fire starting).
I've tried spring steel, drill rod,garage door springs, old & new files and I cannot get good consistent results.
I've also looked in the iforge area and found some info but the best I can come up with is that the secret appears to be in the hardening/tempering process. I've been at this for a good year now and still haven't found the answer.
Any suggestions?
|
|
Louis
- Thursday, 06/14/07 17:48:13 EDT
|
Guru,
I was following up on the thread Alex started, and thinking of a weapon hammer, swung more or less horizontally. I should have been clearer, though, especially given that this is a blacksmithing site. Of course, gravity would be a factor even with a horizontal swing, but a tough one to quantify.
|
|
Mike BR
- Thursday, 06/14/07 18:55:46 EDT
|
Fire Strikers: Louis, The higher the carbon the better (within the steel range), the lower the alloy (no chrome no nickel) the better, and generally the harder the better but you do not want glass hard brittle. The narrower the striking edge the better (squares and diamond shapes on edge work well). Finally, the quality of the flint also makes a difference.
Part of the problem with forging these is that the outer surface can become decarburized form the oxygen in the fire. So grind off the surface in the striking area.
|
|
- guru
- Thursday, 06/14/07 19:34:58 EDT
|
ArcWelding: What do you think about the auto darkening masks? I am a strictly amateur welder and still have trouble striking the arc. I have seen some of the auto masks pretty cheap.
|
|
JLW
- Thursday, 06/14/07 19:53:20 EDT
|
Im looking for info on rebuilding a fifty lb Star Power Hammer. I've searched the internet and found some stuff, but if anyone knows of anyother good places to check out it would be a huge help. Thanks Casey
|
|
Casey
- Thursday, 06/14/07 20:35:33 EDT
|
JLW,
I've been using auto-darkening helmets for around ten yers now, I suppose. I started out with the Chinese cheapies form Harbor Freight and others, and while they were convenient, they left me with sore eyes at the end of the day. Also, their adjustments left a LOT to be desired. None of the cheapies I used had a "grinding" level, either. I still have a couple of them, that I use for "loaners."
For my own use, I purchased a Jackson NexGen auto helmet about a year ago. I love it, compared to the cheapies. Way more adjustable, way more sensitive, no tired eyes. Way more expensive, too; about six times the cost of a cheapie on sale. $300 vs. $50 and worth every penny of it. The NexGen is good for all welding processes, though for gas welding I still use my old round goggles. If you do TIG weldinng, the NexGen is nice since it has 4 sensors instead of one or two, so it "sees" the arc start, even from weird positions and low amperage.
The only thing I have against the NexGen is the headgear. Jackson has, for reasons best known to themselves, seen fit to make a change from their old standard style in their headgear, and the new design is sucky. I took the headgear out of my last old Jackson fixed-lens helmet and swappedit into my NexGen and now I'm happy all the way.
Hobart, Miller, Optrel and others also make good auto helmets, and are priced between $150 and $350. If you stick with the big names, and don't get cheap, you'll get a good, safe and handy auto-darkening helmet. If you get cheap Chinese stuff, you'll probably get a headache and a helmet that dies young.
|
|
vicopper
- Thursday, 06/14/07 20:47:28 EDT
|
Casey, You are pretty much on your own as is anyone with an orphan machine. Standard machine shop practices apply to most of the tasks such as babbiting, shaft repair, clutch lining, belts. Reverse engineering is an absolute necessary skill.
If you do not know power hammers then here are a few pointers.
Most running fits should be snug but do not need to be ultra precision. The ram should operated smoothly with no rattle through is travel. That means no taper in the guide system. toggle pins often need replacing and the fits they run in bushed.
Die height (running without or too low) can damage the machine. Springs get tired, loose length, break. . and are the most needed replacement part in these old machines. Tired springs results in poor performance.
Clutches in these machines are designed to be oily and slip to control speed.
They ARE a machine, not "just a hammer" and need to be in smooth well lubricated running condition. Between the clutch and the open bearings a mechanical hammer should be covered with oil. If not it is being abused.
|
|
- guru
- Thursday, 06/14/07 20:49:42 EDT
|
JLW,
What Jock said about having high ambient light levels will really help on striking an arc, as you can actually see. Also, be sure you're running the welder at the proper current rating for the work/rod you're using. Too low a current setting will make the rod stick on the start. A lot of guys will make the mistake of setting the current too low, then increasing the arc length to get the puddle hot enough. Bad practice. Run hot enough, then keep your arc length the proper size and you'll have easier starting and cleaner welds with fewer inclusions and pitting or undercutting. Guess how I learned this? It does take practice to run a short arc without sticking it every once in a while, but you'll soon get used to it.
|
|
vicopper
- Thursday, 06/14/07 20:55:51 EDT
|
welding,
As a part time welder, the auto darkening hood is the single best investment I have made.
E-7018 VS 6013 I use 6013 as a crap cutter. Goes thru paint, dirt and so forth. I use E-7018 as taught at the boiler shop. Clean beveled steel. Dry rods. Good DC machine. They taught this as EVERY inch of EVERY pressure vessel weld was x-rayed, and EVERY indication had to be gouged out and repaired. In the mid 80's a welding supplier made daily deliveries of rod, in the truck load size, and almost all were 7018. This was all code work. In the valve shop we used 7018 to weld A-105 forgings. A-105 is basically a C-1023, and these were pressure welds as well. The welder who tuaght me much welded valves 8 to 10 hours a day, 5 to 6 days a week and after 34 years he was the smoothest stick welder I have ever seen, and it was not just appearence, as every weld was shell tested to 1,5 times the cold working pressure, and in our high pressure line that was 10,500psi. And if he had a 1% defect rate we looked for what major problem had occured in the parts.
|
|
ptree
- Thursday, 06/14/07 20:56:13 EDT
|
Sean - Welding: Sucess with stick welding to some degree depends on the machine, more to the point most 115 volt cheapie welders arn't worth a shit. If this is what You are using, get something better. I use 6011 rods for going through crap or when I want penetration and 6013 for sheetmetal and when I don't want penetration. These work well on a decent AC welder.
|
|
- Dave Boyer
- Thursday, 06/14/07 21:49:08 EDT
|
Stick-- The above posts pretty well cover the subject. Want to add, however, that a bad ground can cause an awful lot of problems with arc welding. Ground to steel, not painted steel. And give it enough amps. If the rod is sticking a lot, and is hard to start, you prolly are not running hot enough. The 70 series rods are hard to start and immediately get a shell of flux hanging out over the rod that you have to bust off to get an arc. Learn to see what's REALLY going on down there amid all the smoke and flash and razzle dazzle. Do you really have a puddle and are you really getting any penetration? Get an amperage/electrode-diameter chart from Miller. They put out, free, some marvelous sturdy little cardboard slide rules for stick, MIG and maybe for TIG, too, I dunno. Harris has some good charts for oxy-acetylene cutting and welding tips and pressures, too, by the way, also free. Also, as my AWS-certified welding teacher, Seferino Archuleta, of Northern New Mexico Community College and pproprietor of Superior Welding in Hernandez, put it so eloquently, welding is an art.
|
|
Miles Undercut
- Thursday, 06/14/07 22:26:50 EDT
|
Our mask is a big problem as we cannot see anything until it arcs. the auto helmet sounds like a great Idea. I think our rods are E4303 that may be a Chinese system. on the box there is a chart that has C - .12 Mn .3-.6 Si- .35 S- .035 P- .040. I don't know what these mean, but maybe they help can identify our our sticks. I am quickly learning that welding is an art, I just like to think of myself as an abstract welding artist right now, grin. I will try to practice. thanks to all the great advice.
|
|
Sean in China
- Friday, 06/15/07 00:24:39 EDT
|
I am learning all this as I go so a lot of the terms are new to me. Vicopper, by short arc do you mean holding the the rod closer to the metal? When you speak of penetration, is that when the puddle bonds to the metal? Thanks again.
|
|
Sean in China
- Friday, 06/15/07 00:36:09 EDT
|
howdy
|
|
glenn moon
- Friday, 06/15/07 00:37:06 EDT
|
Louis,
the best way to temper strikers
is to get it to non magnetic, and quench just the first 1/8 or so of an inch in the quenchant ( oil or water) depending on the steel untill all noticeable glow has faded from the whole pice, then quench the whole peice
this gives you a glassy face that will be cut off easy, while still giving ou a flexible back and hand holder,
files work the best for me, but has to be light oil quench, or they break pretty easy, warmish water does allright, but you must make sure to do less than 1/8 inch to start,
|
|
Cameron
- Friday, 06/15/07 00:51:18 EDT
|
sorry
the best way to temper strikers is to harden the face and not temper anything...
|
|
Cameron
- Friday, 06/15/07 00:51:54 EDT
|
E4303 rodsSean, The ambient lighting I spoke about will solve the vision problem.
E4303 is a Chinese rod. Do a google search and mostly Chinese sites come up. One says "Weld the important mild steel structure and mild steel with the same strength".
The best I can determine it is a cheap rod (high tollerances on constituants) using a lime titania flux coating which does not cross over to North American type rods. It IS an AC-DC all position rod.
Long and short arcs are exactly what they say. A long arc does not penetrate and sprays sputter ball all over. Too short and you do not get enough heat and you usually short out. You need to be JUST RIGHT. . (about 1/8" for 1/8" rods). If you can also remember the decimal equivalent for 1/8 is .125 then you can remember that 125 AMPS is about the right amperage for plate welding with that size rod.
Penetration is how deep the rod melts into the base metal.
|
|
- guru
- Friday, 06/15/07 01:06:03 EDT
|
Tyler,
"Turned" is an old fashioned smithing word meaning to bend in a circular curve. For example, farriers still say that they are going to turn a horseshoe, not bend a shoe or make a shoe. You simply forge the end of the bar to a circular shape, so that the inside diameter has a
relatively tight fit over the hammer head. It is unwelded. The rest of the bar gives you something to hang onto.
Shallow hardening medium or high carbon steel gives you an advantage in making a hammer head. After hardening, you are tempering a "hard case" and the interior gives you a "tough core", the latter being resiliant. This is what you want in a hammer head. We call this the case-core effect on shallow hardening steels, but IT HAS NOTHING TO DO WITH CASE HARDENING...just a confusion in terminology. Perhaps that is why the present day term for case hardening is "carburizing".
|
|
Frank Turley
- Friday, 06/15/07 08:11:31 EDT
|
Thank ya Frank.
|
|
Tyler Murch
- Friday, 06/15/07 10:34:49 EDT
|
Casey with the Star hammer:
I have one in good working order and would be happy to give you whatever help I can. The only trouble is they were built by three different foundries over their history and each one used a different guide design.
Mine is from the middle period, about 1923 or so, in which the ram is set diagonally to the frame, thus allowing the frame itself to be one guide. The outer guide/guard piece is a nifty art deco thingy that wraps around the ram and bolts through a slot in the frame, which is how the guide is tightened. Simple and reliable.
If yours has the flat-front Little Giant-style dovetail guide it's an earlier production.
The email scrambler for this site can't deal with my email address with its multiple dots, so let me know if you want me to send you pictures or whatever.
|
|
Alan-L
- Friday, 06/15/07 10:38:03 EDT
|
Miles; does he weld with his pinkie out?
Fleamarket report: Picked up a 4# sledge with a nice head; but bad handle: $2 and its an old american one. Didn't really need it but someone will come along bewailing how expensive storeboughten tools are...may add it to my "loaner" set up I have for students who are just starting to equip their smithy.
Note: one other aspect of going to college and getting a good job to support a forging habit--is that for the last nearly 20 years I have held jobs where I *can* come into work late on fleamarket days; I don't have to punch a clock like I did when working in a factory. OTOH I did stay over an hour and forty minutes last night working with a team on a problem we have been seeing. Flex time is a great thing!
Thomas
Thomas
|
|
Thomas P
- Friday, 06/15/07 11:39:44 EDT
|
Hey guys, Im working on redoin my forge set up outside. my father has committed a section of our backyard (woot) to my forge and we want to put something down thats both stable and good to work on, but also will allow for drainage so we dont get a soupy mess back there. Any ideas as to what we should do? we're either going to make a frame around the alloted area and fill it with something (like stone dust) or excavate down to the depth of our frame and fill that. Thanks for the help
-Sebastian
|
|
Sebastian
- Friday, 06/15/07 12:15:14 EDT
|
Sebastion, Forge floors are a subject of much debate. Some say clay soil only, other brick, some have used wood, others swear by concrete. It also makes a difference if you are indoors or out an what your budget is. The following is without regard to economics
Clay soils are easy on the feet but are dirty and each bench, stationary tool or machine needs a post or foundation. Small tools can get lost in the dirt. It is not suitable for outdoors in a wet climate.
Gravel has good drainage for outdoors is cleaner than dirt but has all the other problems of clay/dirt AND tools and hardware get lost in it much worse. It can be used indoors and out.
Brick floors are heat resistant and easier to clean than dirt. Tools do not get lost. However, the practice of putting brick pavers over a sand base results in a high maintenance floor that must constantly be releveled as bricks work their way out and become trip hazards. To prevent this it needs a concrete base then the bricks grouted in.
Wood floors have been used in both large and small forge shops. They must be heavy, built for the purpose. They are easy on the feet like clay. Their biggest drawback is flammability and absorption of oil. Threated wood can be used outdoors. For machines like power hammers they need separate foundations cut through the floor. For other equipment they are easy to bolt to.
Concrete floors are generally preferred in modern shops. They are easy to clean, fire resistant and are easy to move heavy machinery on. Most machinery does not heed special foundations on a heavy concrete slab and they are a good base for anchoring benches and fixed tools. They are hard on the feet and will spall if exposed to high heats.
As you get older your feet often make the decision for you. However, there are a variety of anti-skid cushioned work pads that you can put in places where you stand a lot. With this one change concrete wins hands down. Note that brick is often used because it can withstand high temperatures. However, as long as you are not using a cutting torch directly over concrete or resting heavy hot forgings directly on the floor concrete is no problem.
|
|
- guru
- Friday, 06/15/07 13:07:09 EDT
|
I photographed a blacksmith in NYC in 1954, but I can't remember where in Manhattan that was. Could someone remember in what part of Manhattan the blacksmith's shop was located?
Thank you very much.
|
|
Vivian Cherry
- Friday, 06/15/07 13:35:46 EDT
|
Vivian; *WHICH* blacksmith?
Thomas
|
|
Thomas P
- Friday, 06/15/07 15:31:15 EDT
|
Yep, Today I doubt there is a single smith in Manhattan (too high a rent) but in the 50's there was still a lot of industry and small manufacturers in the city.
I would try the New York State Designer Blacksmiths
http://www.nysdb.org/
I see I need to update my links. . .
|
|
- guru
- Friday, 06/15/07 16:03:15 EDT
|
Progress with cable damascus:
Well, finished the cable weld, only small areas did not weld completely, maybe 3 or 4 small corners through the whole piece, all cut off, not bad for a first try I think. Experimented with different quenches, tried low/med/high heat in both motor oil, and cool water. The oil left the piece really soft, and had the best luck with a high heat, brightish red, dipped in water. gave me a reasonable hardness, enough to hold some sort of edge anyway. It was during this time I discovered that the wire rope I had, was not all that good. Really soft and flexible, so not all that much carbon I believe. bent easy enough (hammer) even after quenching. So I apparently didn't have any of this "plow steel" cable, and I am not sure if it exists out here in the Ukraine. Unless someone can tell me otherwise ? My sources tell me that most of the steel here is produced here and a large quantity is exported to russia, and that I probably won't find that good American like stuff, because its all the same stuff, even what they use on cranes. I don't know, but I have a hard time believing that.
Anyway, didn't have enough to make the knife I wanted, so ended up making a butter knife look alike, with an edge. Then I attempted etching (after thorough polishing), for about 20-30 min in 9% vinegar.
Amazingly a pattern became visible, somewhat uniform with some randomness, probably from the twist I did. So the process appears to work. The pattern however was not very dark, not all that much of a contrast, but satisfactory. What I am wondering is, is it the lack of carbon that, or the weakness of the acid that caused the light pattern as opposed to something darker?
If I say radio shack here, people just sort of look at me funny, so getting that ferric chloride stuff is gonna be an adventure...
thanks again for info,
-bruno
|
|
bruno
- Friday, 06/15/07 16:11:35 EDT
|
Bruno,
Brightish red may have been too cool a temp to quench from. Most folks use a magnetic to sense when the Currie point has been passed and assume that is a good starting point to quench from.
I would guess that the wire rope for lifting in the Ukraine will be pretty similar to the material in the US as it serves the same function, and it is not an exotic steel.
If you read the junk yard steel FAQ you will see a thread about quenching samples to determine a process. If you can find a good lenght of the wire rope, then you can practice the welding and experiment with the quench Temp's, fluid and temper
After welding, the steel will have a decarberized surface that needs removing to get to the good hard steel under. A grind of perhaps .1mm should get the de-carbed steel off. do this after quench and temper, and don't get the steel hot enough when grinding to make any color show. Use lots of water dipping before the color shows when grinding.
I suspect that if you get the quench temp up, past the Currie point where the steel is no longer magnetic, hold for perhaps 30 seconds at temp to ensure that the steel temp is even and quench you will get a harder sample. When doing long slender sections like a blade plunge the blade down into the quench with the blade verticle, and once all the way in, resist the urge to swirl. Cooling the blade evenly will help fight warping.
To get a good etch, polish, and place in the etch. After you see a pattern, pull, rinse, and lightly polish, and repeat till the contrast is at the desired level. Be aware that wire rope does not produce as sharp a contrast as many of the nickle/steel combos.
good luck.
|
|
ptree
- Friday, 06/15/07 16:59:30 EDT
|
Sebastian,
The best floor I've used for a forge area that was subject to rain was rammed tailings form the local gravel crusher operation. Here it is called "crusher run", other places call it "tailings" or other terms. It has aggregate of all sizes in it, from about #0 to fines smaller than beach sand. with al those different sizesof particles, it packs down very tightly and stays where you put it, so to speak. Almost as easy to maintain as concrete, though benches and anvil stands with open pipe legs will settle into it slowly as you pound on them day after day. If you weld plates of 12 to 16 square inches in area to the bottom of each pipe leg, they are very stable.
For setting a floor of crusher run, I dug down and then set a treated wood form that woudl give me a depth of 8". The crusher run was dumped in the form and tamped into place with a hand tamper, then leveled where necessary, tamped agan and finally gone over with with a vibratory plate compactor from the rental place. Made a great floor that rain went through without puddling, but still hard enough to sweep with a push broom.
|
|
vicopper
- Friday, 06/15/07 17:59:29 EDT
|
Mr.sory but y have a very bad english,y am a "herrero" from Argentina and y wish if you may send me the plan book of the east and west hammers.Y will try to make one and y choose the esear one for me in relation with the components y have .Thank you , for all your ideas and attentions for all novices that consult your page Go ahead ,you are the best
|
|
- Carlos Lomazzi
- Friday, 06/15/07 19:18:04 EDT
|
I have a few questions. I have been blacksmithing for only two years and would enjoy some new projects that i can do. My imagination must be broken or something of the sort, because i can not think of anything to smith other than knives. I am now hoping to raise my over all skill level in blacksmithing. I am in need of prejects. Hopefully that can be done with high carbon rail road spikes. Also, I was wondering where i could purchase flux for forge welding. I suppose i am just out of the loop. thank you.
-David
|
|
David
- Friday, 06/15/07 20:57:37 EDT
|
Carlos Lomazzi,
Lo siento. Tenemos no libro. Go to "NAVIGATE anvilfire". Click on "Power Hammer Page". Click on "User Built and JYH Hammers".
|
|
Frank Turley
- Friday, 06/15/07 21:38:16 EDT
|
David,
Go to the "NAVIGATE Anvilfire" drop-down menu and go to iForge Demos. Lots of things there to try.
Anvilfire advertisers such as Blacksmiths Depot, Centaur and Blacksmiths Supply carry forge welding fluxes or you can go to the supermarket and get some 20 Mule Team borax. It's found in the cleaning supplies aisle as a laundry booster.
|
|
vicopper
- Friday, 06/15/07 21:39:09 EDT
|
|
|
[
CSI - anvilfire MEMBERS Group |
Getting Started in Blacksmithing ]
|