Guru,
You said about something in the fuel line. Do you mean in the hose? Because I used no teflon tape on any of the metal fittings and pipes in the gun assembly. PS. I could cut a shorter piece of lamp pipe for holding the MIG inside the bell. Still got a good long piece of stock on hand, might as well use it.
Also, I ordered a 3" x 1 1/2" nipple for the large piece with the bells on it, not a 4". I'll remeasure it though just to see if we weren't duped or sent the wrong item. I'm *very* sure I *ordered* a 3" long nipple, but then again the place I ordered from (McMaster-Carr was it) could still have made a mistake. It's wee at night while I'm posting this message right now so I can't go and just measure at the moment. As for the second bell I was using that as a holder because I was afraid if I took the weld-the-bracket-on approach that that's a 1-shot deal (No, actually, it's a two-shot deal as the nipple cuts into two 1.5" pieces.) insofar as alignment goes. If I screw up the bracket... Using the second bell was a way to try and get the gun nice and centered. So I've got it now, and so isn't it a good idea to try and make it work instead of wasting it?
Time? Got lots of that. Money? *Don't* *have* a lot of that. So taking _frequent_ trips to Boise would not be financially feasible.
Others,
I'm not sure where I could find an HVAC shop here but that might be a possibility. Also, do you mean like using something off a house heating furnace???
|
|
mike3
- Sunday, 06/01/08 03:19:59 EDT
|
Long time back a cat named Venturi found a way to use the fact that a gas flowing faster than the surrounding atmosphere creates a low pressure area. Nature abhorring a vacuum, the surrounding air rushes in to equalize the pressure. (This is what keeps an airplane wing, and the attached airplane, aloft. See Bernoulli, above.) By injecting fuel gas under pressure into the trumpet bell of the furnace Venturis, you are causing it to suck air in with it. The smooth trumpet-shaped bell of a Vanturi promotes a better flow than does a plumbing bell reducer. Sooooo, yes, by all means, get the Venturis-- cast iron ideally but sheet metal is okay, too-- off an old junk gas furnace and use them.
|
|
Miles Undercut
- Sunday, 06/01/08 08:13:05 EDT
|
If the idea of using somebody else's old castoff Venturis (ewwww!) offends one's delicate sensibilities, one can always buy them and other gas-related heating goodies new from Ransome,out in sunny California. If one can afford them, that is.
|
|
Miles Undercut
- Sunday, 06/01/08 09:54:05 EDT
|
The never ennding debug: Mike, In either case a "close nipple" is as short as they come with threads meeting in the middle. Note that in my design the nipple is sawed in half shortening it and resulting in 2 usable parts.
Fuel line includes everything from the tank to the tip of the injection orifice. Manufacturers often assemble things with Teflon tape and insects getting into things are pretty universal on our planet.
The ONLY point of my using the lamp pipe in my design and accepting the problems with leaking straight threads was to be able to adjust the injection orifice position with two lock nuts. Otherwise standard tapered thread pipe nipples should have been used. The lamp pipe thread must be heavily doped with a hardening pipe dope (not one of the fancy anaerobic that require a thin tight space).
|
|
- guru
- Sunday, 06/01/08 11:21:59 EDT
|
Actually it's a misconception that airplanes fly using the Bernoulli principle. If you've ever been dumb enough to stick your hand out of the car window on a highway it becomes really apparent. Having the side of your hand facing the wind generates almost no lift, which is opposite of the common theory, the vacuum created above an aerofoil is minimal. If you slightly angle your hand upwards, you'll notice an immediate and strong amount of lift. Airplanes fly by by the wings being angled so that incoming air gets pushed downward and as a reaction force the air pushes the wing upward. Same for the engines, they push air backwards and according to newtons third law, the air pushes the engines forward.
|
|
Nabiul Haque
- Sunday, 06/01/08 11:48:02 EDT
|
For burners you do not need high tech. For my Poor Boy Propane Fordes I use copper tubing within a bell coupler and use a .0303 drill to make the orifaces. I use the KISS principle to the maximum extent possible. Everything is pretty well plumbing/hardware store off the shelf. I do have to send the nipples to a machine shop so they will fit within the receivers on top of the forge.
With each forge I provide a 1/2" cut off valve. Transitioning from it to a propane line requires two adaptors. Had been buying them through a local auto parts store for about $10 per set. Noticed the hardware store I use now carries cast ones for about $3 a set. The auto parts ones are no doubt U.S. made, vs Chinese for the hardware store. But for the price difference I simply can't buy American without either raising the price of the forges or eating the $7 per forge difference. Same with the bell couplers. U.S. produced ones are about $6 each, vs about $2 each for China export.
|
|
Ken Scharabok
- Sunday, 06/01/08 12:07:27 EDT
|
Uh huh, and sailboats can't tack, either.
|
|
Miles Undercut
- Sunday, 06/01/08 12:23:35 EDT
|
Look, we all know what really keeps airplanes aloft: it's all those passengers like me, holding them up by the armrests. And gravity helps, too, the gravity of the situation if they fall. For more on this vital question, see: http://tinyurl.com/6kln4q
|
|
Miles Undercut
- Sunday, 06/01/08 13:58:46 EDT
|
I have a Peter Wright Farriers anvil with a clip horn, 130 lbs. in weight, patented england with an "H" stamped into the base. This anvil is in very good condition and is used daily. I was wondering if anyone could tell me what it's value is.
|
|
Jerry Brandt
- Sunday, 06/01/08 14:27:34 EDT
|
I dunno, Miles. When I look out the window, I swear I can see the wings flapping.
|
|
Mike BR
- Sunday, 06/01/08 14:27:57 EDT
|
I have a Peter Wright Farriers anvil, with a clip horn,130 lbs. in weight, patented England, with an "H" stamped into the base. This anvil is in very good condition and is used daily. I was wondering if anyone could tell me of it's value?
|
|
Jerry Brandt
- Sunday, 06/01/08 14:32:00 EDT
|
So does this "close nipple" thing mean I need something even _shorter_ than the 3" I've got (so short the threads are all along it)? (I measured the nipple I've got, and yes, it's 3", not 4", long.)
And swapping out the lamppipe for a copper nipple like the one you can see in the pictures would leave the MIG tip ending near the beginning of the reducing bell, or maybe even inside the 3" nipple. You said that is where it should be, so I'll give this a shot tomorrow when the hardware store is open again and tell you how it works out.
Looking over my fuel line I don't see any tape holding it together. However, when I shine a light through the gun (the thing with the MIG tip on it), not connected to a gastank, I cannot easily see the other end where the light is coming in through the tip, only the reflection on the walls of the pipes. Have I found my bug?
I'll also may be going out on Wednesday or Thrusday this week to visit someone with a gas forge. You were right, there was somebody near here that had one.
If it still doesn't work then I'll scrap the hemisphere and go for a "side arm" like design with the wye. Interestingly enough, the brand of that big box reducer is WARD, so does this mean they've changed their product?
|
|
mike3
- Sunday, 06/01/08 14:32:27 EDT
|
If you want to know what the rocket scientists think about lift, go here: http://tinyurl.com/4omnrx and click around some. According to them, we're all wrong.
|
|
Mike BR
- Sunday, 06/01/08 14:39:36 EDT
|
Jerry Brandt, I paid close to $300 for a Hay-Budden, 140# clip horn anvil about 5 years ago. I don't feel that I got stung.
|
|
Frank Turley
- Sunday, 06/01/08 14:53:49 EDT
|
Jerry anvil prices are about double here than where I used to live and both places are in the USA!
Not knowing what country you live in sort of impedes us guessing where you are at to guess at a price. In the USA it will probably be between US$1 per pound to US$5 per pound with the latter for very special, mint condition anvils.
Thomas
|
|
Thomas P
- Sunday, 06/01/08 15:47:34 EDT
|
Lift: Nabiul, Follow the link above to the one labled "wrong threory" and the demonstrator at the bottom of the page that demonstrates the CORRECT theory.
Lift in an airfoil is created by the air moving a longer distance over the top of the wing than over the bottom. When a non-airfoil shape is pushed through a liquid or gas turbulence in the form of eddies is created at the back of the surface forcing the bulk of the air flow to follow a longer path just as if there was an airfoil.
When flat surfaces are used for lift (or an airfoil at too great of angle) the turbulence causes vibration and in fluids it causes cavitation (creation of vacumme bubbles on the back side). Cavitation can cause errosion of metal parts in pumps, turbines and propellers. If you do not believe in cavitation just remove the prop on a boat and reverse it OR travel in reverse a distance. In a very short time (a few miles in a small boat) the prop will be nearly destroyed by cavitation.
Lift and cavitation can be controlled by changing the attack angle.
Wings on jet airplanes are nearly flat on the top and bottom both sides being curved with a very slight difference. Lift is so great at high speed that only a slight difference is needed.
Lift in the form used in fluids for pumps and turbines was defined by some of the greatest mathematicians and physicists in the world long before the first airplane.
Propane gas burners are on the far end of most venturi calculations due to the density and viscosity of the gas. The initial reaction in a propane burner is more like spraying water out of a nozzle. Then turbulence entraps air as the gas breaks up and expands. By the time the gas leaves the mixing tube it should be mixed evenly with the air and most of the turbulence gone. It should also be moving at a velocity faster than the flame front moves through the air-fuel mixture. Otherwise you get a back-fire and a lift off of another kind.
|
|
- guru
- Sunday, 06/01/08 16:10:00 EDT
|
Buffalo Broil Air - A Broiling heat in 3 minutes
Well folks, we were ALL wrong. Buffalo Forge of NY and Canada made a heavy duty grill with a hand crank OR motorized blower. It looks almost identical to a round rivet forge on wheels except it has an adjustable grill and a built in food handling tray. Unlike forges it had an enameled surface on the forge pan for ease of cleaning. They were sold in the late 50's and maybe early 60's.
|
|
- guru
- Sunday, 06/01/08 16:22:53 EDT
|
Mike BR-- not to worry: the flapping is a design feature, included to distract passengers from the cavitation in the aft vector area. It stops after a while, when the yield point of the aluminum spars is reached.
|
|
Miles Undercut
- Sunday, 06/01/08 16:53:52 EDT
|
Uh, Guru, you should check out Nabiuls comment on Bernoulli. Your statement that airfoil lift is created by air traveling a lnger distance(therefore higher velocity)over the top surface is a restatement of Bernoulli, which actually accounts for something like 3 percent of total lift. The curve of an airfoil applies the coanda effect, not Bernoulli, which directs air moving over the top of the wing downward and increases effective angle of attack without creating turbulence. If Bernoulli were the predominant principle, no airplane could fly upside down. Or slowly. BTW, most jets (commercial, subsonic) still have markedly curved upper wing surfaces: only the really fast movers have the very slight differential you wrote about.
|
|
- Peter Hirst
- Sunday, 06/01/08 19:04:10 EDT
|
I bought the biggest anvil I could find, an old Railroad Peter Wright that is 36" from horn to heel, and weighs a LOT.
...that didn't work. The stuff I made looked like a kindergartener's failed play-doh attempts.
I bought a Uri Hofi hammer.
...that didn't work. The stuff I made STILL looked like a kindergartener's failed play-doh attempts.
Suppose I need more practice?
I respect you "real" smiths who can actually produce what you think up in your head or draw on paper. Thanks for your encouragement and for showing me that it CAN be done.
- a blacksmith wannabe
|
|
Paymeister
- Sunday, 06/01/08 21:38:37 EDT
|
Paymeister,
Get some Play-Doh and forge it - maybe it will come out looking like Samuel Yellin's blacksmithing. (grin)
Seriously, one effective tool I use for teaching forging is having my students work with plasticine clay first. It forges like steel, just at room temp and with no effort at all. Mistakes can be wadded up and started over, and successes can be stuck to the dining room table for the whole family to see. Cheaper than steel, too. I still use it myself for "proof of concept" on new elements I want to try out, or for working out complex forging sequences on very involved pieces where I can't afford either the time or the materials to experiment in steel or bronze.
My wife likes getting up in the mornings to find a clay dragon on the kitchen counter or a clay flower in the bathroom. For some reason, she was a bit underwhelmed by the clay centipede in the shower stall. Go figure.
|
|
vicopper
- Sunday, 06/01/08 22:42:48 EDT
|
 Practice means making the same thing over and over. . . Every project I did was a learning experience and the first couple were always "backups" or test pieces. . . usually junk. Practice means making the same thing over and over. . . Every project I did was a learning experience and the first couple were always "backups" or test pieces. . . usually junk.
Forging leaves was something fast and not all that common back when I was demonstrating. I made a LOT of leaves. Maybe a dozen or two in a weekend that I also made dozens of S hooks and such. My very first leaves (shown) were flat and lifeless. Make a few hundred and you get a LOT better. Click the leaf for more.
One project I had was to make a bunch of common round or "brean" end door pulls. They were forged from 1/4" x 1" flat bar. My first samples were trash. But with two identical ends I made a lot of progress by making a dozen pulls in one day. That is too many if you are not in forging practice but it was right for me at the time. After that I had a good new basic shape in my skill set.
I would learn a new shape with each project. After a while you have a set of shape skills that can be combined or used as the basis of something else. At some point you have learned to make all the basic shapes and many combinations at ease. Then you can forge almost anything you dream up. But it is all based on practice.
|
|
- guru
- Sunday, 06/01/08 23:24:20 EDT
|
I was thinking about repairing my 140 lb english anvil. The face is swayed and it has several large chips. Its not in terrible shape, but its seen alot of use. If I do repair it What is the best techneque and is it worth repairing money wise.
|
|
- John L.
- Sunday, 06/01/08 23:32:10 EDT
|
Acording to an aircraft mechanic friend of Mine, Jet airplanes suck their way through the air, and helicopters beat their way through it. As He has worked and flown extensively on both, He should know.
|
|
- Dave Boyer
- Sunday, 06/01/08 23:40:38 EDT
|
Dave, Many high performance fighter jets do indeed suck and push their way through the air relying largely on engine thrust almost like a rocket. . . Helicopters shouldn't be able to fly (like bumble bees can't but do). I'm still waiting for my 21st Century hover car that uses anti-gravity and a mini nuclear power source.
|
|
- guru
- Monday, 06/02/08 07:30:16 EDT
|
John, If you have read these pages much you know my feelings about anvil repair (don't do it).
Yes, having good tools is a matter of pride but do not let your pride ruin a perfectly good tool.
While sway is an aggravation sometimes it is better for straightening work than a flat anvil. An anvil is not a flat reference surface. They all get worn and dinged over time and many new anvils are dressed by belt grinding on machines that leave a smooth but not necessarily flat surface. In fact when new your English anvil was hand ground by leaning it by hand against a huge rotating wheel and judging the flatness by eye. On average most were fairly flat but many had dips, crowns and drop offs that were not apparent unless you put a straight edge on them. Machining anvils on big milling machines is a modern advance.
To fix sway you must build up the face. While the best old anvil faces were about 5/8" thick to start they were hand forged and hand ground flat. They are often only 1/2" thick in a places. Since being new 100 years or more ago it may have been hand dressed a time or two as well. If you have the top machined to clean up 1/8" (3mm) sway they will more likely take off 3/16 to 1/4" (5 to 6mm) or more due to difficulties trying to align to crooked surfaces and trying to clean up the edge drop off and wear. The final result can leave as little as 1/4 to 1/8" (6 to 3 mm) of original steel face material. This will be quite soft due to the rapid drop off in hardness in the old steel faces. It will also not hold up. Machining also shortens the step (a useful feature).
So weld build up it the only satisfactory solution. This is more expensive than machining due to the necessity to grind out flaws in each pass and re-weld. Preheating is required to prevent damaging the old plate and forge weld. Some use hard facing rod but this is often much harder than needed and will be harder than any old face left exposed. Others have written articles on this subject and one of our google advertisers has a book that includes anvil repairs.
Grinding: I prefer to just dress the anvil with hand grinders removing as little material as possible. If you start by cleaning up the sides of the anvil near the face you often find that there has been mushrooming of the face and anvil body. Once this is cleaned up the worn and damaged edges may not be as bad as they seem. You can also take a little more off than just vertical thus removing more of the damaged area and taking off the least material.
I would not want to try to remove all the sway (due to face thickness issues mentioned) but you can reduce it or spread it out with a hand grinder. After dressing the sides as above you can work the top down to remove hammer dings and SOME of the broken or worn edges. Then if you dress the edges to a reasonable radius you may find that the anvil was in better shape than you thought. However, producing sharp crisp corners is counter productive and a waste of time and a good anvil.
If you are dissatisfied with it you may want to consider an upgrade rather than a repair. I had a guy trade me nearly identical anvils plus $50 because he could detect a dip in his with a straight edge. He was happy and later I sold his anvil for no less than mine would have fetched.
If you want perfectly flat I would buy a new anvil with a machined face. However, you will need to upsize to get as solid an anvil as the old English anvil as they usually have a heavy waist that supports more of the face than the later and modern anvils (other than types like Nimba that have no waist).
|
|
- guru
- Monday, 06/02/08 07:47:21 EDT
|
How flat is flat?
A fine finished concrete floor may LOOK flat, feel flat and measure flat as best as you can tell until you poor some water on it and see it pool in the same place every time. An anvil that LOOKS perfectly flat may be out by 1/16" or more on large anvils. Even new machined anvils are likely out of flat by .005". Those finished with big belt grinders have had curves of 1/4" over 30".
If you work in the precision machine trades you know that there are degrees of everything. You can machine a piece flat in a single pass, un-clamp it and do a simple straight edge check and find it is not really flat. If you carefully machine each side flipping the piece over between passes it will get flatter and flatter as evidenced by being able to take a finer and finer cut and sill cutting the entire surface. But each time you take less you will often find there are dips. . .
However, if you take that piece that you thought was perfectly flat on the mill after many passes and put it on a surface grinder a light cut may skip all over the part. The process of flattening is repeated by flipping the part over between pases until a very light even cut is achieved. I'll alternate the angle of the work taking two no-cut passes on my surface grinder and get a beautiful even checker finish that you cannot feel. This will indicate a near "perfect" flatness as created by that grinder.
But after all that, the piece can still be honed on a precision flat. If the grinding had been done right this will just remove the hatching but often will show a high spot or two . . .
Check THIS surface with an optical flat and you may find that it is still not perfectly flat. . but nothing is.
We have large granite flats in our shop. The big one is a foot thick and 5 by 8 feet. If I remember right it is an inspection grade and was guaranteed to be flat within .0005" overall and .00005" in 6" or better. My small 18x24" laboratory flat is +/-0.000037 overall. Since our best dial indicators are only good for reading .0001 and most .0005 the accuracy of the granite flats is fine for most purposes.
Of course to meet regs both of these and the indicators need to be checked for flatness once a year.
Anvils? Flat? Hah!
|
|
- guru
- Monday, 06/02/08 08:26:53 EDT
|
I find that a 2 inch section of the top plate with a sharp edge (right by the table) is sufficient for certain procedures on my little 100 lb Wilkinson. Sometimes when drawing down to a step that sharp portion works better than some of my fullering tools. It's only a small spot on the edge, the rest has a nice radius all over.
|
|
- Nippulini
- Monday, 06/02/08 09:41:14 EDT
|
Thanks for the advice!
|
|
- John L.
- Monday, 06/02/08 10:21:17 EDT
|
Whats the trick in a venturi forge? I have the burner and the forge, but all it does is fill the forge with a cold orange fireball. I've heard something about the shape of the forge, how do I know how to sculpt it?
|
|
Craig
- Monday, 06/02/08 10:35:45 EDT
|
Craig-- please shut it down and don't light up again until you are sure you have the answers to your question. There are many places you might start. Here is one: http://ronreil.abana.org/design1.shtml
|
|
Miles Undercut
- Monday, 06/02/08 12:10:43 EDT
|
Craig, See all the long discussion above (this part week). If you are building a burner using someone's plans then check to see if you followed their instructions exactly including operating parameters if given (orifice size, fuel pressure. . .)
Forge shape is not critical but the ratios of burner size to forge and forge to forge vent do make a difference.
It sounds to me that you are running too low of fuel pressure AND the burner orifice is too small. Otherwise the fire would be back up in the burner.
As noted above the most common DIY burner problems are DIY designs rather than proven designs and quality of construction (wrong orifice, lack of deburring the orifice, crooked orifice, teflon tape in or over the orifice. . .
|
|
- guru
- Monday, 06/02/08 13:42:52 EDT
|
I don't understand a concept that is constantly brought up by tool collectors.
Old English hand planes are supposed to have the very desirable "laminated plane blades".
If they just fold the steel to "laminate" then it serves no purpose does it? The steel should still be homogenous and will still require the forging process and hardening, tempering that a non laminated piece would. What's the scoop on this belief?
|
|
- deloid
- Monday, 06/02/08 14:14:06 EDT
|
deloid,
They aren't just folding. The older blades had high carbon laminated (forge welded) to the low carbon wrought iron, wrought iron being no longer manufactured. This was done because high carbon steel was expensive in the old days. So to a collector, the two dissimilar ferrous metals indicate that it is an older blade than an all steel blade. The blades weren't necessarily better, but they indicate age. The Japanese may have a different slant on this. They laminate so they can fully harden the high carbon. It becomes martensitic, but will have a shock absorbant "cushion" of softer steel behind the cutting edge to help prevent cracks or thumbnail breaks.
This is my understanding. If others have more info on this, I am open.
|
|
Frank Turley
- Monday, 06/02/08 14:54:06 EDT
|
John: Since you indicated missing pieces of your top plate, a contrarian view to Guru's advice. An anvil is a tool. From time to time tools needs to be be dressed up or rebuilt. There was once several sources in the U.S. where an anvil could be sent to be repaired to near new and returned. Grinding off and replacing the top plate was probably the most common repair, but apparently some also replaced broken/missing horns and heels.
Now my advice somewhat depends on your anvil brand. Mousehole, Peter Wrights and Wilkinsons are common. Another brand may have more collector than user value.
I have retopped (welding) over a dozen anvils. I occasionally see some of the clients at Quad-State and all say they are still quite happy. If you want my technique e-mail (click on name) and I'll forward it to you. Essentially requires an arc welder capable of 7018 rod, large hand grinder and a heavy hammer.
|
|
Ken Scharabok
- Monday, 06/02/08 14:59:52 EDT
|
Frank, I think you nailed it. What is important to collectors is NOT necessary what be the best in a tool. Like very rare tools made by unknown makers. They are worth less than a marked piece by a known maker that may not have been as good. But they ARE known and others collect them and thus the price is often higher even though the product may have been inferior to a small custom maker.
|
|
- guru
- Monday, 06/02/08 15:02:25 EDT
|
Early 20th Century Anvil Repairs: All the folks that I have seen advertising this service were anvil manufacturers some of whom were still forge welding plates on their own product and all of who had the heat treating capability.
|
|
- guru
- Monday, 06/02/08 15:12:11 EDT
|
Deloid, another aspect is that the blades may have been made from Shear Steel which is a higher quality steel than blister steel and made by laminating up blister steel billets and forge welding them and drawing them out thus helping to equalize carbon content and to make any inclusions smaller in cross section. Also an indication of age of the piece.
Just depends on what they mean when they say "laminated".
Thomas
|
|
Thomas P
- Monday, 06/02/08 15:49:09 EDT
|
Debug Update: I just swapped out the lamp pipe on the gas burner for a shorter, tapered copper nipple, so the MIG tip ends in the reducing bell (I think it's in the high half of the bell now.). I also tried straightening the tip out a little as well. The flame now doesn't seem to sputter anymore but is still a little "raspy" (it doesn't look nice and smooth). Is that because of the geometry of the bell, or because it's not in a proper forge, or both?
|
|
mike3
- Monday, 06/02/08 17:52:12 EDT
|
Sounds like it looks normal. Without a step/nozzle the burner will not perform smoothly. Even then this is not a torch or Bunsen burner it is a forge burner and must have a significant flame velocity (thus turbulence and roughness).
Misaligned tips are best aligned somewhere else (the pipe) or bracket rather than forcing the compression fitting. The copper pipe nipple should bend well.
|
|
- guru
- Monday, 06/02/08 18:09:51 EDT
|
I have a picture I downloaded from ron reil's web site a couple of years ago. I built my burner from it and havent had a bit of trouble with it. If you cant find the picture "Ron Reil's propane burner modifications" let me know and I will email you a copy of it.
|
|
JLW
- Monday, 06/02/08 22:13:40 EDT
|
Looking at the picture again, I made mine slightly different in that instead of fastening the brass nipple to the reducer bell with brackets I drilled through the bell and inserted the nipple that way. I centered the mig tip orifice using water instead of gas and I flared a piece of pipe on the horn of the anvil and threaded it to the end of the long burner pipe instead of using a set screw. I inserted the burner into the forge side then screwed on the flare and then built up the kaowool and refractory in the forge shell. I got a regulator from a web site that sells knife making supplies and refractory and ITC. It is a great little forge and still works pretty well. The refractory needs some patching but that is about all. I used some square steel pipe about 10inches on a side and about 18 inches long.
|
|
JLW
- Monday, 06/02/08 22:19:49 EDT
|
We have an anvil that reads "WILK" with cross hander or a cross under that. The next word under that is "Queens" and then under that "Dudley". This anvil weights 150 pounds. Can you please provide me with any information?
|
|
steve
- Tuesday, 06/03/08 00:01:41 EDT
|
Steve, That is a Wilkinson anvil made in Queens Cross, Dudley England. They made anvils from the 1830's to late 1800's. They were one of the more progressive anvil makers in the area known as the "black country" of England. The origin of this term is not known but at its height this was THE iron working area of England. All the industries burned coal and coke making everything black.
They were a minor importer into the US compared to Peter Wright and Mousehole forge but also supplied the British colonies such as India and Australia.
|
|
- guru
- Tuesday, 06/03/08 00:21:53 EDT
|
Guru, I work at a county historical park. we have a forge and several of the guys at work do demos for school groups and events. None of the guys are computer literate so they asked me to look online for mold they can use for casting toy soldiers. they want to demonstrate to the school groups and then sell the soldiers at our gist store. I read the FAQs but did not see anything about this.
I have looked online for molds but would greatly appreciate any advice you might give on where to find quality molds for the guys to use. Thank you for your time.
sincerely, Ley Cash
|
|
Ley Cash
- Tuesday, 06/03/08 00:33:36 EDT
|
Ley Cash: I don't know where to buy molds for soldiers today, but I do remember Mine from 40+ years ago. The casting material [lead in those days] said "Home Foundry" on it. Today You should probably use a lead free material, perhaps lead free solder if You can't find anything else.
My molds are not particularly high quality, they are made of die cast aluminum, and they flash pretty badly. This makes for a lot of hand work to finish. These were from a kid's casting set, not production quality.
|
|
- Dave Boyer
- Tuesday, 06/03/08 01:08:19 EDT
|
(about the burner project) So if it's now adjusted right, is it time to start thinking about puttin' together the Forge?
|
|
mike3
- Tuesday, 06/03/08 04:11:20 EDT
|
Guru is right: forget lead, think pewter and white metal. Google "pewter casting moulds soldiers and see what pops up. :-) Prince August in UK apparently supplies for any period, in fact just about any unit, you can imagine
|
|
Peter Hirst
- Tuesday, 06/03/08 07:22:55 EDT
|
Ley Cash: Double check if it is even possible to offer the toy soldiers to school groups. For some a weapon is a weapon, even if on a mineature toy. Remember reading about some 6th grader who had glued some of the small plastic soldiers to the top of his motarboard in support of troops in Middle East. He was forced to cut the weapons off of them before he could proceed.
Question for those with a Hossfeld #2 bender. Is it possible to do centered, closed eyes on them? Best I can do is to come close and then have to forge finish. Since I do a lot of eyes, adds to time, expense and effort.
|
|
Ken Scharabok
- Tuesday, 06/03/08 10:07:08 EDT
|
Casting Toy Soldiers: Wow. . been a long time since that was popular.
A google searh using "Toy Soldier molds" brought up at the third listing:
www.miniaturemolds.com
These folks have all the equipment and molds. Their cart is poorly setup and there are no pictures matching the molds BUT there is an image gallery of finished pieces.
Lead used to be popular but tosay you want to use pure tin, lead free pewter (mostly tin) or lead free solder (also mostly tin with hardeners such as silver).
As Ken pointed out weapons or representations of weapons can get you in HUGE trouble in U.S. Schools. I am surprised they haven't ripped all the war images out of history books they are so ridiculas about it. In Virgina a 5 year old Kindergarten child was expelled for having a pistol key fob (about 1" long) in his posession. A friend's son was expelled from HS AND arrested for having a paint ball gun in the back seat of his car. . .
More. . . Another aquaintance beat himself to death making sample nails for every one of two classes (about 50) of elementary school children. All the nails were confiscated before the children got back on the bus because they were possible weapons!
|
|
- guru
- Tuesday, 06/03/08 10:46:22 EDT
|
RE: Wilkinson anvil--Hello Guru, they might have been a minor importer back in the day but I have one that was pulled out of a creek that was used in the California gold rush. The description on mine is different, though: it has JOSHUA WILKINSON stamped on the side, no Queens Cross or Dudley. The weight is stamped in the hundred weight notation (around 110 lbs or so). From the wear patterns, one know-it-all told me it was used for many years to sharpen picks and shape shovels. My other anvil, also from the gold rush but out of an established shop, is a ~200 lb Peter Wright, in much better shape, but much less portable than the Wilkinson.
|
|
- David Hughes
- Tuesday, 06/03/08 10:49:25 EDT
|
Eye Bending: I've done lots of these on static benders. To get a closed eye the holding dog that keeps the end of the work against the die must be quite narrow and positioned as close as possible to the end of the bar. After the bend is made in a P loop it is removed from the bender, flipped over and positioned with the long end on the dog side. It is then given a gentle pull to center the bar on the eys. This must be done hot to get a tight bend centering the eye. I usually work with a light hammer in one hand to tap things around a bit. But the whole process is very fast and the bender just a drum (center) and dog pin in a plate.
Second method. The centering bend of about 60 degrees (45 to 80) is made first. It must be made EXACTLY the right distance from the end of the bar. This is usually determined by trial and error adjusing a stock gauge until it is right. The loop is now bent by putting the piece on the bender with the angle bend snuggly held against the holding dog with the bender nose just behind it. Then the bender is pulled around to make the loop. This can be done cold. I do not know about a Hossfeld but it works on Diacro type benders.
Third method is the similar to the first except that a two lever bender is needed. The loop is bent first and then the second lever makes the entering bend against the first lever. This is normally a machine (rotating table) bender with a second ram or lever. They are not hard to build for manual use.
If the Hossfeld bender manual does not have it then it is probably not a simple thing to do on one. Ries might know but I think it is a Diacro job.
|
|
- guru
- Tuesday, 06/03/08 11:09:39 EDT
|
When I make a forge simple is better right? Because for moneys sake i was going to make a simple bowl shaped coal pan and run my piping for the blowers, and put this in a steel 55 gal drum and fill it with sand or dirt around the forge. Will this work? Is it good enough? Here there is a farrier supply, they sell 50 lbs of coal for 12$ or 50lbs of coke for 17$ which is a better deal?
|
|
- Jacob Lockhart
- Tuesday, 06/03/08 11:11:34 EDT
|
Wilkinson Anvils: While they are not actually rare they were not imported in the millions as were Peter Wright and Mousehole. However, they were made by several generations of the Wilkinson family and quite a few made it to the U.S.
Wear on an anvil can give you a clue to what it was used for but unless you were there you will never truely know. There ARE wear patterns distinctive to shoing and punching their nail holes. But beyond that I would not hazzard a guess.
I met a fellow that was making Coloinal reproduction hardware, mostly latches. While visiting his shop we noticed the wear pattern in his anvil from the one operation he did the most of. It was a single dip about 1" wide crossing the face just short of the pritchel hole. the fellow remarked that he had never noticed until just then how much wear there was. But he knew HE did it because the anvil was one of two brand new 75# Hay-Buddens he had found in an old hardware store.
Pick and bit sharpening is done in the middle of the sweet spot of the anvil because it is heavy work. This is where most of the wear occurs on any anvil not used for ane specific job and would be impossible to distinguish unless the wear pattern was so focused to be shaped like the tool. This almost never happens unless the shop it was in only did one thing for many years.
|
|
- guru
- Tuesday, 06/03/08 11:29:26 EDT
|
Forge Design and Fuel Costs: Jacob, The coke burns cleaner and probably has more fuel value. But is harder to keep going and makes a very hot focused fire that will easily burn work if you are not careful. The coal would be better for starting out.
Simplicity in design is best in most things. What you are building is a raised pit forge. While this is the earliest and simplest design it works well.
One thing to note is that fuel, ash and clinker fall down into the tuyere unless it is side blast. A clean out is very handy and makes it easier to use the forge. See our plans page and the brake drum forge for a simple tuyere with an ash dump.
Also note that the cross-pipe forge with holes drilled in the pipe for a grate is a charcoal forge design that does not work well with coal. Charcoal does not have the heavy ash and clinker problems of coal which quickly blocks grates with small holes.
|
|
- guru
- Tuesday, 06/03/08 11:40:34 EDT
|
"good enough" is a meaninless term if you do not include the answer to "for what?" Will this be used to work 4" stock or 1/4" stock? Do you need wide flat access or will a deep contained fire be just right?
Not known what you want to use it for makes any comment pretty much a guess. Also note that *free* can be way too expensive if it doesn't do what you want it to do and very expensive can be dirt cheap if it will do what is needed!
As for getting started I would suggest using real chunk charcoal to learn the basics and then start adding either coal or coke to the charcoal to gradually get used to the other type of fuel.
Thomas
|
|
Thomas P
- Tuesday, 06/03/08 12:00:29 EDT
|
Actually, on a hossfeld number 2 bender, you do it pretty much the way the guru described- bend the loop in one bend, then flip it, and use the sharp point of the bending dog to center and close the loop. This does not need to be done hot on 3/8" and below- hot might be good if you are making em from 1/2" or bigger round bar, though.
It is clearly described in photos in the hossfeld manual.
I have done a few hundred, in stainless, mild, aluminum, and bronze.
Works great.
It usually requires doing a practice bend or two, to figure out how much stickout you want on the material- once I figure this, I usually premark a big stack of metal with a sharp silver pencil, and then index each piece to the same place when bending.
Like any hossfeld process, it requires studying the manual to learn the right setup, and following the instructions. I still keep a hossfeld manual right under my bender-even after almost 30 years, I still dont remember all 101 setups, hole numbers, and pin configurations.
|
|
- Ries
- Tuesday, 06/03/08 12:14:15 EDT
|
Hossfeld Benders: Even after studying the manual I often have a hard time figuring out this tool. Since I can often build a specialized bender in the time it takes me to figure out the Hossfeld that is the route I often go. However, I'm not the average tool builder.
One thing I like about specialized benders is that they require no setup. For stock lengths I usually weld on a tab so there is no measuring or marking. If a stock stop will not work I try to put permanent marks or even a dimension on the tool. The trial and error testing is done ONE time.
However, you can end up with a HUGE pipe of special benders, jigs and fixtures. . But for repeat jobs they make sense.
Note that you can make setup fixtures that drop onto your Hossfeld that has stock gauges stops and positions on them. These are basically scraps welded up with an index pin or tabs to position it on the bender. The problem with these is they tend to look like junk and unless the job is stamped on them they are hard to keep up with.
|
|
- guru
- Tuesday, 06/03/08 13:02:02 EDT
|
True Cautionary Tales Dept.: I knew a guy in college who became a military historian, carried his profession over into making lead soldiers to replicate battlefields in miniature, casting them at the dining room table, died young, of lead poisoning.
|
|
Miles Undercut
- Tuesday, 06/03/08 13:10:49 EDT
|
oh i forgot to ask what would you reccomend to start the coal or coke? i heard that you can use pine cones but what do you use?
|
|
- Jacob Lockhart
- Tuesday, 06/03/08 13:29:03 EDT
|
I have the instruction manual for the #2 and have followed it, as best I can. Still can't get that closed, centered eye. Either it is the manual, or me, but...
Bought the #2 from a friend for $300 (with buyback rights). Apparently includes almost all of the accessories.
3/8" I bend cold. Above that I heat end in forge. Both have to forge finished to center and close. Not a biggie, but would be nice to get it right on one try.
|
|
Ken Scharabok
- Tuesday, 06/03/08 13:33:10 EDT
|
On English anvils, I asked Richard Postman about Wilkinson. He said he could only suspect they were all family related.
Mousehole took on the Armitage family name about 1820. When it was bought out about 1875 new owners tried their own name for about a year, then went back to Armitage as it was known in the industry.
Peter Wright factory no doubt went through many owners, but kept the same name.
|
|
Ken Scharabok
- Tuesday, 06/03/08 13:38:02 EDT
|
Starting Coal fires It depends on the grade of fuel. Good coal kept dry can be started with a little paper and a gentle blast of air. Coke needs to be started with a coal fire at full heat or an oxy-acetylene torch. Between these two extremes is the way to do it.
Usually a little paper and kindling is needed. The type of kindling depends on what you have available. If you have big dry pine cones then that is great as long as your supply holds up. I use something different almost every time. One day it will be pieces of broken handles, the next wood curls from the hand plane, we often use wood scraps splintered up from training newbies to hammer or demonstrating a power hammer. When the coal is wet and cold or I have used up all the kindling I use a torch. Many use a little kerosene or diesel fuel on paper and kindling. DO NOT use heavy oil, solvents or gasoline.
For more details see the Movie "Quest for Fire".
|
|
- guru
- Tuesday, 06/03/08 14:37:06 EDT
|
About 25 years ago, I visited the Shaker Museum in Old Chatham, NY, and they had a "Dudley" anvil weighing about 200 pounds. My friend Johan Cubillos, found anice "Dudley" with the cross logo IN Costa Rica, and it weighs over 300 pounds. www.johancubillos.com
|
|
Frank Turley
- Tuesday, 06/03/08 15:39:54 EDT
|
Utra! Utra! and watch out for those folks with bows!
Thomas
|
|
Thomas P
- Tuesday, 06/03/08 15:53:55 EDT
|
Lead, Plumbum, Pb: I have a bit of this in my shop. Most is there just in case it is needed for an application it is really needed for. Most of it was inherited.
Things you DO NOT need lead for:
Radiation shielding (a huge myth)
Weights of almost any kind including treadle and power hammer rams.
Soft pliable metal
Bearings
Bird shot
For most of these applications tin, zinc or steel can be used. For shielding and weights steel is best.
Applications FOR lead:
Some bullet projectiles as it wears and tins the barrel least and deforms when it strikes something.
Radiation shielding were space is very tight. This rules out most applications.
Radiation shielding where the lead is dissolved in glass or mixed with plastic sheeting for special applications.
Electrical solder and solder for non-food contact items.
Part of low temperature melting alloys for fuses and fire related triggers.
Soft faced hammers (other things work).
The problem with lead is, it is easy. It is easy to melt and pour, easy to weld, easy to cut, easy to form and fairly easy to obtain. It is easy to make your home or place of business a hazardous pollution site with lead. It is as easy to poison yourself with it as it is to use. The ancients knew and used lead. It likes flesh, sticks to it and is absorbed by it. But it is toxic and spreads easily as dust when liquid metal is spilled. Mild lead poisoning creates slow learning disabled children, moderate levels creates a whole plethora of problems in adults including death and there is NO CURE, NO GOING BACK, NO REMOVING IT FROM YOUR SYSTEM. If a soil test is done on your property and lead is found you will be in a huge mess with the EPA and may never be able to sell it.
When liquid lead is spilled on a concrete floor it splatters into thousands of droplets and many thousands more small sand and dust size particles. It is then easy to track on ones feet and spread as dust. It is nearly impossible to clean up.
In the nuclear industry lead is popular because of its density. However, for 99% of all applications steel works as well. In fact, where heavy shielding is needed lead sheet is not self supporting. It must be molded in a steel box or bolted to a steel plate. The result is that you are fabricating a steel structure to support the lead when a slightly heavier steel structure could act as the shielding alone. It only takes 30% more thickness to replace steel with lead.
Lead is expensive. $4 to $5/lb. in ingots or shot compared to steel at $1/lb cut to shape. A wall to replace a complicated fabricated lead wall that would cost over $10/lb. would only cost $1.30/lb. or $5/lb fabricated.
Most uses for lead are lazy, ignorant and irresponsible. There are almost always substitutes and they are usually cheaper especially if environmental concerns are added to the cost.
|
|
- guru
- Tuesday, 06/03/08 17:48:13 EDT
|
How much lead does it take to contaminate the ground to EPA interest levels? Almost every chimney in town -- including mine -- has several square feet of lead flashing exposed to the weather. Isn't this is because it is a soft, pliable metal? This is enough to keep the wood shingles downslope of the chimney clean and free of slimy growng things. Anything leaching from the flashing is going where the rain goes, which is right to the ground. There must be 50 pounds of lead exposed around the chimney. How much lead would have to be lying around the property before it becomes a soil contamination concern?
|
|
Peter Hirst
- Tuesday, 06/03/08 22:54:40 EDT
|
Guru, I have a question about heating structural steel red hot, inch by inch along a weld that has been ground smooth, to put grey "mill scale" back on it's surface. The architect is concerned that it might weaken the structure. I doubt it as the steel was made red during the welding process. What should we understand about this? I have heard that one is not supposed to heat rebar or weld it when preparing concrete reinforcements. I think maybe he is extrapolating from this idea and applying it to I-beams, which I assume are hot roll "mild steel." Isn't rebar made of melted down scrap which perhaps includes cast iron and maybe some high-carbon steel? And is it because of this random mix of steels that rebar perhaps ends up brittle or is not properly fuseable to the mild steel welding rod of the welded joint?
|
|
brian kennedy
- Wednesday, 06/04/08 04:01:22 EDT
|
Peter, most flashing is galvanized steel. But lead was used on a lot of roofing. Corrosion of lead is not nearly the problem that spreading fine dust is.
|
|
- guru
- Wednesday, 06/04/08 07:43:03 EDT
|
Heat and Scale: Brian, You are right in the structurals unless it is Corten rusting steel. Modern rebar is a hardened and temperd product that is supposed to have a specific bending resistance. The high strength stuff is really tough to bend.
Recreating mill scale is the problem. Heating the steel red will create scale. However, the mill scale was created during the heating and rolling of the whole piece. You MAY be able to come close to matching the color but the texture is difficult. The other problem is the local heating which causes expansion and contraction usually loosens nearby scale and results in flaking.
Expecting to use mill scale as a finish is always a problem and something I do not recommend. If the architect want that color and texture he should specify a paint process that protects the steel and reproduces the color and texture.
|
|
- guru
- Wednesday, 06/04/08 07:52:37 EDT
|
On the Hossfeld #2, I'm wondering if I might have found the problem. On mine Part #17B (Page 15 in my manual) extends past the bottom of the turning yoke. This keeps the yoke from coming all the way. Is Part #17B suspose to extend past the bottom of the yoke?
|
|
Ken Scharabok
- Wednesday, 06/04/08 08:07:47 EDT
|
i need some help on choosing between my 55 lbs cast anvil which is fairly soft, or thes two 3/4 inch steel plates to make an anviltop, and i cant find any refractory bricks around Waco so in the trough style forge, will normal bricks work?
|
|
- Jacob Lockhart
- Wednesday, 06/04/08 10:22:52 EDT
|
I'm on the road for a few days. Be back Saturday.
Jacob, Not enough information Plate doe not make an anvil as the mass is in the wrong direction. The 55 pound anvil is generally too light for average work.
Ask any builkding supply for "fir bricks". Refractory bricks come from foundry suppliers in general.
Regular red or yellow clay brick will do. I would try to find a few refractory (fire) bricks for the area where the fire is the hottest. This is the best route to go in any case as the price difference is about 10:1.
|
|
- guru
- Wednesday, 06/04/08 10:44:44 EDT
|
My understanding is that that the term "refractory" fire brick refers to the soft light-weight stuff they use like in pottery kilns. Around here you can get "hard" fire brick at most masonary supply stores, they use them in fire place construction.
|
|
- grant
- Wednesday, 06/04/08 11:31:28 EDT
|
Ken: Go to "hossfeldbender.com" under "tooling options". Does your "17B" look like the one in Fig.2?
|
|
- grant
- Wednesday, 06/04/08 11:40:31 EDT
|
Ken- Hossfeld makes 2 pins that look a lot alike- the 17B, and the 17B3, which is more offset than the 17B. So you could be using the higher offset pin, but it only moves the bending dog, (which is what I am assuming you are calling a "yoke" farther in or out in relation to the centerline of the swinging frame. You use the 17B3 on smaller diameter steel, and the 17B on larger.
This offset is also present, to a lesser degree, on the standard 17B. They call one side the "shoulder, and the other side is more or less straight up.
They specify the "shoulder towards the front", which I think means towards the direction of bend.
But reversing this pin, and therefore moving the bending dog in relation to your center line, could help your problem.
Kinda frustrating diagnosing this type of problem online- If I was in your shop, I could show you how to do it in a minute or two. But not being able to see it, I just dont know.
One thing I often do is turn the bending dog around for the first part of the bend, so its point is pointing to the right, not the left. It seems to grip better, and you can always reef it down with a vise grip too. That way it doesnt make a ding in the round bar. Then I flip it back to the left for the final reverse pinch when I center and close the eye.
Clear as mud, eh?
|
|
- Ries
- Wednesday, 06/04/08 11:48:42 EDT
|
will anyone please send me something describing annealing, normalizing, and tempering in more depth for my research paper please but it has to be understandable for high school because what i have found is not much.
|
|
Nitemare
- Wednesday, 06/04/08 16:13:05 EDT
|
Well I would suggest you go to the local public library and ILL something like "The Complete Bladesmith" by Hrisoulas---you do have enough time to have it shipped in right?
Otherwise you may want to look up a piece called Metallurgy of Steel for Bladesmiths & Others. who Heat Treat and Forge Steel. John D. Verhoeven.
I believe you can find it on-line if you dig around; but *YOU* have to do the digging. The stated policy of this website is that we will help but we will *not* do peoples homework for them.
Good luck!
Thomas
|
|
Thomas P
- Wednesday, 06/04/08 17:41:51 EDT
|
On LEAD,
First lead is a toxin that sneaks up on you. Small amounts accumulate untill symptoms appear. Can take many years. Young children 6 and under are most at risk. Most lead in children is injested through the mouth by chewing and by breathing dust.
The prime sources of lead dust in residences are;
1.) lead bearing paint. The old paints, especially exterior white paint had large lead content. The exterior paints were designed to "chalk" that is the surface would break down into a fine dust and the rain would wash it off, producing a dust contamination of the soils at the dripline of the painted structure.
2.) PVC in household items, miniblinds especially. A molding aid often used in PVC is lead. Again the surface degrades, in this case from sunlight and produces lead dust.
3.) Lead melting for fishing sinkers and bullets ETC.
4.) Fallout from leaded gasoline.
Lead in children is a real problem and leads to reduced IQ, and is also now thought to also produce aggressive behaviour.
Lead bioaccumulates in the body, mostly in the bone marrow. The Guru is almost right about never getting rid of lead once in the human body. There is a process to remove lead called chelation therapy. This will over some months pull lead from the body, but it has dangers and unpleasant side effects. But it can be pulled out. If however a childs brain is damaged so far that is beyond repair.
In the lead Risk Assesor, and Lead Inspector courses I took, I did not ever hear of a risk from lead flashing washoff. Does not mean it is not a risk, but I did not hear it mentioned.
|
|
ptree
- Wednesday, 06/04/08 17:55:03 EDT
|
Dear Merl,
I don't have those exact dimensions but it says on it a 20" shaper. It's probably over 2500 lbs. so I deff. want to learn more before I do anything(like how to use it and what all the controls do before I start it up)!
|
|
John in Jersey
- Wednesday, 06/04/08 18:53:05 EDT
|
On Brian's scale question -- the steel was heated a lot hotter than red when it was welded!
|
|
Mike BR
- Wednesday, 06/04/08 19:16:48 EDT
|
brian kennedy: A little more on rebar: It is manufactured in different grades, to different yield strengths. Some rebar is weldable, I forget the specification for it however. Altho not a precision alloyed product, it does conform to published specifications.
|
|
- Dave Boyer
- Wednesday, 06/04/08 21:58:24 EDT
|
John in Jersey, that "20"would mean it has a 20" work envelope (20x20x20)
That is mesured from a bare table so you would always subtract the higth of the vise or fixture but it's unlikely you'll need that mutch higth just starting out.
I would be happy to help you get familiar with the machine and how it all works but, I don't think Guru would appreciate us using his web site for that purpose. Click on my name and e-mail me directly if you like or ask the Guru for advise as well.
A good healthy respect for a machine tool is always the most important first step in the learning proses, false pride and arrogance are left at the door.
Befor you even wire the thing up you had better know how to shut it off.
One thing I was going to mention about the wireing.
If it is a three phase motor then you have a 50/50 chance of getting the motor going in the correct direction on the first try. All mechanicaly driven shapers have a ram motion that is slower on the forward stroke and faster on the return stroke. This is due to the way the Scotch Yolk and ram linkage are arrainged. It is intended to make the machine run a little faster and give some greater mechanical advantage to the forward cutting stroke.
So if you have the machine running and the ram is engaged and you see that the return stroke takes longer than the cutting stroke then the motor is running backwards.
You can't "just live with it" because that would mean other stuff may be running backwards too and it does make a differance 99% of the time.
Like I said either ask the Guru or e-mail me and I'll help you as best I can.
|
|
merl
- Wednesday, 06/04/08 22:48:59 EDT
|
Rebar-- don't put much effort into forging stuff-- pokers, back scratchers, S hooks, etc.-- out of rebar. It is basically reconstituted caca and will only break your heart.
|
|
Miles Undercut
- Wednesday, 06/04/08 23:34:41 EDT
|
If you can find a piece of say 3/4" rebar with the X pattern it does make an interesting snake.
|
|
Ken Scharabok
- Thursday, 06/05/08 09:09:37 EDT
|
I thought rebar had to be made to pretty strict ASTM standards, usually either A615 for carbon steel or A706 for low alloy. I can understand that a short section without the marked end could be an unknown quantity, but if I have a piece with the ASTM mill and grade markings, can't I rely on it ?
|
|
Peter Hirst
- Thursday, 06/05/08 09:24:07 EDT
|
Peter Hirst,
Yes, you can rely on it to meet the specs set by ASTM for that material, but may have nothing to do with the actual chemistry of the alloy. Just like ASTM grade A36 structural steel meets certain yield strength requirements, but has no specific chemistry. Threfore, it may be fine when used as rebar, but very poor for forging, or no good for welding, etc. For dependability of chemistry in alloys, you need chemistry-specific grading like the UNS or the AISI numbers.
|
|
vicopper
- Thursday, 06/05/08 12:14:12 EDT
|
Nitemare, go to www.iforgeiron.com and look up blueprint number BP0078. This is a much more basic explanation of heat treating for the blacksmith than the Verhoven text.
|
|
quenchcrack
- Thursday, 06/05/08 12:18:08 EDT
|
Farrier Question: There is a 600 year old Spanish expression that translates; "Strike once on the nail
and a hundred times on the horseshoe". I would appreciate
any insight as to the meaning of this idiom.
|
|
Har Fisher
- Thursday, 06/05/08 20:18:06 EDT
|
Har; my take on it would be that you should spend a lot more time getting the horse shoe *just* *right* than you do putting it on.
Or good prepairation makes for fast use!
Thomas
|
|
Thomas P
- Thursday, 06/05/08 20:33:07 EDT
|
Brian K- I do the same thing all the time at the REQUEST of architects. As long as it was welded properly in the first place you should have no problem with the possible exception of additional warpage. Tell him (or her) that it is a normalization process for the crystal structure of the steel and either they will get bored with the tech talk or decide that you know what you are doing. Either way they should leave you alone to do your thing.
|
|
Judson Yaggy
- Thursday, 06/05/08 20:42:55 EDT
|
Har,
Maybe it means make the horseshoe, but *buy* the nail. (Actually, I doubt that's it, but I couldn't resist).
|
|
Mike BR
- Thursday, 06/05/08 20:54:30 EDT
|
Guru, I need to roll some hinge barrells on some 3/16 x 5"
flatbar. I seem to remember seeing a shop made hinge roller in my travels, but I can't find my notes on this gadget. Does any one have a design they would be willing to share, Its a real challange (for me) to roll em freehand.
Thanks in advance
|
|
- Tim in Orygun
- Thursday, 06/05/08 22:36:01 EDT
|
Tim in Orygun,
I use one similar to the one Don Streeter show in his book, "Professional Smithing Techniques." 5" wide stock is going to be a real struggle, though - 1/4" x 2" gives me a workout.
|
|
vicopper
- Thursday, 06/05/08 23:16:24 EDT
|
Spanish Horse shoes: "measure twice, cut once"
|
|
Peter Hirst
- Friday, 06/06/08 08:32:24 EDT
|
Rebar -
For what its worth I forge rebar all the time with many techniques including aggressive swaging, long tapers, leaves, twisting and so on. I cannot remember the last time I had a break (or crack).
|
|
- Jamie
- Friday, 06/06/08 10:27:56 EDT
|
JYH tire tip. Look in the trunks of ALL vehicles from the 80's and 90's at your local junk yard. They're sometimes overlooked because they're under the carpet. That's how I found mine.
|
|
- Thumper
- Friday, 06/06/08 12:15:52 EDT
|
Hello Guru
Me and some friends desided to learn blacksmithing as a hobby.But first we need to build a forge.I'm sure there arent any blacksmiths living near us, so i would be very greatfull if you could give us some advise on different forge types preferably coal forges.Thanks in advance.
|
|
Kristian
- Friday, 06/06/08 12:32:39 EDT
|
Kristian - Start by reading the linked page 'Getting Started in Blacksmithing' (bottom of this pages posts right hand button.) Your question has been asked by many others, so the Guru (Jock Dempsey) wrote this as a starting point.
I have to stress GET THE SAFETY GEAR! Particularly the eye and hearing protection. Even if you don't carry on in smithing those things are wise to have for other hobbies, and required for a lot of jobs.
Don
|
|
Don
- Friday, 06/06/08 13:45:56 EDT
|
A well known swordmaker nearly lost an eye mowing his yard something that a nifty set of safety glasses would have totally prevented. I wear my safety glasses whenever I'm not sleeping and my hearing protectors a *lot*; like driving long distances in my old noisy (wind noise) pickup.
Thomas
|
|
Thomas P
- Friday, 06/06/08 13:53:30 EDT
|
I have a harbour freight copy of a Hossfeld bender, and was wondering if anyone could direct me to some information on how to use it. The instructios it came with are pretty sparse, and I couldn't really figure out how to bend an s scroll of flat stock. Can someone clear this up for me?
|
|
- Hollon
- Friday, 06/06/08 14:07:33 EDT
|
I need a picture of a hammer striking a hot piece of metal on an anvil with sparks flying. I need it for a sermon tomorrow morning. can you help?
|
|
Rabbi Charlie Edwards
- Friday, 06/06/08 14:58:58 EDT
|
The only time you have sparks flying is during forge welding. If sparks are flying during regular forging you have pretty much trashed any modern steel.
Look down the site below to the bottom section and you may find a picture you like
www.passforge.com/photogallery.htm
Or do a search on "Forge Welding"
Thomas
|
|
Thomas P
- Friday, 06/06/08 16:41:34 EDT
|
The harbor freight machine is not a copy of a hossfeld- its a copy of a shop outfitters model which kinda sorta took its inspiration from a hossfeld.
Nonetheless, there are two ways to bend scrolls-
Either you buy a scroll die, which, in the case of harbor freight, means it will bend clunky looking scrolls in one size of metal- in the harbor freight case, 1" x 3/16" flat bar the easy way. (other companies, like Grizzly, sell slightly different scroll benders)
Or, you can draw a scroll the way you want it to look, and bend the steel to match the drawing. Obviously, you can do this hot with a hammer or anvil, or cold with a bender. The harbor freight and shop outfitters designs, unlike the hossfeld, require you to do all your bending in between the top and bottom frame- so on a scroll, the pins and frame can get in the way. But it still can be done- you just use the round pins, no additional dies, and bend a bit, check against your drawing, bend a bit more, unbend where you went to far, and repeat until your scroll matches your drawing.
Do this a hundred times or so, and it becomes automatic.
With a real hossfeld bender, you do this with longer pins, up on top of the frame, and so can make a scroll any size and shape you want- I have done em up to 6 feet or so in diameter from 3/4" material on occasion.
|
|
- Ries
- Friday, 06/06/08 16:42:53 EDT
|
Har Fisher, Maybe something got lost in the translation, if you get my drift. Could you forward the horseshoe saying in Spanish?
|
|
Frank Turley
- Friday, 06/06/08 18:39:18 EDT
|
Getting away from the benders a bit, you can make an oversized "scroll form" or "scroll tool" around which you bend your scrolls hot. The method is shown in the British book, "Wrought Ironwork", pp. 35-36. If the tool is oversized and you have your scroll drawn within, say, a module, you can hold the tool over your drawing and rotate it until if fits the module or frame, making an allowance for the scroll stock thickness. Make a soapstone or Presto correction-pen mark on the tool and do a test piece, stopping at the mark. Check the test piece for fit. The scroll may not look exactly like the drawing in terms of tightness, looseness, negative or positive space, but it will fit the module and might be usable on the final project. This can be a time saver.
|
|
Frank Turley
- Friday, 06/06/08 19:03:40 EDT
|
When I emptied out an old smithy in Trinidad, Colorado, I found a box full of various sizes of pipe with a single 2-inch or so slot cut in one end parallel to the long axis of each. Scrolling jigs, the retiring smith told me. Another way to skin the cat: draw your scroll on the work table and bend it with forks.
|
|
Miles Undercut
- Friday, 06/06/08 19:11:02 EDT
|
Refractory Brick: All special high temperature brick from the light weight foamed insulating brick to the hard dense liquid metal resistant bricks are "refractory brick". Then there are many special pieces called "blocks" of one sort or another like burner blocks.
|
|
- guru
- Friday, 06/06/08 19:26:40 EDT
|
Awhile ago i asked some questions about the tuyere and the piping for a forge and was told to look at the brake drum forge but the tuyere especially is unclear. is there someplace i can go that would clear thaat up for me?
|
|
- Jacob Lockhart
- Friday, 06/06/08 20:11:28 EDT
|
Scrolls- Take the module that Frank is talking about. Weld to a piece of angle iron. Weld the angle iron to a large mechanic's socket. Insert into a standard ratchet (1/2 inch drive or bigger) Clamp or weld down the whole thing. Insert the hot workpiece and rotate the jig as needed. Be sure to make the scrolls to EXACTLY fit within the golden ratio rules just to drive the Guru nuts ;).
|
|
Judson Yaggy
- Friday, 06/06/08 20:16:04 EDT
|
A hossfeld bender IS a bending fork.
Its just a better one.
With three pins, rather than two, and being bolted to the floor, this bending fork allows you to put all your energy into bending the metal, rather than holding it with one hand and pulling against yourself with the other, which is why you have to do it hot, rather than cold.
And a hossfeld, with its multiple holes and pins, is 20 or 30 bending forks in one, rather than having to make, and store, all those individual forks.
I find its a lot easier to have the entire mass of the earth holding my metal in place while I bend it.
I often do bend things hot with the hossfeld, though, for the same reasons you bend things hot with a bending fork- its easier, and metal bends differently hot and cold- you can control the hot area, and get different looks by that control of heat. So for aesthetic and efficiency reasons, the hossfeld is often used with hot metal in my shop.
I would be willing to take on all comers, in bending a scroll, drawn by a neutral third party, with me on a hossfeld, and any challengers with their bending forks or just hammer and anvil. I am confident I can produce equal or better quality scrolls, more accurately to the original drawing, faster every time with the hossfeld, hot or cold.
Winner buys the beer.
|
|
- Ries
- Friday, 06/06/08 20:19:02 EDT
|
Scrolling:
Mostly I do mine over the edge of the anvil with a hammer since it is quick enough for one or two and I can get them exactly the way I want them. However, one of the handier little items you can have available in your shop is a set of bending pins for your post vise. Only take a few minutes to make them and they'll save you fifty times that time in annoyance alone.
Take two pieces of 1" square bar about ten inches long and drill a 5/8" hole about 3" from the end of each one. Cut two pieces of 5/8" round bar that are 2-1/2" long and chamfer the ends heavily. Set the pins in the holes in the square bar and plug weld the end to retain it. If yo want to save yourself some annoyance, weld a piece of 1/8" x 1/2" flat bar at the top of each piece of squ are bar to keep them from slipping down in the vise jaws.
To use the pins, clamp them in the vise with the pins spaced a distance apart that suits what you're trying to do. One pin acts as the stop and the other is the fulcrum around which you pull your steel to bend it. Like an adjustable bending fork clamped in the vise, right?
Now, for those of you who own one of those basically worthless Harbor Freight benders, there is a bonus: I had you make the bending pins from 5/8" round bar because that is the size that the dies from the HF bender will fit over perfectly. Now you have a variety of fulcrum diameters form 5/8" up to 3" available for those times when you want a circular bend, or just want a fatter pin so you don't ding the stock so much.
On my personal set of pins, I milled a tongue and groove in the mating faces so they cannot twist out of parallel, but that's really overkill if you're working hot. Working cold stock over 3/16" you can exert enough force that you might shift the bars in the vise jaws, and the T&G stops that. Mostly, I just felt like milling something that day. :-)
|
|
vicopper
- Friday, 06/06/08 20:21:43 EDT
|
I have one of the original Lockdown securities benders that HF knocked off. It is not a hossfeld. It is a very usefull tool, making many repaetable bent up things in my shop. I do not bend scrolls on it however. For that I either make them over the edge ofthe anvil or use one of my scroll forms. The scroll forms are great when many of a same scroll are needed. Mine have a solid bar welded to them and drop into the handy hole. I taper the end if desire, start a tight scroll start it around while using the tongs to hold the start end, once around a little the tongs are not needed as the scroll grips the form and around you go. A gas forge with say 18 to 24" of lenght such as mine makes for a one heat nice long scroll. I have one heat rolled scrolls from bar as big as 1/2 x 2" flat the easy way.
|
|
ptree
- Friday, 06/06/08 20:30:32 EDT
|
Guru:
I have a small bellows that I believe may be part of a Colonial/Revolutionary War mobile or cavalry/farriers forge kit. It is the classical teardrop, double action configuration but measires only about 3 1/2 feet long, including the nozzle. The leather (which is of course shot) is bound by 1" strips of oak or ash, hand-chamfered and fastened by a zillion small hand forged tacks. The hook on the bottom board is hand-forged wrought fastened by screws with square cut -- not tapered -- ends. Slipped over the end of the nozzle is what I believe was the tuyere. About 7" long, about 3/4" i.d. octagonal pipe, slightly flared at one end (to about 1 1/4" i.d.) and constricted at the other. It is either a section of rifle or musket barrel or a pipe of similar construction. There is a residue of clinker and burnt iron just inside the crimped end of this pipe. The bellows was found mounted on a frame consisting of two long pieces of 1/2" sq. hand-forged wrought, bent up and punched about 3/8 " at each end, sort of like sled runners, connected by wood cross pieces, such that the bellows is held about a foot off the ground. One end of the runners holds a 3/8" rod that runs cross-wise through the middle board. The other ends look as though they bolt or screw to the underside of a forge. Above this frame, a curved wooden lever is mounted and connects with a short rod to the hook on the lower board. My intention is to restore this bellows for a Colonial demonstration I have been asked to do. My question is, what the hey might the forge have looked like? I have found nothing remotely like this online. From the details I have described, I surmise that it is a traveling set-up, possibly military, and most likely Colonial. I have seen plenty of stone, brick and wooden permanent forges from this period, but nothing on the small scale of this bellows. My inclination is to fabricate a small wooden side-blast open forge with a sand hearth covered in unmortared half brick, with a small clay firepot positioned to put the opening of the gun-barrel tuyere flush with one side. I also have a small (40 lb, 4" jaws) leg vise with lots of hand forged detail that I believe is also in period and in fact came from the same barn as the bellows, to attach directly to the forge. Any idea what the forge might actually have looked like?
Thanks as always.
|
|
Peter Hirst
- Saturday, 06/07/08 07:56:34 EDT
|
Tuyere: Jacob, Technically a tuyere is the fire resistant pipe or nozzle that forced air enters a fire through. A bottom blast coal forge tuyere is a little more complicated.
What could be more clear than a cross section and an exploded view?
Air from the side enters a T and goes UP into through a simple grate the fire pot. Ashes and clinkers fall through the grate into the T and can be emptied out the bottom. A tilting counterbalanced door or a sliding gate allows quick and easy ash removal.
I show several ways of making the ash dump gate. The easy way is to weld two tabs onto a short piece of pipe (a pipe nipple cut in two) for the tilting gate. BUT if you do not have welding equipment you can make a rotary sliding gate with nothing more than a hack saw, a file and a drill. This requires cutting two slots with the saw to make a tab that bends to the side. The excess pipe is sawed off so that the tab is flush to the bottom of the pipe.
NOTE: Some people close thew bottom of the ash dump with a pipe cap. This does not work if you burn coal. Coal creates heavy ash and clinkers that build up rapidly in the ash dump. They also include burning bits of fuel. All this must be removed often and the pipe cap is too clumsy and gets too hot for this purpose. A pipe cap is OK with charcoal and a fine grate but I do not recommend it.
|
|
- guru
- Saturday, 06/07/08 08:45:24 EDT
|
"Pipe scrolls", bent around a pipe, as Miles talked about earlier, are not really scrolls. They are atrocious, cheesy things that have a couple of things wrong with them. They are partial curves with no exponential growth. They all have a straight line center from being stuck into the slot of the pipe. Yet we find them installed all over the U.S. on mostly fabbed, cheesy ironwork.
Peter Hirst. I have not had the opportunity to see a colonial period permanent forge setup. The repros of such are often attached to a recent cast iron firepot. The hearth and chimney may be brick, but the U.S.A. firepot is in there. I have a vague clue that I found in Hummel's book, "With Hammer in Hand," page 16. There are diagrams of the Dominy family forge where the bellows was stored in the attic for reasons of space. The drawings are small and difficult to read. I assume it was a side blast from the 1800's. Therefore, I can find little information on a permanent forge setup, let alone a traveling one. Jock did the illustrations for "The Revolutionary Blacksmith," which I cannot find at present. Your answer may be in there. Hawley, in his book, "The Blacksmith and his Art," fills the hearth with wet wood ashes. The horizontal tuyere nose or pipe is a little above hearth level. Hawley forms a dish-like depression where the fire is to be, from whence (I think) came the old expression, "duck's nest". The behavior of a side blast fire is shown in "The Blacksmith's Craft," pp 15-18.
|
|
Frank Turley
- Saturday, 06/07/08 09:48:42 EDT
|
Mr. Undercut is deeply shocked.
|
|
Miles Undercut
- Saturday, 06/07/08 10:17:30 EDT
|
Small Bellows: Peter, Assuming a bellows was for a portable blacksmith forge setup by size is a big jump in logic. Bellows were made in sizes from the huge machine powered size for iron furnaces down to jeweler's hand held size used to melt precious metals in thimble sized crucibles.
Many kinds of craftsfolk used them other than blacksmiths. All the non-ferrous metal workers that did casting used bellows including the white smith who often made pewter items, early plumbers who melted lead. Small hand held bellows were called moulders bellows and used by foundrymen to blow loose sand out of molds.
Blacksmith bellows size also varied greatly depending on the type of use. Small scale ironwork included nail making, small chain and light hardware. I have seen little storage box hinges with forge welds made of stock less than 1/16" thick. Farm shop bellows were also smaller than commercial shop bellows.
Your bellows support frame is common for floor supported bellows. Most are wood but some have metal parts.
The Forge: When bricks were available they usually were used to build a permanent brick forge. But it is safe to assume that smiths would have used bricks much the same as we do today to modify a forge, reinforce or provide a hearth on an earthen forge if they had one.
Wood enclosed forges were usually side blown and filled with light soil and then coated with clay or a clay/manure mixture. The tuyere may have been the end of the bellows but only an amateur would have done that. To prevent burning the end of the wood bellows the pointed nozzle blew a high velocity jet of air at the end of an open pipe/tube/tunnel or shield stone. Tubes were often ceramic but could be build of stone. Shield stones were make of soapstone. Occasionally the end of the nozzle would be a short distance inside the tube but it did not make a tight connection.
Portable Forges: In my story A Blacksmith of 1776
I describe an apprentice smith quickly promoted to Journeyman as the American militia is called up for active duty throwing together a portable forge on an available wagon.
Paw-Paw used this same fictional device in his book The Revolutionary Blacksmith. I illustrated both. However, this is quite different than actual known military portable forges. These were built on heavy axles similar to cannon caissons and had a place to carry charcoal, store tools and such. Very little is know of actual details.
|
|
- guru
- Saturday, 06/07/08 10:17:55 EDT
|
"Mr. Undercut is deeply shocked."
That's why GFIs are recomended
|
|
JimG
- Saturday, 06/07/08 10:24:55 EDT
|
 Pipe Scroll Fixtures and pipe scroll fixtures. There are cheap poorly made circular fixtures and there are better made well used fixtures. Pipe Scroll Fixtures and pipe scroll fixtures. There are cheap poorly made circular fixtures and there are better made well used fixtures.
These scrolls made by Pat McGhee of Greenwood Ironworks are an old style used with flat bar and when overlapped create more mass than the flat bar would alone.
Hot/Cold Scrolls: When a spiral scroll jig is used the tight inner scroll is done hot but the gentler outer curve is often done cold. A long heat is not necessary unless the bar is very heavy. I often forge the scroll terminus or end in one or two heats and use the residual heat for the scrolling.
|
|
- guru
- Saturday, 06/07/08 10:47:11 EDT
|
How to handle anvil crack?
Dear Anvil Experts: my (probable) Peter Wright monster anvil (36" horn-to-heel; too heavy for me to pick up) appears to have a crack in it - possibly why I got it for cheap. This came from the railroad shops, so it was probably used for heavier work than I can imagine; how careful do I need to be with it? I hope to use this anvil on a hobby basis for a long time: half-inch square is likely to be the biggest I use on a regular basis, with occasional axles being sledgehammered to make anvil tools. Since I'm working solo, I really need to use the hardie hole for a cutter and other tools as I make them, but I *really* don't want to break off the heel! All advice welcome.
(large) If the photo and link don't appear, find the small version at http://www.netdataconsultants.com/misc/cracksm.jpg and a larger version at http://www.netdataconsultants.com/misc/crack.jpg - thanks in advance!
|
|
Paymeister
- Saturday, 06/07/08 11:07:42 EDT
|
Nice tool Vicopper, think I'll make one today before I forget and wish I had one later.
|
|
- Thumper
- Saturday, 06/07/08 12:12:45 EDT
|
Paymeister, It is difficult to tell absolutely but I am fairly sure this is a weld joint. Faces on old anvils were often pieced together. If not then it is only in the anvil face, the wrought under the crack is not breaking. It also appears to be a very old crack. In either case I would not worry about it.
|
|
- guru
- Saturday, 06/07/08 12:14:36 EDT
|
Re: Refactory fire brick
You're right again! I think the term I was thinking of was
|
|
- grant
- Saturday, 06/07/08 12:27:22 EDT
|
Re: Refactory fire brick
You're right again! I think the term I was thinking of was "insulating fire brick".
|
|
- grant
- Saturday, 06/07/08 12:27:49 EDT
|
Guru and Frank Thanks for the insight on the small bellows.
Guru, I believe we are agreeing on the interpretation of this bellows. Portability aside for the moment, I think it is safe to say it was at least used for smaller, lighter work than in an all around shop. As for the tuyere, it is not the end of the bellows, but a separate piece, much heavier in construction, and has every appearance of being a section of musket barrel modified for the purpose. It does in fact fit fairly loosely over about an inch of the nozzle, which is itself 6 or seven inches long. The residue at the constricted end of the musket barrel piece is unmistakable: it is clinker and burnt iron: looks like stick weld splatter. It may have been mounted in a soapstone shield, but if the edge of the wooden forge is adequately protected from the fire, then the bellows which is a nozzle length farther away than that should certainly be safe.
As for portability, I surmised that from the height of the bellows frame, and the fact that it disassembles readily. It only holds the mounting rod a foot or less off the bottom of the frame, It would have to be raised up, say on a wagon bed, to put the nozzle level with the tuyere. In fact, it would be set up exactly as your cover illustration to The Revolutionary Blacksmith shows!! I'll send pics when I get it put together, but for now, I think it is at least some evidence for the accuracy of your and Paw Paw's conjecture about the militia forge. Now, where to find a covered wagon . . .
|
|
Peter Hirst
- Saturday, 06/07/08 13:08:23 EDT
|
With the HF Hossfeld lookalike, you could also work from the top. Just get some longer grade 8 5/8" bolts. You don't have the force you do working on the inside, but enough for 1/4" cold and better when hot.
|
|
- Marc
- Saturday, 06/07/08 14:51:25 EDT
|
Thanks for all the replies about making scrolls. Thats very helpful. Now another thing. My welding instructor told me that welding on a leaf spring would make it brittle and would make it crack. Even though I've heard this before, I would've thought only air hardening steels would do this?
|
|
- Hollon
- Saturday, 06/07/08 15:03:13 EDT
|
Welding, The HAZ: Hollon, Time and temperature. If you quickly heat a small place above the critical temperature and you cool it fast enough as the surrounding cold metal will do then it will have a hard brittle zone. Arc welding metals results in what is known as the HAZ (Heat Affected Zone). In this zone conditions can vary from nearly annealed to overly hardened as well as the base metal being zoftened. In low carbon steels the condition is not a serious problem but the higher the carbon or the more hardenable the steel the greater the problem.
If you preheat the metal to near its normal tempering temperature then weld it then the cooling metal will not cool fast enough to harden OR it will be tempered by the surrounding metal after hardening. A preheat of 350°F gives you the minimum temper for carbon steels. Since the welding ads heat it may be a little better.
Large pieces that are not high carbon are post heat treated. This after weld heating is designed to return the weld and all the surrounding metal to the original condition.
In tool steels a preheat that would be uncomfortable to work around on large pieces is used and a hardening rod as well. This is followed by peening to stress relieve the weld zone and in some cases a post heat treatment.
Ideally a full heat treatment would be performed. However, even the best weld material is never a perfect match for the surrounding metal.
This messy area or the wled is what I do not recommend anvil face repair.
|
|
- guru
- Saturday, 06/07/08 17:04:56 EDT
|
Marc, You can extend the pins on the Hossfeld as well. It just takes bigger pins and they need to be a good heat treated steel like SAE4140 for tight or colds bends.
|
|
- guru
- Saturday, 06/07/08 17:59:57 EDT
|
Marc,
Yes, you can extend the pins on the HF bender, but I seriously doubt you could work 1/4" cold on it. HF only rates the thing for 3/16" cold between the arms, and going above them puts significantly more stress on that already undersized piece of equipment. Note, I haven't tried it, and probably won't, so I'm just guessing here.
|
|
vicopper
- Saturday, 06/07/08 21:28:43 EDT
|
Vic, at first I thought you were thinking of a different bender, so I checked t HF. Their listing is probably a little wrong. They say 3/16 X 1-1/4 or 1/4 X 2, which doesn't make sense. I'd guess hey reversed a dimension, 1/4 X 1-14 makes more sense. In any case, I formed some brackets on top that were 1/4 X 1-1/2 cold. That strained the bolts a bit, but it was doable. It's done 1/4 X 3/4 on top with no problems at all.
I think doing 5/8 square inside is probably a stretch, but I know 1/2 square works well enough.
Anyway, my point is not that the HF is every bit as good as the Hossfeld - it's obviously not even close. But I doubt a Hossfeld, with dies, will ever find it's way in this hobbyist's shop. They look like wonderful tools, just not cost justifiable in the foreseeable future. The HF knockoff of a knockoff, at $80 (mine was $60), will do enough to keep me happy and out of my wife's hair.
Just as the HF throatless shear is not close to a Beverly. But that little guy has cut lots of sheet up to 14g. Not lots compared to you pros, but enough for me and my doo-dads over the years.
|
|
- Marc
- Sunday, 06/08/08 15:51:00 EDT
|
Shop Outfitters (and HF copy) vs. Hossfeld Benders: The difference between these machines is about 4 to 1 in size. Between HF and Hossfeld the price is 11:1 Between Shop Outfitters and HF there is a 6 to 1 difference. There is NO comparison other than they look a little alike. The Hossfeld also has a line of special dies that allows some sophisticated and extra heavy bending. The Shop Outfitters is now much heavier than their original that was copied by the Chinese for HF AND it has a number of add on dies and features. When you buy the HF you get what you get.
Note that Shop Outfitters has a very nice scroll tool.
While Hossfeld is a very pricey tool for a hobbiest I have known quite a few to find entire outfits with all the dies for a reasonable price. Others have found the base bender without dies for $25 - $50. I have two of the later that need dies bought or made for them. More importantly they need a VERY heavy mount such as on the corner of a weld platen or a very heavy dedicated stand bolted to the floor.
Hobby or not, if you have the work for one of these tools they will pay for themselves as most tools do. But they are NOT tools for one off bends or small projects. Setup often takes enough time that it is almost always less expensive time wise to make single bends by hand on in a vise.
When it comes to most bending I have built my own tools. Scroll jigs take minutes and other complicated benders can take up to a day. Many benders MUST be custom made and in those cases having made simple benders is good practice for the more complex. Then the cost of having made those simple tools has been an education that pays you back later. It is what blacksmithing is about.
|
|
- guru
- Sunday, 06/08/08 17:43:39 EDT
|
You guys are gonna force me to teach hossfeld classes one of these days.
Setup on a hossfeld averages 30 seconds. Maybe a minute if you need to put in one of the multipart dies like the angle iron flange in die, which I use to pull circles and arcs with.
I do one off bends on a hossfeld every day, 20 or more times some days.
It is the PERFECT tool for this.
I have taught probably 15 or 20 employees to use it over the years, and once they get the hang of it, the vise just gathers dust.
It is absolutely true that they must be bolted to the floor. I have easily moved a small pickup by trying to bend a piece with the hossfeld bolted to the back- and this is with the E brake on, and the tranny in Park.
I have yet to come across a situation, using common profiles like round, square, flat or angle, up to about 2" or 3", in 30 years of use, that a hossfeld isnt better and faster at than a home made die.
The shop outfitters bender is now running $589, while a Hossfeld is $598 from American with minimal tooling, or $775 from American with a pretty good basic die setup. These American Benders are exact Hossfeld clones, with totally interchangeable parts.
A real Hossfeld from Hossfeld, with basic tooling package, is about $850.
So compared to a shop outfitters, you get about 4 times the tool for an additional $261.
The harbor freight tool is not in the same league, or really worth using, in my book. 1/4" flat bar the easy way? I have bent 1" x 4" flat bar the easy way on my hossfeld. Hot, but I bent it quite easily nonetheless.
I just think the perceived complexity of the hossfeld (I accent "perceived- once you get to use it, its a very simple tool, just a bending fork that is bolted down) tends to scare people off.
But once you start using it, hot and cold, it is truly amazing what can be done with it.
We had a job a couple of years ago where we completely hammer textured, in the power hammer with a swage die, about 150 linear feet of 1 1/2" schedule 40 stainless pipe, in 15 foot lengths. When we were done, it was as wiggly as spagetti. 20 minutes or so each in the hossfeld, and they were straight.
Show me how to build a shop made jig to do that.
Perfect circles, all the same size, from 1/2" round or 3/4" square, cold, in 5 minutes each. Pulled by a helper who is just learning. We do that all the time in my shop. No measuring, no checking templates, no master blacksmith required.
Or accurate 115 degree bends, exactly 8" from the end, in 3/8" round, 100 of em all the same, with 3 or 4 minutes setup time, and that would include bending a couple of test pieces.
Maybe if there really is another Abana conference, I will break down and do some hot and cold hossfeld demos.
Really, its not rocket science. Its leverage, and the properly built tool that was designed and refined by some very smart people since 1922. In my book, any tool from 1922 is traditional.
|
|
- Ries
- Sunday, 06/08/08 21:27:35 EDT
|
Ries... I seem to recall that you said you would demo at Quad States. This fall's demonstrators for Quad States are all set up, but maybe we should start planning for next year... I KNOW there would be a big audience for your demo....
|
|
- djhammerd
- Sunday, 06/08/08 21:58:03 EDT
|
Hossfeld: Ries, Practice helps a LOT. I've watched guys without a manual sort through a truck load of hundreds of Hossfeld die part for half an hour and not find what they needed. . . The literature helps as well. Many of the setups are not intuitive to those that have not studied the bender. Yep, setups only take seconds when you know exactly what to do. It only takes seconds to setup a lathe or milling machine when you know exactly what you need to do and what and where the parts are. . .
For straightening I use my arbor press or hydraulic press if the work is heavier. All the setup required on either is to toss the straightening plate on the press. Right angle bends are equally easy in fairly heavy bar.
The press is not as flexible a tool but it is simple and produces tremendous force that is very controllable. On the other hand they are often a required tool in many cases.
A good tutorial on the Hossfeld would be valuable. While their manual (last one I saw) has photos of all the setups, I could relate to diagrams better. . .
The last special benders I made created a part with a flat bolting pad, a long 8" radius then a 1.25" diameter loop on the end and a weld overlap flush to the 8" radius. It was a four bending station part. Two in a press and two on hand benders. The only "setup" required was clamping the two hand bending fixtures in a vise to hold them. It would be possible to make these bends in a Hossfeld but it would take as much or more time to setup the end stops and gauges to the prints every time they were setup as it took me to make the fixtures. It was a repeat job so there was almost zero setup after making the fixtures. Milling and drilling the bolt slots and holes took much longer than the bending. . . Universal machines are great up to a point. Then they either need custom tooling OR to be replaced by custom tooling.
|
|
- guru
- Sunday, 06/08/08 23:24:57 EDT
|
Hossfeld Mfg Co., Bending Division, 460 West Third Street, Winona, MN 55987. Probably have a website. Maybe if enough people contacted them saying they are interested in a unit, but would like to see it demonstrated at Quad-State first, they will send a unit and a rep. there. Doesn't need to be part of the Q-S program. Set up in the tool sales area or under one of the buildings. As Ries noted, it could be mounted on the back of a trailer.
I purchased my #2 for $300 with apparently most of the available dies, which fill a milk carton and a half. Mine is mounted on the end of a not-too-rigid table. Works fine for 3/8" round cold. Above that I usually heat the area to be bent, such as putting eyes on the end of 1/2" stock.
Apparently it can be used to put 90 degree bends in 2" pipe. It can also be equipped with a hydraulic unit to replace the handle.
Hossfeld offers a video, but it isn't of any more particular help than the manual - more of a sales video than how-to. Perhaps Ries should sub-contract with them to do one or more 'real-life' videos oriented to the ornamental blacksmithing shop.
I tried to get them to go to Q-S last year. If they get hit on enough, perhaps they eventually will.
|
|
Ken Scharabok
- Monday, 06/09/08 07:03:01 EDT
|
Ken, If you are heating 1/2" rd to bend in your hossfeld, you really need it mounted better. I use my hossfeld daily. The last stock I had to heat, was 1/2" by 2", bent the hard way, to a 2.5" radi. I looked at a hossfeld manual once, but did have the benefit of employment in a fab shop, where the hossfeld had most favored status. Yes, it is confusing at first, and I can see that if one didn't have any instruction at all, it would be somewhat useless. As far as I know, the hossfeld manual is available online, and imho is the single most usefull tool in my shop, other than the 3000# table it is atached to. I made most of my dies, including pipe dies, and I make scroll molds for the top, if I need quite a few identical scrolls. I make the scroll molds on a round plate with a center hole, and two holes 180 degrees apart in the perimeter. The outside hole is used to position the jig for the first part of the bend, then the plate is revolved, allowing a rather large scroll to be bent cold, even from thick metal.
|
|
John Christiansen
- Monday, 06/09/08 07:44:21 EDT
|
Ries, once upon a time you thought you'd write a book on how to get the most out of a Hossfeld. I figure writing a book can take up time you'd rather spend in the shop. How about you have a video camera ready and have someone video you during some normal Hossfeld operations? You wouldnt' be able to keep an inventory of a DVD of that. And maybe Hossfeld would even sell them for you.
If I ever ran across a Hossfeld at a flea market or something for $200 or less, I would probably dig up the cash for it. Other than that, I just have to wait for it to bubble up to the top of my fantasy tool list.
|
|
- Marc
- Monday, 06/09/08 07:55:01 EDT
|
Jock, I genuinely apologise but have had quite a few enquiries re me and Linna. We are both safe. There was a big aftershock today and have been several over the past couple of days which suggests we haven't finished yet!
We got some very targeted aid this week from Chabad China. They sent us exactly what we asked for.
The forge chimney is going to have to remain unreconstructed for the time being. I am going to London on Wednesday to see various members of the great and good to try to raise some awareness (and I hope some funds) to help rebuild.
Pleased to say we have a major sponsor for the teaching guys in the dirt poor villages how to forge project. So that can restart as soon as I am back from Europe.
To all those who were concerned- a very big and heartfelt thank you. To those more concerned about Linna than me....... I can see your point.
Have a safe day.
|
|
philip in china
- Monday, 06/09/08 08:02:23 EDT
|
Ken, the full set of dies will cover the bed of a pickup truck. You are short a few I think.
Anchorage is absolutely necessary. Then you need room for that six foot long handle and to walk it. Benches less than a ton or more are useless unless bolted down. The big advantage to the hydraulic powered unit is that the forces are internal and it does not need the heavy anchoring.
|
|
- guru
- Monday, 06/09/08 08:17:53 EDT
|
Anchoring Benders: Most of us do not have space to spare (no matter how much space we start with). Many of us also have weld platens as used ones were selling for less than scrap not too long ago. I now have two and consider them solid gold tools.
The problem with weld platens is that like all benches they tend to get cluttered. Permanently mounting a vise or bender on one makes it worse and reduces the utility of the platen. So the thing to do is make mounting plates that drop into the holes or the platen and lock in place. Then you can mount that heavy chipping vise or Hossfeld bender to the plate. Swapping them out should be quick, easy and perhaps within the range of a jib crane servicing the weld platen.
I don't normally like to make vise mounts a temporary mobile affair but I have one that is HUGE and needs a very heavy bench to be useful. However, any vise mounted on a weld platen should be easily removable.
A small vise could be mounted to a single square shank that fits the table. A draw bolt and a sloped cut across the shank will make it a locking device that is easy to make and use.
If you have access to steel plate it can be used to make a floor area and your vice or bender mounted on a stand attached to the plate. As long as you are standing on the plate there is no possible way for you to move the tool. I have one vise mounted this way and I am going to do several others. In the case of vises the area you stand in is relatively small. Vises mounted this way are portable but immovable when in use, a rare combination.
I keep thinking that mounting a vise on my fork lift counter weight would make a very sturdy and "portable" vise mount. However, the propane tank is in the best spot . . . and it would be a little high.
Vises are often mounted on trucks. Hitch mounts are rather low but COULD be located elsewhere.
No matter how you setup tools it takes time and some planing. But not mounting them is as good as not having them.
|
|
- guru
- Monday, 06/09/08 10:17:12 EDT
|
I am very interested in becoming a blacksmith but have had very little luck in finding a local teacher. Could you please let me know whereabouts I would locate someone in SOUTH AFRICA or where else I would be able to study from. I am desperate! It is truly something I want very much to do. It has been my dream since childhood, I love the sound and the feel of cold hard steel, it is my dream to one day make my own set of armour and a beutiful sword.
I am 20 years old thank you so much.
|
|
Stavros
- Monday, 06/09/08 10:23:28 EDT
|
For Vicopper.
Sir (I assume). I read your reply on the hinge bender, found Streeter's book, then found my notes, and then found the bender I made the notes from. (It is a real cobb job, based on Streeter, but wonkey). My question now is, Streeter mentioned a roller on the base (I assume, again, to feed the stock into the action). I cannot see it in the pictures in Streeter's book, and wonder if you can enlighten me.
For Ries, I do have a Hossfeld, I an curious about using longer pins and doing the work on top (like bending eyes).
I am trying to bend 3/16 x 6 (the easy way) for hinge barrels. Did you build a big 'dog' for this (don't know the correct name, the dingus used to wrap eyes on top.
I was lucky to get a Hossfeld many years ago, and sure wish there was a instructional video. I have the manual and if I study the pics, read the text, I can usually figure it out.
By the way, after getting my Hossfeld, I was grazing in the local scrapyard, and found a Hoss swing arm, then about 50 yards away I found the main frame. I crawled all over the area around and between them and found a few pins and dies...my lucky day...
Thanks to Guru's and Gurinos for all the help over the years
Tim in Central Orygun
|
|
- Tim in Orygun
- Monday, 06/09/08 11:06:10 EDT
|
A hossfeld is great for a lot of things- but I dont think its the right tool for bending 6" hinges.
I use by big Chicago brake for stuff like that. I can bend 3/16" right around a piece of round bar with it quite easily.
The problem with trying to do it on top of a hossfeld is that the hossfeld pins are only 3/4" round (1" for the center pin) so they get kinda wiggly 6" up unsupported. I do bend up to about 2" the easy way up on top, but much beyond that you dont get an even bend, as the pins bend too much.
I have had my hossfeld in 7 different shops now over the last 30 years, and every time, it goes in first, and the whole shop layout is predicated on it. The normal arm is 4', with a 4' extension arm, so you need 8' of free swing room, for about 120 degrees of movement. But more important, you need 20 feet of runout, if you are going to be bending 20 footers, which I often do. Ideally, in two directions. So my hossfeld is right in the middle of the room, and always has been. I have had shops where I could only bend a 20 footer from one end, or I had to open the door to do it.
A hossfeld should be bolted to a concrete floor. With big bolts. And then, you are best served by having all your dies readily accessible and easy to see- not rummaging around in a milk crate. I have a stand under my hossfeld with 2 big shelves, but along both sides are racks to hold dies as well, including a pin rack that holds all the pins easy to see and get at.
Imagine trying to run a lathe or mill if all your tooling was in a big heap- it would take twice as long to do anything.
|
|
- Ries
- Monday, 06/09/08 11:46:20 EDT
|
ZA, South Africa: Stavros, There are a handful of smiths in South Africa. In 2002 there was an attempt to launch the Artist Blacksmith Association Of Southern Africa. I was in contact with these folks for a while but they seem to have faded. You would need to search for the individuals in the article.
There was also an attempt to train African smiths in the Townships in 2006 by a non-profit group called The Blacksmiths Workshop operated by Dammon Rice. You may want to contact her.
See also www.conradhicks.com
|
|
- guru
- Monday, 06/09/08 11:51:35 EDT
|
I am a 50 year old amateur woodworker and want to try making a wood sword. I read your entire website and I am no where near to making a metalsword, but I'm sure I can make a wooden one. In making the guard, your web site does not show the diagram for making the starter holes. I can pretty much guess what you mean, but I want to make sure. Can the diagram be posted or sent to me? Thank you.
|
|
Jose Marquez
- Monday, 06/09/08 12:54:42 EDT
|
Jose, The starter holes are like making any square or rectangular hole in wood such as for a mortise. They are drilled on-size or just a bit under size so that you can get tools (chisels, saws, files) into the space. I would make the holes a little short of the space to cut as well as the under size.
Note that my wood sword making outline is for a representation of a metal sword in wood, not a structurally sound wooden sword. The point of this exercise is to practice shaping material with files and to accurately fit the guard, grip and pommel. The result could be a work of art or simply a model to go by.
|
|
- guru
- Monday, 06/09/08 13:28:02 EDT
|
Ries: You produce a well-done, comprehensive video on using a Hossfeld bender in multiple applications and I'll be your eBay salesman. You ship me finished (ready to sell) DVDs and I'll only take out enough to break even on the deal (about 15% of total). Something to consider.
|
|
Ken Scharabok
- Monday, 06/09/08 13:34:37 EDT
|
Tim in Orygun,
If I wa syou , I'd jump in my truck and take a ride up to Seattle and have Ries show me how he does it on his brake. Be sure to take enough stock for him et odo the whole job. (grin)
Yeah, when I buit my eye bender a la Streeter, I stumbled over that reference to a roller, too. Never di dget it figured out. Mine has no roller, just the pin that the platen pushes the stock around to form the eye. The operation, of course, is the same as Ries is doing when he uses the big brake. The big advantage of the brake is its massive size, allowing it to make tight radius bends without deflection.
To make a Streeter-type bender for 3/16" x 6" hinge barrels is going to require some hefty stock for the tooling, and I'd suggest using a medium-carbon steel like 4140 that can be heat treated. A steel that can be heat treated to have increased wear resistance would be ideal, since there's gong to b e significant friction under pressure at the nose of the pusher and on the mandrel shaft itself. For the mandresl, I'd probably try to get a scrap H-13 ejector pin from a big die machine. They're already nicely polished and just about 6" long, as I recall. The H-13 will tolerate the heat and pressure just fine. Maybe use H-13 for the nose of the pusher, too.
Based on my little bender, I'd guess you're going to need 3/4" thick stock for the body of the thing and 1-1/2" for the handle, which will need to be about six feet long. You may still need acheater pipe, even with hot stock. That width really adds us fast when you're trying small radiu bends.
|
|
vicopper
- Monday, 06/09/08 19:37:39 EDT
|
Boy, I will heartily and loudly second what Ries said about having the tooling organized! For all your tools and operations.
In the course of several reconfigurations of my limited shop space, I have finally gotten to where I have most things reasonably well organized for efficiency. The tooling for the mill is in a cabinet under it, with the drawbar wrench hanging right there next to where it is used, etc. Like wise for the drill press: full indexes of bits right there, along with countersinks, etc. That means I have duplicate sets of drill bits also at the mill, and on the truck and where the handheld drill motors are kept - bits are cheaper than the time to chase them down.
I've tried to apply that methodology throughout the shop. It has meant making a lot of extra drawers under equipment stands, racks on walls, rolling tool carts, tool tray on the anvil stands, and so on, but it has increased my efficiency tremendously and saves me a tremendous amount of aggravation. I no longer have to search all over to find my 25' tape measure, I just have six or seven of them wherever they're needed. I have checked them all against each other to make sure they agree, so the one I measure the part with will agree with the one I measure the cut with and so on.
These little things do cost some extra money, but the savings in time more than pays for it all. I do th is for a living, so time is money and I can't afford to lose $30 worth of shop time hunting down a $20 tape measure or a $1 silver pencil. The big bonus is, when I'm in the shop doing stuff just for fun, I have more time to have fun and less time having headaches.
|
|
vicopper
- Monday, 06/09/08 19:47:16 EDT
|
Stavros,
Ik gaf het zelfde antwoord aan een earlerbericht. Verzend me een e-mail. Ik denk ik u kan helpen.
|
|
philip in china
- Monday, 06/09/08 20:06:38 EDT
|
Rich I agree on the shop organization. I have also put tape measures everywhere. I like the flourescent ones. I have a tape measure on each saw that stays there. I also have the drill indexs at each place. I am trying to get to the "A place for everything, and everything in its place" I am however not near there yet. Spent most of this weekend reflooring the shop in crushed limestone dust. That meant everything had to move, and lots went into the scrap as it had sat too long. Lots more was considered hard and found a hang up home.
|
|
ptree
- Monday, 06/09/08 20:25:13 EDT
|
One of My friends is a marine stainless fabricator. The Hosfeld at the boat yard where He works is mounted outside on a concrete slab a good 15-20'from anything. All the tooling is stored right inside the building.
|
|
- Dave Boyer
- Monday, 06/09/08 20:37:03 EDT
|
For consumables like silver pencils and drill bits (if you don't sharpen them), it isn't really wasteful to have several (or several sets) strewn around the shop. You're just spreading the use around so any individual item will have to be replaced less frequently. If you drill one drill bit's worth of 3/16" holes a month, you'll stil buy one bit a month on average; you just won't be replacing the same one every time. Multiple sets do tie up a little more capital, though.
|
|
Mike BR
- Monday, 06/09/08 20:52:19 EDT
|
Good topic. Every minute that I spend on permanent shop organization pays hours in dividends, usualy starting right away. It can be hard to find those minutes though.
|
|
John Christiansen
- Monday, 06/09/08 22:28:24 EDT
|
Mike BR,
Yep, you do have to bite the bullet for fthe front end expense of three or so sets of drill bits. But I've found that I have saved much more than the cost of the other sets by not having to go to the store when I break a bit. Small bits, under 3/8", I buy in copious quantities since those get broken with some frequency, but the larger ones break too, and when they do, being able to walk across the shop and snatch one from the index by the mill saves me a trip clear across island to get a replacement. That drive would cost more in fuel than the cost of the bit, if the local hardware store had normal prices. Sadly, they don't.
I do sharpen bits; I bought one of the top-end Drill Doctor machines and it actually works. I'll take a couple hours one every six months or so and sharpen all the dull drill bits. It's mindless, relaxing work if you don't have to do it often.
You're right about spreading the use over three or so sets and thus not replacing any more than you would with one set. Maybe even replacing less, since you are less likely to lose them by not having to schlep them around so much.
I alos find that I save huge amounts of time and money by having six or eight 4-1/2" angle grinders. I buy the Harbor Freight model number 91223 grinders and have two set up with grinding wheels, one with a zip disc, one with a cup brush, one with a knotted straight brush and one with a sanding disc. Those all live under my big welding bench, along with the big 9" grinder. There are another pair of small ones with grinding discs that stay on the smaller rolling welding bench that I use outdoors, and a couple more in the truck. Since I never use any one of them long enough to overheat it (since it is so easy to switch off to a fresh one), I have yet to burn one up. I burned up several Makitas, Milwaukees, and Porter-Cables until I learned that overheating is what kills them. NOw, the cheapies seem to last forever. I pay $15 each for them when HF has a sale. The time savings from not having to change from a wheel to a brush, etc, more than pays for the cost of the extra tools. I have six more on the shelf unopened as backups that I haven't needed yet.
|
|
vicopper
- Monday, 06/09/08 22:55:14 EDT
|
Hey guys, not strictly a question, just thought I would crow a little 'cause I just found a real nice #119 peter wright for $150 here in maui! Sweet!
|
|
vorpal
- Monday, 06/09/08 23:05:19 EDT
|
oh, anyone know where to find a good pine cone tutorial?
|
|
vorpal
- Monday, 06/09/08 23:09:18 EDT
|
Vorpal,
Check back issues of The Anivil's Ring; one of them had an article about pine cones several years ago, as I recall.
|
|
vicopper
- Tuesday, 06/10/08 00:53:14 EDT
|
Shop organization:
My shop is for every handyman thing I might need to do, not just metalwork. So I keep a toolbox full of the things I might need for each purpose. I've got an electrical box, plumbing pail, Dremel box (it's a big Dremel with spiral saws), ... It means I might have to buy a couple extra pliers, screwdrivers, etc., but when I need to do something I just get the box. It saves all those walks back and forth for the tools I forgot to pick up the first time. And if it's helping my son on a project at his house, that walk is about 15 miles.
|
|
- Marc
- Tuesday, 06/10/08 07:27:57 EDT
|
Depending on the couple, lately for a wedding gift I've been giving a home-oriented tool box and kit. Common wrenches, hammer, pliers, hand-cranked drill, assortment of bolts, nuts, screws and nails. Wal-Mart quality. Couple of times I've been told it turned out to be the most practical of all of their wedding gifts.
|
|
Ken Scharabok
- Tuesday, 06/10/08 09:53:04 EDT
|
My solution to the shop organization puzzle is same as Sen. Aiken's (Vermont) was to Viet Nam: declare victory and withdraw. If one is extremely careful, one can actually move around, sometimes even find and reach tools-- and take them outside to do the work.
|
|
Miles Undercut
- Tuesday, 06/10/08 10:11:27 EDT
|
It's real nice having a set of "house tools" so that the shop tools don't migrate houseward.
Even worse my wife has a tendency to carefully hide any tools in the house, never the same place twice and she never seems to be around or disavows all knowledge of any tools---until you find that the allen key set is in the bottom of her spinning basket and then she admits that she borrowed it a couple of months ago and never returned it....
When we lived in a 100 year old large house I made a tool bucket for each *floor* with the basics in it so you were not running from the attic to the basement fetching tools to tighten a doorknob or hang a picture. Not very expensive with a good fleamarket handy to buy name brand tools cheap!
Thomas
|
|
Thomas P
- Tuesday, 06/10/08 10:25:28 EDT
|
Vorpal---named after the Maringer knife line no doubt, I used to help make them!
Paying over a US dollar a pound for an anvil is *not* crowing; it's in the bragging range; which is lower than the admitting range, which is lower than the confessing range, which is lower than the crying range...
Of cource being in an anvil poor area may shift your ranges over a bit...
Thomas
|
|
Thomas P
- Tuesday, 06/10/08 10:28:54 EDT
|
Our shop was given a pickup load of antracite bricks. We were wondering if we could break it up into small pieces and use a little at a time to mix with our bituminous and make it last longer. Would this do any harm?
|
|
nrobertb
- Tuesday, 06/10/08 10:34:42 EDT
|
Nrobertb, No, it will work fine. I would keep the anthracite down to 10% or it will be hard to keep your fire going. However, depending on the coal you are using you might want to test your "gift". If it is high ash you may not want to use it. In that case it becomes pretty black landscaping stone. . . they sell coal in California for that exact purpose.
|
|
- guru
- Tuesday, 06/10/08 10:42:14 EDT
|
Organization: The best thing I ever did back in the 70's was buy 12 drawer top and 12 drawer bottom tool chest from Sears and then use a label maker to identify all the drawers. Beside helping me keep organized if you asked someone to get you a tool it was in the drawer marked "wrenches" or "screwdrivers" or . . .
Over the years my system broke down a bit as my focus changed and it is time to reorganize. But that one day with the label maker and some thought has saved years of rifling through drawers.
I also have a wide Kennedy top chest and two middle riser boxes. One of the riser boxes contains all the tools for my 6" lathe and is kept on the lathe stand. Currently the top chest and middle desperately need a Kennedy multi drawer cabinet to give them a place to live and a place for the overflow. . . My birthday is the 26th of this month (hint, hint).
I recently obtained two more used roll around cabinets and a top chest. The Kennedys won't fit, too wide. They are partially full but will be completely filled when I get the current mess in the shop organized.
Like Marc I keep several "specialty" boxes. All my electrician and wiring tools are in a two drawer portable chest, my wood carving and sharpening stones in another. There are others with miscellaneous bits. I keep a very minimal mechanics set in an ammo case in the car or truck.
Small to Medium Machine Tools each need a roll around cabinet for all the attachments, bits and pieces to operate them. I always scrounge or purchase a set of wrenches to fit everything on the machine and put in the chest. Many of the "old fashined" heavy pattern wrenches you find at flea markets were made for this use. A fully equipped vertical milling machine will fill two regular or one extra large cabinet and that does not include your precision tools needed for setup and measuring.
Drill Bits up to 1/2" come in drill indexes and a full set should be kept there. I prefer the seperate fractional, letter and number indexes. If you do ANY machine work or drilling and taping all three sets are needed. I have multiple fractional indexes. The 1/32 increment set is used for general work and is usually stored on my 6" lathe. The 1/64 increment set is stored in the machinist chest when not in use.
I see that McMaster-Carr has a 1/2" shank drill index that goes up to 1". It is only in 1/16 increments but it will help. On the other hand I might need to make one that takes 1/32's.
I also have a set of what most would consider very large tapered shank drills about 16 to 18" long. They start at over an inch and run to 2-1/4" with #3 and #4 MT shanks. I need to make a fitted wood index for them as they are hard to sort through every time a large drill is needed. This sounds like an expensive time waster to organize but that box of bits would cost about $4,000 to replace. . .
Any time I do a job that uses small bits or has a LOT of holes to drill I buy multiple drill bits. This practice has always paid. In a recent instance while working on our power hammer project we managed to break two out of three of the bits I had bought. It was from a design error with crossing holes that came to light when the bits broke. . .
Hex Keys are the other small tools that many people have a hard time keeping organized. Allen Co. makes a plastic stand that holds the common sizes up to 3/8". This is one of the handiest bench top organizers I have ever used. However, you MUST return the keys as you use them. I bought one for my shop and one for the family shop. I was always disappointed to have to scrounge around in a drawer for hex keys. . .
Blacksmiths Tools are more difficult to store and need to out in the open, visible and close to the forge. I have a short square rack about 30" x 30" with bars around the edges for hanging tongs and storing anvil tools. The center shelf area (top and bottom) is good for bending jigs and odd shaped tools. I need to make another like it and think an extra tier for more tongs would make sense.
Steel Shelving is a great help in getting organized and like all storage solutions is not cheap. I recently purchased two units of medium duty shelves at the big box construction store. We set them up in three spans. The problem was that they only come with three shelves and needed four. . . It ended up cheaper to buy two more complete units for the shelves and scrap the end units! Separate shelves were going to cost about 50% more. . . $600 created 144 square feet of shelf space which was instantly filled. I could use another set of the same.
There have been periods of time when I have given up on organization, I was acquiring more than I had storage for. Now I am trying to stop acquiring so much and make better use of what I have. A stock rack is now high on the priority list and another set of shelves . . . I have most of the steel needed for the stock rack but I want it designed so I can move it with a fork lift.
|
|
- guru
- Tuesday, 06/10/08 11:00:17 EDT
|
Vorpal sword. When I was a kid, we had an old 78rpm record with Lewis Carroll's "Jabberwocky" on it. "The vorpal sword went snicker-snack."
|
|
Frank Turley
- Tuesday, 06/10/08 11:05:12 EDT
|
Multiple Grinders the way VIcopper is doing with 4-1/2" units is great for the blacksmith shop. I knew a woodworker that did the same with cheap 1/4" hand drills. He had a production bench that had about 8 drills each one with different tools ranging from flat, round and conical sanding tools with different grits to chamfering tools and polishing pads. If you drill a lot of holes in your metalwork then a small drill with a chamfering tool in it all the time is handy.
I have 3 big old floor drill presses that will eventually all be setup in a row. They all take the same tooling so one tool cabinet with bits, chucks, furniture, vises and fixtures will do for all three. Any time multiple operations such as drilling a taping are done have multiple drills is handy.
A lot of blacksmiths have more than one power hammer. One is usually better than the other for specific jobs or has different dies for different stages or types of work. I've seen Josh Greenwood use three hammers on one piece in one heat.
While all these multiple tools may seem overkill or extravagant they are often needed to provide the level of efficiency needed in a small shop to compete with low wage imports. Besides the wage difference smiths in the U.S. now have to face the comparatively lower prices of fuel and steel from the same places that have low wages.
Take advantage of all that used machinery going to scrap out there! It is one of our major advantages.
|
|
- guru
- Tuesday, 06/10/08 12:00:54 EDT
|
Vorpal blades do indeed go snicker snack... here it's the sound of my clients finishing off a big boar
|
|
vorpal
- Tuesday, 06/10/08 12:49:26 EDT
|
I am in the process of fabricating two fireplace screens that have both screen doors and glass doors. I normally finish fireplace screens with high heat black paint but my customer wants a natural iron finish. What would you recommend that I use for a protective clear coat? I can't use a beeswax finish because it will start to melt when the frame gets hot.
Pugs
|
|
Pugs
- Tuesday, 06/10/08 16:33:10 EDT
|
Yeah, I found that one 4-1/2" grinder was plenty, but two weren't *nearly* enough. I recently added two Ryobis to my collection -- the two-pack Home Depot sells for $40. I haven't run them long enough to say anything about durability, but they seem to be much smoother than the Chicago Electrics. Might be worth the extra $5 each.
|
|
Mike BR
- Tuesday, 06/10/08 18:44:02 EDT
|
Scale finish or bright finish: Pugs, There is no such thing as a high temperature clear coat. High temperature paints have as little binder as possible and are mostly high temperature resistant pigments (graphite, titanium white).
Wax finishes rub off, are eaten by insects and melt.
NEVER, EVER agree to a "natural" iron finish unless the customer understands and signs a statement that they have been warned that the pretty blue grey will eventually change to spotty red and finally allover rust.
Blue scale is an artificial finish, rust red brown is natural.
There is ONE exception. If you make all the parts from stainless steel and heat just enough to discolor. The stainless is not perfect and spots of rust may show up unless all your tools are also stainless or you carefully passivate with acid.
|
|
- guru
- Tuesday, 06/10/08 19:07:40 EDT
|
A "natural iron finish" is rust. *everything* else is unnatural unless you live in a hard vacuum!
Thomas
|
|
Thomas P
- Tuesday, 06/10/08 19:09:30 EDT
|
Stove black might be acceptable.
|
|
John Christiansen
- Tuesday, 06/10/08 19:56:19 EDT
|
Bending biggish hinge eyes
A continuation of dialog with ViCopper and Ries on bending these puppies.
First off, THANKS to all who contributed info on the Hossfeld bender, I think I'll keep mine!
Second, ViCopper and Ries suggested using a big brake to bend the eyes in hinges. Help me here guys, I have access to two local big brakes or Hydraulic presses with dies, but I can't envision how one can bend plate around rod/shaft in a brake. Now I haven't even touched a brake since Mr. Davenport's Metal Shop in the 7th. grade in 1956!
I can only remember making sharpish bends in sheet metal. How do you handle it with a pin??? Sorry to be so ignorant.
Meanwhile, I an refining Streeter's design, and seriously beefing it up. If this is successful, I will try and post some foto's if I can also figure out this technology...
Thanks to all...Tim in Central Orygun.
|
|
- Tim in Orygun
- Tuesday, 06/10/08 21:56:58 EDT
|
I dunno guys: "natural" and "eventually" are pretty flexible terms. I have four sets of colonial strap hinges on my shop that were forged by Stan Gove in 1977. When they went up, they had blue black forge scale and light oil. They haven't been touched in 30 years. Now they have that blue black forge scale, lightly oiled, with a few pinpoint rust spots, if you look close. I call that both nateural and eventual.
In one gallery I am in, one of the artists gets a lot of plate pieces clear powder-coated. I don't know about the temperature tolerances of the finish, but the stuff is cured at 400 F. "High temp" can be pretty flexible , too. I've never had a firescreen get too hot to handle barehanded in use
|
|
Peter Hirst
- Tuesday, 06/10/08 22:19:31 EDT
|
I use my chicago finger brake, not a hydraulic press brake.
I clamp my hinge blank in the brake, with the round bar I am using for a die sitting on top of it, and clamp the whole shebang down with the top leaf. Then I begin to bend the part that sticks out. The round bar acts as a rounded end finger, so instead of a sharp bend, the bend follows the radius of the round bar. Then you take it out and flip it over, so the sticking out hinge blank is facing in, and roll the whole assembly around the round bar by bending, moving bending.
Hard to explain, but it works fine.
At the end, you knock the round bar out of the rolled hinge end.
Theoretically, you could notch first- I have not done production hinges, just the odd replacement, so I notch afterwards.
|
|
- Ries
- Tuesday, 06/10/08 22:20:41 EDT
|
I am confusing myself- I am not sure I actually flip it over with the end sticking in- Maybe on thursday, (I am out of the shop tomorrow) I will bend one, and actually write down the steps.
I can do it, I just cant describe it.
|
|
- Ries
- Tuesday, 06/10/08 22:22:15 EDT
|
I think I will check out the auto parts stores. From looking on the web, auto parts stores sell a high heat clear for exhaust manifolds. I thought about using a powder coated clear but I am afraid that if the fire gets hot enough the coating will start to melt.
|
|
Pugs
- Wednesday, 06/11/08 07:56:37 EDT
|
I never saw clear manifold paint. . . might be something new.
Scale finishes can hold up well IF the scale is continuous and tight. But as soon as you assemble something with rivets, straighten a part or need to take a file to a corner the scale is no longer tight or continuous.
The degree things rust depend on the environment. That may be known or not. Humidity is not the primary factor, temperature change resulting in condensation on things with mass is more important. The quality of the air which includes what you are downwind of (Here in the East we are down wind of everything) and local conditions such as number of smokers in the house. Finally, user care, how often they dust. . .
I have all kinds of pieces that were just forged and hung on the wall that show no obvious rust in a very humid indoor environment. But in that same indoor environment I had racks of steel with mill scale that is thoroughly rusted.
The final question is, Do you want your reputation to be determined by luck and anecdotal "evidence" or by probable certainty and scientific method?
|
|
- guru
- Wednesday, 06/11/08 09:01:04 EDT
|
Firescreen finish-- wouldn't this depend a lot on the climate wherein the hearth is situated? Some years ago I finished some railings with Presto Black or some such patinating chemical, nothing else, in a bathroom- yes, it's at 7,000 feet above sea-level in the arid foothills of the Rockies in New Mexico, but where it gets pretty misty-moisty every time there is a shower taken, which is often, and a sink used, ditto. They are holding up just fine, no rust whatever. Caution: do NOT use Presto Black on anything with declivities, indentations, recesses, etc. The stuff leaves a residue the factory calls "swuss" and getting it out without using their tank dip process is nigh impossible. There are patinating agents that don't leave such a residue. Choice Steel in Albuquerque sells something made in Arizona somewhere, comes in various hues-- I have used "pewter" for a lot of hardware-- that works great.
|
|
Miles Undercut
- Wednesday, 06/11/08 18:20:51 EDT
|
thanks guru for the tuyere info i have dial up and the whole thing never loaded i guess, cause i only got 1 picture, but i need to pester you with a couple more requests. Im not sure with what a know now that ill be able to keep a concentrated coal fire correctly,like im not sure how to keep it concentrated with a litte fire on top and keeping the fire from spreading too much, and where do i put the metal on the coal, in it? or laying on the top across the little vent hole on top of the mound where my fire is supposed to be concentrated? detailed description would help and even a crappy picture would be a godsend thanks for any help yall guys give and i appreciate it,
|
|
- Jacob Lockhart
- Wednesday, 06/11/08 19:58:40 EDT
|
lol i have anoher question, i was told that my 55 lbs cast iron harbor freight anvil is too small, well unless i can get a 70-90 lbs anvil for good price ill have to make the 55 lbs one work. where could i get a bigger one for a good price, and shipping is a problem because most times its real expensive
|
|
- Jacob Lockhart
- Wednesday, 06/11/08 20:12:18 EDT
|
Ougs: Don't go by what you are afaid of. Find out. How hot do you expect the firescreen to get? Powder coat is cured at 400 F. That's too high for frying bacon and way too high for anything exposed to a living space. If you expect the visible part of the screen to get that hot, I would seriously rethink the design. FWIW.
|
|
Peter Hirst
- Wednesday, 06/11/08 20:15:44 EDT
|
Oops. that was supposed to be "Pugs" My bad.
|
|
Peter Hirst
- Wednesday, 06/11/08 20:16:23 EDT
|
Jacob Lockhart: Check back at the Harbor Freight retail outlet. They may still have some of the 110lb cast Russian anvils. Do believe the 55-lb-er you bought was cast iron.
|
|
Ken Scharabok
- Wednesday, 06/11/08 20:27:34 EDT
|
Jacob; I'd run go buy that one right over there before it gets sold to someone else!
Thomas
|
|
Thomas P
- Wednesday, 06/11/08 21:22:03 EDT
|
I don't know of high temp clear paint for exhaust manifolds either, but there are some automotive paints that look like a shot blasted casting when they dry.
|
|
- Dave Boyer
- Wednesday, 06/11/08 23:00:53 EDT
|
Natural Iron Finish : Pugs, would your customer accept a cured iron finish? if you cure your lard oil or vegitable oil finish as you would on a cast iron frying pan it will not burn off unless your screens start to get to a dull red heat(unlikely) I find that if you cure at 250 F and hold for an hour it won't turn brown or black either.
|
|
- merl
- Wednesday, 06/11/08 23:23:41 EDT
|
Dayyum, there is sooooo much interest in how to lay out a shop efficiently, how to buy an anvil, how to build a fire, where to place the workpiece in the aforementioned fire, and all that smithly-type stuff, betcha dime if somebody troubled to write a book on the subject with lotsa good pictures and diagrams, it would sell like, um, hotcakes! Just think, The Anvilfire Papers!! Y'all do remember books??
|
|
Miles Undercut
- Thursday, 06/12/08 00:05:31 EDT
|
Jacob, If you can get one of the 110lb cast steel anvils from Harbor Freight, do it! This was my first anvil and untill I found my HEY-BUD, it was and still is a very servicable unit. Like Guru says, they're but ugly ( I call mine "Ugly Ivan") but they will get you started.
BTW, I got two of those 55lb ASO's and nailed each to a small stump for each of my boys. That and a set of MIC (Made In China) hammers keeps them off my good anvils when they are "helping Dad in the shop" They are 5 and 3 years old and just love to turn the crank on the blower. Safety glasses are MANDITORY and they don't give any trouble about wearing them (sometimes even to bed...) But I make them bothe stand in a designated safe area when I start hammering and they know not to touch ANY metal when the fire is going.
|
|
- merl
- Thursday, 06/12/08 00:10:48 EDT
|
I am very intrigued by old steel/irons, their manufacturing and their use.
If I look on internet based information there is much confusion.
In the past we had a book with history on steel making but this one is gone in favor of internet info.
The case:
"puddle steel/iron" and "puddle steel/iron"
The book mentioned if I recall correctly that puddle steel was made in very small amounts by melting ore in an open puddle, because it was long exposed to air all the carbon was burned and slag refinement was not known so the material contained much phosphorous inclusions.
So this would be the real old say "one step" Puddle steel ( in fact almost pure Iron) used for instance for shackles.
Other hits claim that puddle steel is made out of grey cast iron where the carbon content is reduced by "puddling" (stirring in an open puddle) the steel for some time( up to 45 minutes) to oxidise the carbon thereby reducing the carbon content to make structural steel ( claim is that this type of material is used for the Eiffel tower)
So the new type of puddle steel, a two step proces.
Which one is true ?
Next to this: the puddle steel and (malleable) cast irons
were used for the piping network to distribute town gas to houses and street lighting, the welding was poor so tapered thread was invented to connect the pipes
NPT(T) or BSP became the codes.
The mentioned materials were easily deformable and self lubricating so no metallurgical problems .
Are these statements on history and properties correct ?
Nowadays these types of tapered threads are abused in stainless resulting in fretting/galling and stress corrosion cracking can there be something done against this abuse ?
|
|
joan majoor
- Thursday, 06/12/08 05:01:21 EDT
|
In NJ there's a metal supplier with 4 warehouses chock full of odds and ends, everything metal... it's like a candy store for us. They have strange unmarked cast anvils from 5 to 250 pounds... cheap, I got a 30 pounder for my act years ago and it was $20 at the time. The place is called Fazzios Steel. Anyone looking for a cheap cast ASO and you're in the area, look them up!
|
|
- Nippulini
- Thursday, 06/12/08 08:11:42 EDT
|
Open Eyes: Jacob, The brake drum forge article has five links, three to large drawings. All are part of the article. The links all follow.
Detail of Forge Illustration
Cross Section Detail
Exploded View and Details
See My first forge
Coal Fire Reserve
See our other FAQ's such as:
Coal Fire Management, building and maintaining a coal fire
Note that because this is a Junk Yard Project and designed for people for few tools all the methods are slightly different. If the blower on A HREF="/21centbs/forges/forge01.htm">my first forge, which was made decades before brake drum forges came in vogue was not so huge it would be the best of the lot. It was built almost entirely with junk found at home. And THAT is the point of Junk Yard Projects.
I was 18 years old when I built it. The only book I had seen about blacksmithing was Alex Bealer's The Art of Blacksmithing which had just been published.
|
|
- guru
- Thursday, 06/12/08 09:26:33 EDT
|
My brake drum forge. Has served me well as a novice blacksmith. I am taking my 80 layer Damascus hunter to the Knifemaker Guild mtg. at Disney'sBuenavista Palace this July. My tuyere and ash dump are automotive exhaust pipes, and my blower is an elecrric fan out of a used Kitchen Aid dishwasher. 120 v. and low amps. Plenty of air for forge welding. I found an old butchers table ,one inch square tube frame, added scrap steel diamond plate for a top , cut a hole for the brake drum and dropped it in. Maybe twenty dollars out pocket. Happy hammering.
|
|
- Gator
- Thursday, 06/12/08 10:10:58 EDT
|
Joan; I would suggest you read "Steelmaking before Bessemer, vol I blister steel; vol II Crucible" steel for a better overview on how it was done.
The original direct process was known as the Bloomery process; in it iron ore is smelted to wrought iron without a liquid stage. What you get out the base of the bloomery is a semi solid bloom of iron and slag that you then consolidate into wrought iron stock, generally with one or more stacking and welding processes to refine it more. This was the process used from the start of the iron age until just a couple of centuries ago (though it still has been used in remote primative areas up until we started doing it for fun these days).
The second method is know as the indirect method in which ore is smelted in a blast furnace that produces liquid cast iron that can then be processed into wrought iron or into steel through a number of different methods, (Waloon, puddling, Bessemer, BOF, etc) The indirect process started in the late middle ages/renaissance and in one form or another is the method still used today---(save for direct reduction with hydrogen!).
Puddling is always an indirect method where you start with cast iron and melt it and oxidize the excess carbon out of it. As the iron becomes more pure it's melting temp goes up and so you start getting a sludge on the bottom of the puddle of molten cast iron you are stirring that you can form into a bloom and remove from the furnace and consolidate into wrought iron.
Note that wrought iron is very different in properties than cast iron; which causes confusion when people just say "iron"
Steel as in "mild steel" came into use after the 1850's when the bessemer process started producing it (and later, other, processes) and over the latter half of the 19th century gradually took over from wrought iron.
Thomas
|
|
Thomas P
- Thursday, 06/12/08 10:12:47 EDT
|
Iron Making and other Questions: Joan Majoor, Your memory is mistaken or you are listening to modern myths.
Puddled Iron made by the Puddling Process was big business for a short period of about 50 to 75 years. In this process several tons of cast iron (which was previously smelted from ore elsewhere) is melted in a large open furnace most commonly known as a "reverbatory" furnace. In this hot gases from a nearby furnace were directed from one side of the furnace to the other playing across the cast iron and heating the arched roof of the furnace.
In the puddling process the hot gases burned out (more like absorbed) a little of the carbon in liquid cast iron pool. This resulted in a pure iron skin on top of the puddle. This skin was raked up by a worker into a ball of nearly pure iron along with a little slag and some cast. The balls of iron went to the "finery" where they were heated and forge welded into a larger mass which would then be forged into a bar shape. Some grades were re-welded to remove more impurities and make the grain finer. This would be double refined iron. While this was a labor intensive process it was done on large scale and the furnaces kept hot 24/7 with workers continuously working the melt except when the furnace had to be shut down for maintenance.
Prior to the discovery of puddled iron it was made by the bloomery process. In this process the smelting furnace is very carefully controlled so that it does not get hot enough to make cast iron. The pure iron collects above the air inlets and when a sufficient amount has collected in a ball it is pulled out while white hot (thus a "bloom") and forged into a mass and refined as above.
After puddled iron came the blast furnace process invented by Bessemer in England and others in the U.S. In this process iron is smelted to create cast iron. The liquid cast iron is then put into a "converter" where air (later pure oxygen) was blown through the molten metal. The carbon was burned out in gigantic blast of fire and sparks the result being low carbon steel. The time of the blast could be controlled to produce steel that was nearly pure like wrought or with more carbon like structural steels. This was a HUGE improvement over hand raking puddled iron . . .
Malleable Cast Iron is a different product than used for gas pipe. Gas pipe has been made from highly refined wrought iron but more commonly low carbon modern steel. It is still called "wrought iron pipe" because the steel is wrought, not cast.
When threaded pipe was invented there were no portable welding methods such as oxy-acetylene or arc welding. All welding at the time was done the way blacksmiths do, heating in a forge and hammering the steel together. This was not a suitable process for pipe so threaded couplings were invented. All gas pipe is "doped" with a hardening pipe sealant. Self lubricating is not really a factor.
Threaded fittings are very successfully used in thousands of miles of stainless steel pipe so I would not call it an "abuse". When stainless threads are properly assembled galling is not a factor. However, they DO gall, especially is assembled dry or with flaws. It is the disassembly and re-use that is often a problem due to some galling on the original assembly. So, threaded SS pipe assemblies are a one time process about 50% of the time. But this does not prevent it from being a viable assembly method.
The best way to learn about galling of stainless steel is to go out into the shop and assemble and disassemble some stainless parts, both pipe and bolts. Try it dry, dirty, lubricated, over tightened or forced. . . Saw apart locked up or broken joints. Take the parts and look at them under magnification.
Stress corrosion cracking is a very technical subject that I am not qualified to discuss and sounds a little too much like a homework or term paper question. . . It is also a subject that many failures have been blamed on that were clearly human or other mechanical failure. So there is far too much "witch hunt" or coverup in many case studies.
Take the infamous nuclear reactor core support plate bolt failures of about a decade ago. ALL blamed on stress corrosion. However, the drawing with the torque specs for the bolts had crossing leader lines and 1" bolts were probably torqued to that of nearby 1.5" bolts. The difference was about four to one putting the 1" bolts just short of failure as-tightened. Later load, heat and vibration would have finished the job started by human error. No-one questioned why many of the big 1.5" bolts were loose and a few had fallen out. . . THEY were undertightened just as the smaller ones were overtightened.
There was human error in making the drawing, human error in reading the drawing, human error (or a cover up) in pointing the problem elsewhere. . .
|
|
- guru
- Thursday, 06/12/08 10:31:26 EDT
|
I agree with Miles. Dayyum, what ever happened to books?
Joan Majoor,
The puddling process was done mostly in the old days to produce wrought iron, sometimes malleable iron, and rarely steel. Your second description is close. The puddling was done on cast pig iron to reduce its high carbon content and make it workable. See the book, "American Iron 1607-1900" by Robert B. Gordon; Johns Hopkins Studies in the History of Technology.
"Coal Forge Handbook" is sold by ABANA. www.bookmasters.com/abana/titles.htm
|
|
Frank Turley
- Thursday, 06/12/08 10:38:05 EDT
|
Joan-- another interesting and valuable book re: steel-making is Non-technical Chats on Iron and Steel, available in paperback from Lindsay Books. www.lindsaybks.com Lotsa yummy details. They have many other old tyme out of print goodies re: metalliferous subjects, too. And cheap!
|
|
Miles Undercut
- Thursday, 06/12/08 11:11:39 EDT
|
Gas Forges:Anyone have any experience with the Diamondback Blacksmith gas forge. Does it heat up within a reasonable time, made well enough, etc. It looks like the side ports are very big and would loose a lot of heat from them? Any info would be appreciated. I 'm looking for a two burner gas forge. Any other makes that you might suggest? Thanks
|
|
David
- Thursday, 06/12/08 13:09:52 EDT
|
hey thanks for answering me but on the harbor freight site all i found was the 55 lbs and the 15 pounders
|
|
- Jacob Lockhart
- Thursday, 06/12/08 13:20:46 EDT
|
Jacob Lockhart: HF is two separate, but related, operations, the on-line/catalog and the retail stores. Check with your nearest retail store. If they don't have a 110 one in stock, ask if they can get one from a central warehouse.
|
|
Ken Scharabok
- Thursday, 06/12/08 13:56:48 EDT
|
god bless you man, and with a brick forge what kind of mortar should i use?
|
|
- Jacob Lockhart
- Thursday, 06/12/08 14:00:10 EDT
|
hey Ken i called my local harbor freight and the 110 lbs ones come from California and they have no control over what they get each time they restock
|
|
- Jacob Lockhart
- Thursday, 06/12/08 14:52:38 EDT
|
Diamondback Forges: David, These are a relatively low production copy of other forges that have been on the market for quite a while. The C frame model has some advantages others do not. These let you get odd shaped work but at the cost of using more gas.
What you DO NOT get is the nifty VERY convenient piezoelectric igniter that has been on the NC-Tool forges for years. While this may seem a simple little thing it is a definite convenience to hit the gas, push the button and you are off and away. The only thing more convenient is the very expensive commercial forges with single switch control and electronic ignition.
|
|
- guru
- Thursday, 06/12/08 14:58:30 EDT
|
Piezoelectric Igniters are available for propane grills and the manufacturer will sell then to you However, what they WILL NOT do is sell a kit with the parts to make it work with a forge. These have been engineered to the product manufacturers requirements and considered proprietary. On this NC-Tool forges this includes a high temperature ceramic insulator, conductor and the brackets to hold it all together. Ignition occurs up in the burner tube where the is no flame normally.
However, one setup I saw simply used a common auto spark plug in the corner of the burner and a wire that ran to the igniter. Note that spark plugs will NOT take forge heats but will work well up in the burner tube where it is almost room temperature.
|
|
- guru
- Thursday, 06/12/08 15:08:39 EDT
|
Forges: Not having a great deal of experience with the commercial forges, I found the NC Whisper blacksmith forges,& forgemaster as the most popular. Any recommendation for general blacksmithing with a back door or side ports?
|
|
David
- Thursday, 06/12/08 16:38:29 EDT
|
David, The more doors and ports the better. For forging billets the end ports on the NC forges are much handier than the front door. On the Whisper Baby I use the vent port in the front door until the work has too much shape to fit in the port. No back door is needed on the larger forges if you have both end ports so that long bars can be put through.
It helps using these to have a piece of brick or scrap Kaowool to plug ports not in use. This also keeps birds from building nests in your forge. . . I've had it happen over a weekend!
|
|
- guru
- Thursday, 06/12/08 18:02:25 EDT
|
Thank you to all who responded about the natural iron finish. I think I will do some experimenting with different finishes on some scrap steel before I decide what I will go with. I like the cured oil idea.
Thanks
Pugs
|
|
Pugs
- Thursday, 06/12/08 18:54:16 EDT
|
I am interested in building a charcoal retort, and I have basic design I like that recycles the wood gasses back into the fire and supports a self sustaining burn. One thing I have not found in these designs is a burner that introduces air -- either by blower or venturi -- into the recycled gas stream. It seems to me that such a burner would provide more than enough energy for the coaling process heat and excess for auxiliary purposes as well. Any inforamtion on a burner head for recycled retort gasses?
|
|
Peter Hirst
- Thursday, 06/12/08 19:09:08 EDT
|
Peter, Many charcoal burners recycle the gases. However, normally it is done by just dumping them into the fire box. Since the amount of gas varies greatly most burners just control the process by how much fuel they add to the fire box. Air is normally a natural draft created by the wood fire and stack.
|
|
- guru
- Thursday, 06/12/08 19:26:00 EDT
|
Guru: That's exactly what my research shows. My top design candidate uses 2" pipe with dozens of 1/8 " holes in the return pipe in the firebox under the closed retort chamber. Films of the thing in action show an absolute volcano of yellow flame roaring out of the firebox once self sustaining heat is reached. I am thinkinG about adding a couple of 1/2" or so holes to the return pipe just outside the firebox, covered with a sliding sleeve, so that I can experiment with adding increments of air to the volatile gas return stream to maximize the efficiency of the volatile burn. (And yes I will rig a loooong linkage to the slide so it can be operated from a distance) I am seriously interested in any engineering that might already have been done on such a burner. Or anyone who might like to do such engineering
|
|
Peter Hirst
- Thursday, 06/12/08 19:39:23 EDT
|
The important thing is to NOT let the burner holes clog. This type of burn tends to deposit carbon in the burner nozzels. A VERY low pressure safety pop-off might be advised in a closed retort.
Charcoal is made for many reasons word wide and as far as I know most charcoal furnaces are one-offs.
|
|
- guru
- Thursday, 06/12/08 20:50:06 EDT
|
Just want to clarify one point here: The mounting requirements mentioned here are not related specificly to the Hossfeld bender but to the work being done. Dosen't matter if it's a Hossfeld, Diacro or a home made bender, you need to resist the force being applied. And if you need the eight-foot handle on the Hossfeld, you'll probably need a similar handle on a home made bender to get the needed power.
Another thing to keep in mind when comparing benders is not just size. When scaling up, a frame that is twice the size is EIGHT TIMES as stiff! Add to this the fact that the Hossfeld (and probably the American) are made of heat treated alloy steel that is probably FIVE TIMES the tensile strength and ther is really no comparison. I've had THREE guys pulling on the eight foot handle and not harmed the machine. I've also done MANY jobs on the Hossfeld that would pay for a new machine in less than a day.
|
|
- grant
- Friday, 06/13/08 01:05:48 EDT
|
I use one of the Diamondback forges. I like having the fron and rear openings with the side that can be raised, very useful for odd or large objects. It's also easy enough to block the rear opening with a firebrick when working wwith small items. I added an idle circuit on mine to lower gas burned while actually forging.
|
|
RFG
- Friday, 06/13/08 08:48:30 EDT
|
While I agree with you most of the time Guru, I do have a different perspective on benders. Forget that tub full of Hossfeld tools, probably 75% of the time all you need is the same half-dozen or so. Just change radius of the pin. Most of the time it only takes a minute to set up. For repeat bends it's easy to add a stop. On large jobs that I expect to do again, I make some custom setups, but they just drop in place. Think of the Hossfeld like any machine in the shop; It supplies most of what you need in the way of rigidity, a framework, a swing arm with lots of holes and the means to apply a lot of force. Kinda like tooling up a little press; you don't make a new press every time - you just make tooling to go in it. I make custom vise jaws for my mill all the time, I don't make a new vise.
|
|
- grant
- Friday, 06/13/08 17:20:19 EDT
|
The bender discussions have been interesting. I'm curious what people's thoughts are on the fly press...
|
|
andy
- Friday, 06/13/08 20:00:22 EDT
|
Hi.
I have a problem with the regulator I've got for my gas forge project. I tried sticking in a gauge to read the pressure but it doesn't seem to register any pressure when I turn on the gas, even though gas comes out of the burner.
I discovered that the opening at the bottom of the socket on the regulator for the gauge appears to be sealed or otherwise blocked somehow. I'd guess that's a safety to prevent the gas from pouring out of there when there's no gauge attached. But now that I've got a gauge, what can I do about it?
|
|
mike3
- Friday, 06/13/08 20:33:02 EDT
|
Mike, Many regulators are not designed for a gauge. Many gas regulators are also preset at very low pressures (inches of water column). This is a question for the manufacturer.
You can always put a gauge in a T off the regulator.
Also note that gauges are notoriously inaccurate at low pressures. To read low ranges you need a low maximum pressure gauge. 30PSI is a good size for a propane setup as you rarely use over 15 PSI or 20 when there is a small orifice and high pressure is needed.
|
|
- guru
- Friday, 06/13/08 21:02:32 EDT
|
I shoulda posted this sooner. I'm going as an outrider and doing blacksmithing demo's on a "City Slicker" cattle drive tomorrow!! Be gone a week, but the demos will be occasional. Anybody got ideas besides horseshoe hoof picks, "S" hooks w/ a simple twist in the middle and a leaf or two??
|
|
Thumper
- Friday, 06/13/08 21:02:44 EDT
|
Forgot to mention, I'm using a 70# anvil and it's a lot like forging on a trampoline.
|
|
Thumper
- Friday, 06/13/08 21:04:30 EDT
|
Andy, a flypress is like any other tool, it has things it is good for and things that they are not. In the small shop they do not replace a power hammer any more than a treadle hammer does. Each of these machines has its best uses. See our iForge series on presses ands the tasks that can be done with a fly press.
|
|
- guru
- Friday, 06/13/08 21:05:17 EDT
|
Custom benders do not need to be a complete machine. Often just the die shape and a bending fork is all you need.
While we have been discussing the Hossfeld benders a lot I rather like the Di-Acro type. The first bender I built was a little horseshoe nail bender modeled after the Di-Acro.
|
|
- guru
- Friday, 06/13/08 21:08:46 EDT
|
Thumper, Nails, Staples, Hooks for a Staple latch (close that gate). . . Spike hooks for camping. Chain links for wagon repair.
|
|
- guru
- Friday, 06/13/08 21:12:58 EDT
|
Mike3:
The regulators I've seen that are designed for gauges but ship without them generally come with a threaded plug in the port. Did yours come with one? If not, it might not be a "live" port.
You could always remove the gauge and crack the tank valve. You'd know in a hurry if the port goes anywhere. If it doesn't, use a tee as the Guru suggests.
|
|
Mike BR
- Friday, 06/13/08 21:14:57 EDT
|
Just a matter of nomenclature really. What you describe as �just the die shape and a bending fork� to me would not be a �custom bender�. Something like that I would usually call a form. Forms like that can easily be used in the Hossfeld too. Like Ries said, The Hossfeld is little more than set of bending forks. The original thread was about bending a centered eye in a 5/8 square bar, wasn�t it?
|
|
- grant
- Friday, 06/13/08 21:58:04 EDT
|
Guru, thanks!! Between packing, getting all the BS necessary to go between state lines w/ a horse and also getting a cap and ball demo together, I feel like a one armed paper hanger!! Tell you how it went next week.
|
|
Thumper
- Friday, 06/13/08 22:28:22 EDT
|
I, too, really like Di-Acro benders. They are good for different things than hossfelds, and ideally, it would be great to have both.
The Di-Acro is usually better than a hossfeld for small diameter tubing, and is more accurate on small stuff in general.
The two big disadvantages, to me, of a di-acro, are the cost, and the type of tooling.
A new Hossfeld straight from the factory costs $875.
A new Di-Acro, in the smallest size, was priced at about $1400 a couple of years ago, and a number 4, which is roughly equivalent to a hossfeld, was going for $3000.
Obviously, used prices are different, but since there is no guarantee of getting a used tool cheap, I have to base my costs on new.
Secondly, hossfeld tooling is mostly pins and blocks- easy to fab and machine. Di-Acro tooling, on the other hand, is complex machined parts- which are much more expensive new, and much harder to fake in the shop.
There is no question that I would snap up a Di-Acro number 4 with tooling in a New York Minute. But I have never seen a used one with even a fraction of its stock tooling- the stuff seems to have legs, and a strong desire to hit the highway.
So the end result is that the average used price of Di-Acro's, without tooling, runs about the same as new prices for Hossfelds, with tooling.
Di-Acro is still supported, but they only make a small amount of the tooling that was once available. The do still make a few other of the Di-Acro tools as well- the excellent small finger brake, and few of the rolls and punches.
All run 4 to 6 times what imports cost- in other words, real money.
And they no longer make many of the incredibly cool sheet metal tools Di-Acro used to make, like gang punches, hand operated press brakes, form rolling sheet rolls, spring winders, and more.
Old Di-Acro equipment should always be grabbed right away- you can always find somebody else who wants it if you dont, and almost always for more than you paid.
|
|
- Ries
- Friday, 06/13/08 22:39:07 EDT
|
The regulator is "high pressure" and goes up to 60 psi (I think it's like 3-60 psi or something.). It has a gauge port there, marked explicitly as "gauge". That's what I was trying to use. Are you saying the manufacturer is lying when it says "gauge" on there? No, the port was not threaded, and when one runs it without a gauge no gas comes out of that port. Like I said, the hole looks "filled in" somehow.
|
|
mike3
- Saturday, 06/14/08 02:11:41 EDT
|
Mike3,
Since the hole wasn't even threaded, it sounds like they use the same dies for casting regulators with and without gauge ports. Yours is one "without," so they didn't thread the hole or drill a passage to connect it internally. Theoretically, you might be able to drill the passage yourself, but I wouldn't risk ruining a regulator to save a couple dollars on a tee.
|
|
Mike BR
- Saturday, 06/14/08 07:11:12 EDT
|
I guess I should have added: the passage they didn't drill may come into to the regulator port recess from the side (near the bottom, of course). Don't assume it would be on the same axis as the existing hole, and don't even think about drilling unless you're *sure* you know what you're connecting to. But drilling's a bad idea even then.
|
|
Mike BR
- Saturday, 06/14/08 07:16:11 EDT
|
I've got the same regulator that Mike3 has, and yes, they're sold with instructions to drill a #29 hole in the bottom of the gauge port. I have not done so because I thought it sounded pretty stupid to drill a hole in a high-pressure gauge body...
The hole is threaded, it just stops at the bottom. A standard 1/4" gauge screws right in.
|
|
Alan-L
- Saturday, 06/14/08 09:04:02 EDT
|
Fireplace iron lintel.
Jock wrote once about a job he refused to do, because the museum curator wanted a faux hammered finish on a wrought lintel bar. My question has to do with the definition of a lintel bar. I thought that they were fairly well hidden in the brick or stone work, and if that is the case, what would texture matter? Or are we talking about an exposed, horizontal bar up in the hood from which to hang hooks, trammels, etc.? These are especially evident in the early Dutch homes of the Hudson and Delaware River areas where the fire places are "jambless"; they are truly "places for fire" and have no sides. These bars are normally of rectangular section, and even they are not all that visible unless one looks up or is using them. They become soot and ash covered. Some museum curators have called them "lug bars" or "lug poles." There were no pivoting fireplace cranes in the Dutch setup.
Early fireplace hooks. A very mild rant, if I may. Nearly all professionally made hooks in the colonial and the immediate post colonial era were of flat stock. If a lengthy S-hook was made, sometimes the two flat-stock hooks were connected by a round, forged length in order to save iron. Likewise, trammel hooks were of flat stock. I suspect that the idea of flat stock hooks was to prevent a pot with bail from twirling around so much.
|
|
Frank Turley
- Saturday, 06/14/08 09:46:59 EDT
|
Lintel bar. Frank, this was a standard brick fireplace from the 1820's and the bar was set back about 1/2" from the front of the brick. You would have to climb in the fireplace to see it. The curator was just full of it. . .
|
|
- guru
- Saturday, 06/14/08 10:14:54 EDT
|
Thumper: Next year, if you are allowed to sell items, obtain a copy of 101 Things You Can Build From Horseshoes by W. F. Dohrmann. (Available from some Anvilfire advertisers.) A couple from this book/booklet which don't require welding:
- Bridal Holder: Heat center and bend 90 degrees. One side can then be screwed to wall.
- Bucket Hook: Reshape shoe to an "S" shape, heat center and turn 90 degrees.
- Door Stop: Close heels and bend toe over a little past 90 degrees.
- Tent Stake: Straighten out shoe, bend one end over and point other end.
One not in book: If you have any shoes with side clips bend down the toes to make a four-point trivet.
|
|
Ken Scharabok
- Saturday, 06/14/08 12:21:30 EDT
|
Colonial Flat Stock: Frank, Could it have been that rectangular stock was more common from the rolling and slitting mills of the time than good drawn square stock. Even today, when flat is sheared up it is everything from about twice the thickness in width up. I have a bundle of Double Ought (pure iron) that was sheared from plate and there is no real square.
|
|
- guru
- Saturday, 06/14/08 12:50:29 EDT
|
Forges: Has anyone heard of Mighty Forge from Canada. I can't seem to find any info on them yet. I would appreciate any info about these forges, especially the two burner "mighty forge" model, and on the company, etc Thanks
|
|
David
- Saturday, 06/14/08 14:16:01 EDT
|
I guess I'll go for the tee, then. Thanks for the information.
|
|
mike3
- Saturday, 06/14/08 15:59:21 EDT
|
Thumper: talk with the cook and bring stock to make things they can use! Getting the cook on your side pays off BIG TIME!
Thomas at home
|
|
Thomas Powers
- Saturday, 06/14/08 16:32:54 EDT
|
Hi All! I Recently started at a scout camp in ne ohio as the camp blacksmith and metalworrking counselor. I am there first full time blacksmith so I am almost starting from scratch and have only just started studing the art within the last year. Any way I have a couple Questions. When tempering a piece with a propane torch do I move the torch back and forth do get an even temper or do I keep it in one spot. Secondly I had a scoutmaster who has dabbled in blacksmithing ask me how to prevent his hardy tools from softening up. I told him to make sure he's using the right steel and I wanted to know about the heat treating process involved (for myself as much as for him) thanks guys
|
|
Jake
- Saturday, 06/14/08 17:41:18 EDT
|
Heat Treating and Tools: Jake, IF by tempering you mean the last last step in heat treating, you can temper evenly OR temper as needed. Almost all steel should be tempered to a minimum of 350°F and most tools except cutting edges to 500-600°F. How you manipulate the torch depends on the size and shape of the steel but you almost always move the torch to produce an even heat as needed.
IF you are talking about heating to harden by quenching then you will find that except for quite small parts a typical bottle mounted propane torch is too small. You CAN however heat part the size of pocket knife blades but NOT parts the size of a bowie knife blade. Hardening heat must be even and it is best to quench while increasing the heat (a rising heat) NOT by over heating and letting cool to the quenching temperature. The proper temperature for most common hardenable steels is just above the non-magnetic point. So you heat to a low red and test with a magnet. Very high carbon tool steel needs to be hotter.
Hardies are a difficult tool to make well. Old fashioned ones were simple high carbon steel and would easily soften if large hot work was cut on them. Today they are often made of very high carbon hot work or air hardening tool steel. These steels can reach a red heat and still retain much of their strength. Some temper at temperatures as high as 1,300°F. This mean they can get over 1,000°F in use and not be hurt.
A steel currently in vogue for making hardies is S7. Another popular hot work steel is H13. We have specific heat treating instructions for a few tool steels in our heat treating FAQ.
Note that these tool steels must not be over heated when forging OR worked too cool. They are also VERY tough to forge so you should have a power hammer OR a heavy anvil and helper to strike.
|
|
- guru
- Saturday, 06/14/08 18:13:34 EDT
|
When spelling can get you in trouble: Ken, Etal
Bridal refers to a wedding ar a bride.
A bridle is what is used to control a horse.
So a bridal holder may be a very strange device and could get you in a lot of trouble unless your wife is accustomed to be treated like a horse or your horse like your bride. . .
Yeah, I know this is the pot calling the kettle black but this one jumped out at me. . .
|
|
- guru
- Saturday, 06/14/08 18:19:15 EDT
|
Trenton anvil - year of manufacture?
Guru,
After several years of pounding away on a section of RR track I have landed a genuine Trenton 59#, serial number 195223, at a garage sale. Are the first four digits of the serial number indicative of the year of manufacture? If not, do one of you folks know how to tell? TIA
John
|
|
John L
- Saturday, 06/14/08 19:03:40 EDT
|
Hi. I saw a big bench vise today it had 5" jaws and a lever on the side to titen the jaws. No screw just small teeth cut on the side. Ever see one like that? Thanks!
|
|
Izzie Longer
- Saturday, 06/14/08 19:23:49 EDT
|
Thanks Guru that helps alot. I'll make sure to pass the info on as well.
|
|
Jake
- Saturday, 06/14/08 19:25:56 EDT
|
Ratchet Vise: Izzie, There are a variety of quick action vises that use ratchet teeth to move the jaws quickly but then there is usually a cam or screw to finish the job.
Vise of this type were often built into machines like cut off saws. But vises are a subject that a very large book could be written about. They have been made in almost infinite variety since the mid 1800's. Up until then the blacksmiths leg vice and small bench vises of the same general pattern were the rule. The availability of inexpensive machining, screw cutting and threading and the rush to patent every new idea produced thousands of vise designs. At one time there was probably 100 major vise manufacturers in the U.S. and many smaller specialty makers.
In the past decades bench work has declined greatly and the vise has become a less important in the general scheme.
|
|
- guru
- Saturday, 06/14/08 21:10:56 EDT
|
Spelling, Punctuation, your public life: Today I saw a news report about getting into colleges that repeated something I recently said here. What you post on-line may be seen by people reviewing your college OR job applications. It is VERY common to "google" someone today to see what you can find. Imagine when they find the following in YOUR NAME or alias.
"hi iv just bought a swage book and was wandering do you know of any books giving guidance on uses and how to use a . . ."
Your email address or alias may also be taken to mean something about you. Imagine these on a job application:
ShadowSoul_DarkFlame_DeathBringer@. . .
SmartAssIndian@ . . .
shoot_to_kill@ . . .
The above are just a few real examples used publicly on the Slack-Tub Pub. We also get some very vile and sexually explicit aliases, passwords and emails. I have told our pubmaster that if these upset HER sensibilities to simply reject the applications. Imagine needing a job and your thoughtless non-PC email address costing you that position with a simple press of the delete key?
Folks need to remember that when they apply to almost anything on-line that SOMEONE, a real person will have access to everything on your application including the password. A little searching will often bring up alternate aliases and email addresses. Did you flame someone on a game forum? Post a "JackAss" style video on U-tube. Have a my-face or other community forum page under one of more of those often easily found and linked alternate aliases?
Who else might use your "personal information" of this type? Banks, insurance and credit companies. . . Is your hobby racing bikes or participating in demolition derbies. . . BOTH will keep you from getting life insurance at a normal rate and worse possibly no health insurance (they ASK on the application and OD have the right to refuse).
Recently I have known teenagers to be involved in stupid things that caused big trouble. One had an unloaded paintball gun in his car on the first day of school and was arrested under the current draconian anti-gun laws. It was thrown out of court and the record "expunged". In legalese that means that because the court thought a mistake was made that every reference to the charge will be removed from every legal record. But the charges made the papers and the Internet where the court order to expunge has no power. Every time this young person applies for a job, especially a security related position he MAY have to explain himself. Legally he is supposed to be able to say he has never been arrested. But his arrest and charge is in public files that may never go away. The result of that arrest may never be found. . . The data may live longer than he does.
So think about it when you make up an email address or post anything in public. "Deatheater221" might sound cute on your gamers' site but how will it fly on your school or job application? How will it look on a car or mortgage loan? You can't even get an apartment without a credit check these days. Often folks that have a good sense of humor have absolutely none when it effects THEIR job. Rejecting someone on anything that might mean they have a psychological defect is common today.
Something to think about. . . And if your password or login for the pub was @%*#@!$ and you never received a response . . now you know why.
|
|
- guru
- Saturday, 06/14/08 21:25:59 EDT
|
Thanks for the info on the vise! Izzie
|
|
Izzie Longer
- Saturday, 06/14/08 21:40:52 EDT
|
Colonial flat stock. I did a little research at the Saugus Iron Works recently and learned some interestng things about flat and square stock. Some 90 percent of what Saugus produced (about 1640-1665) was "merchant bars". Wrought Iron in about 100 lb pieces maybe 1 1/2 x 3". Saugus also had the first rolling and slitting mill in America, and only the 6th in the world, which rolled merchant bars into flats and slit them into square stock. These slitting wheels are very refined machines for their era and produced even, consistent, square stock. They do not work just like like shears, although the cut iteslf is the shearing action of two wheel rolling in opposite directions, in that all pieces but the edges get 2 uniform, symmetrical cuts and are then rolled through very square grooves in the slitters. Even the edge pieces, which get only one edge sheared, of ocurse, then roll through identical square slots in the rollers, producing very even, consistent square stock. I am sure this precision could not be matched by just shearing without the subsequent rolling. These squares, however, overwhelmingly went for nail rod. There were no round rollers in the Saugus mill, so all round stock would be hand forged. Much square stock of the period also would have to be hand forged or perhaps forged and sheared from the merchant bars and therefore far more variable and inconsistent than the rare machine slit stuff. As for fireplace crane hooks, whatever the source, falt, square or roughly square would have been the initial forged shape and rounding stock to make hooks or anything else would have added a step.
|
|
Peter Hirst
- Saturday, 06/14/08 23:00:07 EDT
|
Trenton anvil. According to Postman, serial number 195223 would have been manufactured in 1927.
|
|
Bernard Tappel
- Saturday, 06/14/08 23:32:43 EDT
|
More on job applications . . . I recently eliminated a promising looking resume from a short list of applicants for a job opening based on a really silly and unprofessional answering message on the applicant's cell phone. The cell number was the only phone number listed on the resume as means to contact the applicant. Hard to believe anyone would apply for a professional position and then present such an unprofessional image via their messaging service.
|
|
Bernard Tappel
- Saturday, 06/14/08 23:51:38 EDT
|
Bernie,
I've heard any number of inane, profane and mostly insane, answering machine/voicemail messages and everyone one of them leaves me with the impression that the owner is a ninny. Definitely not a good way to impress a prospective employer.
I wonder if the ready availability of canned "resume builder" software and other packaged image-enhancement nostrums has eroded peoples' ability to compose coherent thoughts and present a professional image when forced to rely upon their own wits and verbal skills. I remember many years ago in my first year of college, taking an English course that included resume writing, business correspondence and other bits of esoterica deemed necessary to make one's way in the world or commerce and industry. To this day, I still have Kate Turrabian's little handbook somewhere at hand, accompanied by a copy of Strunk and White picked up later down the years. Do colleges still teach that stuff, of have they all given over to text messaging and voicemail "communication?"
|
|
vicopper
- Sunday, 06/15/08 03:01:52 EDT
|
I can't address college, but I have seen the output of high school students today. Apparently philosophy is it is the thought(s) which matter, not the presentation. About ten years ago now I spent the night at a sister's house. He high school aged daughter brought home a paper she was proud of because she got a B+ on it. I read it and in my day (60-64) it likely would have received a D-, if not an F. Almost no capitalization, no coherent sentence structure, horrible spelling, little punctuation.
I've noticed the same thing with basic math. Ask a kid today what 8 x 9 is and they will likely give you a blank stare. Hired one young man to do farm work. On a rain day I tried to use him in the shop. He had never, in his life, apparently used a ruler or tape measure. Fractions baffled him. Yet, it was a high school graduate.
I have heard of cases where local straight A, honor classes, graduates have flunked out their freshman year of college. Thus, I assume college standards are still higher.
I am not a fan of the No Child Left Behind Act. It may have identified problems, but it certainly hasn't seem to fix any of them. My proposal is to go back to the old master the basics by the 9th grade and then a three-track high school program: general studies (designed to turn out a competent citizen ready for an entry level job), voctech and college prep.
OK, through ranting.
|
|
Ken Scharabok
- Sunday, 06/15/08 08:33:29 EDT
|
Hello brothers and sisters. I just renewed my CSI membership. I was not aware that it expired 11 days ago. The yearly membership is more than worth the $1 a week. I rarely post anything, but I visit, read and learn so much here. I am a Charter member of CSI since the Guru's conception back around 1993-94. I urge all newbies and non members to join and support Anvilefire and CSI. There is more help and information contained within this web site than volumes of books about metal working. Thank you Guru and all those who help manage things around here. Best Regards. R. Guess-Amelia Island Forge
|
|
R Guess
- Sunday, 06/15/08 09:29:13 EDT
|
Colleges and highschools do still teach all of these things. Unfortunatly when the students refuse to learn or do their work the teachers are forced to pass them anyway so the schools numbers remain good enough to insure the government money keeps rolling in. The no child allowed to get ahead program will just dumb everthing down to such moronic levels that everyone is deemed a success. This country needs to stop rewarding mediocrity and reinstitute a society where laziness and stupidity are not tolerated. I went to college ten years after I graduated highschool and couldn't believe the semi-literate, ignorant dolts that I was having to take classes with. Television and game consoles need to be restricted and useful trade and hobby skills taught to children in their spare time. The only up side to the current scenario is these fools and their money will be easily parted because they are too lazy and stupid to any of their own work and will hire craftsmen to do it all for them.
|
|
- Robert Cutting
- Sunday, 06/15/08 09:48:55 EDT
|
U.S. Education: You can thank attempts to quantify "education" with reliance on standardized tests and legalization of teaching to the test to the current failures.
Only a few short decades ago if a teacher at ANY level was caught teaching to the test (teaching ONLY the factoids to pass the test) they would have been immediately dismissed and would have likely had a hard time finding a teaching job anywhere again.
THEN came the notion that teachers should be paid by performance based on standardized tests. In Virginia one of the first trial states this also applied to the principals. Sadly when money is involved there will be cheating. In Virgina it appeared that the principals were greedy enough to pass test answers on to teachers and expected the teachers to teach those factoids so the test scores would be better. Many teachers refused, having been taught that this was a cheat and cheapened the students education. The program ended in failure and was discontinued.
The NEXT assault on education in Virginia was the "Standards of Learning", SOL's or "S**t Out of Luck" as known by most of the teachers. The SOL's are a set of factoids that every student must learn and are tested for. In order to meet testing goals the standard then became teaching to the test. So we no longer have what was the basis of a liberal education and use what what considered cheating a few years before.
About this time our "education" President George W. Bush stated in his inauguration speech that there was nothing wrong with teaching to the test. Perhaps that is why he only uses half the needed words to make up an understandable sentence. This was also from the same person that as Governor of Texas allowed students who would possibly test low and drag down the general scores to not be tested. . . Now THAT is cheating no mater what you think of teaching to the test.
There are many other problems including lack of discipline and respect in schools. Perhaps too much TV. . . Definitely too much educational jargon in writing about the subject.
To be truly literate a population needs a general broad based education that includes history and literature as well as math and science.
Teaching practical application of math and science has always been a problem. For some reason students are taught to hate fractions . . . Fractions and their application is EASY if taught correctly. But they are not. And sadly they are the basis of all higher math from algebra up. So not understanding them is a complete failure.
Ken what you describe is the same liberal arts education that we both had. It was the system that made America great and produced some of the most creative people on Earth.
|
|
- guru
- Sunday, 06/15/08 10:55:15 EDT
|
Highschool failures: My son attended a school in Connecticut and did very poorly. Since most of the other kids in this small town did well, they had no credible special ed program. It was more like babysitting. He got into trouble a lot but managed to get a GED. He did odd jobs and sponged off of me until we moved to Houston. He enrolled in an Automotive Tech College (UTI) and the change is astonishing! They teach by doing, not reading or lecturing. It is 90% hands on and he is doing exceptionally well. He is carrying an A average. The point is, we don't all learn the same way. Unfortunately, most schools teach everyone the same way. Those who cannot learn this way are doomed to failure even though they are probably not stupid or lazy. Don't give up on your kids, find out how they learn and get them into a program that teaches that way. PS-do you know how much certified auto mechanics earn???!!! OMG.
|
|
quenchcrack
- Sunday, 06/15/08 11:10:28 EDT
|
I wonder how important fractions would be if we were on the decimal system like the rest of the civilized world. I can't imagine a European carpenter having to puzzle out 3 and 13/64 centimeters. I think of the "English" system as as much of a dinosaur as the QWERTY keyboard and the Phillips screw. ANd I dare ya ta get me started on either of those. And no, with all deference to you machinists, who I respect as the real magicians of metal, I don't think the decimal/inch thing cuts it either.
|
|
Peter Hirst
- Sunday, 06/15/08 11:11:48 EDT
|
PS: Thank you Ms. Dunn, my 8th grade English teacher. You kicked my butt until my brain engaged!
|
|
quenchcrack
- Sunday, 06/15/08 11:11:57 EDT
|
Your Internet Persona: As Jock mentions, above, we do leave a trail behind us. I try to remember the "Markland Woad Rule" (long story, but involved a number of folks dressed just in woad): Never do anything in public that you wouldn't do in front of your maiden aunt. If it's on the internet, it's in public. Think twice, post once.
People will also do a search for you on the internet in all sorts of circumstances. I know when a dispute on a lease went to the Court of Federal Appeals, the lawyers on one side Googled me before "googling" even became a verb. Fortunately, they ended up on our side, but there was some ribbing about "Vikings" going to court instead of holding a duel.
Fortunately, our family address at "asylum"* has several layers of meaning, most of them actually positive; but it's still amazing to see some of the nasty spam we get based on that address.
I will also say that the postings at Anvilfire have actually accrued some positive credit to me when I meet fellow blacksmiths or folks in the NPS. The other week one of our Alaska folks said: "Hey Bruce, you should see the article on spearheads on that Anvilfire site you sent me to; really cool..." ;-)
Visit your National Parks; working with Canaveral National Seashore this week: www.nps.gov/cana
Go viking: www.longshipco.org
* Picked by my wife.
|
|
Bruce Blackistone (Atli)
- Sunday, 06/15/08 15:54:21 EDT
|
I have an old blacksmith's anvil (my grandfather's) with the inscription: IS "43 D (up arrow) D" -- though it is hard to read. There is something else above that "?? CWT". It is a two person lift anvil. Very heavy. I was interested in its history, weight and its approximate value. I live in Melbourne, Australia. Thanks for reading this.
|
|
Martin Davies
- Sunday, 06/15/08 20:12:56 EDT
|
Ken,
Don't feel too bad about your typo. Last week, the Washington Post-owned tabloid they hand out on the Metro ran an article about the failure of an "earthern damn" in Wisconsin.
Not quite the same thing, but I bought an electric hair trimmer at the drugstore today (made in China, of course). The back of the box says "DANGER: Shocking Hazard." No wonder they were selling it so cheap . . .
|
|
Mike BR
- Sunday, 06/15/08 20:49:29 EDT
|
Peter Hirst: The decimal inches used in the machine trades works out really well. There are NO FEET, just inches, as many as it takes, and the decimal parts of an inch. In Metric blueprints, there are millimeters and decimal parts of a millimeter, no centimeters, decimeters or meters.
|
|
- Dave Boyer
- Sunday, 06/15/08 22:53:05 EDT
|
I got a Hay-budden anvil a couple days ago. I was wondering when it was made. The serial number reads A12317. Dose anyone have a idea on when it was manufactured. Thanks
|
|
- John L.
- Sunday, 06/15/08 23:33:57 EDT
|
Mathemetically speaking, there are only meters and decimal parts and multiples of meters. The use of mm is a notational convention, like scientific notation. It uses an alpha character to stand for three decimal places. A millimeter is by definition a decimal part of a meter. That aside, I understand that each works well within its own system, which I noted above. The problem is that most of the world, and some US technologies, are metric, some US industries are inch/decimal and some are inch/fraction, and some, such as my steel supplier uses either inch decimal and inch fraction for different products, and sometimes both for certain products. All this requires at least constant vigilance, frequent conversion and occasional major apologies. Witness the loss of the Mars climate orbiter in 1999. One team was metric and one team was inch/decimal . . .
|
|
Peter Hirst
- Sunday, 06/15/08 23:55:45 EDT
|
|
|
[
CSI - anvilfire MEMBERS Group |
Getting Started in Blacksmithing ]
|

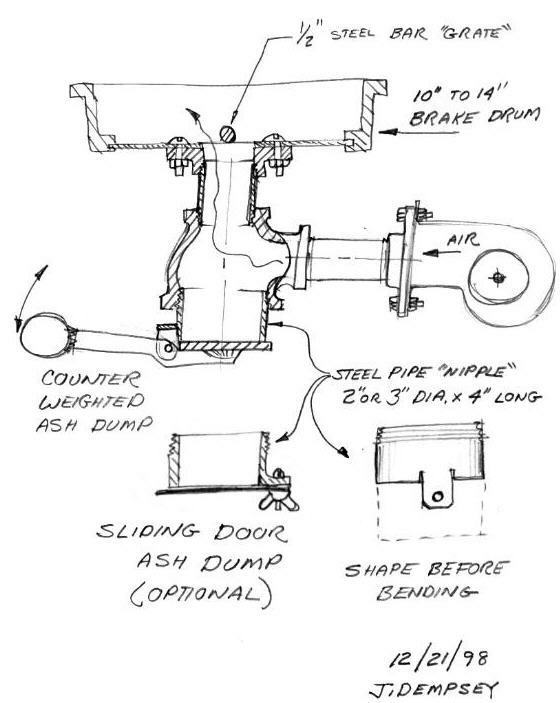
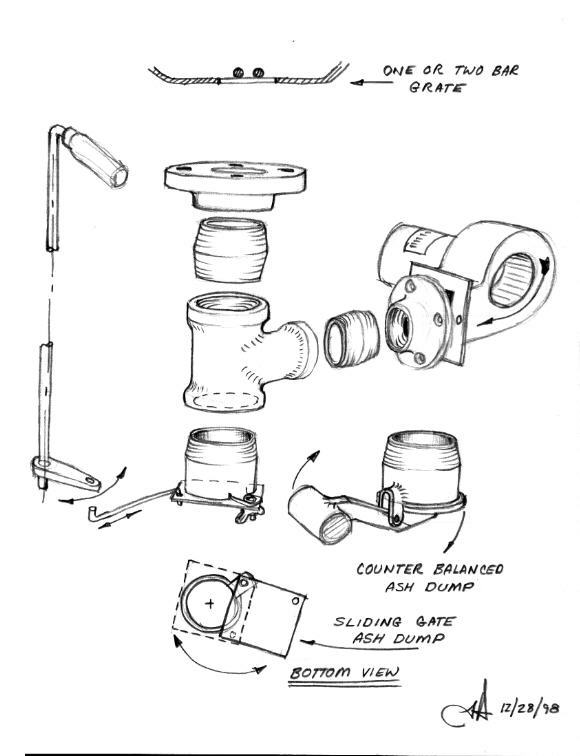