Hi All,
To cut out sword sized patterns would you use a mounted hand ban saw or a 4x6 ban saw or something else? Thanks guru for the $50 Knife Shop book recomendation. I loved it.
|
|
Mike
- Sunday, 08/16/09 10:41:07 EDT
|
Blanks: Mike, Everything depends on your desired production rates and budget. If you are not slitting the bars lengthwise and just profiling ends you can use a hand hack saw getting the most bang for the buck. A good 4x6 saw is a little faster but unless you get a good one the frustration factor may be higher than busted knuckles using a hand saw.
If you are not into hand sawing a reciprocating saw works but are hot and noisy. They are cheap and do the job.
A chop saw (friction cutting) is not recommended as it heats the metal and makes very hard, hard spots.
Good small metalworking band saws are far and few between. Even good used ones are fairly expensive. If you can find one they are far better than anything else. The big difference between a woodworking band saw and metalworking is the speed. Metalworking saws run a twentieth to fiftieth the speed of woodworking. That takes a worm gear reducer which adds $500 to $1500 cost to the machine.
|
|
- guru
- Sunday, 08/16/09 12:05:51 EDT
|
Mike
Mounted hand bandsaws work great for your needs....they are pretty mucch 'standard equipment'in knife shops...only problem is cutting sharp radi...
|
|
- arthur
- Sunday, 08/16/09 13:04:39 EDT
|
Mike,
There are several knock-offs of the venerable Rockwell Model 14 vertical band saw on the market that have jackshaft speed reduction to around 700 sfpm. While this is still a bit high for steel (300-500 is better), it does work just fine if you use nothing but high quality bi-metal blades. My preference in blades for use with my Rockwell 14 knockoff is the Lenox Diemaster II Varipitch blades. Using a dry graphite/wax lube, I get hundreds of hoursof use out of every blade, providing that I don't try to cut the heat affected zones (HAZ) left from flame cutting or abrasive cutting. I do anneal any hardened stock before cutting, of course.
These saws are available from Harbor Freight, Grizzly, Enco and other purveyors of Chinese/Taiwanese knock-off tools. Since the basic band saw mechanism is so simple that some people make their own using wood and hardware store parts, these knock-offs perform very satisfactorily. My own saw was purchased for under $300 from Home Depot just 26 years ago and has done yeoman service in my shop ever since. The same basic tool still sells for about the same price; not bad with what inflation has done to most other items.
If you need to cut any radius tighter than about 4" you can forget a horizontal band saw used in the vertical mode, likewise for a Porta-Band. Those saws simply are not made to do curves. The vertical band saw however, excels at curves using the correct blade. With a 1/4" wide by .035" thick Diemaster II in the 10/14 Varipitch, I regularly make 1-1/2" radius cuts in steel up to an inch thick.
If you do some fiddling around with different sheaves on the jackshaft and driven shaft, you can get the speed down to around 600 sfpm before you run out of room for the sheaves in the housing. I bought the sheaves to do this several years ago, but haven't gotten around to it just yet.
Hope this helps you out.
|
|
vicopper
- Sunday, 08/16/09 13:22:43 EDT
|
Real Band Saws: Woodworking saws are only good for wood and plastics but metalworking can be used for both even though not as efficiently on wood. Standard non-twisted blade band saws with rubber tires can take a wide range of blades. My 20" Rockwell, will take from a 1" wide blade down to 1/8".
Narrow blades cut very tight radii. In wood a 3/8" skip tooth will turn around in a 1/4" hole. . (don't ask how, all I know is it works). This makes band saws an amazing tool. My Rockwell will cut scrolls and circles in 8" to 1/8" wood and resaw logs and make veneers with ease all with the same 3/8" skip tooth blade. A fantastically productive tool for wood working. It will do everything a table saw will do except dados and raised panel edging, but will much much more.
|
|
- guru
- Sunday, 08/16/09 15:04:55 EDT
|
I bought a little 10" band saw on sale at Sears for around $100. You get what you pay for, but it's reasonably rigid and has all ball-bearing guides. I installed a 60 RPM DC gear motor. I haven't really used it enough to give a final verdict, but it's working well so far.
Of course, if I'd bought the gear motor new, it would have cost a pretty penny. (Actually it *was* new when I bought it, but that was from a friend who picked up a big lot of surplus motors cheap.)
|
|
Mike BR
- Sunday, 08/16/09 18:52:40 EDT
|
Were old wagon wheel tires made from wrought iron? A few years ago I made a cross from one but it worked different from steel. I was making a fleur-de-lis at the top and cut a leaf from the sides but as I tried to bend the leaf down after bringing it to a nice orange, it snapped off. The next time I cut the leaf, I let it cool to a dark red and had no trouble bending it 180 degrees. It had a deep red color to it after it cooled. I thought it might have had cast iron in it. I know it was an old wheel because it had eight felloes which is supposed to predate the two felloe wheels. Anyone know what kind of metal I'm dealing with?
|
|
- Robert Dean
- Sunday, 08/16/09 20:31:41 EDT
|
Robert, Good chance. Wheelwrights used wrought for as long as it was available due to the ease of bending and welding. However, millions were also made from mild steel as well. So it is not a hard fast rule. But it is good to test every one you come across.
|
|
- guru
- Sunday, 08/16/09 20:36:02 EDT
|
if i want to start knife making as a hobby how should i make a forge i know that i need one and im on a tight budget
|
|
- plainedge
- Sunday, 08/16/09 22:18:06 EDT
|
if i want to start knife making as a hobby how should i make a forge i know that i need one and im on a tight budget
|
|
- plainedge
- Sunday, 08/16/09 22:18:19 EDT
|
if i want to start knife making as a hobby how should i make a forge i know that i need one and im on a tight budget
|
|
plainedge
- Sunday, 08/16/09 22:18:32 EDT
|
Who makes name stamps suitable for marking steel?
|
|
Troy Ehrmantraut
- Sunday, 08/16/09 22:54:12 EDT
|
Guru, you say I can test the tire to see if it's wrought? How? Thanks.
|
|
- Robert Dean
- Sunday, 08/16/09 23:03:55 EDT
|
Robert, see our FAQ page, W, wrought iron.
|
|
- guru
- Sunday, 08/16/09 23:26:22 EDT
|
Steel Stamps: These vary a lot depending on quality level but the better ones are made of alloy steel like S7.
|
|
- guru
- Sunday, 08/16/09 23:27:44 EDT
|
Tight Budget Forge: It depends on the type of fuel. The cheapest forge which is still in use in primitive places world wide is a shallow hole in the ground with an air pipe (tuyere) leading to it from the side at the bottom. Imagine a hole about the size of the top of your head or a little larger.
Air is provided by a bellows or blower. Bellows can be two sections of tubing with bag diaphragms made of leather, cloth or plastic. They can also be the legs cut off a pair of jeans. The cuff would be the top and left open, two strips of wood making them like the opening of a woman's purse. In operation one is pressed down while the other is lifted up. The one going down is clamped shut in you hand while the other is let spring open to let air in as it is raised. This takes a little practice and coordination. It also takes a helper to be productive at all.
There is usually a large flat stone set in the ground between the fire pit and the bellows to protect it and the operator from the intense heat. In Viking forges the stone has a hole in it to let the air pass through and this is called a "shield stone". In other more primitive forges the air tunnel just goes under the stone.
Common European leather bellows could also be used as well as an oriental box bellows as shown in The Craft of the Japanese Sword by Leon and Hiroko Kapp and
Yoshindo Yoshihara
The alternative is a hand crank blower OR a small electric blower with an output about like a hair drier. If you have electricity (even a long extension cord) this is much preferable for the lone worker.
The fuel in such as forge is charcoal. NOT briquettes sold for the barbecue, but real wood charcoal. This can be bought at some of the big box stores as well as restaurant supplies. You can also make it.
The next cheapest forge that is more suitable for longer blades is a trough forge.
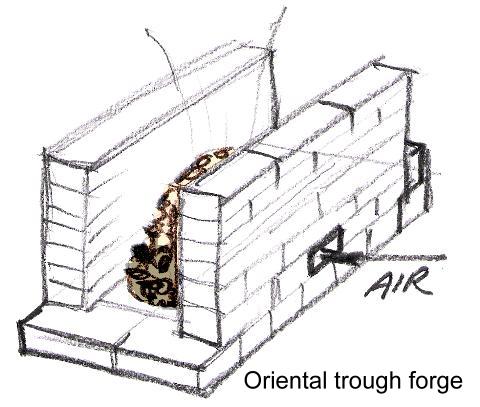
The oriental trough forge is simply two walls of stacked brick or masonry on a base of the same. Do NOT use concrete. Firebricks would be best for the base but are quite expensive. Any fired (vitrified clay) brick will do. Air is supplied as above.
The NEXT level of forge is to raise either of the above off the ground in the Western manner. A pit forge can be made in a raised wooden box filled with dirt (preferably high in clay and low in organic matter). The fire pit is usually lined with a layer of purer clay such as red modeling or brick making clay. This simply helps the dirt hold its shape and reduces fuel mixing with the dirt lining. Sheet metal is often used to protect the wood. A shield stone is also used to protect the bellows and operator.
A pit type forge can also be built in an old (or new) wheel barrow as shown by Alan Rogers in
Forge and Anvil
AND then there is the Brake Drum Forge. See our Plans page.
All the above can be made with 0 to $50 worth of materials depending on your scrounging ability.
|
|
- guru
- Sunday, 08/16/09 23:59:06 EDT
|
Mike BR,
Watch out for swarf getting in those ball bearing guides. Unless they're double-sealed bearings, small cutting swarf is going to eventually work its way into them and gobble them up. If that happens, just replace them with double-sealed bearings from MSC or McMaster. My saw came with ball bearing back guides which I did have to replace with double-sealed ones and solid side guides. I use the new ceramic solid side guides and they work extremely well at keeping the blade aligned for very accurate cutting - they haven't shown any wear at all after hundreds of hours use.
Good idea on the DC gear motor. I'd like to find one for my saw, too.
|
|
vicopper
- Monday, 08/17/09 06:31:35 EDT
|
Philip in China: any news on the Chinese made hand-crank blowers for expor to the US?
|
|
quenchcrack
- Monday, 08/17/09 07:32:16 EDT
|
is there a chance i can use a tin bowl because i don't need a large area to tempature treat a knife i have looked at some other websites and they state it is just as good to use a cake tin with a pipe in the bottom that is slathered with fire cement
|
|
plainedge
- Monday, 08/17/09 09:41:12 EDT
|
One of our Camp Fenby friends came across this positive Crucifix die on eBay, and asked a number of interesting questions:
"Maybe these dies are to positive instead of negative--maybe you could use it for clay or silicone and then fill. Or maybe . . . I don't know. Bruce, can you see how this would work? L"
http://cgi.ebay.com/ws/eBayISAPI.dll?ViewItem&&item=390082095734
As above, I could see a number of uses for it, but the question still remains as to how it was originally intended to be used? Was there a matching negative die? Was it used to creat negative dies in some soft medium? Obviously not my forte', so now I'm curious too.
|
|
Bruce Blackistone (Atli)
- Monday, 08/17/09 09:55:58 EDT
|
small forge: Plainedge, Thin containers such as stainless cook ware or enamel ware will burn out pretty quick in a forge situation. Aluminium will melt. "Fire cement", at least the good stuff, is expensive and does not stick well to sheet metal. The typical sheet metal charcoal grills will also burn out easily under forge conditions.
For metal forges something heavier is needed. Items used for DIY forges have included brake drums, automobile wheels (with few holes), disk harrow disks, hot water heater end bells, old propane tanks (a little thin).
Note that "tin" is an elemental metal with a very low melting point used to coat steel "tin" cans and mixed with lead to make solder and copper to make bronze. "Tin" should not be used in metalworking discussions generically as sheet metal. Sheet metal comes in many varieties. The most common steel roofing is no longer tin plated but galvanized with zinc. Special grades such as terne plate have a tin/lead alloy coating. Cookware is generally not made of tin coated steel but copper pots and cookware are tinned to keep copper out of the food.
|
|
- guru
- Monday, 08/17/09 10:13:03 EDT
|
Crucifix Pattern: Bruce, Etal, That is a master pattern for fine sand casting or a plaster mold. As hardened and tempered steel it may have been used to make other molds that were in turn used to make wax investments. Rubber molds, now silicon rubber, have been used for a long time to make waxes that were in turn investment cast.
|
|
- guru
- Monday, 08/17/09 10:42:28 EDT
|
Has anyone tested the difference between the 6 amp and 10 amp delta portable bandsaws? I would guess that there should be slightly less chatter when cutting 1/4 inch steel (1084 for example).
|
|
- deloid
- Monday, 08/17/09 11:52:38 EDT
|
deloid,
Are you talking about the little 9" bench-top vertical band saws, or the hand-held portable band saws? As far as I know, Delta has recently discontinued the benchtop units and the old portable hand-held units were discontinued sometime back in the 1990s.
In the case of a vertical band saw, the power of the motor has very little to do with the way it cuts. That is much more a function of the rigidity of the frame, balance, true and mass of the wheels and the condition of the blade itself. No band saw should chatter, ever. If it doing so, something is wrong with the saw or the blade, usually the blade. A blade that is dull or has missing teeth is what usually causes chattering, followed by one that is badly welded.
|
|
vicopper
- Monday, 08/17/09 15:12:23 EDT
|
Thanks vicopper. I am writing about the dewalt models DWM120k & D28770K That are currently in production. These are the hand helds that everyone seems to be mounting (shelf or wall) in some fashion.
|
|
- deloid
- Monday, 08/17/09 15:21:52 EDT
|
Hi,
I am having trouble finding a bandsaw. The advice I got was to get a rockwell 14" knock off for around $400 and and get it to 700 fpm, then try a jackshaft reduction. That sounds good and there is plenty of information about it on the internet but grizzly customer service wont help me and they deny having any information on it. And I cant find any wood bandsaws on the web slower than 1500 fpm.
Thanks
|
|
Mike
- Monday, 08/17/09 15:53:11 EDT
|
thank you i will make sure to take your advice
|
|
plainedge
- Monday, 08/17/09 16:47:05 EDT
|
deloid,
Well, there's a difference between Delta, which you initially asked about and DeWalt. I don't buy DeWalt tools since they started making them in Mexico - just too many issues with poor quality control. For portable hand-held band saws, my preference is still the Milwaukee Porta-Band. Unlike "everybody", I don't use my Porta-Band as anything but a hand-held portable saw.
I can't tell you anything about the DeWalts, sorry. Regardless of model or amperage though, they shouldn't chatter - that's a sign of a problem that needs to be corrected.
|
|
vicopper
- Monday, 08/17/09 18:06:47 EDT
|
Mike,
Apparently Grizzly no longer makes the 4-speed 14" band saw. However, Harvbor Freight has their model #32208 saw that is essentially the same saw I am currently using. Low speed is 600 fpm and the price is under $350. If you use Lenox Diemaster II Varipitch bi-metal blades you can run it at that speed just fine and get good blade life.
Note that for good blade life it is necessary to tension the blade properly and break it in correctly. Lenox publishes that information and also provides it with the blades, usually. I also recommend the use of a good dry stick type lube when cutting metal.
Enco sells a 14" vertical band saw for under $500 that has speeds from 170 fpm to 780 fpm, which would make a good metal shop saw for moderate duty. If you need a heavy duty saw, you need to look at DoAll or Grob and be willing to spend at least three grand and up - way up.
HOpe this clears things up for you.
|
|
vicopper
- Monday, 08/17/09 18:17:06 EDT
|
Delta 28-276x shown on deltaportercable.com is the $400 3/4HP model. It runs at 3000 FPM.
Lowes and others claim it to be a 2 speed which MAY run slower but the factory says its a one speed.
This saw comes in a 3/4HP, 1HP and 1.5HP model (for twice the price).
FIRST! NO retailer is going to give you any information about modifying one of their products, especially machine tools. There are critical legal reasons including the manufacturer's liability would revert to the seller if they even hint at non-factory modifications. Employees that do so may be fired on the spot. No warranties would apply on making any change either.
To slow this saw down to common metal working saw speeds requires a 10:1 reduction. When you reduce speed by 10 you increase the torque by 10x (given the same HP). Torque is what breaks parts. The probability that this saw has a 10:1 safety factor is very low. However, since it appears that they make a 1.5HP version then there is a 2:1 factor at 3/4HP. So slowing it down to 1/10th speed would only be a 5x overload at 3/4HP.
My Ridgid 4x6 saw (no longer made) runs 65, 120 and 220 FPM. With top quality vari-pitch HSS soft backed blades I cut everything at the 220 FPM. However, for lesser blades the recomendations are:
| Ridgid 4x6 Cutoff Band Saw : 1/3 HP | | FPM | Materials | | 65 | Tool Steel, Stainless, Bearing Bronze | | 120 | Cast Iron, Mild Steel, Brass, Soft Bronze | | 220 | Copper, Soft Brass, Aluminium, Plastic |
SO, you could reduce your saw to 1/10th speed and 1/2 the supplied HP (to 1/3) and only be 2.5 times the factory engineered design load on the integral gear box. This is within reason BUT is still more than it was designed for. However, it is near they typical momentary overloads expected to be seen by the machine. It would work but you have used up ALL the over design (if there was any).
10:1 is a lot of reduction. This normally requires two steps. 3.16:1 twice or 2:1 and 5:1. . If you do it with belts and pulleys there will be a lot of friction losses and you could up that 1/3HP motor to 1/2HP. It also requires several shafts, bears and pulleys and the costs add up.
Worn gear reducers give you all the reduction you usually need in one step. 10:1 is at the bottom of their availability. 20 to 60:1 is common.
So, lets reverse engineer the saw. It has 14" wheels. Thus they have a 43.98" circumference or 3.66 feet. 3000 FPM divided by 3.66 is 818.5 RPM. Since this is only about half the speed of a standard motor in the U.S. they are not using a gear box. They are using pulleys with a 2.199:1 reduction ratio.
To get 250 FPM (a little faster than the Ridgid above) you need to turn the driven 14" wheel 68.3 RPM. This is 26:1 slower than an 1800 PRM motor. So the ideal method to drive this saw for metal working is directly with a 27 to 30:1 worm gear reducer. This is a common size that you may find in a scrap yard. McMaster-Carr has the size you need for $300 to $500.
I would look for one that you could hang the bandsaw wheel directly off the gear box (judging by the output shaft size) OR I would direct couple it to the existing shaft. If you play with the numbers you could use less reduction in the worm gear reducer and step pulleys to give you several speeds. I would set the low speed at 220-250 FPM and the high speed as high as possible (probably 500 FPM) for cutting wood and plastics.
For about $1000 invested in the saw and all new parts and some labor you would have a pretty good hobby duty metal working bandsaw that would also be suitable for other materials as well.
Please note that the numbers above were done on the fly and should be carefully checked before using them. Do your own math! When you modify machinery you are 100% on-your-own and you are the only one responsible for the results.
|
|
- guru
- Monday, 08/17/09 18:23:20 EDT
|
Saw Speed Recommendations: I said slowest should be 250 FPM. That should be 90-120 FPM if you want to use common carbon steel metal cutting blades to do tight radius work.
Cheap Tools: A lot of folks brag about the service they get out of some of the little 4.5" grinders that often sell for $13 to $15 on sale. . . We were using one Paw-Paw had bought that looked like it had never been used. It was probably one he bought for his new shop and never used. After about a half hour the switch failed. Maybe it had been operated 10 or 20 times. . .
I told Dave it could go one of two places. The trash can or home with him. Dave is cheap, he took it home. He may fix the switch but is it worth it on a $15 tool?
For $15 this tool was NOT cost effective. My $125 Milwaukee has hundreds of hours on it by many people. At $0.50 an hour this has been a cost effective tool. It may last much longer and become a $0.25 or $0.10/hour tool. Compare this to the HF cheapo that cost $8 to $15/hour. That is a 30:1 difference in value.
Some folks make it an art finding the cheapos that perform well but what about the ones they bought that only lasted minutes. . . What does this do to their average cost effectiveness? Do they ever get enough hours out of the tool to beat $0.10/hour?
To me the aggravation factor is worth a LOT. A new out of the box tool failing in minutes has a high aggravation factor. Folks have strokes and heart attacks over this kind of aggravation. For the short life the cost of waste disposal even becomes a significant factor in these tools.
What REALLY bothers me is that at the rate things are going there will no longer be ANY professional quality electric hand tools at ANY price. I don't mind paying a couple hundred dollars for a long life low aggravation tool that I can depend on.
|
|
- guru
- Monday, 08/17/09 18:56:33 EDT
|
More about Modifying Machines: When you make changes to any machine you need to THINK about it. Do the math, do the research. When I setup my old Delta 20" bandsaw it had a rusted up 2 speed motor. High speed was 1200 RPM. I replaced it with a standard 1800 RPM motor using the original belts and pulleys.
But before doing so I did the math and some research. This was going to run the saw at 5,600 FPM. It was not too fast (in RPM) for the sealed ball bearings. But that is REAL fast at the blade. It is within the range for cutting almost any kind of wood. It is too fast for many plastics as it melts them and you cannot saw ANY kind of metal. But in wood it just flies.
As a demo to how dangerous it could be I flick a baseball bat size piece of hardwood at the blade. It will cut it off with no effort or slowing the motion of the piece. I point out that that piece of wood it bigger than any bone in one's body and the saw cut it effortlessly in less than the blink of an eye. If that doesn't get your attention nothing will. Great tool.
If you setup old line shaft operated machinery you have to reverse engineer the input speeds unless you are lucky enough to have the OEM instruction sheet (HA HA ha hah ha!). You start with a the reduction in the step pulleys and how fast tool moves or feet per minute. Then you make a chart with the nominal cutting speeds for most materials. Steel is 90 to 120 FPM. High carbon, stainless and alloy steels at the low end and easy to machine materials above. You have to look at the machine's maximum capacity compared to the speed ranges. You should be able to use the machine to cut steel at its maximum stroke, travel or work size. Then the highest speed is what is whatever it is. If you do not have the mate to the step pulley (a common situation) then you need to guess at your average or maximum size work and pick a SINGLE speed. Note that truck and automobile gear boxes DO NOT work to replace the steps in the pulley set. The ranges are completely different.
When you retask a machine, modify it for something than other than what it was originally designed for then you are stepping into the OEM engineer's territory. Are you increasing forces, speeds? Will the bearings take the speed, the parts the force? What were the OEM design parameters? Did the machine have a lot of over design to last forever or was it designed to survive just long enough to make the warranty period based on some statistical low average usage (IE, a homeowner that fires it up twice a year for a few minutes). So what was on the OEM engineer's mind? Was he told to make a life long tool or was he reverse engineering something he did not fully understand and told to make it as cheap as possible. . . This last case is VERY common today. Manufacturing engineers that could not design anything on their own redesigning others work. . . That is how you get switches with a 20 cycle life instead of the design norm of infinite. The difference? One step in sheet metal gauge size. . .
My point. If you are going to change an engineer's work you need to think about his thought processes and reasons for what he did. Even if you do not understand all the engineering you at least need to appreciate it before you disregard it.
|
|
- guru
- Monday, 08/17/09 19:35:24 EDT
|
VICopper,
Thanks for the kind words and the advice. I've seen the ceramic guides in catalogs and wasn't sure if I could believe the claims. Nice to know they really work.
|
|
Mike BR
- Monday, 08/17/09 19:58:48 EDT
|
Or, you could just buy one of the two saws I listed for you and be done with it. Why re-invent the wheel?
|
|
vicopper
- Monday, 08/17/09 20:07:29 EDT
|
Mike BR,
Yep, they're worth the price of admission for sure! I'll not go back to steel or other guides.
|
|
vicopper
- Monday, 08/17/09 20:08:33 EDT
|
I have just bought a shear which will cut 3/8" round bar. The base has 4 holes drilled so it can be mounted to a bench. My question is- should I bolt it to a bench or should I put a hardy hole stake on the underside and use it on an anvil? (I have several servicable anvils and actually also a heavy ASO). Out of interest here when you buy a shear you don't get a handle- it is upto me to make my own so I am using a yard or so of scaffolding pipe pending anything better turning up. I might add a weight to increase momentum.
|
|
philip in china
- Monday, 08/17/09 20:49:03 EDT
|
How do the ceramic guides differ from the graphite filled fiber guides? The fiber guides were marketed as "cool guides" and were supposedly very good. I couldn't find them to fit my saw and the minimum material purchase to make them was more than I was willing to pay.
|
|
- guru
- Monday, 08/17/09 20:56:22 EDT
|
Anchoring a Shear: Phillip, Leverage tools will often tip an anvil off its base or the base and anvil together. You might try clamping the shear to the anvil and testing it first.
Bench mounting such tools ties up a lot of bench space. Its not just the space for the tool but for the stock on both sides.
I've clamped such tools in vices but the leverage tends to be hard on the vice jaws unless it is a very heavy vice. However, if your vice is on a heavy stand bolted to the floor then you might mount the shear on the same stand or behind the vice.
Otherwise a seperate stand well anchored. Large shears are often anchored on the floor but are less convenient to use. They do however allow putting full body force on their long levers.
|
|
- guru
- Monday, 08/17/09 21:11:23 EDT
|
OK Jock, thank you as always. I shall rethink along those lines. BTW 3 phase is finally due for installation today! So shall at least be able to weld again soon.
|
|
philip in china
- Monday, 08/17/09 21:25:48 EDT
|
The ceramic guides are harder than woodpecker lips and simply don't wear out - not yet, anyway. Unlike the others, they are designed to be smooth but not easily abraded. The graphite-filled fiber ones definitely do wear down and need frequent re-adjustment. They'd probably be dandy for re-sawing or cut off work, tasks where there is little lateral pressure on the blade, but when you start doing curves, particularly tight ones where the blade gets flexed, they wear too rapidly to suit me. Even solid steel guides wear too much under those circumstances.
The other issue with less-than-really-damn-hard solid guides on a metal cutting saw is that bits of swarf get lodged in them, or between the guide and the blade, and markedly increase abrasive wear on the blade, since the swarf is not smooth like the hard guide faces. Pretty soon the blade is irregular and you simply cant get consistent guide clearance. This issue doesn't come up when they're used for wood working, of course.
The ideal situation for a band saw blade guide is that the guide and the blade both be highly polished and clearance is set too close for swarf to enter. Next to no friction, excellent blade control and no drag at all. Thus, no heating, no distortion, no galling and the blade is constrained so well that tight radii are not only possible, but controllable. The ceramic guides, especially after I've lapped the faces on a 1 micron diamond lap, fit that bill very closely - the best I've found so far.
now, if you're a devotee of doing teeny fretwork on your band saw using a 1/8" tapered-back blade, you're going to have some work cut out for you to get ceramic guides lapped to perfectly match that tapered blade profile. I don't know of anyone still making tapered-back blades like that anymore, so it probably isn't an issue. Take it from me though, it's not easy to change the face angle on those ceramic guides. Not an issue though, since they last so long.
My old Ohio Forge(ry) knock-off of the Rockwell 14 takes 1/2" square, square-faced guides and the ceramic ones fit perfectly right out of the wrapper. They also make them for the saws that use the 1/2" square, angle-faced guide blocks, and possibly in other configurations as well.
|
|
vicopper
- Monday, 08/17/09 22:21:10 EDT
|
Philip,
What I do for my Beverly shear and some other leverage tools is to mount them to a plate that has a 1-1/2" square tube tang welded to it. That tang goes into a receiver welded to my workbenches. The receiver is 2" square tube with grub screws in the corner of the tube to lock the tang into the opposite corner. One heavy bench has receivers mounted at both ends just under the top and also down at the floor, against one leg. My old bar shear is usually used in the floor level receiver so I can really lean into it. When not in use, the shears are stashed out of the way under a bench.
The receivers are deep, some going from one side of a bench to the other, while the tangs are usually anywhere from 6" to 12" long, depending on the amount of stress expected. The tangs are 1/4" wall thickness and the 2" tube is 3/16" wall to yield a decent fit on the 1-1/2" tangs. The whole thing works a treat. I have to credit Ralph Sproul for the concept - he calls them "gazintas", 'cuz stuff goesinta them.
|
|
vicopper
- Monday, 08/17/09 22:34:51 EDT
|
Gazinta is a Yiddish word, meaning something to the effect of something extraordinary.
"Did ya see the gazinta tuchus on that girl?"
|
|
- Nippulini
- Monday, 08/17/09 23:46:28 EDT
|
Hmmmmmm would work on your trailer hitch receiver as well. . .
I think my saw uses 5/8" square guides. It has steel guides in it. Haven't noticed any wear since I dressed them but all I cut is wood.
Thanks for the info on the ceramic guides. Something to think about on a metal cutting saw.
|
|
- guru
- Monday, 08/17/09 23:48:00 EDT
|
Gazinta: After a good google search I think Nip is wrong. . In Yiddish it has a slightly different connotation than he gives but it has more common usage in math and engineering (division and plugs or connectors). Seems that many fields use it as Ralph Sproul did.
|
|
- guru
- Tuesday, 08/18/09 10:29:52 EDT
|
I never paid much attention to my grandmother when she went over Yiddish with me. But "gazinta" is definitely in there. I don't know why I think "fa-shizzle" sounds Yiddish too.
|
|
- Nippulini
- Tuesday, 08/18/09 12:49:46 EDT
|
I am setting up a small blacksmiths shop to compliment my wheelwrighting and wagon building, I have obtained a 100lb Peter Wright anvil in very poor shape with badly chipped faces. What is the best material to weld the faces that have been damaged? I have access to good machine shop facilities to machine it flat after welding. It appears to be a cast steel rather than cast iron? Any advice appreciated. Thanks
|
|
Brian Reynolds
- Tuesday, 08/18/09 15:27:16 EDT
|
Anvil Repair: Brian, Many other may advise you to make these repairs but you are probably better off NOT. The steel is medium to high carbon and hardened. Repairs leave hard and soft spots. Often the repairs to chips a cosmetic and only repair the owners pride and not the anvil. Anvil corners should be radiused to make better forgings and to reduce chipping. Sharp corners just invite chipping.
See our FAQ page article on anvil radii. These are average radii and can be more or less. If a bit more takes care of your chipping then you do not need to weld up the corners.
Some chipping can be taken care of by dressing the sides of the anvil. Grind the side a 1/16" and then dress the radius and you may find the problem gone. You also do not need to dress the chipping 100%.
To weld repair an anvil a high manganese high strength rod such as a hard facing fill rod (not surface hard facing) is recommended. Stoody is one brand. Check with your local welding supplier. Cracks should be ground out, the anvil preheated to about 350°F and each pass peened and cleaned before the next. After welding the material is ground, porosity and cracks cleaned out and welded again. Its a lot of work and the better the welder you are the cleaner and easier the job.
Where the alloy rods meet the old carbon steel a circular mixing pass will blend the color so the repair is not so obvious. If the chipping is severe it may have taken out some of the wrought body. This should be built up with the surface horizontal. The slag in the wrought will flow out at arc welding temperatures and must be replaced with filler rod. It takes two or three times much rod to fill on wrought iron as mild steel due to this. Welding flat reduces the amount of metal that would run off with the slag.
|
|
- guru
- Tuesday, 08/18/09 17:01:08 EDT
|
One thing that came to my mind concerning the re-facing of anvils, is the new steel putty being marketed. Suppose to be able to repair cracks in engine blocks, claims it can be drilled and tapped. I wonder if it would hold up on an anvil.
|
|
Mike T.
- Tuesday, 08/18/09 18:26:39 EDT
|
Metal Putties: No. And there is nothing "new" about it. Metal filled epoxies have been around since the 1950's. Industrially the primary maker of these was and is Devcon. They were often used to repair iron, aluminum and bronze castings. However, while strong these are superficial repairs with much less strength than the base metals.
Many things are compared to steel but there is nothing that really replaces it for practical purposes. Without it, technology can not exist.
|
|
- guru
- Tuesday, 08/18/09 19:30:27 EDT
|
When I firs started blacksmithing, Ralph was the NH director for the New England Blacksmiths. He invited me to his shop and I caught the gazinta bug. I use it for my vise, bender, and shear. It's a real big help in a small shop. I mounted the tools' tangs at a 45deg angle, which gives me a little more flexibility.
And they do work nicely in the receiver hitch. I've only used the vise in there, but it's nice to have that outside the shop.
|
|
- Marc
- Tuesday, 08/18/09 20:00:35 EDT
|
Yea, Ralph's got a billion good ideas. The DVD of his demo at one of the UMBA confrences is a really great, and you can push pause to write down the good ideas, something that's hard to do when talking to Ralph in person :). Can't wait to se him at the NEB fall meet.
|
|
Judson Yaggy
- Tuesday, 08/18/09 20:09:00 EDT
|
Philip in China - At a shop I used to work at in Lubbock, Texas, in my college days, the owner had a large work table that he had basically made large hardy holes in along one edge - cut square holes in the top and then welded steel square tubing into it. He had several different tool he dropped into them, but mostly vises. Seems like it might be a good way of mounting your shear. Basically Vicopper's suggestion turned 90 degrees and letting gravity and friction do the job of the screw.
|
|
- Stormcrow
- Tuesday, 08/18/09 21:46:02 EDT
|
Yeah, Ralph is one smart cookie. The pinnacle of my year was when I mentioned a notion of mine to Ralph and he said it was a great idea. I was more proud of that than some awards I've won. :-)
Whenever I visit Ralph I take my camera and notepad. And figure on a week's hard work when I get home, just catching up on all the great ideas I got from him. I'll be spending a couple days in his shop after the NEB meet, collecting another batch of inspiration and improved techniques.
|
|
vicopper
- Tuesday, 08/18/09 22:41:46 EDT
|
Stormcrow,
You don't really need the set screw to retain the tang in the gazinta. Most of the time, I just shove them in and get to work. I find that the horizontal receiver is way handier than a vertical hole, particularly when I'm schlepping heavy vises, shears and benders - the holes are mostly at about waist level so it's really easy to slide the tang home or remove the tool when finished.
A big bar shear, like the Edwards, is much easier for me to use when it is mounted on the floor. The floor-level gazinta takes care of that very handily. It also make s a good place to stick a Johnson bar for shiftin gthe 1200# bench when I need to. :-)
|
|
vicopper
- Tuesday, 08/18/09 22:47:47 EDT
|
Work Benches and tool Holders:
I like the horizontal receiver idea because benches tend to get used as shelves (no matter the signs that Frank Turley has that says "A Workbench is not a Shelf" on every bench). A horizontal receiver cannot get piled up with tools and junk. . .
If you are lucky enough to have a weld platten, vertical shank vise and shear holders are handy but as ViCopper noted you may want/need a hoist to install the tools. The advantage of a ton or more bench to anchor tools to is considerable. But with high leverage tools like benders you can still shift one of these heavy benches so it may still need to be bolted down.
Another way to go is a combination tool tree vise stand. Most of us have vices mounted on heavy posts of steel columns bolted to the floor. That same post could have tool receivers at various heights and directions. For overhung loads it would need to be anchored better than a vice but not a great deal more.
|
|
- guru
- Wednesday, 08/19/09 01:47:59 EDT
|
Judson, you'll really enjoy the meet. Ralph is a great guy. not just clever, but real open and friendly. The rest of the crew are great, too. What's a lot of fun at those meets is when Ralph and a couple of the gang get to jamming. Not musical, though, but more like gadget jamming. Ralph will take out the ever-present piece of soapstone from his overalls and get to drawing on the side of a forge hood, or whatever. It's great to see those minds at work.
|
|
- Marc
- Wednesday, 08/19/09 07:25:48 EDT
|
Gazintas: Guru, maybe we need a gallary of unique, smith-made tools?
|
|
quenchcrack
- Wednesday, 08/19/09 07:39:40 EDT
|
Setscrews in gazintas. I, too, usually don't set the screw. However when I'm bending things I like to set it because the looseness is annoying. I use 1/2" eye bolts for the set screws, making them thumb-screws, I guess. I screwed up (unintentional pun) on my first set of gazintas and put the set screws on the side, instead of the corner. It's not a big problem, but the corner is better. I must not have been paying enough attention at Ralph's.
In the most recent incarnation of gazinta, I mounted my post vise to the bench using one. Before, the vise was freestanding, mounted to a pipe welded in a semi brake-drum for a base. But I had some large twisting to do and couldn't stand on the base for that. So I decided to mount it to the bench, but I still wanted some portability. So I kept the vise the way it was, put a ring clamp around the pipe mount and welded that to a tang. I added another gazinta to the end of the bench, and wala - quick-release post vise. I did put the set screw in the corner of this one, although it's not needed for the vise. But now I have a third gazinta in case I happen to have a real busy day.
|
|
- Marc
- Wednesday, 08/19/09 08:02:21 EDT
|
Just occurs to me that a double hardy shank fitting exactly into a double hardy hole would be solid. The force on the shear doesn't work upwards and that would be the only way to extract the tool if I made it precise.
|
|
philip in china
- Wednesday, 08/19/09 09:07:11 EDT
|
QC, Good idea. Would be an umbrella index for many of the articles we already have posted as well.
Set Screws, Grub Screws: When I built the portable blacksmith shop trailer I put 1" square bar legs in the 1.25" tube frame corners. The bar in the tube was a fairly loose fit. When the trailer was parked for use it was jacked up and leveled then these legs were extended and locked in place. Locking them in place was a single 1/2" setscrew on each leg. These were threaded into square nuts welded to the tubes. Each supported about 1000 pounds and withstood wind loads from the roof, vibration from the hand crank drill and twisting forces from the vice. I never tightened the screws particularly tight (just snug) and never had them come loose.
I was surprised at how well these small single screws did. I expected to have to put in multiples.
I prefer to permanently anchor vises either on a bench or a stand. But I have many so I do not worry about portability. The exception is on weld platens. The platen makes a great place to anchor a vice but then the platen is tied up if you need the full surface for a gate or rail assembly job.
|
|
- guru
- Wednesday, 08/19/09 09:08:11 EDT
|
I am thinking of purchasing some Solingen knife blades. I read where razors and surgical scalpels are made from it. What makes this steel so popular and what simple carbon steel could you compare it to ?
|
|
Mike T.
- Thursday, 08/20/09 04:51:52 EDT
|
Mike, Solingen is the steel making district in Germany and has a history going back many centuries. It is similar to the Sheffield District in Britian. As for the quality of the steel, well, good steel can be made almost anywhere today. I think Solingen has had a justifiably good reputation for quality for a long time but I am not sure it is that much better than US made tool steel.
|
|
quenchcrack
- Thursday, 08/20/09 07:28:45 EDT
|
Quenchcrack,
Thanks for the information. :)
|
|
Mike T.
- Thursday, 08/20/09 07:35:02 EDT
|
I don't know if I read this or dreamed it, but it seems like the iron ore in some of these areas is more pure and does not require as much processing to get the finished product.
|
|
Mike T.
- Thursday, 08/20/09 07:39:47 EDT
|
Mike,
These days, I think almost all steel has at least some scrap/recycled/remelt in it. Metallurgy has advanced to the point where they can test melts down to teeny little amounts that a hundred years ago couldn't be measured, too.
I think Solingen steel has become like French wine - sure, it's good, but there's good stuff made lots of other places, too. They make all kinds of steel in the Solingen region so I don't think you can really compare it all to a simple carbon steel. They make stuff like 1084 and also stuff like 440C, so you have to compare similar alloys to draw any meaningful conclusions. I'd sure recommend sticking with their high-carbon plain steel, though. No matter what chachi name you paste on it, stainless still doesn't make nearly as nice a blade as plain carbon steel - in my opinion, anyway. :-)
|
|
vicopper
- Thursday, 08/20/09 09:06:21 EDT
|
Mike & Rich, yep we can test a lot further down in ppm and for a lot more elements at once than we could even 50 years ago. Leco C & S, and O & N test take about 5 minutes max and most of that time is sample preparation and typing info into the computer running the machine. Same time for an OES burn (optical emission spectroscopy) that can give 20 or more elements, depending on how you've set up your analytical curves - again, most of that time is sample preparation and entering sample data in the computer. A little more time using an older X-Ray flourescence spectrometer for actual testing, as it testing the elements sequentially, about 8 minutes.
Most steel companies today are using at least some recycled materials - anyone running an electric arc furnace is using mostly recycled materials as the feed stock. The blast furnace/BOF route is becoming less common, and seems to be dedicated to areas where lower residuals are important - auto body sheet is one, and I'm sure there are more, just not ones I'm familiar with.
|
|
- Gavainh
- Thursday, 08/20/09 09:27:00 EDT
|
Any ideas what to do with a bunch of fencing foil blades?
|
|
Carver Jake
- Thursday, 08/20/09 09:43:05 EDT
|
Vicopper & Gavainh,
Thank you for your responses. Vicopper, I am with you, I only want carbon steel. I believe all these new ( exotic )stainless steels, such as high carbon stainless ( which will corrode and pit to some extent )is just an attempt to reach high carbon steel status. I read an article this morning that stated that any time a new steel enters the market, it is touted as the best for blade making, of course salesmen want some sort of edge to increase their sales. The point of the article was to encourage the use of good old tried and proven steels.
|
|
Mike T.
- Thursday, 08/20/09 09:48:56 EDT
|
Carver Jake,
What kind of steel is in these foil blades. If high carbon, I would be interested in working up a deal with you. Even if lower carbon I might want to use it in damascus.
|
|
Mike T.
- Thursday, 08/20/09 09:52:34 EDT
|
Mike, I think you need to do a lot of studying on steels. Even "simple" carbon steels have alloying ingredients to increase ductility, reduce cracking, improve hardenability. Silicon and manganese are almost always present in modern steels for good reason.
While they are getting harder to find the low alloy high carbon steels such as SAE 1095 are still available.
Yes, there is always a new alloy du'jour with miracle properties. But in the end the best tools and blades made of any type of steel can be good or bad depending on the care the maker put into their creation and heat treatment.
In every field their is also the sales hype used to sell sexy exotic sounding alloys and their treatment. It does not matter if the benefits are real, or if the actual alloy is in use or if the processing is done correctly. . . It is sales hype. One of the most blatant sales hypes used was the "living steel" routine where the more the work is forged the more of the smiths energy goes into the steel thus making it better and giving it "life". . . Then there are those that sell "Damascus" folded 400 times. . . (too many folds and it is homgenous and too many welds and it is nearly decarburized).
Where the best hand made steel items can surpass factory made is by careful heat treatment using selective hardening and tempering. However, even factory made products often use selective heat treating.
|
|
- guru
- Thursday, 08/20/09 10:33:38 EDT
|
Guru,
Thank you for the response. I will take your advice and keep researching. When I ventured into steels, metals, metallurgy, forging, heat treating etc. I did not realize how complicated it can get. I don't know how people become professional metallurgists, but for sure, they must be smart. What little I know, I enjoy it.
|
|
Mike T.
- Thursday, 08/20/09 11:40:39 EDT
|
Fencing blades are usually not very high in carbon and made from a maraging steel (see wikipedia) that has the nice property of breaking rather squarely across rather than "splintering" or having sharp ends when snapped.
They may be interesting to weld from the alloy lists; but I have never tried myself---I use them for shish-kabob skewers
MikeT check with any local college with a fencing program, blades are "consumables" and they should have a bunch of old ones to get rid of.
Thomas
|
|
Thomas P
- Thursday, 08/20/09 12:28:39 EDT
|
Can you tell me if anyone possibly knows of any resources for pressed or stamped copper leaves? I'm looking for a supplier so I can tack weld them to ornamental ironwork.
Thank you,
Jason Failor
|
|
Jason Failor
- Thursday, 08/20/09 13:46:21 EDT
|
Jason Failor,
Try Julius Blum.
|
|
vicopper
- Thursday, 08/20/09 14:28:30 EDT
|
Jason, not that I know of. It is not good to mix metals as it sets up bi-metallic (galvanic) corrosion. You would be better off to hand finish the piece using products like the Gilders Paste that BlacksmithsDepot and others sell.
Alternatively you could make the entire work from brass or copper.
Steel components in both flat and formed are available from the architectural suppliers like King Metals.
|
|
- guru
- Thursday, 08/20/09 14:41:16 EDT
|
Solingen steel has a good reputation; but it's like Sheffield steel; sort of a generic guarantee of some base level of quality.
Back during my brief career in the USMC I bought an "Othello" sheath knife with a Solingen blade at the BX. Turned out to be some piece of stamped-out $#!+. On the other claw, I've seen some very nice pieces from there too.
Not a new phenomenon, ask Ulfberht. ;-)
A hot humid day on the banks of the lower Potomac. We just worked out a site for Hastings XXXXI, our 40th anniversary, October 24th & 25th, 2009.
Visit your National Parks: www.nps.gov
Go viking: www.longshipco.org
|
|
Bruce Blackistone (Atli)
- Thursday, 08/20/09 16:56:30 EDT
|
King, like Julius Blum, is simply a retailer.
They buy from manufacturers, and resell.
So if you only need a few of something, in a commonly stocked size or material, they are fine.
If, on the other hand, you need a lot of something cheap, or a custom part, it often helps to go to the actual manufacturer.
Most of the leaves in the USA are stamped by a couple of companies-
Frank Morrow, in Rhode Island, at www.frankmorrow.com is one.
They will run you leaves, in any of 40 or so designs, in steel, aluminum, copper or brass. Of course, there will be minimum order quantities, but they are probably who King buys from.
There used to be one other big leaf stamper- AllState Metal Stamping, originally on Forsyth Street, in Manhattan. I used to buy a lot of leaves from them, for pennies- the exact same leaves Blum, and American DeRosa, and JG Braun sold for two or three times the price. But All State moved to New Jersey, then the office moved to Florida, and then they moved to Arizona, and a few years ago, they dropped out of sight.
Many of the leaves places like King sell are All State designs, leading me to believe somebody bought em- maybe even King, I dont know- but their original, 50 to 80 year old dies are still being run by somebody, somewhere.
Could be they moved to Mexico.
|
|
- Ries
- Thursday, 08/20/09 17:53:14 EDT
|
Guru and Jason Failor,
I went to the Devcon site and looked at their epoxy products, I think they have copper or brass metal epoxy,
might be good to glue the copper leaves onto the ornamental iron work.
|
|
Mike T.
- Thursday, 08/20/09 17:54:20 EDT
|
i was wanderin if anybody had some plans on how to make a windmill out of railroad spikes, ive seen one done but every one is tight liped on how its done, my uncle is retirin after 30 yrs as a track welder wantin to make one for him, ive had the liberty to weld beside him for 12 yrs now so getting the spikes will be easy, thanks
|
|
wallydrifter
- Thursday, 08/20/09 18:48:24 EDT
|
Mike T,
While the metal-filled epoxies can be very useful for filling voids and plugging holes, they're not all that great for holding things together where the contact patch is very small, like the stem of a leaf. The joint would probably be stronger if done with silver-bearing soft solder, and it would be quicker and easier to do, too. Even silver soldering with real silver solder would not be difficult and would be very strong.
I've stuck copper to steel using the TIG welder and silicon bronze filler with good success, too.
As the Guru pointed out, if the piece is going to be exposed to weather there is a likelihood of galvanic corrosion forming at the dissimilar metals joint. That could be reduced by adding some sacrificial zinc anodes to the piece, but it wouldn't eliminate it and they would need to be periodically replaced as they were consumed. In a dry environment like indoors, or outdoors in the desert, the corrosion might not be an issue for many years, but in an environment like my island in the middle of the ocean, it would be surprisingly quick.
|
|
vicopper
- Thursday, 08/20/09 18:55:27 EDT
|
Wallydrifter,
If you could post a link to a photo, or at least a more detailed description, I'm sure you'd get an answer on how it could be made. More likely several. But we can't tell from your post whether you're talking about a windmill made from one spike or a thousand.
|
|
Mike BR
- Thursday, 08/20/09 18:58:29 EDT
|
Vicopper,
What island do you live on ? Is the fishing around there
good ? Are there any bathing beauties on the island ? :)
|
|
Mike T.
- Thursday, 08/20/09 19:05:22 EDT
|
the windmill is made of several spikes welded together prob about 5 feet tall. its just a decor peice that would go in a garden or flower bed, i cant find any links or pictures i was needing help on that part
|
|
- wallydrifter
- Thursday, 08/20/09 19:05:59 EDT
|
It is amazing what people can make. Such as RR. spike windmill. I was in the doctors office the other day and on the shelf was a cowboy made out of 2 1/2 horse shoes ( twisted ). Big washer bent up for a hat, bandanna, and twisted wire for a lasso, looked very good.
|
|
Mike T.
- Thursday, 08/20/09 19:10:40 EDT
|
ive seen that cowboy before very neat i wish i was that artistic, to think of makeing stuff like that. i can if i have plans ur something to look at but to think it up and make it it just isnt there
|
|
- wallydrifter
- Thursday, 08/20/09 19:14:40 EDT
|
wow i must of stumped everyone, keepin ya on yur toes
|
|
- wallydrifter
- Thursday, 08/20/09 19:31:43 EDT
|
A small problem with epoxy materials used in sunlight. They degrade, some rather quickly. Many of the composite aircraft use variuos grades of polester epoxy materials for the matrix in the composites, and most have to be painted a white or yellow to resist sunlight, and as the heat rises from sunlight the epoxy also gets weaker. In joining metals, especially ones with large differences in thermal coefficient of expansion, an epoxy material is a short fix. The joining material often must have a yeild strenght large enough to not fail in the joint. There is also that little issue of peel strenght. Epoxies are not great on peel.
The repair products are quite good when used as intended. That is for filling voids and so forth.
|
|
ptree
- Thursday, 08/20/09 19:32:28 EDT
|
Would you give some advice on how to adjust the cap oiler hold down brackets on top of a 50lb little giant hammer the machine was moved and the shaft had to be removed.The old shims went south so to speak and I now must readjust. Is it best to adjust just with the hammer linkage off so you can get free spin.Question is how tight should all the slop be out or just snug,so there is no drag on the rotation,
|
|
George
- Thursday, 08/20/09 21:37:32 EDT
|
Crafty Stuff: This is generally the anti-art of artist blacksmithing. There are those that create or invent these things, and others that just copy them. The horseshoe cowboys with bent washer hat and welding wire lasso are seen the world over. No telling where or who or when these were invented but I've seen them in Chicken Shacks in rural Costa Rica. Cute spreads. . .
Yard art windmills have been popular for decades and you can probably see them in rural Russia or Kenya. Some are built from scratch to be replica western style windmills, others are more crafty. Automobile fans are commonly used. I've never seen rail road spikes used and I've think it would be a little too heavy for yard art.
How to? Weld up 4 legs and braces, hang a fan on a couple bearings and you've got it. But if you need a blueprint then . . . keep searching but I doubt you will find one. Maybe in a 1950's Popular Mechanics. . . Most guys that build these things see one, then copy what they see.
|
|
- guru
- Thursday, 08/20/09 23:15:40 EDT
|
LG Bearings: George, The OEM setup had wood blocks between the frame and bearing caps. Adjustment was by compression of the wood.
To use shims, you make a shim set. Start by measuring the space between the frame and bearing caps with the shaft in place. Then you need a stack of metal plates to fill the gap plus a little. If the gap is large then make one plate fill most of the space (say 1/8"). Then the rest should be shim stock, .032, .015, .012, .010, .005. There is a bit of art to the numbers so that you can get any thickness as needed. The art is not using too thin of shims. You can make a shim stack with lots of .002 and .003 shims but it is a pain to make and use these foil thin shims.
Shims can be either plain with holes OR slotted to the holes. Slots let you swap shims without removing the bearing cap. To make the shim stack you cut the shim stock, make the stack, clamp it tightly between two cold finished steel plates about 3/8" thick then drill the stack with a clean sharp (preferably new) drill. Use a 1/16" oversized drill (IE 9/16" for 1/2" bolts). If you use very thin shims the holes may need to be punched or cut with a leather or gasket punch. Very thin shims must be clamped very tight and very flat to drill in a stack.
After drilling you can use tin snips to make slots out of the holes in the thin plates.
--------------------------------------------
The bearings should have as little play as possible but not enough to create any extra drag when lubricated with SAE 20 motor oil.
You can trial and error the fits OR use "Plastigauge". This is a round plastic strip that you clamp in the bearing space. A calibrated card is used to determine the clearance by measuring the flattened plastic. .002 to .005" would be right for old used plain bearings in a slow turning machine. Auto supply houses normally carry Plastigauge.
If the hammer is an old model with the pressed plate wrap around guides you will need shims for that as well. As these guides wear more shims are needed to close the gap. The guides should be tight but without drag. You should be able to bounce the ram on the springs freely when the guides are right.
It is also good to check the fits of the toggle arms and spring arm pins. When these are loose, control is reduced and the hammer hard to control. However, if all you do is heavy drawing fine control is not critical. But keep these well oiled.
|
|
- guru
- Friday, 08/21/09 00:34:53 EDT
|
And yes, It is easiest to adjust the bearings without the hammer linkage.
|
|
- guru
- Friday, 08/21/09 01:07:07 EDT
|
Pre-apology for the big post:
What exactly is the “Hot Short” condition? What causes it, and what are the symptoms. I know it has been discussed, but I tend not to pay attention until it happens to me.
I got a piece of re-bar (I know the junkyard nature of this, you don’t have to tell me – you can repeat for the benefit of others, though) which I tried to make a welded eye on the end (turned loop forge-welded to itself) at my usual high temperature welding heat. The stuff stuck together ok, but cracked right below the welded area, almost clean through. Tried the other end, same thing happened.
Now, as I said, I wasn’t paying attention, but I seemed to remember something about Hot Short and High Carbon content, so I decided to try this material in a pattern-welded piece, mating it with some standard HR flat bar and welding at lower temperatures. This has seemed to work, though I did see a crack in the re-bar layer, but dealt with it by folding and re-welding (doubling the layers). My theory is that when the carbon migrates from the re-bar to the mild fb, this will alleviate the hot short condition. This is not going to be the case if Hot-Short is due to other alloying elements.
Another topic, our neighbor Rube Miller is now making anvils; (this old gent is retired, and seems to choose his projects solely for the fun of doing them, not for the outcome – last year he made full-scale wooden patterns of an anvil, a swedge block, and a cone mandrel, and had them cast in brass or bronze, resulting in cool looking, but totally useless smithing tools). He has found some 1-1/8” thick high-carbon steel for faces, and is cutting huge blocks and cylinders of mild steel to make bodies, to be welded together. I will try to get pics and dimensions for possible addition to the “DIY ANVIL” page. I wish I could show him the Guru’s anvil making articles, and may still try to print them – Rube is brilliant, but is of the pre-internet generation. His designs will be his own, regardless, and will be another version of the “Anvil as Art” movement.
|
|
Dave Leppo
- Friday, 08/21/09 06:48:25 EDT
|
Dave Leppo, hot shortness is actually a high sulfur condition. One of the reasons manganese is added is to combine with sulfur to form manganese sulfides. This ties up the sulfur and keeps it from forming on the grain boundaries. On the grain boundaries, the sulfur will melt, dissolving the grain boundary and the two metal grains fall apart. On a macro-scale, the whole section can fall apart. That is one reason re-bar is often a heart breaker. There is not a darned thing you can do about it but start over with another piece.
|
|
quenchcrack
- Friday, 08/21/09 07:40:21 EDT
|
"the two metal grains fall apart. On a macro-scale, the whole section can fall apart"
Does this typically happen at high temps, or more so? It seems that if I don't over-heat the material, I don't see the cracks. I now have a twisted tapered PW round "pin" which I plan to coil into a snail shell. Can I expect cracks to open where the material stretches on the outside curve?
|
|
Dave Leppo
- Friday, 08/21/09 08:07:06 EDT
|
Dave, Are you quenching the piece? Rebar is often fairly high carbon to make it high strength and quenching can be a problem. In construction the shaping of rebar using heat is verbotten even when very difficult to bend.
I've had some steel that was supposedly "mild steel" that I made loop handles in and when quenched they snapped off just below the loop where the heat ended. After one broke in my hand after quenching I stopped quenching the pieces and had no more trouble. Later I tried making tools from the same steel but it did not harden well under normal heat treating conditions. I never figured out what it was. .
|
|
- guru
- Friday, 08/21/09 08:43:39 EDT
|
Couple weeks ago tried to make a knife from an old crescent wrench. Orange heat, one strike, crumble. Hot short or CI? It was stamped "forged" on it, but I know that means nothing when talking about cheap foreign tools.
|
|
- Nippulini
- Friday, 08/21/09 09:05:55 EDT
|
Guru,
Thank you for your knowledge and help. Thank you also for this wonderful site. When my hammer(50lb.LG)
is fully operational I'll post all the things i changed from the first plans and Ideas to what really worked best.
George
|
|
George
- Friday, 08/21/09 09:26:52 EDT
|
I can't remember if I quenched the welded eyes, probably not; I normally dont. I am not quenching the PW twist, trying to do everything at close to welding heat, probably will do the forming around or above critical temp.
The proof will be in the pudding, but the rebar is probably just very high carbon in this case. In the past I've used rebar that WAS forgeable, weldable, and heat-treatable. This is from a different source.
|
|
Dave Leppo
- Friday, 08/21/09 10:11:34 EDT
|
Nip, Many alloy steels if overheated will crumble. Often you can see them start to crumble from the heat, wait till they cool a little and continue to forge them.
|
|
- guru
- Friday, 08/21/09 10:45:50 EDT
|
Carver Jake & Thomas - re fencing blades, well it depends, I haven't checked the chemistry on any maraging blades, but the last I checked "normal" blades are still available. I ran a chemistry check on an old broken Prieuer foil blade about 2 years ago. The closest match I came up with was a European spring steel with higher silicon than 1060. The analysis showed about .60 % carbon, reasonable levels of manganese and higher than expected levels of Silicon - I believe around .80 %. So not 1060, but something similar. I'm not certain where I put the analysis, but I did post it over on Forgemagic at the time. Should be able to make a half decent knife out of them, if they aren't the maraging type.
Nippulini - was that a "Crescent" wrench, or a Crescent wantabe wrench. Twenty-five years ago or so, Crescent was using 4140 for their adjustable wrenches - should be able to forge a decent shaped knife from it, though carbon would not be optimal. Wrenches were heat treated under controlled atmosphere conditions in their SC plant. Other manufacturers used different allos. Some had moved to microalloyed steels where the strength in the wrench came from cold-forming the stock to its final shape. It could also be an issue of being in contact with some corrosive agent over the years.
|
|
- Gavainh
- Friday, 08/21/09 11:23:22 EDT
|
Red Short: I had some WW-II rebar from the old Amphibious Naval Trainig Base in Solomons, Maryland. I'd bring it up to a working red heat, and the stuff would just crumble under the hammer. Best theory was that, under the pressures of an ongoing war, the stuff only had to work for what it was intended for... Quick, cheap and....not so good. I tossed it back in the hedgerow somewheres; and intereesting pattern but pretty useless for forging.
|
|
Bruce Blackistone (Atli)
- Friday, 08/21/09 14:47:33 EDT
|
OK, Maraging blades have been the requirement all the places I have played for years. Of course they will often spec the maker as well and a run of bad blades will get them dropped from the allowed list.
I still like them for kabob skewers...
Thomas
|
|
Thomas P
- Friday, 08/21/09 15:03:36 EDT
|
Bruce,
I've read that there were "war emergency" steel specs that loosened up a lot of requirements. Maybe that does explain the crumbly rebar.
|
|
Mike BR
- Friday, 08/21/09 17:24:14 EDT
|
REBAR: Rebar does come in in an arc weldable grade, unfortunatly I don't remember the grade. As Jock mentions, rebar is generally worked cold, and has to meet yield, elongagation & tensile strength requirements, depending on it's grade, but not alloy requirements if I remenber right.
|
|
- Dave Boyer
- Friday, 08/21/09 20:56:17 EDT
|
Drawing out heavy stock: i am having trouble drawing out a u bolt that i scrounged up. the guy i got it from says it was 4140, but this stuff moves like 5160 at low orange (just visible in day light) at a yellow heat. i am wondering (other than a bigger hammer which is a duh moment, but i don't have an anvil i feel comfortable using bigger than a 4lber on) is there anyway to make the steel move easier? any hotter and i will burn it so i am afraid to ruin my steel. thanks for the advice.
|
|
bigfoot
- Friday, 08/21/09 21:07:30 EDT
|
Hotter is better as long as the steel is not burning or crumbling due to alloying. Bigger hammers are OK on small anvils as long as you work in the middle not the edges.
Drawing goes faster with radiused surfaces. If you are working on the flat of the anvil then a hammer with good crown or arc helps.
|
|
- guru
- Friday, 08/21/09 21:41:16 EDT
|
I was taught years ago that you didn't ever weld rebar or heat to bend it, due to the sulfur content and the resulting hot shortness. Just heating it to yellow to get a tight bend will often make the grain structure so weak you can snap the bend even after slow cooling.
For situations where the rebar simply must be welded you can purchase special weldable rebar. And special it is, judging from the price. I had to buy a ton of it for bending saddle wraps for concrete beams in a pier we were building. With the premiums for both weldable and below-waterline marine use, that stuff cost almost as much stainless steel.
|
|
vicopper
- Friday, 08/21/09 22:33:56 EDT
|
thank you guru, but the biggest hammer i have is 4lb so no worries there :D. but the radiused surface gives me an idea. drawing out over a round surface, like the side of a truck axle might work, right? or am i grasping at straws?
|
|
bigfoot
- Friday, 08/21/09 23:01:12 EDT
|
Bigfoot, See the BlacksmithsDepot.com, Anvil Tools, Anvil Block - OC Drawing. You could either buy or make one of these. If you make your own offset the fuller so that it is over the better supported part of the anvil body (shank all the way to one side).
Many people draw over the horn but I do not recommend it on old wrought anvils where the horn is welded on.
|
|
- guru
- Friday, 08/21/09 23:31:56 EDT
|
Higher temperatures will exacerbate the hot shortness problem. Because rebar is mainly made to strength not chemistry specs, it can be a variety of things. This of it as the sausage of the steel industry.
|
|
quenchcrack
- Saturday, 08/22/09 08:05:03 EDT
|
Guru et. al.: thanks for your help thus far. I have more questions if you don't mind. I am intrigued by the mention of a downdraft forge. But I see absolutely nothing about them on the internet except some references in very old books (google books). They get 1 or 2 sentences, though all the references call them something along the lines of "the superior method". For my layout, it looks like the cats meow from several perspectives.
I suspect I could build my own. I have easy access to 3100 degree rated refractory cement, 2800 degree insulating castable, etc. But what I'm wondering is this: are these not in common use because blacksmiths find they don't work well for forging, there are other problems, something else?
|
|
joe
- Saturday, 08/22/09 08:05:53 EDT
|
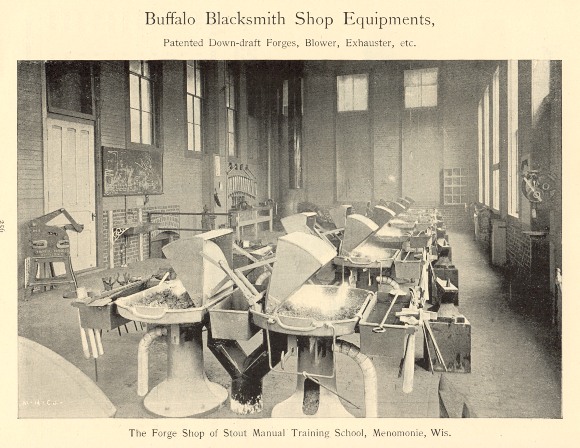
Down Draft: Joe, the down draft forge used a huge exhaust fan and ducting under the floor. This was great for industry and schools where the building was designed for permanent forges and energy was cheap. These were steam era forges where the blowing power was a small part of a large steam power plant.
No refractories are used in their construction, they are all metal (cast iron and steel).
The other place they were used was factory floors such as railroad shops where the entire shop was covered by a rectilinear crane. You could not have a chimney stack in this case so down draft was necessary.
There are several styles of these forges. The large round ones simply have a gap at the edge of a couple inches. The school forges had a small adjustable hood. See our review of the Buffalo Forge catalog on our review page.
|
|
- guru
- Saturday, 08/22/09 10:03:45 EDT
|
i picked a small metal lathe up that has a 4 step pulley and no motor. I was thinking about putting a 4 step pulley on a electric motor and then having another 4 step "jack" pulley spinning on pillow blocks before getting to the 4 step lathe pulley. The hard part seems to be making the motor and jack shaft movable to change the belts on the pulleys. any clever ideas on how to rig this lathe up? am i headed in the right direction? thanks
|
|
coolhand
- Saturday, 08/22/09 10:29:43 EDT
|
my son is 12 and is interested in becoming a blacksmith. do you know if kids can learn blacksmithing at a young age?
|
|
Carrie
- Saturday, 08/22/09 11:25:51 EDT
|
thanks guru, i have made a fuller, but it wont stand up to my new project! and i am afraid to draw over my horn as i have a fisher and i am strong so i might break it off. thanks again.
|
|
bigfoot
- Saturday, 08/22/09 11:36:57 EDT
|
Lathe Drives: Coolhand, Normally you only need two speeds off the motor then the four off the cone pulley. With back gear (if they work) this is 16 speeds ranging from about 50 to 2000 RPM.
The trick is finding (or making) a four step to match the one on the lathe. These use a simple geometric progression but need the center distances to be all the same. I think there is an article on this in Machinery's Handbook. The two speeds from the motor are the same (equal centers).
Normally on bench lathes the back shaft with the cone pulley moves on pivots and is locked in place by a cam which is also the tensioner. When the cam lever is moved the back shaft is free to move forward loosening both the spindle belt and the motor belt. In the tightened position both belts are tight. On my little Craftsman lathe I have slots in the steel bench top so that the motor and back shaft bracket can be moved in and out.
On my bigger old lathes the motor and step pulley are on an overhead tilting plate. The plate tilts down to loosen and shift the lathe drive belt and is spring tensioned to lift back up. The motor is in slots to adjust separately from the step pulley. This is a common setup on old flat belt lathes and a few were made this way from the factory.
Alternate Lathe Drives: Later lathes have room for the belts to go under the lathe. In this case the motor and primary drive (back shaft) are on a board or plate that is hinged. The weight of the motor tensions the lathe belt.
Many users simply pick a single speed for the lathe and use a single groove pulley on the motor. This works but greatly reduces the capability of the lathe.
A modern option is to use a heavy duty speed control along with the single position belt drive. Put the belt in the position with the largest reduction (large pulley on the spindle and small on the motor). This lets the motor run faster producing more power and the large diameter pulley will drive the spindle better.
You can get variable speed drives for 3PH AC motors and for DC motors. Many users prefer this setup due to the infinite adjustment.
The important thing is to study your machine and determine the correct speeds and look at the type work you want to do. Books like the South Bend "How to Run a Lathe" have specification charts for a range of lathe sizes. They also have photos of the drive system.
Running too fast is most common problem. You need slow speeds to turn large diameters and for operations like thread chasing where you manually engage the feed at the right time and manually withdraw the cutter just at the crash point. If back gear is broken (which is common) you may want to run the belt drive slower than normal.
My best operating lathe in the shop at this time is a little 6" Craftsman that is as old as I am. . . You would not believe the size of the parts we are making in it for our power hammer project. It will probably also be used to make new tailstock parts for a 14" lathe. . .
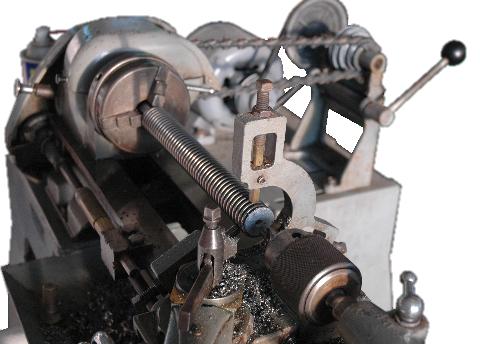
The photo above just happens to have the backshaft and drive system. Tis abit fuzzy but gets the idea across.
|
|
- guru
- Saturday, 08/22/09 12:04:38 EDT
|
Youth and Blacksmithing: Carrie, YES, young children can learn blacksmithing. I have taught girls and boys as young as 8. However, most places with require that an adult accompany students under 16.
Other than building a (controlled) fire and dealing with very hot iron the craft is fairly safe. Tools however are not cheap and much practice is necessary. It is the need for practice and short attention spans that defeat many (including adults) from learning blacksmithing.
The practice is needed for two things. One to develop fine control of the relatively blunt instrument, the hammer. The second to build up the muscles in order to have that control. Time to do this often requires having ones own tools and a place to practice. However, you might be lucky and have a smithy near by.
A lot depends on the student. I have had tough determined 8 year olds that outdid their 14 year old brothers.
Start with looking for your local blacksmithing organization (see ABANA-Chapter.com). Most associations have monthly meetings were guests are welcome. They also often have what are known as "green coal classes" for beginners. These classes cost no more than membership which is usually less than $50/year. A good deal.
There are also crafts schools and blacksmithing schools all across the country. A few list their sessions on on our Calendar of events page. Some association meetings are also listed.
The Boy Scouts also have a metalworking merit badge that includes forging. However, access to smiths that will work with scouts varies.
Let us know where you are and we might be of more help. Feel free to write me directly.
|
|
- guru
- Saturday, 08/22/09 12:21:16 EDT
|
Guru.. i got it the fuzzy little picture did it. Lets say i have a 2" and a 4" pulley on my motor, then i will have a 4" and a 2" on the back shaft, plus my cone pulley to match up with the lathe pulley? Is that what you mean by the two motor speeds are the same (equal centers)?
|
|
coolhand
- Saturday, 08/22/09 14:00:57 EDT
|
one other thing! If i have say 2000 rpm at my motor with a 1" pulley then the 4" pulley on my back shaft is spinning at 500rpm. If i have 1" pulley spinning on the back shaft along with the 4" pulley which is spinning 500 rpm is the 1" pulley spinning at 2000 rpm, because its circumference is 4 times smaller?
|
|
coolhand
- Saturday, 08/22/09 14:10:43 EDT
|
Coolhand,
If one end of the shaft is spinning 500 RPM, so is the other end!
|
|
Mike BR
- Saturday, 08/22/09 14:37:04 EDT
|
Coolhand, Yes that is the math. You can ignore PI and just use ratios of diameters. Actual centerlines on V-belts are a little different and the numbers are not quite the same but are very close. However, they may not be close enough if you are making a matching 4 step pulley.
Four step machine pulleys are not simple mirror images. They are often larger on one end or the other and the rest of the steps made to match. However, mirror image pulley's DO work correctly.
Standard motors rotate at synchronous speed unloaded (3600, 1800, 1200, 900 RPM) and at their rated HP speeds when loaded (3550, 1750, 1175, 875). Rated speeds vary depending on the motor design.
More in a few minutes. . . gotta pull some info.
|
|
- guru
- Saturday, 08/22/09 14:38:40 EDT
|
| Lathe Swing | Straight Drive H/L | Back Gear | | 6" Atlas | 3225
1067 | ? | | | | | | 54 | | 9" SB | 1200
640 | 900
490 | 662
362 | 505
272 | 130 | 95 | 75 | 54 | | 10" Atlas | 2072
635 | 1270
418 | 805
266 | 500
164 | 345
112 | 211
70 | 134
45 | 83
28 | | 10" SB | 1365
670 | 1010
495 | 760
370 | 570
285 | 130 | 95 | 75 | 52 | | 13" SB | 940
470 | 628
314 | 418
209 | 270
135 | 135
67 | 90
45 | 60
30 | 40
20 | | 14.5 SB" | 875
437 | 545
272 | 350
175 | 215
107 | 130
65 | 80
40 | 50
25 | 30
15 |
The above are some common small lathe speeds. They may give you an idea of where to setup your lathe. Note that high range and low range varies between 2:1 and 3:1. Also note that many lathes do not recommend operating them in high range and back gear. Thus instead of being a true 16 speed machines, they are 12 speed. For most metal work lathes are not run in the high speed range unless it is very small work. These speeds are for wood and plastics, ocassionaly aluminum.
Also note that for practical purposes most reduction by belt is no more than 3 or 3.5:1.
I thought my original Atlas manual gave the speeds for the 6" lathe but it did not. Time to do some measuring.
It is handy to make a speeds chart for machining various metals at various diameters and then relating to the speeds of the machine.
Reverse engineering the facts about your lathe is a handy thing to do as it helps familiarize you with the machine and its capability. Making your own speeds chart is a good exercise. Spread sheets are REAL handy for this as well.
|
|
- guru
- Saturday, 08/22/09 15:59:37 EDT
|
For a ton of photos and information about old small lathes see http://www.lathes.co.uk/
There are lots of photos of back shaft designs. You may also want to check on ebay for parts. Many dealers are parting out small lathes and you might be able to pick up the right parts.
|
|
- guru
- Saturday, 08/22/09 16:08:48 EDT
|
thanks guru. ill be up and turning before long!
|
|
coolhand
- Saturday, 08/22/09 18:17:25 EDT
|
Drawing out.
Bigfoot. This is where well rounded edges on the anvil are handy. I draw out using what I call half face blows over the far edge of the anvil. This is the hammer half on, and half over the anvils edge. Remember to turn your work a 1/4 turn regularly.
|
|
JimG
- Saturday, 08/22/09 20:47:31 EDT
|
jimg: thanks for the advice, and that is exactly what i do, and i have moved bigger stuff, just this ubolt acts like h13! I have decded, this is gonna be punches and hot work tools not tongs, as i have some mild steel rod that is begging to be made into tongs, and thanks again for the advice.
|
|
bigfoot
- Saturday, 08/22/09 21:04:25 EDT
|
LATHE DRIVE: My 13" Clausing has speeds from 34 RPM in back gear to 575 RPM in direct drive. There is a high speed set of pulleys on the motor & jackshaft, but We NEVER use those. This machine has been in the family for 50 years.
An easy way to make a jackshaft is to use an old motor that has shafts out both ends, the motor doesn't need to work. If You weld some door hinges on this jackshaft motor so it can pivot and mount the functional drive motor behind it You only have to move the drive motor and it will pull both belts tight. Hinge the drive motor too. This gives quite a range of movement, so pulleys don't have to match perfectly. My Dad built a drive for a wood lathe this way to get enough speed difference to make anything from porch posts to chair spindles [the lathe was built on a length of channel iron].
|
|
- Dave Boyer
- Saturday, 08/22/09 21:48:38 EDT
|
Lathe Drive FAQ
I've compiled the Lathe Drive information into a FAQ, added some information and will update it over time. It could stand some math and diagrams.
|
|
- guru
- Sunday, 08/23/09 08:57:52 EDT
|
My Delta drill press has a jackshaft the floats on a pivot the way Dave describes (I've also used a double-ended motor as a jackshaft, but Delta didn't).
My drill press (a Home Depot special) came with short-lived belts marked A25. I bought a pair of new A25s, which were too long to use. This seemed so odd that I came up with a hare brained theory about Delta's supplier marking 4L250 belts as A25, without realizing that lettered belts are sold by the inside diameter and numbered ones by the outside diameter. Predictably, I guess, the 4L250 belts I bought were too short.
I was pretty bummed about buying four belts the wrong length. Then I realized that they were the right length *on average*, and there was enough play in the jackshaft to use one of each. That was around 10 years ago; I just put the spare (mismatched) pair on the machine this spring.
|
|
Mike BR
- Sunday, 08/23/09 10:43:42 EDT
|
|
|
[
CSI - anvilfire MEMBERS Group |
Getting Started in Blacksmithing ]
|