| WELCOME to the anvilfire Guru's Den - V. 3.0 |
|
THIS is a forum for questions and answers about blacksmithing and general metalworking. Ask the Guru any reasonable question and he or one of his helpers will answer your question, find someone that can, OR research the question for you. This is an archive of posts from September 9 - 17, 2003 on the Guru's Den |
|
|
|
Hi! I just bought a wrought iron flip grill setup at the Yankee Peddler Festival in Canal Fulton, OH for my husband to use over our campfire in the backyard. It is VERY heavy made out of thick wrought iron-the blacksmith was making them right in front of us-very cool, I give you guys alot of credit!! Anyways, I forgot to ask him how to keep it from rusting-we plan to keep it up year round. It has the spit setup, with a grill underneath that is right over the fire. Should I rub it/season it with mineral oil or some other kind of oil? Would I have to repeat this after every use? I assume that it's not desirable to have it rust, and then get rust in your food?! Any and all help/suggestions would be appreciated!! Thanks! |
| Lori - Tuesday, 09/09/03 00:25:22 EDT |
|
Atli, you carry the axe and I will carry a long bow.... :) I would much rather be able to 'reach out and touch ' someone... |
| Ralph - Tuesday, 09/09/03 02:39:45 EDT |
|
Lori; Crisco oil or Mazola would be ok. If you have a gas grill with cast iron grates, read the instruction manual. They would be treated pretty much the same way. Yes, oil it up after every use, and when you use it the next time, heat it up to smoke off the old oil and apply fresh oil to keep yer Porterhouse from sticking. Then you get in touch with me, and I'll come over and help you get rid of the steak. (Grin) If you want to see a BUNCH of us doin' magic, come on down to the Southern Ohio Forge & Anvil Blacksmiths Roundup at the Miami County Fairgrounds in Troy, Ohio on September 27 & 28. We'll have you and the old man makin' yer own BBQ equipment, once we get some coal smoke up yer nose and get you hooked. Best regards, 3dogs |
| 3dogs - Tuesday, 09/09/03 02:47:26 EDT |
|
RALPH; You guys carry your stuff, and I'll carry my authentic Viking 12 ga. (Mossberg) If I can't hit 'em, at least i'll deafen 'em! |
| 3dogs - Tuesday, 09/09/03 02:59:45 EDT |
|
i have just got my first anvil. I am female so please bear with the symbolic nature of this email. But i had advertised for an anvil in the local paper and i had a call from a gentleman who had one but wanted $500 australian for it i thought that was way to expensive for myself so i declined. Then i decided i really wanted one. So i started phoning around and an antique dealer said that he knew a man who had one who also owned an antique shop. So after much persistance i found this man.( i had to travel to a neighbouring town) The man that i found with the anvil was actually a really good friend of my grandfathers back in the very old days (very small world) and because he was such good friends with my grandfather he decided to give me the anvil.....but wait for it........this man after some more talking i found out was the man that had phoned me with the $500 anvil so i got a $500 anvil for nothing. i suppose you would really want to know about the anvil now..its a soderfors with something like BRKSAB stamped next to the soderfors and falun sweden stamped under that it is a 101 lb probably not really worth $500 australian but anvils are very hard to come by down under. so if anyone could tell me some history i would love to here it. But i really think i have the best anvil finding story going at present. cheers from australia |
| Banjo - Tuesday, 09/09/03 08:51:48 EDT |
|
Ralph, y'all go out and play with the sharp pointy stuff; I'll stay at the forge, console the widows, and let folks like you pour gold on me for *more* sharp pointy things. Ketil |
| - Thomas Powers - Tuesday, 09/09/03 09:44:46 EDT |
|
Banjo I think I come in second. I found a 30# arm and hammer anvil at a garage sale and when I asked how much he wanted the guy scounged around and brought out 3 different sizes of forging hammers and said how about 5 dollars for everything. |
| Chris Makin - Tuesday, 09/09/03 09:48:00 EDT |
|
"Wood Pellets" Coal up around my area is getting harder to find. Has anyone used wood pellet as a heat source. They are in very good supply here @ 5$ Cdn per 100lb bag. I use charcaol lots here during the summer months. As I keep my coal for demo purposes. North Bay Ont Canada in case anybody wants to drop some coal off some day.. But call first. Cheers. 'Barney' |
| Barney - Tuesday, 09/09/03 11:25:37 EDT |
|
"Axles" Eat your wheates in the morining Scott.. I made a few bicker irons for my anvil. Truck parts are good but be ready to hammer if you have no power hammer. Mine are done by hand and turned out well.... Cheers |
| Barney - Tuesday, 09/09/03 12:10:15 EDT |
|
Barney, We forge those heavy truck axles in i hit to upset the spline end, and 4 hits for the flange end. Course we use an upsetter that hits about 2500 tons a lick. we forge axles for off road stuff with about a 24" diameter flange, and it still takes about 4 licks. |
| - jeff reinhardt - Tuesday, 09/09/03 12:56:14 EDT |
|
Barney, We forge those heavy truck axles in i hit to upset the spline end, and 4 hits for the flange end. Course we use an upsetter that hits about 2500 tons a lick. we forge axles for off road stuff with about a 24" diameter flange, and it still takes about 4 licks. |
| jeff reinhardt - Tuesday, 09/09/03 12:56:14 EDT |
|
Barney, We forge those heavy truck axles in i hit to upset the spline end, and 4 hits for the flange end. Course we use an upsetter that hits about 2500 tons a lick. we forge axles for off road stuff with about a 24" diameter flange, and it still takes about 4 licks. |
| jeff reinhardt - Tuesday, 09/09/03 12:56:40 EDT |
|
Sölderfors Anvil: Banjo, These are a Swedish anvil. Sölderfors claims to have been making anvils since 1200AD (Richard Postman). In the US they were sold under the names Sölderfors and Paragon. They also made anvils for Columbian Hardware Company. Sölderfors Bruks Akkticbolog is the company's full name and they are located in Falum, Sweden. Most are solid steel and may be cast or forged. They are considered a very good anvil. Yep, anvils are where you find them. I spent YEARS looking for my first anvil. I have been given three anvils and at one time I think I had 8 or 10. Now I am down to two large anvils and three junk anvils, plus a couple stake anvils. . . . However, it DOES seem that after obtaining your first anvil more follow. |
| - guru - Tuesday, 09/09/03 12:57:19 EDT |
|
Banjo. Very nice way to get that first anvil! I have been to Oz five times and it is one of the few places on the planet I would return to. You have a beautiful country and the people of Australia are wonderful. If this is your fist visit to Anvilfire, please return often. You will not find a better site for learning, sharing, and good friends. |
| quenchcrack - Tuesday, 09/09/03 13:26:57 EDT |
|
I am an over 16 yrs old wire jewelry designer. I also make hammered necklace type collars using 14kt gold-filled and sterling silver 1/4 inch 1/2 round wire. I have a neck-shaped mandrel, and use a brass hammer to form the collars. No heating is required. A customer asked me to make one of these collars in 14kt gold and I of course said "no problem". Well, the gold arrived, and there's a problem. I just learned that 14kt gold cannot be shaped cold like gold filled. I obviously need to heat the gold to make it pliable enough to shape and get a hand hammered look. I am willing to buy the equipment, but I have not idea what to do. Help! |
| Gina - Tuesday, 09/09/03 16:08:02 EDT |
|
jeff: Is that really 2500 tons = 5 million pounds on the upsetter hammer? Yikes! Banjo: Nice anvil story! It must give a warm, friendly feeling to your start. I dont know prices in Australia but in the US it probably would fetch the equivalent of $500 AUS. Like QC says - y'all come now :) |
| adam - Tuesday, 09/09/03 16:25:47 EDT |
|
Well, it's my time to brag. (grin) A few years back, one of my foster sons was in a warehouse where a friend was selling off his father's and grandfather's estate. Joe saw an anvil sitting on the ground and paused to ring it. He asked the guy how much he wanted for it, and the guy said that he didn't know how much it was worth, but would Joe give him $25 for it. Joe commented that there were a few small chips on the side, but "Jim can probably fix them." so he gave him the money and loaded the 105# Mousehole anvil in the trunk of the car. Sent it to me from Texas in his Father -in-law's truck. Wouldn't let me pay him for it, just said that when I was done with it, it was his. So I got it for free. and I'm still using it! (grin) |
| Paw Paw - Tuesday, 09/09/03 17:16:09 EDT |
|
GINA Anyway you look at it 14k gold is a very hard alloy.You will have to aneal it to make it soft but even so it is hard to work.Ive made jewelry for 20yrs mostly sterling but I do some gold now and then and made the mistake of using 14k for bezel wire now i use 18k the higher the gold content the softer it is |
| Chris Makin - Tuesday, 09/09/03 18:03:01 EDT |
|
Charlie Hinton, Please send me an email, I've managed to lose your address. |
| Paw Paw - Tuesday, 09/09/03 18:04:14 EDT |
|
Gold Gina, maybe one of our jewlers can help you as this is out of my field. But here are some suggestions. 1) Have you tried annealing the gold? I think the added silver work hardens so drawn or rolled stock can be quite hard. Annealing requires heating just as hot working would. This can be done with a MAPP/air torch. Heat to a low red (in low light) then quenched in water. Should be much softer. When I hot work brass it starts hot then is like working annealed as it cools. You reheat to make soft and start working at that very low red. The heating surface in the old days would be asbestoes. It was soft and wouldn't scratch the metal. Today you want to use refractory brick or Kaowool board. IF you make a corner out of brick the heat is captured and reflected back into the metal and is more efficient than on a flat surface. OR you may just need to change to a bigger steel hammer and a heavier mandrel such as the horn on a blacksmiths anvil. Blacksmiths texture steel cold all the time. On annealed or unhardened (as milled) steel a ball pien hammer can be used to create a hammered texture cold. If doing more than texturing then the steel will be worked hot OR annealed. On google the search term "14k gold annealing" came up with a large number of listings germain to the question. |
| - guru - Tuesday, 09/09/03 18:14:50 EDT |
|
Swedge block cleanup: I have one of those SF castings - It's a lot of work to cleanup but I do it a bit at a time. The fuller grooves on the edges have a waist to them. I assume this is from the casting draft and they need to be widened to a constant width? I have another, old swedge that I rescued from a welding shop and the fuller grooves are all straight. Also, despite maybe 100yrs of mistreatment, the surface is still MUCH nicer than the SF casting. |
| adam - Tuesday, 09/09/03 18:33:33 EDT |
|
Adam, The SF blocks are shipped in the same way that they come from the founder. Years ago, the forms were much more carefully made than they are today. But even with that caveat, that 100 year old swage probably had many hours spent on it to clean it up. The SF swage block, (in my opinion) is very good value for the money. |
| Paw Paw - Tuesday, 09/09/03 18:46:09 EDT |
|
Adam, I got my SF block about a month ago and spent all day grinding and polishing. The best thing I found was the 3M disks on a mandrel that fits in your drill. Start with 60 grit and work down. I did have to use a stone on those fuller grooves and they still aren't quite straight. However, I agree with Guru, good block for the money. |
| quenchcrack - Tuesday, 09/09/03 19:14:58 EDT |
|
PawPaw: Yes, quite right. I shouldn't whine. :) I do realize that if my SF block were nicely finished it would have cost a LOT more. Essentially, I bought a kit and that's fine. What did you do with the edge grooves on yours? ( I assume you own one since you rose to defend its honor? :) )Did you straighten the waists? This seems like it will be a lot of work. The spoon and bowl depressions only needed surface finishing. Also they aare much easier to get to. |
| adam - Tuesday, 09/09/03 19:16:01 EDT |
|
Adam, I used a belt sander with a 60 grit aluminum oxide belt to straighten the waists out. It didn't take as long as I expected. |
| Paw Paw - Tuesday, 09/09/03 19:20:31 EDT |
|
QC: Thanks for the tip. I will look for those at mcmaster. Also, thanks for the metallurgy faq at iforgeiron. We really needed something like that. I need to read it several more times but already, it has explained several things that I hadnt understood.+ |
| adam - Tuesday, 09/09/03 19:20:51 EDT |
|
Hi! :-) I live in Cleveland, Ohio, and I'm looking for a blacksmith for a project that I'd like done. I'm building an addition to my house, and the addition will have a loft. I'm building a ship's ladder, and I'd like someone to make a wrought iron railing for it. The design looks fairly simple. So.....I'm looking either for a blacksmith in the Northeast Ohio area or for a blacksmith somewhere else who won't charge me an arm and a leg for shipping costs. I'd appreciate any help anyone can give me in locating a blacksmith. My email is: timwarneka@yahoo.com Warm regards, Tim |
| Tim - Tuesday, 09/09/03 21:11:01 EDT |
|
Thank you for the tips. I'm going to give it a shot. |
| Gina - Tuesday, 09/09/03 21:11:23 EDT |
|
Gina, To work 14 kt gold,with a peened finish a jewelers hammer is nedded as well as a nice flat chunk of steel. Make sure that the steel is clean, no rust, or the rust ends up in the gold, and rusts the customers neck. Next anneal. This means heat carefully to a soft red, hold for a few seconds and cool SLOWLEY. Do not quench. When comfortable to the touch, ready to work more. You should be able to peen the entire surface, anneal, and shape.(assuming that the gold is annealed as recieved. The best source for goldsmithing info and tools is RIO GRANDE in N. Mexice. Look under THE BELL GROUP. The have the tools that you can't find locally.Another item they have is charcoal and other blocks for heating on that are very cheap. The white low cost block and a simple propane torch will heat the gold to annealing temp. Good luck, and be careful. gold is not cheap. By the way, in another life in the last century(1970's) I trained in Germany under a master goldsmith. |
| - jeff reinhardt - Tuesday, 09/09/03 21:42:42 EDT |
|
Marc, I posted the e-mails to the GURU, for the power hammer page. Assuming that I did not screw up, He has the images and he has the ball now. GURU, I remember that someone mentioned the large balls for tooling are hard to come by. Try at a valve repair shop, the kind that serves the oil fields or refineries. The valve mfg that I used to work for used balls up to 4" diameter made in materials like 440C, monel, and 316 ss. The best way to determine is to try a magnet. the 440C is magnetic, and the hardest of the lot. Also good to fairly high temp. Hard to weld, easy to braze. if you get the entire ball too hot you may lose hardness,just oil quench. as I remember the roundness of these balls was in the millionths, and in qty they were a few dollars apiece. You might also try the net, look at precision balls. Adam, yes that is 2500 good old American tons. The energy is stored in a VERY large flywheel, and the crank for this machine is about 10 tons by it self. In 4 hits we take 6" bar and flange it out to about 24 to 30" with the flange about 2" thick. |
| - jeff reinhardt - Tuesday, 09/09/03 22:26:02 EDT |
|
G'day......thanks all for your words re the soderfors anvil. Now it is daylight i have done nothing but admire it and brag to all my friends about my anvil. I can't wait to get my forge and don't worry i shall tell you all about it, plus the giant anvil (my parents think its about half a tonne in weight) that needs a truck to move it unfortunately i live about 1000+ k's from where this anvil is but at least i know its in the family and can't easily be stolen. i will be sure to come back and visit this site often cheers |
| Banjo - Wednesday, 09/10/03 00:07:16 EDT |
|
Score one for our side in the fight on SPAM, and from an unlikely source: http://www.msnbc.com/news/964036.asp If anyone has any detail pics of the linkages on old Bradley hammers of any kind, please email them to me. Trying to improve my understanding of these interesting hammers. Threatening rain in Kaneohe, Hawaii. |
| T. Gold - Wednesday, 09/10/03 00:17:14 EDT |
|
Hi, I am going to a midevil fair to sell some of my work and I was wondering what a typical midevil smith would wear? Thanks |
| Hayes - Wednesday, 09/10/03 01:09:29 EDT |
|
What to wear? What to wear?: Is it date night? First, if you want accuracy it depends on exactly what period, time of year, what country and what kind of smith. I am not much on the reenactor scene but most people fake it when they get back this far. But it depends on the situation. Are you being judged on accuracy? Is there a review board? Most primitive work clothing is depicted as loose baggy, no or few buttons (usualy draw strings). Prints and bright colors would be practicaly unheard of. Shoes were much simplier than todays and were often more like mocasins. No matter what the century a smith working in summer is going to wear the lightest of shirts or none at all. In the winter he may be wearing a wool sweater, fur hat, jacket. . . A poor village smith who worked alone would wear different clothing than a prosperous city smith that had armor contracts and many workers in his shop. He would have been a merchant and would dress like one even if he still worked in the shop. This could include ruffled shirts and fancy embroidered suit of cloths and perhaps even a stylish hat. Those in the historical recreation buisness call this developing your "persona". Exactly WHO ARE YOU? Second, if you are demonstrating, safety gear often covers a lot. A good leather apron will fit any period even if it is not accurate. Work gloves have only become common in the last 150 years or so but many workers wear them all the time today as safety equipment. And many reenactors bow to modern sensibilities and wear safety glasses. Glass blowers in Colonial attire wearing dididium glasses. . . Avoid modern label or cover them. Those work glove may have "Mule brand" all over them. . . |
| - guru - Wednesday, 09/10/03 02:11:09 EDT |
|
Gina, You can cold forge 14k gold very satisfactorily if you anneal it first. Heat it to about 1200�F and hold that temp for a minute or two. Then quench in room temperature pickling solution (10% Sulfuric acid in water). If you air cool it, it will only achieve about half the possible annealing, plus you will have much more firescale to deqal with. The quench in pickle dissolves the firescale. As you work the gold, watch for signs of hardening and stop before the metal becomes s hard it cracks. You can anneal it as many times as yo need to finish the job. To make the annealing easier, try heating it on a charcoal block. If you don't have one, make one by wrapping a piece of fir 2x4 in aluminum foil and baking it in the oven at 400� for a couple hours. Be sure the aluminum foil is tightly sealed to keep all air out or you will light it on fire. Asbestos will also work, but is politically incorrect these days. A shallow pan filled with pumice rock will do pretty well, too. Use a propane or MAPP gas torch. Hnadle the gold with copper tongs when you put it in the pickle, as steel tongs will discolor it. Yes, gold costs more money than silver or copper, but it is just another non-ferrous metal. Don't be afraid of it. The foregoing is a brief overview of what I spent a lot of time teaching at the university level. I commend to you as a source book, Metal Techniques for Craftsmen by Oppi Untracht. Still the best all-around book on metalsmithing written. |
| vicopper - Wednesday, 09/10/03 02:32:31 EDT |
|
Pexto rivet header: I cant figure out what the holes are for in this piece. One is next to the the depression for the rivot head on the "business end" it extends longitudinally about 1" and the other is on the side. they both intersect. any thoughts?? thanks |
| rugg - Wednesday, 09/10/03 02:37:53 EDT |
|
Rivet Set: Rugg, the holes are for tightening the joint before heading the rivet. When there are several layers of metal (such as sheet metal) the set is used to compress the metal tightly around the rivet OR to drive the rivet through the stock (the through hole in the side). For larger rivets on bar stock smiths use a "monkey" tool, which is just a block with a snug clearance hole drilled in it. Sometimes these are heavy enough to be used as a backup tool when driving a rivet in a tight hole. Light ones are backed up with a hammer OR driven with a hammer. Good ones are tool steel, cheap ones are mild steel. |
| - guru - Wednesday, 09/10/03 03:03:24 EDT |
|
The problem with modern blocks: Although a lot of people like the Salt Folk block (mostly because of its price), it and others like it are BAD PATTERNS. Some foundries have insisted that block pattens be drafted from the middle. This is entirely incorrect and is almost impossible to clean up by hand. ALL swage blocks were drafted from one surface until the new crop the last 10 years or so. The old castings were also smoother. They were cast using fine facing sand that produced a fine surface that needed little dressing. Using facing sand is a hand molding technique that is almost unheard of in today's iron foundries. However, the petro bond molds being used CAN be coated with a wash that produces a fine finish. It is just one step and a material cost that the makers are not insisting on or the foundries offering. Even though it adds to the cost it is MUCH cheaper than hand finishing even if you count your time at less than minimum wage and forget the high cost of abrasives. The problem is a combination of amature pattern makers and the wrong foundry processes. Today we have the capability of making much better blocks than the old ones due to the prevelence of ductile iron foundries. However, most foundries are geared to high production and do not modify their process for specialized castings. So it is very difficult to find one to work with. 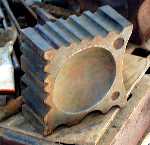 I have several very nice swage block patterns of my own that I have had cast. But to get good castings they cost as much per pound as a good anvil. I've tried to get them cast again in recent years but nobody will deal with loose patterns so they want them remade to fit their process. The foundries I've talked to also do not like dealing with outside patternmakers or discussing details like cores or finish. The molds to make molds (instead of loose patterns) are expensive to make. I can do it but have not been able to set aside a month to do it in six years. . . the guru business has absorbed a lot of projects I'd like to work on. . .
Click for detail. |
| - guru - Wednesday, 09/10/03 03:02:22 EDT |
|
NOTE: My block above is much smoother than the photo looks. I needed a photo in a hurry a couple years ago and the block was quite rusty and dirty. It has since been cleaned, painted and oiled. . . |
| - guru - Wednesday, 09/10/03 03:12:24 EDT |
|
Guru, I've heard this fine facing sand/wash mentioned several times. Any details? Would, say, fine beach sand mixed with water (assuming you're doing a greensand casting) work, or is there something more to it? Also, what is ductile iron!?!? Can't seem to figure this one out; is it the same thing as this new "semi-steel" that some companies are using for various items? What's added to regular CI to make it Ductile Iron? It's dark right now in Kaneohe, Hawaii. |
| T Gold - Wednesday, 09/10/03 03:55:42 EDT |
|
I'm attempting to make a bracelet with some small gauge stainless aircraft cable. I couldn't get silver solder to flow or even stick to it (big surprise). Is there a way to make that work, or is there a different (better) way to join stainless? |
| - solost - Wednesday, 09/10/03 07:29:48 EDT |
|
Ok, Paw Paw, am I EMBARISED! You would expect someone who gets paid to inspect aircraft tooling to know how to add! YEIKES! Swage blocks, I bought mine from Green Mengel at the Abana 2000 show. It is drafted from one side and had a decent finish for being a raw sand casting. I spent about 2 hours with a die grinder and assorted stones and mounted sandpaper to clean it up. It was a good investment and I am quite happy with it. I was interested in becoming a dealer for them on the west coast as there was quite a lot of interest in it (and still is!) when I bought it. However, it seems that we were never able to connect up to talk about it. I still wouldn�t mind being a dealer for them though. One of the members at our museum made a pattern and had some anvil/swage blocks made up. He explained the surface requirements and what his expectations were when he ordered them. The caster said they understood and that it wouldn�t be a problem. When he went to pick them up, there were large sand inclusions, snag grinder marks that looked like they were made with grinders using boulders for abrasive and just a general poor quality appearance about them. The caster couldn�t understand why he was upset and wouldn�t accept them! He was then told that his business wasn�t welcome there! It is a sad comment on the state of the industry. |
| - wayne parris - Wednesday, 09/10/03 08:40:29 EDT |
|
Wayne, Don't sweat the small stuff. We all make mistakes. Jock caught me in one very similar a couple of years ago. |
| Paw Paw - Wednesday, 09/10/03 09:40:18 EDT |
|
Looking at Mike Boone's folded pair of leaves in News v30 p4 may 16 '03. I am curious about forming the central ridge/vein - does he do this with just a hammer or does he use a fuller? |
| adam - Wednesday, 09/10/03 11:28:48 EDT |
|
Adam, I think he folds it nearly in half, using the anvil step and a straight peen hammer, then clamps it into a vise hot to complete the fold. Once it is folded, he then opens the leaf up and flattens it out, leaving the central vein from the fold. |
| Paw Paw - Wednesday, 09/10/03 11:43:34 EDT |
|
Facing Sand: TG, It is just finer casting (green) sand. The larger the casting the coarser the sand needs to be for venting and support. Swage blocks are relatively a VERY heavy casting (being about 4" thick). To use facing sand (which is about as fine a that used for jewelery) the molder would dump on some sand, then form it by hand to make a thin layer on the pattern (about 1/2" or less) then back fill with the regular weight sand. Before removing the pattern vents are made using wire about the size of coat-hanger wire or 1/16" welding rod. In a large operation a little facing sand does not contaminate the regular sand much but it DOES degrade the coarser sand. It also requires hand molding. It is how ALL old production swage blocks (or anything else that needed a fine cast surface) were cast. Mold Wash is made of a variety of compounds but graphite and a binder is common. It is usualy solvent based and drys quickly. When brushed on green sand molds the result is like the old Kohlswa anvils, looking like a broom finish. When brushed on hard petro-bond molds it makes a fine finish. However the brush texture can still be seen (just like brushed paint) but it is pretty darn smooth. For first class work it can be sprayed on the surface of the molds. Mold or core wash also contaminates the sand but less so than facing sand AND it is usualy something that can either be screened out as fines or is of little consequence. The problem in many foundries is that it IS an extra step that they may not normally do. Wayne's story is typical of dealing with many small foundries. The last time I had my blocks cast the first attempt floated the top of the mold (the foundry failed to weight it) AND there was insufficient riser and the sides shrunk in. I refused the castings. The foundry man KNEW they were bad but hoped I did not. They tried a SECOND time. These did not float the mold but they still had curved shrunken faces and a rough finish. I paid for two ($50 each) which I eventualy gave away (*I* couldn't take money for such junk). The first time I had my blocks cast they were done by a large foundry that specialized in heavy castings. They were perfectly cast but had the slightly rough surface from coarse sand. But they cost $1.75/pound in 1984 PLUS shipping from the West coast. |
| - guru - Wednesday, 09/10/03 11:49:02 EDT |
|
Folded Leaf With Vien: See my iForge demo #10. No viening swage needed. The same method also works from blanks cut from plate. More leaves are also shown on my bio page. |
| - guru - Wednesday, 09/10/03 11:58:33 EDT |
|
Hayes, first learn to spell "medieval"; nobody will give a hoot over wear/ware/where but folks have had a lot of hassel over "midevil"---including this one which happed to me! "Medieval" is that halfway between low evil and high evil?" or one I never figured out "Well we're christian!" Next date/location is very important; but "Cathedral Forge and Waterwheel" by Gies and Gies has several pictures of medieval smiths, (pg 65 & 127 in my copy for starters), There is some information on the stave church carvings of Siggurd just past the viking time period; if you can go late (into the renaissance) there is a ton of material in "De Re Metallica" not to mention the various pictures of smiths in allegorical compositions---look for Vulcan or Hepheastus (sp?) in the art museum catalogs and then look at the folks in the background of the pictures. For real fancy duds that engraving of the HRE visiting his armourer's shop has folks in puffed and slashed IIRC. Over the edge, Goya, I believe did a painting called "The Forgers" doing large work in Spain they were wearing bull hide aprons and braes and nothing else. Mosst of the pictures will show folks wearing what everyone else in that time wore; tunics, belted and leather aprons, simple turn shoes and various types of hats---particularly usefull when working with charcoal that has a larger fly around component. Of greater importance is *WHAT* the clothes are made from! *Pure* wool is *best* (after leather) and need not be coarse scratchy stuff---look and feel an Armani suit and then say wool has to be nasty! Most modern wools would *not* be accepted in medieval times as being too coarse for human use. Look for fine worsted wool with fine herring bone or broken diamond twills if you can find them for early medieval garb. Linen and Hemp are next best---100% of course, as soon as you start adding synthetics like polyester to the mix you are asking to have burning, melting plastic dripped on your skin and then ripped off by the ER folks. Cotton works ok but is late period for most areas and was not used as much for clothing. Note many Medieval Faire folk do not know much about medieval fabrics and so may tell you that it had to be coarsely spun and coarsely woven to be medieval---not true at all, hand spun can be more finely spun and woven than machine spun stuff; but most folks ideas of the medieval period come from hollywood and the victorians and not what is actually there for us to look at! (Guru, sorry for the rant) Thomas |
| - Thomas Powers - Wednesday, 09/10/03 12:27:52 EDT |
|
Ductile Iron: This is made by innoculating cast iron with magnesium which causes the carbon to collect in graphite nodules. Thus you get a low carbon iron with graphite nodules. It is ductile and fairly weldable. Machines like a cross between cast iron and mild steel. Lots of dirty graphite in the chips and the cut metal looks slightly porous due to the graphite nodules. The magnesium can be added in the pouring ladle and sometimes it is added in the mold by constructing a place in the gating to fill with lumps of magnesium. YES much of it flares off. This is NOT something the backyard foundryman should attempt without a lot of advise. |
| - guru - Wednesday, 09/10/03 12:31:20 EDT |
|
Just another note to add to what the Guru and Thomas said: I have a number of holes burned in the hem of my linen tunic, and a few smaller ones in the ends of my wool trousers. No matter how careful you are, sparks and coals get around, especially with charcoal. DO NOT wear your best velvet tunic. I�ll be sending the Guru some pictures that Mathew Amt took at last Hastings- A lovely day on the banks of the Potomac. Article on Viking ships in the latest issue of Wooden Boat magazine. Visit your National Parks: www.nps.gov Go viking: www.longshipco.org |
| Bruce Blackistone (Atli) - Wednesday, 09/10/03 15:43:55 EDT |
|
Just to add a note to the Guru's warning above, I was at the Forging on the River event at the National Ornamental Metal Museum when someone decided to add magnesium one batch of the iron pour. The resulting fountain of flames and sparks scared the daylights out of several folks and was REALLY impressive to see once you got over the flash blindness. In the wrong circumstances it could be really, really dangerous. |
| tanix - Wednesday, 09/10/03 15:48:18 EDT |
|
Guru, Not to rush, but when you get the chance, please email me my membership password. I can't remember it. Sorry about the trouble. Thanks. |
| - taylor - Wednesday, 09/10/03 16:17:22 EDT |
|
I am just getting started in blacksmithing and I took some advice from this website on making a cheap anvil. I went to the local scrap company and bought a 142 lb. chunck of steel for $14.20. I would like to machine a hardie hole and a prichell hole in the face. Can you tell me how deep these need to be? Also, can you tell me the best location for each of these? Thanks, Joel |
| Joel - Wednesday, 09/10/03 17:22:21 EDT |
|
Hi Jock, I was wondering if you are still accepting submissions to the user built air hammer page? I build Kynion style air hammers and I've made a modification to the air system that seems to work much better for me. I haven't seen this modification elsewhere. My main question is what do you need for the submission. I was thinking overall picture (jpeg), close up of controls, close up of main plumbing, schematic drawing, and some text. Is this too much or what do you suggest. Take Care David Robertson |
| David Robertson - Wednesday, 09/10/03 17:37:51 EDT |
|
JYH: David, Yes. We just recieved a series on a spring helve (like the Little Rusty) and I will be posting that as soon as I edit the images. The more details you send the better. Send JPG images. Do not edit them. I'll adjust lighting, cut out backgrounds if necessary and crop. I can make large images small and post pop-ups with them but I cannot make small images large. |
| - guru - Wednesday, 09/10/03 18:03:07 EDT |
|
Cheap Anvil: Joel, Good sized anvil. Keep your steel hot and your hammer off the surface and it will hold up OK. You may need to ocassionaly dress the face. A soft anvil will teach you to keep the corners of your hammers dressed and OFF the face of the anvil. The low cost anvil article has approximate locations. Hardie and pritchel holes need to go through so that punchings (biscuits) fall through. One way to do it in a solid block is to have them intersect larger holes drilled through from the side. However, this is some serious hole making if you do not have the machinery. A HD drill press will make the holes in a few minutes but otherwise it is a real chore. The most common hardie hole is 1" square. To make this drill a 1-1/8 to 1-1/4" cross hole centered about 2" from the face of the anvil. Then layout the square hole and center punch for four 3/16" holes near the corners. Drill the corners and then the center with a 1" drill. If you have access to a milling machine you can remove the rest with a 3/8" diameter end mill and then clean up with a file. Alternatively you drill the holes, then start with a die grinder or cold chisel and worry out the hole. Finish with files. This could take a couple days of cursing, blistering and calling me bad things. . . Then next best alternative for a square hardy hole is to weld a 3" length of 1-1/4" .090 wall square steel tubing to the side of the anvil then add a flange at the top made of bent 1/2" square bar or cut from plate. Weld all around and then grind flush. This will not take a heavy bating but it will take what the heal and hardie should take on a regular anvil. Another thought is to go with a ROUND hardie hole. Many farriers anvils come this way so the heavily chamfered oversized hole can be used for bending. AND another option is to make a "stake" or bolster plate and attach it to a heavy post or stump near your anvil. The plate can be made of (min.) 3/8" to 1" steel. Drill and make the square hole as above. Drill punching holes and in the corners drill and counter sink for flat head screws. The wood under the holes should be drilled out and if you are going to do hot punching cross drilled so the biscuit can roll out. It would not hurt to put a piece of steel in the bottom to prevent starting a fire. If you make a stake or hardy plate you may want the following square holes: 1-1/8", 1", 7/8". Those will cover most common hardies. If you want it to be a true stake plate then the holes will need to go up to 1-1/2" and the plate should be at least 1" thick. Bolster plates are usualy loose plates with a series of holes. Often the holes are the same size but have different openings, counter sinks for making flat head rivets, radiused holes for squareing shoulders, and raised edge holes for relieving shoulders. These are simple but handy tools and can be placed over the hardie hole for a good fit. They are also simple to make and easier to come by than a swage block. THAT is tonights iForge demo sans images. . . guess I should make drawings and post. |
| - guru - Wednesday, 09/10/03 19:43:14 EDT |
|
Gina, The pickle that vicopper suggests is available from Rio Grande, and is know as SPAREX. The reason that I did NOT suggest that you use pickle is that it spatters acid about as you place it in the bath and you need to wash off the acid prior to working the gold further. The pickle works best in a pirex pan. READ all the instructions and follow. The spatters will tend to degrade any surfaces they fall on, so this is not a kitchen table operation. The pickle will give you a better finish to start polishing from. You can peen, aneal as needed and still get a good product. Just a bit more work. The white block to heat on that are cheap are made from Magnesia and do a great job. If you ask for the Bell Group findings catolog also ask for the tool catolog. Many tips and techniques. Wear a respirator when polishing, as the compounds go everywhere. The planishing hammer has an unuasual handle that lets the hammer sort of rock in your palm. Get a good hammer with a polished head, A standard ball pien is too big, and to rough for most jewlers work.Good luck. |
| - jeff reinhardt - Wednesday, 09/10/03 21:52:09 EDT |
|
Pickle: Sparex is actually NOT 10% H2SO4. It is actually sodium meta-bisulphite, which is half-neutral sulfuric acid. It is considerably safer to use than the 10% sulfuric solution,and works very nearly as well. It is, however, considerably more expensive. Often times, you can get a small amount of sulfuric acid from your local automotive battery store. (Sulfuric acid is the electrolyte in lead/acid car batteries.) Large battery operations purchase their acid in 55 gallon drums and are sometimes willing to give you a cupful if you bring your own proper container and demonstrate that you know what you're doing with the stuff. As Jeff said, the spaters form any acid will damage whatever they fall on. Wear eye and face protection and an acid-proof apron. If if you get any on your skin, neutralize it immediately with baking soda and water and then wash/rinse thoroughly. If you get spatters on your jeans, you may not even notice them until you take them out of the wash later and find that they look like tattered rags. For years, most of my shorts were cut-off jeans that had the lower legs eaten up by pickle where the apron didn't protect them. All hammers and anvils/stakes used for jewelry work should be polished to a mirror finish. Not only because it saves polishing time later, but also because it reduces the amount of spurious steel that gets embedded in the jewelry metal. When not in use, those polished tools should be protected with a thin coating of Vaseline or light grease to prevent rust. |
| vicopper - Thursday, 09/11/03 13:02:41 EDT |
|
Barney, If you look at the Anvilfire Yahoo picture group under my picture section(Caleb Ramsby), you will see a photo(I think I left it there) named big ol fire. This is what happens when one burns wood pellets. With a little excess air.grin The problem I found with the wood pellets(they work great for starting a coal fire) is that by the time they char down. The "glue" and pressed particles let go and there are a LOT of little sparks. Since they are so small they burn up instantly after they have chared, thus it is almost imposible to get any heat into the metal. If the charcoal prices are getting too high, check out. . . They have a booklet on the production of charcoal. It describes how to make a small building out of cinderblock and make charcoal in it. If I remember correctly, they describe a one or two cord design. Hope this helps, Caleb Ramsby |
| Caleb Ramsby - Thursday, 09/11/03 16:43:06 EDT |
|
Dear sir i'm trying to find out infromation on old sputter steel's used for making marmlaied or cherry extract's used meny year's ago i would like any input you may have on these machine's or print's on how to build one and informatiom on formentiation prosess's to make solid's in to liquied sorry for the spelling but any help would be greatly aperated . |
| Kevin - Thursday, 09/11/03 20:16:08 EDT |
|
Dear sir i'm trying to find out infromation on old sputter steel's used for making marmlaied or cherry extract's used meny year's ago i would like any input you may have on these machine's or print's on how to build one and informatiom on formentiation prosess's to make solid's in to liquied sorry for the spelling but any help would be greatly aperated . |
| Kevin - Thursday, 09/11/03 20:17:10 EDT |
|
Hi guru group I don't know if this has something to do with you guys(blacksmiths) but you guys are experts in all sorts of metals..here goes. In a very small town of Spain (Zamora Province) there is a church bell with a crack and I will like to fix it. Right now it sounds like a tin can. I know that the proper way would be to cast it but this is too expensive plus the bell is a very old piece-18th century. Is there a way to solder these buggers or another method? I know that this way it will not sound the same as before. |
| Paco - Friday, 09/12/03 08:10:03 EDT |
|
hi |
| - Paco - Friday, 09/12/03 08:13:14 EDT |
|
h |
| - Paco - Friday, 09/12/03 08:21:46 EDT |
|
hi |
| - paco - Friday, 09/12/03 08:24:10 EDT |
|
ffffff |
| - paco - Friday, 09/12/03 08:26:37 EDT |
|
Barney, there is a cheap & dirty way to make charcoal: Oak, wild cherry, elm etc grows wild on fence rows. I give it to anyone who will cut it. Burn it in a barrell then cover & let it smolder. Works great. you just need more of it than coal, but you can use a big truck brake drum for ur fire pot. Smells better than coal and is actually better for forge welding. |
| Ron Childers - Friday, 09/12/03 08:38:14 EDT |
|
solost Any good hardware store should stock a special stainless steel solder it may come with it's own flux or may have a flux core.Fluxing is important to making the material clean enough to get a good bond there may be oils or other contaminants on the cable. |
| Chris Makin - Friday, 09/12/03 09:53:21 EDT |
|
Paco: The traditional way to repair a crack in a cast bronze bell is to drill a hole at the end of the crack (to prevent it from increasing), and then repair the crack with bronze brazing rod. After the crack is filled, the bell must be "tuned" by careful hammering to restore its resonance. As of twenty years ago, there were about three people in the world who could do this reliably. Cracks were also sometimes repaired by inserting a series of rivets along the crack in an effort to allow the resonance to carry across the break. I don't know how successful this was. In the United States, we have a long-standing (since 1776) tradition of NOT fixing cracked bells. For a classic example, go to Philadelphia and check out the Liberty Bell. It is one of the symbols of our great country and is shown on one denomination of our currency, the crack prominently displayed. We actually revere that cracked bell. |
| vicopper - Friday, 09/12/03 10:13:40 EDT |
|
Cracked Bell: Besides what Vicopper had to say above, bells usualy crack for a reason. It could due to there being something wrong in the alloy the bell was cast from OR some slight problem with the shape of the bell. Brazing will often create the same stresses that cracked the bell and result in a new crack at a later date. The bell Vicopper mentions (the famous Libery Bell) was remelted and the alloy adjusted, then recast at great expense. Twice I think. Each time it cracked. The last time it held up for a number of years but in the end succumbed to what must have been its fate. Alloying is very complicated and the most minor of contaminates can sometimes be disasterous. Once the metal is improperly mixed it is almost impossible to fix. In your case it is probably best to put your effort into raising money to replace the old bell and retire it to a museum or some honored place in the church. |
| - guru - Friday, 09/12/03 10:57:20 EDT |
|
why cant i find any info on swords |
| - william morgan - Friday, 09/12/03 12:09:54 EDT |
|
william morgan Odds are because you have neglected to look ;-P That aside, go to the upper right of this window and use the drop down menu to get to the "Armoury" page. This contains an interesting array of articles about misc. weaponary and some on making said weaponary. That said, if you want to make one, start with the "Getting Started" link (at the bottom of the page), become a blacksmith. When you have done that awhile you will have the ability to understand the books done by Dr. Hrisoulas and others and may, after sometime, become good enough to make your own. As someone else mentioned here before, "Swordsmithing is to Blacksmithing what Brain Surgery is to medicine". Good luck! |
| Escher - Friday, 09/12/03 12:58:43 EDT |
|
Escher, so kind! I was going to answer "because you are not worthy"; but then I'm a bit waspish as I had a bit of minor surgery and still "uncomfortable". Mentioning the sword forum might be a good idea too Thomas |
| - Thomas Powers - Friday, 09/12/03 13:59:27 EDT |
|
Liberty Bell: Actually the bell cracked and had to be recast shortly after delivery. This is the second time that it's cracked. Recasting makes sense given the value of the bronze (and the cheapness of labor) in those days. See: http://www.nps.gov/inde/liberty-bell.html You may wish to contact the park (start at www.nps.gov/inde/) for further details of the repairs. If I know the NPS we have someone there who has studied the question in depth. Good luck. Swords: Sword Forums has a good beginners bulletin board: http://www.swordforum.com/ Showers and warm on the banks of the Potomac. Visit your National Parks: www.nps.gov Go viking: www.longshipco.org |
| Bruce Blackistone (Atli) - Friday, 09/12/03 15:45:18 EDT |
|
I looked at the brake drum forge plans and have been looking at the Centaur Vulcan forges. The fire pot seems to be about 9" round or 9"x9" square. Is that small for a blacksmith's forge. Are these meant for ferrier's or, as a beginner, am I over estimating what size the fire pot should be? |
| Carl - Friday, 09/12/03 16:39:32 EDT |
|
Carl, you only need to heat the metal you can work before it gets cold. Size of the fire is usually tied to mass of the irem not size so you can actually make swords in a small forge *until* it's time for heat treat and even then there are ways. My advice is to start *cheap* and find out what you like/want in a forge and build it! Repeat as necessary, a forge is more like a consumable, the anvil, postvise, etc are the capital expenditures. Thomas |
| - Thomas Powers - Friday, 09/12/03 17:33:54 EDT |
|
Coal Forges: Carl, We spent last Saturday using this forge put together by dragonboy and his friend Matthew. 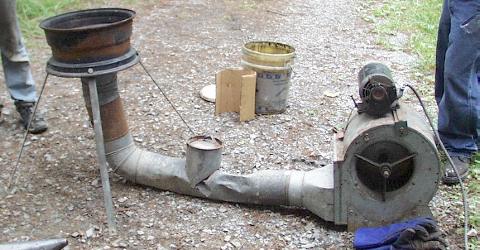 Inside the wheel it had an old auto flywheel that reduced the depth by about 1/3rd. It worked quite well but needed an air control. So we stuck a board in the hole where the damper vent it. They had good coal and it got hot enough to burn the end off several pieces as I was demonstrating. . . Made one small clinker in half a day. Better air control is required to forge weld. The draw back to a small diameter forge is coal capacity. When burning coal you are constantly raking coal onto the mound in the center. When using a small forge you must constantly replentish coal from the bucket. The small diameter also limits the depth of the fire. A shallow fire is hard to get to a non-oxidizing state for welding. The fire pot goes into a forge table, or larger forge pan that holds a larger quantity of coal. The 9" diameter firepot is for small forges but it will do a LOT of work. The actual "capacity" of a fire pot is determined by the size of the air opening and supply pipe (tuyeer). A 2" pipe is average and large forges often use 3". The forge above has a 6" supply but it is respricted to about 2-1/2" at the firepot. With coal the limitation is usualy the size of the pan, the blower, and the skill of the operator. With enough blower and a half ton pile of coal you can heat a several hundred pound piece (like an anvil). Most of us do not want to put half a ton of coal in a forge. . . but a hundred pounds is NOT unusual in the average forge with more added while replentishing during the day. |
| - guru - Friday, 09/12/03 18:34:31 EDT |
|
I was reading the online version of Modern Blacksmithing from 1904 and I ran across this note: "TO MAKE STEEL AND IRON AS WHITE AS SILVER Take 1 pound of ashes from white ash bark, dissolve in soft water. Heat your iron red, and cool in this solution, and the iron will turn white as silver. " Is there a way to make the same solution from household or commercial chemicals? I'm a little short on white ash bark this week and was hoping maybe something under the sink would do. :) Thanks, Mike |
| Mike - Friday, 09/12/03 18:44:07 EDT |
|
MIke, what's the URL for that version, please? |
| Paw Paw - Friday, 09/12/03 19:45:09 EDT |
|
White Steel: Mike the ash bark is having lye extracted from it as part of the process. A weak lye solution will do the same (use Red-Devil lye). I would not recommend heating the iron but you can boil the solution with the part in it. Now. . "white" does not mean "bright". Chemical etched steel is flat white to grey. These processes do not improve the finish, they degrade it. Soo start with a good finish. On clean steel you can get a similar effect with Ospho (a proprietary phosphoric acid solution). However, the steel needs to be absolutely clean to start. |
| - guru - Friday, 09/12/03 20:46:16 EDT |
|
well, i made the giant bellow and have started working on a piece. im starting with a simple dagger blade. it makes a HUGE blast of air. its like a hurricane in a bag. |
| colin - Friday, 09/12/03 23:17:41 EDT |
|
Guru, fit that furnace blower on Dragon Boy's forge with the wall mounted type of speed control for a ceiling fan and you will have very good control of the air. Tis what I have on my charcoal forge and on the lowest motor speed winding, with a 1/5 hp blower motor, I can blow the charcoal out of the pot. Dragon Boy's blower looks larger than mine. Makes it almost silent too. The speed controls usually also have a light dimmer. I hook the incandescent forge lighting up to that dimmer so I can control light around the forge. The "low hum" speed controls do make the motor a little quieter. |
| - Tony - Saturday, 09/13/03 09:03:21 EDT |
|
Thanks Guru. |
| - taylor - Saturday, 09/13/03 09:59:30 EDT |
|
Salt Fork Swage Have been looking at the swage blocks that the Kaynes have. Are they the SF swage blocks mentioned above? If not who carries the SF? Thanks Jack |
| jsilliman - Saturday, 09/13/03 13:08:39 EDT |
|
Contact Jim Carothers at: colonel@fullnet.net Tell him I sent you, please. |
| Paw Paw - Saturday, 09/13/03 13:42:42 EDT |
|
Sorry, Jack. I should have mentioned that Jim is the contact point for the Salt Fork swage block. |
| Paw Paw - Saturday, 09/13/03 13:44:17 EDT |
|
Blower Controls: Variable speed fan controls work on small motors that are usualy what's known as "shaded pole" motors that do not have a capacitor start. Motors with capacitors OR split phase starting circuit controled by a centrifugal switch should not be put on speed controls. Dragonboy tried one on the fan above and it did not work. . . A sliding gate valve is easy to fabricate from thin plate or sheet metal and works well for controlling air flow. Controls for ceiling fans are generally heavier duty than light dimmers. |
| - guru - Saturday, 09/13/03 15:27:40 EDT |
|
With cap-start motors, dimmers are not something I would generally recommend. However, it can be done... there are a few ways to do it. One is to wire a switch and dimmer in series and have the dimmer at max to start with; flick the switch on, watch the motor spin up, then adjust the speed down with the dimmer. Another method is to wire a switch and dimmer in parallel, and have the dimmer on a nominal speed setting before you flick the switch on. When the motor has spun up, turn the switch off; then the dimmer alone will carry the load. Note: I'm not responsible if you smoke your blower/switch/house with these tricks, but they *are* what I use on my blower. Good luck. Rainy and humid in Kaneohe, Hawaii. |
| T. Gold - Saturday, 09/13/03 16:29:10 EDT |
|
Hi I've been doing blacksmithing now since I was nine and have just recently turned Twentyfour ( to give you a clue as to my experiance ) and I am realy into japanese swords and have made a few acurate representations of them although they've never been completly acurate due to the tempering prosses. If you could you give me a little info on hamon tempering, and ways of polishing it in properly I would forever be in your debt Kenneth Walden of Walden Forge |
| Kenneth Walden - Saturday, 09/13/03 16:44:17 EDT |
|
Hammon: Kenneth, There are some very good books on this subject that you should study. The Art of the Japanese Bladesmith is one and the Jim Hrisoulas series is another. The hammon line is the result of a change in crystal structure where the edge of the blade is hardened. In this process the entire blade is coated with a poreceline type clay (very refractory) and then the clay is scraped off the edge of the blade so that it feathers or blends from the bare edge to the thicker clay. The edge is then heated and quenched. Tempering varies but may not be applied in this process as the whole blade is not hardened (check the references for correct details). Buffing correctly is one of those tricky thing you will have to practice. Many blade smiths apply this and similar processes in various ways to get a localized hardening. Some use traditional process and some use methods of their own. Bladeforums probably has several people who can answer this better than I can. But I recommend reading the books first so that you can ask more specific or questions. |
| - guru - Saturday, 09/13/03 17:14:32 EDT |
|
Calendar of Events: We have an ALL NEW Calendar of Events page. This page is open to anyone that wants to post a blacksmithing or related event. Currently it only has a few events posted but eventualy we hope that every blacksmithing group has their events listed. Posting is easy. Select the month/yr enter a date, title of your event and a short description. There is a place for a link to a detail or organization web site and your email (encrypted as it is on the rest of our forums. Just be sure someone has not already posted your event. Events are listed in the order of posting. As months fill up we will sort them manually. This is something a lot of folks have asked about over the years. . . So we finaly took on the task. Another anvilfire first! |
| - guru - Saturday, 09/13/03 18:34:53 EDT |
|
Oops, yes, that does look like a centrifugal switch start motor in the picture and I see how a ceiling fan control wouldn't work with a centrifugal switch. Too bad. The ceiling fan speed controlled blower motor setup works quite nice. Much quieter than a blower running full speed. Slide gates work too as do butterfly or plug style valves. A sliding gate over than fan inlet is most efficient. But the difference in electricity cost is probably minor Soo many options. grin |
| - Tony - Saturday, 09/13/03 19:29:30 EDT |
|
We have a new member of the guru's "color" guard. Robert Nichols AKA "quenchcrack" now posts as an offical "guru" with a dark green signiture. quenchcrack is a Professional Engineer and has over 20 years experiance in the steel industry doing things many of us dream of. He has only recently taken up blacksmithing to get true "hands-on" steel working experiance. A "back to roots" metalurgist! He has graciously agreed to give us benifit of his education and some of his valuable time. Welcome! |
| - guru - Saturday, 09/13/03 22:09:51 EDT |
|
I have been a blacksmith for over 40 yrs but never had any experience with a fly press. Now I want to purchase one and would like some advice on the following Who makes the highest quality unit Where could I find a used one if desired I want to purchase a large unit like a number 6. Which is the best choice C frame or H frame and why. Thanks Dave |
| Dave Plowman - Saturday, 09/13/03 22:16:55 EDT |
|
can anyone help me with instructions on making a "coil handle" for a BBQ pit? i am not a blacksmith, i do metal fab as a hobby. thanks, doc |
| doc - Saturday, 09/13/03 23:48:08 EDT |
|
Hey guys, I just got an anvil from a family friend, maybe someone could let me know what its worth, where it came from, etc. It is a 038 size and has the number "8" stamped on it. It also has a name engraved (?) on it that says "Joshua Wilkinson Dudley". Any help will be greatly appreciated. Thanks, TGN |
| The Great Nippulini - Sunday, 09/14/03 00:06:09 EDT |
|
TGN, I think if you check you will find that the first word is Joseph, not Josua. I believe your anvil was manufactured by Joseph Wilkinson in Dudley, England. It is a forged, wrought iron anvil with a tool steel face plate. If you will scrub the anvil down with a Scotch Brite pad, wipe the dust (from the scrubbing) off with a dry rag and do a pencil rubbin of the face with a soft lead pencil. Then scan the rubbing and take pictures of the anvil. Send them to me email, and I'll try to give you a date of manufacture for it. Value? I can't guess at that without seeing good pictures of the anvil. |
| Paw Paw - Sunday, 09/14/03 02:19:06 EDT |
|
Pencil rubbing should be of the sides, not the face. Especially the side where you see what you have quoted. The other side probably does not have any markings. |
| Paw Paw - Sunday, 09/14/03 02:20:18 EDT |
|
Thanks, the anvil is not in my possession yet. From what I've been told, those are the specs. I have also been told it has a hardie hole on top and a pritchel hole on the side (?). I know the weight numeration on it, but the number "8" stamped into it is a mystery to me. Thanks for the advice, I'l send you pics as soon as I get it. TGN |
| The Great Nippulini - Sunday, 09/14/03 09:29:29 EDT |
|
A hearty handshake and a boat-load of appreciation to Quenchcrack for commiting even more time and know-how to "The Cause." The "Color guard" and indeed all the folks that share their knowlege here are an absolutely invaluable resource. It amazes me that you can find countless lifetimes of experience freely shared, just for the love of it. I can't imagine, let's say, a baking web-site where seasoned professionals would share their best recipies and trade "secrets" with each other as well as with some guy that just wants to make the best peanutbutter cookies for a party. "Anvilfire: The bestest place in cyberspace." |
| Gronk - Sunday, 09/14/03 09:43:46 EDT |
|
Ok. So I had a question and forgot to ask it DUH! I had the opportunity to use a different anvil, different than mine that is, It looked to be quite a bit smaller in weight but the horn and heel were shorter. That is they didn't extend very far from the waist. Umm more blocky I guess I mean. Well the metal seemed to move much faster on the blocky one even though the stand it was on was rather bouncy and not connected to the floor. Is it all in my head or do blockier anvils perform better than more elongated ones of similar weight? Thanks |
| Gronk - Sunday, 09/14/03 09:53:34 EDT |
|
Gronk, The more mass you have under the hammer, the easier it is to work. So two anvils weigh about the same, but one is long and lean the other is short and stout. The one that is short and stout has more mass in it's waist, which is under the face. So you will be able to accomplish more work with equal labor, or the same amount of work with less effort on the short and stout anvil. |
| Paw Paw - Sunday, 09/14/03 10:18:03 EDT |
|
Fly Presses: Dave, I have searched the net and various industrial literature looking for fly press information in recent months and the best I can find out is that all the manual machines now come from one source (an importer). These seem to be coming from Pakistan through India. The Indian exporter carries the little manual machines as well as huge thousand ton forging presses. I think they come from a variety of manufacturers in the area. In the recent past outfits like Bliss made fly presses and there was numerous European manufacturers but they were never popular in the US so used fly presses are far and few between in North America. I suspect that those being made by American manufacturers were mostly exported. With the loss of domestic manufacturing we now import these machines. . . Today huge flypress are used in industrial forging operations and are considerably more sophisticated than the old units of the past. However, many of these also seem to be made overseas. The India exporter claims to grade the machines according to fit and finish. I am told there are top grade machines, seconds and so on from the same source. Currently two outfits in the US sell manual fly presses to the blacksmithing community. Kayne and Son (an advertiser here) order the top quality presses and inspect each one before the ship them. They also stock the presses (or have been trying to as they have been moving very fast). The other dealer is not stocking the machines and is primarily taking special orders. I have seen and operated these machines at the Kaynes (see our iForge demos) and was impressed with the quality of the machined surfaces, fit and the smoothness of operation. I am hard to impress, I'm a machine designer and have built a variety of machinery and also do a lot of my own machine work. The choice of C frame or double column depends on press size. Size depends on application. However, when you get into the larger double column preses they are generaly designed for two man operation. The big presses require two handed and full body motion on the lever to get advantage of the full capacity of the machine. The little C frame presses (the #6 is actualy quite a large machine) are designed for single handed operation. This means you can hold the work with your left hand while operating the machine with your right (these machines are ALL right handed). On the larger machines you CAN concievably place the work in the machine, grab the handle, cycle the machine down and back, then remove the work piece. This may be acceptable for cold work but usually not for hot work. If you purchase an older machine you need to be aware that there are different types of flypresses. Forging presses have a fast multi lead screw. These are screws with more than one thread. All the forging presses I have looked at had four lead screws. Cold work presses designed for plate work and coining (popular in the flatware industry) have slower screws. These could be single start or double start. The difference is the rate of vertical travel and the distance that the work is done in. Forging presses need a fast rate of travel in order to get to the work and expend their energy in a relatively long distance then get off the work quickly. Coining presses are used on cold plate and the press expends it energy in a very short distance. Different machines for different purposes. However, many machines are used in cross over applications and it is not unusual to see forging presses doing punch press jobs, blanking and punching holes. |
| - guru - Sunday, 09/14/03 10:38:26 EDT |
|
Coil Handles: Doc, You start with a mandrel (a round bar) and wrap the coil around it. The mandrel wants to make the largest diameter of the handle. Then to shape the coil to a tear drop or taper you compress the coils a little at a time working from near the center out. This can be done hot with tongs or pliers or cold in a vise. You squeeze a spot, rotate then squeeze another a little tighter and so on until you get the shape you want. It is not hard and can be done hot or cold. Smiths prefer doing it hot because it is faster and takes less effort. There is some trial and error required to find the right starting length. And like anything else it helps to practice. In high production these are made between tapered dies in a machine like a thread roller. The straight coil is placed between the dies and then they shift parallel to each other. Tapered faces in the dies smoothly tighten the ends of the coil as it rolls between them. Like rolling clay snakes between ones hands. . . |
| - guru - Sunday, 09/14/03 10:53:41 EDT |
|
Anvil Solidity and Efficiency: Gronk, Paw-Paw pretty much covered the anvil efficiency question if not briefly. Yes, it is surprising to use a small anvil that is more solid than a larger one. If you look at old Colonial era anvils they had solid mass under most of the face and short horns. Modern farrier's anvils are the opposite end of the spectrum having very long horns and heals and a very narrow waspish waist. There is a huge difference in feel under the hammer. The trend throughout the history of manufacturing anvils has been to try to provide an increasingly larger working surface for a given mass. At some point a balance was achieved but there are still differences between manufacturers and style of anvil. Blacksmiths forging anvils have a relatively heavy waist compared to farriers anvils. Farriers anvils are designed for one specialized purpose, a specific range and shape of work and often for a degree of portability. They also include features not found on other anvils (clip horns, turning cams, bending holes). Among the old lines of anvils they did not discrimiate between farriers and shop anvils nearly as much as today. But the lighter anvils had narrow waists and were considered primarily to be shoers anvils because THAT is what most people did with them. As the weight increased, proportionately more and more mass was added under the face (in the anvils waist) as these were known to be general shop anvils. Often there is little difference in the overall length between a 200 pound anvil and a 300. The mass going into the body under the face. However, 200 pound and greater farriers anvils WERE made, like my Hay-Budden, which has a very narrow waist and large face for its weight. Much of this has to do with style and our perception of what an anvil SHOULD look like. The old blocky anvils did not have that sexy narrow waist and long (obviously phalic) horn that people expect an anvil to have. But the old anvils were more solid under the hammer and did not have that ear piercing ring that is largely the result of the shape of modern anvils. Anvil Evolution: The modern anvil is somewhat of a do-all tool like a Swiss Army knife. Early forging anvils were blocky and hornless. If you needed a horn shape you used a stake anvil. Horns were added largely for farriers but caught on with other craftsfolk. Punching was done over bolster plates (see the latest iForge demo #164) until the hardy hole and the pritchell hole were added. THESE both led to increasing the narrowness of the anvil's waist because they are difficult to punch through thick material. The long thin anvil heal made it easier to punch these holes. To balance the longer heal the horn was extended. Thus, much of the modern shape was now dictated by manufacturability. Another feature that was dictated largely by the manufacturing process was the step or chisel table. When tool steel faces were forge welded to the tops of anvils it was easiest to use a rectangular plate that just stopped and did not extend over and blend into the horn. This made it easy to leave a soft spot in the wrought iron to chisel over. Many modern all steel anvils have this feature but it is far from soft. So a feature that was an artifact from forging a bi-metal design is now included in solid cast steel anvils. . . The step IS useful in forging but that is not why it was originaly there. American made double horn anvils (moade for export) often had two steps while European anvils did not. Among modern anvils some are much more solid than others. The Italian styled Nimba is about as solid as you can get having no waist at all. These are followed by the Bulgarian Style sold by Euroanvils and then Peddinghaus with its relatively short conical horn and a thick waist. Texas Farrier supply makes a short anvil with little mass in the base (similar to the Bulgarian style) which is very solid for its weight. The "Austrian pattern" popularized in the Otto Schmirler book is tall and VERY solid in that it had no waist under the face. However, makers of new castings miss this point and have corrupted the design selling what some claim is the same pattern but it is far from it. The new castings have a waist where the originals did not. The original also had the hardie hole immediately adjecent to the the body (not out on the heal). This is much more solid and is more useful for special anvil tools than hardie holes out on the heal which is springy. It is difficult to make this long deep hole but it makes a superior tool. These are fine points, but to claim it is the same as the original is insulting to the designer. Good anvils are deceptively sophisticated in their design. This is a point missed by many including folks that use anvils every day and many that make them. |
| - guru - Sunday, 09/14/03 12:47:19 EDT |
|
I have two anvils, 1) Peter Wright Patent England Solid Wrought J on poinit end two symbols 103 it weights 120 lbs. on bath room scales 2) Peter Wright Patent Solid Wrought 3 pointed end 7 0 13 it weights 100 lbs. on Bathroom Schales what years made and worth. Thanking you in advance, Kirby B. Green, Jr. 704 NE 12th. Ave. Gainesville, FL 32601-3715 Tel. 352-372-6122 "E" Mail Kirby@gru.net |
| Kirby Green - Sunday, 09/14/03 13:09:15 EDT |
|
Guru, I tried to cut and paste info onto the "Calendar of Events" page. It didn't work so I typed in some info. Looking at the post, part of the paste worked and it took up more space than necessary. Is there a way to edit it? |
| - Coalforge - Sunday, 09/14/03 14:33:53 EDT |
|
When I braze (with a torch, not in the forge, just in case there was any confusion), I scrub the finished joint good with a wire brush, and then go over the whole assembly again with a wire brush before painting. This does a pretty good job of taking off the flux residue, for the most part. But ever once in a while, like with some locks I finished recently, there are some inside corners that I don't get clean enough, and then after a few days the flux seems to sort of crystallize or something and makes this white residue. My question is: can I dunk the parts in something (water? alcohol? thinner? acetone?) that would get into all the crannies and take out the flux before I wire brush and paint? I'm using Weld-It Brazing Flux from Hobart Welding. I don't see anything on the label about this. Thanks, Steve |
| Steve A - Sunday, 09/14/03 14:36:11 EDT |
|
Steve, Soak the parts in vinegar till all the flux is gone, then soak in soda water for a bit to neutralize the acetic acid. Finally, dry well, remove any rust that may have formed, prime and paint. |
| Paw Paw - Sunday, 09/14/03 14:41:16 EDT |
|
Coalforge, I'll look at what you did. Cutting and pasting HTML will break up as HTML is filtered from our forums. Cutting and pasting from most Microsoft products (other than notepad) into anything else is always a disaster. . . Not too bad. . just looked like a double click. BUSY weekend in October! |
| - guru - Sunday, 09/14/03 15:12:42 EDT |
|
Flux Removal: Steve, This is always a problem. Soaking will not always remove the baked on anhydrous borax but it is a start. You may want to soak in plain water overnight and then in vinegar or a dilute boric acid solution the next day. Depending on the metal you will need to check the acid soak often. Vinegar may seem benign but it can be quite agressive on steel. On brazed steel there is going to be more chemical activity than on plain steel due to the dissimilar metals. On brazed brass objects you can let them soak for days if need be. When you weld or braze with borax based fluxes the borax is converted to anhydrous borax. Over time the molecules want to revert back to their hydrated state (10 water per molecule of borax) and they capture water from the air. So the glassine anhydrous borax turns to fluffy white crystals. I have seen places on brazed equipment that weeped white borax crystals for decades. When this occures on painted objects it makes boils in the paint and then rust pockets. Arc welding flux has borax in it as well. That is why I recommend sand blasting for cleaning. However, arc welding boils most of the flux out of the joint so that most is on the surface. Brazing often traps it deep in the joint making is very hard to clean. |
| - guru - Sunday, 09/14/03 15:27:50 EDT |
|
Anvil Value: Kirby, Peter Wright is a good brand but condition is everything in pricing anvils. You may think old anvils are antique but anvils do not achieve antiquedom until they are nearly 200 years old or more. These are about 90 to 120 years old. So the pricing is based on value as a tool. Beat up old anvils still bring 50 cents to a dollar a pound. Anvils with serious damage less. Anvils in good condition (signs of use but not abuse) sell for a round $2/pound and Peter Wrights in mint condition for as much as new or more ($4/pound). SO, depending on condition and who is buying (another variable) anywhere from $50 to $400. |
| - guru - Sunday, 09/14/03 16:14:13 EDT |
|
Guru; are your anvils sick? You keep referring to their "heals". I had thought the term was "heel" like the end of a foot or plane and the odd "heal" was merely a typo; but after seeing so many used in 1 post I am beginning to wonder? Local jargon? Thomas |
| - Thomas Powers - Sunday, 09/14/03 18:28:43 EDT |
|
hey guru, I have allways wanted a katana/nadacia lol so umm i have a 4 1/2 foot bar of rebar thats semi-rusted i found on one of the family woods (own tonza land) while walkign and i was wondering if i could use charcoal in an old tractor rim setting by my shed to heat it up and pound it out into a blade shape by bending and hammering untill it was about 4 inches wide 2 in depth in back and about 1 - 2 cm wide in the front and then quench, cover it with old charcoal dust green clay and watter mixed up in a 5 gal. bucket and cover it about and inch & 1/2 in the back and 3/4 inch. in the front and let it cool over night, anyways would this work for starting a jap. blade? and if it would what could i use for a handle and is rebar stainless steel or is it carbon-steel? thnxs fer ur help, James. |
| James Johnson - Sunday, 09/14/03 18:44:54 EDT |
|
Borax flux removal: If you have the facilities and the time, boiling it i nplain water for a couple hoursw will remove all the borax. The boiling temp increases the rate of hydration dramatically, and the borax becomes dissolved in the water. Like cooking dried beans, change the water a couple of times for best results (least outgassing later). |
| vicopper - Sunday, 09/14/03 19:10:43 EDT |
|
Thomas, My bad. . . thanks for the spelling lesson. . . :) |
| - guru - Sunday, 09/14/03 20:11:18 EDT |
|
Modern Blacksmithing from 1904 http://www.usgennet.org/usa/topic/preservation/smithy/cover.htm Gugu and others, Thanks for the lye tip... silly me not to have recognized it as an acid etching process. I've been using muriatic acid for months ot etch designs on my work, but went brain dead with the white ash bark bit. Sadly, today was the last hammering I get to do for a while... its off to my wedding next weekend, honeymoon [yea!] after that, and a few weeks of catchup before I can even set my new anvil up [HF Russian cast steel, my first]. While I wouldn't miss my wedding/hm for the world... I'm a little disappointed about Quad State. Mike |
| Mike - Sunday, 09/14/03 20:14:47 EDT |
|
Mike; Congrats on the wedding. There will be more Quad States. Getting off to a good start in your marriage and maintaining it will go a long way in the pursuit of your hobbies down the road. Best wishes, 3dogs |
| 3dogs - Sunday, 09/14/03 20:26:02 EDT |
|
Rebar Sword: James, See our FAQ's page on Rebar, Heat Treating, Quenchants and Coal. See the plans page for brake drum forges (as well as the photo posted above a few days ago). Rebar is not stainless and neither are traditional Japanese blades or any other quality blade. Handle material can be hard wood (rosewood, walnut, ebony), wire wrapped wood or wood/leather, bone, Corian (synthetic ivory replacement). . . Furniture (the guard and pommel) is traditionaly pattern welded steel OR mokume gane' (pattern welded non-ferrous - copper/brass/silver). I recommend you read The Art of the Jappanese Bladsmith and all the books by Jim Hrisoulas. See our getting started page for other recommended reading as well as our book review page. Yeah, anyone with a forge and a hammer can heat and beat any old piece of iron into an edged weapon. . . . But it is up to you to make it a work of art. |
| - guru - Sunday, 09/14/03 20:34:47 EDT |
|
Hey guru, I also fergot how do i make a habaki, and what about a sheath (cannot think of correct naem for a katana sheath? is it iai?) anyways does anyone know where i could find a whetstone locally (ex. Wal*Mart, Lowe's, Local Hunting Goods Store, ext...) anyways i also have some old files use to scrape rust off screw driver heads and sharpen poking items they are semi-rusted also could they be carbon-steel as the same for the rebar (metal barb-wire fence post)? anyways i have basicly everything i need for a forge and hammering the steel out just asking simple q.'s lol. thnxs!!! |
| James Johnson - Sunday, 09/14/03 20:37:23 EDT |
|
Concerning Swords> I'm not trying to insult anyone, or anything like that. However, I feel the need to ask what is with the "I wanna make a sword..." by so many people? What is the appeal? Are they planning to fight with it or something? Open food cans with it? :-) |
| - taylor - Sunday, 09/14/03 21:28:53 EDT |
|
Taylor, Watching too many movies, mostly. Conan the Barbarian and Bruce Lee movies. |
| Paw Paw - Sunday, 09/14/03 21:52:41 EDT |
|
Concerning swords: I can remember a time when I wanted swords because they were "stuff" and I wanted stuff. I didn't want to make one then because I was into wood-working, although I made one nice looking waster that lasted for years until I used it. :( I'm not into making sword blades now, but I do make hilts for WMA fencing weapons [SCA, theatrical, CSG, etc]. When people ask what I make, most need a lot of explaining to understand why its just hilts, not whole swords [something about making the blades safe to hit people always confuses the uninitiated]. But, if I weren't also involved in WMA combat, I'd likely be one of the "sword making" folks. We each make what we like, I guess. Mike |
| Mike - Sunday, 09/14/03 22:32:22 EDT |
|
guru thnxs, my dad thinks we can use the torch in our shed instead of a forge to heat the files and that "trashey" rebar LOL. anyways what do i do? will the torch work well or should i take my old tire rim put a grating in the bottom, weld it in and weld/bolt legs on it stand it up and use charcoal instead? and the remark to the why make a sword, because my family was once part japanese, im like 1/86 or some thing anywho its nothing even irrelevent but still i find it to be a great "honor and prideful" thing to wield a weapon wraught from nay but a peice of steel and your hands.anyways back to the subject could the torch work or should i work on a rim forge? would i need a blower if i used charcoal and set it up about 3 feet tall on legs? thnxs guru ur a great help |
| James Johnson - Sunday, 09/14/03 23:25:23 EDT |
|
James, I use a charcoal forge made in a brake drum [common design, plans found on this site], with some plumbing fittings in a T. my grating is scrap 18 ga steel with holed punched in it. For a blower, I borrow my fiancee's hairdrier, it works GREAT! I can get good heat, but a bigger blower would probably work better. Without a blower, it would be good for hamburgers but not steel. 3 ft long legs are all it needs. Its an easy beginner's forge, although I'm already thinking about building a better one! I bet you'll need more than just a torch to make the blade. Good luck and let us know how its going! Mike |
| Mike - Sunday, 09/14/03 23:35:56 EDT |
|
Hello! What do you think about a flame hardening steel with 0.90 Carbon. Is that worthy steel for a knife and what the difference with an air hardening steel? Finally! Can I do zone hardening on an air hardening steel by using some kind of clay or stove cement? Thanks for your helpful reply |
| Frids Laguna - Monday, 09/15/03 00:37:57 EDT |
|
I just purchased a Star triphammer and need to find a source for rebuild info. Can you give me some ideas. Iv been blacksmithing for 25 years and can get it up and going but would like to know the specs to be safe. |
| RLD - Monday, 09/15/03 00:44:54 EDT |
|
Taylor surely you have seen the "higlander" movies Christopher Lambert in my opinion is enough to make any normal woman want to make a sword, especially if he was offering to teach. Just my opinion *sigh* cheers from a very springy oz day |
| Banjo - Monday, 09/15/03 01:17:58 EDT |
|
Quenchcrack; warm congrats on your elevation! Paco; The "Stabilizer" a promotional publication from the Lincon Welding Co for a great many years, used to have a repeating feature called " The liberty bell story" wherein they boldly proposed to weld up the ironic crack in our national symbol. Seemingly, the company wants to forget that episode now. Perhaps because our current administration has taken the crack so much to heart...sigh. One should probably be reluctant to work on such an old piece, fraught with lots of history...But..a fastidious weld prep, a controlled preheat, proper fluxing, matching brazing rod and a very skilled welder ( TIG would be best) followed by a careful postheat and dressing,might pull it off. If you muff it, it'd be ugly. James, Banjo; The desire to make a sword is a trick played on the unsuspecting to get them into blacksmithing. Rebar is often an invitation to frustration . A car or truck spring is better, new tool steel is much better . Yes, It's possible to forge out a blade using a torch but it is an additional handicap. It is so easy to overheat the steel, especially when the edge gets thin. Starting off with making a sword is like getting on a Harley before you can ride a bicycle, when you live in a thick mountain side forest. Spending time learning basic blacksmithing will get you a sword faster than direct action. Direct action with a sword will get you prison time, or shot. It's luck of the draw, so to speak. You can save a great deal of money on my very considerable consulting fee ( that you just ran up) by sensibly joining the Cybersmiths to help support Anvilfire...right?!! |
| - Pete F - Monday, 09/15/03 04:49:21 EDT |
|
Frids, a steel with .90% carbon should make a good knife blade although you will probably want to oil quench it. Air hardening steel is a highly alloyed steel that hardens by cooling slowly in air rather than cooling more rapidly in oil or water. It does not react with the air to harden so covering parts of the surface to prevent contact with air will not "zone harden" the piece. You can use a flame to harden a .90 Carbon steel but be aware that non-uniform heating of thin sections can cause distortion or cracks. |
| quenchcrack - Monday, 09/15/03 07:44:43 EDT |
|
Frids, I forgot to mention that the slightly slower cooling rate of the steel under the clay would not likely be sufficient to prevent it from hardening to about the same hardness as the exposed areas. It would be better to harden the entire piece and selectively temper the areas you want to be softer. |
| quenchcrack - Monday, 09/15/03 08:16:06 EDT |
|
PPW and Guru,thanks for the anvil styles info. Good to know I wasn't imagining the performance difference. Guess I'll be keeping an eye peeled for a short, fat anvil. Something I can lug around without crippling myself and still get metal moving. |
| Gronk - Monday, 09/15/03 09:10:28 EDT |
|
Gronk, Something in the 90 pound range works well for demo's. Although I know guys that carry heavier ones. |
| Paw Paw - Monday, 09/15/03 09:28:32 EDT |
|
Re anvil shapes: OTOH I've been working on this garden rake on my "disposable anvil" a lovely 125# or so forge welded anvil totally missing the heel; but with a flat face and and an ok horn. Boy I sure miss the heel when I need to work on a "U" shape the connical horn is not a great replacement for it; I'd haul out another but I'm forbidden to do any lifting for a while and I *do* want to heal before Quad-State! Good Guru; I was just wondering about the spelling as you do run into local variation: swage-swedge is one that's pretty common; who knows as the apex of smithing wisdom perhaps you were starting a new bit of jargon on us...you know the saying that if you read it 3 times on the internet its "true"... Thomas |
| - Thomas Powers - Monday, 09/15/03 10:06:00 EDT |
|
Thomas, The other blacksmith wordw that commonly gets switched around. Pein and Peen. According to Websters, Peen is correct. |
| Paw Paw - Monday, 09/15/03 10:17:42 EDT |
|
wow guru! the charcoal against the briquettes really made a difference. i got the piece of iron orange in about 5 minutes! i didn't have enough time to finish my work though. thanks! |
| colin - Monday, 09/15/03 10:30:03 EDT |
|
Frids I make all of my japanese style tantos and do the traditional clay hardening with water quench.The coating is about 1/8" on back and basicly just a wash on the edge were I want it to harden this results in a very hard steel below the hamon and much softer above it.This becomes very apparent when you start to hand finnish the blade |
| Chris Makin - Monday, 09/15/03 11:00:18 EDT |
|
Hello all. Now the question. Do you need to change anything (tips, etc.) when you change a cutting torch over to propane? I want to cut down on the number of tanks of explosive stuff sitting around. I have used several torches that ran off propane and O2 which worked fine but was told you need a special set-up for using it. |
| Gary - Monday, 09/15/03 11:05:37 EDT |
|
Something Wicked This Way Comes Isabel seems to have us in her cross hairs as of right now. Looks like the nastiest thing since Hazel in �54 (I remember her taking out our old apple tree). Depending on where and how hard this one hits, I may be incommunicado for a few days, or more, until roads are cleared, power restored and repairs made. We�ll probably sink the Fyrdraca at her slip on Wednesday, doubling-up the docklines and lashing everything aboard (which isn�t much) to the thwarts, and lashing down our 16� long dock box on shore. I also need to lash some things down at the barn and the forge. As a matter of fact the forge could be quite useful for any barn repairs our neighbors need, assuming any of us still have barns. Jock: You may want to move some more machinery out of the mill, it could get a little deep per the NOAA track maps: http://www.nhc.noaa.gov/ftp/graphics/AT13/refresh/AL1303W5+GIF/151458W5.gif Every age and place has its hazards. Keep your heads down. |
| Bruce Blackistone (Atli) - Monday, 09/15/03 11:45:17 EDT |
|
Cracked Bell: Thanks to all of you (Vicopper, guru-Jock Dempsey, Bruce Blackistone and Pete F.) for all those suggestions on fixing a cracked church bell. If I give it a shot I will let you know the outcome (hopefully the bells will peal merrily again 'cause in this small town of 200 in Spain we have expert "tollers"....actually the cracked bell is the smaller one of a two). Thanks! |
| Paco - Monday, 09/15/03 11:51:26 EDT |
|
Having been thruogh a couple of major Hurricanes here, I sympathize with those of you in the path of Isabel. Please take every precaution to be safe! The first thing you notice the lack of, after the power, is fresh drinking water. Store plenty. Foods that don't need refrigeraton. First aid kit. First aid kit. First aid kit. Also, one of those little kits the auto stores sell for plugging flat tires, along with a small compressor that plugs into the cigarette lighter. All that crap blown all over the roads will end up in your tires. Best of luck to all of you, you're in my thoughts. |
| vicopper - Monday, 09/15/03 12:12:52 EDT |
|
Clay Hardening Blades: QC-I have to disagree on the statement that clay would not slow down the quench rate much on blades. This practice has been used very successfully by many smiths, both in recent times and in years past. If you get a chance to look at blades done this way you will see a very distict "temper" line. Often, the clay was placed over the entire blade and then cut away in a wavy pattern, which then shows up in the final blade. Keep in mind that most of these blades, espcially the older ones, are made from 1050 or equivalent, so you don't have to slow down the cooling rate much to miss the nose of the transformation curve. Also, special clays were/are used for this application, so a refractory clay would tend to hold the heat in. Patrick |
| Patrick Nowak - Monday, 09/15/03 13:04:45 EDT |
|
Patrick; I think he was referring to air hardening steels where the alloying is such that they are deep hardening even in still air and so a clay coat wouldn't slow things down enough. The traditional katana working with medium carbon low Mn steels is a very shallow hardening alloy and so the clay coat does make a difference. (Just got my first job interview *tomorrow and for a local job too!) Thomas who could add pane to the peen/pein list |
| - Thomas Powers - Monday, 09/15/03 13:32:06 EDT |
|
Propane Cutting: Gary, There are special tips for propane, everything else remains the same. However, there is hose rated for acetylene only that is not suitable for propane. The propane (multi fuel gas) hase also works with acetylene. The Victor propane cutting tips are a two piece tip. The inner tube is copper and the outer is brass. The copper tip has many fine slots cut into it for the preheat mix to travel through. This tip allows for more breakup and mixing of the heavy propane and for more smaller burner orifices. The need for a variety of tips is why I use Victor torches. They carry a diverse line of tips that fits 40 year old torches. Many off brands only carry the ONE universal (ha ha) tip that came with the torch. |
| - guru - Monday, 09/15/03 14:51:29 EDT |
|
Patrick, I meant it would not work very well on AIR HARDENING steel. They harden with very slow cooling and the heat conducting between the edge and the spine would probably even things out. Sorry for the confusion. |
| quenchcrack - Monday, 09/15/03 15:01:25 EDT |
|
More on Isabel Keep your fingers crossed for us here on Roanoke Island (N.C. Outer Banks). We've been working all summer on a working repro of a 16th century timber frame blacksmith shop at Elizabeth II State Historic Site, so we made get a chance to test the durability of these early colonial-type structures. At any rate, hopefully a whole summer's worth of work won't go down the drain (literally and figuratively). |
| - Chris W. - Monday, 09/15/03 15:39:21 EDT |
|
Thomas, best of luck on the interview! I start my new job on the 28th of this month. |
| quenchcrack - Monday, 09/15/03 15:47:41 EDT |
|
lol ok thnxs umm so how do i tell my dad that i should use a forge lol umm anyways i need to know where can i get some ebony? would i be able to obtain it at just my local lowe's/ home-depot in the wood ilse? or would i have to goto the local lumberyard? any about the sword i just want something to begin practicing iaido with just something that can hold its edge better than that damned stainless steel anywho i also have 4 carbon files that my dad also thaught a torch would work well with, would those files (want to make knives from them) also get thinned and weakened at the edge and be harder to work with than in a forge? also when they talk about the bending of jap sword u apply clay to the entire blade do u heat the blade then cover it with the clay then quench it in water or do u heat the blade apply clay and let it slowly cool over night? or do u heat apply clay heat more then let it cool over night or do u continually heat roll and pound it untill ready to bend it then quench then apply clay then re-heat then let it cool? or is it none of the above and also what type of clay should i use? and for my first habaki should i just take some scrap steel and heat it and cut it to fit the blade from the hilt side up? im not positive on all of the steps? like u have this bronze piece wrapped along the blade then the habaki goes on that and so forth can anyone find some pictures for me to help me understand all of the steps? i don't have really any money for a book over it and about forges could i take my tire rim and build like a brick housing around it on grounds level and fill it with charcoal and use that? and if i could will i need a blower? and if i do will a big heating coil fan work? it spins farely slow but it is about 4 feet wide with 2 squirrell cages (steel cylinders that are fan blades) that are enough to make ur baggy shorts ruffle would that work if i set like 2 openings 1 in front and back and set oen up to blow air into it? if not what are other easier forges to make besides brake drum because i don't have one nore a local landfill/junkyard to get one lol anyways i need to quit spamming lol in short terms i need some pics on steps of forging katana's help on where i COULD POSSIBLY find ebony and help with a newb forge and then after i replace the springs in my 76' mustang i might use one for steel for a new blade thnxs guys... James |
| James Johnson - Monday, 09/15/03 17:07:21 EDT |
|
Thomas; Good luck with the interview. QC: I agree wrt to air hardening steels. Absolutly. By the way, where are going to be working? I guess I missed that you found another job. Congrats. Patrick |
| Patrick Nowak - Monday, 09/15/03 17:11:40 EDT |
|
Patrick: Manager of Quality, Energy Products Division, Maverick Tube Company, Hickman, Arkansas. They make pipe for oil wells and transmission pipeline applications. It is pretty flat up there but it is only about 2 hrs to the Ozark Mtns. Being from Colorado, I really have missed the mountains! |
| quenchcrack - Monday, 09/15/03 17:59:05 EDT |
|
I've been using Estwing's gad point chisel for years now, I've been wondering how they temper one end so hard, and the other end, partly mushroomed when purchased, so nice and soft to take repeated blows with a metal hammer? |
| Charles B. Franco - Monday, 09/15/03 18:24:58 EDT |
|
Quenchcrack, Congratulations on both the new jobs, the one in Arkansas and the one that made your name turn green! I grew up in the Ozarks, albeit on the other side of the state. You're close to Crowley's Ridge, a very beautiful and unusual region. Visit it often! In terms of Arkansas plant life, there are things growing there you won't find anywhere else in the state, or for that matter, in most of the Eastern Deciduous Forrest. I'm envious! Being in Eastern NC, I really miss the mountains, and the Ozarks will always be home. Thomas, Good luck on your interview! Local is always best when you can find it. Waiting for a visit from Isabel! Eric |
| eander4 - Monday, 09/15/03 18:35:09 EDT |
|
Way off topic, but the other day the grocery store was having a sale on "devained" shimp. |
| Mike B - Monday, 09/15/03 19:01:21 EDT |
|
That's shRimp. Guess I've been devained. |
| Mike B - Monday, 09/15/03 19:03:14 EDT |
|
James J. I buy specialty woods like ebony from a local supplier, they have a web site that has alot of interesting wood, tools, and supplies. www.woodcrafters.com. A book that you might find interesting is "The Glossary of the Construction, Decoration, and Use of Arms and Armour" By George C. Stone ISBN 0-517-065878. It has a large inventory of all the different parts of Japanese swords and the names of the different possible material and designs. Iaido is about technique. Many of the people I have met do not even use live blades to practise with, until they are VERY good. Two use blades made of raw copper; because it is unforgiving of bad technique and will nick and bend giving immediate feed back. The swords used in Iaido are very peculiar in their design and detail. |
| Myke - Monday, 09/15/03 19:28:23 EDT |
|
Sorry that web site is www.woodcraft.com |
| Myke - Monday, 09/15/03 19:40:42 EDT |
|
Ebony: There are a bunch of places to get ebony and rosewood. Musical instument builders use it in relatively large pieces for fret boards and bridges on stringed instruments. A junk guitar or violin may have some nice pieces of Ebony or rosewood. I buy it from Stewart McDonald Guitar Builders Supply and Albert Constantine & Son of Bronx, NY. Costantine's of New York is now closed but they have an on-line catalog working out of their Florida office. If you search you will find that there are specialty wood shops hiding in the dangedest places. We have one out in the sticks a few miles from where I live. In town we have an international seller of specialty fasteners and wood products. The are known the wolrd over but most people localy don't know McFeeley's has a store front. . . Let your fingers do the walking. THEN there are many exotic local hardwoods all over the US (ae well as the rest of the world). I have a stack of walnut and cherry cut from our yard this spring (just trimming limbs). These are actually common in the US but there are local hardwoods almost everywhere below 4,000 feet. . . We also have some of the finest ash and shagbark hickory in Virginia and I often glean pieces from the wood pile. New England is famous for its hard rock maple which is often dyed to look like ebony on musical instruments. Stumps from orchards the world over produce some of the worlds finest exotic burls and fancy grains in apple, peach, pear. . . When all you need is a 6" long piece it is NOT a big deal. But you MUST educate yourself. . . . and have the gumption to ask if you can dig up that stump in the orchard then DO IT. Books are part of the cost of an education. ANY education including blacksmithing and ESPECIALLY sword making or any technical discipline. When dealing with exotic metals and modern tool steels you do not just guess at what your are doing. The results can cost you more than a small library of books in about 1 second of overheating a piece of steel or using the wrong quenchant. Books are cheep. Steel, fuel and YOUR TIME are expensive. I also have a REAL problem with people that come here using a several thousand dollar PC hooked to the net on a better connection than I can afford gleaning free information then give us the "I'm too poor" excuse for not reading the necessary books. Don't have your own PC? Then WHERE ARE YOU USING ONE??? Many people use one in the public library, while surronded by BOOKS. Although public libraries often have little on making exotic blades or blacksmithing in general they ALL have basic metal working texts, and a copy of MACHINERY'S HANDBOOK in the reference section. If you ASK the librarian and fill out a little paper work they will borrow almost any book in print from another library via the Inter Library Loan System. In most places this is FREE or at the most will cost you 3 bucks for postage. When I started in smithing there were only one or two books and NONE on technical bladesmithing. Today there are hundreds of books covering techniques that were once the most guarded secrets of a few makers, and many lost, are now YOURS if you are willing to read about them. Yep, it might take a month for that copy of Dr. Jim's book to come in via Inter Library loan. But being in a hurry costs money, one way or the other. |
| - guru - Monday, 09/15/03 20:23:02 EDT |
|
Mike, I was in a store recently that had a sign over the tomatos that read "Vine Ripe Tomatos". They were mostly green. Guru, I share your frustration with folks who won't read and THEN ask questions. The internet has made it too easy to get information and actually doing research in a library is a dying art. I will always go to books first, then the internet. I cannot imagine the net replacing books. After all, who wants a computer in their bathroom? |
| quenchcrack - Monday, 09/15/03 20:32:04 EDT |
|
Ebony and Rosewood: Be careful of the sanding dust or scrapings of these tropical hardwoods- wear at least a dust mask to avoid inhalation. For many people (myself included) they can be extreme irritants. When I still worked primarily in wood my nose would actually bleed after only an hour or so of working Rosewood. It didn't take long before I gave away any I had. |
| SGensh - Monday, 09/15/03 20:50:12 EDT |
|
Have a question about use of the fly press. In the i-Forge demo it showed a tenon being formed and mentioned the ability to stop the depth of the blow at a determined thickness. I think this was with a nut on the main shaft. I have also heard that this could crack a frame if overdone. Is this a real danger or can common sense avoid damaging the machine. In otherwords, is the frame stong enough to handle all but deliberate overload? |
| John M. - Monday, 09/15/03 21:02:31 EDT |
|
k thnxs guru umm so just check the local wood dealers i guess lol and yes i have my own comp, but i got it 3rd hand from my cousin for 200 dollars, and it is a 95 hp thats way to old to be using the net and my net is 28.8k which costs me 10 bucks a month, nothing big; and the library in town is just a tad small on books on anything besides childs mystery; but none the less i will go in and see if they have any metallerigy books or can get any; also i have one question do u have any idea of a simple newbie forge i could make easily that is charcoal ur barrel drum forge sounds great but i don't have a land-fill near my town thats within a 45minute drive i live way out in the woods; anywho can someone sell me/loan me any books on japanese sword smithing like the process for beginners? i know some one should atleast have one for like 5 or ten dollars (us currancy) and if not could i borrow one? i can't steal it because u got my home addy and eletronic evidence i have it lol will take very good care of and so forth; hurts my heart to see a damaged book LOL; anyways if u can please post here so i can place my snail addy (mail box address); will pay shiping when returned... thank you all for ur help and could anyone tell me whare they find their sword iron? thnxs vry very much if some oen could help me on the entire subject!! ^'o'^ J. Johnson |
| James Johnson - Monday, 09/15/03 21:53:07 EDT |
|
JJ dig a hole in the ground, stick a piece of black pipe down to the bottom in it. Put blow drier on end of pipe with cardboard and duct tape, build fire in hole when it gets going good add lots more wood and turn on blow drier, forge. When I lived ina town in AR I was able to get books from over 90 other libraries through ILL and it didn't cost me anything, (including a half dozen university libraries). Get sword steel from local auto repair place, asked for leaf spring parts. Learn to forge; then come back and ask about sword forging; it will make more sense from both ends of the questions! Have you located the nearest ABANA chapter? Are you withing travelling distance to a good hammer-in, (Quad-Statein western OH is coming up!) Have you looked in the back of a copy of Knives 2002 for a local bladesmith? Get off the net and get cracking in your own backyard! QC, *I* wanted an AR job; but in the NW corner; the Ozarks don't look much like the Rockies; but the winters are sure a lot nicer! If I get this job it's a term limit one; but at least I will time to hunt one that's a perfect match when this one winds down. Thomas |
| - Thomas Powers - Monday, 09/15/03 22:13:30 EDT |
|
Fly Press: John, You could probably damage one of these presses IF you tried hard. In normal usage you pull the handle about a foot or 90°. There is a distinct limit as to how fast the normal human can accelerate that mass in one foot. The difference between a 90 pound little girl and a body builder is only about 10%-15% velocity . . . So, if you stood over the press and spun the wheel as fast and hard as you could for more more than one turn. . . you probably COULD damage the press. These machines are designed to have the frame stretch a few thousandths of an inch per ton. If you run the calculations (I am working on them now), these machines expend their full NORMAL capacity in that distance. This induces a stress of around 3,000 PSI or less in the frame. That is about a 2x safety factor in cast iron. The best I can currently determine is that these presses (the ones the Kaynes sell) are rated in tons by the model number. However, the middle press, the #5 currently has the same flywheel as the #4 so they are the same 4 ton capacity. Rating these presses has been a REAL trick. . First you have to estimate the ultimate velocity created by the operator pulling on the lever. Then you have mechanical efficiency. AND in the end you have the distance in which the work is done. In the big picture all the mechanics cancel out except efficiency. You have mass and velocity converted to force absorbed within a given distance. It turns out that there is no real straight forward rating for the flypresses. The power (force) is directly related to how thick the work is or how long a distance the force is expended over. So ratings have to be graphed. An apparent rule of thumb is that the flywheel (rim weight) equals about 1% of the capacity of the press. 85 pounds = 4 tons, 110 pounds = 4 tons and 135 pounds = 6 tons. The excess takes care of the friction losses. Using a range of velocities the full work rating distance on these machines seems to be about .012" to .020". I have not published my calculations because I have three engineering references with three different formulae that do not agree. One, is one one of the most used engineering references in the world and it just plain has a mistake but I do no remember enough physics to correct the oversite. On the other hand it has the best explanation of the design of a fly press. :( MACHINERY'S HANDBOOK is the only one that makes sense but it uses the old English units formulae that include the acceleration of gravity. Metric unit formulae now ignore gravity and use mass as a constant. . . Do I sound like Mr. Spock muttering about mass no longer being a constant in the time warp calculations. . . ? Well, when I get them organized I will fly them past some volunteer engineers and see it they agree with me. So why am *I* doing this. . . It seems the manufacturers do not provide the rating information. THAT may simply be because like a lot of modern manfacturers they are not engineering new products they are just building old proven designs. No new designs, no engineers to provide rating charts and graphs. . . Is the metal working industry in a state of decline? You bet it is. Hmmmm. . if I do all the calculations and publish the report with graphs (free) will anyone read it? |
| - guru - Monday, 09/15/03 22:58:27 EDT |
|
QC, Congrats! Will all that fit on your new business card? ;) Hmmm . . Maverick Manager of Quality Tube Energy. . . Thomas, its your turn! Send me you e-mail if you could. Nite all. . |
| - guru - Monday, 09/15/03 23:05:10 EDT |
|
Fly Press Stop: Yes, the stop nut at the top of the screw is used to limit the travel of the press. When THIS occurs the energy goes into twisting the screw between the flywheel and the bottom of the nut, the wheel spokes may flex a little. Very little goes into the frame other than the threads. Since this is a normal function of the press then the press SHOULD take it. However, it is like a lot of things. Firing pins on guns break when dry fired often enough. . . it is supposed to be cushioned by the the cap. . . Abuse anything long enough and you can break it. |
| - guru - Monday, 09/15/03 23:12:11 EDT |
|
Uhhh, PPW "Bruce Lee" movies? not really that much in the way of swords... now the younger crowd will be watching Highlander reruns and Blade as well as a few other movies... (grin) |
| Ralph - Tuesday, 09/16/03 00:07:28 EDT |
|
Ralph, True. But it's the same mind set. |
| Paw Paw - Tuesday, 09/16/03 00:19:25 EDT |
|
James Johnson, Someone just has to be forthright enough to say in plain words what you don't seem to be comprehending by the more gentle posts of the Guru and others. Okay, I'll be the one to say it. You have no business asking the same questions over and over if you won't take the time to read the vast amount of information that is already on this site. Look in the 21st Century Page for Learning Blacksmithing and the FAQ on Getting Started. There are plans for a simple brake drum forge, and others even simpler. AFTER, and only after, making the effort to learn some things on your own, will you be ready to absorb the information that the experts here have to offer. At this stage of your "learning", you have no more business attempting to make a sword than you would of trying to perform an appendectomy. I have a pretty fair library of books on smithing in general and most of Jim Hrisoulas' books on sword making. I would no more lend them out than I would lend my tools. Nor would I sell them for pennies on the dollar. I did give away one duplicate I had, to a young man of 12 who demonstrated a sincere desire to learn. He had already purchased two other books that I felt were not as suitable for him, so I gave him the one. He earned it by spending a day "assisting" me at my humble little forge. Think about it, learn from it, work for it. |
| vicopper - Tuesday, 09/16/03 00:25:54 EDT |
|
Guru, I'll sure read a piece on flypress capacities. Never seen a flypress before I came to Anvilfire, now I'm considering saving up for one once I get a job (grin) Aren't you proud? I seem to remember someone mentioning that higher-carbon steels rust more slowly than normal mild steels. Because of this, I'm starting to think that this motor shaft I have is made of something tougher than A36. Does anyone know of some common steel alloys for heavy-duty electric motor shafts? This one was about a foot long and 1" in diameter when I bought it, but I'm not sure exactly what type of motor was used with it as I bought it as just a shaft. (I don't think it's oil/air hard or anything too exotic because water-quench didn't crack it.) And thank you, Vicopper, for expressing what I'm fairly sure we've all felt over the past couple days... I know I felt the same way. Hoping that the hurricane approaching the East Coast will do the same thing as the one that was approaching my area a few weeks ago in Kaneohe, Hawaii. |
| T. Gold - Tuesday, 09/16/03 01:51:01 EDT |
|
Quenchcrack: good deal, looks as if you have an abundance of lemonade to sip on the rest of the summer. I just looked at your posting on metallurgy. Overviews like that sure would help before a man takes a class in the subject, wish I'd known ya then. |
| Mills - Tuesday, 09/16/03 07:55:15 EDT |
|
Mill, thanks. That is but the briefest treatment of the subject but it's a start. There is much more that should be included and maybe one day I will expand upon it. However, I want to stop short of achieving the title of Professional Pedantic, like those folks, who, when asked what time it is tell you how to build a watch! Guru, the title on my business card would probably be in very fine print. James Johnson: We all kind of unloaded on you the frustrations of answering the same questions over and over again. Trust me, there was nothing personal in what was said. You will not find a group a folks more willing to share information than right here. We do like to see some individual efforts made to learn the craft. Make no mistakes, blacksmithing is very thinking intensive and requires a lot of planning and forethought. Get used to using your brain first and the rest of you won't have to work as hard. |
| quenchcrack - Tuesday, 09/16/03 09:29:59 EDT |
|
Vic, Thank you! |
| Paw Paw - Tuesday, 09/16/03 09:49:54 EDT |
|
Marc, Installed the double leaf design, with a short slightly arched spring on top of my hammer to replace the too stiff tapered spring. Works much better. With a single leaf got bounce at contact, and with the tapered spring, so stiff as to remove energy on the downward stroke. Daylight adjustment is also very important, so make the pitman arm very easy to adjust. The picture I sent to the Guru show this spring arrangement. I also have some sketchs. We got virused by a download that one of my four young hodlums did. So I have been offline for a while, and we are still somewhat fighting the damage. Virus writers should be quenched and tempered is all I can say. Jeff |
| Jeff Reinhardt - Tuesday, 09/16/03 11:44:56 EDT |
|
Uh, if it's *me* you want, an e-mail is on the way to the "guru's address". Thomas Powers |
| - Thomas Powers - Tuesday, 09/16/03 11:50:26 EDT |
|
I've been using Estwing's gad point chisel for years now, I've been wondering how they temper one end so hard, and the other end, partly mushroomed when purchased, so nice and soft to take repeated blows with a metal hammer? Charles B. Franco - Monday, 09/15/03 18:24:58 EDT |
| Charles B. Franco - Tuesday, 09/16/03 12:59:19 EDT |
|
Chisels: Charles, Just like a file. The whole tool is hardened and tempered, then the struck end (handle or tang) is tempered to a higher degree of softeness (usualy by heating with a torch or flame). In the past almost all critical tools had localized hardening and tempering. Most mass produced modern tools are hardened and tempered uniformly. This often results in edges that are not as hard as they could be and other parts that are too hard and likely to crack, break or spall. Many small makers of high quality tools still use localized heat treating but it is just one too many steps for many large manufacturers. |
| - guru - Tuesday, 09/16/03 13:33:30 EDT |
|
Jeff, I will get your photos posted soon. If you lost originals let me know and I can return them. . |
| - guru - Tuesday, 09/16/03 13:34:22 EDT |
|
ITC-100 I'm coating my Forgemaster double burner propane forge with ITC-100 I ordered from The Store. The instructions say to fire between coats. My question is do I allow the first coat to air dry for 12-24 hours or so and then fire the forge or can I dry right away by firing it and then recoat it? Thanks, the Duck |
| the Duck - Tuesday, 09/16/03 13:57:00 EDT |
|
Curing ITC-100: the Duck, As soon as the ITC is dry to the touch you can usualy fire it with no problems. However, if you did any other patching or repairing then the other refractories need to dry throughly before firing. IF you patched with ITC-100 and Kaowool the moisture trapped in the pocket around the Kaowool may expand and make a lump. All refractories benefit from through drying and the more patient you can be the better. The ITC may take the heating fine but the refractory underneith may have absorbed moisture from it and cause problems. |
| - guru - Tuesday, 09/16/03 15:28:20 EDT |
|
Thanks Jeff. I'm looking forward to seeing those pictures. My new forge is just about done, so I need another all-consuming project. Now all we need is for Jock to pry himself from watching soap operas all day and post those pics. I disagree about the virus writers, though. Something slower, like maybe a slow feed into your new power hammer, would be more satisfying. -Marc PS - Just kidding about the soap operas. I don't think it's been said recently, but thanks for all the work putting this site together. |
| MarcG - Tuesday, 09/16/03 15:38:26 EDT |
|
SOAP OPERAS! SOAP OPERAS! . . . well, I DID used to know who Eric's man'djor was when the TV in my office worked but that has been over two years ago. . . Ocassionaly I run videos as background when I work. . . But not between 9am and 9pm (anvilfire business hours). Lately I keep missing both the 6 o'clock and 11 6 o'clock news . . have to call my parents (who have cable) and ask if we are under immienent threat of war, flood or famine. . . Thanks all who have been posting on the new Calendar of Events page. I'm thinking about adding a "monthly" section for groups that that have a set day of the month for meetings. Does that make sense? I'm also looking into some page redesign. Possibly putting the entry form in a pop-up so the display will be cleaner. Suggestions welcome. |
| - guru - Tuesday, 09/16/03 16:17:48 EDT |
|
Was given a carving knife, forged from steel. The knife is approximately 14-1/4 inches long with the blade at 9-1/4 inches. The writing on the blade says I. Wilson Shear Steel, Sheffield England. I got it from my grandparents whom are both in their 90's. Any help would be appreciated. Thanks, Karen |
| Karen Herrman - Tuesday, 09/16/03 16:35:57 EDT |
|
Received a carving knife from my grandparents, both in their 90's. The knife is 14 inches, give or take and the blade is 9 inches of that. The blade say, I. Wilson Shear Steel, Sheffield, England. Any history on the knife or the company would be appreciated. Thanks, Karen |
| - Karen Herrman - Tuesday, 09/16/03 16:37:58 EDT |
|
Received a carving knife from my grandparents, both in their 90's. The knife is 14 inches, give or take and the blade is 9 inches of that. The blade say, I. Wilson Shear Steel, Sheffield, England. Any history on the knife or the company would be appreciated. Thanks, Karen |
| - Karen Herrman - Tuesday, 09/16/03 16:38:24 EDT |
|
Received a carving knife from my grandparents, both in their 90's. The knife is 14 inches, give or take and the blade is 9 inches of that. The blade say, I. Wilson Shear Steel, Sheffield, England. Any history on the knife or the company would be appreciated. Thanks, Karen |
| - Karen Herrman - Tuesday, 09/16/03 16:38:36 EDT |
|
Received a carving knife from my grandparents, both in their 90's. The knife is 14 inches, give or take and the blade is 9 inches of that. The blade say, I. Wilson Shear Steel, Sheffield, England. Any history on the knife or the company would be appreciated. Thanks, Karen |
| - Karen Herrman - Tuesday, 09/16/03 16:38:42 EDT |
|
Suggestions: In my opinion, (no, no one asked) this site gives away too much for free. There ought to be more incentive to pay dues. There is little direct benefit from paying CSI dues. Relying on people's better natures to support something they like is an iffy thing. People's better natures are notoriously unreliable - I know mine is! A few possibilities: iForge - show all the titles but limit nonmember access to just a handful of demos. Slackpub, hammerin and perhaps Guru's Den too - allow non members to read only. Offer a free, limited duration membership to anyone who registers so that people can try out these forums at no cost. This will accommodate people who just need to ask one question e.g. (How do I make a sword so that I can do brain surgery on my brother?) You can, of course, expect some cheating with trial memberships but mostly people will play by the rules if they are fiar and affordable. I use a chess server that has this scheme and it works very well. They also give a 50% discount for students. Also, How about a "Making a Sword" FAQ that has all the standards answers to all the standard questions that you get from teenage boys who have just seen Lord of the Rings. I know you have Bruce ATli's excellent articles but they dont really fit this bill. |
| adam - Tuesday, 09/16/03 16:46:21 EDT |
|
hey thomas the nearest abana chapter to me is a 4 hour drive and we have no local black/bladesmiths within that 4 hour drive so no i cannot drive that far, wish i could and i am so sorry about asking these questions but i have a problem with reading from a book/faq and then trying to comprehend it by myself; i like to discuss and review the new info befor it quite settles in this big ol' rock fer a head i live in the center of missouri on I-70 just incase i might have missed some on near my living place.... ok just about it so basicly i dig a hole pore in my charoal pore lighter fluid on it light 'er up and get a blow-drier to blow cold air towards the hole? or do i set the blow-drier on hot? (it seems more logical to use cold to me but just checking) anywho if some one on the post board lives about half way imbetween springfield mo. and columbia mo. (right on I-70) and is willing to help out a newbie i'd be greatful would try my hardest have been searching for any blacksmithing schools around but the closest one in missouri i found was by the lake of the ozarks which is a 3 hour travel from my house thnxs fer ur extremely bearing help j. johnson Paw Paw i have read the faqs getting started and what not its just not that much help to me i need more info lol. i like to be able to listen to ones words it helps me see it in my "third eye" as so to speak i hope i am not making any of u all more mad then what you allready are at me; also i am not trying to nickle and dime ur books off of you i was/am willing to pay 3/4 to 1/2 half of the origonal price that you paid depending on book condition and again i would like to ask (waits for every one to blow up on him) is anyone who lives from around the relative area of sweet springs, missouri willing to take an apprentice at blacksmithing? if not thnxs fer the help u all have kindly but begrudingly information u've giving me thnxs again J. Johnson |
| James Johnson - Tuesday, 09/16/03 16:55:56 EDT |
|
James: I guess people got a little impatient and its not all your fault. We get a lot of kids here who know nothing about smithing but want to make a sword. It's frustrating because we dont really know what to answer other than that there is a lot to learn. Many people here have been smithing for years and never made a sword. Its a bit like showing up at a CPA class and wanting to do brain surgery. Most of these guys ask a few questions and then move on. It gets a bit tiresome. But we really ought to be more patient. It isnt their fault they dont know anything yet, or that this question has been asked hundreds of times on this forum. (It is their fault if they dont listen to the answers) A few of them will go on to learn smithing and mebbe even bladesmithing. The reason people come is often not the same as the reason they stay. Smithing is a helluvalotoffun and if you want to get started you will get a lot of patient, friendly advice at this site and mebbe even some actual help. We love to help new smiths, even new bladesmiths providing we feel their interest is serious. Finding a smiths in your area is a very good way to start. A good way to do this is find your local chapter of ABANA (the national organization for smiths) Check out www.abana.org. Go to a meeting, you will probably see smithing demonstrated live and you will connect with a bunch of mostly helpful, friendly guys. You might get lucky and be invited to spend a few hours in a shop - this is a real windfall. But dont expect free lessons from a busy smith who has to make a living. Also, most smiths are hoarders by nature and feel somewhat threatened when you ask them for their stuff. It's funny thing because they are also generous and will often give stuff away especially to people starting out, but you are walking on thin ice if you ask. I have never seen a smith part with anything from his library. Try the online used booksellers for this. |
| adam - Tuesday, 09/16/03 17:35:38 EDT |
|
James Johnson, I am a person who could not read at all till I taught myself in the third grade. I still do MUCH better when I can SEE it done. That said, Go to the library, and get a blacksmithing book. ANY blacksmithing book. TRhis will have many pictures, step by step. Take the book with you to the shop and do the first simple thing it says, picture by picture. When you can do the first thing, go on to the next thing. After you get through the first book, get a different one and do the same thing. Then get the first book, read and do the exercises again. The true way to learn is to start simple, and repeat untill that simple exercise is MASTERED. One does not have to read well. Most people can do ok if the read, look at the pictures and DO it. Watch the calender for a hammer-in within a few hours driving and GO. Most have biginners classes. Again start simple. For reference I have checked out the same 8 or 9 books from the libary here in town about 6 times each over a 5 or 6 year period. I learn something from each one each time I read it. ASlso, inter-libary loans are a great way to get books. Good Luck. |
| jeff Reinhardt - Tuesday, 09/16/03 17:40:58 EDT |
|
James Johnson I see a slight thickening of the skin already. You are on your way to being a crusty old fart :) So what have you done since your first post here? I'll put you in touch with my nephew in Miami who has to do this stuff and not use any of Dads tools or make any noise or smoke that the neighbors disapprove of. He now has a single burner propane forge and a neighbor who has always wanted to try some of this as well. In less than 6 months. well maybe a year. So.. What have you done? Give us an action and then corrective action can be taken. |
| Mills - Tuesday, 09/16/03 17:56:46 EDT |
|
what alloys of stainless steel are forgable? |
| sarah - Tuesday, 09/16/03 19:23:23 EDT |
|
which alloys of stainless steel are forgable |
| sarah - Tuesday, 09/16/03 19:24:41 EDT |
|
Sarah, Virtually all stainlesses are forgable (too many to list here). 304 is the most common unless you need a hardened part. Then you generally need a 400 series like 410 or 440. |
| - guru - Tuesday, 09/16/03 19:30:26 EDT |
|
what alloy of stainless steel is forgable |
| sarah - Tuesday, 09/16/03 19:33:07 EDT |
|
James Johnson, If you are having trouble with reading text instructions check out the following book. It is mostly wonderful drawings of smithing tools and methods. There is very little text needed because the pictures are so clear. The comments are in German, French, and English. Author: Otto SChmirler Title: Werk und Werkzeug des Kunstschmieds ISBN number: ISBN 3 8030 5040 5 Don't let the german title put you off- this is a wonderfull book and is easily understood. It won't teach you how to make sword- it could help you learn to be a smith. |
| SGensh - Tuesday, 09/16/03 19:48:10 EDT |
|
"The Complete Modern Blacksmith" is also an easy one to find with *LOTS* of illustrations on how to do stuff step by step. In "Knives 2001" I counted 42 blademakers in MO; not all of them are smiths; but I'd bet there was someone closer than 4 hours (that the distance to St Louis or KC?) Check the MO ABANA groups and ask if any members are near you. Check with a local SCA group and see if any one is forging. Folks are out there. Learn to make "S" hooks and sell them to buy the books you want, *all* forging will get you that much closer to having the skills to do a sword. Thomas |
| - Thomas Powers - Tuesday, 09/16/03 20:06:15 EDT |
|
JJ The Blacksmiths Association of MO, an ABANA Affiliate is located just south of Columbia---at least the two contact folk on the ABANA page are. Anyway why don't you e-mail the two contact folks listed and ask if any BAM members live closer to you? Or at their website, www.bamsite.org, there were contacts listed in about 7 different area codes. Their meetings shift around the state too, with over 400 members I'd bet there was one fairly close! (Or ask when the next meeting near Columbia will be.) Blacksmithing is really best learned "hands on" and you can start saving to attend the American Bladesmiths Society (ABS) school in Southern AR (Texarkana) Thomas, begrudgingly, |
| - Thomas Powers - Tuesday, 09/16/03 20:38:42 EDT |
|
Hey Guru! Need some help in finding a cast iron bar three inches round by 12 inches long. We are in SE Virginia and repairing the carriage of a mid-19th century Naval gun. Have run into all sorts of dead ends, Hope you can help us. Thanks |
| Mike Connolly - Tuesday, 09/16/03 20:48:03 EDT |
|
James J, I don't know about the Missouri chapter(s), but we have members of the New England Blacksmiths sometimes driving 7 hours to get to a meet. Obviously it's not a weekly trip, so what do they do? They form local groups. We have groups in Vermont, Rhode Island, Maine, who make there own workshops and get-togethers. So before you give up completely on the local ABANA chapters, contact one and see if they have any local groups. I drove to a meet once being held 3 hours from home. I was standing in line behind someone who lived maybe 200 *yards* from my house. You never know where they are. Good luck. And I second, third, 27th?? the recommendation to start small. I only know a few smiths who forge blades, mostly knives, and they were smithing candle holders and such for years before that. |
| MarcG - Tuesday, 09/16/03 20:52:14 EDT |
|
Used MACHINERY HANDBOOKS cost about $25 used, $75-$100 new. It is about the only metals reference that is readily available due to being used as a text book at many technical colleges for a course on "How to use Machinery's Handbook". Stupid course, but they are hoping you actualy learn to use a REFERENECE and keep the MACHIINERY'S. . a large number of folks do neither. The only replacements for MACHINERY'S cost hundreds of dollars, are very rare and are NEVER on the used book market. So it is a VERY good deal and an absolute minimum requirement in an amature bladesmiths library of necessary references. Serious amatures buy the $200 ASM references (several are required). Alex Bealer's The Art of Blacksmithing has been selling for $10-$11 dollars since it was first published in about 1969. Its a darn good book and it you haven't read it, then STUDIED it. . . well, then I am wasting my time. Those two books have more information in them than most people ever absorb. You can learn much of what you need from them and the MACHINERY'S is a necessary reference. Mow a few lawns, turn in a few cans a few odd jobs. Come back when you are ready to learn. |
| - guru - Tuesday, 09/16/03 20:53:22 EDT |
|
James Johnson, Your only about 60 miles from Kansas City or Columbia, MO. and BAM (Blacksmith Assoc. of Missouri) has a large group of members and I`d bet many right in your area. Join their Assoc., go to meetings and meet all the smiths you can in your area. Forget the sword for now and learn the basics. |
| - Robert-ironworker - Tuesday, 09/16/03 21:07:28 EDT |
|
Travel a couple or three hours to learn something? I would literally jump at the chance to drive three or four or even eight hours to meet another smith and see his shop. In October, I will be FLYING several hours for the opportunity to meet S.Gensh and see his shop and then driving to another state to see a fellow smith who makes powerhammers. If I lived where there were actual roads that went to other smiths, I'd hitchhike if need be to get there. It's all a matter of how badly you want to learn. When I was in Jr. High School, I worked everyday after school, for free, in a radio/tv repair shop because I wanted to learn about electronics. I swept up, loaded trucks, carried things and was the general gopher for months, while the owner would occasionally offer a bit or two of information. After a couple years, I was doing some service work, all the antenna installations, and set-up work, and actually being paid. You have to pay your dues in any field ifyou want to benefit from the wosdom of those who went before you. There are NO shortcuts. |
| vicopper - Tuesday, 09/16/03 21:12:22 EDT |
|
Cast Iron Bar: Mike, This material is readily available from outfits that make contiuous cast billets. No sand molds so it is nice clean material. The stuff isn't cheap, sells for stainless prices, BUT it is much cheaper than making a pattern and finding a foundry to do a one off blank. We MIGHT have some close to that size in the family shop as we used to use a lot of it. Probably bigger (4"). I think we ordered it from the manufacturer (but that was 15 years ago). McMaster Carr lists grey cast iron round bar in 12", 36" and 72" lengths from 5/8" to 12" in diameter. . . the piece you want is only $40 plus shipping on 23 pounds. Where are you? I'm 25 miles S. of Lynchburg. E-mail me. But for the price above you probably can't drive here cheaper . . . |
| - guru - Tuesday, 09/16/03 21:13:50 EDT |
|
CI Whoops. . I thought the price was steep until I priced it. However, we also used to buy square and rectangular bar stock. They SAW it from big cast rounds. . . I think it is pricier. . Great material for making machine tool parts. Get the stiffness and dampening of cast iron without the cost of patterns and foundry work. |
| - guru - Tuesday, 09/16/03 21:18:56 EDT |
|
oh ok i didn't even think of K.C. thnxs guys *slaps self* so does anyone live in/near K.C. ?? if you do and you are willing to take an apprentice let me know and i could see about working something out perhaps?? will work for free, i am wanting experience, want to become a hobbiest smith, always liked the thuaght of bending metal in a fire,.... makes me feal superrior! lol thnxs again lataz |
| James Johnson - Tuesday, 09/16/03 23:21:17 EDT |
|
Good priced books...Check http://www.EdwardRHamilton.com in Falls Village CT. Many,many "remaindered" books. Shipping is $3.50 for the order(not each book). |
| - ironspider - Tuesday, 09/16/03 23:47:29 EDT |
|
As long as we're recommending books, I bought Practical Blacksmithing and Metalworking (by Percy W. Blandford) a few days ago, and it was the exact thing I needed... has instructions on how to make many many things, along with the images and details I need. Guru, email me if you want a review of it for the Reviews page. Also, check abebooks.com for used books. Excellent prices usually. Very humid in Kaneohe, Hawaii (I got 20 free computers today, I ain't complainin'! :) |
| T Gold - Wednesday, 09/17/03 01:14:54 EDT |
|
Hey, I've been searching for patination methods for iron/steel and have not found very much. selenic acid blackens, there's the gunmetal blue paste. Has anyone had any success in trying bronze recipes on steel? Or does anyone have any recipes for steel, like japanese methods? |
| Luke - Wednesday, 09/17/03 02:27:05 EDT |
|
Luke, I have a 1940's Machinery manual that lists a lot of recipes for coloration of metals. That said, talk to a chemist and or safety guy prior to mixing up any of these old recipes. They used to not pay much attention to dangers to the operators and they used to dump the leftovers on the parking lot. Lots of these recipes are dangerous and will produce residues that are near impossible to dispose of legally except as HAZARDOUS waste @ huge expense. |
| Jeff Reinhardt - Wednesday, 09/17/03 06:18:54 EDT |
|
Is anyone out there familiar with a book called "The Artist Blacksmith" by Peter Parkinson? If so, could you provide a summary of the book. I am thinking of buying it, but I can't remember if I have seen it, or what the subject matter is (ex. techniques/interviews with blacksmiths etc). Thanks Patrick |
| Patrick Nowak - Wednesday, 09/17/03 07:17:59 EDT |
|
Luke, I have a copy of "Firearm Bluing and Browning" that has about 150 pages of patination info, mainly on brown, blue, black, blue-brown, etc We founded our local smithing group mainly as a way to carpool to the ABANA chapter 2 hours away and to do stuff when the weather was bad and we didn't want to travel so far, and now look at the MOB! Thomas Guess I wasn't the thomas the guru wanted |
| Thomas Powers - Wednesday, 09/17/03 07:22:44 EDT |
|
Luke, I bought a kit from a well known retailer of these materials, I, for the life of me am drawing a blank on the name (I will look it up and post it) You can make steel look like anything, brass, bronze both either new, old or somewhere in the middle. These are coatings you apply to the metal and the bonus is that they are low/non toxic. Most of them are water based. Real good stuff. I just had a thought that the mans name is Ron Young but I COULD BE WRONG! Hey, I was right! I did a quick google search and came up with his website it is http://www.sculptnouveau.com/ LOTS of good info there, Gotta sign off now and check out what is on his sight. Good luck! |
| Wayne Parris - Wednesday, 09/17/03 09:03:31 EDT |
|
Patrick: I have parkinson's book. The technical content is rather basic but the pictures are wonderful and the examples of master work are superb. Worth it for the pix IMO. |
| adam - Wednesday, 09/17/03 10:19:56 EDT |
|
Begrudgingly?! Are you out of your mind? J.J. The response to your post was fast, honest and freely given, although it may not have been what you wanted to hear. The folks here can not give you what you asked for (Tell me how to build a sword out of scrap rebar with a blowtorch in 5 easy lessons)because you are asking the impossible. You can NOT do it. Put it out of your head. What the kind folks here took time out of their day to tell you is how to get started on the road to where you want to go. Whether you choose to believe them or not is up to you. Please note that no one told you how to sharpen that piece of scrap to look like a sword, because they all know that if by some miracle you get it to look like a sword and you use it for anything other than decoration you will hurt someone, because it won't BE a sword. No one is withholding some "instant pudding" rebar sword making technique from you waiting for the secret handshake or password. In fact you have received some of the best advise I've seen given on any topic. Just look what happened when you showed the least little effort trying to find a smith in your area, you got a bizzillion (yup its a word) replies. Begrudgingly is not a word I would use when so many people have gone out of their way to steer me in the right direction. I'm not yelling at you nor am I upset. I just want you to realize that you need to start at the beginning... of anything. If you really want to smith as a hobby etc... then go back, read the posts from yesterday and FOLLOW them. I know its all vary exciting and you're champing at the bit, now take a deep breath, relax and realize you've been shown the fastest path... though fast may mean years. |
| Gronk - Wednesday, 09/17/03 10:46:21 EDT |
|
The Art of Blacksmithing... www.EdwardRHamilton.com go to booklist, do it yourself, general do it yourself, then The Art of Blacksmithing. $9.95 +$3.50 shipping. Order several books for the same total shipping. Things can be tucked into strange places... look around. |
| - ironspider - Wednesday, 09/17/03 11:14:02 EDT |
|
J.J. This web page has some great tutorials on blade smithing http://www.customknifedirectory.com/CKD_TutorialFrameset.htm?CKD_Tutorials.htm~tmain |
| Chris Makin - Wednesday, 09/17/03 12:01:02 EDT |
|
T Powers Yep right guy. . been trying to get ready for the little storm coming in between answering questions. . . . I DO live/work next to a rather excitable (flashy in flood terms) stream. Last decent huricane we had 20+ feet of water where there is normaly one and I still haven't gotten all the sand cleaned out of all the machinery. . . moving immovable vehicals today. . :( J.Johnson, The first time you smack that questionable piece of rebar a little too cool with a hammer and it dents both your hammer and anvil it will take that superior to steel attitude right away and perhaps give you some respect for the art. Build a forge, pound some iron, read a book or two and get some humility before you ask more questions or make smart comments here. |
| - guru - Wednesday, 09/17/03 12:24:46 EDT |
|
Luke, A possible source for the patanation chemicals you desire is BIRCHWOOD CASEY. They make several lines or metal colors that are LOW toxic and low heat. To all; I have been discussing the upcoming ABANA conference in Richmond Ky. with several of my suppliers. If you are interested in being able to buy Brand name quench oil, or the new polymer forging lubes in small size quantities put up a post. These guys sell to industry and have nice products. They are used to sellin forge lube by the 275 gallon tote. Imagine a forge lube that sticks to a hot tool, unlike graphite and water. We use this stuff in automatic forge machines that stroke on a 6 second or so cycle. the dies stay at 300 to 600F, and we have a few seconds to spray a lube on the dies to pull out the heat and stick lube to the dies. If you guys show interest, I can get maybe these vendors to set up a tent. Jeff |
| Jeff Reinhardt - Wednesday, 09/17/03 12:48:39 EDT |
|
More Flypress questions: OK, so now I'm back to wondering what can be done with a flypress that can't be done with an equivalently-rated arbor press. The ram of the FP is a relatively low mass and the velocity isn't all that high (compared with a hand-hammer for example). So the higher ram velocity of the FP wouldn't be a real factor over the AP, right? So I've got a Greenerd #3 (3-ton). I can apply 3 tons using gravity (my body hanging on the lever), vs a #3 FP that applies 3 tons using inertia. I know I'm missing something, but can't figure out what it is. Would it be worth it to make some fixturing for dies, similar to that of the FP and save myself some $$? |
| MarcG - Wednesday, 09/17/03 13:18:09 EDT |
|
Guru, Jim and all in the path of Isabel, we are praying for y'all. Hope all is better than the weather seems to show. |
| Ralph - Wednesday, 09/17/03 13:40:23 EDT |
|
Fly Press vs. Arbor Press: The slow ram velocities are similar but the flypress has the large mass of the flywheel moving considerably faster than any of the arbor press parts. To get the full capacity out of an arbor press it is designed to have a full grown man hang on the end of the handle (with both hands). To do the same with a flypress a slightly built little girl can pull the handle with one hand. This gives the flypress a greater sensitivity when you need it. The arbor press, like the manual flypress must be returned by hand. The big difference in the arbor press is that you must release the ratchet and crank the small hand wheel several times to return the ram. This takes both hands and a lot of time compared to the flypress. The imported flypresses are also smaller (less expensive) machines than domestic arbor presses of the same capacity. Strange but true. When you hit the larger flypress sizes like the #6 there is no comparison in capacity in arbor presses. SO, you CAN do the same with an arbor press. Donald Steeter showed good use cold notching and blanking with a small arbor press, others have used them for forging. But the arbor press in not nearly as convienient and you will quickly find that you need help to handle the work or the press if you are producing any kind of quantity of parts. |
| - guru - Wednesday, 09/17/03 13:46:22 EDT |
|
Ralph, So far, so good. |
| Paw Paw - Wednesday, 09/17/03 13:47:03 EDT |
|
Anybody got any thoughts/opinions/etc. on the smithing coke that Kayne is selling? I know you have to keep a blast going to keep coke burning, but I was thinking about using it to stretch my meager coal supply and reduce smoke at the same time... maybe mixing coal and coke in a 1:2 ratio, perhaps? enought coal to keep it going, but not enough to choke the neighborhood is what I'm after. |
| Alan-L - Wednesday, 09/17/03 14:00:03 EDT |
|
Building a power hammer similar to the rusty. Finally got it working after some trial &error. Not too bad I guess, using only a picture as a guide.I know I used too thin a base plate, but this I can fix. On the rusty type hammer, is the rocking arm (leaf spring ) pivoting on bearings? my spring pivots on a pipe nipple on a shaft and raises up during operation and stops the hammer stroke. Other than this the hammer works good on a 1/3 h.p. washing machine motor. Hammer is a 12 lb. sledge head welded into a length of 3" sq. tube and slides inside a length of 4" tube, well greased.Thanks for your time. Rodney Dunn Tsalagi Forge Red Boiling Springs TN. |
| Tsalagi - Wednesday, 09/17/03 14:41:30 EDT |
|
Hello, kind folks. I am a novice who wants to learn how to pound metal in my limited spare time. I have attended some California Blacksmith association demos & classes, and have worked with their coal forges. I have no experience with propane. I am interested in buying a propane forge (due to my neighborhood) which my wife will let me get for a birthday present. I hope to make hardware, brackets and a gate or two for my house. I'm looking @ the NC Forge line. A few questions, if I may... End ports or rear stock door? How many burners? Any good leads on used forges? I am in southern california. Many thanks. Michael |
| - Michael Reinhart - Wednesday, 09/17/03 15:16:34 EDT |
|
Iron in the hat: Just curious, how do you figure the odds to be no less than 1:1200 per ticket? Is that all the tickets you have? For the rest of you sluggards who havent already pitched in! Here's a chance to win a genyouwine PuddingHouse anvil - or at least to fantasize about it. Much better odds than most lotteries and you'll be helping Anvilfire. Tslagi: Send in pix to anvilfire - guru will post them - I'd love to see it. I wonder if its possible to tune the leaf spring so that there is a null point at the pivot and save it from getting zapped by the shock wave that runs along the arm? Michael. Many people make there own propane forges - taint hard and you can probably do the whole thing for about $100 or so , depending. |
| adam - Wednesday, 09/17/03 15:36:08 EDT |
|
Michael, If you have been to some CBA events and classes, then you are a member of CBA....RIGHT?? You DO know about the hammer in at Bob Netts THIS WEEKEND.....RIGHT?? I will be there as well as about 75 to 100 other smiths. You will get the chance to talk to and with the other smiths and gain MUCH useful info there. If you need instructions or more info go ahead and email me (by clicking my name on this post) and I will get back to you |
| Wayne Parris - Wednesday, 09/17/03 15:42:58 EDT |
|
Michael, I forgot to mention that there will be tailgate sales and vendors selling gas forge making supplies. You will be able to get all the info you need as well as all the parts ALL IN THE SAME PLACE! More than worth the price of admission, if you ask me! Not to mention the demonstrtators the great food and the chance to do some forging with some really great guys (and gals!) The food alone is worth the trip PLUS you need to bring some money for the auction and iron in the hat. Yep, all in all, you MUST be at this event if you are at all interested in smithing. It is in So. Cal, South of Perris Ca. |
| Wayne Parris - Wednesday, 09/17/03 16:00:10 EDT |
|
I need to weld brass hinges to mild steel. Is there any other way besides brazing? It needs to hold. Thanks. |
| - CLINKER - Wednesday, 09/17/03 16:01:21 EDT |
|
Tslagi, I also built a spring type similar to the rusty, but on steriods. Mine is a 32#. I have played around with springs and ETC. (see past posts) I used a hydraulic cylinder rear pivot and mount, with a pin that was drilled for grease fittings. The pivot has been no problems. The great Guru has pictures and is working on posting them, hurricane pending. |
| Jeff Reinhardt - Wednesday, 09/17/03 16:35:27 EDT |
|
Clinker: What's wrong with brazing? Done right, it's actually stronger than most welding in shear (not sheer, note) strength, and easier to clean up around as well. |
| Alan-L - Wednesday, 09/17/03 16:42:50 EDT |
|
Forging Speed I have been building a bunch of j hooks, and I keep wondering is I am working at a reasonable pace. The hooks in question are built from 1/4" sq stock, about 4" tall, with the front curve of the J a tapered round point. The top of the hook is a flattened tab. Heat Budget: 1st heat: point bar, start drawing out 2nd heat: draw out to length (3" or so) 3rd heat: strighten, square to octogon 4th heat: octogon to rnd 5th heat: scroll point back, bend into J 6th heat: start flattening tab top 7th heat: finish tab top, minor adjustments to square up. Then I drill a 5/32 hole in the tab, file/grind the tab symetrical, and wirewheel clean. Question 1: is 7 heats too many for something like this? It seems like alot to me. I have probably done 50-75 hooks of this type, and I am down to 7 from 10+ heats, but still... Question 2: should I be able to forge a tab top symeterical enough to not need grinding? on larger stock I can get by with just forging, but the little stuff doesn;t spread as nice for me. Thanks! -JIM |
| Jim - Wednesday, 09/17/03 16:44:56 EDT |
|
I realize many people build their own forges, but I'd rather spend my time on the anvil. Anyone car to post regarding my questions (see recent post) regarding buying a forge? Thanks. Michael |
| - Michael Reinhart - Wednesday, 09/17/03 17:19:40 EDT |
|
Michael I have an N.C. forge whisper momma with front full length front door and dual end ports.It works great for blade smithing and smaller blacksmithing projects anything you can angle in to get heat on the right part.It has two burners and gets plenty hot enough to forge weld.I've had it for over two years wekend use with no problems.I got mine from wallace metalworks around 500.00 |
| Chris Makin - Wednesday, 09/17/03 17:40:02 EDT |
|
Michael, I have the same style forge that Chris has, and I've been very satisfied with it. Check the product reviews on the 21st Century page. |
| Paw Paw - Wednesday, 09/17/03 18:11:36 EDT |
|
Ok, once again I have a blower question. I rebuilt my burner and now the numbers match Jock's simple burner desgn (how long should the mixing chamber be, I made mine 12"). I scrounged a blower/gun assembly from an old oil heater and stripped the oil gun out, coverer all openings and hooked up power. I got this hooked to the burner and it didn't feel like a lot of air coming out of the burner but I went ahead and grabbed the ol' extiguished and headed outside for a test fire. Once I get flame going I gardually increased gas presure. All this managed to do was cause some of the gas to flow back into the squirel cage and light off, a fire that died quickly once the gas was shut off. My question is, what does 200-300 cfs feel like on the back of the hand? I've heard all the suggestions. I thought about using a sholvac but that seems like A LOT more air than any oil gun I've ever seen. I'm trying to make a forge after all, not a self propeled barbque. One of these days I'll get thins thing done. |
| Aksmith - Wednesday, 09/17/03 18:34:01 EDT |
|
I didn't cover all the openings, I set one up with a blade type valve that I tried in sevral positions during this experiment. |
| Aksmith - Wednesday, 09/17/03 18:35:24 EDT |
|
Cast iron Bar: Mike Connolly, the people who make the continuous cast iron bar are Dura-Bar and Versa bar. They generally do not sell small quantities direct but maybe for a resto of a Naval gun, they would send you a sample. We buy ours from Midwest Alloys when we buy a small quantity. Let me know if you need more contact info. I have many scrap pieces of 65-45-12 ductile iron (continuous cast, and looks like cast iron, but is stronger) that could be turned down to 3" diameter and would be happy to get you one for free, but I'm in WI. I will be in Troy Ohio for Quad State next week. Jock, Dura-Bar now casts rectangles and squares directly. Very nice stuff to machine! |
| - Tony - Wednesday, 09/17/03 19:22:11 EDT |
|
hey guru i doubt it will dent my "anvil" (not a smart remark) because it is a rail-road iron wich can support like 75-ton + and i allways make sure that my steal is orange/cherry red befor hammering or at least hot enough to sizzle my spit,....... LOL anywho thnxs fer the bladesmithing links guys |
| James Johnson - Wednesday, 09/17/03 20:34:23 EDT |
|
AKSMITH 200 to 300 cfm is a lot of air. A standard vent fan for a bathroom is about 50 cfm. It also has a lot to do with velocity. 200 cfm thru a 8" duct is quit and not too forceful. 200 cfn thru a 3" duct is pretty fast and forceful. A possible good source for blowers for forges is BURDEN'S SURPLUS CENTER. They are on the web, and have a lot of blowers that have been pulled off copies etc. My abane style pipe forge uses one 3" outlet, about 85cfm blower and runs fine. Pressure is also important. The squirel cage blowers are designed to move alot of air, quitely, but at very little pressure. The best forge blowers are pressure blowers. A pressure blower has straight blades that are long, vs the wide short inclined blades of the squirrel cage. A good source of info and parts is a Graingers catalog. Lots of technical info on blowers. They are fair on price for new stuff. Good lock. |
| jeff Reinhardt - Wednesday, 09/17/03 20:40:14 EDT |
|
i just found a new way to make charcoal that is an alternative method if you do not have a stove in your shop. i started by lighting some charcoal briquettes. i stuffed a can full of wood until the wood would not fall out when i turned the can upside down and shook it. i put some water in them too so that they would have a chance to turn to charcoal. i then put the can on the briquettes open side facing down and let them cook. in about 3 or 4 hours, i took the charcoal out of the can and dumped sand on them. once they cooled, i had a healthy pile of charcoal. |
| colin - Wednesday, 09/17/03 20:53:03 EDT |
|
Hooks: Jim, way too many heats. Yes you should not have to file the tab. How are you cuting the stock? If saw or sheared it should have clean ends. Before flattening round the corners a little to prevent getting little mouse ears on the tab. I make hooks from square stock in two heats when I am fresh and in practice and three heats when tired or demontstrating. It is possible to do them in ONE. On square stock I leave the entire hook square, on round I round the stock. On large special hooks like gun hooks I round the bearing surfaces and this usualy adds one heat. Heats: 1) Point and taper (+ scroll point and bend when fast/good) 2) Scroll point and bend hook. Adjust by eye. 3) Reverse hook in hook tongs, round corners, flatten, then clamp in vise and twist. Hooks 1/2" and up take an extra heat to draw and twist To finish (steps): 1) Punch hole with Whitney punch (10x faster than drilling). 2) Hand wire brush if needed. 3) Wax or paint. I've had my apprentice making hooks for months and he is down to 3 heats until he gets tired. With two irons in the fire (Whisper baby) there is no reason to need to pause of slow down for anything. He says he's not sure but thinks he is making 12 to 15 hooks an hour. I told him he should be keeping track. I suspect he could make more if he was pushed. XX/Hooks per hour is the goal if you are mass producing hooks and then heats are not a consideration. Just the total production. Often in a gas forge where several pieces are soaking at onece you can take extra heats to keep the steps the same every time BUT extra heats is always extra time. And time is money. ------------------------------------- Just finished moving all the tool boxes and "portable" tools from the low shop to the high(er) shop. . . All my relatives are calling saying move out. . . to where and to what end? Have one more clunker vehical to move tonight. . . |
| - guru - Wednesday, 09/17/03 21:09:11 EDT |
|
Forge Blast by Feel: AKsmith, A 300 CFM blast from a 2-1/2" hole will lift your hand. A 150 CFM blast will give some push but not much. A 75 CFM blast is a gentle breeze but sufficient that you can readily feel it on dry skin. The 75 to 150 range is where you should be for a large (in small 1 man shop terms) gas OR coal forge. My plan shows a 150 CFM squirl cage fan with a speed control. It normally ran at about 2/3 speed which is about 1/2 capacity. This type burner must push fuel/air into an enclosed forge, they will not fire in free air. If you have the thing firing back into the fan then you have too little air or too much restriction somewhere. |
| - guru - Wednesday, 09/17/03 21:17:55 EDT |
|
Gas Forges: Several of our advertisers sell forges. The Kaynes sell Forgemaster, others sell NC-Tool and Mankle. I think Centaur still sells Johnson. The Blacksmiths Journal sells an interesting short forge. They all work and they all have their pros and cons. The biggest con to all gas forges is size. Little ones are efficient for little work and only little work fits. Big ones are required for big work but are VERY inefficient for small work. Solid fuel forges can be operated in a wide range of capacities and are equally efficient (more or less) throughout their range. |
| - guru - Wednesday, 09/17/03 21:24:50 EDT |
|
Tony etal, see you ALL at Quad state. Got a ride. Now just have to NOT be washed away first. . |
| - guru - Wednesday, 09/17/03 21:48:10 EDT |
|
|
|
|