| WELCOME to the anvilfire Guru's Den - V. 3.0 |
|
THIS is a forum for questions and answers about blacksmithing and general metalworking. Ask the Guru any reasonable question and he or one of his helpers will answer your question, find someone that can, OR research the question for you. This is an archive of posts from September 24 - 30, 2004 on the Guru's Den |
|
|
|
SOFA: We got in too late this evening to have photos to post. Will have some tomarrow. Already saw lots of anvils, vises, swage blocks, blowers, . . . you name it. Lee Liles of the Horseshoeing Tools Museum is here as well as many others. I got to run John Larson's hammer to draw out a piece. Had good control even though it was on a trailer that bounced up and down an inch with every blow. Needs better dies. . . He has a power module for anyone that wants to build his own hammer. Ebay Anvil: As noted by others it would seem that every word of the description is not true. This is one of those VERY cheap, bad copies of the Russian. | ||||||
| - guru - Friday, 09/24/04 00:03:42 EDT | ||||||
|
Lighting Fixtures: To be legal under most situations an electrical lighting fizture that is permanently part of a house (in the US) must be UL approved. For custom fixtures this requires a manufacturers UL number. I do not know the particulars. For non attached fixtures the rules are different. There is nothing to stop a homeowner from using non-approved items. However, insurance companies have their own ideas about things... As a "manufacturer" you do not need to be a licensed electrician. This rule assumes manufacturers have electrical and manufacturing engineers checking their work as well as UL testing. But there is nothing to say YOU the individual can't be the manufacturer. Libility issues in the US are that if someone is injured or there is property damage then you are likely to be sued and lose everthing. As a manufacturer you can get libility insurance but if you make and sell something today and drop your insurance next year and are sued then it is as if you never had insurance. Modern life. . . | ||||||
| - guru - Friday, 09/24/04 00:31:03 EDT | ||||||
|
I need help with coal definitions. As I understand it, Anthricite is hard coal, the stuff for smithing. Bituminus and lignite are soft coals not suitable for only but heating, (boilers and such) Several people have said its bituminus is for smithing, But I believe thats wrong. Maybe its just a translation thing for me? Thanks, H�kan | ||||||
| - H�kan - Friday, 09/24/04 01:16:33 EDT | ||||||
|
from what I've heard and read, bituminous is the most popular for smithing, though if you scroll up to Wednesday, 09/22/04 11:05:13 EDT, Thomas said that some people do smith with anthricite. Charcoal (lump, not briquettes) has also been used alot for smithing. I will be making some charcoal for my first home smithing attempts. Later I may buy some bituminous from another smith. | ||||||
| Elliott Olson - Friday, 09/24/04 01:52:40 EDT | ||||||
|
Hammers: I noticed that the 3# cross pein I bought last weekend has a face that is not quite square with the head (not parallel with the handle). When I place the face flat on a bench or 'anvil', the handle (or my knuckles) doesn't touch, though if it were farther off square, it would. Side to side, is IS square. Should I put the effort into squaring the face with the head (parallel to the handle, or just use it as is? The other hammers I could have picked had the handle grip twisted a few degrees off the plane of the head. | ||||||
| Elliott Olson - Friday, 09/24/04 02:05:50 EDT | ||||||
|
BTW, how do I get the first word(s) here to be bold? there is no "subject" line like the Hammer-in forum has. | ||||||
| Elliott Olson - Friday, 09/24/04 02:08:58 EDT | ||||||
|
As a frequent buyer and seller on ebay, I feel like I need to speak up in its defense. I have bought a power hammer, buffalo blower, 6" post vice, 3 ton chain hoist, 7" black & decker angle grinder, and numerous hammers and other unique old tools too numerous to mention on ebay. I have never had a bad experience exept when buying a yug I oh (sp?)card for my son, but even that came just way late. As is the case in many things in life everyones experience will vary. Don't condem all of ebay because of the actions of a few jerks. One thing I have figured out for sure is that I will not be buying an anvil any time soon on ebay. I have been looking for 2 years and any decent anvil gets bid up to a crazy price. Even worn out, sway backed, dinged up junk goes for more than it should. I have decided to bide my time and buy a new euroanvil when the time and pocket book are right. The cost will be about the same, and I figure that at least this way the dings and cracks will be mine. | ||||||
| FredlyFX - Friday, 09/24/04 02:21:24 EDT | ||||||
|
HaKan, you have it backwards. Hard coal is best for use in industry where they have a constant air flow going. Smithing coal is generally solf or bituminous coal. | ||||||
| Ralph - Friday, 09/24/04 02:38:23 EDT | ||||||
|
Mr whitburn a mastersith of established reputein london and scientific metalluurgist,together with mr collinge,an aminent manafacturer from london stated"The llangennech coal possesses a property the other coals in country dont have,being entirely destitute of sulphur and dirt.Its known to be the most profitable coal that can be used for engines,copperworks,ironworks,tinworks,leadworks,potteries,brick makers,lime buisness,glassworkers,saltworks,distillers,brewers and various other purposes too numerous to mention.the llangennech colliers may be said to contain a mine of coal wholly uninterrupted by other working proprietor which in quality and value,is not equalled in this kingdom" I copied this out of a book written on the history of my village.so it looks like i hav a supply of very good free coal. whats the diffrence between the diffrent patterns of damascus steel and what is damascus,I mean whats the diffrence in the properties. | ||||||
| Andrew - Friday, 09/24/04 04:49:56 EDT | ||||||
|
oh yeah forgot,i have recently come into possession of some smelting pots and moulds,used to make nose cones for attillery rounds during ww2.the smaller ones are made of clay but the larger ones are made from some kind of cast ive never seen before.when its brocken it looks alot like chipboard(but metal)and its the colour of gunpowder. what would be a good depth to layer the fireclay? | ||||||
| Andrew - Friday, 09/24/04 06:10:40 EDT | ||||||
|
andrew if your interested in seeing a set of bellows and checking iron working temps i'm the demonsating blacksmith at the museum of welsh life at st.fagans not far form you pop in some time. castpots? pos graphite | ||||||
| - boyo - Friday, 09/24/04 06:49:13 EDT | ||||||
|
Elliot: It would be good if your hammer face were square with the handle, as that will affect the height of your anvil. I would get rid of the fiberglass handle that no doubt has a rubber grip and install a nice hickory handle. Not only is wood more resilient(sp?), you can get the haed square in all directions before you wedge it. Those fiberglass handles held on with epoxy in combination with dubious heat-treating are why many folks shy away from those $3 hammers from China, Mexico, or wherever. $14 will get you a fine wood-handled crosspein at any Ace hardware, or $22 will get you the same one at Sears. These come with the face already dressed, for the most part. The pein will need some work, and you will have to strip or sand off the varnish from the handle to avoid blisters, but you will be much happier with one of these. I knew a guy who had one of those Chinese hammers that was so poorly heat-treated the face mushroomed after a week of use on hot steel only. As for the first words in bold, only the Guru is allowed to do that on this page. | ||||||
| Alan-L - Friday, 09/24/04 08:14:09 EDT | ||||||
|
Coal Types: H�kan, Besides the accurate replies above note that coal comes in INFINITE variety of hardness, purity and usefullness. The high BTU Bituminious coals with good coking properties and low ash ARE best for blacksmithing. However, depending on your local supply the bituminous may be low BTW, high ash stuff and not suitable for anything. Hard Anthracite coals tend to be more uniform in quality as they are very dense low volatile coals. But they are dificult to keep burning and due to the amount of air required to keep it burning it tends to burn too hot or not at all. Off to take lots of photos at SOFA! | ||||||
| - guru - Friday, 09/24/04 10:14:33 EDT | ||||||
|
Andrew first lets dump the term "damascus"--it's used for 2 very different types of steel: pattern welded and wootz. To make things worse "damascus" is the term used commercially to refer to pattern welded steels but it is used preferably in the academic world to refer to wootz steels. Pattern welded steels are produced by taking various alloys and stacking them and forge welding them together. This billet is then often drawn out and folded and re-welded. It has been called "folded steel" and even very poorly "mechanical demascus"---(which it isn't!). It's properties rely solely on what alloys are used and how well the welds are done. You can make pattern welded billets from nickel and wrought iron that look beautiful and won't harden even in super quench. You can make billets out of tool steels that may show little patterning but harden out the bejeezus. One thing to realize is that carbon migrates fairly fast at welding temps and so with thin layers and multiple welding passes the carbon content will usually equalize over the billet. Outher alloying elements don't diffuse as fast and so will show a layer effect even when the carbon content is the same. A side effect of this is that if you are using a high C and low C steels you may end up with a medium C billet. The different patterns refer to how the layers material is worked, No difference in properties as much as a difference in looks. See James Hrisoulas's books for an explination on making the most common patterns. BTW after grinding you need to etch the blade to see the patterns. Wootz AKA "crucible damascus" is produced by melting specific alloys/elements together in a crucible and letting it cool slowly. The result is then heat treated to allow forging it into something. Repeated thermal cycling is used to promote the growth of carbides that give wootz its "patterns"---which can also be manipulated a bit the same way that pattern welded patterns are as well. The two have no real relation to each other. It used to be claimed that europeans came up with patternwelding after they were exposed to wootz blades in the crusades---the big problem being that the peak of pattern welding in europe happened centuries before the crusades. Pattern welding is know the world around and seems to be a common offshoot of how wrought iron is refined from blooms. Wootz was much rarer and was primarily done in Central Asia and exported to places like Damascus in the Middle East. It turns out that trace elements are essential to get the "patterns" to form and it has been speculated that when the appropriate ore bodies were exhausted or "lost" the output of Wootz declined. Remember that most of what you hear about *both* types is "hype". Thomas | ||||||
| Thomas P - Friday, 09/24/04 12:02:04 EDT | ||||||
|
Both wootz and pattern welding were ways to get better steel when the steel creation process was very primitive. Back in the day, the hype was real because other steel wasn't as good, but with modern methods regular steel is of excellent quality and it isn't needed to do those things to further improve it except asthetically. Pattern welding was useful where they didn't have alot of steel to work with, so by making a blade from a combination of steel and iron you can make something the size it needs to be without using as much precious steel. The vikings made the center of swords out of bars twisted together to make nice designs and put good steel all around the edge. Repeated folding can remove inclusions and even out the carbon content. The japanese bladesmiths fold their steel for that reason, the steel they smelted from sand was very uneven in makeup. They'd take chunks of their "bloom" of smelted steel, determine carbon content of that section, then combine it with other sections of varying carbon until they get an average carbon level they want, and they'd repeatedly fold it until the steel evened out and became a basically homogenous steel with a pattern. Wootz on the other hand is one of the earliest crucible steels, and crucible steel was a good improvement on regular steel of the day because it is much more homogenous, so one end of the sword you're forging will act the same as the other end because the steel is the same all the way through. The carbide patterns were just a pretty side effect back then, though they took advantage of them to manipulate the patterns to make it even prettier. Nowadays the prettyness is the only reason to bother making it, which is a rather difficult process that only a few smiths attempt. There IS one effect that some people feel makes damascus (pattern welded variety) superior, but it's one of those opinion things. With a tight twisted pattern, the steels all cross the edge in thin lines. Since the steels are different, when you etch one will etch slightly faster then the other, and what this does is make a built in serrated edge. Serrations are better for cutting some things but worse for others, so it's not really superior overall, but it can be better for certain tasks. | ||||||
| AwP - Friday, 09/24/04 13:52:46 EDT | ||||||
|
Actually there does seem to be some differentiation taking place as the melt cools and due to the heat treatment to allow working so there is a preferred orientation to getting a blade out of a wootz cake. The carbide patterns are part of wootz's cutting ability---why a "soft" blade still cuts well. Nowdays beauty is a major factor in selecting for these steels---that and lots of hype. Way back when there were some reasons---if someone went to all the trouble to do pattern welding they were most likely doing high end work and so the pattern was a possible guide to quality. My most recent blade is 641 layers with the 1 being a 1.2% C monosteel folded into the center the last weld to make the edge from. Thomas | ||||||
| Thomas P - Friday, 09/24/04 14:02:54 EDT | ||||||
|
good evening guru i have been asked by a local safe company to forge 4 specialy shaped pinch bars for moving safe doors in to place could you recomend a sutible grade of steel i was thinking about using en19t i am in scotland i dont know the american codes thank you | ||||||
| david hannah - Friday, 09/24/04 14:05:49 EDT | ||||||
|
David, Pinch bars should be tough so your equivalent to 4140 or 4150 would probably be a good choice. Heat treat for maximum hardness if you like but I would probably forego the heat treat so they'll bend and not break. Forge and reheat to normalizing temp then allow to air cool. | ||||||
| - HWooldridge - Friday, 09/24/04 14:33:24 EDT | ||||||
|
FredlyFX, good decision on the Euroanvils. Of course, not all of eBay is corrupt and deceptive. It reminds me that not everything that lives in the swamp has big teeth. However, learning which ones do can cost an arm and a leg. | ||||||
| Quenchcrack - Friday, 09/24/04 19:56:08 EDT | ||||||
|
I called around (local calls only) today and only found one place so far that can get me fire brick for my forge (to make the cast sink shallower). They can get a liner kit for wood or pellet stoves for about $13. Otherwise they'd have to order a whole pallet of bricks. I'll do more checking though before I buy anything. When I do find something, should I line the bottom (under the bricks) with sand first to level it (curves at edges and remaining enamel glass)? | ||||||
| Elliott Olson - Saturday, 09/25/04 00:59:57 EDT | ||||||
|
Elliot, See if there might be an EJ Bartells near you. Most likely not. ( I am lucky as there is one in the city near me) But they have various refractoies. Perhaps you might want to look into a ramable refractory. a 55 lb box cost me about 40 dollors. Also look for furnace repair shops and outfits near you. As well as ceramic supply shops. ( the kind that sell kilns etc) all will have these sorts of supplies. Also instead of a sink, see about getting an old car brake drum as the basis for your starter forge. Not saying a sink won't work, but it might be a lot more work to get working. | ||||||
| Ralph - Saturday, 09/25/04 01:58:49 EDT | ||||||
|
Hi, Hows it going. You know those clear saftey glasses that say they are good for UV protection? Are they good for forge work? Anyone use them? If not what do you use for uv or ir protection? The dark green cutting glasses really suck for forge work. Thanks, | ||||||
| - Hayes - Saturday, 09/25/04 02:07:35 EDT | ||||||
|
Ralph, I'm in an extremely rural area, so probably not much of that within 100 miles. Rather than a car brake drum, I would get a truck or bus brake drum. Or my uncle has an old implement rim where the stud/bolt holes were starting to tear out. | ||||||
| Elliott Olson - Saturday, 09/25/04 02:10:57 EDT | ||||||
|
Hayes, I don't know about the clear glasses except they do protect the eyes-That YOU can't do without! I know it don't grow back. Maybe for the I-R you can shade up-#4 etc. Or learn to deal with it! It CAN happen and work,But take care of the peepers! | ||||||
| - JES - Saturday, 09/25/04 06:55:37 EDT | ||||||
|
Hayes, If wearing safety lenses only, not prescription type lenses, there are some very nice flip-up shaded safety glasses. Polycarbonet lenses do provide UV protection in some wavelenghts. A possibility is to use a shade 4 lense, mounted on an adjustable mount near the forge. look thru it when looking at the hot zone. | ||||||
| ptree - Saturday, 09/25/04 08:28:47 EDT | ||||||
|
Hayes, what many smiths do for IR protection when working with coal is simply not stare into the heart of the fire. Sneak glances now and then, but don't just stare. When forging something at high heat, squint. All of this assumes you ARE wearing clear safety glasses and are not doing industrial forging, which will require some extra protection. Gas forges are another thing entirely, and I don't know about them. Elliot: Size isn't everything. Stick with a large car or pickup brake drum, or you'll just be wasting coal. Bonus with the smaller drums (11-12" diameter): you will not have to line it with anything. David Hannah: The Guru is off enjoying himself at a smithing meet, but if the grade of steel you mention is commonly used for prybars or something like that, it ought to work for your intended application. | ||||||
| Alan-L - Saturday, 09/25/04 08:48:18 EDT | ||||||
|
Anvils: Troy, OH. For everyone that says they "can't find an anvil". 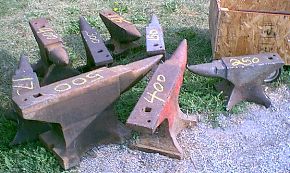 Here are maybe 2% of the anvils at SOFA Quadstate, Troy OH this weekend. Many of these folks travel all over the country to blacksmithing events. There are OLD antique anvils, good used anvils, the largest and smallest Hay-Budden and NEW anvils. . . so just how many do you want? More in the NEWS posting now. . . LIVE FROM SOFA! | ||||||
| - guru - Saturday, 09/25/04 09:56:07 EDT | ||||||
|
Prybar Steel: These are like ALL manufactuered items, they are made out of whatever the manufacturer wants. I know a small manufacturer that makes them all from SAE 5160 which is also commonly used to make springs. However, properly heat treated SAE 1040 through SAE 1065 would work. See our FAQ about Junk Yard Steels. | ||||||
| - guru - Saturday, 09/25/04 10:03:05 EDT | ||||||
|
Elliot if it is a 1/2 ton pick up truck it will be ok. But anything larger will be getting too big to use. Remember, the drum is not going to be the entire forge. It is going to be the fire pot. You will also want to scrounge some sort of metal for a table to set the drum into. I would say if you could find a piece of 1/4 inch thick sheet metal that you could put the drun in you would be in business. And I have yet to find a rural area that did not have a lot of stuff like that about. Just have to keep your eyes open. | ||||||
| Ralph - Saturday, 09/25/04 10:35:03 EDT | ||||||
|
Elliot I second Alan and Ralph's comments. A pickup truck brake drum will use a gallon of coal and be able to heat 1" diameter material. After working 1" diameter material a time or two, you start to think along the lines of "striker" and "power hammer" - not a bigger forge. | ||||||
| - Conner - Saturday, 09/25/04 16:30:37 EDT | ||||||
|
Thanks for the words about coal, Makes sense about bituminus working better to remain burning. I currently use an excellent hard coal packaged name "Cumberland", Its beautiful to work with and very clean fires. Expensive at 20dollars per 50lb bag. Since I make knives and trinkets in a handcrank panforge, I try to keep the expensive fire small, It will extinguish if I dont blow it every couple miniutes, As we know, its a bugger to re-light a hot coalforge. | ||||||
| - H�kan - Saturday, 09/25/04 19:07:31 EDT | ||||||
|
Cumberland Elkhorn is out of Kentucky and a fine bituminous smithing coal. A bit pricey however... Eighteen years ago, I went to Stigler, Oklahoma just because it was the closest place to me for coal. A friend and I drove up to a mile long mountain of coal with a trailer while the mine workers laughed at us. I had previously made a jig to hold sacks open while shoveling and we bagged about 4 tons in three hours, then we went back to the motel for a shower and drove home. A long two days but we got it back here for about $6 a hundred. I still have about 1200 pounds left and am using a lot of propane now so it may last awhile. I also bought some from a fellow who made a run to Alabama and it was great stuff but had a lot of volatiles and made a large yellow flame. | ||||||
| - HWooldridge - Saturday, 09/25/04 22:54:52 EDT | ||||||
|
Some time ago I had a page diagram that showed how to derust metal (tools) using a battery charger, fish tank, water w/some soda in it and an iron bar. It's some form of electrolasys, but I can't put my finger on it again. Anyone??? | ||||||
| jerry crawford - Sunday, 09/26/04 00:27:58 EDT | ||||||
|
I found a chart of railroad iron metal types (spikes, plates, etc.). Does anyone have any idea what type of steel is used for the hitch pins on railroad cars? I found a piece of this (about 1-1/4 round, high pitch strong ring) on the railbed and a worker identified it for me. Would this be suitable or too hard for making another hammer. | ||||||
| Elliott Olson - Sunday, 09/26/04 01:16:47 EDT | ||||||
|
Jerry, it's reverse electrolysis. Use a plastick or rubber container, you don't want to accidentally break your aquarium. If you use washing soda, it'll work better than regular baking soda. Using scrap sheet metal will increase the current and effectiveness because of increased surface area. Every so often you'll want to wipe or rinse off these sacrificial anodes | ||||||
| Elliott Olson - Sunday, 09/26/04 01:30:21 EDT | ||||||
|
reverse electrolysis, on the sacraficial anodes stainless steel works nicely. It will tend to last longer..... ,I get mine from garage sales. Things such as small SS pans etc or those small resturant serving dishes. | ||||||
| Ralph - Sunday, 09/26/04 01:33:55 EDT | ||||||
|
Hi, Actully I m having a bacalite moulder and the size of the die is 7.14" x 10" actual pieace start from 44mm from the edge, right now we are using external filament heater placed around the die but now i want to convert in coil heater with 1/4" copper or ms tube with heater wire inside, but i could not getting the required data that how much wattage or btu heat required for the heater. heat wire capacities can i get some assistance on that. Thanks in advance | ||||||
| Harminder - Sunday, 09/26/04 07:06:16 EDT | ||||||
|
Elliot, that sounds like good stock for hammers, but railroad steel is always tought stuff to work and a hammer is not the easiest of early projects. That having been said, go for it! My first project involved making a set of fire tools out of some ca. 1840 wrought iron muck bar found in an old log cabin that had been torn down as it fell down. Muck bar is a barely consolidated barely refined iron, full of slag, voids, and all kinds of true crap. I had to refine it as I worked it, which involves keeping the piece at a full welding heat while fluxing and rewelding the whole thing. As the guys who taught me said, "Well, it won't be easy, but if you can forge that you can forge anything." | ||||||
| Alan-L - Sunday, 09/26/04 08:39:58 EDT | ||||||
|
SOFA: I posted a few more pages to the NEWS this AM. Hope to post more tonight from somewher on the road . . . | ||||||
| - guru - Sunday, 09/26/04 10:28:29 EDT | ||||||
|
Harminder, what is going to insulate the heating wire from the copper tubing (what is "ms tube")? If it makes contact, the copper will conduct current much better than the heating wire and become an undesired momentary heater itself (before something burns off). | ||||||
| Elliott Olson - Sunday, 09/26/04 12:59:14 EDT | ||||||
|
Jock, Quad State photos should be in your E-mail now. | ||||||
| Brian C - Sunday, 09/26/04 16:25:08 EDT | ||||||
|
I found a haybudden 125 lb anvil for $275.00, they say its in good shape but i`ll wait for them to send the pictures to me first. Its at http://www.keenjunk.com/ | ||||||
| - NewSmith - Sunday, 09/26/04 22:01:35 EDT | ||||||
|
Question about tempering steel for blades: To temper steel after quenching, should the steel be raised to tempering temperature and then: 1: Allowed to cool in still air? Or 2: Quenched again in oil/water? Some people seem to claim that steel should be cooled naturally in still air to temper, while I've read other accounts that steel should be quenched after reaching tempering temperature. Which of these is right? Thanks | ||||||
| - Kazrian - Sunday, 09/26/04 22:15:02 EDT | ||||||
|
I am fixing to build a forge, and need to find some coal. I have no clue where to buy it around here. I live in Coffeyville, KS. The week of Oct 6th I will be making a trip down to Oklahoma City, OK, and would like to know if anybody knows of a place to pick up a couple 50# bags on the way? I looked on the Blacksmith's Gazzette list of places to buy coal and didn't see a single one in OK or KS. Also, I am just trying to get started in this, and what is "coke" as opposed to coal? What's the difference in the different grades of coal and what's best for blacksmithing? Thanks in advance for any advice. | ||||||
| Dustin Cantrell - Sunday, 09/26/04 22:24:50 EDT | ||||||
|
Jock-- Many thanks for the lovely job on covering Quad State! Nifty snaps! | ||||||
| Miles Undercut - Sunday, 09/26/04 22:33:36 EDT | ||||||
|
Kazrian, for me it depends on how the steel was reheated. If I reheat in the forge or with a torch, I quench the blade in water once the proper temperature is reached, so that I don't accidentally get it any hotter. If the blade is baked in an oven to the proper temperature, I just let it cool. Then, if I am softening the back but leaving the edge hard, I put the edge in a pan of water and heat the back with a torch. I usually let it sit for a minute, then quench afterwards. Note that this is my procedure for straight carbon steels (10xx series) and 5160. Other alloys may not like this treatment. | ||||||
| Alan-L - Monday, 09/27/04 09:47:02 EDT | ||||||
|
After a lot of grinding on my HB anvil, the face around the hardy hole and heel is now pretty flat. What an improvement! It used to look like a relief map of Montana. Now hardy tools sit straight and I have a nice flat area for reference. The plate in this area is still over 5/8" thick. I reckon to go down another 1/16" which will give me some nice square corners. I do a bit of grinding every day - by the time I am eligible for social security I will have this anvil in perfect condition. The plate over the sweet spot is about 3/8" thick and substantially dished but I am quite happy with that shape. It works very well for general forging. I have been using a 24 grit Zirconia cup stone ("bad ole leg eater" as 3dogs calls it - at anvil height it is pretty much set to rip off the family jewels!) This seems to cut faster than the 16 grit Al oxide stone or anything else I have tried. Also, it's pretty easy to get a level surface with the cup stone as compared to the recessed center wheels which flex and produce ripples. Thanks for the advice on this topic The hardy hole is an odd, 1"+, size with a sleeve to bring it down to 1". The problem with a loose sleeve is that I have to have a loose fit on the hardy shank too otherwise the sleeve just jams onto the hardy tool and then has to be hammered off when the tool is lifted out. Also, the tool wont seat securely because the sleeve itself is loose in the hardy hole. Plan B is to tack weld the sleeve into place at the bottom of the hole and file smooth. I am reluctant to use a welder on a sound anvil. Plan A is to epoxy the sleeve in place. I am looking for suggestions and for advice on a suitable epoxy. | ||||||
| adam - Monday, 09/27/04 11:26:05 EDT | ||||||
|
Adam, I am returned from Pennsylvania and D.C., and was able to march with thousands of Indians for the opening of the National Museum of the American Indian. Tom Joyce used to (still does?) use an angle iron, either store bought or homemade, in the hardie hole, with the top edge drawn thin and bent over the anvil face. The hole remains squarish, and you can easily insert and remove. | ||||||
| Frank Turley - Monday, 09/27/04 12:21:07 EDT | ||||||
|
Dustin - coke versus coal, coke bears the same relationship to coal that charcoal does to wood. Commercially produced coke has been heated to high temperatures, and volatile elements have been driven off, mostly complicated hydrocarbon compounds including tars, and sulfur. (Note in modern production, the byproducts are collected and used to manufacture many synthetic products, including dyes.) The remaining material is relatively pure carbon. My experience using coke is that the fire is more likely to go out and is harder to restart than with coal, but there is less smoke on startup. Hope that helps a bit. | ||||||
| - Gavainh - Monday, 09/27/04 12:23:57 EDT | ||||||
|
Guru, Where can I find info on a Sight Feed Generator company acetylene generator. I have one that I want to restore. Is Calcium Carbide available? What is the resulting by-product and how "environmental unfriendly" is it? This Generator is complete and needs only some cleanup. Doug | ||||||
| Doug - Monday, 09/27/04 12:24:34 EDT | ||||||
|
Heat treating steels. It really depends on what type of steel it is. What is the cross sectional dimensions. Etc.Heat treatment is not something I know a lot about form a book learning point of view. BUt it IS a very well researched SCIENCE. I like many other hobby smiths have read a bit about it and have experimented with it to find things that work. But with that said, I do know that it really does depend on what alloy you are using, what tool or item you are making. How thick or thin it is. and so on. I would suggest that you look into several books. ONe being any of Dr. Jim Hrisoulas books. ALso Machinery's Handbook has lots on heat treatment plus tons of other very usefull info. The New Edge of the Anvil is also good. These are just a few to get you started. Personally I quench almost everything in either peanut or some type of vegetable oil. If it does not get hard enough then I will go to water. I also almost never use exotic steels. I stick to plain ole basic 10 series carbon steels. | ||||||
| Ralph - Monday, 09/27/04 13:09:35 EDT | ||||||
|
Adam, Why not make the sleeve protrude a bit on the bottom and weld a "keeper" on it---no welding on the anvil just on the sleeve; or have it portrude and slit the corners and hammer the sides over flat onto the anvil bottom---or be cute and "coil" them hot to make it ornamental...you could remove two opposing sides up a ways from the bottom and then with the other two use the coil or a slight bend at the end and have a "spring loaded" sleeve that you could remove by pinching the projecting ends on the bottom but would hold pretty good otherwise. I'd definitely shim the sleeve to fit tight in the hardy hole though. Thomas | ||||||
| Thomas P - Monday, 09/27/04 13:37:18 EDT | ||||||
|
Doug calcium Carbide is available, cavers and hunters use it in carbide lights. BUT, have you talked with your insurance agent? Using the old generator might nullify your entire policy---they had a reputation for exploding back in the good old days when folks were used to running them...as fuel gasses go Acetylene is one that can even explode *without* the presence of an oxidizer! Thomas | ||||||
| Thomas P - Monday, 09/27/04 13:41:32 EDT | ||||||
|
Ralph, I was going to give that answer too, but then I realized he was asking about cooling after tempering AFTER hardening. I too have not seen much definitive information on that specific question. Yet another reason to stick with simple steels, they're much more forgiving of heat treat error. | ||||||
| Alan-L - Monday, 09/27/04 15:10:00 EDT | ||||||
|
Ebay item# 6121446668 A hollow anvil? Anyone have any idea what this was for? | ||||||
| MikeA - Monday, 09/27/04 15:10:39 EDT | ||||||
|
DOUG; The resultant by-product of an acetylene generator is the least of your worries. It is known as "slaked lime" commonly used as whitewash. I think there's a reason they're made to look like moonshine stills and ballistic missiles; (two other things that blow up frequently.) | ||||||
| - 3dogs - Monday, 09/27/04 15:55:10 EDT | ||||||
|
MIKE; Hollow anvils are designed for forging that most weightless of all the metals, UNOBTANIUM. This stuff is so rare that nobody has any, but if they DO get some, they don't want to hammer it very hard. (There WAS actually an anvil made of fiberglass at Quad State, but no unobtanium smith came forward to claim it nor the glass Avon hammer meant to be used with it. It doesn't even have a number on the periodic table, it's so rare. It also could have belonged to that guy who lifted ASO's by his pierced nipples, and probably retired after he started to look like something out of a 1938 National Geographic Magazine. Or, it could be a store display piece. | ||||||
| - 3dogs - Monday, 09/27/04 16:11:17 EDT | ||||||
|
Frank: thanks - half a sleeve might be better than a whole one in this case. : ) Thomas: Brilliant! - must try it. Cut two sides short and two sides long - use the long sides to make a retaining clip. The top can be peened out into the flare at the mouth of the hardy hole so that it cant drop through BTW on tools such as cones and bicks where the sideways play can be a real nuisance, I drill a hole in the tool stem where it clears the hardy hole underneath and drive in a drift pin. It's quick and works very well. | ||||||
| adam - Monday, 09/27/04 16:14:52 EDT | ||||||
|
Alan-L: re quench after tempering. Unless I temper using the oven I always quench in oil. Do I need to? Do not know. But I know that it works for me. WIll it work with out it? Possibly. And maybe one day I will try it but why mess with sucsess? It takes absolutely no extra time and so I waste nothing. | ||||||
| Ralph - Monday, 09/27/04 16:33:39 EDT | ||||||
|
FRANK; Yah eh teh! You gonna hang around home for a while? I'm gonna send a UPS your way soon. | ||||||
| - 3dogs - Monday, 09/27/04 16:35:40 EDT | ||||||
|
ADAM; Do you still need a 1 1/2" ball bearing? I can throw it in Frank's box. (Ever the tightwad.) 3dogs | ||||||
| - 3dogs - Monday, 09/27/04 16:41:51 EDT | ||||||
|
MikeA, looks like the back end of a vise the type with an anvil only good for straightening nails---made from cast iron. Thomas | ||||||
| Thomas P - Monday, 09/27/04 16:57:13 EDT | ||||||
|
Adam- I just sold a Peter Wright anvil with a simalar problem to the one you have. Mine had a hardy hole that had been nicked by a cutting torch so I welded in a sleeve. Two problems-1)the sleeve was not square with the face and 2) I did not preheat appropriatly and ended up with some minor cracking on the face of the anvil. My solution was to forge everything to fit the anvil. I had about 14 different tools that I sold with it and most of the were an exact fit. This was very nice because they did not bounce, twist, or move in use. My current anvil is a 350 lb HB with a 1 3/8" hardy and I forge all the tooling for this anvil also. Besides gauranteeing a solid fit, it saves me money and gives me practice making tools. I am too cheap to spend $30 every time I need a hardy, and I have rarely seen any that would fit my current anvil anyway. Patrick | ||||||
| Patrick Nowak - Monday, 09/27/04 17:17:18 EDT | ||||||
|
3Dogs that would be super ! thanks! Patrick. Yeah thats my anvil too - a 350# HB with a 1 3/8" hardy. I do make almost all my tools but that shank size is hard to find in stock bar or sq tubing. Also, I have a 120# HB that has a 1" hardy hole, a size which has become pretty much standard, so I like all my tools to have 1" stems. | ||||||
| adam - Monday, 09/27/04 18:45:21 EDT | ||||||
|
Quenching after tempering: The theory says that if you quench after tempering, you will achieve a slightly tougher steel. This is because temper quenching stops the growth of carbides that precipitate during tempering. However, low temperature tempering, typical of cutlery steels, may not see much "over-tempering" growth like you would see if tempering at, say, 1150F. I also quench when tempering at the forge, air cool when oven tempering. | ||||||
| quenchcrack - Monday, 09/27/04 19:26:30 EDT | ||||||
|
Hello, I am trying to make some metal boxes, out of copper, with a metal bending brake. It looks good, except the weld on the corners makes it look amateur. Have you ever used a "box and pan" brake, and if so, do they work well? Thanks, Ryan | ||||||
| metal bending - Monday, 09/27/04 19:39:24 EDT | ||||||
|
Just back from Quad State. Thomas, you missed a GREAT time. Dinner with Tom C. and his lovely lady on Friday night, and some REALLY great BBQ with North Carolina BBQ Slaw on Saturday night. Stayed up WAY too late with the MOB on Saturday night, I laughed so hard listening to some of your escapades that my sides still hurt Sunday morning! Wish you could have been there! (cruel grin) Frank Turley, Choosing between going to DC and going to Quad State was a decision I chewed for almost two weeks. I'm not sorry I went to Quad State, but I wish I could be in two places at one time, sometimes. | ||||||
| - Paw Paw - Monday, 09/27/04 19:42:05 EDT | ||||||
|
Well, I made it home from QuadStates. It was the most fun I've had in a long time, in spite of the somewhat gruelling trip each way. I'm too darn tired to report much right now except to say, if you have the chance to go and pass it up, you should be ashamed of yourself. I'll report more in a day or two, after I catch up on undome work and sleep. Staying up until way past midnight every night and getitng up with the sun does deplete one's reserves a bit, I noticed. | ||||||
| vicopper - Monday, 09/27/04 20:51:59 EDT | ||||||
|
hi there. i live in new zealand and make small home style funky candle holders and fruit bowls. is there any way of building my own power hammer from scratch. ive been playing with forged metal 4 about 7 years and have gottin very good at drawing out steel of all thickness, but my arm is getting very sore. can u help. | ||||||
| tarin - Monday, 09/27/04 22:04:06 EDT | ||||||
|
Gavain--Thanks for your info, I will keep it in mind on my search for some coal. | ||||||
| Dustin Cantrell - Monday, 09/27/04 22:20:17 EDT | ||||||
|
Quench & Tempering. Us old fossils "chase color" on end-to-end tools, ones that have a business end, and where the other end has a striking head or is hafted. The bands of the heat rainbow run toward the business end. When the correct color is reached, you quench in order to "hold your temper". The advantage of chasing color is that no matter what the final temper at the end, there is a built in "cushion", a kind or shock absorber behind it. Don't chase color backwards as in Aldren Watson's book, The Village Blacksmith [which is otherwise, a nice book]. | ||||||
| Frank Turley - Monday, 09/27/04 22:36:23 EDT | ||||||
|
3 Dogs You Ol' Hosteen, Nice try. Yah tah hey. What the hey? Hit the hay. I'll be in White Eagle, Oklahoma, dancing, on Oct. 2, and am driving. So allow two days either side of that where I won't be home. I start a class in Santa Fe, on Oct. 18. | ||||||
| Frank Turley - Monday, 09/27/04 22:41:55 EDT | ||||||
|
I'm hoping somebody can suggest 2 or 3 books for me to purchase on blacksmithing. Keep in mind I've never done this and am just wanting to get started learning. I see a ton on ebay but I don't know what's worth buying to read. Can somebody point me in the right direction? | ||||||
| Dustin Cantrell - Monday, 09/27/04 23:10:14 EDT | ||||||
|
Dustin-- Get the COSIRA book on smithing (available free on line at http://www.countryside.gov.uk/NewEnterprise/Economies/craftpublications.asp), get Schwarzkopf on forging. | ||||||
| Miles Undercut - Tuesday, 09/28/04 00:25:35 EDT | ||||||
|
tarin, I don't remember where at the moment, but the other day I noticed a power hammer built using a rear-wheel-drive axel. An electric motor driving the input of the differential and the (emergency?) brake on the far side (away from the hammer end of the axel) engaging to make the hammer strike. | ||||||
| Elliott Olson - Tuesday, 09/28/04 01:38:48 EDT | ||||||
|
I didn't find it yet, but another design idea can be found at http://www.keenjunk.com/bdc/jyha.htm and in this page he mentions the axel type of hammer. | ||||||
| Elliott Olson - Tuesday, 09/28/04 02:12:38 EDT | ||||||
|
Adam: Just use your welder to build up the outside of your hardy insert, then grind it to fit the hardy hole snugly. Doug: I used to use an acet generator, Had a couple of them...had to fake the gasgets and cleanup/freeup the parts to get them to work. One was built on a 3 wheeled cart that looked almost roadworthy. They were pretty famous for | ||||||
| - Pete F - Tuesday, 09/28/04 02:14:39 EDT | ||||||
|
Adam: Just use your welder to build up the outside of your hardy insert, then grind it to fit the hardy hole snugly. Doug: I used to use an acet generator, Had a couple of them...had to fake the gasgets and cleanup/freeup the parts to get them to work. One was built on a 3 wheeled cart that looked almost roadworthy. They were pretty famous for "regenerating" and blowing up spectacularly. Always clean out the tank before recharging. The waste product is slake lime or whitewash. Good for neutralizing acid, putting in acidic soil, etc. Needless to say... parts aren't available any more. Union carbide was where i got carbide to recharge the hopper. Make real sure that your feed mechanism and diaphrams are all in smooth working order. The thing about using one is that, although it is cheap acetylene, It comes through the regulators and hoses with a lot of extra stuff. After a while, I could break down my hoses, regulator and torch and clean them out pretty quickly. That still took up a lot of time. Welders were pretty happy when they figured out to put that gas in a bottle safely. Tarin: Anvilfire has a whole section devoted to JYH ( Junk yard hammers) Dustin; Check out the book reviews here on Anvilfire. There is probably a book to match your style. | ||||||
| - Pete F - Tuesday, 09/28/04 02:15:19 EDT | ||||||
|
THOMAS.tank you for the explanation on wootz.If i get the gist of it right,there are other more effective ways of forging blades and that a blade costing �200,is because of its looks and the prossess involved over strength and practicality? GURU.how is forge welding done? | ||||||
| Andrew - Tuesday, 09/28/04 07:12:02 EDT | ||||||
|
Dustin, if you look at the top of this page there is a link called "getting started in blacksmithing." Check it out! Elliot: That's here at Anvilfire. Power Hammer Page on the pulldown menu at the top left of this page, catalog of user-built hammers on that page. Andrew: Regarding Wootz and pattern welded steel, yes. A chunk of modern tool steel made into a blade by grinding and properly heat-treated will outperform any "damascus" blade there is. It just doesn't have any romance in its soul... | ||||||
| Alan-L - Tuesday, 09/28/04 08:22:19 EDT | ||||||
|
i need to do a welding test : G2 HORIZONTAL PIPE FIXED ROUTE FILLER ON MILD STEEL 12MM WALL 1 -1.5 12 INCH (300MM) DIAMETER . MUST THIS TEST BE DONE FLUXCORE OR CO2 . IN SOUTH AFRICA WE DO NOT USE FLUXCORE. APPARENTLY IT IS CO2. IS THIS CORRECT | ||||||
| michael - Tuesday, 09/28/04 08:32:10 EDT | ||||||
|
ALUN.Ive allways used argon,but co2 is the same thing.personally I dont like using flux core | ||||||
| - Andrew - Tuesday, 09/28/04 10:13:51 EDT | ||||||
|
Anvil tools: Get some flat stock to fit your hardy in one direction and bend in a "U" to fit the other, then weld a plate on top. This will form a base for anything you want to weld on, from chisels to mandrels or fullers - the list is endless. You can also leave the loop protruding from the bottom of the hardy hole and use a wedge driven from the side to prevent the tool from bouncing. Even though I have a power hammer and can forge hardy shanks in short order, I make a lot of quickie tools this way and it's much faster. | ||||||
| HWooldridg - Tuesday, 09/28/04 10:24:13 EDT | ||||||
|
Umm.. Andrew, I didn't ask about wire welding, that was Michael in South Africa! As for your other question about forge welding, it's easy if you accomplish a number of conditions first. The basic idea is to make sure your steel is fairly clean and in uniform contact where you want the weld to be (condition one). Since you seem to be interested in pattern-welding for knifemaking, that's what I'll describe. To make a billet of two different steels, get a few bars of each the same size, say 1 inch (2.5cm)wide x 1/16" (~1.5mm) thick x 6 inches (~15cm)long. Stack them up in alternating layers, making sure the edges are all aligned, then wire them together or tack-weld the ends electrically. Put the stack in the forge, and flux with borax when the stack reaches a red heat. The flux will melt and hopefully run in between the layers of steel to dissolve surface oxides and keep further oxygen away from the metal (condition two). When you reach welding temperature, which will depend on the type of steel you are using but is usually in the light yellow to almost white range, depending on carbon content (condition three), remove the stack from the forge and hammer gently by hand, by power hammer, or hydraulic or screw press. If you got the temperature right and used enough flux, the result will be a solid bar of alternating layers. This will take several welding heats to get the whole thing welded if you do it all by hand. To get a high layer count, cut your new bar in half (or more), clean off the outsides, stack it up, and do again. Getting various patterns depends on manipulation of the steel after you have reached your target number of layers. This can be done an infinite number of ways, and I highly recommend Hrisoulas' books on the subject. It's a lot of work and a lot of material loss through scale, and if it isn't done with care it'll look bad. Done WITH care, it can result in amazing patterns and even pictures within the steel. Most patterns also require a lot of grinding after forging to get the pattern to show up when the blade is etched. If you were asking about other forge welding, it's much simpler! | ||||||
| Alan-L - Tuesday, 09/28/04 11:17:21 EDT | ||||||
|
All them lies they tell about me---only some of them are true! Like getting caught in an electrified barbwire fence while wearing a chainmail shirt... Paw Paw, I'm sorry I missed it but happy my stuff is under cover and locked up! I've talked it up enough over the years I was afraid folks would be disappointed. Patrick if you would just get a decent sized anvil that takes a 1.5" hardy things would be a lot simpler---give your small anvil to your daughter! If you average your build and your wife's together she should end up being quite an iron pounder! (and a heck of a lot easier on the eyes than you are!) Thomas sobbing quietly into my morning's coffee. | ||||||
| Thomas P - Tuesday, 09/28/04 11:43:13 EDT | ||||||
|
Hollow Anvil on ebay: This is a part of a universal tool set where the "anvil" was part of a vise, drill, forge. . . It is not so unique or rare. What IS unique and rare are unbroken examples with all the parts. This is not a suitable "anvil" for any kind of forge work. | ||||||
| - guru - Tuesday, 09/28/04 11:48:26 EDT | ||||||
|
I have a student that is interested in becoming a blacksmith and making swords and amor. Could you please tell me the type of schooling he will need. Thank you, in advance, for your help in this matter. | ||||||
| Pam Zschau, Career Tech - Tuesday, 09/28/04 12:09:13 EDT | ||||||
|
Home Built in NZ: We have fifteen home built hammers on our Power hammer Page, See "Catalog of User built JYH Hammers". One was built by our Sysop, Andrew "Kiwi" Hooper. His was an air hammer. The best two user built mechanical hammers designs are the "rusty" and the NC-JYH using a tire clutch. My rear-axel design is unique, proved a point, but is huge and the shock linkage is very inefficient. Air hammers are no harder to build but cost a little more for control valves and such. Some parts can be scrounged and they DO require an air compressor of 5HP or more. However, they are generaly MUCH better hammers than home built mechanicals. Lots of folks don't build them because they do not want to purchase an air compressor. But every shop SHOULD have a nice air compressor to run air chisels, descalers, paint and grit blast with. | ||||||
| - guru - Tuesday, 09/28/04 12:09:35 EDT | ||||||
|
Career in Armoury: Pam, There is no one place to go to school for it. Being an armourer is the top of the blacksmithing field. This line of study starts with art and history including an in depth study of historical technology and all the published archaeological studies. Then there is basic engineering and metalurgy. Many swordsmiths have graduate or doctorate level degrees or the equivalent in self study. The "hands on" parts of smithing can be learned at various craft schools or specialized blacksmithing schools such as Frank Turley's school in New Mexico. Then there are years of self study and trial and error in one's own shop. Those who go into this field on their own spend a lifetime collecting books and researching the subject. Learning how to obtain rare books is often one of the necessary skills. There are many in the field with no degree whatsoever but are VERY well educated. Since most of the field of blacksmithing, bladsmithing and armor is a self employed situation I also suggest some study in business and accounting. However, in the end a vast number of these bright intelegent well educated folks are what most would classify as "starving artists" This morning I answered a mail asking about where you go to school for these things. My reply follows (pardon the duplications): The folks that have higher degrees that apply them to bladesmithing received them from schools that were just as different as they were. Any school that has an engineering department has metalurgy courses. This list would include thousands of schools. Usualy the state school that is nearest you is the most affordable choice. At least one smith developed his own doctorate program. This is common among higher degrees. On applying to the graduate program you define your goals and specialty. This often includes a course of study as well as the degree title. | ||||||
| - guru - Tuesday, 09/28/04 12:31:39 EDT | ||||||
|
Anvil Tools: This is a subject I think you folks have gotten much to anal about. I prefer a hardy that drops in and out quickly and easily. In old anvils with punched holes that are usualy out of square as well as out of perpendicular this means a tapered shank that fits loosely and in ALL directions. I have recently used a anvil with tightly fitted anvil tools and a hardy that only fit in one direction. The hardy would jamb up and have to be driven out of one direction and didn't fit at all in two others. What a pain and a waste of time! If tools do not slip in and out of the hardy hole quickly and easily without thought about direction other than what is most convienient then they are a waste of time. Most of the anvil tools with overhang that need to be snug should probably NOT be used in an anvil in the first place. trying to use stakes and bickerns that fit the anvil is trying to make it a universal tool holder. They make stake plates with tapered holes for this purpose. You can also moun those you use often in their own stump or stand whisch is INFINITELY much better. You can also use them in a vise. One reason NOT to use these tools with overhang in an anvil is the chance of breaking the anvil. The point with the hardy hole is the weakest place on the anvil and they are often broken here. I've got a collection of square shanked tools that fit and don't fit. Many are too small and sit loosly in the hole but work fine. Those that are too big are used in the vise or a swage block. This is one of those subjects that is not worth worrying about. The tools fit or they don't. I still use them. If you buy a new anvil and fit a set of tools to it then great. . but do not make them fit too tight or one direction only and NEVER leave them so they wedge into place. | ||||||
| - guru - Tuesday, 09/28/04 13:05:00 EDT | ||||||
|
Quad State: I didn't have a connection the last night on the road and was TOO tired to use it if I did. . . Will be posting more photos as soon as I get them all off my laptop. If you have good photos of the demo's or contests please send them and I will add to the news. More to come. . . | ||||||
| - guru - Tuesday, 09/28/04 13:13:18 EDT | ||||||
|
I live in W. Palm Beach, Fl. I have an ice cream shop. I want to find someone in my area who can fabricate a copper cookie cutter of my ice cream cone logo so I can sell them in my shop. Is there someone out there affiliated with you who does wholesale work of this type? I don't have a clue about how to use the yellow pages to locate someone.There were no listings under cookie cutter. I would greatly appreciate any info or advice you could give me. Thanks very much. | ||||||
| sal - Tuesday, 09/28/04 14:29:02 EDT | ||||||
|
Cookie Cutter: Sal, This is kind of a specialty sheet metal job. However, almost any metalsmith could tackle this job. I have made cookie cutters for my wife from short sections of tin can. If you contact FABA (Florida Artist Blacksmiths Association) they may have have a member that specializes in sheet metal work that would be willing to do this job. FABA is going to have their annual conference October 8-10, Tanah Keeta Boy Scout Camp, Jupiter, FL and you could go to that and perhaps find someone. This is a big group and they have members that specialize in many areas. | ||||||
| - guru - Tuesday, 09/28/04 14:46:24 EDT | ||||||
|
Pam-- This student of yours, if he really has the makings of an armourer, ought to be able to figure out what he needs to know just by studying-- just looking at-- the incredible craftsmanship that was required to make ancient armour. He should get himself to the armour gallery at the Metropolitan Museum of Art in NYC, a football-field-sized room full of crossbows, helmets, full battle dress for men an horses. Or pictures of that collection or one like it. Let him ponder what it meant to be a smith and put your proof mark on a helmet attesting that it would repel a crossbow bolt. He'll get the picture. If he doesn't, then, alas, he is not going to be an armourer. | ||||||
| Miles Undercut - Tuesday, 09/28/04 14:47:34 EDT | ||||||
|
Thomas, I really wish you could have been there. I'd like to have met the man whose "shady" reputation challenges mine! (big grin) My very decorous brown hat will never challenge your red one, though. | ||||||
| Paw Paw - Tuesday, 09/28/04 14:59:21 EDT | ||||||
|
Hollow Anvil - Mike, it looks like the remains of an anvil/vise combo. They were VERY light duty. Don | ||||||
| Don Shears - Tuesday, 09/28/04 15:04:59 EDT | ||||||
|
May I suggest posting the "How to become an armourer" question on an armour specific forum like the armourarchive (note english spelling of armor). There folks who *are* professional armourers could answer. There are several tracks one can take:through art history and museum conservancy; another through fine arts--- sculpture, jewelry making, engraving, repousse, etc; or perhaps through archeological metallurgy. I would suggest they talk to people like Ugo,(over at the armour archive) Dr Alan Williams (his recent book on "The Knight and the Blast Furnace" goes into detail on what the original armour was actually made from). Then you have to consider what you want to do---modern "sport" armours like used in the SCA, armour for Hollywood, Museum grade reproductions.... One thing I will point out is that medieval and renaissance armour was made with considerable hot working and it's no surprise that the top modern armourers also do quite a bit of hot work; so a good solid base of blacksmithing can advance their career goals quite a lot. *Now* is a great time to start the tool and book collection needed. If you just check used book stores and clearence tables at bookstores on a regular basis you can get a start on your library for little money---if you buy them on clearence now for a couple of bucks and wait 10-15 years people will be drooling over your "out of print" books that cost a *lot* through book searches. The same thing with tools; I've amassed several hundred hand tools never paying over $5 for things that go for $80 new in the catalogs, but I've spent a lot of time in fleamarkets, junkstores and even scrap yards. One of the biggest problems for someone starting out is where to store his equipment while in college. Understanding parents are a big help! Getting out and working with armourers while still studying will help both in "training the hands" and focusing their studies. I will say that to make it as an armourer you must have the "need" and the talent to armour. As with most skills with a limited market there are few folks who can support themselves and a family from their armouring: *but* it can be a great adjunct hobby for a metallurgist, art historian, medievalist, etc. Thomas | ||||||
| Thomas P - Tuesday, 09/28/04 16:26:56 EDT | ||||||
|
Hi guys, Jock, after reading about your background, it looks like you might be familiar with my little project. Can you tell me how to make a 'Bullet Cherry' that I can then turn between two pieces of soft steel or aluminum to make a bullet mold? I think that I have all of the necessary equipment. Thank you, | ||||||
| Bob Lowe - Tuesday, 09/28/04 20:27:21 EDT | ||||||
|
Hi guys, Jock, after reading about your background, it looks like you might be familiar with my little project. Can you tell me how to make a 'Bullet Cherry' that I can then turn between two pieces of soft steel or aluminum to make a bullet mold? I think that I have all of the necessary equipment. Thank you, | ||||||
| Bob Lowe - Tuesday, 09/28/04 20:27:22 EDT | ||||||
|
Pam, If your student lives in the East, I would also suggest a visit to the John Woodman Higgins Armory, 8,000 items on 4 floors. In 1934, G.C. Stone authored a large volume, "A Glossary of the Construction, Decoration, and Use of Arms and Armor". It is reasonably priced on www.abebooks.com. | ||||||
| Frank Turley - Tuesday, 09/28/04 21:54:54 EDT | ||||||
|
Forgot to mention that the Higgins Armory is in Worcester, Massachusetts. | ||||||
| Frank Turley - Tuesday, 09/28/04 22:00:54 EDT | ||||||
|
Dear guru, I have searched the web far and wide and have not found what I need. It is with high hopes that I ask your help. I am seeking a hand operated and or inexpensive tool with witch to swedge (reduce the out side diamiter) of seel tubing (.75-1.25 EMT conduit). This opperation need not be fast or automated, but will be repeated many times. Are you aware of a supplier or manufacturer whom I may contact regarding such said equipment. I also wish to press, perfarate, and shape the ends of the same type of tubing. If die (for use in somthing like an arbor press), could be purchased, I would like to concider that as opposed to manufacturing it from scratch. Thank you, any help will be greatly appriciated (and help to ease my frustration) M | ||||||
| morgan - Tuesday, 09/28/04 22:14:57 EDT | ||||||
|
Bullet Cherry: You didn't say if you were going to do a ball or cylindical bullet, but it's all done about the same, take a piece of steel rod (drill rod works good) that is about twice the diameter of your bullet, turn the end on a lathe into the shape of the bullet, with a shank on the end, and enough of the drill rod to be chucked in a milling machine. Grind, file, mill at least two cutting teeth into the blank, heat treat if you want, then take your two blocks of aluminum and drill a pilot hole just undersize of the shank (this is the base of the bullet and the part where you will be cutting off the lead sprue, if you have the ball end mills now is the time to do a little rough cutting of the bullet cavity, then using the "cherry" finish the rough milling to just undersize, then unplug the milling machine, engage the spindle lock, clamp the two blocks with a large C-clamp loosely around the cherry, tighten the clamp, with your hands on the clamp take a turn or two, tighten the clamp, take a turn or two, check for size, repeat untill it's the size you want, if you mess up and get it a little oversize remember you can take some metal off the faces of the blocks to shrink the whole. | ||||||
| - Hudson - Tuesday, 09/28/04 23:55:43 EDT | ||||||
|
Bob Lowe There is a wonderful description of the process for making both the cherry and the bullet mold in Jim "Paw Paw " Wilson's book, The Revolutionary Blacksmith. It is available here in the store. You can access by using the navigation bar at top right of this screen. Adam | ||||||
| lazarus - Wednesday, 09/29/04 00:25:46 EDT | ||||||
|
Newbee where to get info about waking welds look nice. i have not enough exp. to forge weld yet. Thanks | ||||||
| - Fjord - Wednesday, 09/29/04 03:05:06 EDT | ||||||
|
making :) | ||||||
| - Fjord - Wednesday, 09/29/04 03:06:33 EDT | ||||||
|
Bob Lowe, Hudson has it right if you have access to machine tools. If you don't, the operations are the same except you will need to use a tiny chisel and gravers to cut the teeth on the cherry. They should end up looking like file teeth. Oh, and it's harder to freehand file the shape of the bullet. If you have a good drill press you can use it as a vertical lathe for filing. Fjord, do you mean how to make an arc weld look good? | ||||||
| Alan-L - Wednesday, 09/29/04 08:40:53 EDT | ||||||
|
Jock, thanks for all the pictures of SOFA in the NEWS section. I really enjoyed them! | ||||||
| adam - Wednesday, 09/29/04 10:39:07 EDT | ||||||
|
I am making a TIG welder from an AC/DC Arc welder and have a question about the rheostat pedal. Can I wire a pedal in series with the arc welder, replacing the rheostat that moderates current? | ||||||
| Robert Scudder - Wednesday, 09/29/04 10:51:00 EDT | ||||||
|
SOFA: Thanks! Posted the last batch of images about 4am EST. That will be all unless I get photos sent to me. | ||||||
| - guru - Wednesday, 09/29/04 11:02:19 EDT | ||||||
|
Tube Swage: Morgan, Almost all die work like this is strictly custom work. Reducing tubing is one of the most difficult tasks there is. Normally it is done in a rotary forging machine over a mandrel. This is very expensive machinery. Simple crimp type reduction can be done in plain two piece dies but the reduced section must be taken up by one or more depressions in the tube. Doing a clean job requires an internal mandrel so that the crimp is acurately formed. It would be possible to do this in a heavy arbor press. EMT is welded and hot galvanized both of which can present problems with the ID and finish. The galvanizing will sometimes flake off when the tube is heavily deformed. However EMT is fairly smooth inside compared to other welded tubings. When you said "perforate" do you mean multiple holes in the side of the tube or holes in a flatened end such as for bolting together? There is a big difference. Tubes can be pierced without a mandrel if properly supported but the result is a big depression in the tube. Smooth clean holes require an internal mandrel that is also a bottom die. Almost all press work is done in shops that have their own machine shop or tool and die department. Normally it requires a small milling machine like a Bridgeport and a 16" toolroom lathe at a minimum. It is also necessary to have a surface grinder if making punches and dies for cutting and blanking. Then there is an assortment of precision measuring tools. Some shops sub out this work but it often requires some trial and error and re-work of this nature can quickly pay for a few small machines. Making press tooling CAN BE DONE within limits without the above tools but it requires a lot of skill and imigination. Many light production shops use small bench mounted tools for punching an crimping tasks and it IS possible to make hand fitted trimming punches. | ||||||
| - guru - Wednesday, 09/29/04 11:28:10 EDT | ||||||
|
Clean Arc Welds: Fjord, First you start with a good weld. This means lots of practice. My experiance has been that you don't start getting good until you have burned up at least 100 pounds (45kg) of welding rod. Grinding almost always shows in decorative work and is difficult to clean up. Most smiths that weld and grind their work do not make good weld preparations and the result is lumps that are smooth but still look like welds. Proper joint design and weld preparation can produce joints that are close to forge welds in shape and flow with the work. I make a weld prep that makes a good strong joint, then weld it leaving a slightly raised weld. The joint is then cleaned and heated to a high forging heat and dressed by forging. IF welded using coated rod it is VERY important to clean up the weld so that there is no flux left. Arc welding flux is often hard enough that it forges into the surface of the steel and when it decomposes it leaves tracks at the edges of the weld. Power wire brushing or using a descaler is recommended. If MIG welding is used then cleanup is not necessary. For certain joints this can be relatively efficient if done in batches and is well though out. However, for individual joints done one at a time it can be labor intensive taking much longer than a forge weld. | ||||||
| - guru - Wednesday, 09/29/04 11:48:16 EDT | ||||||
|
Fjord, Forge welding really is not an advanced blacksmith technique. SO even beginning smiths can and should learn. It is just one more 'tool' to use. To make a weld ( a forge weld or any other type of weld) requires that you plan it and prep it first. You can not just slap two pieces of stock together and join and then expect a beatiful joint. You may have to form a scarf. forst then carefully position the pieces THEN join. The same mentality that goes into the basic iron work should go into the welding. if you are careful and meticulous in your forging then you should be in your welding. But this does not mean do not try. My mantra if you will is every time I work at a forge I will attempt at least one forge weld. Remember it is a skill. And a skill that is not practised and maintained is lost | ||||||
| Ralph - Wednesday, 09/29/04 12:00:25 EDT | ||||||
|
TIG Welder: Robert, NO. The control would be HUGE to be able to directly control the current. Foot controls on TIG welders control the power factor by changing the high voltage end of a transformer as well as changing the capacitance circuits that stabilize the arc. The electronics involved are way beyond my skills and are a very specialized area. Learning how these things are done requires a good base in electrical engineering and a good bit of reverse engineering (to prevent reinventing the wheel). See my post in last week's archive at 09/22/04 11:35:44 EDT on building welders. | ||||||
| - guru - Wednesday, 09/29/04 12:01:45 EDT | ||||||
|
Welder control. You do need to know some electronics but actually its not that bad. You can make an effective controller using a pair of heavy duty SCRs (plus a handful of inexpensive components) to chop the AC waveform on the high voltage side of the transformer. These are available for about $15 ea from surplus suppliers. Here is an example of control circuitry http://www.dansworkshop.com/Homebuilt%20arc%20welder.shtml The arc starter circuit is usually based on a spark gap to generate the HF. You also need a filter to stop the HF running thru the transformer. http://www.geocities.com/CapeCanaveral/Hangar/6160/welder/arcstarter/hf.html People tell me its possible to run a tig torch off an arcwelder with no HF arc starter using a scratch start. | ||||||
| adam - Wednesday, 09/29/04 12:57:44 EDT | ||||||
|
More on swaging tubing: This is one of those "why cant I build a 747 in my basement with a claw hammer and a jig saw?" kind of questions. There are things that require big and expensive equipment to make. Especially in quantity, and cheap. That is why we have a big industrial infrastructure. If everything made by modern industry could really be done by hand, cheap, in your garage, we all would be living a lot higher off the hog. But it just aint so. As the guru said, its hard to do this properly, and requires big and expensive tools. However, there are some shortcuts- they dont work as well as a rotary swager- check em out at finnpower-google em. But there is a company that makes a lot of tooling for tube punching and swaging for punch presses. Some of this tooling could be adapted to a small hydraulic press- probably not to an arbor press, as the tonnage required is just too much- an average arbor press is 3 to 5 tons. An industrial swaging machine can easily run 50 to 100 tons of pressure. Anyway, the company is called Vogel tool and die- you should go to their site and look at how some of these dies are constructed. -vogeltool.com- Even this route is not cheap- you need, as the guru said, a machine shop. And just the materials alone to make a die out of good steel could run several hundred dollars. One thing you might try is your neighborhood independent muffler shop- they usually have a machine, which they paid about 10 grand for, that bends and swages tubing. They usually do not have dies for smaller sizes like 3/4" emt, but some of the companies make them. So you may be able to cut a deal where you pay for the dies, then they run your parts on their machine. This wont work with a national chain- they wont do anything out of the ordinary. But it might work with a small local guy. | ||||||
| - Ries - Wednesday, 09/29/04 14:17:37 EDT | ||||||
|
If I am mixing linseed oil and beeswax 1 to 1, how much japan drier should I mix in with this? Thanks-Steve | ||||||
| Steve Stransky - Wednesday, 09/29/04 16:24:01 EDT | ||||||
|
I am a Scoutmaster. Our troop is working on Metalwork Merit Badge. One of the projects, which the boys want to do is to make wind chimes from old pieces of silverware. I have acquire several dozen pieces of silverplated silverware (1920 - 1940). How do we bend the utensils and hammer them flat for the project? Hammering alone or should they be heated up first? Thanks for any help you can offer. | ||||||
| Larry Wilson - Wednesday, 09/29/04 18:40:41 EDT | ||||||
|
Thanks Elliott. if u do remember, heres my email tarin_lewis@yahoo.com if u get the time i would love to know more about the home built power hammer, thanks. | ||||||
| Tarin Lewis - Wednesday, 09/29/04 19:46:08 EDT | ||||||
|
Is it possible to use borax as a flux without dehydrating it? I heard that was just to quicken the melting of the flux. | ||||||
| - NewSmith - Wednesday, 09/29/04 20:55:13 EDT | ||||||
|
New Smith, I use it straight out of the box. Works fine. | ||||||
| Paw Paw - Wednesday, 09/29/04 21:30:16 EDT | ||||||
|
swaging== Thanks gentelmen very much for your input. i will check in to the listed suppliers. regarding shaping and perferating, yes I am talking about a singel round hole in a pre-flatened tube. as far as 747s go HAHA, I can manufactur that part with about four mild blows of my hammer, one with a center punch and a pass on a drill press. with that in mind the thought comes along of doing a little milling on two heavy steel plates (perhapes a hole in one for alighnment of a punch point) then squeeeeezing tubing between them by whatever means seems most convient. all this to bring relitive similarity to a few thousand parts. I have seen similarly treated tubing in everything from lawn chairs to lawn mower handels. However ,in my ignorance of the industry, I do not know if my "heavy steel plates" can be purchased readily. regarding swaging. The most common part that is similar to my print is a chain link fence rail. It seems to me that they are manufactured by aranging rectangular blocks of tool steel into a cyclindrical shape, inserting a tube into the middle of the cyclinder, then squeezing. i think that I have seen (on tv) guys (making bike frames etc.)doing this operation with a bench mounted hand opperated machine. Thats what I am lookig for. Thanks again!! hope this clarifies what I'm up to M | ||||||
| morgan - Wednesday, 09/29/04 22:02:52 EDT | ||||||
|
NewSmith, I too use it right out of the box..... more or less. I actually transfer it to a smaller metal box. And my smithing area is outside and my borax is on my back porch ( so it can be out of the rain) so it is probably fairly hydrated but I have never noticed any problems. | ||||||
| Ralph - Wednesday, 09/29/04 22:07:36 EDT | ||||||
|
Thank you. | ||||||
| - NewSmith - Wednesday, 09/29/04 22:28:01 EDT | ||||||
|
Ries, RE swaging. Yes all of my discorse is regarding sampel operations #s 50 and 67 at the vogal sight. thank you. M. | ||||||
| morgan - Wednesday, 09/29/04 22:32:46 EDT | ||||||
|
Morgan, A posible thought to swage down your thin gage, small diameter tubing would be a hose crimper. These are used to crimp the ferrule on hydraulic hoses to retain the end fittings. They may be available in the diameter you need, and a used crimper should be available. The only draw back I see is that these crimpers leave somewhat unswaged ridges running along the tube if a very heavy crimp is performed. Perhaps a light crimp, and a small rotation then another light crimp will serve. Common brands of these machines are Weatherhead, Parker, Gates. These machines will run on a standard 115volt circuit. | ||||||
| ptree - Wednesday, 09/29/04 22:42:42 EDT | ||||||
|
Thanks Ptree. I think that might work. I've seen the machines but will have to take a second look. the ridges are not a problem as long as the their od is close to the tubings original id (for a tight fit) M | ||||||
| morgan - Wednesday, 09/29/04 22:55:51 EDT | ||||||
|
Hello, Can anyone tell me the basics of making a 'Bullet Cherry' to be turned between two pieces of soft steel or aluminum to make a bullet mold? And also I have some railway spikes marked with the 'HC'. What might be the typical carbon content? Thank you, | ||||||
| Bob Lowe - Wednesday, 09/29/04 23:06:19 EDT | ||||||
|
Bob, The answer to your question is just below the message when you asked the first time. This is a message board, not a chat. It sometimes takes a couple of hours for a question to be answered, so always check starting with your first entry. | ||||||
| Paw Paw - Wednesday, 09/29/04 23:25:13 EDT | ||||||
|
Scoutmaster, Just hammer the stuff. Now if you WANTED to, you could anneal the silverware, This could be considered just another step within common metal working practices to give the Scouts more experience, But I dont think its really needed for flattening silverware to make windchimes. BUT, It may be helpful afterall if you wanted to do alot of tight radii bendings or to flatten spoon bowls, otherwise the material might begin to crack. Annealing would be a help to reduce this. Heat the items to dull red and quench in water, They will come out dead soft and very easy to work. On the other hand, Annealing softens the material it would also deaden thge ringing sound of the finished chimes set, So annealing may be a detriment to the overall finished job. Good luck with the Scouts, I have enjoyed alot the couple times when the local Scoutmaster asked me to help with his Scouts metalworking awards. We always end up making fire strikers. Cant go wrong there. Kids absolutely love anything that looks sort-of like brassknuckles AND will make sparks too! Sven | ||||||
| - Sven - Thursday, 09/30/04 01:29:30 EDT | ||||||
|
Bob, and on RR spikes, I found the following somewhere online:
There's more (other RR steels) if you're interested. Let me know and I'll e-mail the Word97 doc I saved it as. | ||||||
| Elliott Olson - Thursday, 09/30/04 01:34:04 EDT | ||||||
|
Annealing Silver Plated Flatware: I would not recommend annealing silver PLATED anything. YOu will probably oxidize the silver to a black dust before you get the steel substrate soft. I would just pound it flat while cold. | ||||||
| quenchcrack - Thursday, 09/30/04 08:45:51 EDT | ||||||
|
Japan Drier: Steve, the mixture you are attempting to make is varnish (read the ingrediants on a can). If you use that ratio of beeswax the finish stays sticky forever and is quite weak. Why not just use a commercial product instead of playing amature chemist? I've finished many things by hand rubbing on varnish. | ||||||
| - guru - Thursday, 09/30/04 10:52:54 EDT | ||||||
|
QC none of my silver plated silverware is on a steel substrate, it's over brass or copper or nickle silver. I did have some stuff where the knife blades were silver plated steel---that was flaking off I bought it for the solid MOP handles with the SS ferrules, (25 cents apiece at a salvation army) Thomas | ||||||
| Thomas P - Thursday, 09/30/04 10:54:28 EDT | ||||||
|
Windchimes: Silverware will not make very good chimes. Why not use metal tubing? It needs to be fairly hard (copper does not ring). Aluminium tubing (such as recycled from old lawn furniture) is easy to cut and makes nice chimes but is not as nice as hard high stength aluminimum. EMT (electrical conduit) would also work. So will steel pipe but it is a little heavy. If you support the bars with a wooden dowel or pin at one third their length (a null node) they will ring better. Take a look at the chimes in various gift shops. Projects from flatware can include jewelery (rings, pendants) and napkin rings. . . Some of the heavy embossed stainless flatware is better quality than cheap plated silverware and will make a more durable product. | ||||||
| - guru - Thursday, 09/30/04 11:00:44 EDT | ||||||
|
Silverware: Some of the best silver tableware has stainless blades for durability. Scoutmaster, The blacksmithing community had a lot to do with getting the metalworking merit badge brought back. Check our ABANA-Chapter.com page for a blacksmithing group near you. You should be able to find a smith or two nearby that would be willing to help with the toolmaking requirements as well as the forging projects. A number of us did this for a regional merit badge jamboreer for several years. However, it is not possible to really meet the requirements and do a good job in one day. The boys need to study the booklet and learn the terms then do the excersizes that they can on their own. A three day workshop could cover the whole thing but it is possible to do the hands on RIGHT in two days. | ||||||
| - guru - Thursday, 09/30/04 11:20:04 EDT | ||||||
|
Hinges. Is there a rule of thumb for which barrel of a hinge gets one ear, and the other two? The fixed leaf? or the moveable leaf? I am making simple butterfly hinges for a small chest. Thanks, Jim | ||||||
| JimG - Thursday, 09/30/04 12:19:34 EDT | ||||||
|
Jim G., My rule for that application is that the piece that weighs more gets more of the barrel. For a chest, assuming you have three hinge knuckles total, the body of the chest gets the two-knuckle half and the top gets the one-knockle part. For really heavy things use heavier stock or more knuckles. | ||||||
| Alan-L - Thursday, 09/30/04 12:27:00 EDT | ||||||
|
After having copleted my brake drum forge several months ago, I finally had some free time to fire it up. I made a pair of tongs and then tried to make a fuller for my anvil. I used a short leaf from a truck spring, bent it into an s shape to put the edhe upright on the anvil, curled one end to fit the hardy hole, quenched it, then tried using it. It snapped right where it made the bend from vertical cutting edge to horizontal on the anvil. I assume it broke because the quench hardened it and I forgot to temper it in my enthusiasm to use it to make a second set of tongs(the first were mighty ugly). If I remember correctly, the temper process is: grind one area clean of scale, heat to a given color, then quench. what color should I temper my anvil tools to? The other slight surprise in my first forging effort was how long it took for the charcoal in the firepot to burn itself out when I was done for the evening. Three hours later, the coals were still hot, so I covered them with sand and left the forge out overnight. How long do charcoal users usually wait for the leftovers to burn out? Thank you in advance for any answers you might have. Without this site, I probably would never have made it to the point I am now - smith in training. I will be joining CSI as soon as the finances permit. | ||||||
| Frank Kloiber - Thursday, 09/30/04 12:30:16 EDT | ||||||
|
copleted = completed edhe = end proof then post - sorry | ||||||
| Frank Kloiber - Thursday, 09/30/04 12:31:15 EDT | ||||||
|
Spring Steel: Frank, For a tool such as a fuller the steel may be hard enough when air cooled (normalized). I have better luck oil quenching spring steels when I harden them. If you water quench be sure not to overheat the steel and then quench in room temperature or tepid water. To warm the water you can quench a piece of mild steel first. Heat the steel until it becomes non-magnetic. This is the hardening temperature for most steels. To temper a tanged tool like a fuller you can "run the colors". This is done one of two ways. One is to quench the working end of the tool, polish it quickly and let the remaining heat in the other end to conduct up into the working end until you have the right color. Quench the part again to stop the temper. Be sure the hot end is below hardening temperature when you do this. The second method is to quench the entire tool then heat from the end you want to be the softest (the tank or shank). When the working end reaches the desired temper color quench to stop the temper. Parts can also be differentialy tempered by hardening and tempering uniformly and then using the forge or a torch heating the areas to be softer to a higher temperature. Tools like drill bits and files are done this way to produce a soft shank or tang. Depending on the steel you may temper up to a blue. Most tools that need to be hard I temper to a straw yellow. However the temper is dependant on the type of steel. Some such as hot work steels do not fully temper until they are in the low red heat range. Other plain medium color steels lose much of their hardness at a low yellow temper. Coal fires go out rather quickly if not very deep and have little air. They usualy go out as soon as you break them up. However, a leaking tuyere or a slight breeze can keep a coal fire going until it is nothing but ash. Charcoal will usualy glow until it is completely burned up OR the ash is deep enough to starve the coals of air. A sheet metal cover or a sprinkle of water will put the fire out. Sand is not a good idea because it will add to the build up of clinker. Charcoal usualy has no clinker but sand will do it. | ||||||
| - guru - Thursday, 09/30/04 13:19:23 EDT | ||||||
|
Hinges: Normally the part with two barrels goes on the stationary part. With small strap hinges the entire strap is barrel so the combination looks neater. I prefer not to notch hinges and leave unsupported width even though this is a common design. | ||||||
| - guru - Thursday, 09/30/04 13:23:07 EDT | ||||||
|
Thomas, I stand corrected. However, I still would not put silver plated anything in a furnace to anneal it. | ||||||
| quenchcrack - Thursday, 09/30/04 14:16:27 EDT | ||||||
|
Frank most fullers dont need to be heat treated. In fact even fullers made of mild steel usually do fine without any heat treatment. Congrats on your first pair of tongs! | ||||||
| adam - Thursday, 09/30/04 14:23:47 EDT | ||||||
|
My propane supplier won't supply me with more than 5 PSI. He pointed out sections in the code that prevent him from doing that. The sections make allowances for industrial buildings, but since this is an attached garage, he's not buying. I've tried all sorts of modifications to my burner, but I can't get to anything near welding temp at 5PSI. My forge is a half-pipe 18" long X 12" wide. The inside is 7" wide with a movable back wall. One of my options seems to be getting my own larger bottle(s) and refilling. But a 100lb tank weighs about 180 lbs filled, so hauling that back and forth could be a pain (literally). And since I live in NH, the cold weather might make an outside tank freeze up if it's much smaller. The other option is adding a blower to make the 5PSI work for me. I've seen some successful NG forges work on <1PSI. Is this as simple as using a larger orifice and piping the air in? About what size would I need? I've also seen some pretty complicated flame holders. Do I need that, or would my simple flare be fine? Thanks for any ideas. --Marc | ||||||
| - MarcG - Thursday, 09/30/04 16:36:03 EDT | ||||||
|
Marc: Yeah - just add a blower and increase the size of the orifice. With a blown burner you dont need an orifice at all but its nice to keep the gas pressure up in a range where the gauge will give you a reading. Try 1/16" and increase until you reach welding temp Some other possiblities: Your forge is pretty big. Perhaps your atmospheric burner is too small - about 500 cu in at full size. That would need two 3/4" R Reil style burners or a 1" burner. Do you have the ends of the chamber mostly blocked up so that the radiant heat is mostly reflectedback into the chamber? I live at 7000' and I could never get to welding heat with an atmospheric burner at 5 psi either. | ||||||
| adam - Thursday, 09/30/04 16:48:56 EDT | ||||||
|
Adam: I've got two burners for that forge. But for my experimenting, I've got the back wall half-way in. That wall has a "mouse-hole" for long stock to pass through and the front (and rear, too) has a hinged top section to let me work large items. I also slide a brick across the bottom for a door. Adjusting all these doesn't improve my low-pressure performance. | ||||||
| - MarcG - Thursday, 09/30/04 17:03:40 EDT | ||||||
|
Thank you, the borax worked, just to keep you updated the first day of practice I made a hook, the second day I made a shovel and fire rake for the coal, and on the third day, today, I welded a cross. You saved me a lot of trouble PawPaw, once again, thanks. | ||||||
| - NewSmith - Thursday, 09/30/04 19:30:31 EDT | ||||||
|
Low Pressure: Marc, One thing about low pressure is you need a large pipe. The NG forges I have seen had 1" and 1-1/4" pipes feeding a medium sized forge. Low pressure atmospheric burners work but require better geometry than most home built. We had a big 100K BTU furnace in my parents old house and it had 6 burners about 24" long, each fed by a large orifice and a long smooth funnel mixer. However, it DID suffer from line pressure drop from the street. As a retrofit it needed the 1" gas line replaced with a 2". . . But it WAS designed to operate at low NG pressures. If you are not running a large pipe that 5 psi may only be 1.5 to 2 but the time it gets to the forge. Note that if you are checking line drop pressure you must have full flow while checking. Otherwise the pressure is the same at both ends of the pipe. Also, most gauges are not very accurate at these low pressures unless they are low range. For these pressures you need a guage that goes to a MAX of 15). NG is measured in inches of water coummn where 12" water = .41 PSI (30" = 1.03 PSI). A LOT less than propane. The last NG forge I saw in operation was about 3 feet square (1 cubic yard) and operated off a 1" line and a small blower. Took about 20 minutes to bring it up to a white heat. Be sure to tell the gas company you are running a 50,000 to 100,000 BTU device so they put a large enough regulator on the tank. If you had told the service guys installing the tank you needed this big a regulator they probably would have "found" a high pressure regulator. . . These are usualy a one time opportunity. I was running 3/4" pipe with a short 1/2" copper stinger between the regulator and the manifold. "Flame Holders" are a crutch for bad burner and forge design. No commerical burner/furnace ever built used this device. If the end of the burner has a shoulder in the burner block the flame will stay at this point of turbulance and low flow. If for some reason you get flash back the flow velocity in the burner pipe is too slow. This means you have too big a burner for the forge and have had to turn it down too much. IF you end up with big portable tanks outdoors but them in an insulated "closet" with some kind of heater to keep things above winter temperatures. If you start with the LPG at room temperature you should be able to draw down about 30% of the fuel before freezing up the cylinder. The colder it is when you start the less you can draw. | ||||||
| - guru - Thursday, 09/30/04 20:12:58 EDT | ||||||
|
All our Natural gas forges in our production upset forge shop run at 8#, but have mixing blowers. The big forge takes several hours to heat to white hot. Heats 6" bars back to a heat lenght of about 22", heats about 30 bars at once, and costs about $30,000/ month in three shift operation for the gas. This forge has 3/4" burner nozzles, and plenty of them. A 8 hour shift will often see 700+ bars thru this thing. We mostly use induction for our heating now, with only two stand-by gas forges remaining. When I first walked into the hammer forge shop in 1981, most of the billet heaters were gas. With the shock from the hammers and the bridge crane running overhead, the exhaust was holes in the roof of the forge! I went in there in Feburary once, at 5:00am. It was about 15F outside. The hammer men were sweating on the front, and had large frost crystals on their backs. The whole place was dark, with the clanging,the flames shooting from the forges, and the hot metal being swung about, it was like something from Dante's Inferno! The ultimate irony was that the leaking steam from the hammers was condensing and falling back as snow onto the hammer-men. We forged about a million#s a month in that 1905 era hammer shop. | ||||||
| ptree - Thursday, 09/30/04 20:38:19 EDT | ||||||
|
NewSmith, That's what we're here for. You are quite welcome. | ||||||
| Paw Paw - Thursday, 09/30/04 21:01:48 EDT | ||||||
|
ptree, Great photo ops. . . | ||||||
| - guru - Thursday, 09/30/04 21:30:05 EDT | ||||||
|
I am a younger smith who is just starting into the trade and trying things out. I am looking for a desent tempering chart, perferably in colour, I would also like to know about diferent tempering for diferent work (such as wood chidels vs metal chisels). Just wondering where I might find a chart such as this . Thanks, George | ||||||
| George Guenther - Thursday, 09/30/04 21:34:03 EDT | ||||||
|
Hello, i have just succesfully built my first propane forge using 2 3/4 inch T-rex style burners usiing fire bricks a refractory board and a ceramic coating. I am using a 20 gallon tank and i am having a problem with keeping the pressure up. I will start by putting the tank on 20 psi to heat up the tank when i come back and it is heated up about 10 minutes later i will put it to 30 psi and about a minute later the pressure will start to drop rapidly and in a bout 5 minutes it will be down to 10psi, i know the tank isnt empty because the pressure will go back up to 30psi the day later but i will have the same problem and it will start going down again. I also noticed my tank gets very cold and ice starts to form on it. I was wondering if i have to get a larger tank to run the forge succesfully or if i just need to hook together2 or 3 smaller 20 gallon tanks, can someone tell me how to correct the problem so i can succesfully keepp this forge at a high enough heat to forge weld in? If someone can e-mail me an answer that would be much appreciated. | ||||||
| John Mahoney - Thursday, 09/30/04 22:35:06 EDT | ||||||
|
NewSmith, how about posting some pics in the photo area ( user Gallery) Go to the pull down menu. | ||||||
| Ralph - Thursday, 09/30/04 22:55:48 EDT | ||||||
|
Temper Color Chart George, see our FAQs page for the color chart and see our book review page for the CoSIRA Metals for Engineering Craftsmen. Few color charts reproduce well in print. Ours can be printed on a color printer OR you can use it as a reference and color in a black and white copy with colored pencils. Propane Pressure: John, You have built too big a forge for the size tank. Most cylinders can only draw about 1/8th to 1/7th their full capacity per hour. As the fuel evaporates it cools the remaining fuel to the point it cannot evaporate. When you draw the fuel faster than the steady state rate then the cylinder freezes up quickly. It happens even faster with a partially full tank as there is less heat sink. The best cure is a bigger cylinder. I have two 30 pound cylinders (the little ones are 20 pounds not gallons) that I manifolded together. My big forge can only run on them for about 4 hours when full and 2 hours when half full. Then they must sit overnight to warm up. A 180 pound cylinder will run two 2 burner NC forges all day or one large forge. I suspect this is what you need. The second cure is a bigger heat sink. Some smiths put their cylinders in a big tank of water. A bracket should be made to hold the cylinder down because it will almost float when full and definitely float when partialy full. A big galvanized wash tub is the best. Cools the water very cold and is often used to cool the beer. . . The best tank would alow water up to the top curve of the cylinder. If you are feeding a power hammer you could quench the steel in the heat sink and keep even with the cooling. . . In the winter the problem is worse and in Northern relms propane bottles must be heated (VERY carefully with thermostatic heating blankets). I do not recommend this method under normal circumstances. Propane bottles come in 15, 20, 30, 40 pound and up sizes. 20 pounds is the common exchange size. All others must be refilled at a filling station. If your welding supplier carries propane this is a good opportunity to start doing business with them on a regular basis. | ||||||
| - guru - Thursday, 09/30/04 23:23:06 EDT | ||||||
|
Propane Economy: The big 250 pound and up cylinders that are refilled by a delivery truck are often cheaper to refill than at most filling stations. It is worth a phone call. See the current postings on the Hammer-In about permanent installations and available pressure. | ||||||
| - guru - Thursday, 09/30/04 23:33:17 EDT | ||||||
|
WHoops. . . that thread was just above a couple posts, not on the Hammer-In. . . | ||||||
| - guru - Thursday, 09/30/04 23:35:17 EDT | ||||||
|
Hello all. I'm looking for suggestions on how to best repair the top die of the power hammer I am rebuilding. The base of the die, where it meets the holder is broken badly. I posted some pics in the anvilfire foto site. There are even more at http://fredlyfx.com/hammer.htm (Die pics are at the bottom of the page.) I would like to replace it, but I just can't afford to now. I was thinking about grinding the broken section smooth then welding on a plate to bring it back up to match the hight of the rest of the die. Will the arc welding mess up the heat treating on the die too much? I'm thinking it doesn't really matter on a die that is in this bad of shape all ready? I only need it to last a year or so till I can get a new one. One of my questions is how critical are the tollerances on the die height for this type of hammer? I am thinking that by the time I grind the die and the slot clean that I may have knocked off 1/8 to 1/4 inch of height. Will this make a big difference in how the hammer operates? As always any suggestions are greatly appreciated. FredlyFX http://fredlyfx.com | ||||||
| FredlyFX - Thursday, 09/30/04 23:45:20 EDT | ||||||
|
|
||||||
|
| ||||||