| |
 |
|
|
|
-GURU
|
|
Its Halloween and there is a full moon shining down like the "Great Pumpkin". . . Goblins and witches are about. . . what better night to demonstrate brooms!
|
|
-GURU
|
|
Tonights demo will show some ideas for using stock brooms.
Some of these ideas have been used in the past and some are new.
But they should give you some ideas of what is possible.
Then we will look at hand tied brooms like the illustration above.
|
|
|
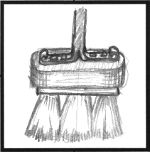
Figure 1 |
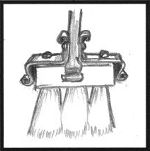
Figure 2 |
|
|
-GURU
|
|
These are brooms made from "Three Knot Brushes".
These brushes are designed for roof painting and come in various stiffnesses.
These were in common use back in the early 1970's by various smiths.
The one on the left has a fabricated box that covers most of the wood and the one on the left wraps around the wood.
In both cases a couple wood screws hold in the broom.
These work but are not great brooms.
|
|
|
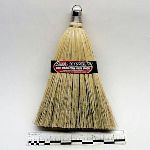
Figure 3 |
This week we had a question about modifying a whisk broom to use in a fire set.
Thus this demo.
When I went to buy a whisk broom I was dissapointed to see that most brushes and brooms now have plastic bodies.
This is the only one I found that did not.
This was purchased at a chain grocery store.
It was made in Mexico.
You may have more choices at a hardware store.
|
|
|
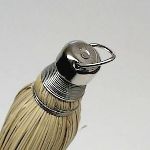
Figure 4 |
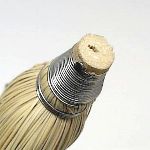
Figure 5 |
|
|
-GURU
|
|
The end of the broom has a metal cap and loop.
This easily pulled out to expose the stub of wood that the broom was built on.
|
|
-GURU
|
|
With the cap removed the end can be drilled for a handle to screw into the wood,
OR a socket fit smoothly around the end. Beware of the tack that hold the end of the wire.
|
|
|
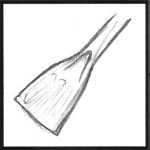
Figure 6 |
Starting with a piece of 1/2 inch (13 mm) round or square stock,
upset the end a little then spread out about three inches of it to between 1/16" and 1/32" thick (1 to 3/4mm).
Use the peen of your hammer in line with the bar to spread the stock width wise.
|
|
|
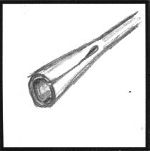
Figure 7 |
Roll the flattened part to form a socket.
You may want to make or find a drift close to the size and shape of the broom to fit it.
Drill a small hole through the socket about 1/2" from the end.
|
|
|
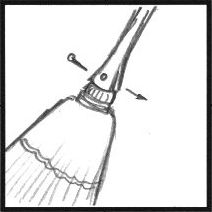
Figure 8 |
The broom is fitted snuggly into the socket and a brad nailed through the broom and headed on the back side.
Optionally you could use a screw.
A big dollop of epoxy glue wouldn't hurt to help make the broom fit the socket.
|
|
|
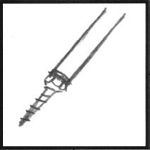
Figure 9 |
A second method calls for welding a 5/16" x 1-1/2" lag bolt to the end of the broom handle.
|
|
|
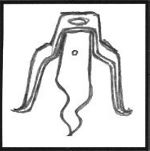
Figure 10 |
Decorative covers are made to hide the top of the broom (commercial brooms are not very attractive).
These can be made of 16ga (1.5mm) to 1/8" (3mm) steel.
They have a hole drilled or punched in the top to snuggly fit the handle.
|
|
|
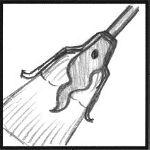
Figure 11 |
The end of the broom is drilled with a 1/4" drill (or appropriate size for the lag screw welded to the handle).
The handle screws into the broom.
Wood glue on the threads will assure a tight permanent fit.
The covers are then slid down the handle and small screws used to clamp them to the broom.
|
|
-GURU
|
|
There are many designs and patterns you could use with above method.
Done properly it doesn't LOOK like you are hiding a commercial broom.
|
|
|
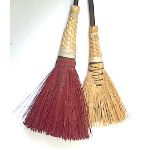
Figure 12 |
The above methods and variations have been used by various smiths.
But if you want first class work you should find a broom maker that will hand tie brooms for you on your handles.
OR you need to learn to do so yourself.
Occasionally they have broom tying workshops at chapter meets OR you can sign up for a course at any one of numerous craft schools.
This is one of those tasks I prefer to sub out to experts.
|
|
|
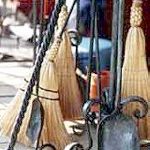
Figure 13 |
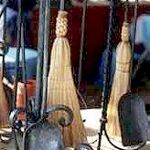
Figure 14 |
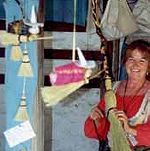
Figure 15 |
|
-GURU
|
|
Sharon Epps makes fancy brooms as well as brooms on Bill's (her husband) fire tool sets.
There are many possible sizes and styles when you go to a custom maker.
One of my favorite sets was a dust pan and whisk broom with matching iron handle.
These were popular in all styles of work. We also used dyed broom corn.
Dark blue and red were popular mixed with the natural color woven tops.
Note that not all broom makers use colored broom corn.
|
|
-GURU
|
|
Questions or comments?
|
|
jj2k
|
|
Jock, I like the wisk broom idea. Just made my life that much simpler.:)
|
|
Pete F
|
|
Excellent as usual Good Guru.
|
|
George
|
|
Jock, on the decorative covers, do you screw them on?
|
|
-GURU
|
|
The decorative covers have a hole that the handle fits through.
Then a couple little screws hold them into place. The core of the broom is usually wood.
|
|
Pete F
|
|
Are the handmade brooms built around the finished handle?
|
|
Sharon Epps
|
|
PF, yes, they are., at least the ones I do are.
|
|
Sharon Epps
|
|
However, I have made a few where I tied the broom on a wooden stick, just did 2 for a guy in Oregon.
After I finished the broom, cut the wood off even w/the top of the woven part of the broom top, so that he could drill a hole in it and either epoxy or do the lag screw weld on the end of his handle and push his handle down into the inside of the broom.
I can't guarantee that either method wont eventually break off, and I usually ask smiths to mail me their handles.
Of course you have double postage involved, plus the $20 price of the broom involved, but they last for years, and that's what lots of folks want especially if they do sweep up ashes w/them.
|
|
-GURU
|
|
Yes, the handmade brooms are made around finished handles (painted first if you use paint).
Different makers use different end preparations.
Mine were drawn down to about half the handle size with a "knot" left on the end.
The shank was twisted to provide a good friction surface for the broom corn.
Others flatten a short end and drill a hole to anchor the tie wire.
|
|
-GURU
|
|
I used to make up a dozen or so handles and ship them (and a check) in a reusable box.
The broom maker put on the ends and shipped the finished product back in the same box.
|
|
jj2k
|
|
Sharon, how much do you charge to tie a broom to my handle?
|
|
Sharon Epps
|
|
I do make a less expensive model than the $20, w/out the woven straw tops, one for $15, and another for $10, but they aren't as attractive. Just depends on what a person wants.
|
|
Ntech
|
|
Very nice demo Guru, thanks
|
|
possum
|
|
great demo Jock, and timely too, fire sets should start selling better now
|
|
George
|
|
Very nice demo Guru, thanks
|
|
Sharon Epps
|
|
Good ideas you passed along, Jock, to the guys who want to have a quick way to do a set.
Thanks for showing off some of my fancies.
|
|
-GURU
|
|
LIFE of the broom is good.
We had my makers card wrapped around the handle inside the broom so that if it needed replacing it could be sent to him. . .
None have worn out in 25 years. Which is good because I can't find my guy now. . .
Thank you for your input and photos Sharon.
|
|


Demonstration by Jock Dempsey
With Commentary by Sharon Epps
October 31, 2001
Then we will look at hand tied brooms like the illustration above.
Figure 1
Figure 2
These were in common use back in the early 1970's by various smiths. The one on the left has a fabricated box that covers most of the wood and the one on the left wraps around the wood. In both cases a couple wood screws hold in the broom.
These work but are not great brooms.
Figure 3
When I went to buy a whisk broom I was dissapointed to see that most brushes and brooms now have plastic bodies. This is the only one I found that did not. This was purchased at a chain grocery store. It was made in Mexico. You may have more choices at a hardware store.
Figure 4
Figure 5
Figure 6
Figure 7
Figure 8
Figure 9
Figure 10
Figure 11
Figure 12
Figure 13
Figure 14
Figure 15
One of my favorite sets was a dust pan and whisk broom with matching iron handle. These were popular in all styles of work. We also used dyed broom corn. Dark blue and red were popular mixed with the natural color woven tops. Note that not all broom makers use colored broom corn.
Thank you for your input and photos Sharon.
iForge is an Andrew Hooper Production
HTML Copyright © 2001-2011 Jock Dempsey, www.anvilfire.com
Webmaster email: webmaster at anvilfire.com