| |
 |
|
|
|
-GURU
|
|
Tonights demo is a little different. Three original fire tool handles. We will be doing all three at once. Each step under the previous. I'll have to dig out photos later.
|
|
|
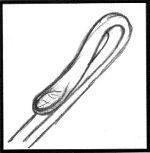
Figure 1a |
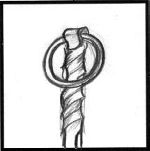
Figure 1b |
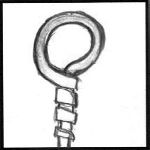
Figure 1c |
|
-GURU
|
|
a) Is what I called my "thumb grip" handle. It is made out of square stock 3/8" to 1/2"
b) Is my "Loose Ring" handle. It has an incised twist in 7/16" or 1/2" square stock. It LOOKS simple but actualy takes more time than one piece handles.
c) Is a common ring handle with a flatened wrap. These are made in 7/16" and 1/2" round. Even though this style is fairly common I never saw one with a flattened wrap.
|
|
|
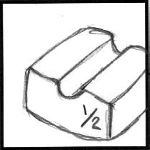
Figure 2a |
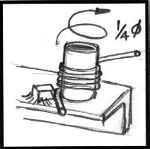
Figure 2b |
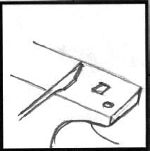
Figure 2c |
|
-GURU
|
|
A bottom swage is needed for the thumb grip. A ring mandrel for the ring handle rings.
The plain handle gets flattened to about 1/2 the thickness of the round and is tapered on the end. The flattend part is squared up lightly leaving some of the rounded corners.
|
|
|
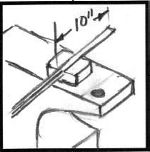
Figure 3a |
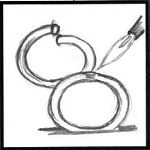
Figure 3b |
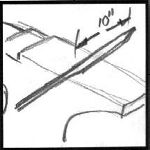
Figure 3c |
|
-GURU
|
|
The thumb grip forged round for about 10 inches.
The loose rings are made of 1/4" round and are about 1-1/2" in diameter.
The ring handle is flatened about 10 inches.
|
|
|
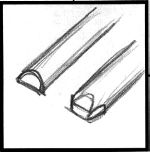
Figure 4a |
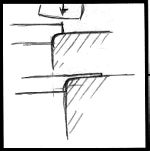
Figure 4b |
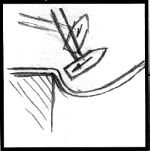
Figure 4c |
|
-GURU
|
|
Before making the thumb grip the end of the bar needs to be dressed round on the half round side.
The end for to hold the ring is drawn out of just about a 1/2 thickness length of the square bar.
It takes a good LONG heat to make the ring handle. When the corner is bent down inertia will cause the bend to start as shown. The corner should be about 18-20 inches from the end.
|
|
|
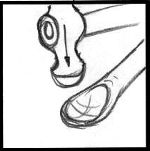
Figure 5a |
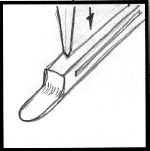
Figure 5b |
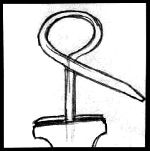
Figure 5c |
|
-GURU
|
|
The thumb grip is formed with a small ball pien hammer.
The short twist on the Loose Ring handle is determined by the width of my hot cut which is what I use to make the incised marks.
The wrap of the ring handle is started as in 5c while clamped in the vise.
|
|
|
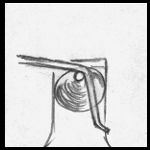
Figure 6a |
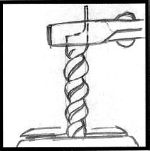
Figure 6b |
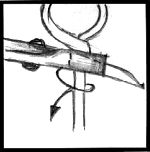
Figure 6c |
|
-GURU
|
|
The loop of the thumb grip is fromed near the tip of the horn.
The length of the twist in the Loose Ring handle is contolled by where it is clamped in the vise. This is just beyond the end of the incised marks about 1/8"
The flat wrap is made by using large flat tongs and sliding then around the handle with a loose grip.
|
|
|
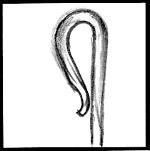
Figure 7a |
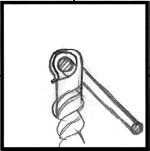
Figure 7b |
|
|
-GURU
|
|
The thumb grip is closed to suit your feel.
The loose ring is installed on the handle by rolling the thin part over the ring with a little reverse lip on the end.
|
|
|
Figure 1a |
Figure 1b |
Figure 1c |
|
-GURU
|
|
. . . and I'll never do a 3 in 1 demo again. It SOUNDED like a good idea. . .
|
|
Travis
|
|
How do I get rid of split screen and only see demo on screen. Top hald demo, bottom half discussion and hard to follow demo?
|
|
-GURU
|
|
Questions, Comments
Travis, I'm sorry, this is the current design. But I AM thinking about setting it up completly seperate.
|
|
dunchadh
|
|
very nice I will have to start the forge up tomorrow and give a couple of those a try
|
|
p-f
|
|
i liked the 3 in 1, tho they needed more differentiation
|
|
pigsmith
|
|
As usual, nice demo, Jock!
|
|
Travis
|
|
Thanks for good demo. Would help if displayed on entire page so one could see all of page at one time. Thanks
|
|
Jim C.
|
|
nice work Jock. I really like the ring handle (center)
|
|
DIMAG
|
|
Good demo Jock,I like the incised twist with the ring,consider it stolen.:)
|
|
-GURU
|
|
Tommarow I'll post photos to go with the images. The Loose ring handle looks simple but is well liked (and takes time to do).
|
|