| |
 |
|
|
|
BILL
EPPS
|
|
Evening Folks. This is one of the first animal heads that I ever learned to make, and it has always been real popular here in Texas.
|
|
|

Figure 1 |
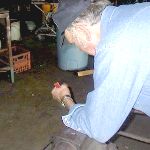
Figure 2 |
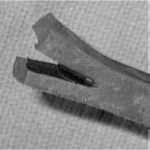
Figure 3 |
|
BILL
EPPS
|
|
On this piece here, I started w/1/2" square. I have made these out of everything from 3/8" to 1 1/2" square bar. (Anything above 1" is a little tough to do though). You start by splitting the end on center, and about 3/4" of an inch back. I cut 1/2 way from one side, and flip it over and finish cutting 1/2 way from the other side.
|
|
|
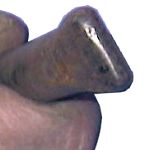
Figure 4 |
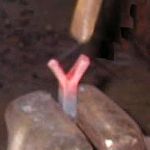
Figure 5 |

Figure 6 |
|
BILL
EPPS
|
|
I use a punch with a radius on the end at the end of the split to take away the sharp point and put in a smooth radius. (This keeps you from getting a cold shunt at the end of the split.) Also, it also starts the split to open up. Then I come back to the anvil and make a "T" out of it.
|
|
|
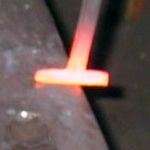
Figure 7 |
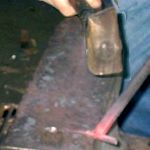
Figure 8 |
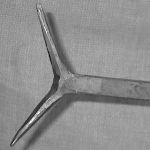
Figure 9 |
|
BILL
EPPS
|
|
Now that we have the split spread out into a "T" and flat across the center, we start drawing the horns; first one side, and then the other, and I try to keep them as even and uniform as possible.
|
|
|
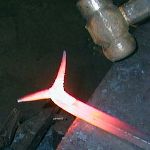
Figure 10 |
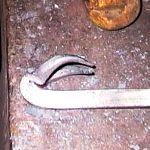
Figure 11 |

Figure 12 |
|
BILL
EPPS
|
|
After I get the horns drawn out, I take a good heat and will turn the bar back onto itself (as short as possible). I lay the horns back to get them out of the way so that I can shape the face. Then we start drawing the face out by taking another good heat, and work on the bottom side. By working on the bottom side, you don't get the face too thin.
|
|
|
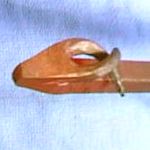
Figure 13 |
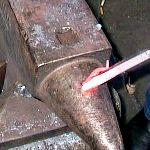
Figure 14 |

Figure 15 |
|
BILL
EPPS
|
|
In figure 13, you can see how the face is starting to take shape. (See why I move the horns out of the way?). After I get the face roughly shaped, I come to the horn of the anvil and put a couple of divets for the location of the eyes.
|
|
|
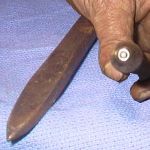
Figure 16 |
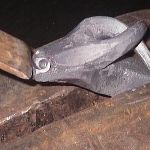
Figure 17 |
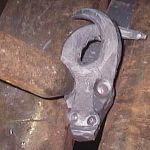
Figure 18 |
|
BILL
EPPS
|
|
Then I use a center punch for the nostrils, and an eye punch for the eyes as shown in Fig. 16. In Fig. 17, I have punched the nostrils and I begin cutting the mouth (just use a hot cutter). In Fig. 18 I am punching the eyes. (I was in a hurry to get this done in time for last weeks demo, and I didn't get the eyes and nostrils as I usually do).
|
|
|
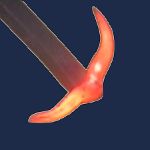
Figure 19 |
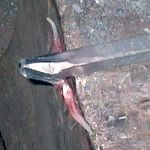
Figure 20 |
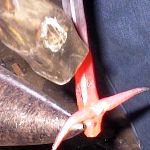
Figure 21 |
|
BILL
EPPS
|
|
Now, we spread the horns back out. I heat the head, and I cool the nose so that I can hammer on the nose and use the side of the anvil to get the straight line back against the top of the horns as shown in Fig. 20.
|
|
|
Figure 21 |
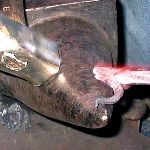
Figure 22 |
Figure 23 |
|
BILL
EPPS
|
|
Now comes the tricky part. It is shaping the horns. I start close in to the head on the tip of the horn of the anvil, by gently tapping down and rotating the head towards me to give the shape of the horns. Repeat the process on the other side, but go the other direction. After I gete the horns shaped (trying to keep them as even and uniform as possible), I heat the section behind the head, and fold it down over the horn of the anvil so that the head is facing you.
|
|
|
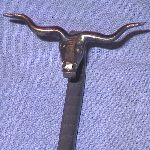
Figure 24 |
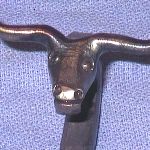
Figure 25 |
|
|
BILL
EPPS
|
|
Then I wire brush it while it is still hot (using a cup wheel on a sander/polisher - NOT an angle grinder). You need the slower speed. It should end up looking something like this. You can use these for handles on fire tool sets, bbq tools, letter openers, boot scraper handles, a world of different things. Any questions??
|
|
BILL
EPPS
|
|
I usually cool the pieces and wipe them dry w/a shop towel/rag, then once they are completely dried, I put a clear finish on them (Krylon Clear) However they can be painted any color you desire.
|
|
Paw Paw
|
|
Bill, your horns came out looking better than mine do. You've probably done a WHOLE LOT more of them than I have.
|
|
JOCK D
|
|
Very nice as always Bill!
|
|
Ntech
|
|
You switched hammers in the middle of the demo. Any reason?
|
|
Llywelyn
|
|
What sort of punches do you use? Are they special for eyes and noses etc....
|
|
BILL
EPPS
|
|
If you have any questions, ask me on the pub. OK?
|
|
PF
|
|
You sure do an admirable demo Bill...Thanks!
|
|
|
|
When you talk about working the bottom side so you don't get the face too thin, are you talking about the side away from the horns, like in figure 12?
|
|
Ntech
|
|
Very nice piece of work Bill, thanks
|
|
BILL
EPPS
|
|
First question, Yes Glenn, I went to a rounding hammer when I am working on the face. The rest of the time, I usually use my diagnol pien. Uywelyn, I make all my punches, but the eye punch is made from a piece of carbon steel, which I put a recess in to make the protruding eyeball, and nostril punch is just a center punch.
|
|
JOCK D
|
|
Llywenlyn, There is a detail of the special eye punches in the demo and we have a seperate demo with drawings of eye punches.
|
|
BILL
EPPS
|
|
Yes, PF. The mass will move away from the force, so I apply the force on the back side of the piece w/the horns turned down, so that the metal will move from the thicker part more than it will from the face.
|
|
BILL
EPPS
|
|
Thank you Jock.
|
|
BILL
EPPS
|
|
In some of my eye punches, I drill the indenture and some of them are punched w/a very rounded center type punch. Can be made a variety of ways.
|
|