J-J : |
Tonight's demo is part 2 of a green bean motiff gate hinge/grasp set. Tonight we make the grasp. | |||||
J-J : |
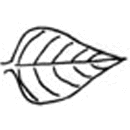
Before I begin, i'll say that for the bean leaves we're doing tonight I went to the garden plucked a few leaves and layed them on the anvil...traced around them with soap stone and that's the shape you see tonight. | |||||
J-J : |
|
|||||
J-J : |
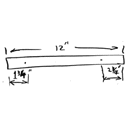
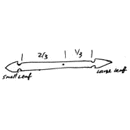
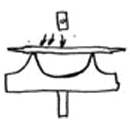
we start with a piece of 3/4" x 3/8" x12" mild steel | |||||
J-J : |
center punch each end, back 2 3/4" and 1 3/4" respectively. | |||||
J-J : |
this will be enough material on the tips for one large leaf at the top of the grasp and one mid sized at the bottom. | |||||
J-J : |
|
|||||
J-J : |
|
|
||||
J-J : |
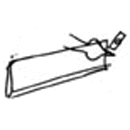
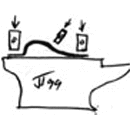
heat the 2 3/4" end and draw to a dull point. | |||||
J-J : |
fuller at the punch mark leaving 3/8" material. cool in the slack tuband repeat on the opposite end. | |||||
J-J : |
|
|
|
|||
J-J : |
lightly punch mark the handle down 1/3 the length from the 2 3/4" fuller mark. This will bethe widest part of the grasp. | |||||
J-J : |
draw taper on the handle from the fuller marks to the punch mark, | |||||
J-J : |
|
|||||
J-J : |
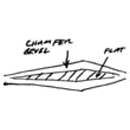
put a deep chamfer on the top side of the grasp only, this will be the side your palm fits against when you open the gate. Chamfer all edges at this point. | |||||
J-J : |
at this point, if you prefer a half round style grasp, now is the time to complete the rounding of the chamfered surface. | |||||
J-J : |
now, we cool in the slack tub and go back to the bean leaf tips. | |||||
J-J : |
|
|
||||
J-J : |
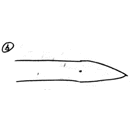
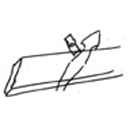
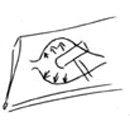
using the rounding hammer, pull the wide back of the leaf out, making it look like an ace of spades. | |||||
J-J : |
remember from part !, last week, to stay back from the edges 1/8" as you spread a surface to avoid excessive thinning on the edges you will still need to hammer on for final shaping. | |||||
J-J : |
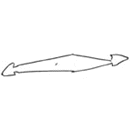
Now, using the cross pien, draw the back sides even wider. I like to work toward me on an operation like this, so i always work only the half toward me. for the back side, i flip the work over. This makes it easier for me to get a good spread. | |||||
J-J : |
Then, turn the cross pien around and flatten the pien grooves out, making the leaf flat and smooth. | |||||
J-J : |
|
|
||||
J-J : |
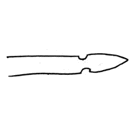
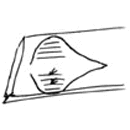
reheat and draw the tip sharper over the edge of the anvil and using half hammer blows (half on the anvil and half off), then return the leaf flat on the anvil face and straighten it back out so it lays flat. | |||||
J-J : |
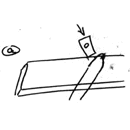
Reheat and using a straight chesil, put the center vein in the leaf. | |||||
J-J : |
The, with a curved chisel, cut in the tributary veins, and reflatten the leaf on the anvil face using light blows so as not to distort the veining. | |||||
J-J : |
Cool the leaf, and do it all over again on the opposite end. :) | |||||
J-J : |
Now, other than forming the bend in the grasp we are finished... | |||||
J-J : |
|
|
|
|||
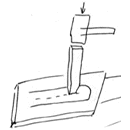
J-J : |
My bottom fuller for this operation is made from a caterpillar driver section welded to a hardy tenon. | |||||
J-J : |
take a good heat on the grasp for the bend. Begin the hammer blows straight down and work toward the large leaf. | |||||
J-J : |
i should say at this point that the drawing is a bit off. The fuller is about 1/2 the length of the grasp, making it possible to work one section deeper into a groove without affecting the other end. | |||||
J-J : |
The top section of the grasp, just below the leaf, should be almost a 90 degree angle to the leaf. | |||||
J-J : |
Complete the contour refining over the anvil horn, then sit the grasp on the anvil face, leaves down, and complete the shape, making sure the leaves are flat and there is sufficient room to fit you hand comfortably around the grasp. | |||||
J-J : |
!!!and, no, I don';t mean to grab that red hot iron with your hand...Cool it down first if you aren't sure it's right. then put your hand on it :) | |||||
J-J : |
That wraps up our bean grasp, but i've got two alternate style ends for you tonight if leaves are not your thing. | |||||
J-J : |
|
|||||
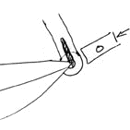
J-J : |
For the ram horn, or any two piece open ended tip, split the tip just in front of the fuller mark instead of rounding as be did in bleaf o4. | |||||
J-J : |
Then, following the technique we used last week for splitting the hinge butt receiver, shape your tipes to the style you prefer.. | |||||
J-J : |
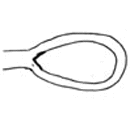
For a closed loop end, ... | |||||
J-J : |
|
|
|
|||
J-J : |
Again, starting just in front of the fuller mark, split the piece within 1/2" of the tip, open it over the mandrel cone or anvil horn and smooth the circle. | |||||
J-J : |
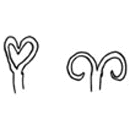
If you want a heart shape, point the tip and roll it back over into the inside of the loop, toward the handle. | |||||
J-J : |
I think i'll stop here as i don't have accompanying drawings...didn't want to go too long tonight. I'll take doug's question first, then jump in. | |||||
J-J : |
Doug, i apologize for not having a finished picture tonight. I couldn't use the scanner and didn't have time to go to town for developing. I have it for the iforge file.... | |||||
J-J : |
I maintain a solid 1/8" p[lus thickness on a medium sized grasp like this one. | |||||
J-J : |
If you want the grasp convex instead of flat, use a bottom fuller and the cross pien hammer to form the contour. By keeping a 1/8" thickness around the edge of the grasp, and rising to about 1/4" in the center section of the chamfer, it gives a pretty rounded feel though. | |||||
J-J : |
Questions? |
|||||
Doug : |
J-J, I'm not sure about the chamfering, what does the cross section of the grasp look like? | |||||
flatthumb : |
I like the source of your leaf design - great job J-J:) | |||||
J-J : |
you can make almost any shape that you can draw on your anvil face...just give it a try. | |||||
Jock-D : |
Do you put decorative finishes or chaseing on your grip? | |||||
J-J : |
Yes, one i like is an early american quill design with center line vein and slanting feather marks to the edge... | |||||
BILLEpps : |
Not a question, just a thought. To generate your shape, try grabbing the top leaf in the vice with the whole piece hot, then grab bottom leaf w/tongs, use a rounding hammer hit in center, and it will generate the grip shape much faster/easier than bottom fuller. | |||||
J-J : |
on a deep chamfered piece like this i use a rounded (concave) tip on a chisel. | |||||
J-J : |
Bill, actually I do that pretty often. It was difficult for me to master though and I thought this method would be easier for someone to do the first time. you know, you have to hold the tongs about head level with the off hand, hitting the yellow hot handle with the other hand and work both sides fist.... | |||||