Basket Twist
Demonstration by Jock Dempsey.
http://www.anvilfire.com
September 22, 1999
Basket Twist
Demonstration by Jock Dempsey.
http://www.anvilfire.com
September 22, 1999
guru : |
Tonights demo will be the basket or "blacksmith's" twist. | |||||
guru : |
|
|||||
guru : |
I do several simple variations on the twist. Forge welded, arc welded, four bar and five bar. | |||||
guru : |
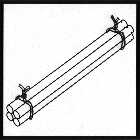
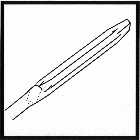
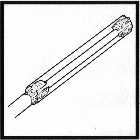
For the four bar twist I start with four 6" (150mm) pieces of 1/4" (6mm) round bar. |
|
||||
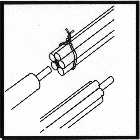
guru : |
There are several ways to hold the pieces together while welding. Soft iron wire as shown, a hose clamp in the middle or tape when arc welding. | |||||
guru : |
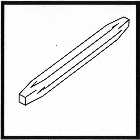
The first step is to forge weld about 3/4-1" (20-25mm) of the ends together. |
|
||||
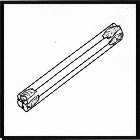
guru : |
Then scarf one end AND the bar it is to be welded to. We have a trick for this on the five bar (later). |
|
|
|||
guru : |
The scarf should be slightly convex so that flux and dross will squeeze out of the joint while welding. | |||||
guru : |
These pieces can be wired together if the scarf is long enough OR welded by the dropped tongs method. | |||||
guru : |
I weld my 4 bar handles to 7/16" (11mm) round and the 5 bar to 1/2" (13mm) round. |
|
||||
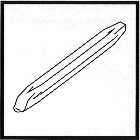
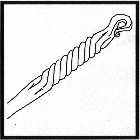
guru : |
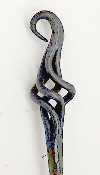
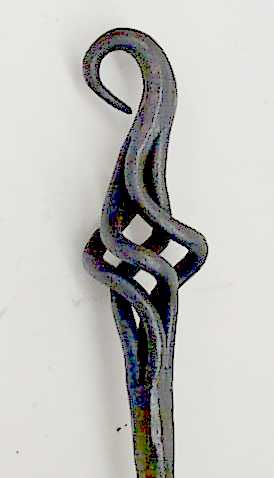
Dress the joint and then forge the end to the shape of your choice. I use a hook but I've also used ball ends. If you weld enough mass it could be an animal head. |
|
||||
guru : |
Then take an even heat and twist the bundle up tight as shown |
|
||||
guru : |
Some folks count turns, other give angles, I just twist it up until it looks right. | |||||
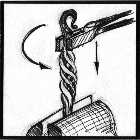
guru : |
Next take a gentle even heat, clamp in a vise and UNTWIST while pressing down lightly but firmly. If you are fast the twist and untwist steps can be done in one heat. |
|
||||
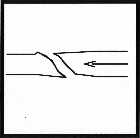
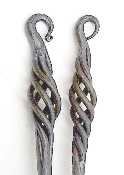
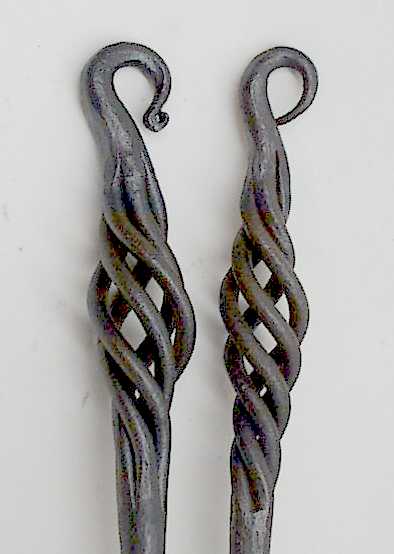
guru : |
You should NOT have to tap downwards with a hammer. The initial twist stretches the outside of the bars and when untwisting the basket should open up on its own. | |||||
guru : |
The baskets on the left were done this way while the other was done by taping downward and twisting (Per many books including Bealer). |
|
|
|||
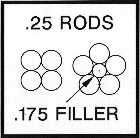
guru : |
When I do a 5 bar twist I use a filler bar in the ends where the bars are to be welded. The handle has a tenon machined on it to fit. |
|
|
|||
guru : |
If you use larger than 1/4" bar the ratio is 0.7 to 1. | |||||
guru : |
The tenon on the end of the long bar will hold the bundle while welding if it is snug OR it can be tack welded. | |||||
guru : |
In a production situation I do not like to forge weld. So, most of my basket handles are made from arc welded blanks. |
|
|
|||
guru : |
I know! Oh, sacrelidge! (sp) Arc welding! Can you tell which of the two samples were arc welded? |
|
||||
guru : |
The secret to using arc welding in forge work is to power wire brush off all flux (or MIG weld) and never grind the welds. Grinding marks are difficult to forge out and may show after considerable rework. |
|
||||
guru : |
Arc welds can also be used as end tacks to hold the work while forge welding. In cases where the joint is to be dressed by forging the weld should disappear. | |||||
guru : |
The reason for wire brushing ALL the arc welding flux off is that it is almost as tough as the steel at forging heat. It will leave tracks in the work when it finally weathers off. | |||||
guru : |
Questions? |
|||||
jeff : |
what are some examples of what this piece is used for? | |||||
guru : |
Basket twists are typically used for ALL types of handles.
Fireplace tools, door handles, wood stove plate lifters.
They are also a nice decorative element for everything from chandliers to bedframes. Bill Epps says he has used a double twist a'la' Dorothy Siegler (a reverse twist inside another) for table legs. |
|
||||
guru : |
Start with (4 or 5) 1/4" by 6" (150mm) long round bars (you can also use square or twisted square bar). |
|
||||
guru : |
Forge weld the ends and then scarf one end for welding to another bar (or NOT, I use them for dust pan handles too). |
|
||||
guru : |
Then dress and finish end to suit. | |||||
|
||||||
guru : |
Twist the bars up tight (this is where I deviate from some references). |
|
||||
guru : |
Then UNTWIST in a vise while pressing down lightly but firmly. |
|
||||
guru : |
More bars can be used and arc welding of blanks has worked well for me. |
|
|
|||
guru : |
Twist while tapping down on right. Notice how much more graceful the first are. |
|
|
|||
iForge
is an Andrew Hooper Production
Copyright © 1999 Jock Dempsey
HTML Copyright ©
1999 Jock Dempsey, www.anvilfire.com
Webmaster email: webmaster@anvilfire.com