Dragonfly
Demonstration by
Bill Epps
http://www.besmithy.com
26 July 2000
Dragonfly
Demonstration by
Bill Epps
http://www.besmithy.com
26 July 2000
Bill-Epps : |
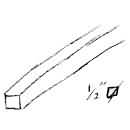
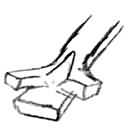
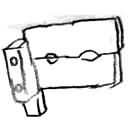
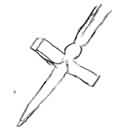
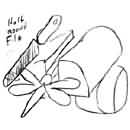
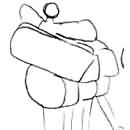
Tonight's demo is a one piece "Dragon Fly" made from 1/2" Square Bar. | |||||
Bill-Epps : |
 |
 |
 |
|||
Bill-Epps : |
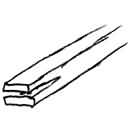
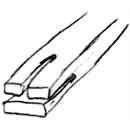
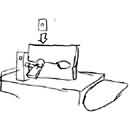
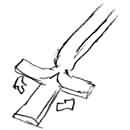
I start by taking a good sharp hot cutter, and splitting the bar about 1" back 1/2 from one side and 1/2 way from the other side. | |||||
Bill-Epps : |
 |
 |
 |
|||
Bill-Epps : |
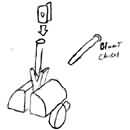
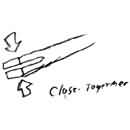
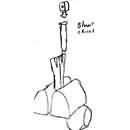
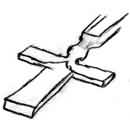
Take another heat and after I make my split, I put it in the vice and go down from the end with a very "Blunt" chisel. This is to do away with the "Sharp" corner at the bottom of the slit, and to make a nice smooth radius so you don't get a cold shunt. You close it back up as shown in the last picture. | |||||
Bill-Epps : |
|
 |
 |
|||
Bill-Epps : |
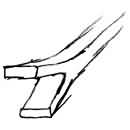
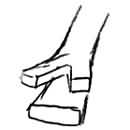
After I close it back down, I split the top section on one side back about 1" distance or the same as the first cut. | |||||
Bill-Epps : |
 |
 |
 |
|||
Bill-Epps : |
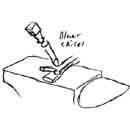
After, I split the top half, I heat the metal and use my blunt chisel again in the vice to radius the bottom of this cut as before. | |||||
Bill-Epps : |
|
 |
||||
Bill-Epps : |
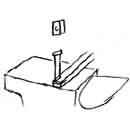
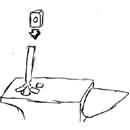
Take another heat, and use the blunt chisel to extend the indention past the first split. This is where I will raise the wings up. | |||||
Bill-Epps : |
 |
 |
||||
Bill-Epps : |
 |
 |
||||
Bill-Epps : |
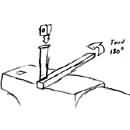
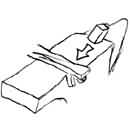
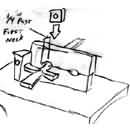
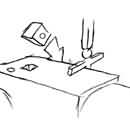
Then I come to the off side of the anvil after I have taken a good heat, and set the piece down just past the wings. | |||||
Bill-Epps : |
|
 |
||||
ironworker : |
hey guys i have never saw this many people in here at once | |||||
Bill-Epps : |
Now I use my guillotine tool on the piece just in front of the what will be come the wings. I round this up in the guillotine tool (ie fullering tool). | |||||
Bill-Epps : |
 |
 |
||||
Bill-Epps : |
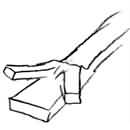
When you neck this down it causes what will become the wings to spread out a little bit more. I put the piece which will become the tail in the pritchell hole to spread the wings out into sort of a "T" shape as shown by hitting down on the top. | |||||
Bill-Epps : |
 |
 |
||||
Bill-Epps : |
Spreading the wings out will enable me to start work on the body. But before I do that, I come back to the guillotine tool and just a little bit past the first rounded up secion, I fuller it down again to form his little round head. (Don't go too far with this step or you will loose your handle). | |||||
Bill-Epps : |
 |
 |
||||
Bill-Epps : |
When we get to this point here, we will start rounding up the tail as shown, | |||||
Bill-Epps : |
|
 |
||||
Bill-Epps : |
Now he is starting to take shape. Draw this out a bit and round it up, and you can come in and put creases or grooves if you want more definition. | |||||
Bill-Epps : |
 |
 |
||||
Bill-Epps : |
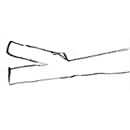
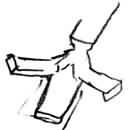
Now we start on the wings. The first thing I do is point the ends of the wings keeping the same thickness, keep both sides as even as possible. | |||||
Bill-Epps : |
 |
 |
||||
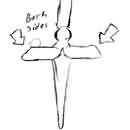
Bill-Epps : |
When I start spreading the wings, I work one then the other so they will stay as uniform as possible. Using the cross pien hammer, we start thinning the wings and allowing them to spread. | |||||
Bill-Epps : |
 |
 |
||||
wombat : |
This place is getting crowded! | |||||
Bill-Epps : |
We keep spreading the wings and making them as thin and wide as possible. | |||||
Bill-Epps : |
|
 |
||||
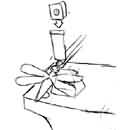
Bill-Epps : |
Now I put my cutting plate on the anvil (I use a 1" thick aluminum plate). I now split the wings with a good sharp hot cutter. Now you have the 4 wings. | |||||
Bill-Epps : |
 |
 |
||||
Bill-Epps : |
Now I take it to the vice and use a 1/2 Round File, to remove all the sharp edges which the hot cutter made and round the end of the wings just a little. | |||||
Bill-Epps : |
|
 |
||||
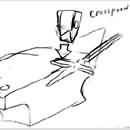
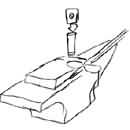
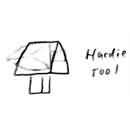
Bill-Epps : |
Now I use my Hardie Tool and the Hot cutter to cut the Dragon Fly loose from the handle. Hardie tool on bottom and hot cutter on top, and it only takes a slight tap and it should cut right off. | |||||
Bill-Epps : |
 |
 |
||||
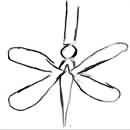
Bill-Epps : |
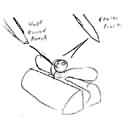
Now it starts getting tricky. You need to heat the head without burning the wings up. The wings are very thin and heat up very quickly, so I cool the wings only and leave the heat in the head and bring the heat in it only up to where you can round the head up on the edge of the anvil, cause you want the face to be rounded. | |||||
Bill-Epps : |
|
 |
 |
|||
Bill-Epps : |
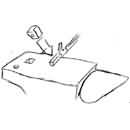
Then you heat the head section again (being very careful not to burn the wings up) and I put in vice to cut him a mouth and punch the eyes. | |||||
Bill-Epps : |
|
|||||
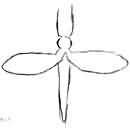
Bill-Epps : |
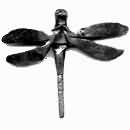
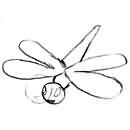
You wire brush the piece and he should look something like this. This is not meant to be an exact reproduction of a Dragon Fly, but just enough to give your mind's eye the impression of a dragon fly. Any Questions. | |||||
Steve-C : |
cool bug Bill, what size hammer do you use for small things like this? | |||||
Bill-Epps : |
Steve, I use my 2" diagonal pien hammer. | |||||
minatawa : |
how much can you get for these little buggers? | |||||
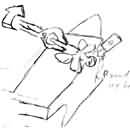
Bill-Epps : |
On this one I was using 1/2" stock, I have also made them out of 5/8" but the 1/2" ones seem to be a better size. | |||||
Paw-Paw : |
Guys-n-gals, let me make a small pitch for Bill. I bought one of Bill's diagonal pien hammers. I've been using it for about 6, 7 months now. Almost the only hammer I use any more. | |||||
Bill-Epps : |
minatawa, I use this for accent pieces on and add them to picture frames, put a couple on a wine cellar door I just did, put them on pot racks, and it increases the value about $50. | |||||
Whitetrash : |
Let's hear more about them hammers. | |||||
Paw-Paw : |
WT, It's a Square faced, 2# plus or minus hammer. Diagonal pien. Bill makes them one at a time, and they come in right and left hand versions. Bill, have I left anything out. | |||||
Bill-Epps : |
Gents, it's no secret, I make crosspien and diagnol pien hammers. I use the style that was shown to me by Rob Gunter some years ago at a demo, and they just make good sense to me. | |||||
Bill-Epps : |
I use the dragon flys, butterflys, snails (all of which I have demoed in past) to add to vines and leaves of pot racks I do, and other custom pieces. Folks like the extra accent:) | |||||
iForge is an Andrew Hooper Production
Copyright © 2000 Bill Epps
HTML Copyright ©2000 Jock Dempsey, www.anvilfire.com
Webmaster email: webmaster@anvilfire.com
![]()