| |
 |
|
|
|
-GURU
|
|
Another demo by 10 year old Sean Conner with photos by his father.
|
|
SEAN
|
|
Tonights demo is about "good" tools that you can
easily make, and that doesn't cost a lot of money. You may have most of the stuff needed in your scrap bin.
|
|
SEAN
|
|
For the first tool you need a large nut, from a nut and bolt. When you find one, ask if you can have it, and take it home.
|
|
|
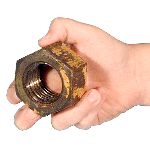
Figure 10
Click for Detail |
It can used for lay out work when you need a 60 degree angle. Just use two corners of the nut to mark the angle.
|
|
|
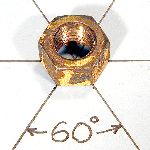
Figure 11
Click for Detail |
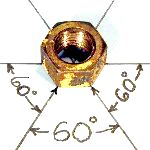
Figure 12
Click for Detail |
The corners of the nut start at 0 degrees, then 60 degrees, 120 degrees, 180 degrees, 240 degrees, 300 degrees and 360 degrees.
|
|
SEAN
|
|
The 2nd tool is a little easier to find.
|
|
|
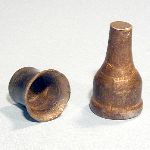
Figure 15
Click for Detail |
Candle cups are easy to make when you have the right tool to make the flair (radius) on the end.
|
|
|
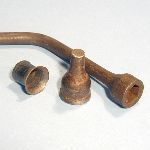
Figure 14
Click for Detail |
Where do you get the right tool? Use the end of an old tire tool, or lug wrench. Just cut it to length, and grind off any casting marks to make it smooth.
|
|
SEAN
|
|
The 3rd tool is one everyone can use.
|
|
|
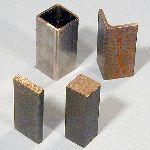
Figure 9
Click for Detail |
There are several common shapes for metal, square solid, tubing, angle, and flat bar.
|
|
|
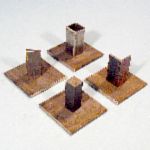
Figure 13
Click for Detail |
Each shape can be used as a hardie post, but one of these shapes can ruin an anvil.
|
|
SEAN
|
|
If the solid square shape is jammed into the hardie hole, it can wedge hard enough to break off the heel of the anvil.
|
|
SEAN
|
|
The 4th tool is from a short piece of round bar.
|
|
|
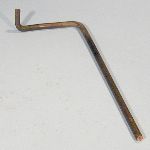
Figure 7
Click for Detail |
Take a rod and mark it at about 2" and 8" from one end.
At the 2" mark, make a 90* bend.
At the 8" mark, make another 90* bend but turn it differently.
(The two bends are at right angles to each other.) This is hard to explain in words but look at the photo and you will understand.
Measurements may be different for your anvil tool.
|
|
|
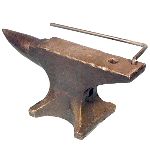
Figure 8
Click for Detail |
If this is done correctly, you can put it in the pritchel hole and have an anvil support for the stock that you work on the anvil.
|
|
SEAN
|
|
The 5th tool can be dangerous so be careful when you are making it and when you use it.
|
|
|
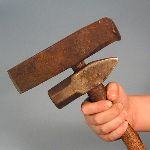
Figure 2
Click for Detail |
This is a cold chisel, or a cold cut top hardie according to the Millwright's and Mechanics Guide of 1940.
That is a 2# blacksmithing hammer held next to it.
Someone sold it to me as a hot cutter, it is NOT a hot cutter! It is a cold cut chisel.
|
|
|
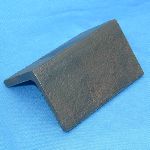
Figure 3
Click for Detail |
To make an anvil cutter (hardie),
take a piece of angle iron about the width of your anvil face. 2" x 2" x 1/4" angle iron works nicely.
|
|
|
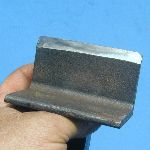
Figure 4
Click for Detail |
Touch the edge with a grinder to make a bevel.
Dad said to touch, but it takes a little more than touching to grind the bevel!
|
|
|
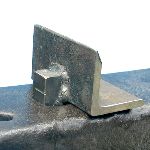
Figure 5
Click for Detail |
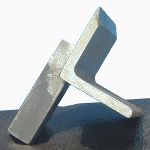
Figure 6
Click for Detail |
Weld a hardie post to the middle and you are finished.
|
SEAN
|
|
To use, get the metal HOT and place it on the anvil cutter. Hit it with the hammer and just before it cuts all the way through, a dark line will form. The metal is thin enough that you can bend it by hand to finish breaking it.
Do not leave any tool in the hardie hole when you forge on the anvil. One miss and you can damage your hand or loose a finger.
We didn't try to harden or temper our cutter, we just used it. If it starts to get hot, dip it in water to keep it cool.
|
|
SEAN
|
|
Any questions?
|
|
PPW
|
|
No questions, Sean. Nice demo, and good handy tools for anybody. Especially good for beginners cause they're made from scrap stock.
|
|
Shdwdrgn
|
|
On the hot-cutter, does it make any difference if you bevel from one side, or from both sides?
|
|
PF
|
|
great demo Sean!!!Good style too
|
|
Rich Hale
|
|
Great Demo Sean,,,thanks
|
|
SEAN
|
|
Bevel on one side of the cutter and it gives you a cut with a straight side and a bevel side.
Bevel both sides and it gives you a cut with two beveled sides.
|
|
bob tal
|
|
nice job sean
|
|
PF
|
|
going to make the pritchel arm and the angle iron side cut.
|
|
Shdwdrgn
|
|
Hmmm hadn't thought of that. Good tip!
|
|
possum
|
|
great job Sean!!!!!!!!!!
|
|
jj2k
|
|
Guess you could super quench some of those tools and get by with mild steel. Great demo!
|
|
fish
|
|
What is super quenching?
|
|
SEAN
|
|
It is a brine (saltwater) quench.
I do not have the formula but it is on the Anvilfire FAQ's page.
Makes steel a little harder than a plain water quench.
|
|
SEAN
|
|
Guru, thank you for letting me do another demo.
|
|
-GURU
|
|
THANK YOU Sean!
|
|