J-J : |
|
|
|
|||
J-J : |
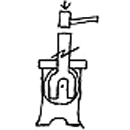
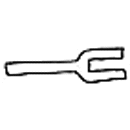
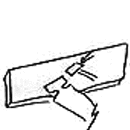
tonight we'll make a "bean" garden gate hinge. the bean requires moving more metal than most tip designes, so by learning the bean movement you can make about anything else. | |||||
J-J : |
|
|
||||
J-J : |
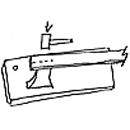
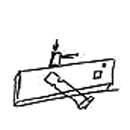
The stock size is a 3" wide 3/16" srtap 24" long. | |||||
J-J : |
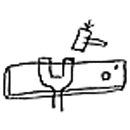
after cntr punch marking one end 2 1/4" from one end and the other 1" from the end, heat the 2 1/4" end for slitting. | |||||
J-J : |
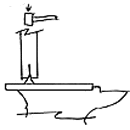
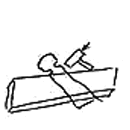
I start the slit on the anvil, using a hold down clamp, and set a shart slit mark from the punch mark to the tip, finishing the slit over the hot cut. | |||||
J-J : |
start the hot cut with the edge of the hot cut hardy exactly on the punch mark and rap it sharply. you want this cut nice and sharp, not rounded over. | |||||
J-J : |
|
|
||||
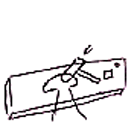
J-J : |
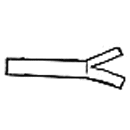
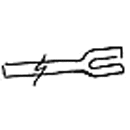
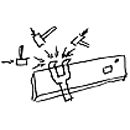
open the hinge loop slit over the hot cut hardy, alternating to the anvil face to straighten as necessary. keep going until the hot cut tip reaches the croutch. | |||||
J-J : |
|
|
|
|||
Youngsmith : |
Is the split centered or is the drawing accurate | |||||
J-J : |
the slit is one a center line. excuse my drawings :) | |||||
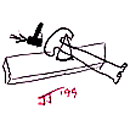
J-J : |
using a small radius bottom fuller hardy, continue opening the slit until you seat the fuller in the croutch of the slit. | |||||
J-J : |
once the fuller is seated, move to the anvil horn and open the croutch up to about 1"width and keep the sides of the forks about parallel. | |||||
J-J : |
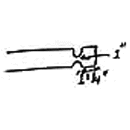
at this point, take a yellow heat, bend one of the forks back over the strap and get to the inside edge of the remaining strap and smooth out the hot cut edge. then do the other edge and realign the forks about 1" apart.1 | |||||
J-J : |
|
|
|
|||
J-J : |
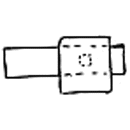
I square the inside of the crotch (!) over a 1" x 8" x 8" hardy plate. | |||||
J-J : |
take a good heat (yellow/orange) and drive the forks over. it goes easily. then true up the sides, maintaining 1" between the forks, and squaring the tips. | |||||
J-J : |
|
|
||||
J-J : |
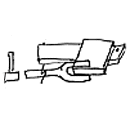
now we'll begin to roll the forks, beginning the hinge loop . | |||||
J-J : |
let the forks over hang the far side of the anvil about 3/8" and hammering downward at about a 45 degree angle, start the downward roll. | |||||
J-J : |
now turn the forks over, roll sticking up and overhanging the far side of the avil by an inch or so, and hammering toward you, roll the forks until theywill hold a 3/8" dia pin. (don't close up yet or the pin might not fit) | |||||
J-J : |
with the pin inserted, complete the roll, closing the circle loop. | |||||
J-J : |
OK, now we have our double loop closed and we need to put the 1" plate backon the hardy and make sure it is trued up. | |||||
J-J : |
|
|||||
J-J : |
reinsert the pin after truing to make sure of alignment. | |||||
J-J : |
cool this end in the slack tub. and heat the other end. | |||||
J-J : |
|
|
|
|||
J-J : |
heating the 1" center punched end, fuller down to 1" material between fuller grooves. i use a 1/4" or 3/8" hinged fuller for this in my hardy hole. | |||||
J-J : |
draw out this end shank you just fullered to 1" wide and 1 3/4" length, square tip. hot cut if necessary to length. | |||||
J-J : |
|
|||||
J-J : |
roll the center hinge loop, following steps 11, 12 and 13. then square up the sides of the loop on the anvil face. | |||||
J-J : |
cool in the slack tub and center punch for the hot cut, making the two pieces of hinge. | |||||
J-J : |
|
|
||||
J-J : |
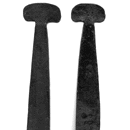
now we are going to fuller material for our decorative bean tip. take a heat and dress the hot cut tip. reheat and fuller 1 1/4" from the tip down to 1" material remaining. | |||||
J-J : |
working with just the tip section on the anvil face, round the top edge of the bean. to an arch pleasing to your eye, but maintaining a 90 degree angle between the strap and the back edge, allowing room to draw down the strap to a taper. | |||||
J-J : |
|
|
|
|||
J-J : |
excuse my drawing ability, but you never do get sharp points on your bean tips like a drew below right! | |||||
J-J : |
draw down the strap working from the bean end of the strap and alternating sides as syou work toward the hinge loop in one nice smooth taper. | |||||
J-J : |
|
|
||||
J-J : |
to draw out the bean ends really wide, i use a cross pien hammer ...NOTE: all work on the bean is done on the back side so our hammer marks don't show. | |||||
J-J : |
then, flatten the divits made bythe cross pien. reheat and use a farriers rounding hammer or a ball pien to work from the center toward the edges, moving metal to shape the bean ends. Stay back i/8" from the edges. | |||||
J-J : |
occasionally, tap lightly the edges of the bean to begin forming the shape you want. Do not hit it hard as you only want to shape the edge not bend it double :)d | |||||
J-J : |
take agoood heat, dip the tip in water, and place the back edge against a cone mandrel or the anvil horn and shape the inside back edges of the bean | |||||
J-J : |
then reverse the last step, cooling the back edge and shaping the front edge. | |||||
J-J : |
although the finished pictures were done with a scanner, they shadowed and tended to fill in the bottom side of the bean round. I like to get 1/4" to 3/8" drop on the bean tips. | |||||
J-J : |
if you need to get more drop on the bean tips, skip the water and work with the whole tip hot, or cool only the diagonal tip you will hammer lightly on. | |||||
J-J : |
repeat the bean steps on the other piece. | |||||
J-J : |
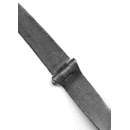
then lay the hinges flat on the anvil face and true them up. check for hinge fit, insert a pin and lay the hinge back-side down on the anvil face with the strap on the double loop suide orange hot. | |||||
J-J : |
nest to the double loop, smack the strap wioth the cross pien so the effect is to make the two hinges lay flat, providing wall clearance for the pin loop.ance | |||||
J-J : |
|
|
|
|||
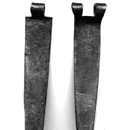
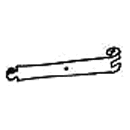
J-J : |
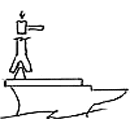
this is what you have now virtually made! | |||||
J-J : |
did we have a system glitch, we went from 22 people to 4 in one second? | |||||
J-J : |
Questions? |
|||||
flatthumb : |
J-J, is this considered Appalachian style? | |||||
J-J : |
don't know flatthumb. i saw a Jerry Darnel video once where he said "you could make a bean like this" and he drew a bean on the board. didn't demo it. i thought what the helx, i might as well figure it out. | |||||
Bill : |
what size neddel did you wrap the eye around???? | |||||
J-J : |
3/8" pin stock bill :) | |||||
flatthumb : |
what exactly is "pin stock"? | |||||
J-J : |
round stock, but i use 100 pt carbon since it wears longer. | |||||
Jock-D : |
100pt carbon is about the same as drill rod (tool steel) | |||||
J-J : |
also, for heavier application, i roll the loop over the strap and forge weld it. | |||||
Ntech : |
What is your selling price J-J ? | |||||
J-J : |
NT, i won't do them for less then $75 a pair. then again, things may jsut be higher priced on the coast. | |||||