| |
 |
|
|
|
-GURU
|
|
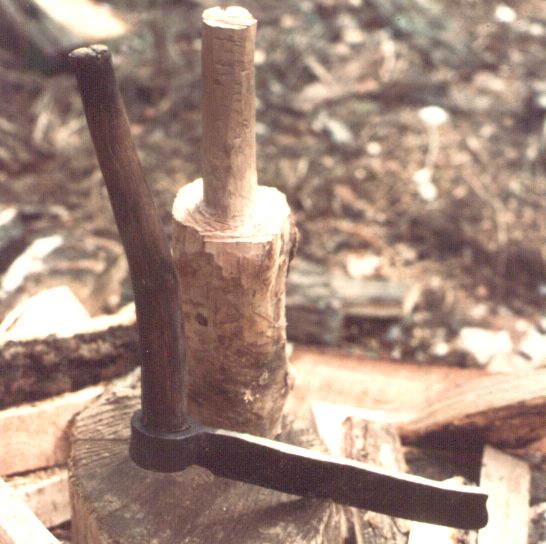
Tonight's demo will be a froe.
The word froe is from the French word fromard, meaning "to cleave".
I used to make quite a few of these.
This one is an average size.
Occasionly they are made larger.
I've made them as small as 6" long for basket makers.
Froes are used to split wood.
Primarily they are thought of as a shingle making tool but they work great for firewood and they were commonly used to split boards out of logs.
Splitting boards is very efficient if you have a long straight log.
All primitive wood workers use them and they are a good seller at rendevous.
|
|
|
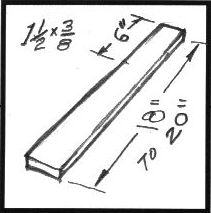
Figure 1 |
Froes do not need to be hard. I make them out of mild steel.
Many were made of wrought iron without a hard edge.
The small ones I've made were spring steel but you want a soft temper.
Froes are also not very sharp.
They are a wedge.
I slide an angle grinder over the edge once or twice to straighten it and the dull it a little with a fine file.
|
|
|
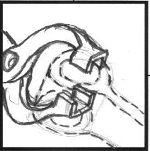
Figure 2 |

Figure 3 |
|
|
-GURU
|
|
The first froe I made using common tongs. Then I modified a pair of goose neck tongs as shown to get a good grip on the froe. They fit the plain bar AND on one side of the eye.
|
|
|
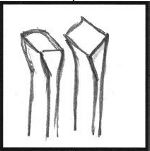
Figure 4 |
If you are going to forge weld the eye then you need to scarf the end.
We are going to show both methods, arc and forge welding.
Upset the end and then form it as shown. Upset, then dress to a sloped scarf.
|
|
|
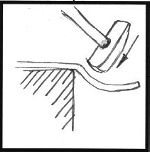
Figure 5 |
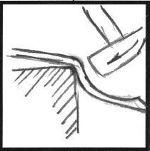
Figure 6 |
|
|
-GURU
|
|
For this size froe the eye starts at about 6".
Start the eye bend over a rounded corner of the anvil.
As you hammer down and at an angle the far end will come UP from inertia.
Kind of handy when you want it to, like now.
|
|
|
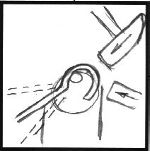
Figure 7 |
Be sure to have the corner of the scarf UP.
Finish the eye on the horn and over the edge of the anvil
|
|
|
Figure 8 |
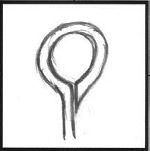
Figure 9 |
|
|
-GURU
|
|
I arc weld the eye inside and out.
Run 1/8" E-6013 rod HOT (about 125 A).
On the outside I run 3-4 passes to make a nice fillet.
Then this is equalized when dressing the weld by forging.
To forge weld the eye, open the eye slightly and wire brush the surfaces, then flux and close it nearly.
Then heat to a welding heat and weld.
Check the weld, reflux, heat and finish weld if necessary.
Due to the prying motion and the low level of expertise of most makers of old froes you see a LOT of failed welds in froes.
If a smith makes a froe the weld should NOT fail!
Some smiths don't weld the eye at all. The handle is made oversize at the end and the opening spings out to grip the wood.
|
|
|
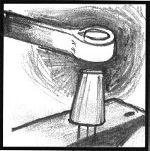
Figure 10 |
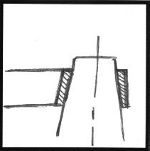
Figure 11 |
|
|
-GURU
|
|
After welding the eye I like to taper them like an adz eye. Most smiths don't, I do.
Froes are an ancient tool but most were made by apprentices, farmers and the like. There is no standard froe eye.
Tappering the eye requires a special drift as shown.
Stop and make it to your size froe after forming the eye.
Mine is 1-3/4" dia and 1-1/2" dia on the end. It has a shank to fit the hardy hole.
Heat the eye to nearly a welding heat then drive it down on the drift.
This upsets the top thicker while stretching the bottom thinner.
If the eye is larger you may need to drive the drift in useing a swage block or support of some type.
|
|
JOHN
|
|
If you are at the forge already for bending the eye, Why would you even bother with an arc welder?
|
|
-GURU
|
|
John, I'm showning both methods. You don't scarf the end if you are going to arc weld. I run several passes to help make a smooth fillet.
|
|
|
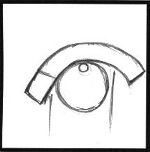
Figure 13 |
Before tapering the blade it needs to be bent to compensate for the growth of the stock lengthwise while forging.
Be sure to bend the right direction (down) if you have tapered the the eye as above.
|
|
|
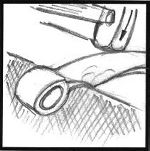
Figure 14 |
I start the tapering back at the eye and work forward.
|
|
|
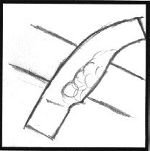
Figure 15 |
You only need to taper about half the blade's width. As you taper it the stock growth straightens the bend.
|
|
|

Figure 16 |
When you finish the point will have extended as shown. This is the effect that creates the clip point that is stylized on blades such a Bowey's and hunter's.
|
|
|
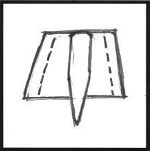
Figure 17 |
This is how the blade should look from the end.
As I mentioned at the beginning I do a very light dressing with an angle grinder and then deburr with a file. A coat of wax and you are finished.
|
|
-GURU
|
|
I used to sell these for $45. Probably need to get at least $60 today (2001).
Questions, comments?
|
|
Ralph
|
|
A wedge edge? I thought it would only be angled on one side. like a butcher?
|
|
-GURU
|
|
People who grind the taper often do this but they do not work well. All I've seen were tapered on both.
|
|
Jim C.
|
|
Fig. 13 / 14 I'm not too sure about the bending shown here.
|
|
Ralph
|
|
Jock, you make it look easy..... I can almost get that type of forge weld....
|
|
dunchadh
|
|
Could you use one of those to cut wood for a longbow
|
|
-GURU
|
|
Dunchadh, Yes. Any job requiring long split wood is done with a froe. Best way to make handles.
The eye can be round or pear shape. There is no real rotational load on the handle. It is used as a lever.
|
|
-GURU
|
|
Yes but not to finished size. Split wood with all the grain running parallel to the length is best for anything to be bent.
|
|
Ralph
|
|
Curve it so that as you thin out the cutting edgte it will get longer and tend to straighten back out.
|
|
John
|
|
Is the eye also pear shaped like an early ax to keep the handle from rotating?
|
|
Jim C.
|
|
Bend the bar the hard way - right? Not the easy way?
|
|
martin
|
|
great idea with the modified tongs, would be handy for other things too
|
|
-GURU
|
|
Yes, you are bending the hard way. But its a LOT harder to try to straighten a forged blade with that much curve.
|
|
Jim C.
|
|
Got the bending part now. Thanks.
|
|
cookie
|
|
is there any tempering after you grind and file
|
|
dunchadh
|
|
somebody need to do an Iforge on draw knives
|
|
-GURU
|
|
OBTW - The slightly bent handle on my froe in the picture is a bad idea. Works better straight.
No hardening or tempering needed if made from mild steel.
A froe made from hardenable steel should be tempered at about 600 degrees F to be sure it is not brittle.
|
|
cookie
|
|
thanx guru great demo seeya next week
|
|