| |
 |
|
|
|
-GURU
|
|
This demo was attemped from a new location due to the local power co. having cut the guru's phone line setting a pole. . The phone connection at the new location was buggy so Bill Epps took over the demo. This version has been edited and is different than the live version.
|
|
|
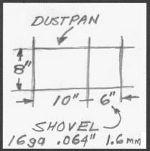
Figure 01 |
I use 16ga steel as a minimum with all my wrought iron work including shovels and dustpans. This is heavier than most folks use but I find it more appropriate to forge work.
The problem with this weight material is cutting it. Snips don't work. Torching makes a mess to clean up. So, I have my shovels and dustpans blanked out by the steel supplier. When you do this it helps to use common dimensions.
|
|
-GURU
|
|
A sheet of steel was sheared into 8" (20cm) strips. These strips could then be sheared into 10" (25cm) and 6" (15cm) wide pieces. This is very economical and wastes almost no stock.
|
|
-GURU
|
|
Before using these I would debur a batch with a file or belt sander including rounding the corners.
|
|
|
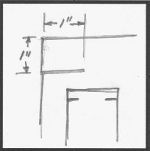
Figure 02 |
Each corner is then laid out using a square and a pencil to make saw cuts. Both my shovels and dust pans are done the same. The corners are then notched with a hacksaw or bandsaw.
|
|
|
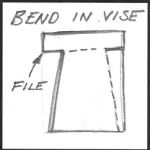
Figure 03 |
Bend the sides while clamped in a vise. Normaly the narrow part is clamped, then I lean on the part and strike it with a large wodden mallet. A regular hammer is used to square up the corners but not too tight. The back or body of the pan sometimes needs to be flattened on the anvil.
While the new corners are exposed I file the edges and round the new corners.
|
|
|

Figure 04 |
The pan is now stiff enough to free bend (unclamped) the third bend.
|
|
|
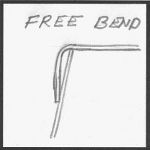
Figure 05 |
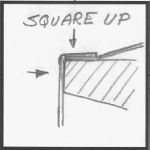
Figure 06 |
|
|
-GURU
|
|
In steel I bend the corner flaps while lightly supported in a vise and square up using a hammer in the vise or on the corner of the anvil. How you handle this corner is a matter of taste.
|
|
|
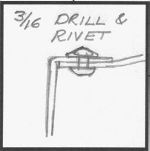
Figure 07 |
The corners are then drilled and riveted. I use 3/16" x 3/8" rivets. I bought about 10 pounds of them from J-C Sales just for making shovels and pans.
|
|
BILL EPPS
|
|
It appears that what Jock is having technical difficulties, so after you bend the tabs over and rivet them down, I personally would use a 1/8" X 1/4" rivet, but an old cut down roofing nail works real well.
|
|
|
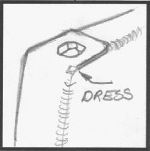
Figure 09 |
Once bent and riveted the corner is sharp and protrudes. I support it on the point of the anvil horn and dress with a hammer and then lightly file.
|
|
|
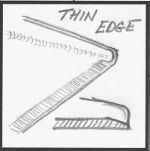
Figure 08 |
This stock is too thick for the edge of a dust pan or ash shovel so I grind a taper on the leading edge reducing it to about 1/3 it original thickenss. While grinding I radius the front corners some more. Both grinding operations must be filed afterwards.
|
|
|
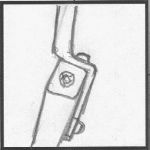
Figure 10 |
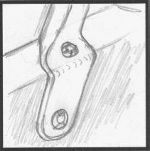
Figure 11 |
|
|
-GURU
|
|
My early attachemnt method was just flattened and bent to fit the shovel and then riveted with the 3/16" rivets.
|
|
BILL EPPS
|
|
We put an offset on the handle to fit the bend of the pan and attach w/2 rivets.
|
|
|
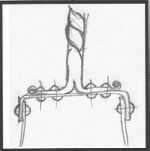
Figure 12 |

Figure 13 |
|
|
-GURU
|
|
Depending on the style of the tool set I used different attachment methods.
|
|
BILL EPPS
|
|
Another nice attachment of the handle is to split it, and attach to the side w/rivets, or flatten the end down and come to a diamond point and again attach w/2 rivets.
|
|
|
Figure 13 |
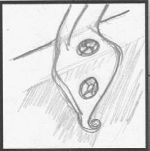
Figure 14 |
|
|
-GURU
|
|
#13 is a kind of bean end with rivet in the center. I also used leaf ends. Large ones sometimes had four rivets, three in a triangle.
|
|
BILL EPPS
|
|
Jock is showing some different styles of handle end attachments. The one (below) looks like he did a mortice and tenant off a cage handle, the one on the left he has flattened the end of his handle down, make it decorative w/curly cue and attached w/2 rivets.
|
|
BILL EPPS
|
|
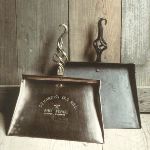
These are some beautiful dust pans that Jock has made. A dustpan riveted together makes for so much Cleaner job than welding & grinding the corners. Also, believe you will find it is faster, once you get technique of drilling & riveting down.
|
|
|
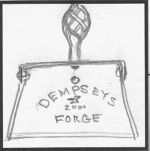
Figure 15 |
One time I put my shop name and date on one dustpan.
I thought it was a little commercial but it looked nice.
It turned out more customers liked the stamping and were willing to pay $5 more (in the mid 1970's)!
After that almost all my dustpans were stamped with name and date.
|
|
BILL
|
|
Questions
|
|
BILL EPPS
|
|
Dust pans are a great idea as an attachment to a firetool set.
|
|
NTECH
|
|
What type of finish would you suggest Bill?
|
|
BILL EPPS
|
|
I would probably use a waxed finish or clear acrylic. Something that won't chip.
I used DeRusto barbque black on most of my fire place tools.
However, when it gets old it chalks (black graphite).
Later I started waxing the handles over the DeRusto.
Today I would probably use too types of flat paint.
Use the DeRusto on the working end that gets hot. -guru
|
|
BILL EPPS
|
|
On these two illustrations, when he made his layout, he was starting w/a piece of 8" X 10" wide, cut 1" deep slot 1 inch off the back edge. Then, layout a line from the bottom of the cut to about 1/4" off the front edge, this is the line you would line up w/top of your vice jaw. this line would be bent on the inside, also after you get it bent & riveted, use your hammer and bevel off front edge to come down to fairly sharp edge.
I grind the edges as the hammering wrinkle the edge. However, I never tried it hot so the material could be drawn forward. Something Bill is probably better at than I am. -guru
|
|
BILL EPPS
|
|
16 ga. is a good thickness material to work w/for this project. Anything heavier than 14 ga. is a little too heavy to work w/.
|
|
JIM-C
|
|
Bill: what would be a fair price for a dust pan with a basket handle?
|
|
BILL EPPS
|
|
I would say probably about $50.
In the mid 1970's I got $24 for steel pans and $45 for the copper and brass. Bill's price is probably right for a steel pan today -guru
|
|
BILL EPPS
|
|
Also, I believe that he uses a 3/16" rivets. Myself, I don't make rivets, not when I can buy them for $.03 a piece.
Another technique that I have seen demonstrated, was to drill a 1/8" hole, cut off a 1/8" welding rod about 1/8"-3/16" longer on each side, and pien down w/ball pien hammer.
|
|
-GURU
|
|
Thank you Bill for finishing up for me with no notice! And to everyone else at this demo thanks for the kind comments
|
|
-GURU
|
|
NOTES: The dust pan above is thinner than the steel.
This was a matter of availability.
I'm not sure of the thickness. I made several from 28oz. material .043" (1.1mm) but then I couldn't get the same thickness stock so I switched to something thinner (20oz. I think).
It was OK but I liked the heavier.
The handle is welded and forged 1/4" brass rod. The rivets are #6 copper wire (ground wire).
These particular basket handles are not a very good form. My later ones are much better.
I sold these for twice the price of the steel pans.
However, even with the polishing the copper/brass is easier to work.
I have also made the same style shovel in brass with a steel handle which is a very nice touch.
Jay-Cee Sales & Rivet Inc.
800-221-4303
Farmington, MI
7,000,000 Lbs. Of Rivets In Stock.
|
|