| Tools and Preparation: | |
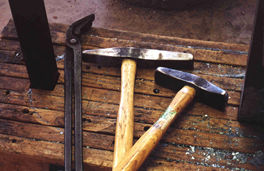
| Typical raising tools - for an armorer, that is. The big hammer in the center is made from 4142 alloy bar, 1.25" square; it weighs a bit under 3 lbs. The smaller hammer is about 2 lbs, made from truck axle (precise alloy unknown). The tongs have flat jaws, bent at about a 45 degree angle; they are my favorite pair for handling hot sheet metal on a raising stake. |
 |
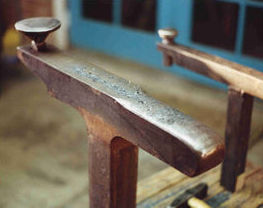 |
T-stakes. I do 80% or more of my raising on the big fellow, made of 3" square mild steel bar welded into a T shape, and weighing about 100 lbs. The stake face is ground to about a 3" radius from side to side, and a little narrower on the front. This means, as will become clear later, that this stake can't be used in the narrow peak of a helmet in the Norman style, especially in the finishing stages. We'll need special tooling for that! |
|
Digression on stakes: are T-stakes "period", and how do you get stakes made, anyhow? First, as to "authenticity" of T-stakes: I don't know. Very few period illustrations exist of armorers bashing out helmets. There is one dandy picture, in ffolke's Armourer and His Craft (1911), Plate IV, showing an armorer pounding away at a little bascinet, on what looks like a mushroom stake set in a stump. I have to say, though, I've never seen a period picture of a T-stake being used by an armorer. I've tried mushroom, or ball stakes, and I don't like them; I found the T-shape much easier to use. I encourage others to try different stake shapes -- what works for me may not work for them. Second, how one obtains stakes: I had my large T-stakes made for me. An experienced welder at a steel fabrication shop welded two roughly 24" pieces of 3" square mild steel stock together at right angles (actually, I think the shank was 26" long, the top, 24"). He took many passes of 7018 rod to do it; I do not know the exact conditions (amperage, preheat, etc). If you want to make such a stake, and you are not an experienced arc-welder, go find someone who is. A T-stake joint must be super-strong and reliable. As to material, mild steel has worked fine. I needed no hard facing of any kind on my stakes. If I ever do raising with higher-carbon steels, though, maybe the stakes will wear a bit more! |
|
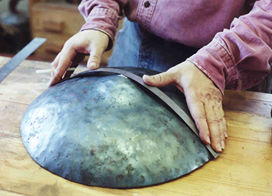
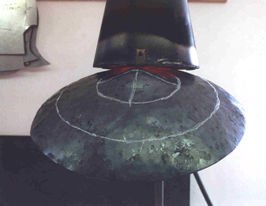
| With a flexible steel rule, I find the center of the bowl on the outside. Dividers can also be used. If I were making a helmet with a rounded skull, such as a barbute or sallet, I would now knock a small dimple in the center from the inside with a blunt punch. This raises a barely visible dimple on the outside, which serves to mark the center during the operations that follow. The rough peak gives a good enough guide, on this piece. |
 |
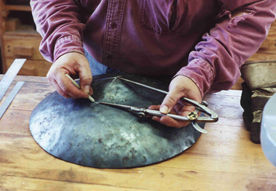 |
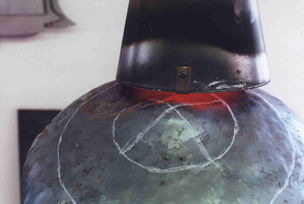
Using dividers, I mark circles on the outside, from the center, to help guide the raising process. I'm using a soapstone marker, as I do for marking all work to be heated. |
| Commencing the Raising: | |
| Back to the forge. I heat a spot on the first ring... |
 |
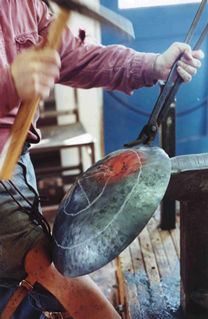 |
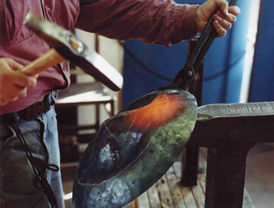
...then go to the big T-stake, to start raising. The hot spot is "in the air" when I start hammering; colder, non-luminous metal is on the stake face. I hold the bowl with tongs, preserving my hands from the heat, and providing more leverage in my grip. It helps cushion the shock of the hammerblows to my hand, as well. The first hot spot is driven down into contact with the stake. I do not use overwhelming force; I just want to feel contact with the face with a "thunk", not a "bang". When the metal cools under blood red, it's time to reheat. |
| Note the leather guard on my right thigh. I have the tendency to push my right leg up until the lower rim of the bowl is braced on my quad muscle; this really steadies the work. It also gave me tremendous bruises on my thigh until I knocked together this "cuisse", made from heavy belt leather. A heavy farrier's apron would probably serve, as well. | |
| Back in the forge, I rotate the bowl counterclockwise, moving the hammered-in area to the left. I heat an area right beside it, letting the heat bleed into it, so the second raising bite will flow into the first. | |
 |
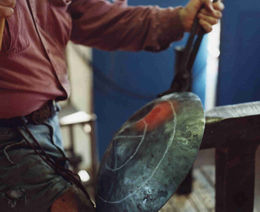 |
| I proceed around the bowl. As for sinking, going completely around the bowl once is called a "pass"; the last bite of the pass can be a bit tricky, as shown here. The last spot in a pass is a ridge between two raised-in areas, and must be hammered in with care, to prevent wrinkling or folding. I must gather and compress this ridge by hammering it alternately from the left, right, and top. |
 |
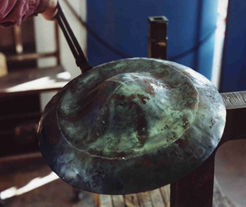 |
The first raising pass is completed. Note the ridge forming in front of the worked area. I must keep my eye on this. There is a strong tendency (at least, for me) to get too greedy in the early stages, and to try bringing the metal in too fast. |
Forward to Part 5: Raising, Continued
Back to Part 3: Finishing the Sinking of the Bowl
Back to Table of Contents