| Finishing the First Raising Course: |
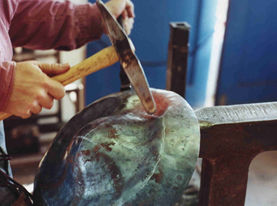
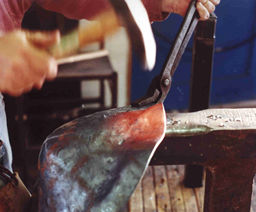
| Starting the second pass. I must take care to raise the ridge in carefully.
The bowl is just a bit too big to carry the second pass out to the edge;
I will have to take in the last 1" or so of the rim in a third pass.
It is far better to take an extra pass instead of trying to hammer in
a rapidly-cooling edge, in too big of a bite. The edge needs care! |
|
|
|
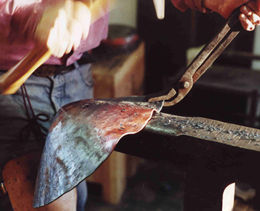
The second pass progresses around the bowl. I often find, as I hammer
in a hot spot, that the end of the stake "pushes back" and undoes
some of the raising behind the region I'm hammering. Not to worry. Just
before going back to take the next heat, I shift the work forward a little,
as seen here, and pound the bulge down with a few blows. It generally
corrects pretty easily. |
| The second pass is completed. On this small helmet, the third pass will
be right on the edge. Things can get really interesting, then. |
|
|
|
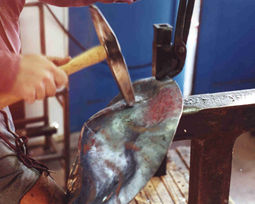
Starting the edge pass. Care is needed! A spot on the edge heats quite
a bit faster than other parts of the helmet - it is not surrounded by
heat-conducting metal. As I drive down a bite on the edge, it gives in
to the hammer almost too easily: it forms a valley, leaving high walls
to either side. These high regions must be managed as they develop into
"waves" or "crimps". |
| Note that the heat gets pretty high on the edge; I want
the edge to be very ductile. I have also switched to a smaller hammer.
I want better control, and I am getting too tired to swing the big 3 lb
raiser consistently. |
| An edge crimp develops as I hammer. This is normal. Crimps have to be
watched, and brought down into the bowl shape carefully. A crimp is hammered
first at its base, and worked upwards, hammering alternate sides. If I
need to, I'll take an extra heat on the crimp to bring it in. |
|
|
|
A large crimp may "split" into two or more little crimps, as I work
it. Not a problem; in fact, this is often desirable. Small crimps are
easier to work. The thing I must prevent at all costs is causing a crimp
to collapse on one of its sides, and fold over. That can ruin a piece. |
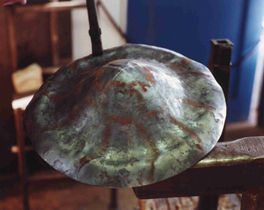
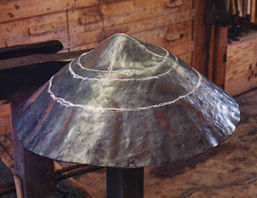
| Edge pass completed. I have finished one "course" of raising (again
in silversmith's terms). Bowl diameter is about 14.5"; height is 5". I've
shrunk the bowl a full inch in diameter, and gained an inch in height.
The bowl is looking pretty good, but before I make it any taller, I'd
better pay some attention to developing the peak. |
|
| Raising the Peak: |
|
|
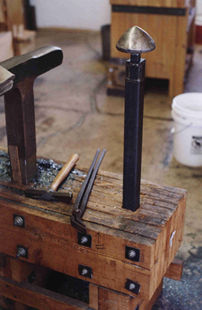
A peak stake, about 6" diameter at the base, and 3" tall.
I made this stake by bending a piece of 3/8" mild steel plate into
a truncated cone shape, arc-welding the seam, then pounding the sides
out into a gentle curve from the inside with a ball-faced hammer and a
sinking block. I then welded a small cone-shaped plug of mild steel on
top, and a disk of plate on the bottom, to complete the head. I then added
a 1" square shank on the bottom, and ground the whole thing smooth
on the belt grinder. |
| Such specialized stakes are not overly hard to fabricate,
and are cheap; but hollow stakes like this one have one feature to keep
in mind: they have little mass, so they heat up fast in use. Remember
not to rest your hand or elbow on them during a work session! |
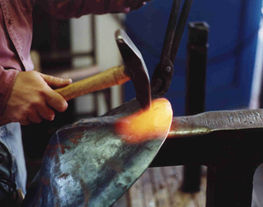
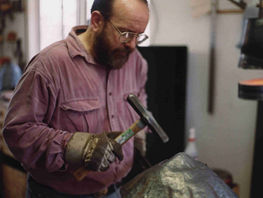
| I take the bowl to the forge, heat it a little off from
center, drop the bowl onto the peak stake, and start raising the hot area
in. I am using a small hammer with a gently rounded face, and giving light,
quick blows. I'm also using gloves, which I normally hate to do, but my
hammer hand is too close to the metal surface for comfort. I am also holding
the bowl with my off hand, without benefit of tongs, which can get very
uncomfortable. |
|
| I forgo tongs whenever possible, when doing light, "precision"
work like this. I keep a spray bottle full of water around the work area
to give a quick cooling shot to an edge, if I must hold the work. |
|
|
I continue around the peak. Note my look of ferocious concentration.
Actually, I am cursing steadily under by breath, because a) the heat is
slowly working through the thin leather glove on my left hand, and b)
any slightly off-the-mark blow causes the bowl to try jumping off the
peak stake. Many low heats, gentle tapping, and Zen-like detachment all
contribute to success. |
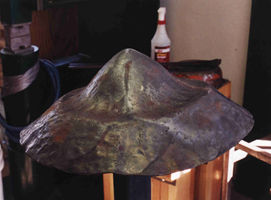
| I've gone around the peak stake once. A definite peak is forming, but
I must remember the mantra: "don't get greedy!" The ridge is back, and
I don't want to push things. I'll go around the bowl on the peak stake
at least once more, to push the bite down to an area that the big T-stake
can fit into. This is marked by the lowest chalk ring, here. |
|
|
|
Turned out that I had to do two more passes on the peak stake, to enable
me to switch to the big T. The top 3" or so of the peak is now 90%
formed; I'll do very little work on the peak from now on, except for fixing
the small asymmetries that always occur. |