Making a Norman Helm
Part 6: Raising, Concluded
Forward to Part 7: Rough
Trimming and Bouging
Back to Part 5: Raising, Continued
Back to Table of Contents
| Near the end of the second course. I'm working on the big T-stake now, and the metal is gathering well. The edge is getting a bit lumpy and wavy, which is no wonder, the way the steel is being compressed there. The bowl is forming a definite cone, and is still within a few percent of circular. |
 |
 |
End of second course. Bowl dimensions: 13" by 13.6" rim (slightly elliptical); 6.2" deep. The depth is an average, since the rim is getting a little wavy, and the depth measurement varies depending on where you lay the straightedge across the rim. Not too bad -- gained over an inch in height, and contracted an inch in diameter, in one course. |
| Midway through course #3. Now you can see a helmet growing out of the stock. This is my favorite part of making a helmet: roughing out the skull, seeing it form like a pot being spun out of clay. I started this course slowly and carefully. I worked the inside of the peak just a little, to bump out some overly constricted areas fore and aft. |
 |
| Yes, that's right: "fore and aft". Now is the time to decide where your major axes are: fore/aft, and side/side. I mark the two axes with chalk -- you can see one mark faintly in the picture. I will now deliberately work the sides harder than the front and back, to start forging the bowl into the elliptical shape I want at the finish. | |
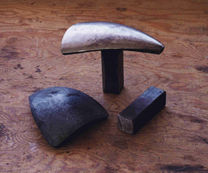 |
The peak stake I used in course #2 is now too short to work the helmet sides in the peak area effectively; it is only about 3" tall. The helmet is growing taller rapidly, so I need a stake to work about 6" of the side down from the peak, and the big T is too wide to get in there. So, a quick pause (one afternoon) in the work while I fabricated a stake to fit. |
| At top in the picture above is the stake I made for this helmet; bottom, are pieces for another stake of similar style that I will finish later. These stakes are very cheap and easy to make. Get a quantity of scrap 1/2" thick truck spring stock from a spring repair/refit shop. They usually have piles of the stuff. Flame cut out wedge, heater, and disk-shaped pieces, depending on the shape of the work you want to fit. Heat them up in a forge, pound them into rough curves in a dishing block. Grind surfaces to final shape. Weld on shanks of 1" mild steel square bar, or whatever shank size you have a holder for. I never heat treat these stakes; the 5160-type alloys used in vehicle springs is very hard and tough, even after cooling in still air. | |
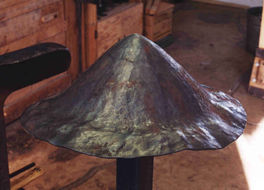
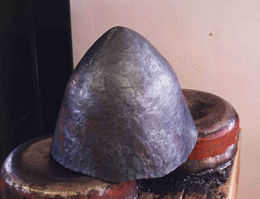
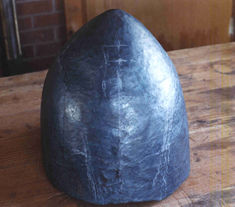
| Course #3 completed. The bowl is really starting to look helmet-like. This is the side profile. Dimensions: Rim 12.5" by 12", height (average) a hair over 7". I've reached my design height, and I'm only on the third course! I may actually have been able to start with a 15" disk, but I have no regrets. Excess is always far better than coming up too short. |
 |
 |
End of course #4. Dimensions: 11" average diameter; 7.8" average height. The height will not grow much more during the final courses. The courses, by the way, are starting about halfway down the helm. The peak is left pretty much alone. You can see the peak area is rather smooth, while the lower areas of the bowl are much rougher. The metal is being compressed enormously, near the edge. |
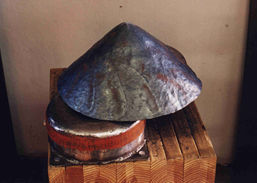
| Course #5 completed. Dimensions: 10.25" by 9.25" rim, 8.3" average height. This course was confined mostly to the bottom 4" of the bowl. The sharp-eyed may notice the ring-like bulge around the helmet about 4" down from the peak. This is caused by the end of the T-stake face "kicking out" as I severely work the lower areas. Some bouging will be necessary soon, to take this area back in. |
 |
| The edge is also getting a bit ragged, now. This is expected. The edge is getting clobbered with repeated crimping and compression, under high heat. | |
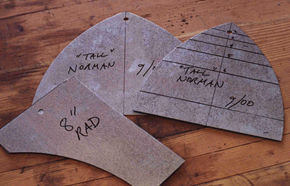 |
To figure out what areas of the bowl need work, I keep profile templates around. Here are three I'm using for this helmet. The bigger of the two helmet-shaped templates is for checking the internal fore-aft profile; it is 9" wide at its base. The little one is for side-to-side checking; it is 7.5" wide. The helmet was designed with simple 8" radius curves from peak to rim, so an 8" radius circle gauge was nice to have. These are cut out of thin galvanized sheet, with aviation tinsnips. |
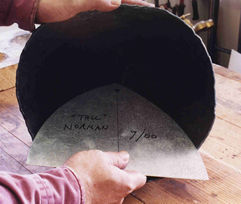
| I just stick the templates into the helmet bowl (you can see here that the helmet is definitely an oval at the rim, now), and make a mark where they cease to touch the sides, with a marking pen. I do this for both fore/aft and side/side, making four marks around the bowl. I then transfer the marks to the outside, using welder's chalk, connect them in a rough ring, and this shows me where to begin the next course. |
 |
 |
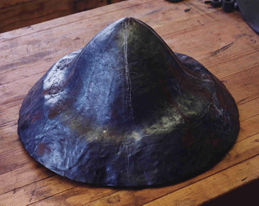
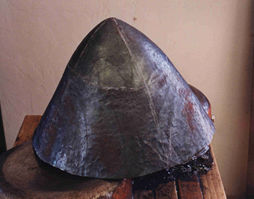
Course #6 completed. Dimensions: 9.25" x 7.75" rim, 8.5" average height. The helmet is nearly at finished dimensions. This course involved one pass around the rim in the conventional manner, followed by about half an hour of "skipping around" on the rim, tucking in areas until a reasonably smooth oval was formed. |
| I decided to leave the widths slightly larger than designed; this helmet is going to be worn over both a padded and a mail coif, so the extra space might be useful. I started weighing the helmet at this point, to record how much weight was lost due to firescale, and to subsequent trimming and grinding operations. Weight: 5 lb, 12 oz. Blank weight was 6.5 lbs, so .75 lbs were lost to firescale. | |
Forward to Part 7: Rough Trimming and
Bouging
Back to Part 5: Raising, Continued
Back to Table of Contents