|
| |||||||||

| |||||||
| |||||||
| |||||||
|
| ||||||
|
| ||||||
| |||||||
| |||||||
| |||||||
| |||||||
| |||||||
| |||||||
| |||||||
| |||||||
| |||||||
| |||||||
| |||||||
| |||||||
| |||||||
| |||||||
|
| |||||||

|
|
Blacksmithing and metalworking questions answered.
|

|
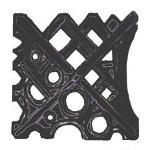
Fabricated Swage Block:Welded up Industrial Style block
This was a project I had never thought about from the aspect of the fabricating stand point other than machining and carving a block from solid.
But a question by a member of our forum got me thinking on this line and brought about this article.
Recently I had been working on articles about fabricating anvils and many of those methods fit this subject as well.
Like many DIY projects this one is labor intensive. It also requires a lot of welding which may cost as much as a good small block. Do not overlook the cost of electricity when doing such projects. TOOLS Required: 1) Small cut off saw, bland saw or hack saw 2) Angle grinder(s). 3) Arc welder (Stick or MIG). 4) Clamps 5) Cutting torch (optional). 6) Drill Press (optional for small holes). 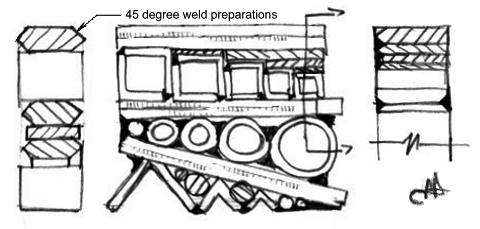 Pieces of angle, pipe and bar all cut the same length are welded together to make a solid block with holes and forming shapes. Heavy bar strengthens and spaces the shapes apart. These have 45° weld preps for joining the parts and fill. Where there are odd shaped holes to fill pieces of round bar of various sizes are inserted then welded over. Bars 1/2" and larger can be full length with weld preps. Shorter fill bars would want to be about 1/2" short (1/4" on each side). Bar down to wire size (1/16" welding rod) can be used. Besides using structurals and holes built up from flats a fabricated block can also have solid pieces with drilled holes and milled slots. Very small holes should be in a plate much thinner than the block with a larger opening underneath. A fabricated block could also have shallow bowls or other impressions created in thick plate. Blocks can also have various curved surfaces. The most difficult thing to obtain for this project is the pipe sizes you may want. Note that standard threaded pipe is sized on its OD for a nominal ID. The wall thickness varies making the ID smaller. So if you have schedule 40 and schedule 120 pipe, the 120 will have a much smaller ID. Many hardware stores carry standard pipe "nipples" threaded at both ends. The maximum length is 6" (with threads). However, some places also carry short lengths of pipe starting at about 18". I would start with 1/8" pipe (.269" ID) and get every size up to 1.5" (1/8, 1/4, 3/8, 1/2, 3/4, 1, 1-1/4, 1-1/2"). | |
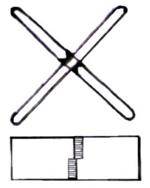 |
X-Frame: To be able to take the punishment that is typical of an industrial swage block it needs to be able to resist being pounded with a sledge. The X-Frame carries that load to the corners of the block which are normally supported in an open bottomed stand. The bars this frame is made of should be: 8" block, 1/2" 12" block 3/4" 16" block 1" and larger. Drawn to represent a 12 x 12 x 4" block the bars are 12" x Square root of 2 (1.412) long. For maximum strength the two bars are notched, the notches weld prepped and then welded. Corners where square holes will be should be clean and without fillets. |
 |
X-Frame Joint Prepped and welded horizontal using E7024 rods for a smooth flat bead. Clean up corners where they are finished surfaces of square holes. |
 |
Frame Additions: Where and how you add major additions to the frame depend on your design. It is best to fit up all the components, then work from the center outward. |
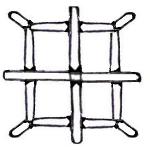 |
Square X-Box Frame:
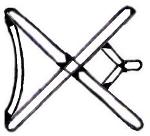
Another frame design suitable for a larger block. A # shape would also be good for a large block. The center joint should be the notched joint as above the others are up to you. Triangular Box Frame: Not shown. Starting with two bars running from the center of one side to the corners of the other. The rest shapes and fill. |
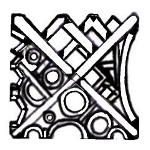 |
Welded Un-Filled Block Note the series of V's, square and rectangular holes at the top. These are made of the same heavy material as the frame and are very solid not requiring fill. They DO require careful planing and weld preps. I would fit the square holes around standard sized bars wrapped with 0.010" brass shim stock. |
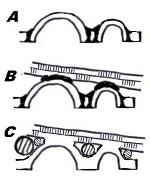 |
Building Shapes and Fill: A. Some exterior shapes can be assembled and welded on the back side for greater strength. B. After assembly the edge shape is welded to the supporting frame member. C. Fill consisting of round bar is fitted in the gaps between parts and frame. Fill pieces 1/2" and larger should be full length and have a chamfered weld prep. Smaller pieces should be shorter and entirely welded over. Small pieces down to 1/16" round can be used. |
 |
Fill Welded Over: All non working holes should be packed with fill and welded over. In some cases it may be possible to fill the entire hole by weld build up (your choice). Fill Welding will inevitably be crowned and need to be ground down. Some places will need touch ups after removing flux coating. A needle scaler is recommended for this work. If well assembled you should be able to grind the entire block flat with much of the surface being the bar stock and frame parts. |
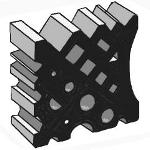 |
Finished Block: Every corner and edge of the finished block should be well radiused. Some places will need to be finished with a file. Round holes made from pipe can be drilled to clean up then chamfered with a countersink and radiused with a file. To make a first class block you want a smooth surface all over. Browning (finishing by rust) is a good finish for swage blocks. Etching or sandblasting and painting with a thin coat of high temperature paint also works well. |
How good a block will this make? A lot depends on the craftsmanship of the maker. However, properly welded using the design principals above it should be nearly as good as any production block and if made very tight and to the best standards it would be a very durable all steel block. The advantages of a fabricated block is that many holes and features that are very difficult to cast can be made. Features like edge grooves could go the long way or depressions put on the sides. There is no need for draft so it is very square. You can also make that "one off" personal swage block that are now very difficult to get cast (no guff from pattern makers or foundrymen). AND, finally it is all steel. This means that besides being stronger than many cast blocks it is also repairable. The disadvantages are that it could end up with some hollow weak places if the welding is not clean and straight so that fill cannot be put in. Straightness could also be an issue if you do not take care in clamping and the order of welds and straightening between welds. | References and Links
|
städ, incus, aambeeld, batente