|
|
| |
| |
| |
|
| |
|
| |
| |
| |
| |
| |
| |
| |
| |
| |
| |
| |
| |
|


|

Tell them you found it on anvilfire.com!

Blacksmithing and metalworking questions answered.
|


|
|
In the spring of 2010, Rick Collins, a member of a Spanish Colonial military re-enactment unit in Tucson, Arizona, approached me with an idea: How about making a period forge, circa 1770, for the Presidio museum in downtown Tucson?
I jumped at the chance.
I love making and operating forges, and I really wanted to help support the Tucson Presidio Trust. (For information about the Presidio site, visit the Trust's website at
www.tucsonpresidiotrust.org.)
|
Background: The Spanish-American Colonial Forge
|
Before I built one, I had to know what to build. I have a copy of Marc Simmons' and Frank Turley's
Southwest Colonial Ironwork, a handy reference for reconstructing 18th century Spanish-American forge equipment. To quote pages 46-47:
"The forge of colonial blacksmiths was a simple platform of earth, adobe, or stone, constructed to accommodate the height and particular needs of the worker...
"Principal parts of the colonial forge were the foundation, hearth, fire pot, tuyere, and fire wall. The foundation, either square or rectangular in form, was made by laying up a masonry wall to a height of two feet or more. The enclosure was then filled in solidly with adobe, rock, or tamped earth to a point approximately six inches below the top of the retaining wall. Finally, the remaining space received a fill of either floor cinders, ashes, or carbonilla, a mixture composed of equal parts of ground charcoal and moistened earth."
The authors then describe the fire pot as a simple depression in the carbonilla hearth, with the tuyere coming in on one side. "Iron tuyeres (alcribs) are reported for three of the San Antonio missions in the late 1770s." (p. 47) This is bang on the period of the Tucson Presidio, which is a good thing, since I really wanted to try an iron tuyere.
What about air supply? Simmons and Turley, page 47: "These were the distinctive double bellows, often termed concertina bellows, used by Spaniards until late in the 19th century." Oh, dear. This really worried me. Plans and how-tos exist for making Anglo-French "great bellows", the double-chamber type, but I knew of no plans for the classic Spanish two-bagger. It turned out that I needn't have worried. Bill Ganoe, the current demonstrator blacksmith at the Presidio, had constructed such bellows, and was only awaiting a period forge to use them on!
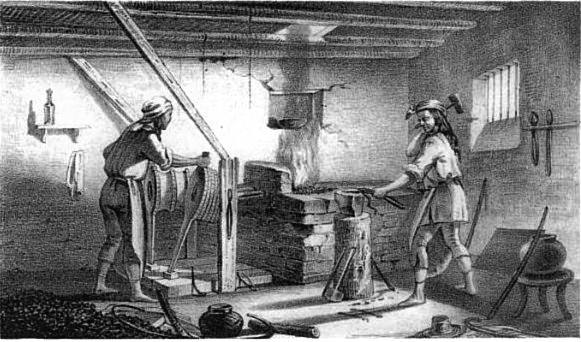
Below is a picture of a Zuni smithy, circa 1854, reproduced in the Simmons and Turley book. This is exactly the type of forge I wanted to build, though I was constrained to a smaller scale: about 3'x3' maximum footprint for the forge body.
 So, I could build an adobe forge body, with a depression in the top for a refractory hearth. An iron tuyere would be permissible. Concertina bellows required, and those already built and ready to hook up.
Consulting with Bill, who would, after all, be doing most of the smithing on the finished forge, I decided on a height of 28 to 30 inches. Since 8"x16" is a fairly common adobe brick size, I picked a six-unit rectangular layout for each course of bricks. This gave a nominal footprint of 24"x32"; small, but very practical for what Bill was called on to make at his forge. Depending on brick thickness, 7 to 9 layers would be needed to achieve the target height, so about 60 bricks would be used in the body. I decided that I would just go with all bricks on each layer, rather than a rectangular wall with tamped earth fill. Adobe bricks are really cheap.
One change from period practice: Instead of a tamped carbonilla hearth, I decided to go with a layer of fireclay mortar, laid directly on the topmost adobe deck. I've had success with fireclay mixes in test side-blast forges I've built in the past. (If the old ways are better, we will find out; if the fireclay hearth can't take a season of use, what the heck -- we'll just tear it out, and fill in some carbonilla.)
The Site: The Tucson Presidio Reconstruction
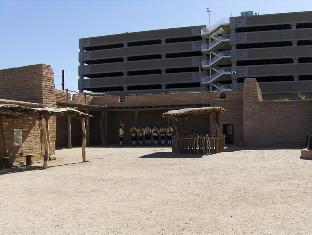 Here's a view of the Presidio courtyard. Really nice adobe walls (adobe supplied locally -- now, as then, Tucson has got some great clay soil in the Santa Cruz river environs), and a barracks in the back. That's the Presidio unit drilling in the background. During the hot months (I am writing this in July 2010) the living history folks don't do demos for the public; it's just too bloody hot. In the fall and winter, though, things can get lively. The unit shown here even has a sweet little 3-pounder field piece that they fire saluting charges from, once a month.
The forge will be located the end of the little ramada on the left.
|
|
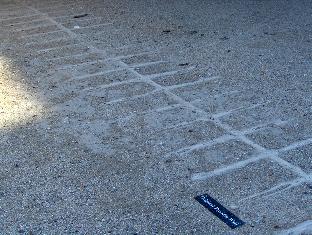
The courtyard actually stands on a corner of the original fort; the modern builders left the discovered remains of the period foundation in place.
|
 |
|
Going a little deeper, they found traces of a Native American pit house. (The Tucson valley has had humans living in it for a good while.) The city fenced off the site, and left it in place as an exhibit.
|
 |
|
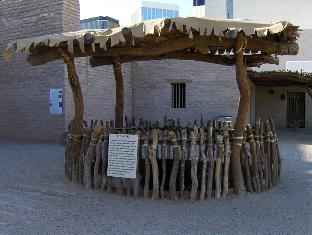
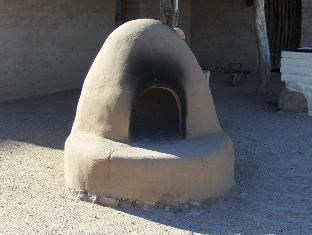
What settlement would be complete without an oven? The staff built a big old horno (earth oven) that works really well. During tourist season (Fall and Winter) bread and sundries are cooked in the oven and available for sampling.
|
 |
Materials
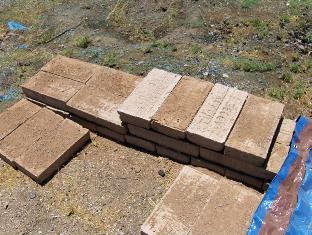 To start with, we need adobe. We need bricks for the body, and loose adobe mix to make mortar for gluing the bricks together. Here are the bricks, supplied by Tucson Adobe West, a company in Avra Valley, about 20 miles northwest of Tucson. (My thanks to John Acton, owner of Tucson Adobe West, for both his materials and advice.) These are 8" x 16" nominal (close to 7" x 15" exact) bricks, weighing about 20-24 lbs apiece. The bricks are about 3.5" high, so I figure eight courses will reach about 28" tall, nearly the height Bill prefers for a forge. Each course will require six bricks, laid out in a 22" x 34" rectangular pattern, so there should be 48 bricks in the body of the forge. Add a few more to build up the sides and the tuyere end, plus some inevitable spoilage, 60 bricks seemed adequate. (I purchased a pallet of about 80 bricks. I always overdo.)
Mr. Acton's bricks are about 45% soil, 45% sand, and 10% Portland cement. Apparently many of the adobe makers in Arizona have switched to cement from the older asphalt emulsion for weather stabilization.
|
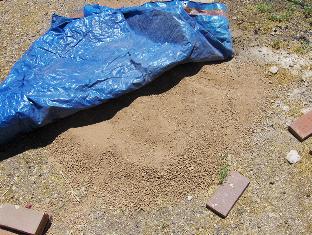 |
The adobe soil, for the mortar. Mr Acton gave me about 300 lbs of his soil component when I bought the bricks. I stored it in my back yard under a tarp. He screens it to 3/8", which is great for bricks and large mortar joints, but I'm going to be using pretty thin joints in the forge, so I decided to screen it to 1/8". The stuff you see here is not yet screened.
|
The other mortar ingredients, sand and mortar cement, I just bought in the regulation bags at a big-box store. No romance there. But there are two more materials needed for this forge: the clay and the granular "extender", both needed for the forge hearth mix. Clay provides the sticky, moldable component; the extender provides body, and cuts shrinkage during drying.
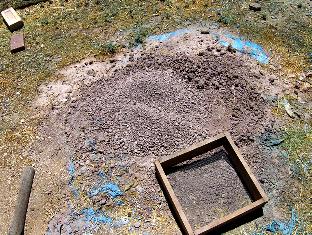
For the clay, I went native. The township of Vail, about 15 miles east of Tucson, has some very good material. An old brick plant, shut down for many years, got a new life as a paintball field, and the owner (Mr. Randy Yeager) let me chop at an outcropping with a pick and shovel. I got a few hundred pounds of a very handsome light red-brown clay, mixed with a lot of rocks. Here is the clay as dumped in my back yard. Also shown is the 1/8" wire screen I made to filter both adobe and clay.
|
|
|
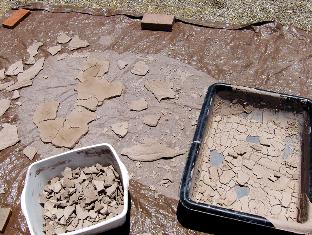
So, how to screen these iron-hard chunks of clay? First I tried pounding the clay with a hammer and screening the resultant powder and rock mixture. This was tiring work, and raised a lot of dust, which is unhealthy to breathe -- clay can contain free silica in very fine particles. Then I tried a "slip" method: dump about 30 lbs of clay in a bucket, cover with water. Let soak overnight, then stir it around with a stick to finish breaking it up. You get a thick clay slip, with pebbles and rock chips mixed in, like loose chunky peanut butter. Strain it though the 1/8" mesh -- a really messy procedure, but dust-free -- into a big plastic tub. Let it dry in the tub over a few days. Or, if you are impatient, pour the slip from the tub onto an old tarp spread on the ground. In the summer heat (105 degrees F when this picture was taken) the slip dries in 4-5 hours, shrinking and cracking into peelable chunks. Break chunks in fingers, toss into bucket.
|
For the "extender", or solid component of the forge pan mix, I decided on grog, which (to a potter) means crushed fired clay. I've made experimental clay forge pans from 50/50 mixtures of clay and grog, and they have worked pretty well, with minimal cracking. For bread ovens, and other relatively low-temperature applications, a clay-sand mixture is fine, but sand does not behave well up in the 2000-plus F range. It vitrifies too easily, and the quartz crystals in it go through crystalline volume changes, causing clay-sand mixes to crack and spall too readily. I figured that grog would have similar thermal characteristics to clay, since it is clay, after all. So, I bought a 50-lb bag of grog at a local ceramics supply house.
|
NEXT Building the Adobe Forge Part II Construction
Building the Adobe Forge Part III Testing the Forge and Bellows
Adobe Forge Update 2015 Modifications and Improvements
References and Links
|
|
|

I jumped at the chance. I love making and operating forges, and I really wanted to help support the Tucson Presidio Trust. (For information about the Presidio site, visit the Trust's website at www.tucsonpresidiotrust.org.)
Background: The Spanish-American Colonial Forge
What about air supply? Simmons and Turley, page 47: "These were the distinctive double bellows, often termed concertina bellows, used by Spaniards until late in the 19th century." Oh, dear. This really worried me. Plans and how-tos exist for making Anglo-French "great bellows", the double-chamber type, but I knew of no plans for the classic Spanish two-bagger. It turned out that I needn't have worried. Bill Ganoe, the current demonstrator blacksmith at the Presidio, had constructed such bellows, and was only awaiting a period forge to use them on!
Below is a picture of a Zuni smithy, circa 1854, reproduced in the Simmons and Turley book. This is exactly the type of forge I wanted to build, though I was constrained to a smaller scale: about 3'x3' maximum footprint for the forge body.
Consulting with Bill, who would, after all, be doing most of the smithing on the finished forge, I decided on a height of 28 to 30 inches. Since 8"x16" is a fairly common adobe brick size, I picked a six-unit rectangular layout for each course of bricks. This gave a nominal footprint of 24"x32"; small, but very practical for what Bill was called on to make at his forge. Depending on brick thickness, 7 to 9 layers would be needed to achieve the target height, so about 60 bricks would be used in the body. I decided that I would just go with all bricks on each layer, rather than a rectangular wall with tamped earth fill. Adobe bricks are really cheap.
One change from period practice: Instead of a tamped carbonilla hearth, I decided to go with a layer of fireclay mortar, laid directly on the topmost adobe deck. I've had success with fireclay mixes in test side-blast forges I've built in the past. (If the old ways are better, we will find out; if the fireclay hearth can't take a season of use, what the heck -- we'll just tear it out, and fill in some carbonilla.)
The Site: The Tucson Presidio Reconstruction
The forge will be located the end of the little ramada on the left.
Materials
Mr. Acton's bricks are about 45% soil, 45% sand, and 10% Portland cement. Apparently many of the adobe makers in Arizona have switched to cement from the older asphalt emulsion for weather stabilization.
For the clay, I went native. The township of Vail, about 15 miles east of Tucson, has some very good material. An old brick plant, shut down for many years, got a new life as a paintball field, and the owner (Mr. Randy Yeager) let me chop at an outcropping with a pick and shovel. I got a few hundred pounds of a very handsome light red-brown clay, mixed with a lot of rocks. Here is the clay as dumped in my back yard. Also shown is the 1/8" wire screen I made to filter both adobe and clay.
For the "extender", or solid component of the forge pan mix, I decided on grog, which (to a potter) means crushed fired clay. I've made experimental clay forge pans from 50/50 mixtures of clay and grog, and they have worked pretty well, with minimal cracking. For bread ovens, and other relatively low-temperature applications, a clay-sand mixture is fine, but sand does not behave well up in the 2000-plus F range. It vitrifies too easily, and the quartz crystals in it go through crystalline volume changes, causing clay-sand mixes to crack and spall too readily. I figured that grog would have similar thermal characteristics to clay, since it is clay, after all. So, I bought a 50-lb bag of grog at a local ceramics supply house.
NEXT Building the Adobe Forge Part II Construction
Building the Adobe Forge Part III Testing the Forge and Bellows
Adobe Forge Update 2015 Modifications and Improvements
References and Links